So, you’ve decided to capture the mischievous charm of the Koala-like alien! Whether you’re an amateur artist or someone refining their skills, our guide offers a step-by-step approach on how to draw Stitch’s head. Ready to dive in?
Character’s Essence: Understanding Stitch’s Unique Features
Expressive Ears: Stitch’s oversized ears are perhaps his most recognizable feature. They droop when he’s sad and stand tall when alert.
Enchanting Eyes: Wide-set and slightly mischievous, Stitch’s eyes are a window to his playful nature.
Distinct Nose: Small and button-like, it gives his face that cute allure.
Unruly Tufts of Hair: These random spikes add to his rebellious persona.
If you’ve enjoyed drawing Stitch, why not try your hand at other characters from Lilo & Stitch? Maybe Lilo herself!
About the Guide: Navigating the Artistic Process
Our guide offers 12 precise steps, ensuring clarity at every stage. To make it even more user-friendly:
Red Color: Represents the lines you should be drawing in the current step.
Black Color: Highlights the lines from your previous steps.
Once you’ve nailed the sketch, consider inking for a polished look. Always wait for the ink to dry before erasing the underlying pencil sketch. This ensures a smudge-free and refined outcome.
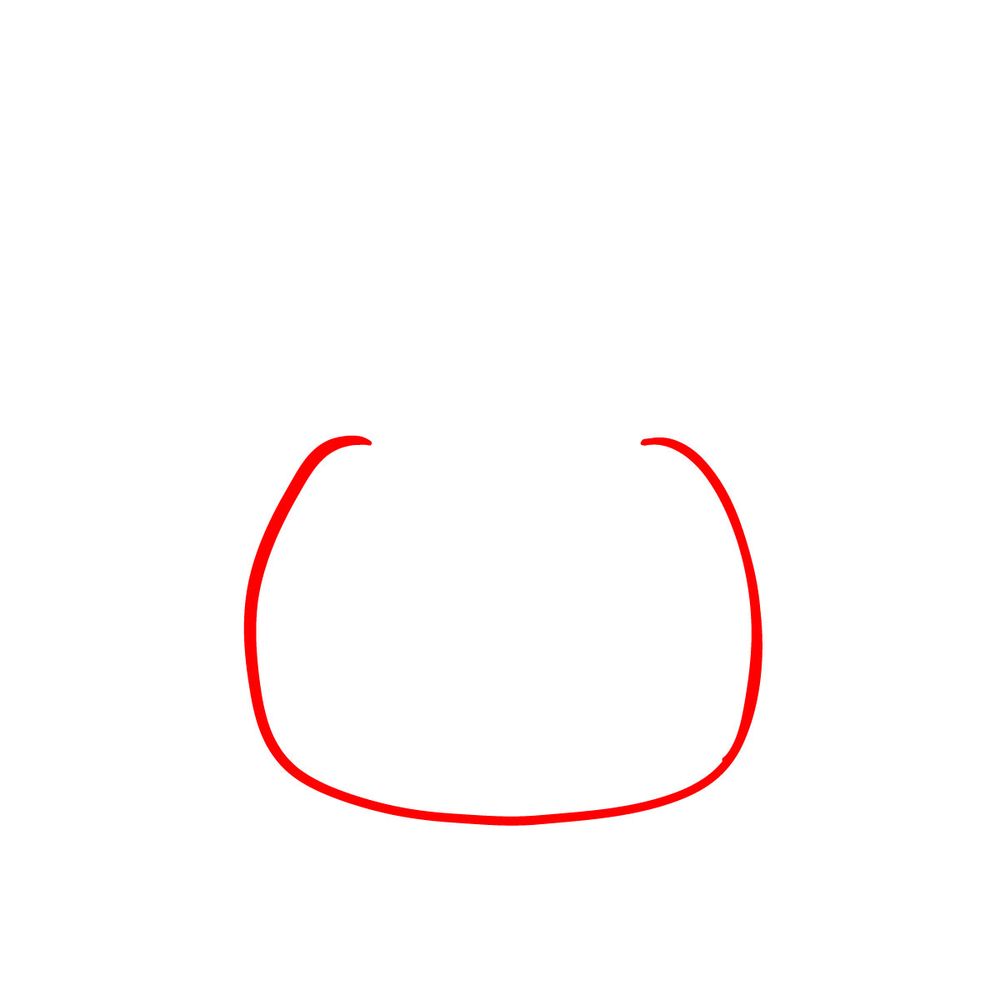
Step 01 – Begin your Stitch drawing by lightly sketching the primary outline of his face. The sides and bottom should have a round and soft curve to give his face a chubby and adorable appearance. This will be the foundation for the rest of the drawing.
Initial face outline for Stitch drawing.
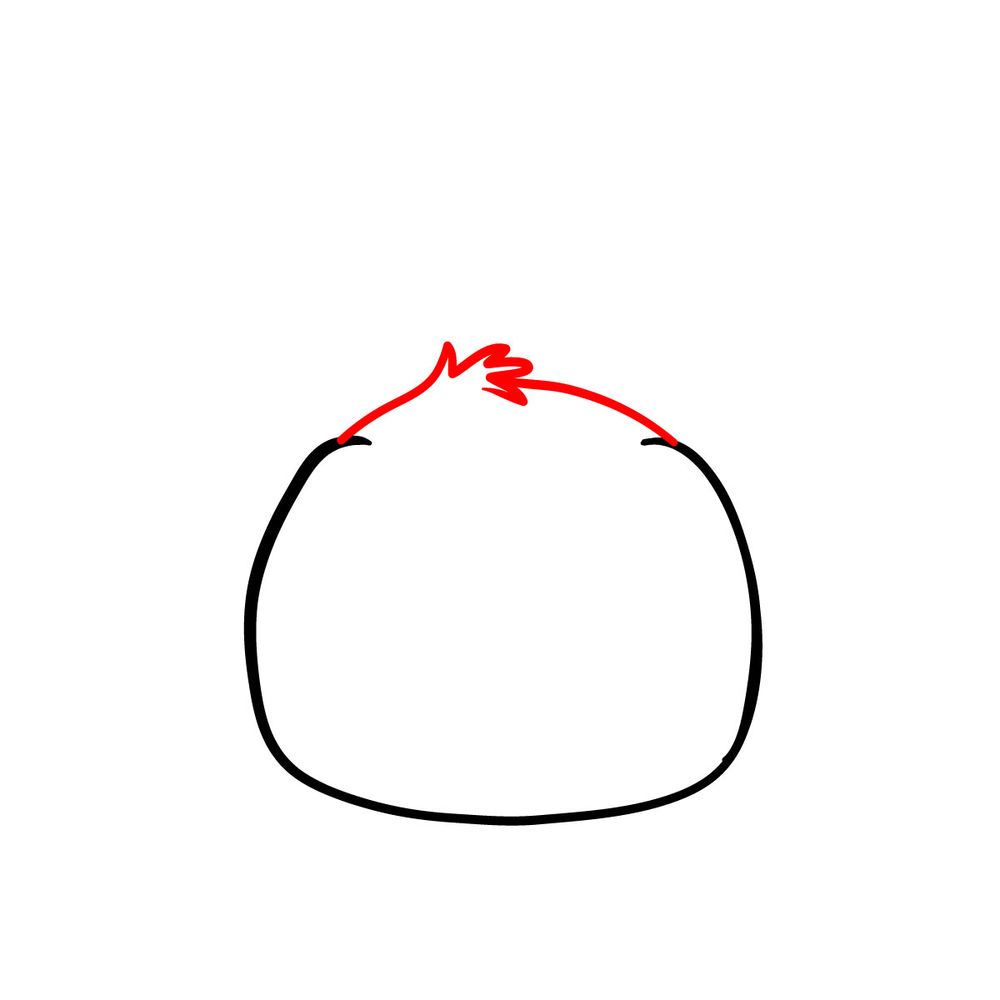
Step 02 – To capture Stitch’s unique look, focus on the top part of his head. Gently draw the upper boundary of his face, ensuring it’s slightly rounded. At the center, draw a small tuft that sticks out. This tuft adds a playful element to Stitch’s character design.
Upper boundary and central tuft addition to Stitch’s head.
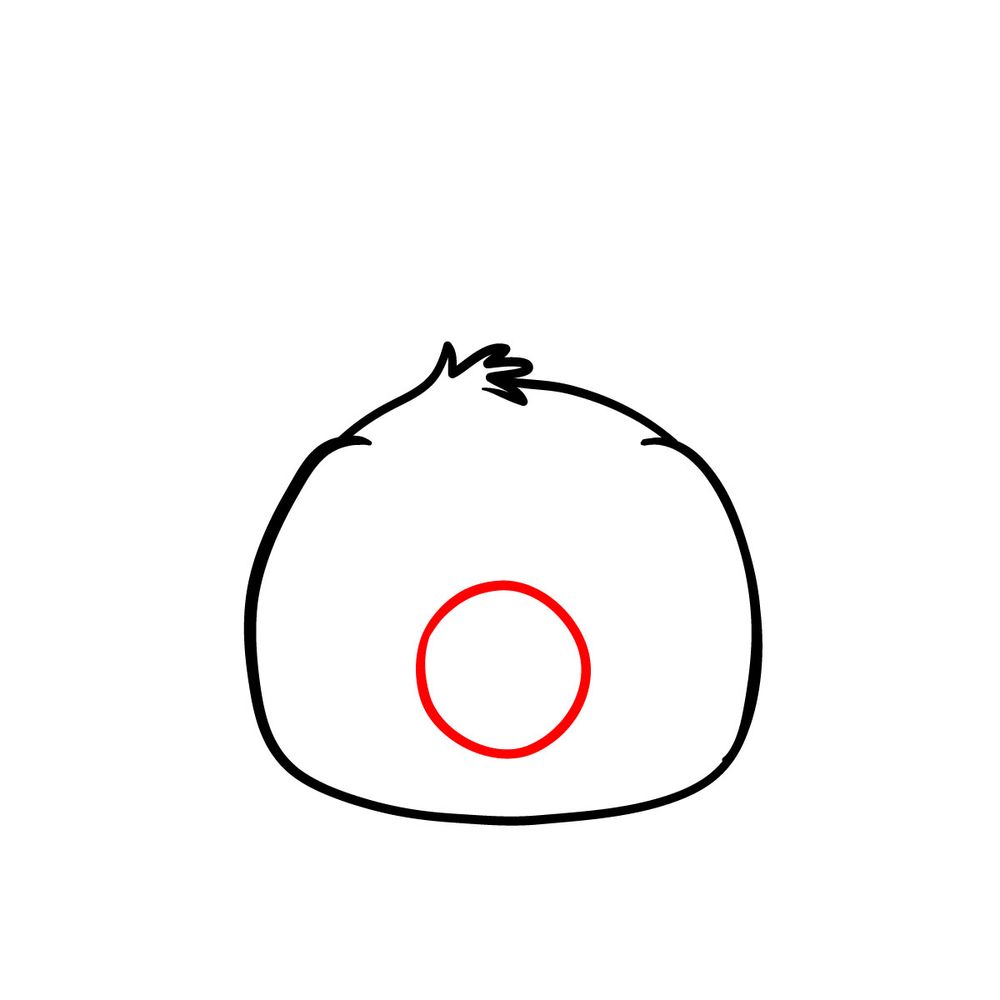
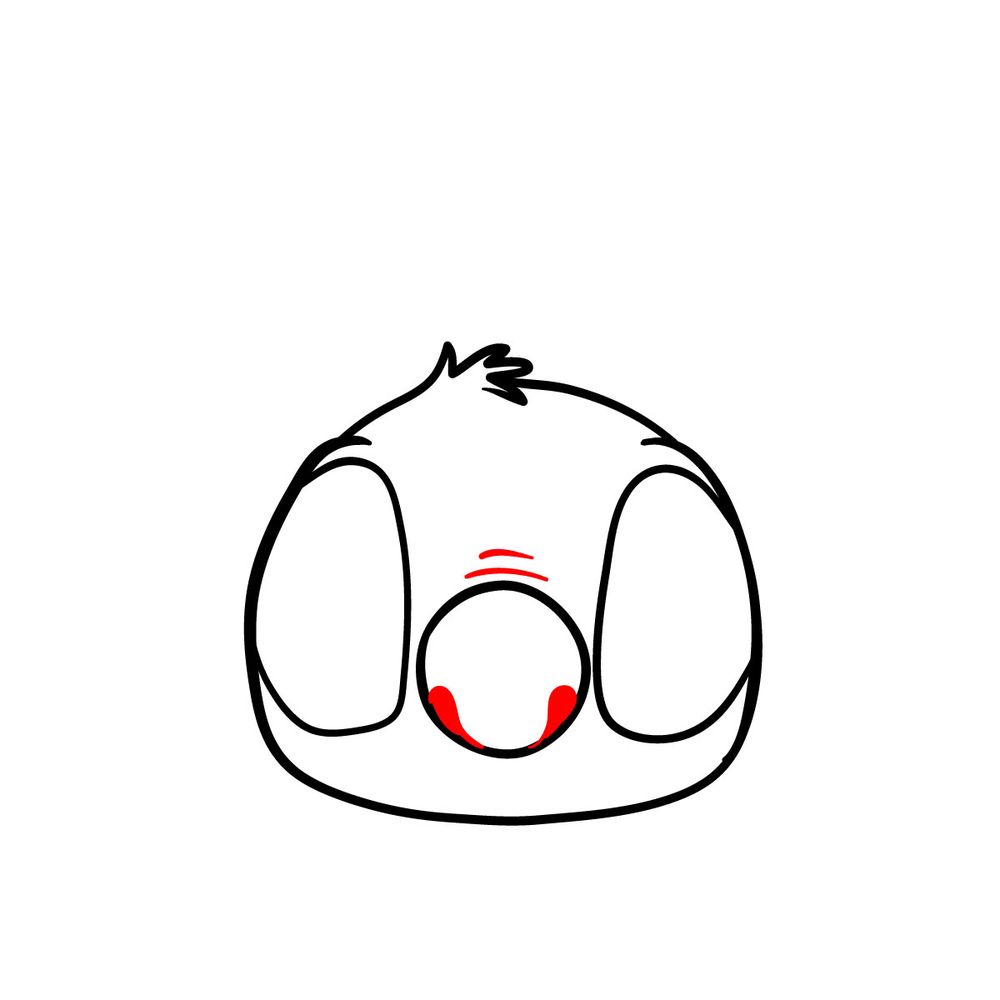
Step 03 – Next, move on to Stitch’s distinct nose. Positioned centrally on his face, his nose resembles a circular shape. Make sure the outline is smooth and symmetric, as it is a key feature of his face in your Stitch drawing.
Stitch’s nose sketch.
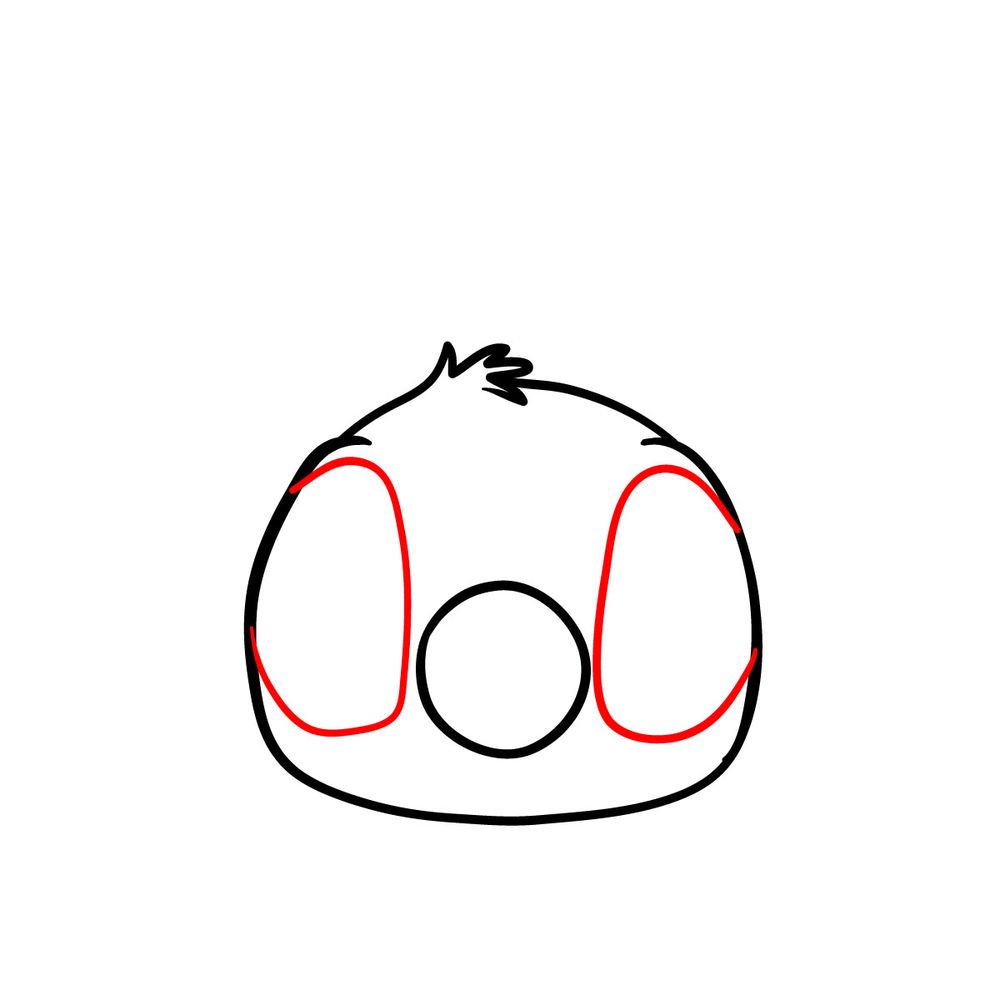
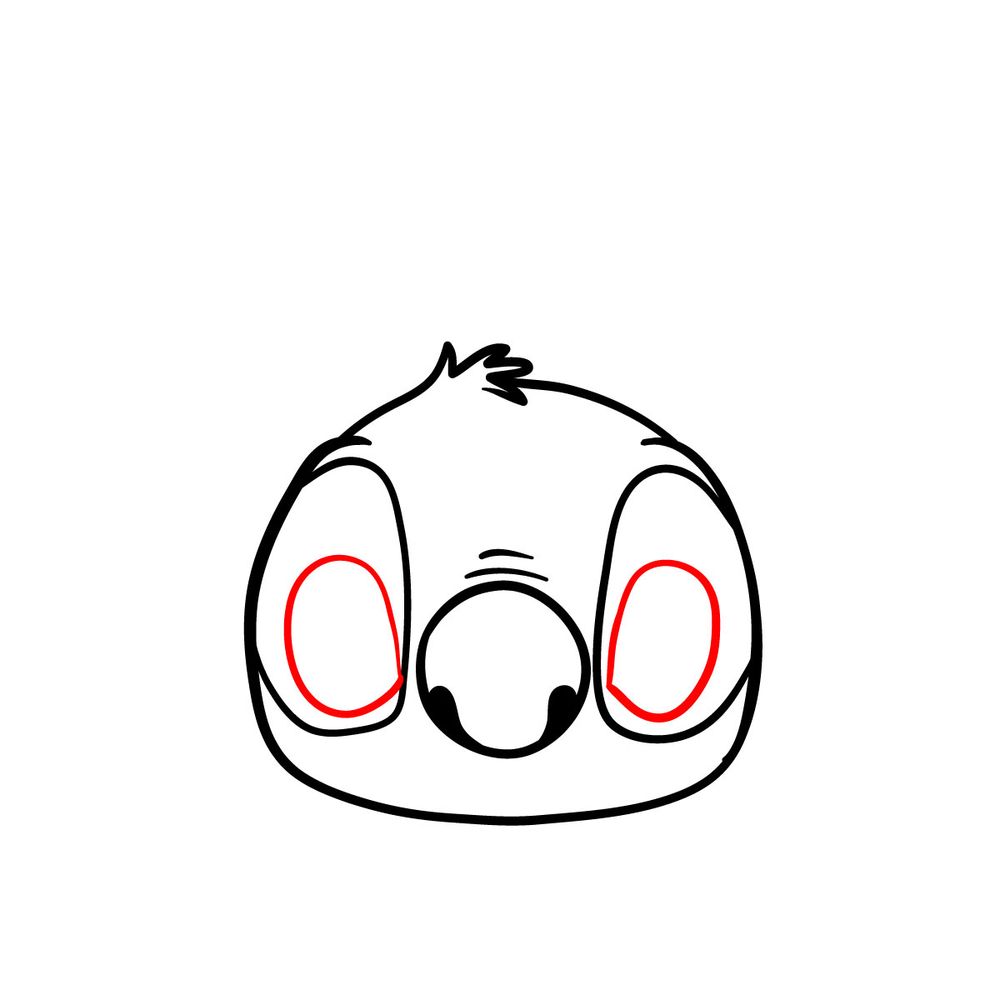
Step 04 – Now, it’s time to capture Stitch’s expressive eyes. Start by sketching the outer boundaries for both eyes. Remember, his eyes are large, oval, and slightly tilted, giving him that inquisitive and mischievous look. Ensure the eyes are evenly spaced on either side of the nose to maintain balance in the drawing. This step is crucial to make your Stitch drawing come alive with emotion.
Drawing of Stitch’s expressive, tilted eyes.
Step 05 – Draw two small nostrils inside the nose. They should be evenly spaced and not too big. Just above the nose, add a few faint lines. These subtle lines express Stitch’s character and emotions, adding more depth to his face.
Nostril details and subtle lines above the nose.
Step 06 – Now, within the previously drawn eye shapes, outline the pupils. These are crucial for Stitch’s mischievous yet adorable gaze. Make sure they’re placed cymmetrically and large enough, filling a good portion of the eye shape but leaving room for the highlights and the outer part of the eyes.
Outlining pupils within Stitch’s eyes.
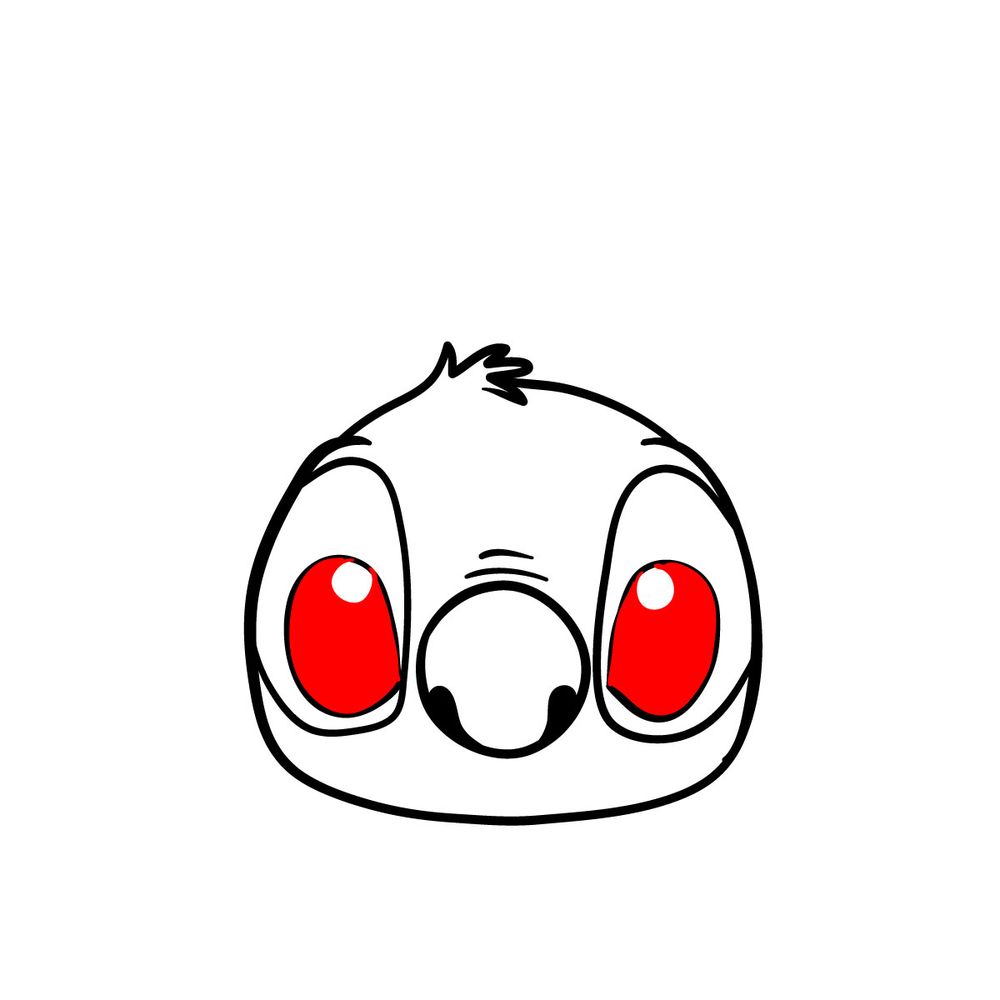
Step 07 – To give life to your Stitch drawing, fill in the pupils with a solid black color. However, remember to leave small circles within each pupil untouched. These small white spaces will act as highlights, making Stitch’s eyes appear shiny and lively.
Filling in Stitch’s pupils with black, leaving highlights.
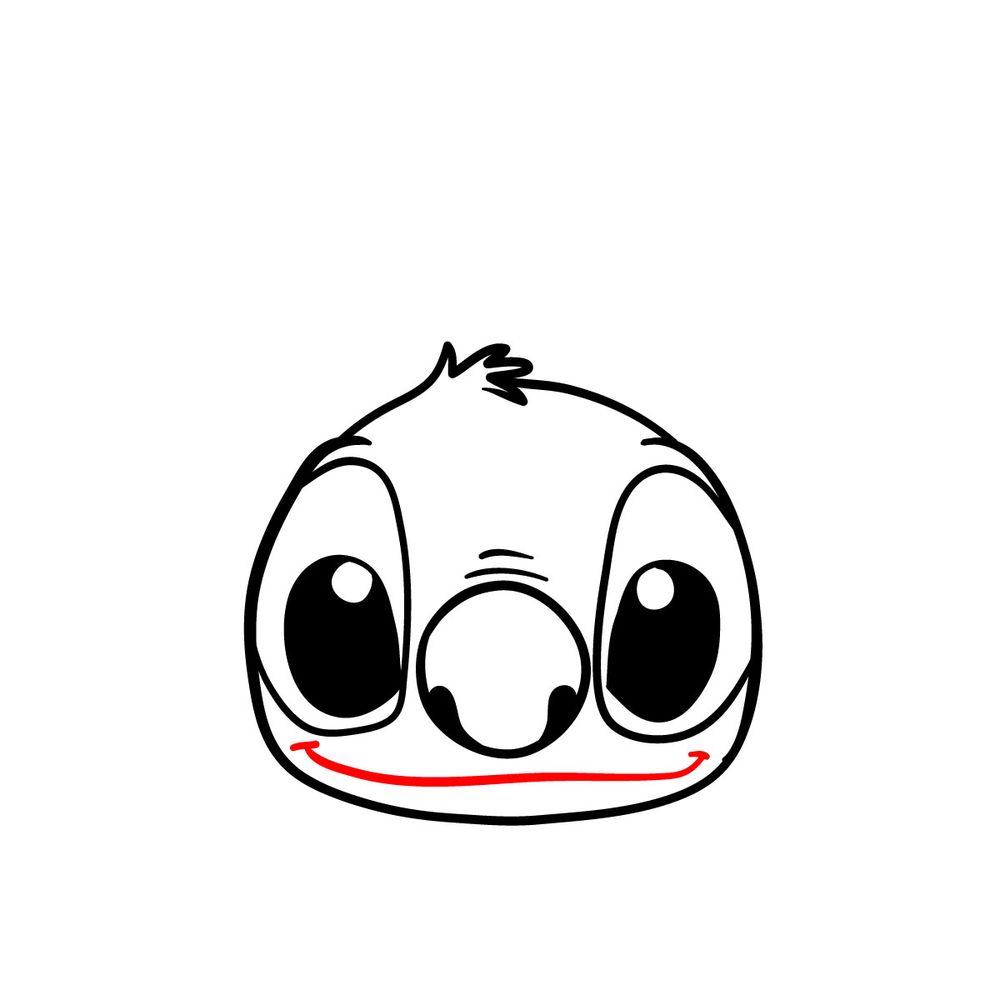
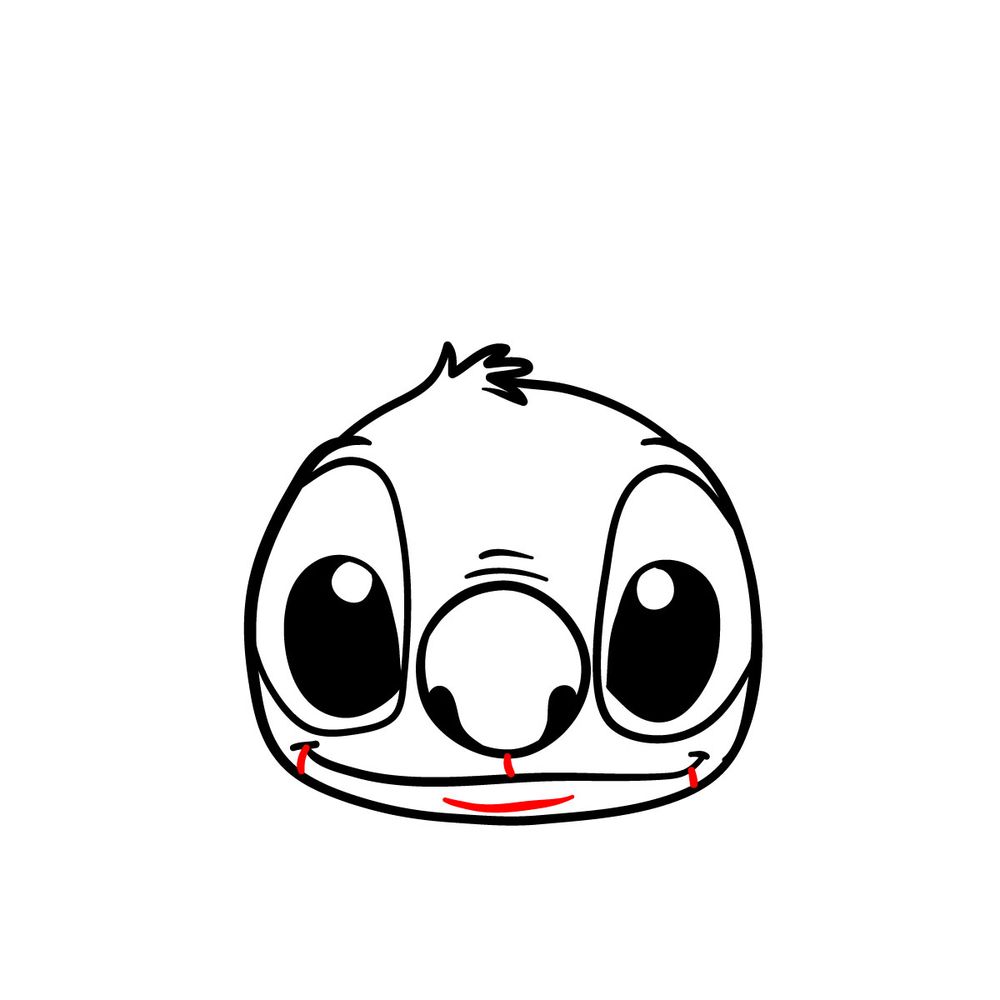
Step 08 – Lastly, it’s time to give Stitch his characteristic grin. Just below the nose, draw a slightly curved line extending towards the edges of his face. Make sure the mouth is wide and has an upward curve to showcase his cheerful disposition.
Drawing Stitch’s characteristic wide grin.
Step 09 – Your Stitch drawing is shaping up nicely! For the mouth and chin details, draw a small line extending from each corner of the mouth downwards to depict the creases that form when he grins. Additionally, right below the mouth, draw a slight curve to indicate his chin.
Addition of mouth and chin details.
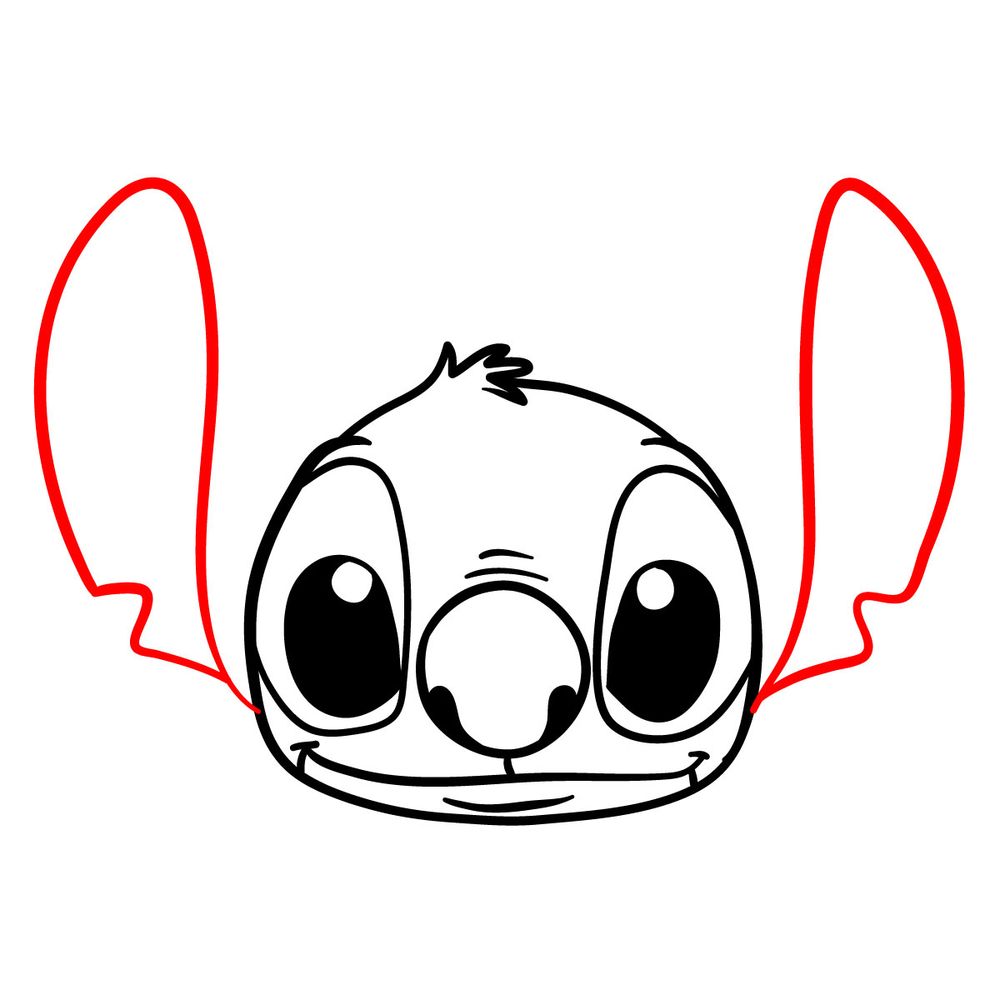
Step 10 – Stitch’s ears are one of his most defining features, and they’re quite large. Starting from the side of his head, begin drawing the outline of his left ear. It should be elongated and taper to a point at the top. Start the base of the ear roughly at the bottom point of his eyes, ensuring it curves outwards and upwards. Do the same for his right ear next. Make sure that the ears are symmetrical.
Sketching Stitch’s defining large ears.
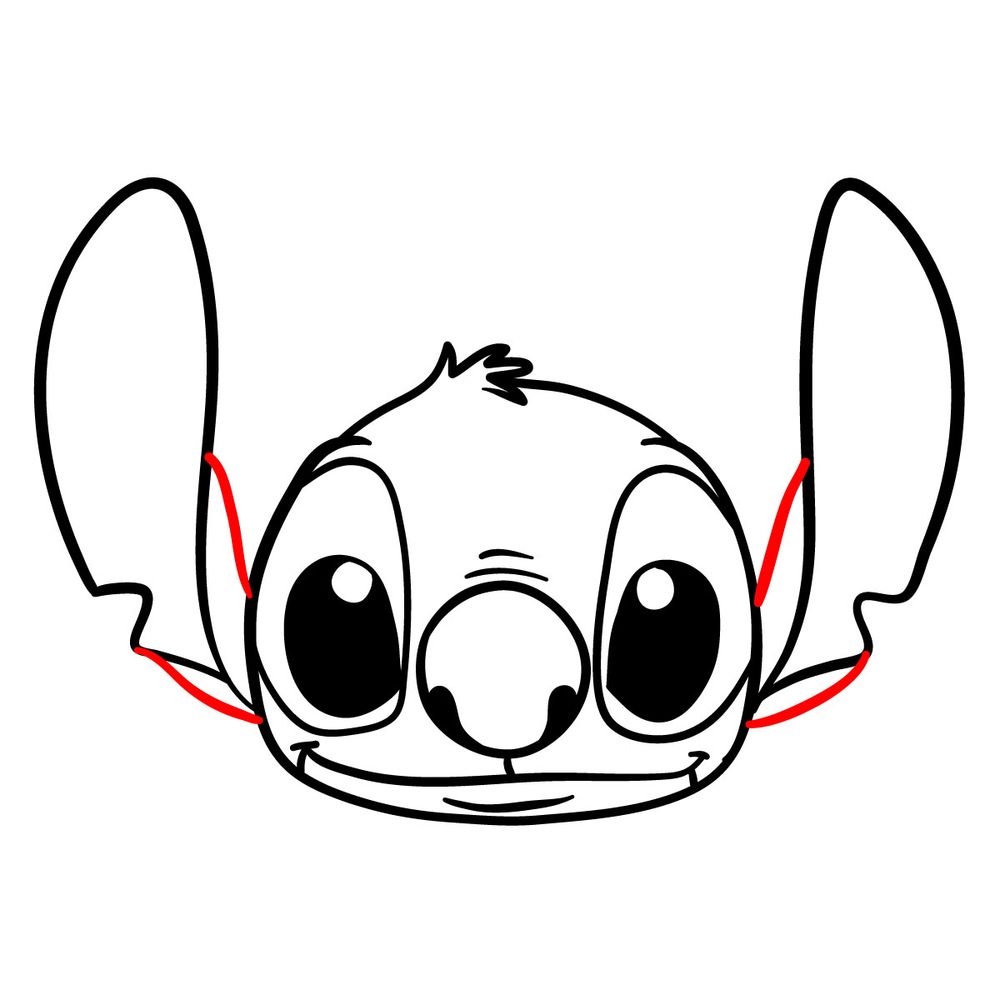
Step 11 – Next, add connection lines from his ears to the head.
Connecting Stitch’s ears to his head.
Step 12 – Your drawing is almost complete! Take a moment to review the entire image. Erase any unnecessary marks or guidelines you might have used earlier. Polish any rough edges or uneven lines to make sure your drawing looks clean and refined. With these final touches, you’ve now successfully drawn Stitch! Great job!
Don't Miss New Tutorials! Follow SketchOk
I publish new step-by-step drawing guides every single day. Follow on your favorite platform so you never miss a tutorial. Thousands of artists are already drawing along and I can't wait you to join in!
On my Patreon you can grab unique hand-made coloring pages: each one drawn by me personally. Every purchase directly supports the creation of new drawing tutorials. It's the best way to practice your skills, keep the site going, and get something truly original at the same time.
To capture Stitch’s eyes, focus on their size and spacing. Remember, they are wide-set and have an oval shape. The twinkle in them brings out his playful mischief, so don’t skip that!
How can I get his ears just right?
Begin by drawing them larger than you think! The ears are pivotal to Stitch’s overall look. Their size gives them mobility, drooping when he’s sad and perking up when excited.
What type of ink is best for finalizing the sketch?
A fine-tip pen or a brush pen is ideal for inking. These tools offer precision and consistency, ensuring your drawing remains crisp. Make sure the ink is waterproof if you plan to color later.
Firstly, congratulations on completing our how to draw Stitch’s head guide! Your hard work has paid off. By sharing your artwork and our guide, you inspire others to embark on their drawing journey.
Don’t forget to spread the word! Share your accomplishments and our guide on Facebook, Instagram, and Pinterest. Let’s keep the artistic flame burning bright!
Vector illustrator and the creator of Sketchok.com and TheHowToDraw.com. I publish free step-by-step drawing tutorials to help people of all levels learn to draw.
Disclaimer: This is a non-commercial, fan-made educational site. All characters belong to their respective owners. We are not affiliated with any rights holders.
Read full Disclaimer
5 thoughts on “How to draw Stitch’s head”
Step 11, that ear, the cut into the ear should be at the top. They aren’t both at the bottom. But otherwise this is very pretty

Step 11, that ear, the cut into the ear should be at the top. They aren’t both at the bottom. But otherwise this is very pretty
Thank you for the feedback. I will try to fix that soon
Here’s the updated version of the guide. Hope you’ll enjoy it 🙂
https://sketchok.com/cartoon-characters/various/how-to-draw-the-face-of-stitch/
cool
wired
wired