Home » Anime » Bleach » How to Draw Kenpachi Zaraki and His Fierce Shikai Zanpakutō

How to Draw Kenpachi Zaraki and His Fierce Shikai Zanpakutō

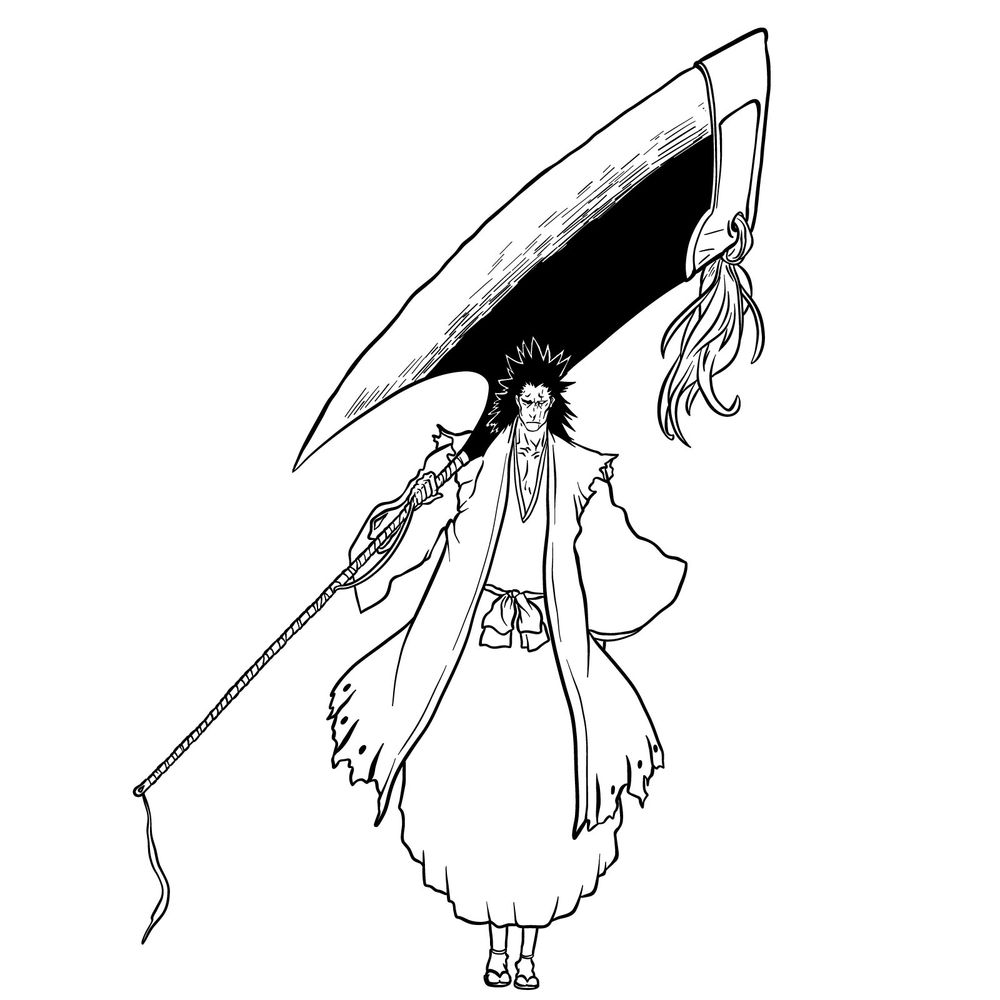
The vibrant world of Shinigami offers numerous captivating characters, but few stand out as much as Kenpachi Zaraki. As the captain of the 11th Division in the Gotei 13, his commanding presence, combined with his iconic Shikai Zanpakutō, makes him an ideal subject for aspiring artists. In this guide, we’ll delve into the details of how to draw Kenpachi Zaraki with Shikai Zanpakutō.

The Visage of Kenpachi: Key Features

  • Facial Traits: Kenpachi possesses a long face with pronounced cheekbones, distinct canine teeth, and hairless brow ridges. His eyes are accentuated by a scar running down the left side of his face, a testament to his confrontations.
  • Attire Details: His black shihakushō is adorned with white bandages, while a captain’s haori with ragged ends drapes over his frame. Unique additions include a distinctive black eyepatch.
  • Weaponry: Nozarashi, his Shikai Zanpakutō, boasts an imposing form resembling a mix of an enormous sized axe and war cleaver.

If you’re familiar with characters like Ichigo or Aizen, incorporating them alongside Kenpachi in a drawing can make for an intriguing scene, capturing the dynamics of the Soul Society.

Navigating the Drawing Guide

  • Red Color: This represents the step you should be currently focusing on in your drawing.
  • Black Color: Lines from previous steps, showcasing the progression of your sketch.
  • Grey Color: The basic sketch to ensure proportions are correctly mapped out. Begin with light strokes, allowing room for adjustments.

This guide consists of 43 comprehensive steps. The initial steps involve establishing a basic proportionate sketch. As you near completion, you can choose to ink your drawing. If you opt for this, ensure the ink dries properly before erasing the pencil marks to avoid smudges.

Step 01

How to Draw Kenpachi Zaraki's Shikai Zanpakuto - step 01

Step 02

How to Draw Kenpachi Zaraki's Shikai Zanpakuto - step 02

Step 03

How to Draw Kenpachi Zaraki's Shikai Zanpakuto - step 03

Step 04

How to Draw Kenpachi Zaraki's Shikai Zanpakuto - step 04

Step 05

How to Draw Kenpachi Zaraki's Shikai Zanpakuto - step 05

Step 06

How to Draw Kenpachi Zaraki's Shikai Zanpakuto - step 06

Step 07

How to Draw Kenpachi Zaraki's Shikai Zanpakuto - step 07

Step 08

How to Draw Kenpachi Zaraki's Shikai Zanpakuto - step 08

Step 09

How to Draw Kenpachi Zaraki's Shikai Zanpakuto - step 09

Step 10

How to Draw Kenpachi Zaraki's Shikai Zanpakuto - step 10

Step 11

How to Draw Kenpachi Zaraki's Shikai Zanpakuto - step 11

Step 12

How to Draw Kenpachi Zaraki's Shikai Zanpakuto - step 12

Step 13

How to Draw Kenpachi Zaraki's Shikai Zanpakuto - step 13

Step 14

How to Draw Kenpachi Zaraki's Shikai Zanpakuto - step 14

Step 15

How to Draw Kenpachi Zaraki's Shikai Zanpakuto - step 15

Step 16

How to Draw Kenpachi Zaraki's Shikai Zanpakuto - step 16

Step 17

How to Draw Kenpachi Zaraki's Shikai Zanpakuto - step 17

Step 18

How to Draw Kenpachi Zaraki's Shikai Zanpakuto - step 18

Step 19

How to Draw Kenpachi Zaraki's Shikai Zanpakuto - step 19

Step 20

How to Draw Kenpachi Zaraki's Shikai Zanpakuto - step 20

Step 21

How to Draw Kenpachi Zaraki's Shikai Zanpakuto - step 21

Step 22

How to Draw Kenpachi Zaraki's Shikai Zanpakuto - step 22

Step 23

How to Draw Kenpachi Zaraki's Shikai Zanpakuto - step 23

Step 24

How to Draw Kenpachi Zaraki's Shikai Zanpakuto - step 24

Step 25

How to Draw Kenpachi Zaraki's Shikai Zanpakuto - step 25

Step 26

How to Draw Kenpachi Zaraki's Shikai Zanpakuto - step 26

Step 27

How to Draw Kenpachi Zaraki's Shikai Zanpakuto - step 27

Step 28

How to Draw Kenpachi Zaraki's Shikai Zanpakuto - step 28

Step 29

How to Draw Kenpachi Zaraki's Shikai Zanpakuto - step 29

Step 30

How to Draw Kenpachi Zaraki's Shikai Zanpakuto - step 30

Step 31

How to Draw Kenpachi Zaraki's Shikai Zanpakuto - step 31

Step 32

How to Draw Kenpachi Zaraki's Shikai Zanpakuto - step 32

Step 33

How to Draw Kenpachi Zaraki's Shikai Zanpakuto - step 33

Step 34

How to Draw Kenpachi Zaraki's Shikai Zanpakuto - step 34

Step 35

How to Draw Kenpachi Zaraki's Shikai Zanpakuto - step 35

Step 36

How to Draw Kenpachi Zaraki's Shikai Zanpakuto - step 36

Step 37

How to Draw Kenpachi Zaraki's Shikai Zanpakuto - step 37

Step 38

How to Draw Kenpachi Zaraki's Shikai Zanpakuto - step 38

Step 39

How to Draw Kenpachi Zaraki's Shikai Zanpakuto - step 39

Step 40

How to Draw Kenpachi Zaraki's Shikai Zanpakuto - step 40

Step 41

How to Draw Kenpachi Zaraki's Shikai Zanpakuto - step 41

Step 42

How to Draw Kenpachi Zaraki's Shikai Zanpakuto - step 42

Step 43

How to Draw Kenpachi Zaraki's Shikai Zanpakuto - final step

Drawing FAQ

How can I effectively sketch Nozarashi’s intricate design?

Start with a basic outline, defining its elongated shape. Gradually add details like the serrated edges and the cloth-wrapped handle. Focus on symmetry and proportion to ensure its imposing nature is captured.

How do I capture Kenpachi’s aggressive facial expression?

Emphasis should be on the eyes and eyebrows. Drawing a sharper, angled brow ridge and focusing on the scar will add to his aggressive demeanor. The enlarged canine teeth can be subtly shown when drawing his mouth slightly open.

Conclusion: Sharing Your Artistic Journey

Now that you’ve ventured into the world of Shinigami and learned how to draw Kenpachi Zaraki, consider sharing your artwork. By sharing the link to this guide, you can inspire others to embark on a similar artistic adventure.

Supporting the SketchOk project through donations doesn’t just keep these guides available for everyone; it also allows you to suggest ideas for new tutorials. This collective effort ensures that free, high-quality drawing guides remain accessible to all. Stay connected and follow our updates on Facebook, Instagram, and Pinterest.
Disclaimer: All original artworks and photos used as references for the creation of these drawing tutorials are the property of their respective owners. If your work has been featured without proper credit, please kindly leave a comment below, and the issue will be promptly addressed. We greatly appreciate your exceptional art. Thank you.

Did you like the tutorial?

You can support the author of this website and also suggest your own ideas for new drawings by making a small donation here:

Leave a Comment

3