Welcome to the tutorial on how to draw water lilies. I will show you how to make seven different water lily drawings. You will start with a simple water lily flower. Then you will move on to a simple realistic sketch that looks a bit more detailed. Next, you’ll try a geometric water lily drawing with clean lines and symmetry. After that, we’ll add some leaves to the lilies for a stylized look. The fifth drawing will be more detailed, showing the flower’s complexity. The last two drawings will feature water lilies on water—one with a short stem and two leaves, and another with lines on the water to show nature movement. Let’s get started and have some fun drawing!
Drawing water lilies can be quite different from sketching roses, which I recently created a guide for. Roses often involve more intricate petal shapes and folds, while water lilies provide a more relaxed experience with their broader, flatter petals. Each flower has its unique charm and drawing them can teach you different skills and techniques. If you’ve enjoyed learning how to draw roses with my previous guide, you’ll find drawing water lilies to be a refreshing new challenge.
Understanding the Water Lily Drawing Guide
This guide is structured to make your drawing process simple and enjoyable. It consists of a series of images, with each image representing a single step. By following these images one by one, your drawing will gradually take shape, just like putting together a puzzle.
Red Color: Highlights the current step to focus on.
Black Color: Shows the lines from the previous steps.
The final stage offers an option to ink your sketch. Inking adds a crisp, definitive edge to your drawing, making it stand out. Always wait for the ink to dry completely to avoid smudging. Once dry, you can gently erase the pencil lines to give your artwork a clean, finished look. This step-by-step approach ensures that even beginners can successfully create a beautiful water lily drawing.
Guide 1: Simple Water Lily Flower
Easy water lily drawing – the final piece
Let’s start with a simple water lily drawing. This guide has just 7 steps, making it perfect for beginners. The final drawing shows a flower with open petals, giving it a welcoming appearance. This guide will help you recreate the image with ease, one step at a time.
Step 01 – Start by drawing an elongated, almond-like shape vertically. This will form the central petal of your water lily
Begin your simple water lily drawing with the central petal
Step 02 – Draw a petal on each side of the central one, starting from its base and curving outward to suggest the width and natural form of the flower
Adding the first pair of side petals
Step 03 – Insert two more petals in between the ones from the first and second steps, ensuring they are partly behind the first set for a layered effect
Sketching additional petals to shape the flower
Step 04 – Add another set of petals behind the existing ones to create fuller layers
Continuing to add petals to your easy water lily drawing
Step 05 – Sketch the final petal to complete the circle of the water lily bloom, and then extend a graceful curve downward from the base to indicate the stem
Adding the final petal and the stem
Step 06 – Give life to your water lily by adding texture lines within each petal, suggesting the natural veins and contours that give the flower its delicate appearance
Adding texture to the petals
Step 07 – Observe your sketch and add any missing details. You can optionally ink your sketch and erase the pencil lines for a clean, defined drawing
Your how to draw a simple water lily guide is complete
Guide 2: Simplified Realistic Water Lily Sketch
How to draw a simplified realistic water lily
Moving on to a slightly more challenging sketch, this second guide will walk you through 12 detailed steps to draw a simple but realistic water lily. The finished drawing will have multiple layers of petals that create a full bloom, and a textured center that brings the flower to life. This guide is perfect if you’re ready to take your drawing skills to the next level and add depth to your water lily illustrations.
Step 01 – Start your water lily sketch by drawing the three main petals that form the forefront of the flower. These should be slightly curved and pointed at the tips, mimicking the natural shape
Begin your water lily outline with three foundational petals
Step 02 – In this step, begin sketching the central part of the water lily, which is the stigma. Draw a set of small elongated shapes at the center
Initiate the center of the flower
Step 03 – Continue to define the center of the flower by adding additional shapes around the stigma. These shapes represent the intricate detail and texture found in the center of a water lily
Continue shaping the heart of your water lily drawing
Step 04 – Sketch more of these shapes and build upon the middle part to create a more realistic appearance
Sketch additional central details
Step 05 – Finalize the first layer of petals surrounding the center of the water lily. Ensure these petals are varied in shape and size to add to the flower’s natural look
Complete the first layer of petals
Step 06 – Add four more petals underneath the initial ones to create a new layer. These should peek out from below the first layer and help to give your lily depth and fullness
Add another layer of petals to your water lily outline
Step 07 – Sketch another series of petals to continue building the layers. These petals should extend outwards, filling the space and adding to the flower’s open bloom
Continue building the layers of your sketch
Step 08 – Draw one more petal in the foreground
Add an extra petal to the front
Step 09 – Sketch in another seven petals to further expand your water lily’s bloom. Arrange them naturally around the flower, with some behind and some on the sides of the existing petals
Expand your water lily outline with seven more petals
Step 10 – Add petals to the bottom side of your water lily sketch to complete the base of the flower. These will give the impression that the flower is sitting on water
Enhance the base of the flower with bottom petals
Step 11 – Add the two final petals to ensure your water lily’s outline is complete
Complete the sketch by adding the final petals
Step 12 – And now you know how to draw a more realistic water lily as we reached the end of the second guide. You can choose to ink your sketch for a polished look, and then gently erase the basic sketch lines for a clean final presentation
The water lily sketch is now complete, ready for inking
Guide 3: Geometric Symmetrical Water Lily Drawing
How to draw a geometric water lily – a step-by-step guide
In this third guide, we’ll explore how to draw a geometric water lily with clean, symmetrical lines. This 8-step process will lead you to create a structured and balanced depiction of a water lily. Each petal is drawn with precision, emphasizing the harmonious design nature offers. By the end, you’ll have a stylized flower that showcases both the beauty of geometry and the organic flow of natural flora.
Step 01 – Begin by sketching a straight vertical line in the center. Approximately halfway up this line, draw an almond-shaped outline to form the first petal of your water lily. This establishes the symmetry and central point of the flower
Starting the geometric water lily drawing with the central petal and a guiding line
Step 02 – Add three new petal shapes. Place one petal directly on top of the initial almond shape, aligning its tip with the vertical line. Then, position the other two petals symmetrically on either side of the first petal, creating a balanced trio of shapes
Adding three surrounding petals
Step 03 – Continue to elaborate your geometric water lily drawing by sketching three more petals. Add one petal at the base of your central petal, its tip pointing downward along the vertical line. The remaining two petals are drawn between the gaps of the upper and side petals, filling out the shape and adding to the symmetry
Further detailing the geometric water lily with a trio of petals
Step 04 – Draw four additional petals. These should be placed in the remaining spaces between the existing petals
Adding a new layer of petals
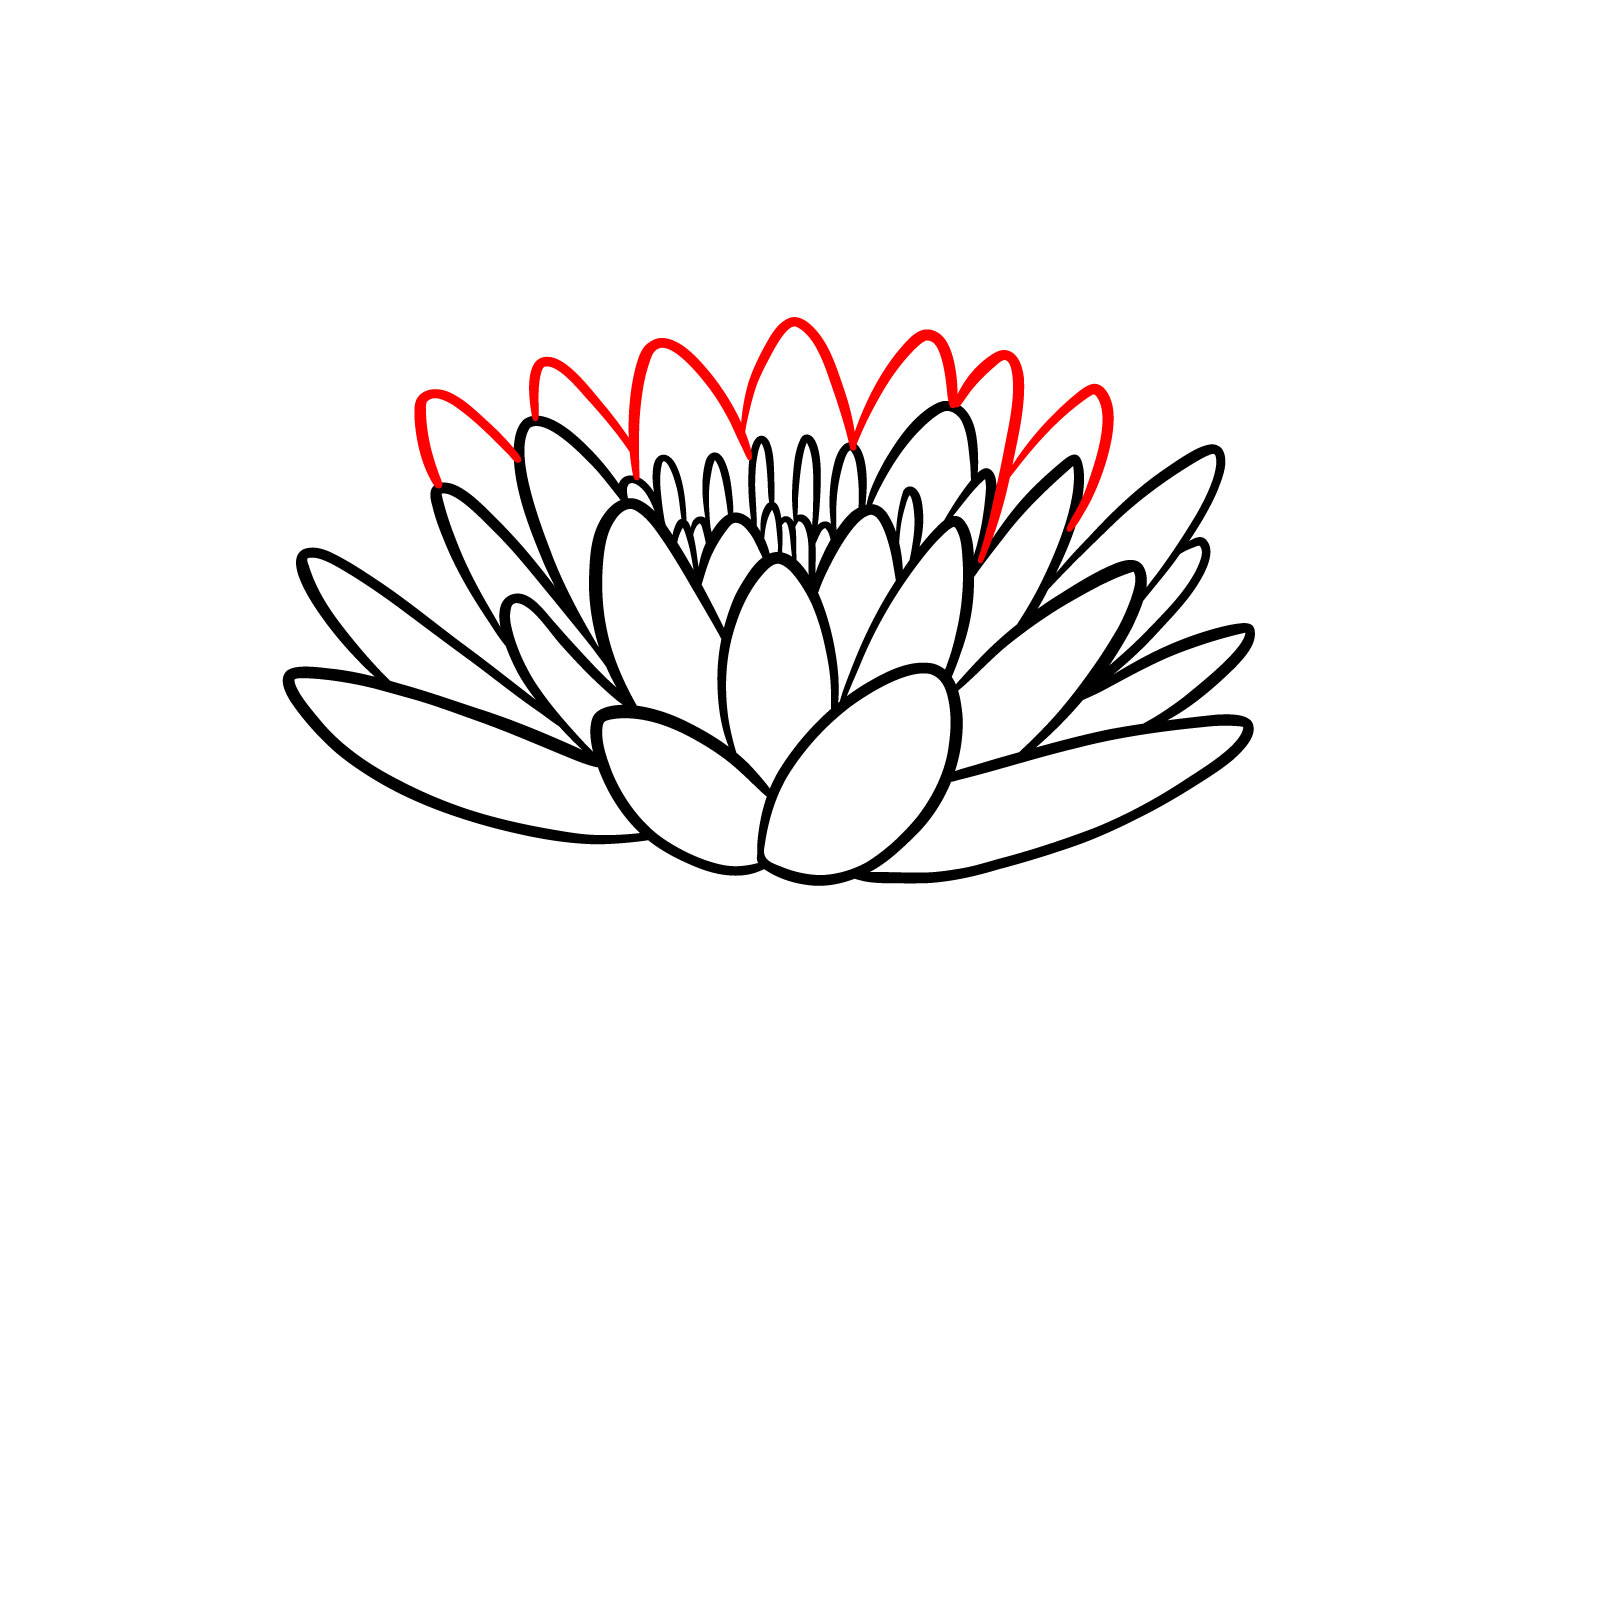
Step 05 – Conclude the base outline of your geometric water lily by adding the final four petals. Position these petals to resemble butterfly wings, with two petals spreading out horizontally at the center and the other two at the bottom, mirroring the top set
Completing the base shape of the geometric water lily with the last set of petals
Step 06 – Now, draw additional lines within each petal. These lines should radiate from the center to the edges, following the shape of the petals and accentuating the geometric style
Adding lines for volume and symmetry
Step 07 – Apply the final touches to your drawing by adding more lines and textures. Keep these lines symmetrical and consistent throughout the petals to maintain the geometric integrity and visual harmony of the design
Applying the finishing touches
Step 08 – Your geometric water lily drawing is now complete. Examine the sketch to ensure that all lines are symmetrical and that the geometric style is evident. I hope this step-by-step guide has helped you create a balanced and harmonious depiction of this beautiful flower
The completed how to draw a geometric water lily guide
Guide 4: Stylized Water Lily Sketch with Leaves
How to draw a stylized water lily
Drawing a stylized water lily with leaves adds an artistic twist to the natural form of this charming flower. In this 11-step guide, you’ll create a drawing that combines the organic shapes of water lily petals with the bold, graphic lines of stylized leaves. This balance of natural and artistic elements makes for a delightful drawing project.
Step 01 – Start with an egg-like shape in the center of your paper. This shape will serve as the first and central petal
Beginning the water lily outline with the central petal
Step 02 – Add four more petals. Place two petals on each side of the central one; the bottom two should be elongated, reaching downward, while the top two are shorter
Expanding the drawing with additional petals
Step 03 – Next, draw five new petals. Sketch four petals in the spaces between the previously drawn ones, ensuring they’re slightly visible behind the front petals. Add the fifth petal at the base to create a backdrop for the central petal
Sketching more petals for the fullness of the stylized water lily
Step 04 – To give your water lily even more dimension, draw an additional set of petals behind the existing ones. These should be slightly larger, peeking out from behind the first layers
Layering petals to create dimension
Step 05 – Finish the petal work by adding the final layer in the back. These should be the largest, mostly visible from the sides and top
Completing the petal layers
Step 06 – Now, draw the stem extending from the base of your water lily bloom with a smooth, curved line. Add one shorter curved line next to it – it will hold the leaf we will draw next
Adding the stem to the water lily outline
Step 07 – Outline the shapes of the two leaves, one on each side of the stem. These should be large and rounded, resembling the natural shape of water lily pads
Outlining the shapes of the leaves
Step 08 – Give life to the leaves by adding vein details. Draw a central vein and several side veins branching out towards the edges of each leaf
Sketching the veins on the leaves to enhance the water lily drawing
Step 09 – Add volume to the front petals by drawing additional lines within each petal for texture and depth
Bringing the water lily to life with textured front petals
Step 10 – Sketch some short gentle lines within the petals to provide stylized texture
Adding texture to the flower
Step 11 – Your drawing is nearly complete! The water lily now has stylized textures and shadows, with detailed lines on both the petals and the leaves. You can further refine your drawing by going over it with ink to create a striking contrast and to make your flower drawing stand out. This step is great for those looking for how to draw a water lily easy and wanting to add a professional touch to their artwork
Completed water lily drawing with stylized textures and shadows
Guide 5: More Complex Water Lily Drawing
Easy drawing of a water lily – a step-by-step guide
Ready for a challenge? This 11-step guide will take you through creating a more complex water lily drawing with detailed petals and a rich center. To make these SketchOk guides clearly structured and easy to follow, I use vector graphics, which is why the shades are often bold and distinct. Remember, it’s not necessary to replicate this style exactly; feel free to add shading in a more traditional way that suits your drawing technique. This approach allows for depth and intricacy, giving you the freedom to bring out the realism and dimension in your water lily as it blooms on the page.
Step 01 – Start your water lily drawing by creating two slightly curved petal shapes. These petals should be positioned with one slightly above the other, forming the basic foundation of your flower drawing
Beginning the water lily drawing with two basic petal shapes
Step 02 – Build upon the foundation by adding three more petal shapes on top of the initial two. Arrange these petals in a way that they overlap slightly with the previous layer
Expanding the flower with additional petals
Step 03 – Continue to add depth to your flower drawing by sketching a cluster of smaller petals in the center
Drawing the inner layer of smaller petals
Step 04 – Add four additional petal shapes extending from the outer edge of your water lily drawing. These should be drawn larger and more elongated to represent the outer petals of the flower
Enhancing the flower’s outline with outer petals
Step 05 – Focus on the heart of the water lily by drawing the stamen in the center. Add some shading inside this area to emphasize the depth of the flower’s core
Sketching the stamen and shading the core of the water lily
Step 06 – Draw five new petal shapes around the central part of the water lily. These should bridge the gap between the inner and outer petals, providing a seamless transition in your flower drawing
Creating a frame around the central stamen with new petals
Step 07 – Enhance the three-dimensional effect by adding another layer of petal shapes at the back of the flower. These petals should appear behind the existing ones, contributing to the lushness of the water lily drawing
Adding dimension with a back layer of petals
Step 08 – Broaden the water lily’s silhouette by drawing two elongated petal shapes on each side. This step will help balance the flower’s overall shape
Expanding the flower’s width with side petals
Step 09 – To give your water lily drawing a base, sketch five petal shapes below the main flower. These will represent the petals that are often submerged or just at the water’s surface
Detailing the lower part of the flower with more petals
Step 10 – Use bold strokes to add shadows, textures, and volume to the petals of the water lily. This step is about refining the drawing with stylistic elements that bring out the flower’s form and make it pop
Finalizing the flower drawing with stylized shading
Step 11 – The completed water lily drawing should now be fully detailed with textured shading, giving it a vibrant and lifelike appearance
The fully drawn and shaded water lily flower in its final form
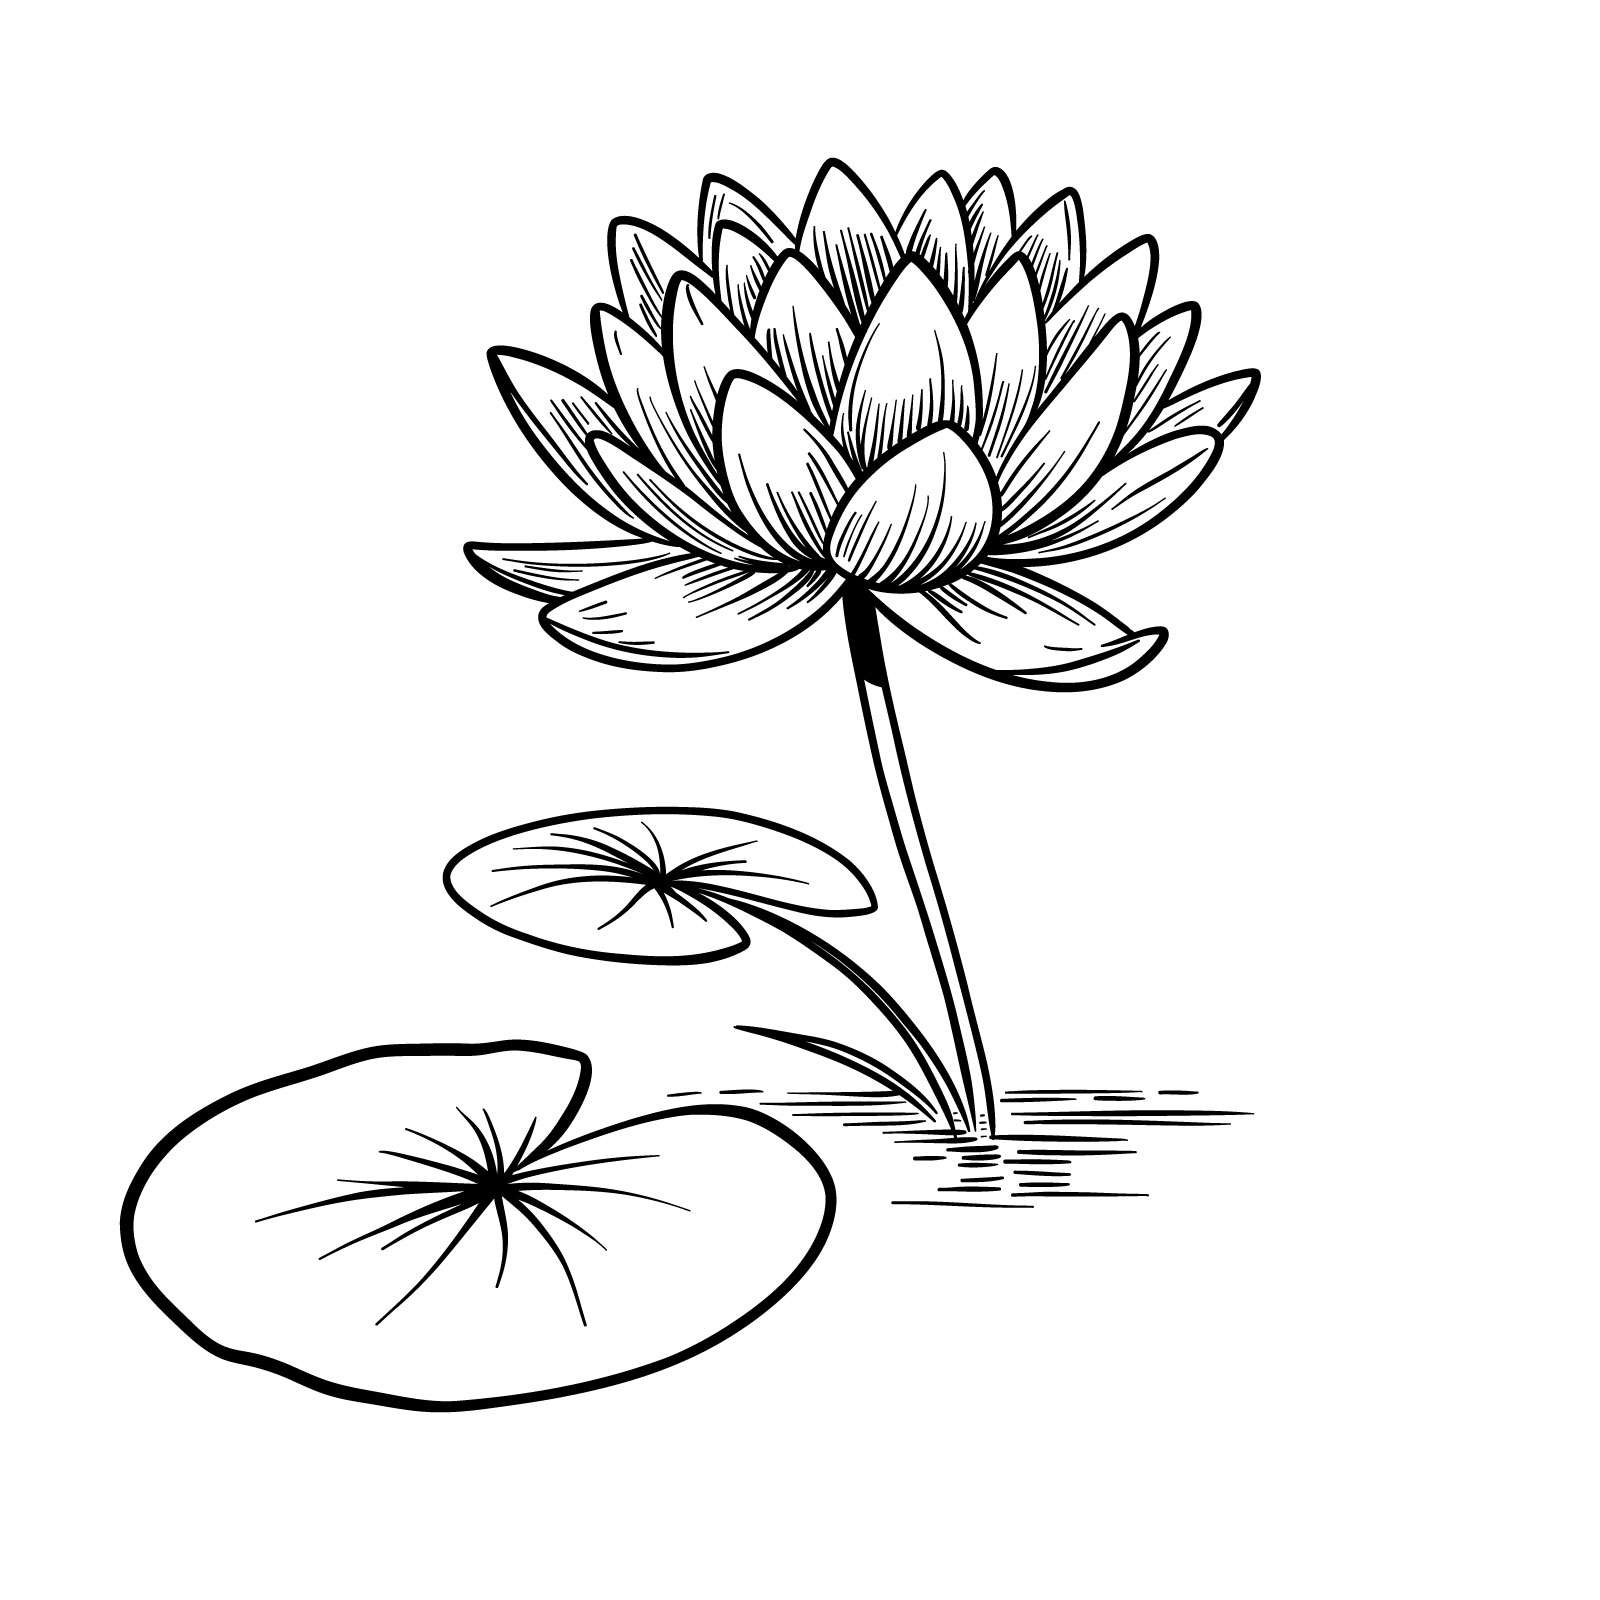
Guide 6: Water Lily with Leaves Peeking Out of the Water
Easy drawing of a water lily with pads on the water
For the sixth step-by-step guide, you’ll master drawing a graceful water lily with a longer stem that stretches above the water, complemented by two broad leaves floating alongside. This 10-step drawing showcases the water lily’s connection to its aquatic environment, capturing both the flower and its foliage. The leaves add balance and context to the composition, inviting viewers to imagine a calm pond scene.
Step 01 – Start by drawing the first two petals of the water lily at the front. These petals should be slightly curved and meet at a point on one end, creating the tip of the petal. They form a V-shape as they overlap at the base, which will be the center of the flower
Drawing the first two petals of a water lily
Step 02 – Add four more petals around the initial two, positioning them to create a fuller look for the flower. Each petal should be drawn with a slight curve, broad at the base and tapering to a point at the end, ensuring they’re evenly spaced around the central petals
Expanding the water lily with more petals
Step 03 – Between the petals drawn in steps 1 and 2, sketch another set of four petals to give the flower a layered appearance. These should be placed in the gaps, slightly behind the first layers, peeking out to fill the flower’s shape
Interspersing petals for a layered effect
Step 04 – Start drawing the next layer of petals behind and below the existing ones. These petals should be slightly larger to represent the way they are positioned further out on the flower. Curve them gently to mimic the natural shape of water lily petals
Beginning the next layer of petals in the water lily drawing
Step 05 – Finish the second layer of petals by adding in the remaining ones needed to complete the circle. Ensure these petals are partially obscured by the ones in front to create depth in your drawing
Completing the second layer of petals on the water lily
Step 06 – Draw the final petal to the side of the flower to balance its shape. Then, sketch the stem leading down from the flower, including the start of one leaf extending from it, to establish the flower’s connection to the rest of the plant
Adding the final petal and the stem
Step 07 – Outline the full shape of the leaf attached to the stem, giving it a rounded edge to represent a typical water lily leaf. Add another small stem near the base of the flower, then sketch the shape of the second leaf
Outlining the leaves and adding a small stem
Step 08 – Create a sense of the water environment by drawing lines that represent ripples or reflections around the water lily stem
Adding water lines
Step 09 – Add texture to the petals and leaves by drawing fine lines to represent veins and the delicate texture of the water lily
Detailing the texture of leaves and petals on the water lily
Step 10 – The water lily drawing is now complete. To polish your sketch, consider inking the final drawing for a cleaner look, then erase any remaining pencil lines for a neat finish. This last step elevates the drawing, making it ready to showcase or to be colored
The Finalized Water Lily Drawing
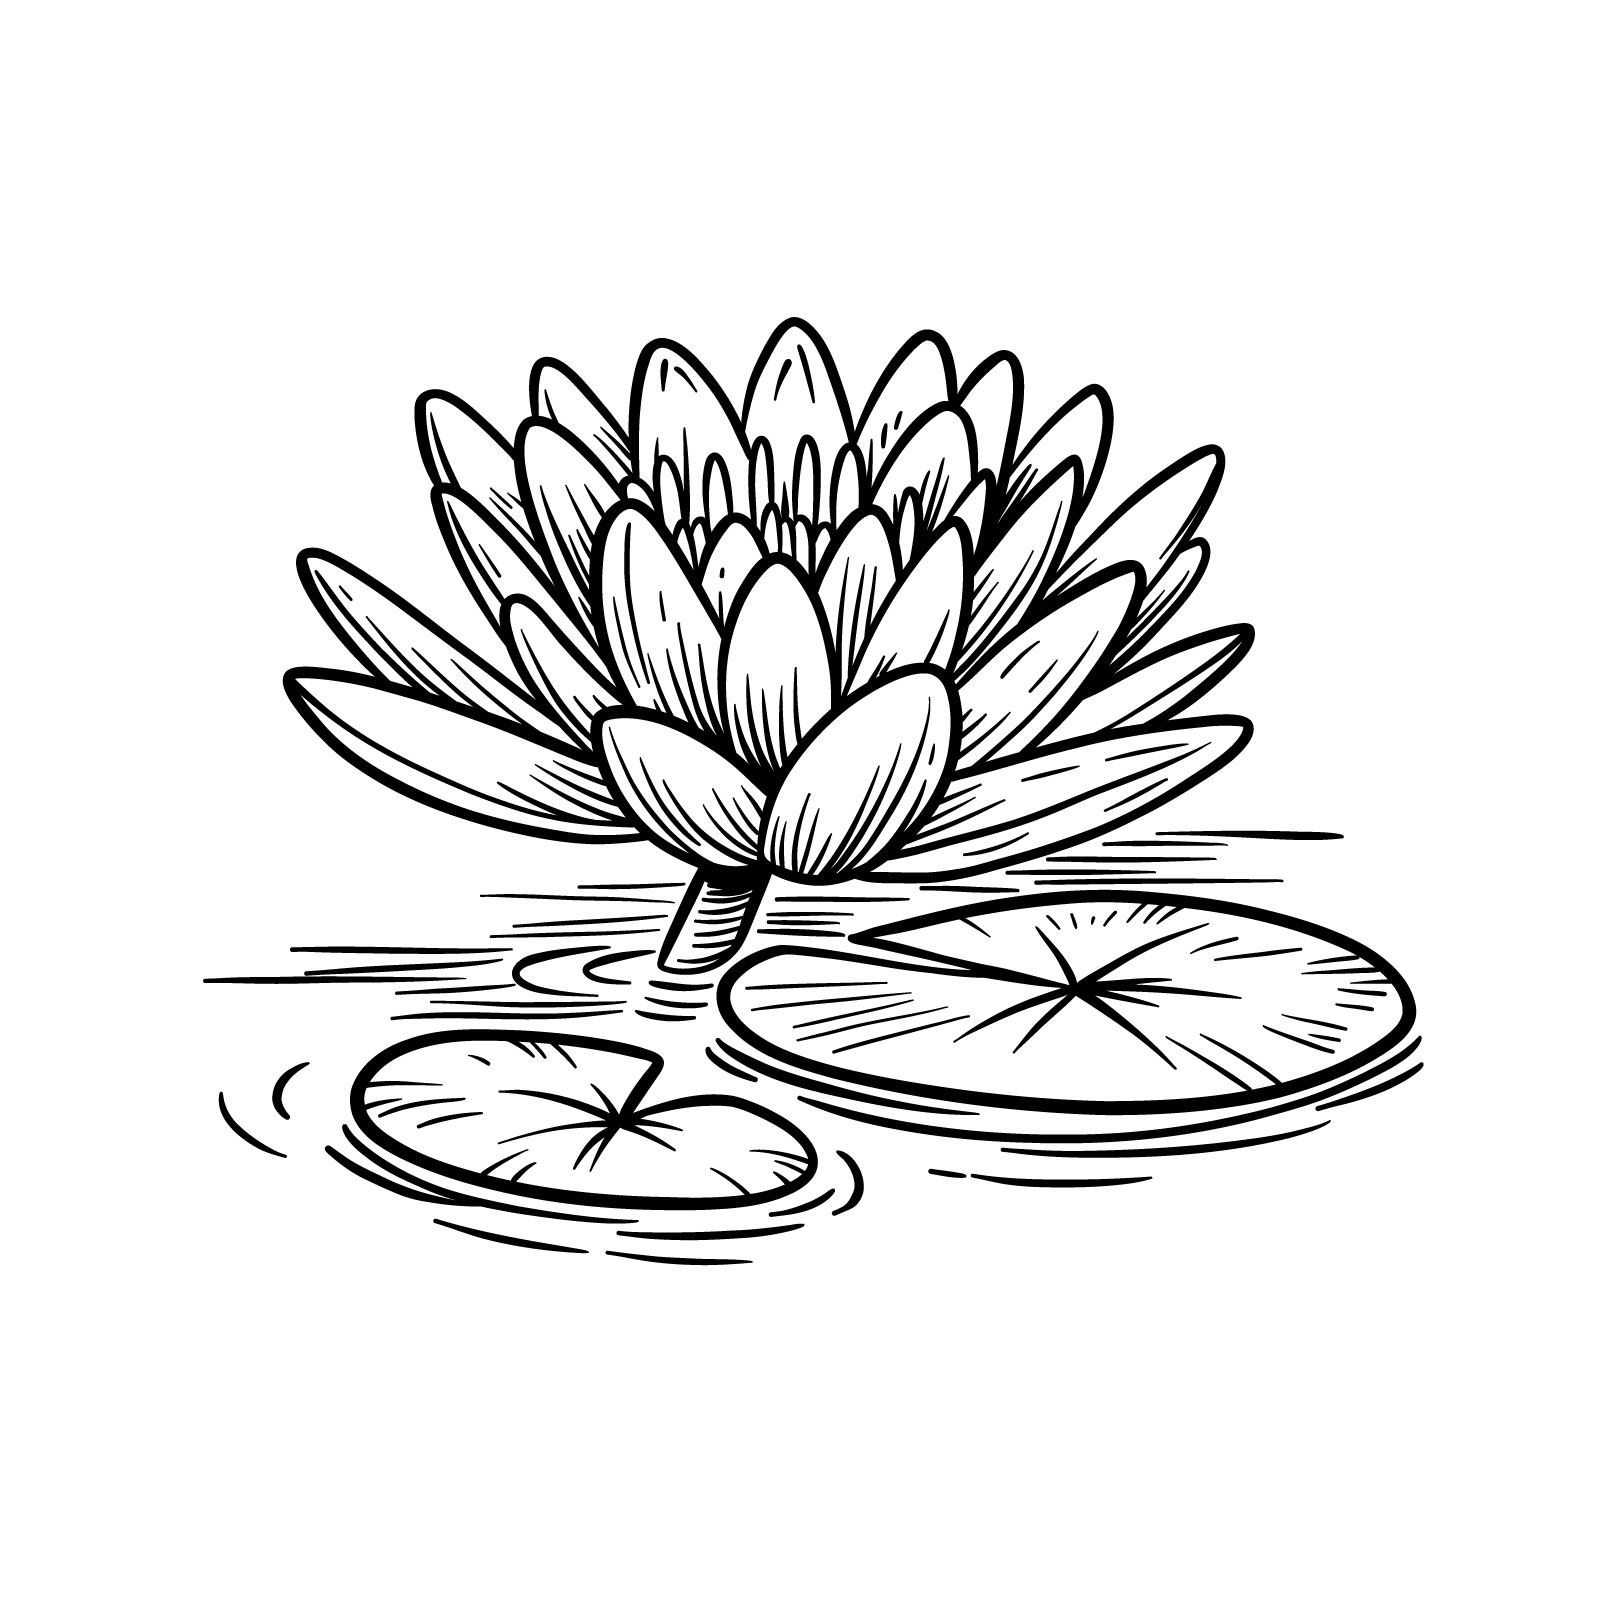
Guide 7: Water Lily with a Shorter Stem
The final easy drawing of a water lily on water
And here’s the last one! This guide of 11 steps will lead you through drawing a water lily with a short stem, floating effortlessly on water, surrounded by two lily pads. The beauty of this piece lies in its simplicity and the serene ambiance it represents. It’s a perfect subject for those who want to capture the quiet harmony of nature in their art.
Step 01 – Begin by sketching two elongated, oval-shaped petals side by side with a slight overlap at the base, forming the front of the flower
Drawing the initial two petals of the water lily
Step 02 – Add one petal on each side of the initial two, curving outward gracefully, and another petal between them at the top, standing vertically
Adding three more petals
Step 03 – Draw four new petals interspaced between the existing ones, positioned higher to create depth, with each petal partially hidden behind the front layer, enhancing the flower’s fullness
Sketching a new layer of petals on the water lily
Step 04 – Outline a set of new petals above the previous layer, varying in size and direction, to complete the top section of the water lily, making sure they appear nestled within each other
Completing the water lily’s top petals
Step 05 – Begin sketching the water lily’s central part, by adding several stamen shapes around it, indicating where the pollen forms
Defining the central structure of the flower
Step 06 – Start drawing the petals on the side of the central part. These petals should be partially visible, tucked behind the central structure and the front petals
Initiating the water lily’s rear petals
Step 07 – Continue adding petals to the backside, ensuring they wrap around the sides of the water lily. These should be wider and slightly curved, giving the impression of a fully bloomed flower
Detailing the rear petals
Step 08 – Sketch the outline of the stem and leaves, starting with a short stem extending downwards and two wide leaves, one on each side, floating on the water’s surface
Outlining the stem and leaves
Step 09 – Add texture to the leaves and the water lily by drawing veins on the leaves and refining the central carpel with additional stamen lines
Texturing the leaves and petals of the water lily
Step 10 – Apply shading to the stem. Draw several concentric lines and ripple marks around the lily pads and stem to suggest calm water movements
Shading the stem and sketching water ripples
Step 11 – Review the drawing, making any necessary adjustments or refinements. Optionally, ink the outlines for a polished finish, and erase any remaining sketch lines to complete your guide on how to draw a water lily
The final step of the guide on how to draw a water lily on water
I hope you’ve enjoyed learning how to draw water lilies through these step-by-step guides. Remember, whether you started with the simple one or ventured into the more complex designs, each stroke brings you closer to becoming the artist you aspire to be. Practice is key, and I’m here to guide you along the way.
Don’t forget to follow SketchOk on our social channels. You’ll find regular updates, more drawing guides, and a community of fellow art enthusiasts. Here are the links where you can connect with us:
Join the SketchOk family, share your progress, and let’s inspire each other. Every day brings a new opportunity to create something beautiful. So grab your pencils, and let’s fill the world with your amazing water lilies!
Disclaimer: All original artworks and photos used as references for the creation of these drawing tutorials are the property of their respective owners. If your work has been featured without proper credit, please kindly leave a comment below, and the issue will be promptly addressed. We greatly appreciate your exceptional art. Thank you.
Did you like the tutorial?
You can support the author of this website and also suggest your own ideas for new drawings by making a small donation here: