Hello everyone! In today’s guide, we’ll learn how to draw a more realistic Christmas tree adorned with decorations, garlands, and gifts underneath. Unlike previous guides, where we focused on simplified versions of Christmas trees to make them accessible for absolute beginners, this guide includes more steps to create a more lifelike impression of a tree. Despite the added complexity, I’ve broken the process down into 24 simple, easy-to-follow steps to keep things approachable. Let’s dive in and see how this guide is structured!
About the Guide
This tutorial uses a color-coding system to help you follow along easily:
Red Color: Marks the lines or shapes you’re adding in the current step.
Black Color: Represents the completed portions of the drawing.
Grey Color: Shows the initial sketch framework.
This method simplifies the process, especially when working on features like the Christmas tree’s layered branches, gifts, and festive decorations.
You might also want to try drawing a cute cartoon Santa Claus or a cartoon Christmas reindeer. Or, if you’re looking for a simplified version of Christmas trees, as I mentioned earlier, I’ve already published three guides on drawing Christmas trees. These include the first, second, and third versions, which I posted quite recently.
Step 1: Start by drawing a vertical line that spans most of the height of your drawing. At the bottom, add a horizontal line to act as the base of the tree and represent the floor. Slightly below the top of the vertical line, draw slanted horizontal lines downward to form a triangle, which will serve as the basic shape of the tree. Near the top, where you made the small gap, add five dots to mark the tips of the star. These will help guide you as you draw the star on the tree.
Step 2: In the upper part of the drawing, connect the dots to form a five-pointed star at the top of the tree. Along the tree, draw curved lines to indicate where the string lights will hang. Below the tree, sketch a series of squares and rectangles to represent the placement of gifts. Adjust the shapes slightly to give a sense of perspective from your point of view.
Step 3: Outline the edges of the star at the top of the tree, refining its shape based on the sketch from the previous step.
Step 4: Start drawing the tree beneath the star, beginning with a small section that connects the star to the tree and the very top of the tree. Instead of a single smooth outline, use multiple short, slightly curved lines to depict the needles, giving the tree a fluffier and more realistic appearance.
Step 5: Add more short, curved lines beneath the ones drawn in the previous step to continue shaping the tree. These lines will help create a fuller, layered look for the branches.
Step 6: Continue drawing the tree further down by adding several more layers of branches using short, curved lines to maintain the realistic and full appearance.
Step 7: Draw the tree further down, adding two more layers of branches. Then, sketch the first Christmas ornament on the left side of the tree.
Step 8: Continue drawing additional layers of the tree and add another ornament, this time on the right side and slightly lower.
Step 9: Add a few more layers of branches to the tree and draw three additional ornaments—two on the sides and one near the center.
Step 10: Continue drawing the tree downward by adding two more layers of branches. Then, place three ornaments in the positions shown in the reference image for this step.
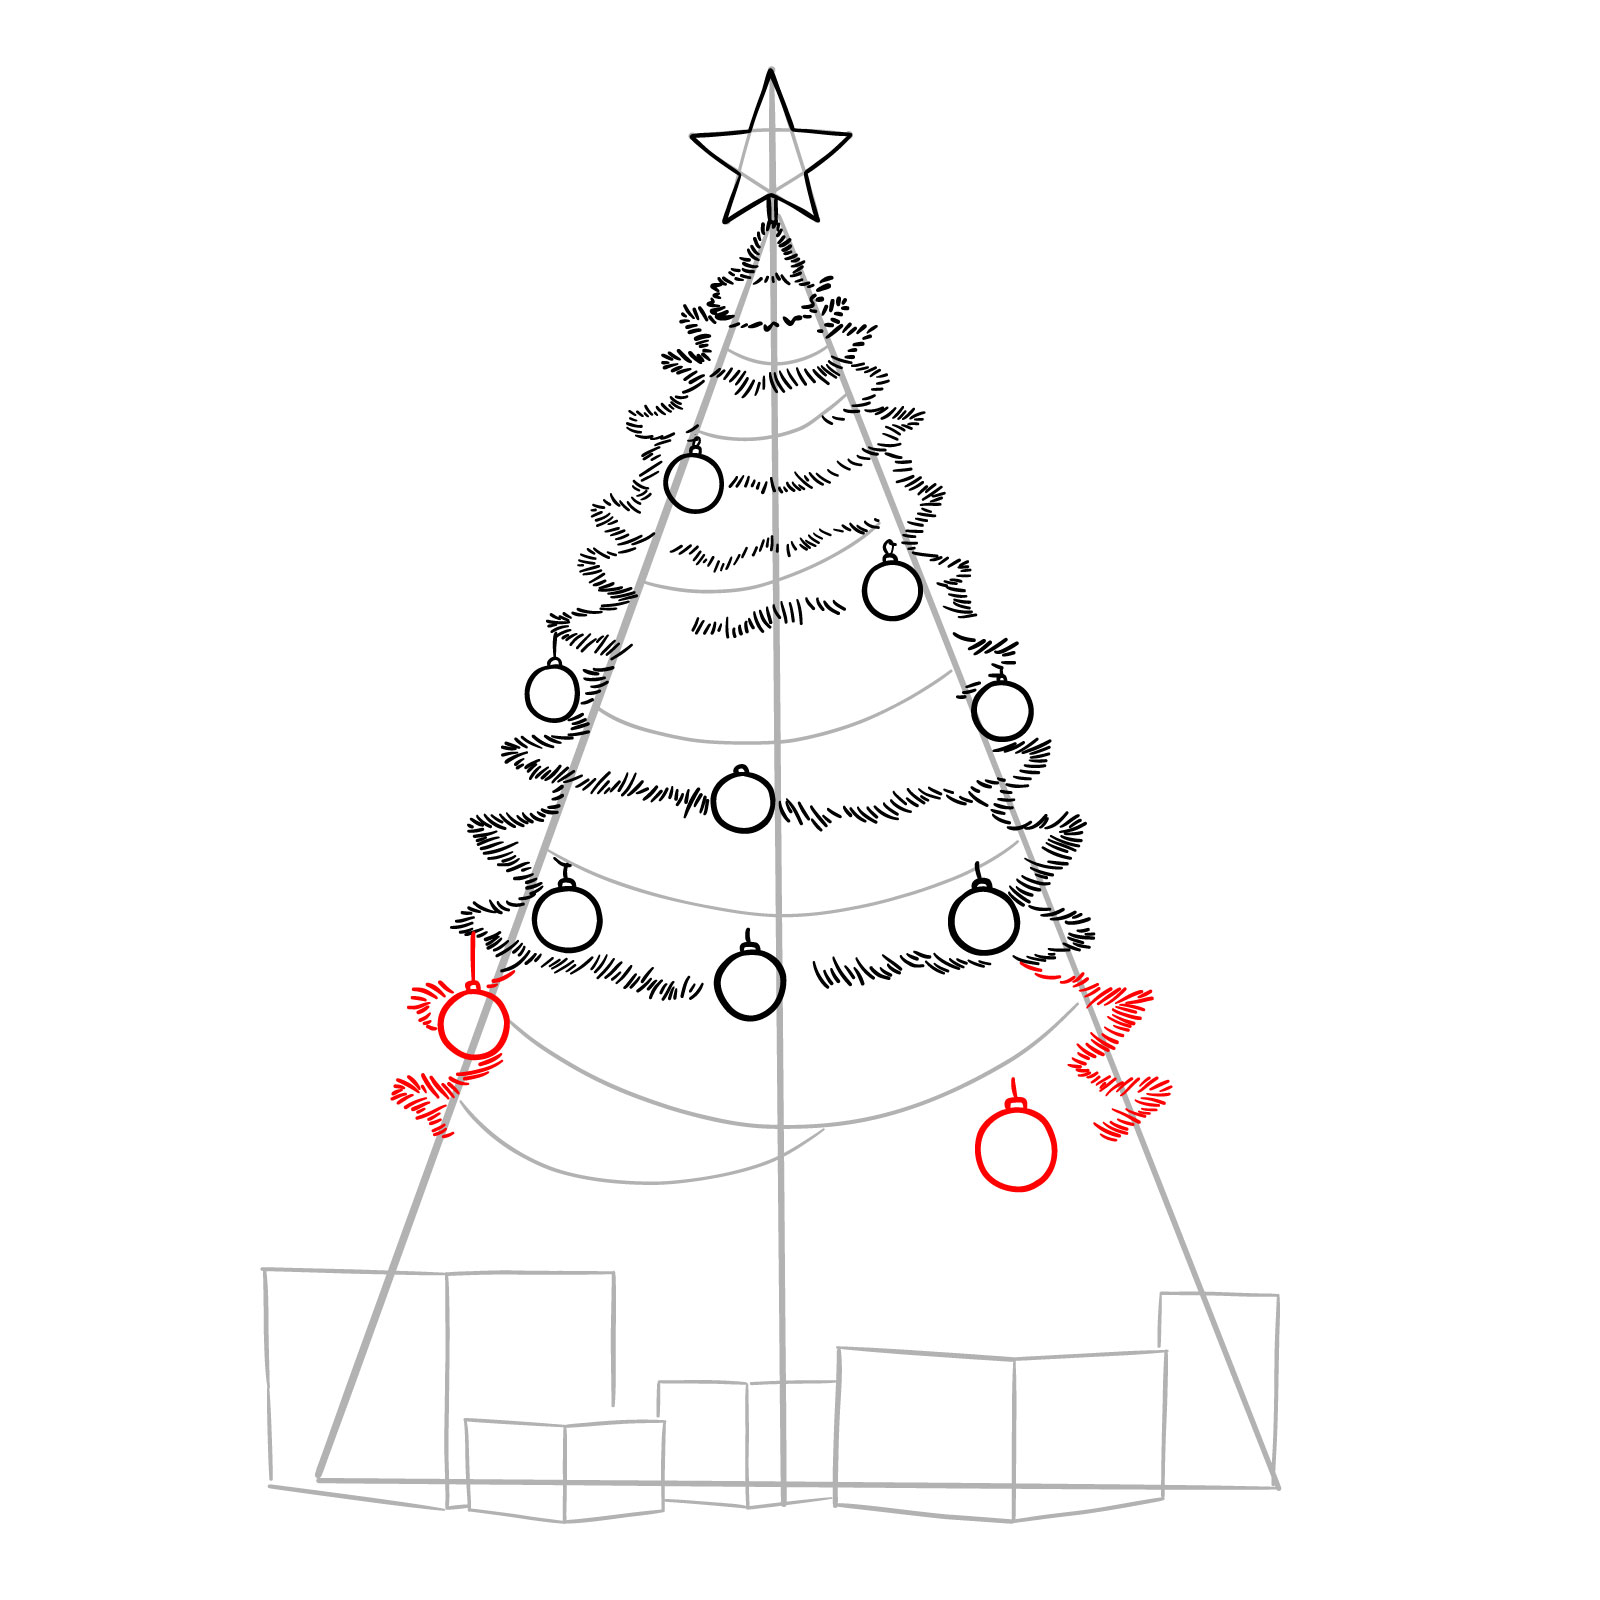
Step 11: Add two more layers to the sides of the tree and draw two additional ornaments. Note that some sections in the center and certain areas of the tree were left blank, as these will be filled with lights later. We will add these details at the final stage of the drawing.
Step 12: Move on to the gifts beneath the tree, as they are positioned in front of it and partially overlap with it. Draw one side of the box located in the center-right, focusing on its left side, and add the vertical ribbon in the middle.
Step 13: Complete the outline of the box, including the beginnings of the bow on top, focusing on the ribbon’s ends. On the right side of this box, add a round Christmas ornament positioned in front of it.
Step 14: Complete the outline of the bow on top of the first box and begin sketching the next box located to its right.
Step 15: Complete the outline of the second box and add a bow on top of it.
Step 16: Move to the boxes on the left side and draw the small box positioned between two others. Sketch the two visible sides of this box.
Step 17: Draw the bow on top of the small box and complete its outline.
Step 18: Draw the side edges of the two boxes located to the left and right of the small box you just completed.
Step 19: Add bows on top of the boxes, completing the drawing of the gift boxes.
Step 20: Complete the outline of the Christmas tree by adding one more layer of branches on each side, and add a Christmas ornament. In the center and along the edges, include additional short lines to define the tree’s levels and enhance its fullness.
Step 21: Using the curved lines drawn in Step 2 as guides, sketch the garlands along the tree. Instead of simple round bulbs, I drew shapes with multiple sharp angles to give the impression of glowing lights. Feel free to use these shapes, traditional round ones, or any other designs you prefer.
Step 22: As we near the completion of our guide on how to draw a Christmas tree with decorations and gifts, add facets to the star at the top of the tree to enhance its detail. Additionally, fill in any empty spaces with short lines to create more volume and texture for the branches and needles.
Step 23: At this stage, we have completed the main sketch and learned how to draw a Christmas tree in this more realistic style with many small details. Now, carefully erase the base sketch from Steps 1 and 2 to remove any unnecessary lines. Clean up the sketch as needed or add missing details. Optionally, you can outline the final sketch with a pen and erase all pencil marks once the ink has dried.
Step 24: In this step, I’ve provided an example of how you can color the tree. For the tree itself, I used various shades of green to add shadows and highlights. The ornaments were colored red and blue, with white highlights on the upper left side of each. The lights were painted a light yellow, and the gift boxes were done in different bright colors. Feel free to use any colors you like that suit your style and preferences.
If you found this guide helpful, consider supporting me so I can keep creating more tutorials for you.
I’d love to see your Christmas tree drawings! Share your finished art in the comments section on Pinterest. Follow me on social media for more drawing guides:
Disclaimer: All original artworks and photos used as references for the creation of these drawing tutorials are the property of their respective owners. If your work has been featured without proper credit, please kindly leave a comment below, and the issue will be promptly addressed. We greatly appreciate your exceptional art. Thank you.
Did you like the tutorial?
You can support the author of this website and also suggest your own ideas for new drawings by making a small donation here: