If you’ve ever wanted to learn how to draw an elephant’s head in side view, this guide will help you break it down into simple steps. Elephants are majestic animals with distinctive features that make them a fascinating subject to draw. Let’s go through their details step by step.
Key Features of an Elephant’s Head
Large, fan-shaped ears that dominate the side profile.
A long, textured trunk with subtle curves and wrinkles.
Curved tusks protruding from the sides of the mouth.
Small, expressive eyes.
Thick skin with visible wrinkles.
After completing this elephant head drawing, you might enjoy sketching other animals like lions and wolves to build a wildlife-themed collection. Or check the guides for the elephant front view drawings – head and full body.
Step-by-Step Guide and Color Guidelines
Red Color: Highlights the step you are currently working on.
Black Color: Represents the lines you’ve already completed in earlier steps.
Grey Color: Shows the basic sketch framework.
These color-coded instructions will help you stay on track and make the drawing process straightforward and clear.
Step 1: This guide has 13 steps, and we’ll start by creating a basic sketch in the first two steps. Use light pencil lines for easy erasing later. In this step, draw a circle as the base of the elephant’s head. Add a curved horizontal line through the center of the circle. From the bottom right side, sketch the general shape of the trunk, keeping it loose and not too defined.
Step 2: Continue shaping the elephant’s head by adding a small mark slightly right of the circle’s center on the horizontal line to indicate the eye position. Then, as shown in the image, sketch basic lines at the bottom of the circle to outline the tusk.
Step 3: Using the basic sketch as a guide, more clearly define the shape of the tusk.
Step 4: Add the outline of the elephant’s head, focusing on the side and back portion up to the ear, as shown in the image.
Step 5: Draw the top part of the head, including the elephant’s forehead. Then add several curved lines to depict the front part of the trunk, extending to where it overlaps the tusk. Use these lines for texture.
Step 6: Continue outlining the elephant’s trunk, using angular lines to depict the front part and its skin’s texture, while smoothly outlining the rest.
Step 7: Add several simple curved lines inside the circle to further define the shape of the head. Also, include a crescent-shaped line above the eye mark to show the form around the eye.
Step 8: In the area where we marked the eye, draw a semicircle peeking from under the crescent line, leaving a small uncolored area for the highlight. Add lines to indicate the upper and lower eyelids, and a few more lines above for the forehead and temple area.
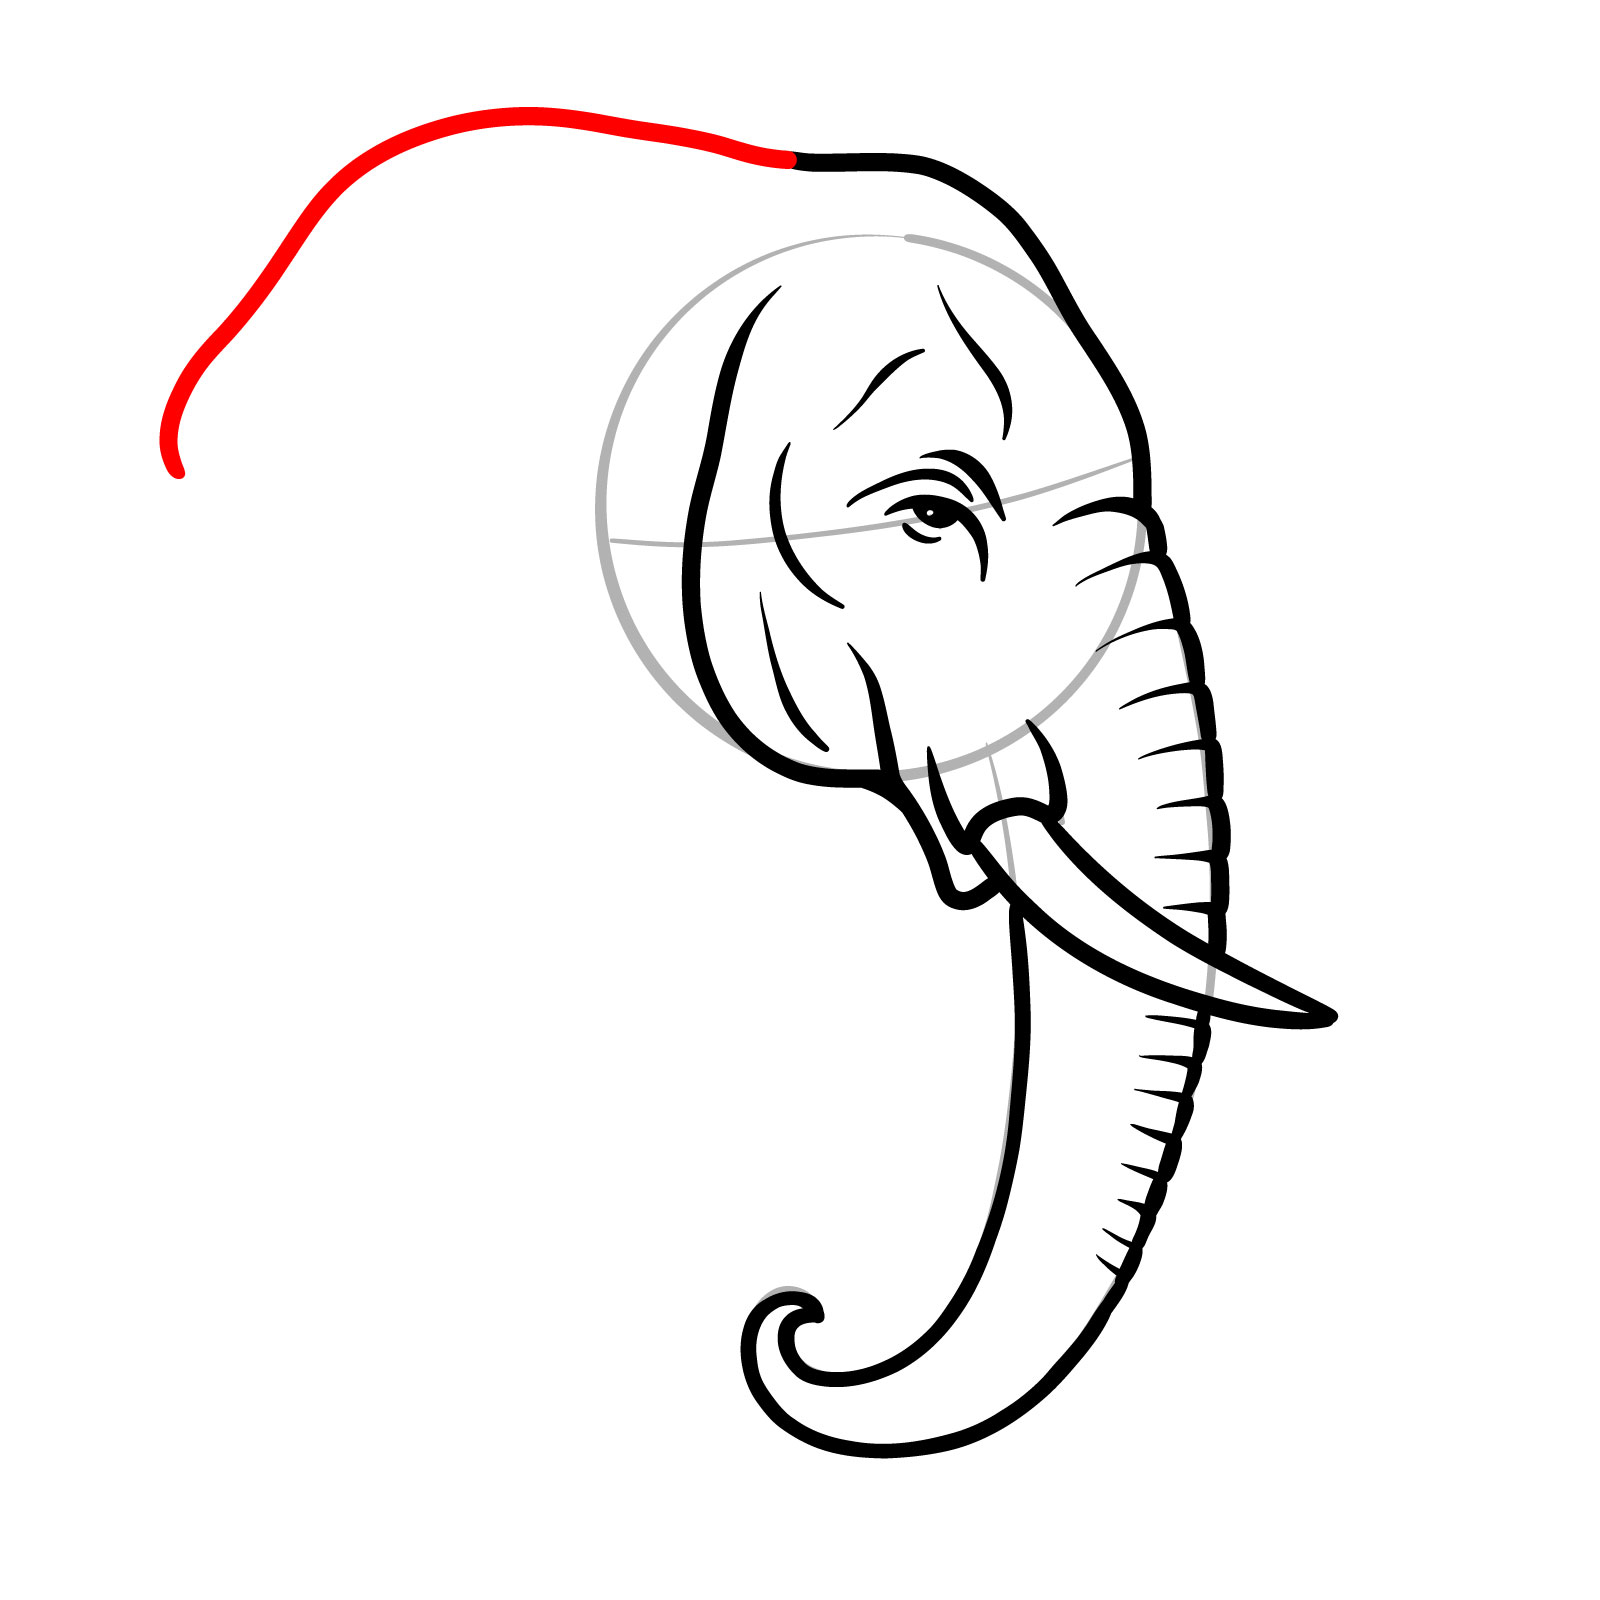
Step 9: Begin drawing the elephant’s ear by extending the line from the top of the head and forehead, curving it leftward and downward to form the upper part of the ear.
Step 10: Complete the ear outline by adding the lower part and a curved arc on the upper section for shape. Add a series of lines on the lower part to indicate folds.
Step 11: Add a few simple lines on the ear’s upper part to show shape and folds. To the right of the ear line, add another line along the head for form. Add a line on the tusk for detail, and a few slightly curved lines on the trunk’s lower part for texture.
Step 12: At this stage, we have created the side view drawing of an elephant’s head. Carefully erase the basic sketch lines from the first two steps and refine any details that need adjustments, removing any excess lines and smudges.
Step 13: This concludes our guide on how to draw an elephant’s head side view. You can optionally color your drawing. I used a brownish earthy color for the entire drawing and added some shading. Feel free to use your own colors or follow the example provided.
Don't Miss New Tutorials! Follow SketchOk
I publish new step-by-step drawing guides every single day. Follow on your favorite platform so you never miss a tutorial. Thousands of artists are already drawing along and I can't wait you to join in!
On my Patreon you can grab unique hand-made coloring pages: each one drawn by me personally. Every purchase directly supports the creation of new drawing tutorials. It's the best way to practice your skills, keep the site going, and get something truly original at the same time.
If you want fresh drawing guides sent straight to you each week, the signup form at the top of this page is the easiest way to stay in the loop without having to check back manually. That way, tutorials like how to draw an elephant’s head in detail will land in your inbox as soon as they go live. You can also find the elephant head guide pinned on Pinterest, where other readers drop their finished drawings in the comments.
Vector illustrator and the creator of Sketchok.com and TheHowToDraw.com. I publish free step-by-step drawing tutorials to help people of all levels learn to draw.
Disclaimer: This is a non-commercial, fan-made educational site. All characters belong to their respective owners. We are not affiliated with any rights holders.
Read full Disclaimer