Hello everyone! Today, we’re going to explore how to draw male paladins. This tutorial is designed to guide you through four distinct styles. We’ll start with a simple cartoon-style paladin, perfect for those just starting out. Next, we’ll step up the complexity with a more detailed cartoon paladin (somewhat Disney style). For our third guide, we’ll tackle a realistic paladin donned in a traditional knight helmet, adding a touch of authenticity to our drawing. Finally, we’ll challenge ourselves with the most complex guide: a detailed depiction of a paladin without a helmet, focusing on intricate armor details and facial features. So grab your pencils, and let’s get started on this drawing adventure together! But if you’re new to SketchOk, I’d recommend you to take a quick look at the next point about the structure of the guides.
Each guide consists of a series of images, each designed to show a different step in the drawing process of male paladins. By following these images in order, you’ll see your drawing gradually develop from a simple sketch to a detailed and polished final piece.
Red Color: Highlights the current step you should focus on in each image.
Black Color: Indicates the lines from previous steps, helping you see how your drawing has progressed.
Grey Color: Shows the basic sketch, which is the foundation of your drawing.
We’ll start with a basic sketch that sets the structure and proportion of your paladin. The final step offers an option to ink your sketch. Inking adds a clean, defined edge to your drawing, making it stand out. After the ink dries, it’s important to gently erase the underlying pencil marks to avoid smudging, giving your artwork a neat and professional appearance.
Simple Cartoon Paladin – Beginner’s Guide
This first guide is designed for beginners and is the simplest among the four. Unlike the other guides, we’ll start drawing immediately without first creating a basic proportional sketch. The style of this paladin is straightforward, akin to a simple cartoon or perhaps even a game-style character. This approach makes it particularly accessible for those new to drawing.
The guide consists of 15 steps, each one building upon the last to gradually form a complete and charming cartoon paladin. By the end of this guide, you’ll have a fun and stylized character, perfect for those just starting their journey in the world of art.
Step 01 – Draw an oval shape with a narrow, arrow-like extension pointing downwards to represent the lower part of the face visible from the helmet’s opening
Drawing the paladin’s face outline
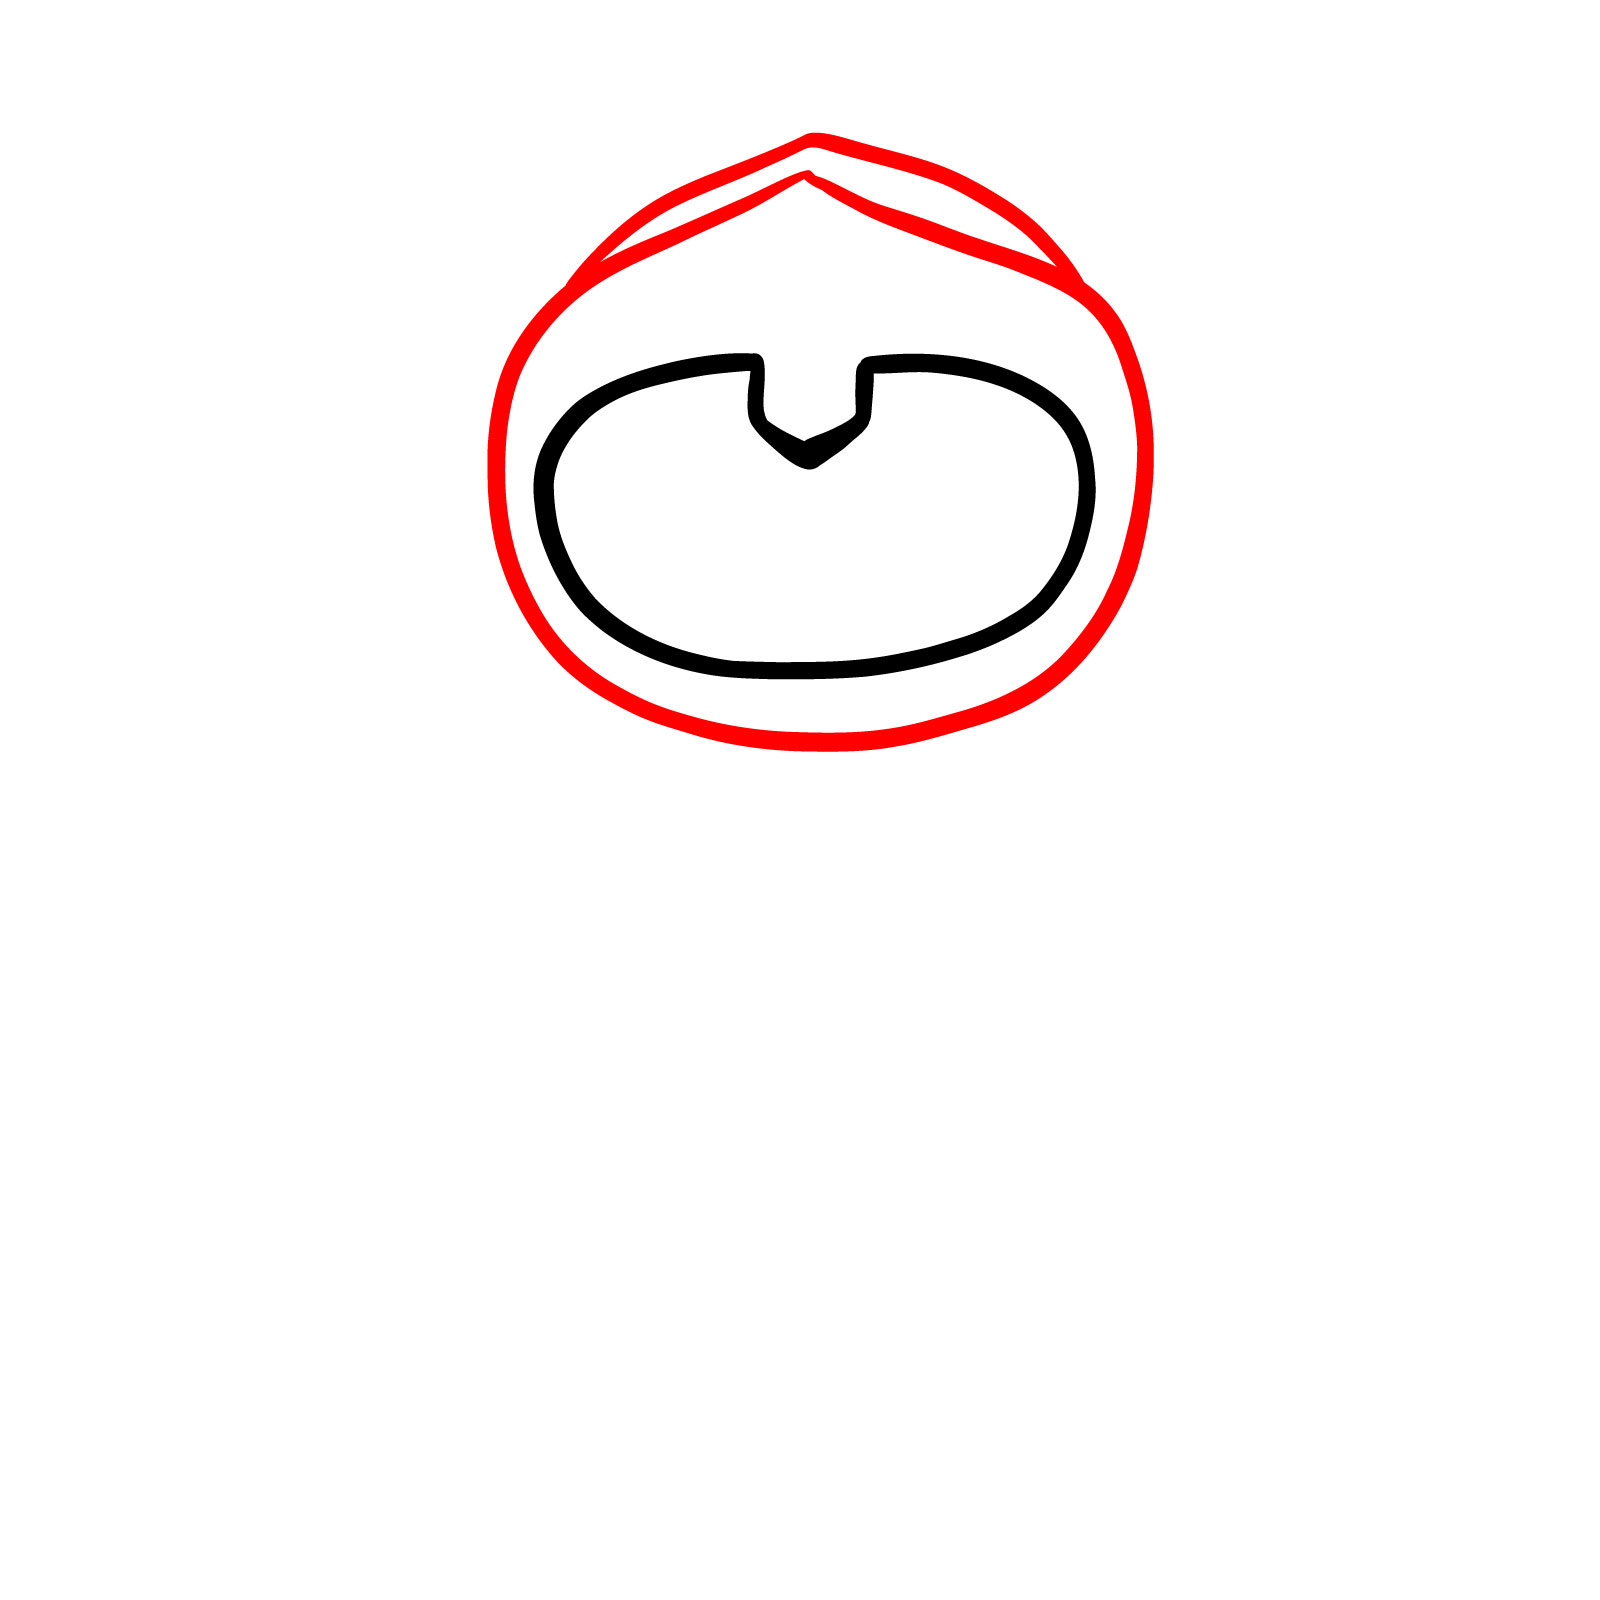
Step 02 – Create a wide, drop-like shape around the head to form the overall helmet, encompassing the initial face outline
Sketching the helmet’s shape
Step 03 – Draw two large, filled-in ovals for the eyes. Add a gentle, curved line between the bottoms of the eyes for a smile. Include several oval shapes or bold short lines above the eyes for ventilation marks on the helmet’s forehead area
Adding facial features
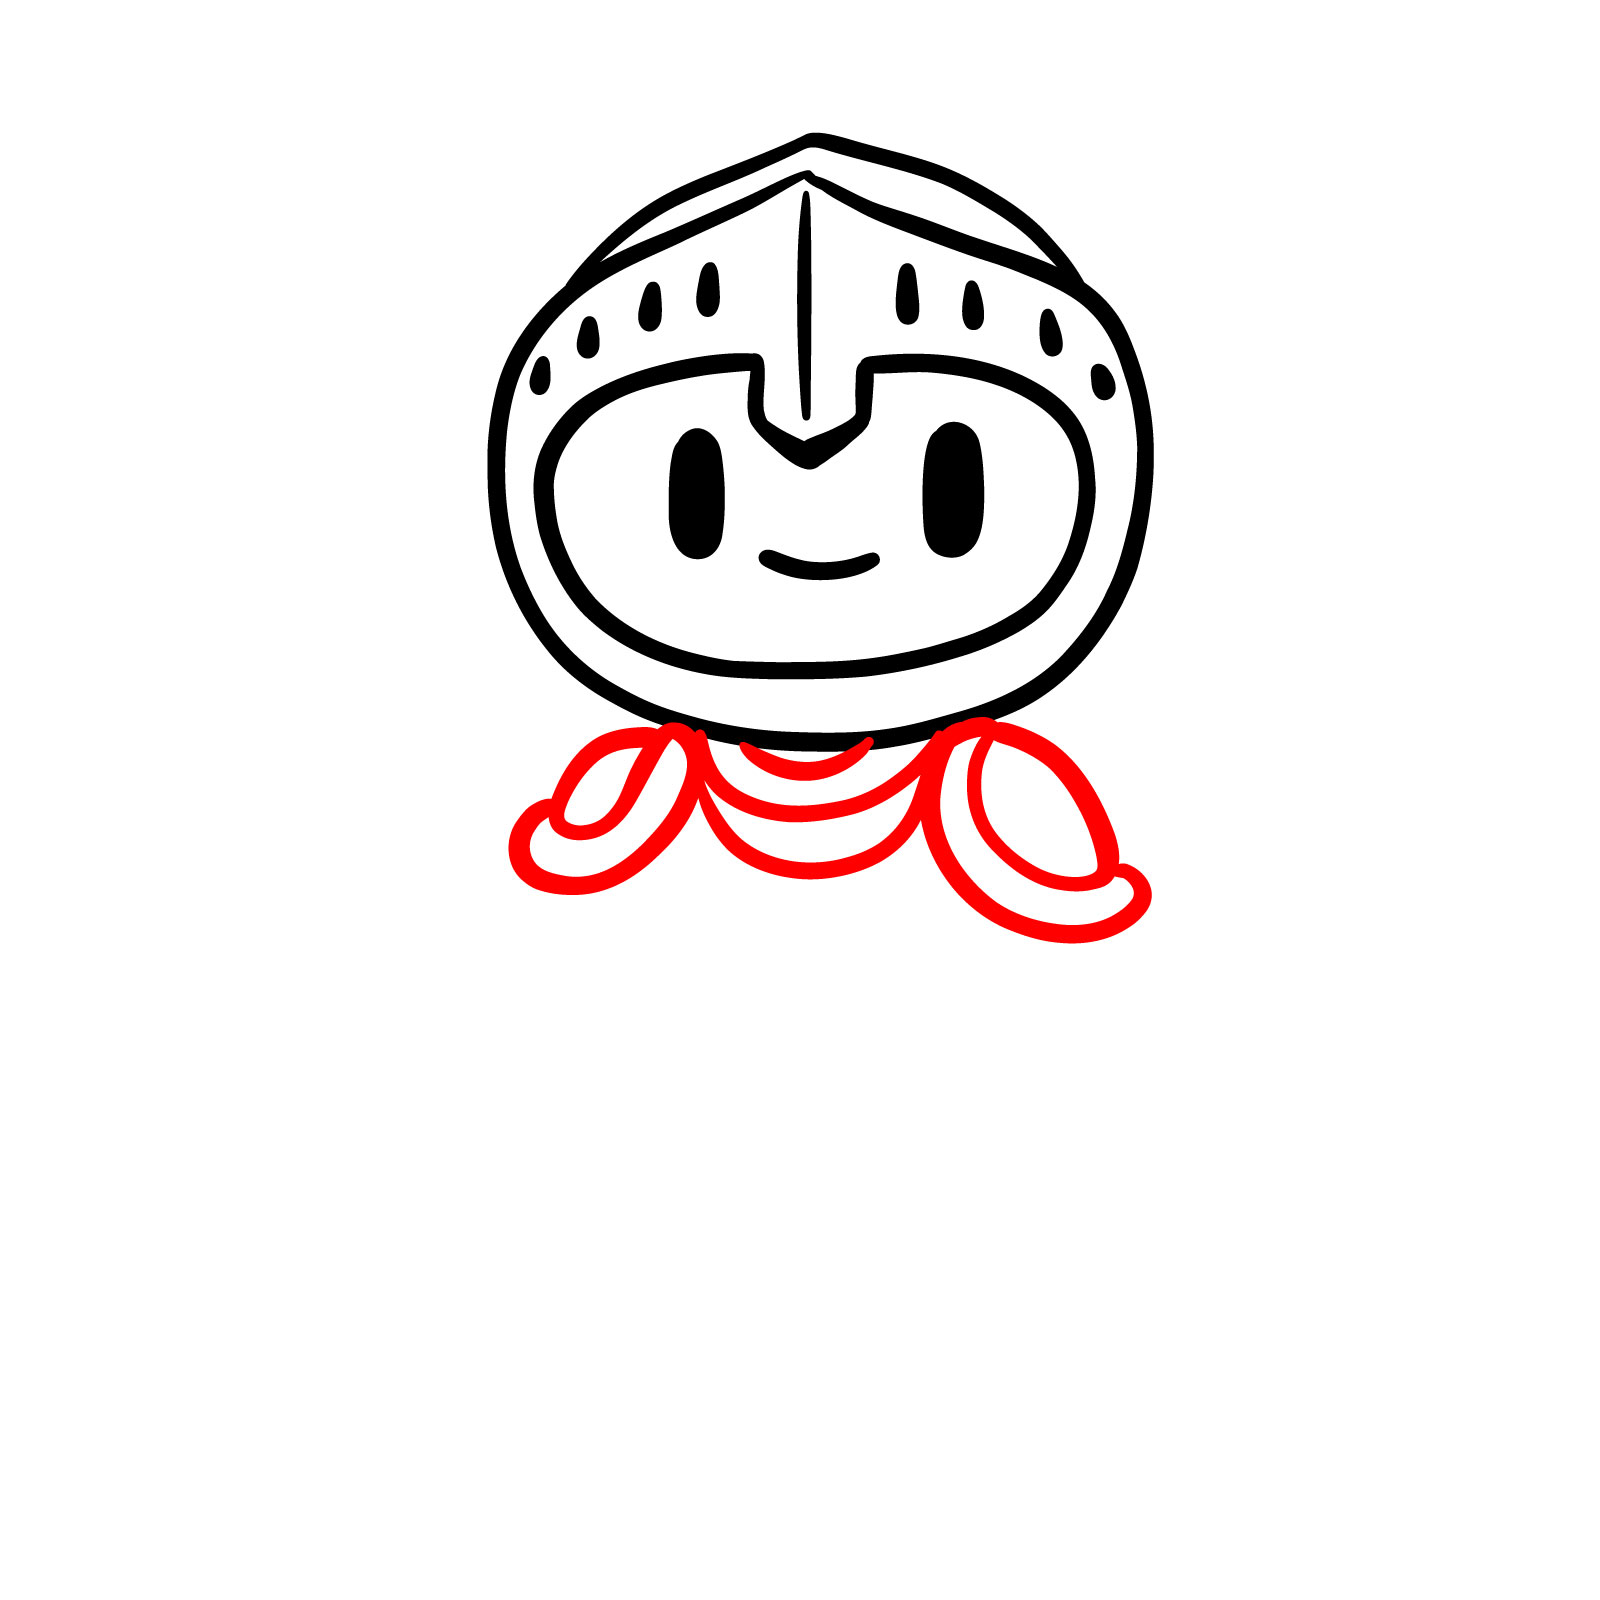
Step 04 – Sketch the neck connecting the head to the shoulder armor, which should be broad and slightly curved over the shoulders
Outlining neck and shoulder armor
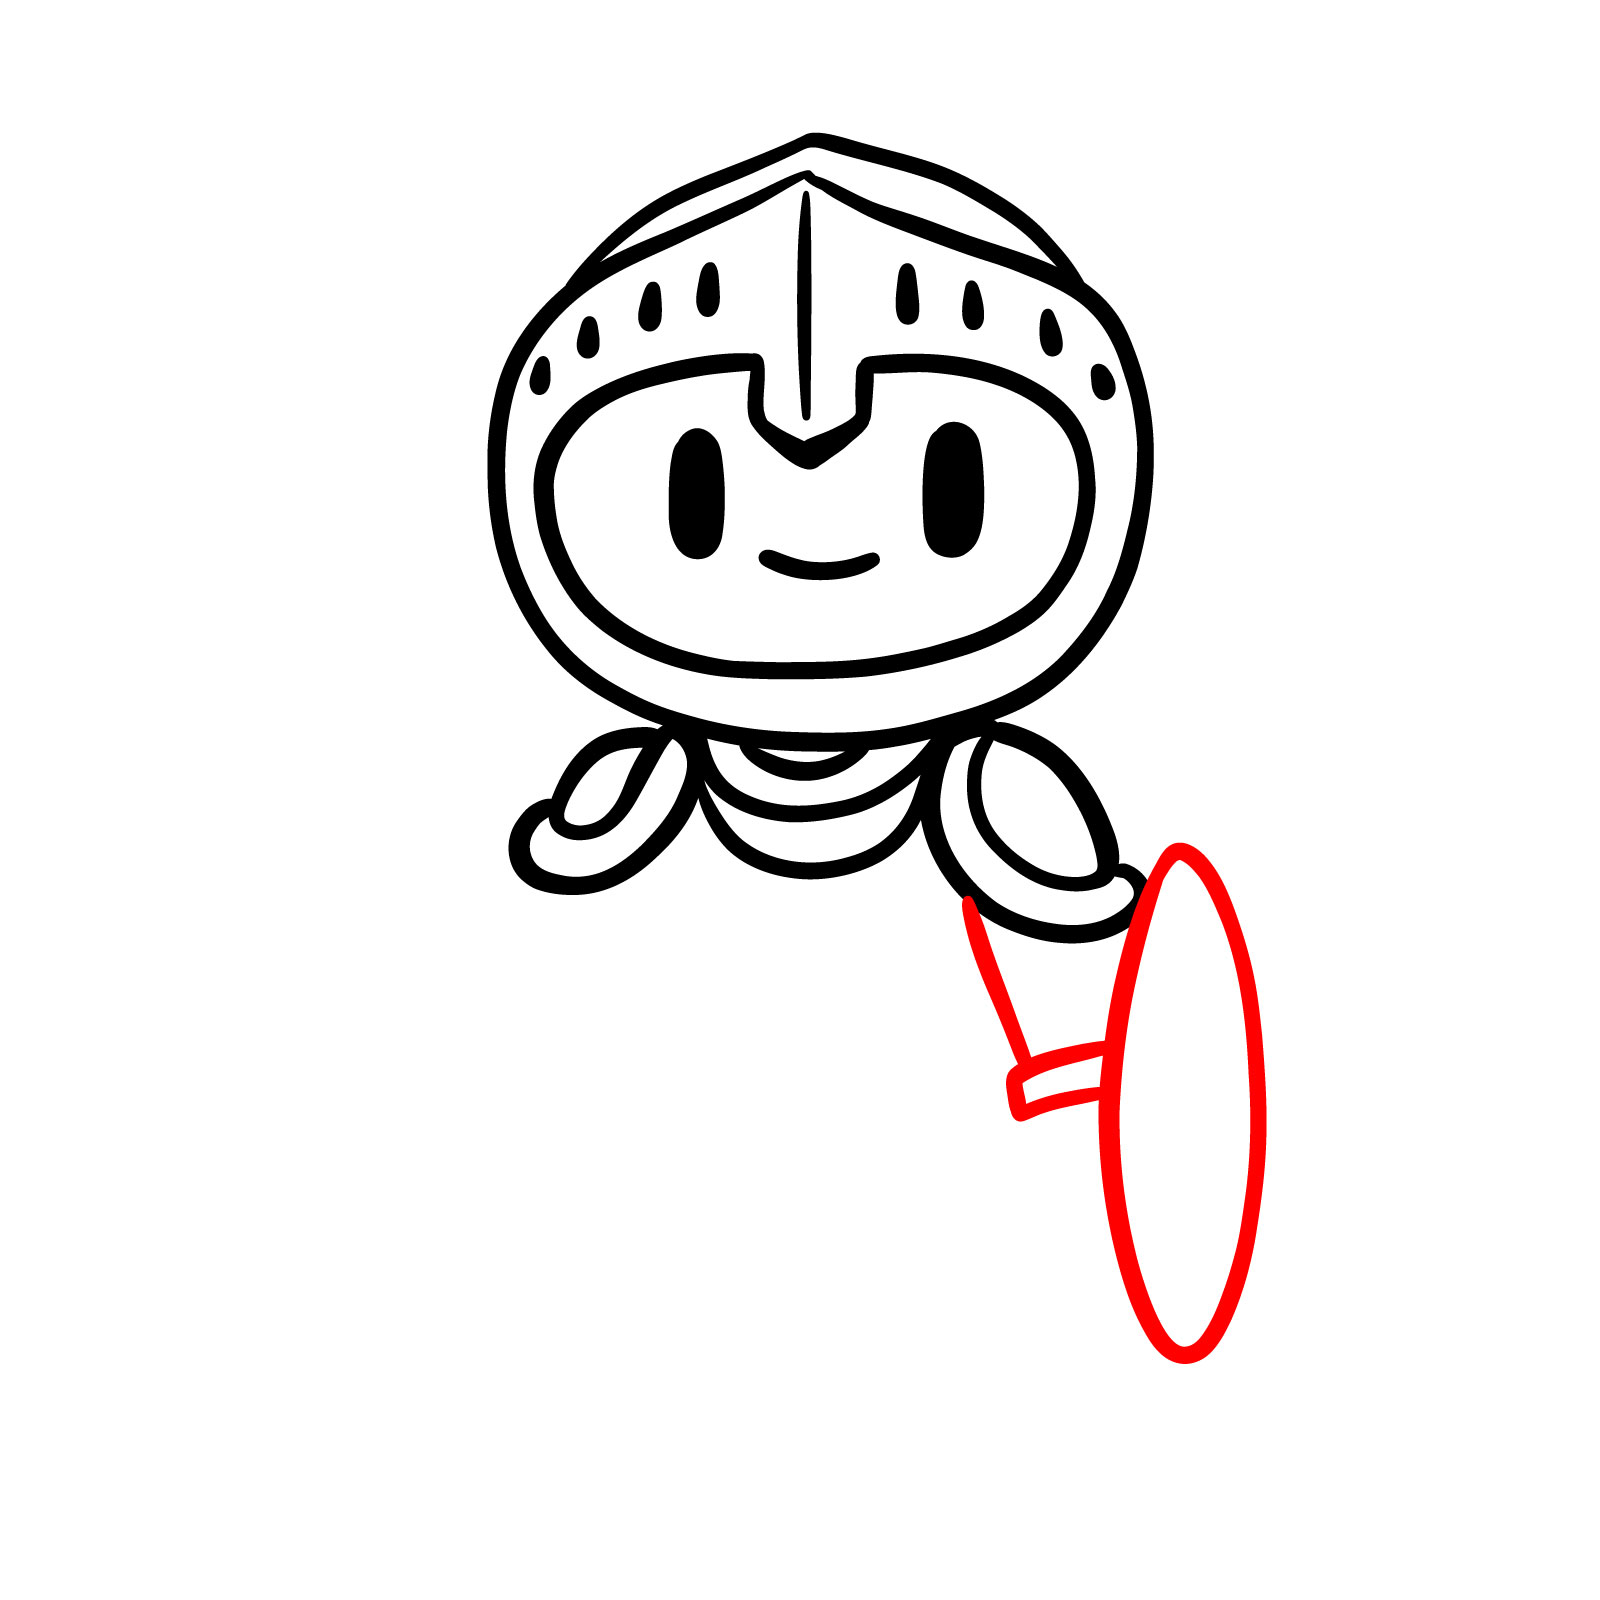
Step 05 – Draw the outline of the arm from the shoulder down to the elbow, and sketch the shape of a shield mounted on the forearm
Drawing the arm and shield
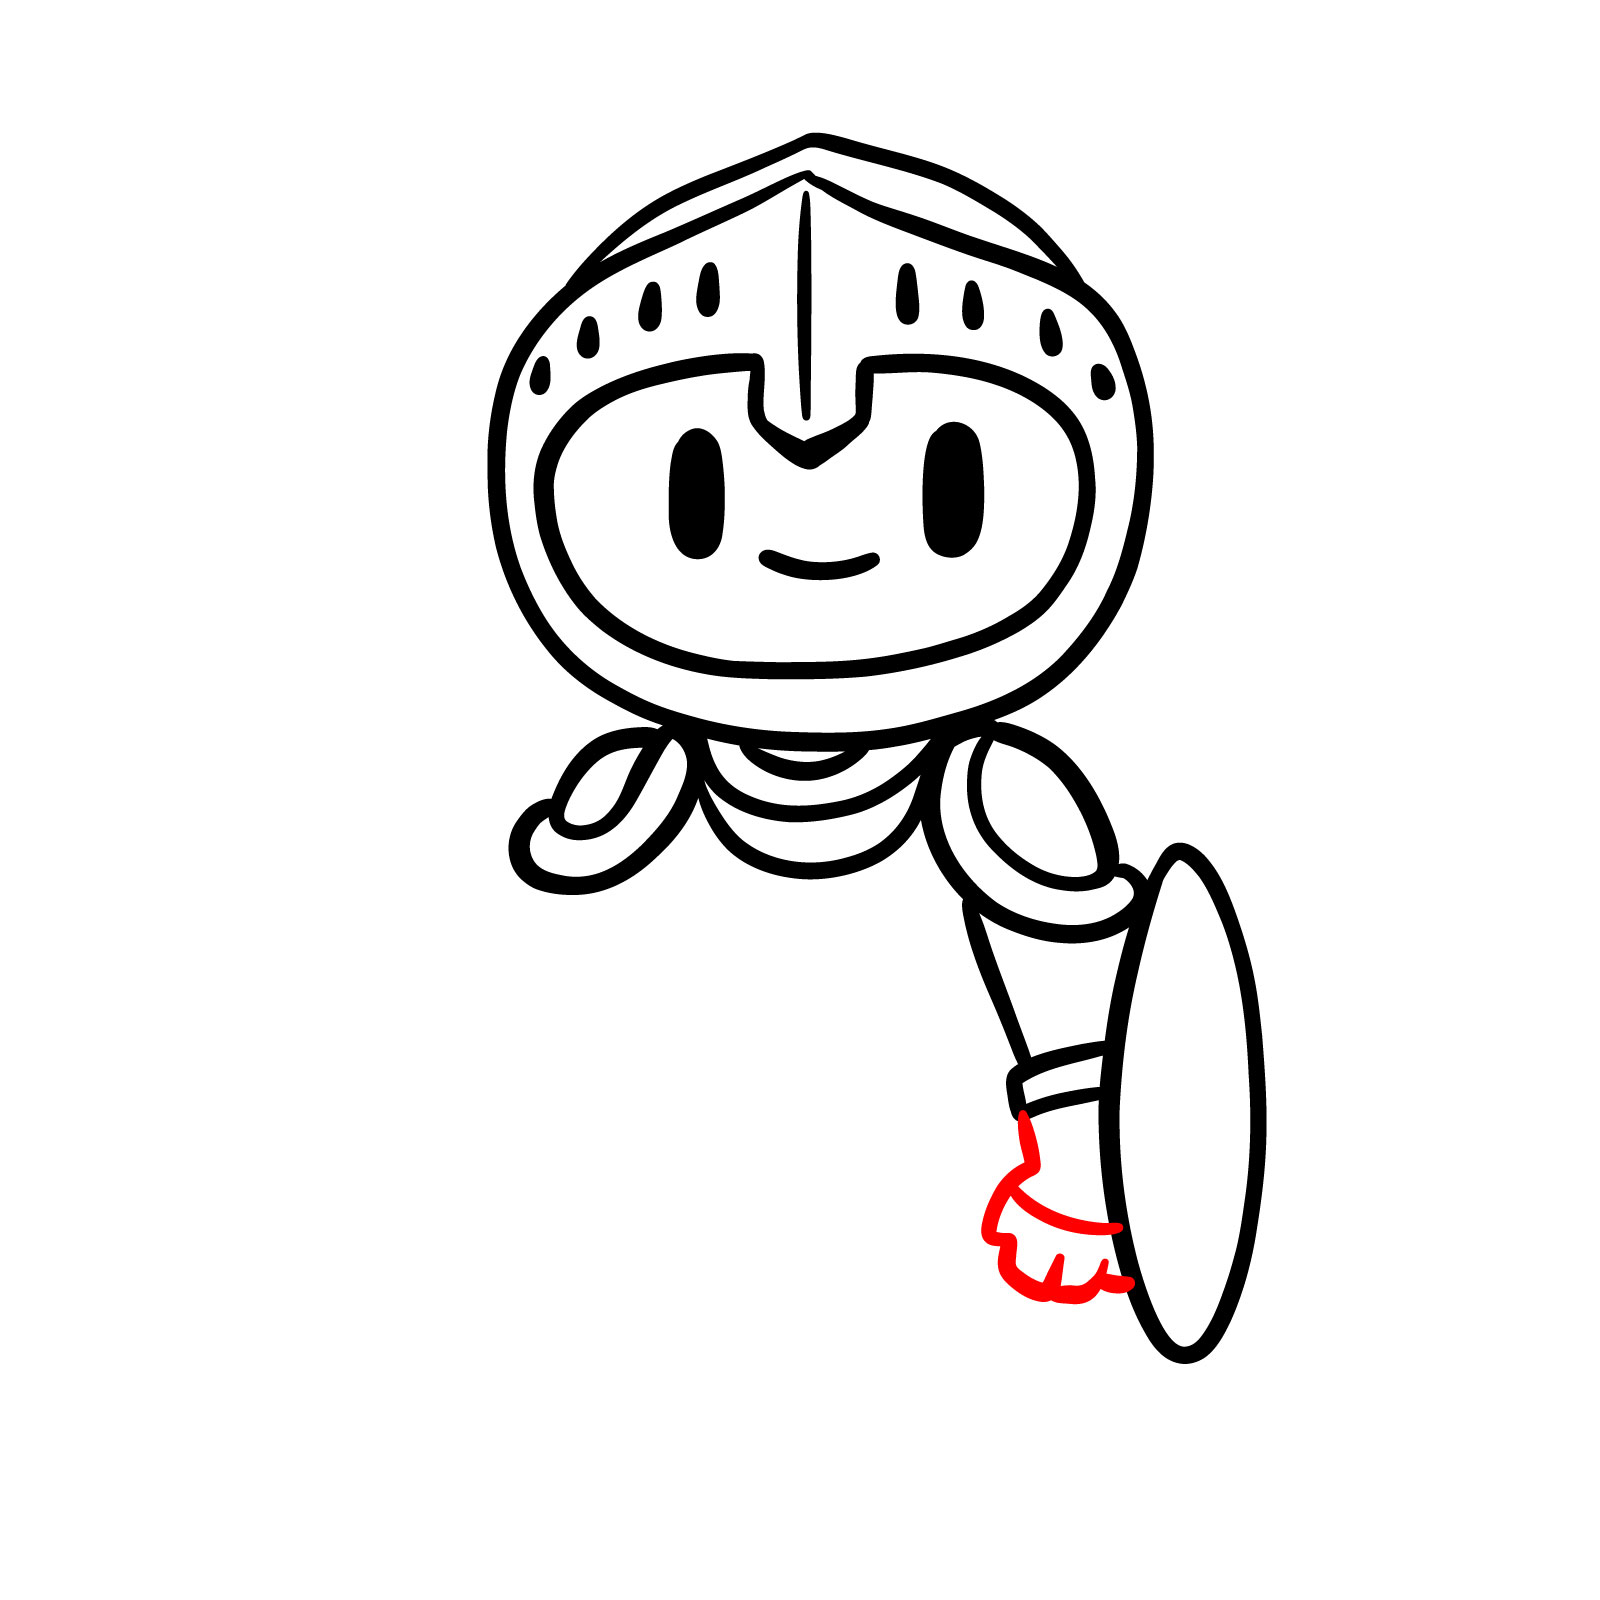
Step 06 – Continue the arm’s outline from the elbow to the hand, forming a fist. Add lines to define fingers clenched around the shield’s handle
Finishing the arm details
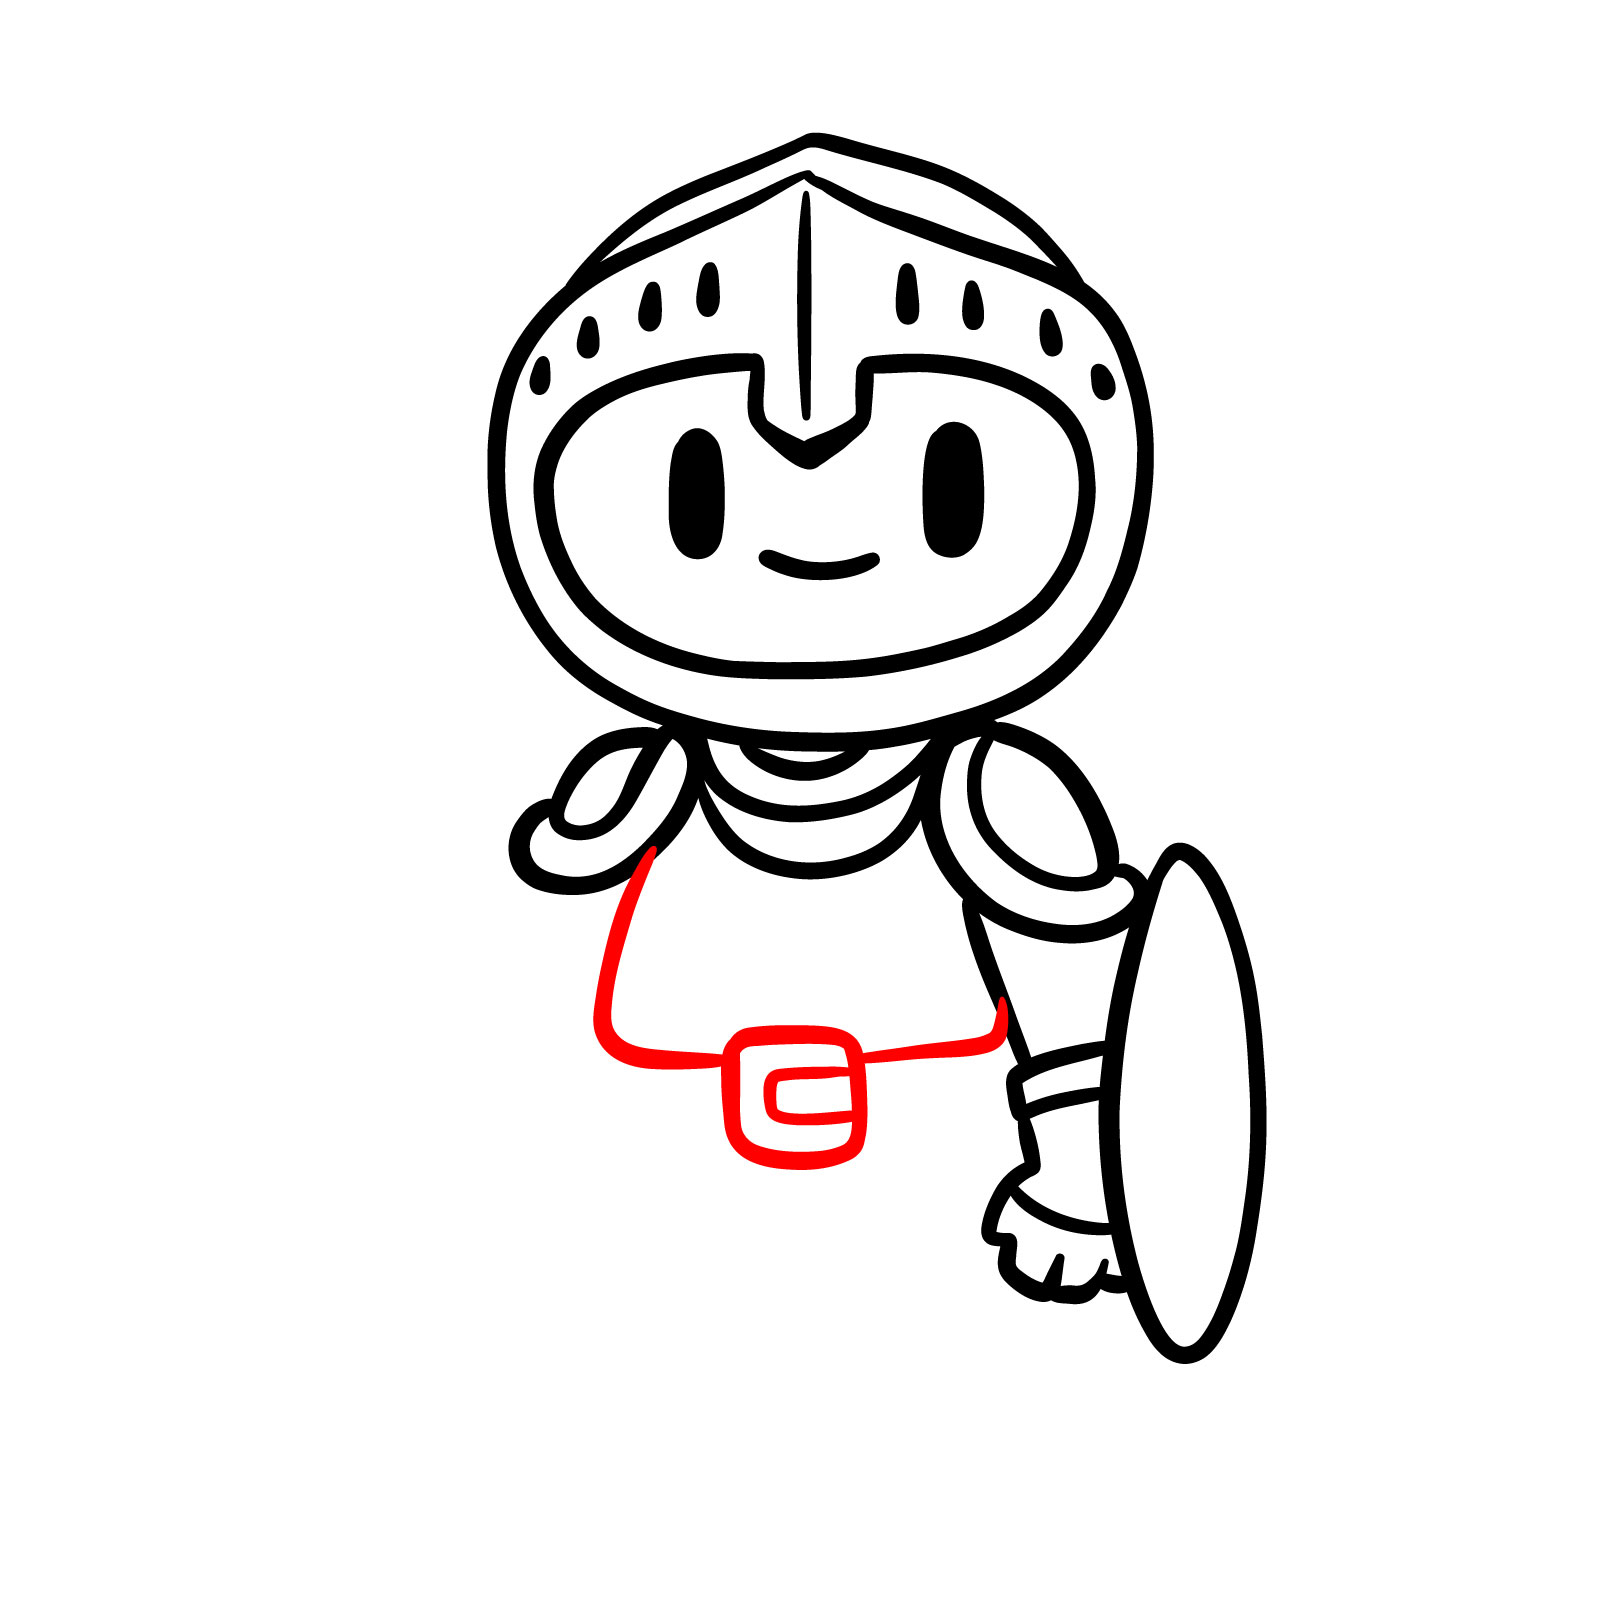
Step 07 – Draw the upper body down to the waist, adding a prominent belt buckle at the center of the waist
Sketching the torso and belt
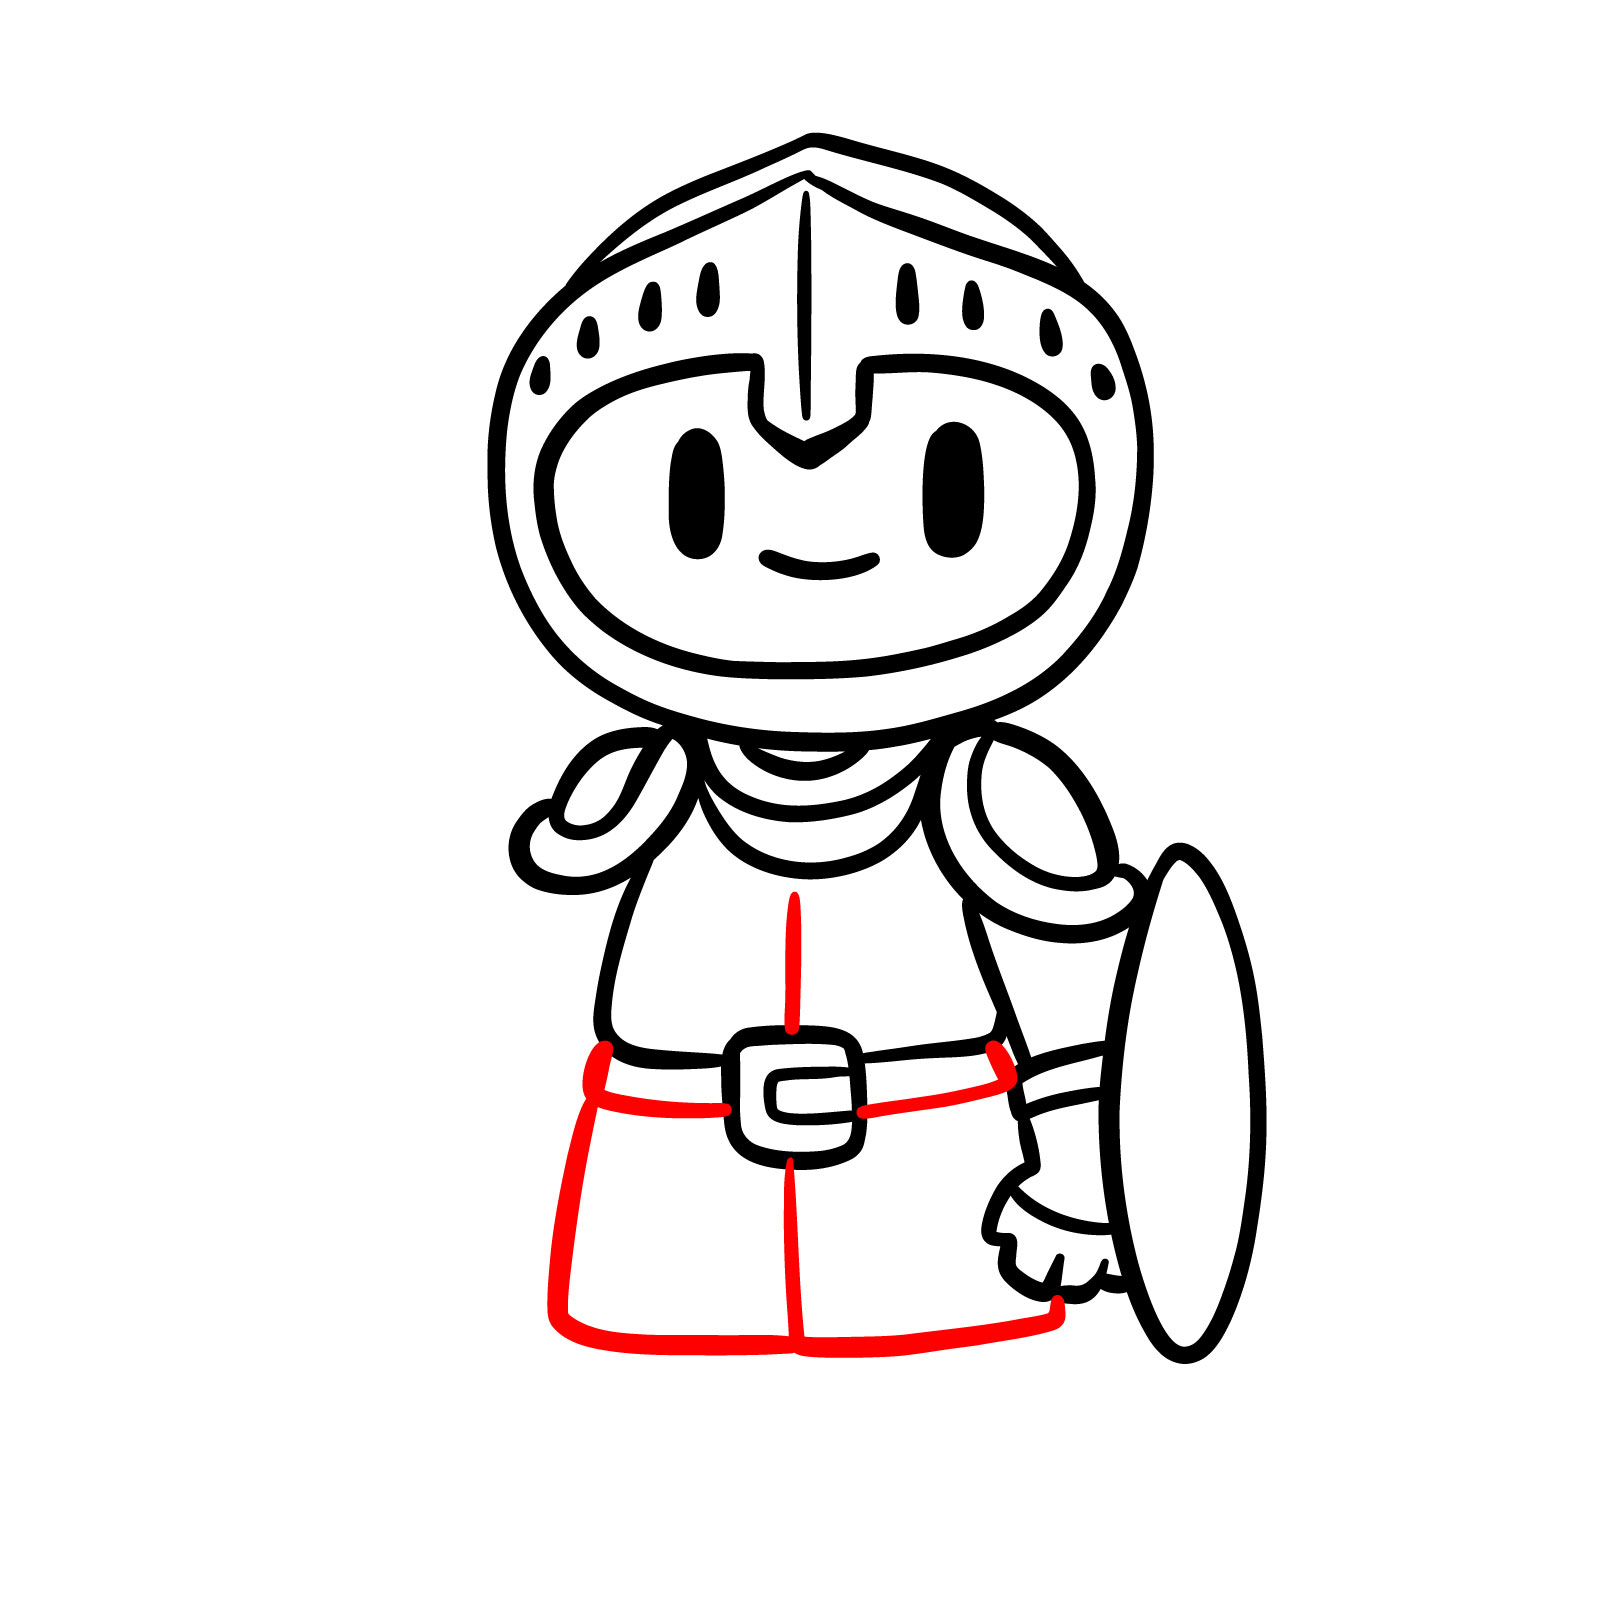
Step 08 – Shape the belt around the waist and extend lines downward to sketch out the tunic, which drapes over the legs
Outlining the belt and tunic
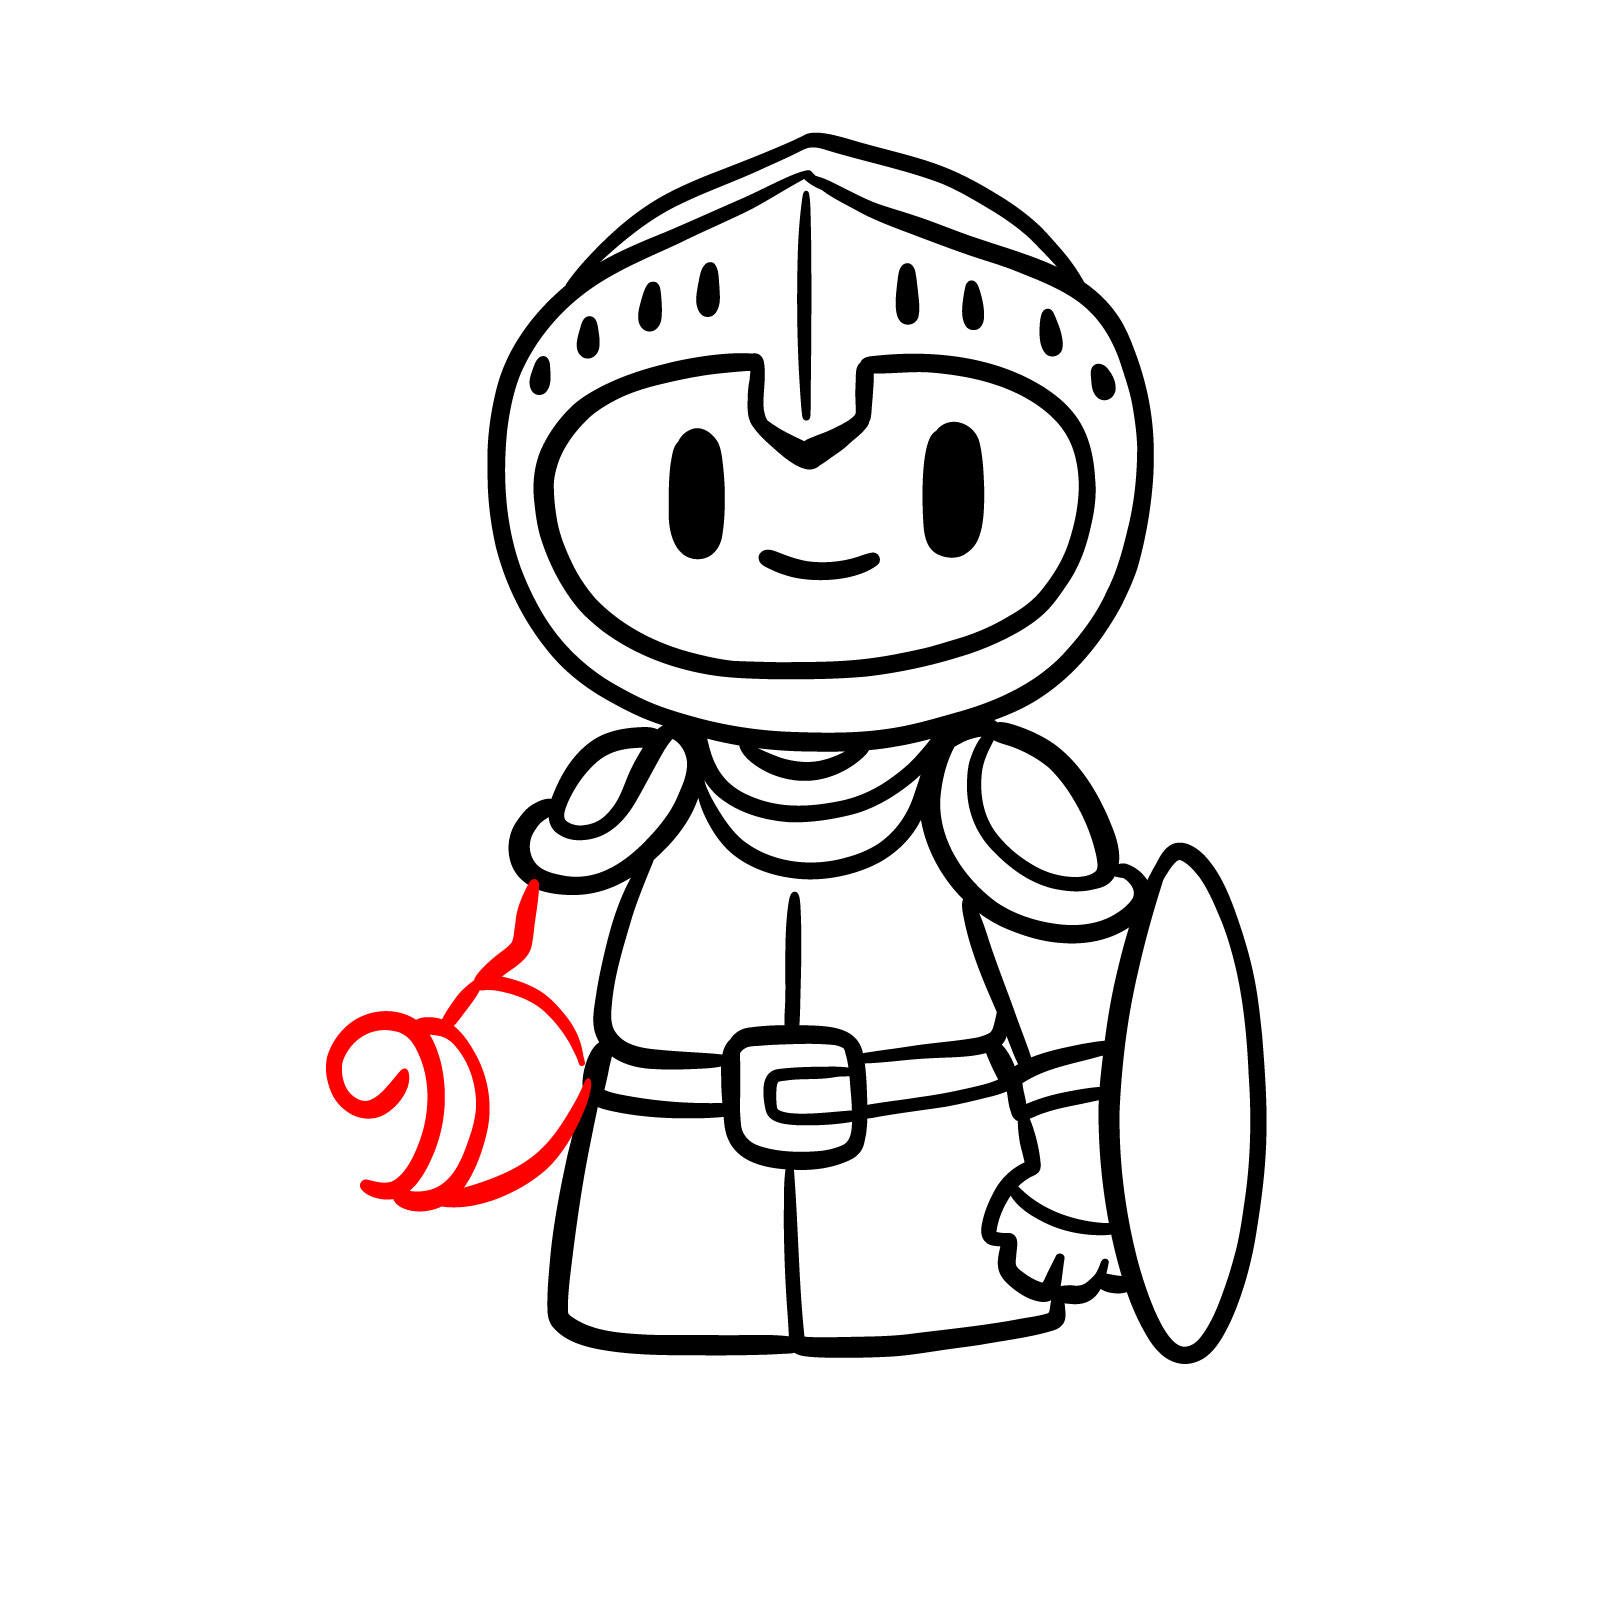
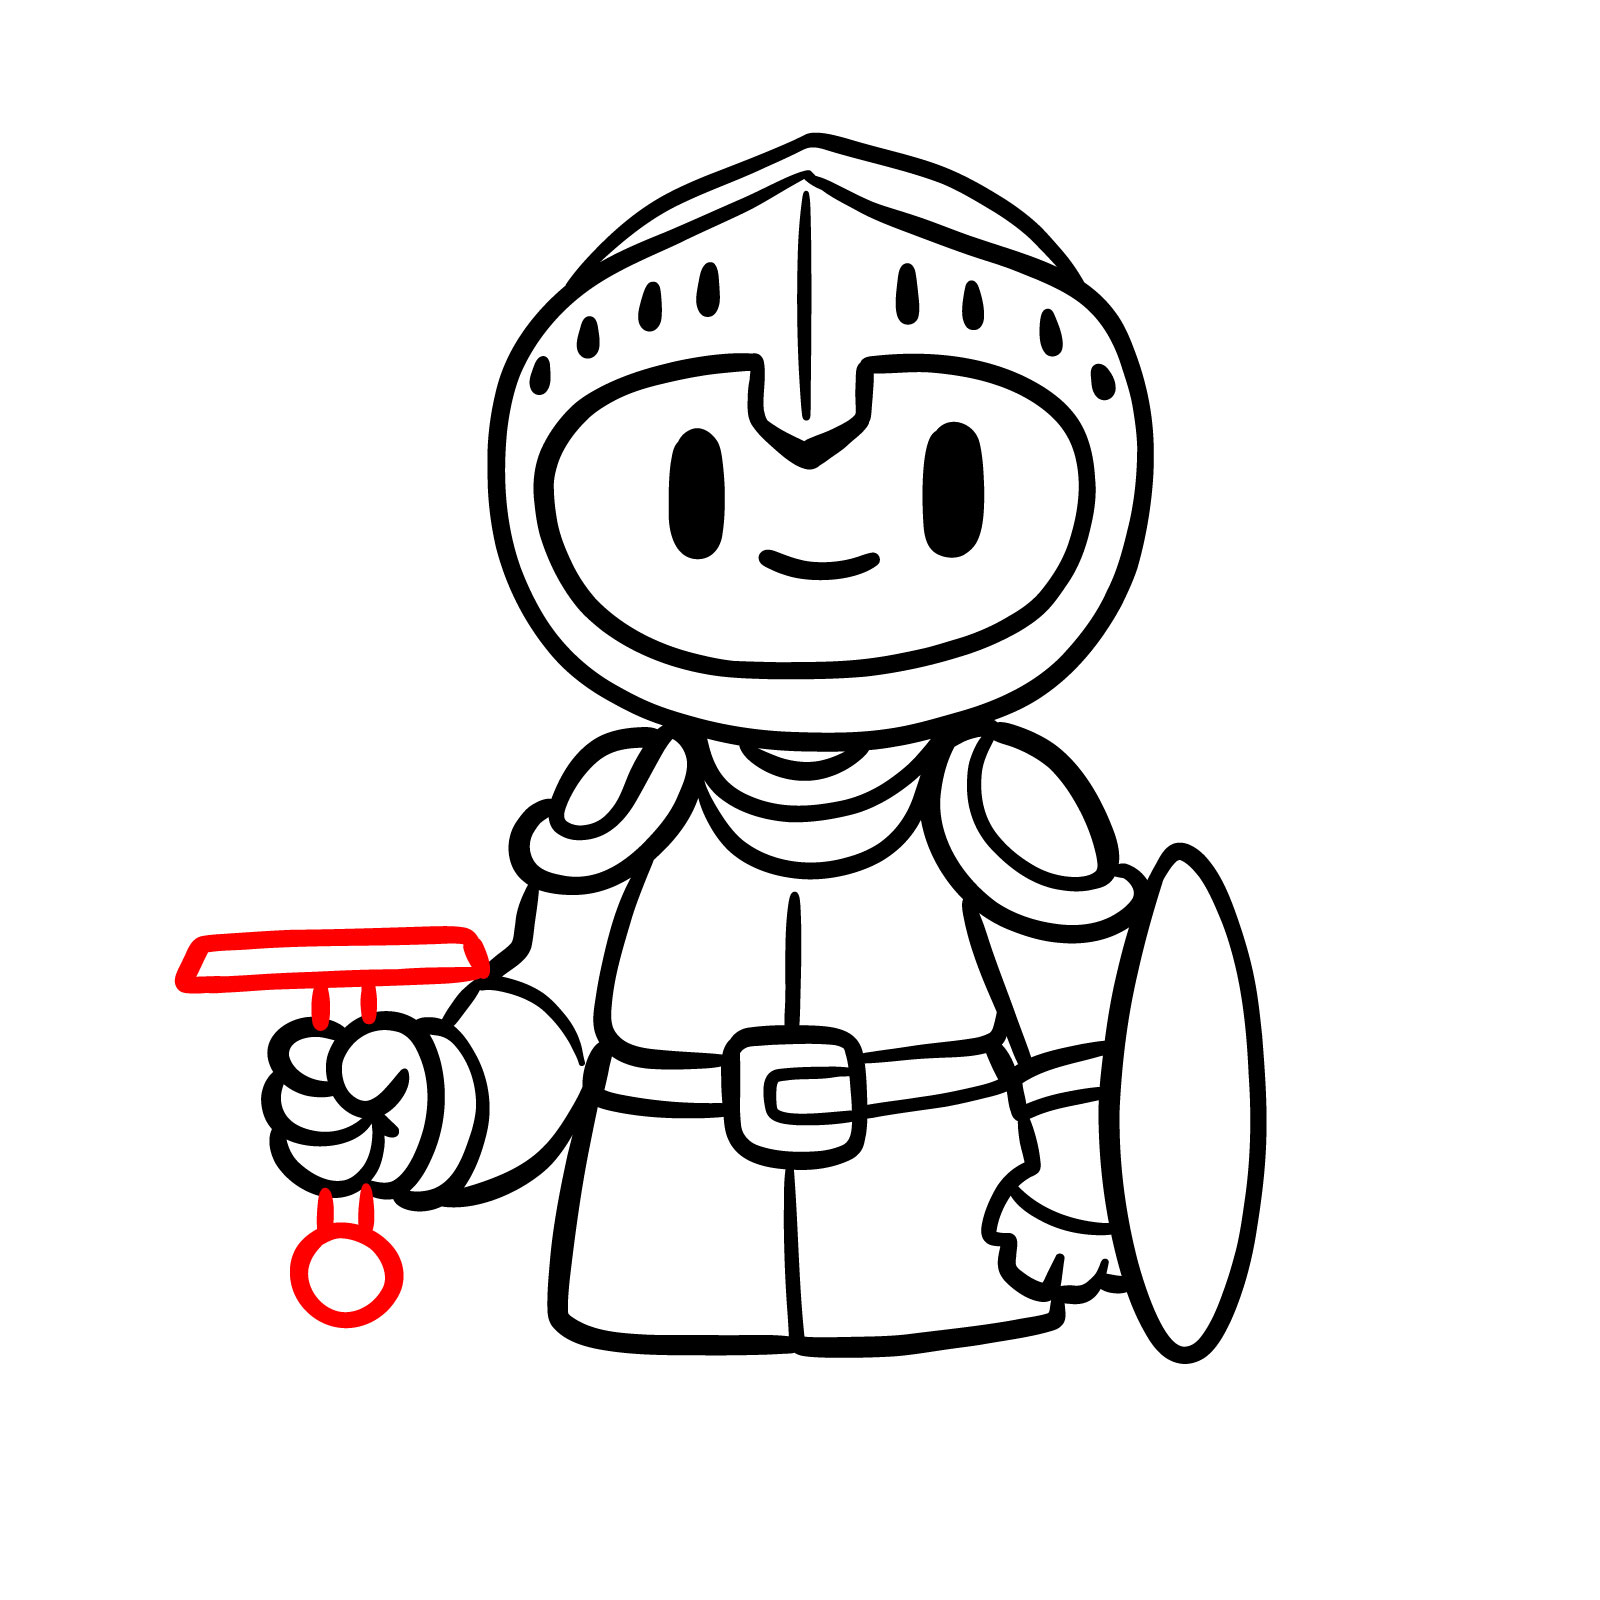
Step 09 – Draw the outline of the second arm and begin sketching the hand by adding the thumb, positioned to later grasp a sword
Sketching the second arm and thumb
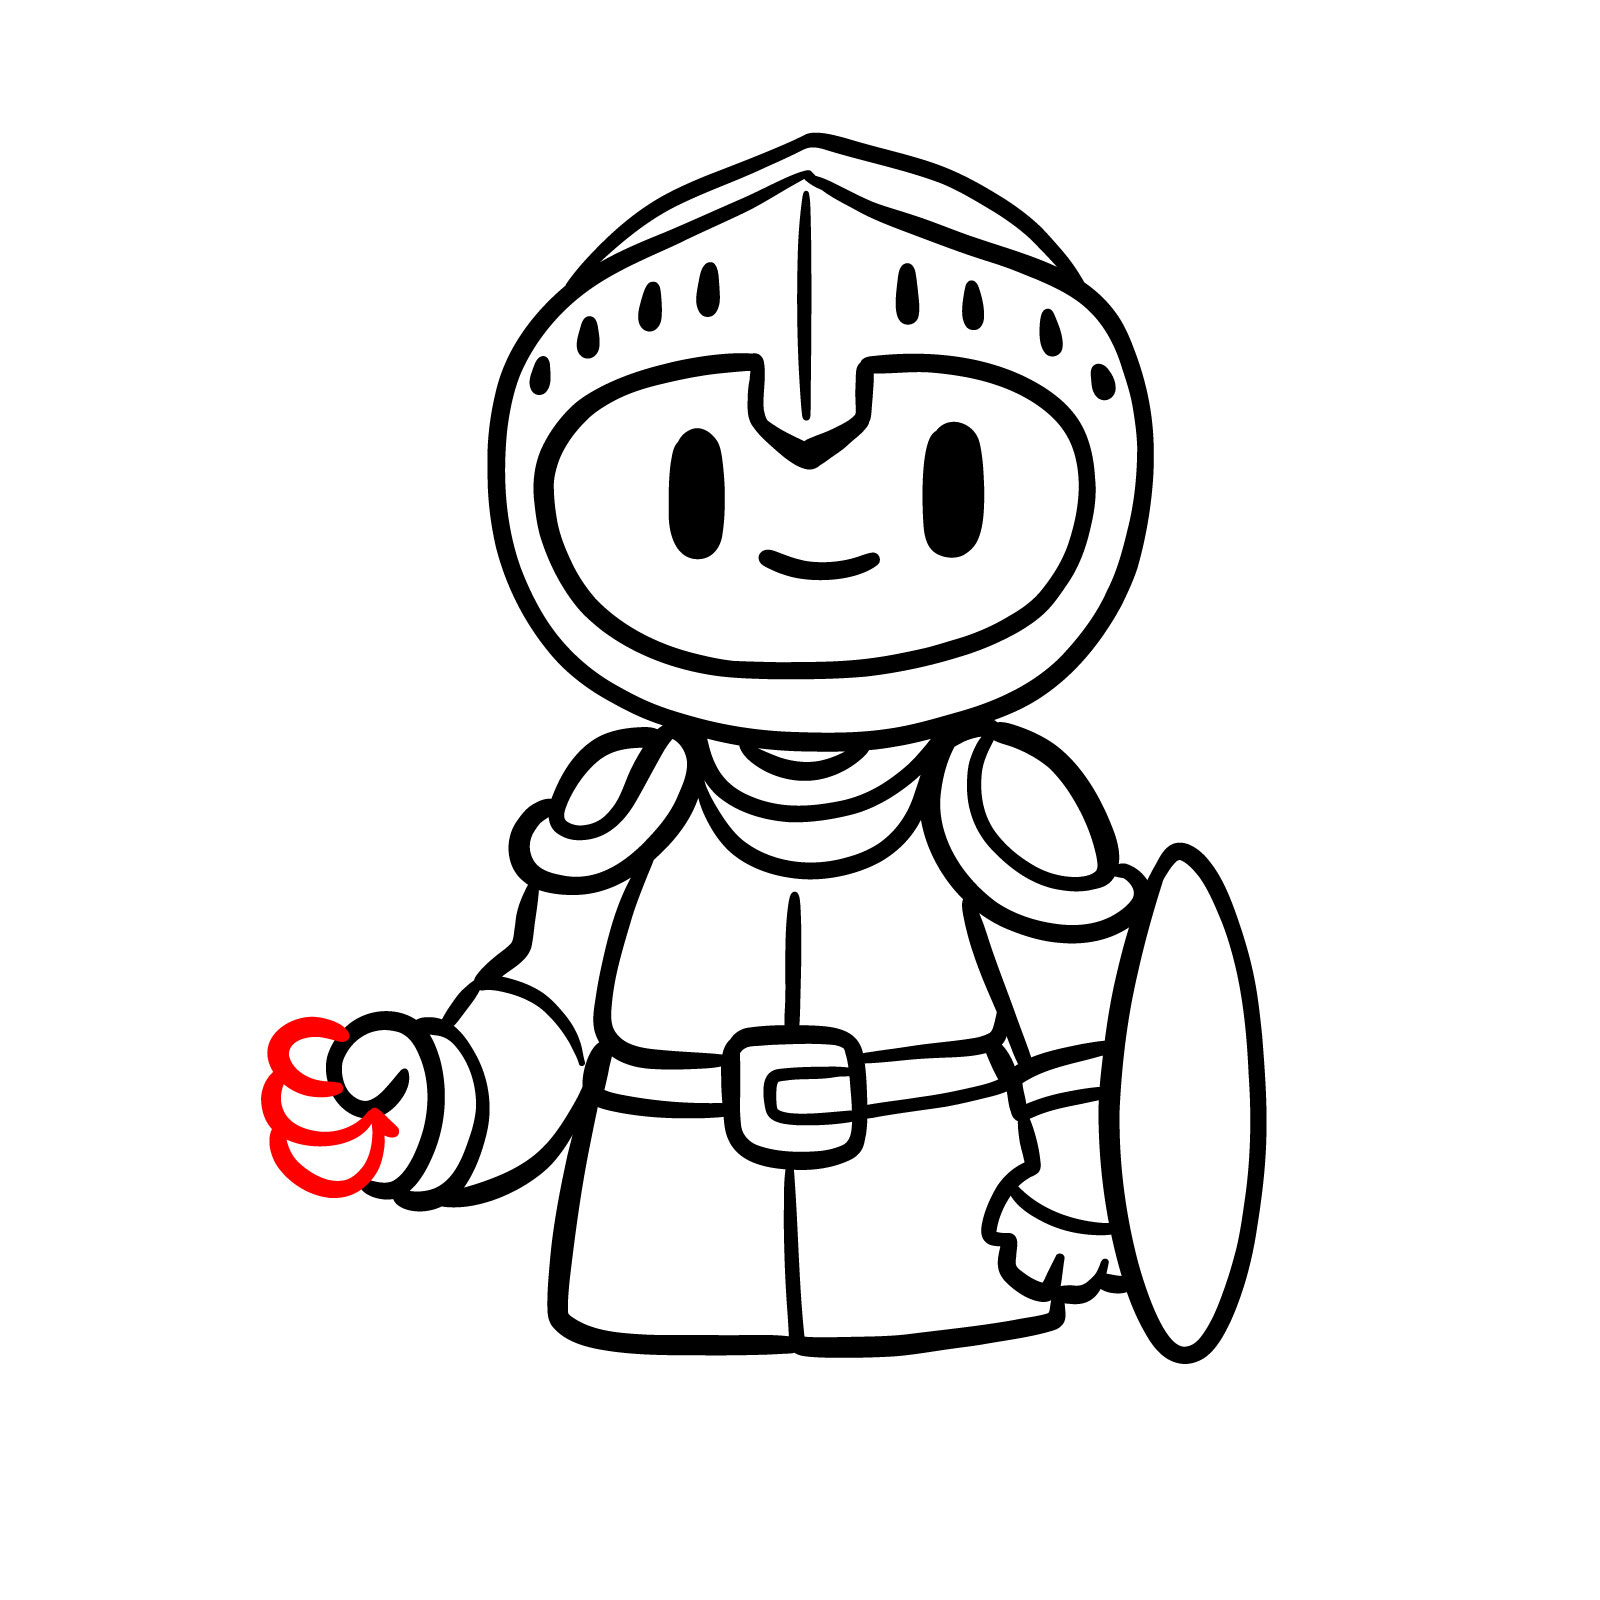
Step 10 – Continue the hand’s details by sketching three remaining fingers clenched as if holding a sword
Detailing fingers on the hand
Step 11 – Add the sword handle within the grip formed by the thumb and fingers, ensuring it’s proportionate to the hand
Drawing the sword handle
Step 12 – Extend a straight or slightly tapered line from the handle to form the blade of the sword, making sure it’s aligned and balanced with the handle
Sketching the sword blade
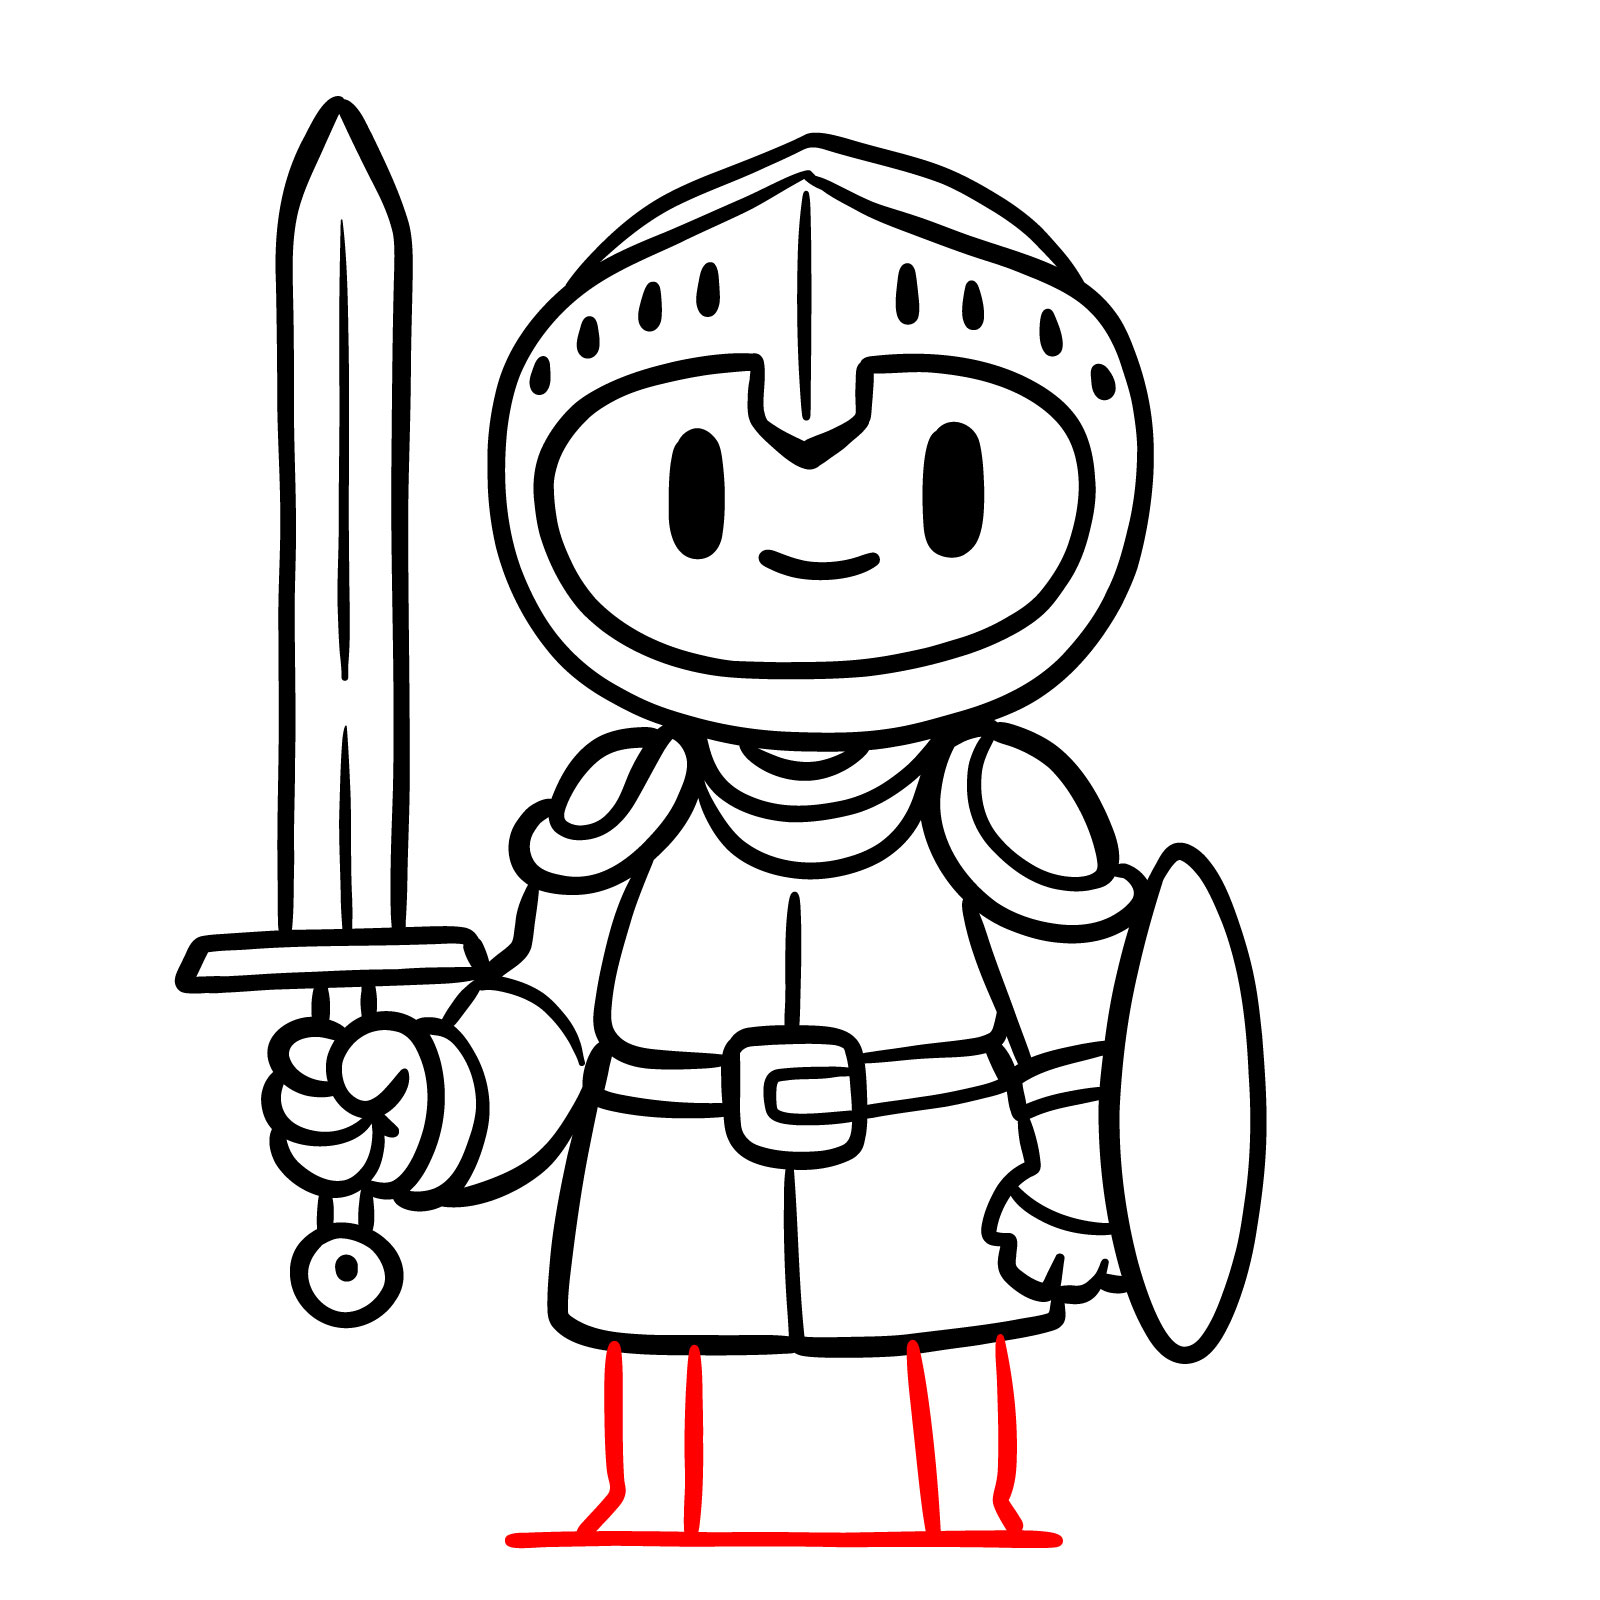
Step 13 – Sketch short, simple legs standing apart for stability, and add a horizontal line near the feet to represent the ground or a stylized shadow
Drawing legs and ground line
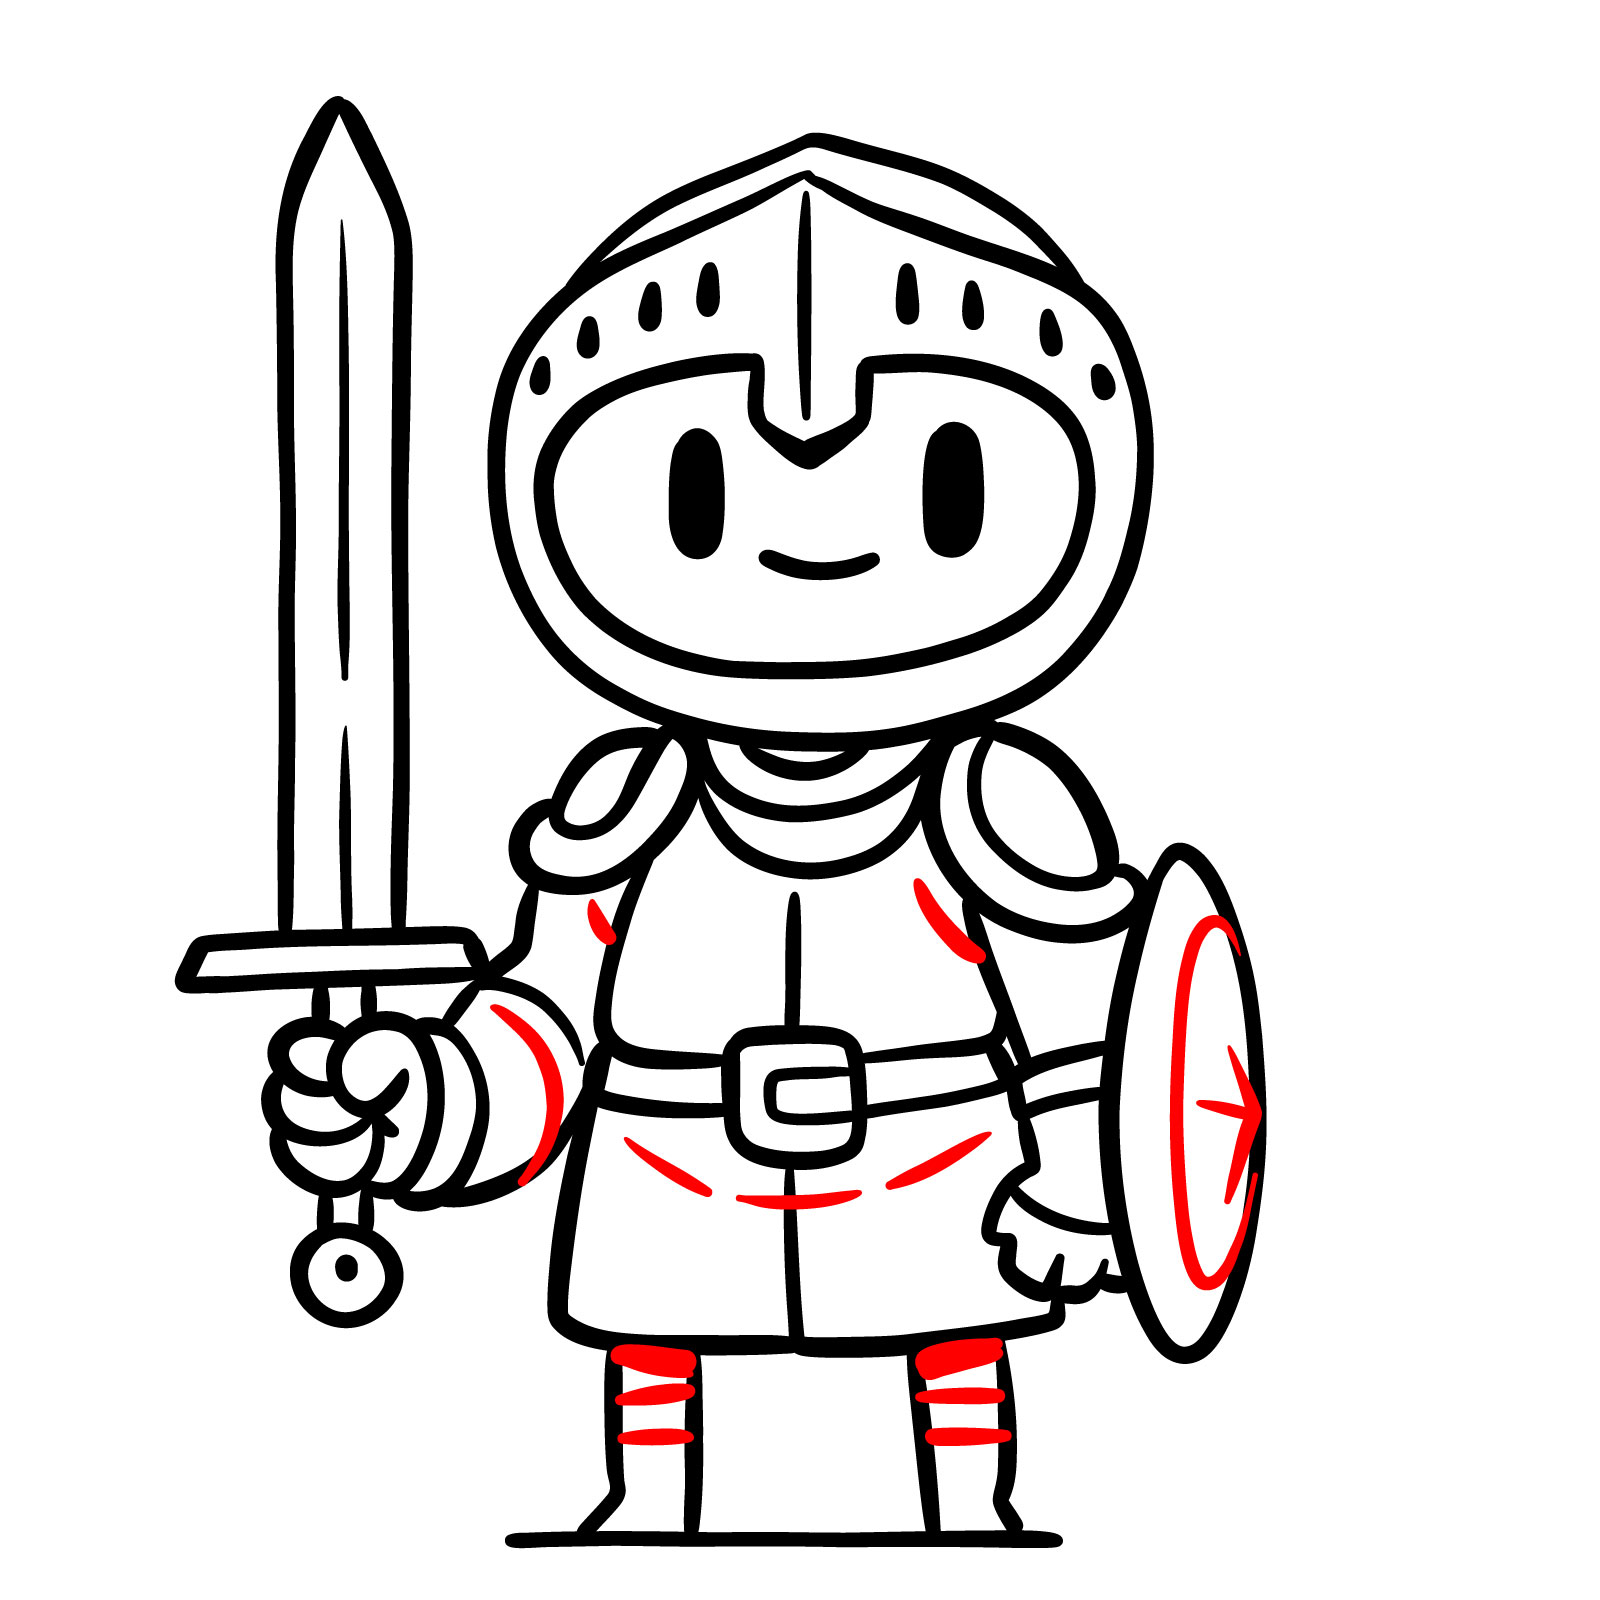
Step 14 – Enhance the drawing with lines for simple creases in the armor, add a pattern to the shield, and detail the leg armor
Detailing armor and shield
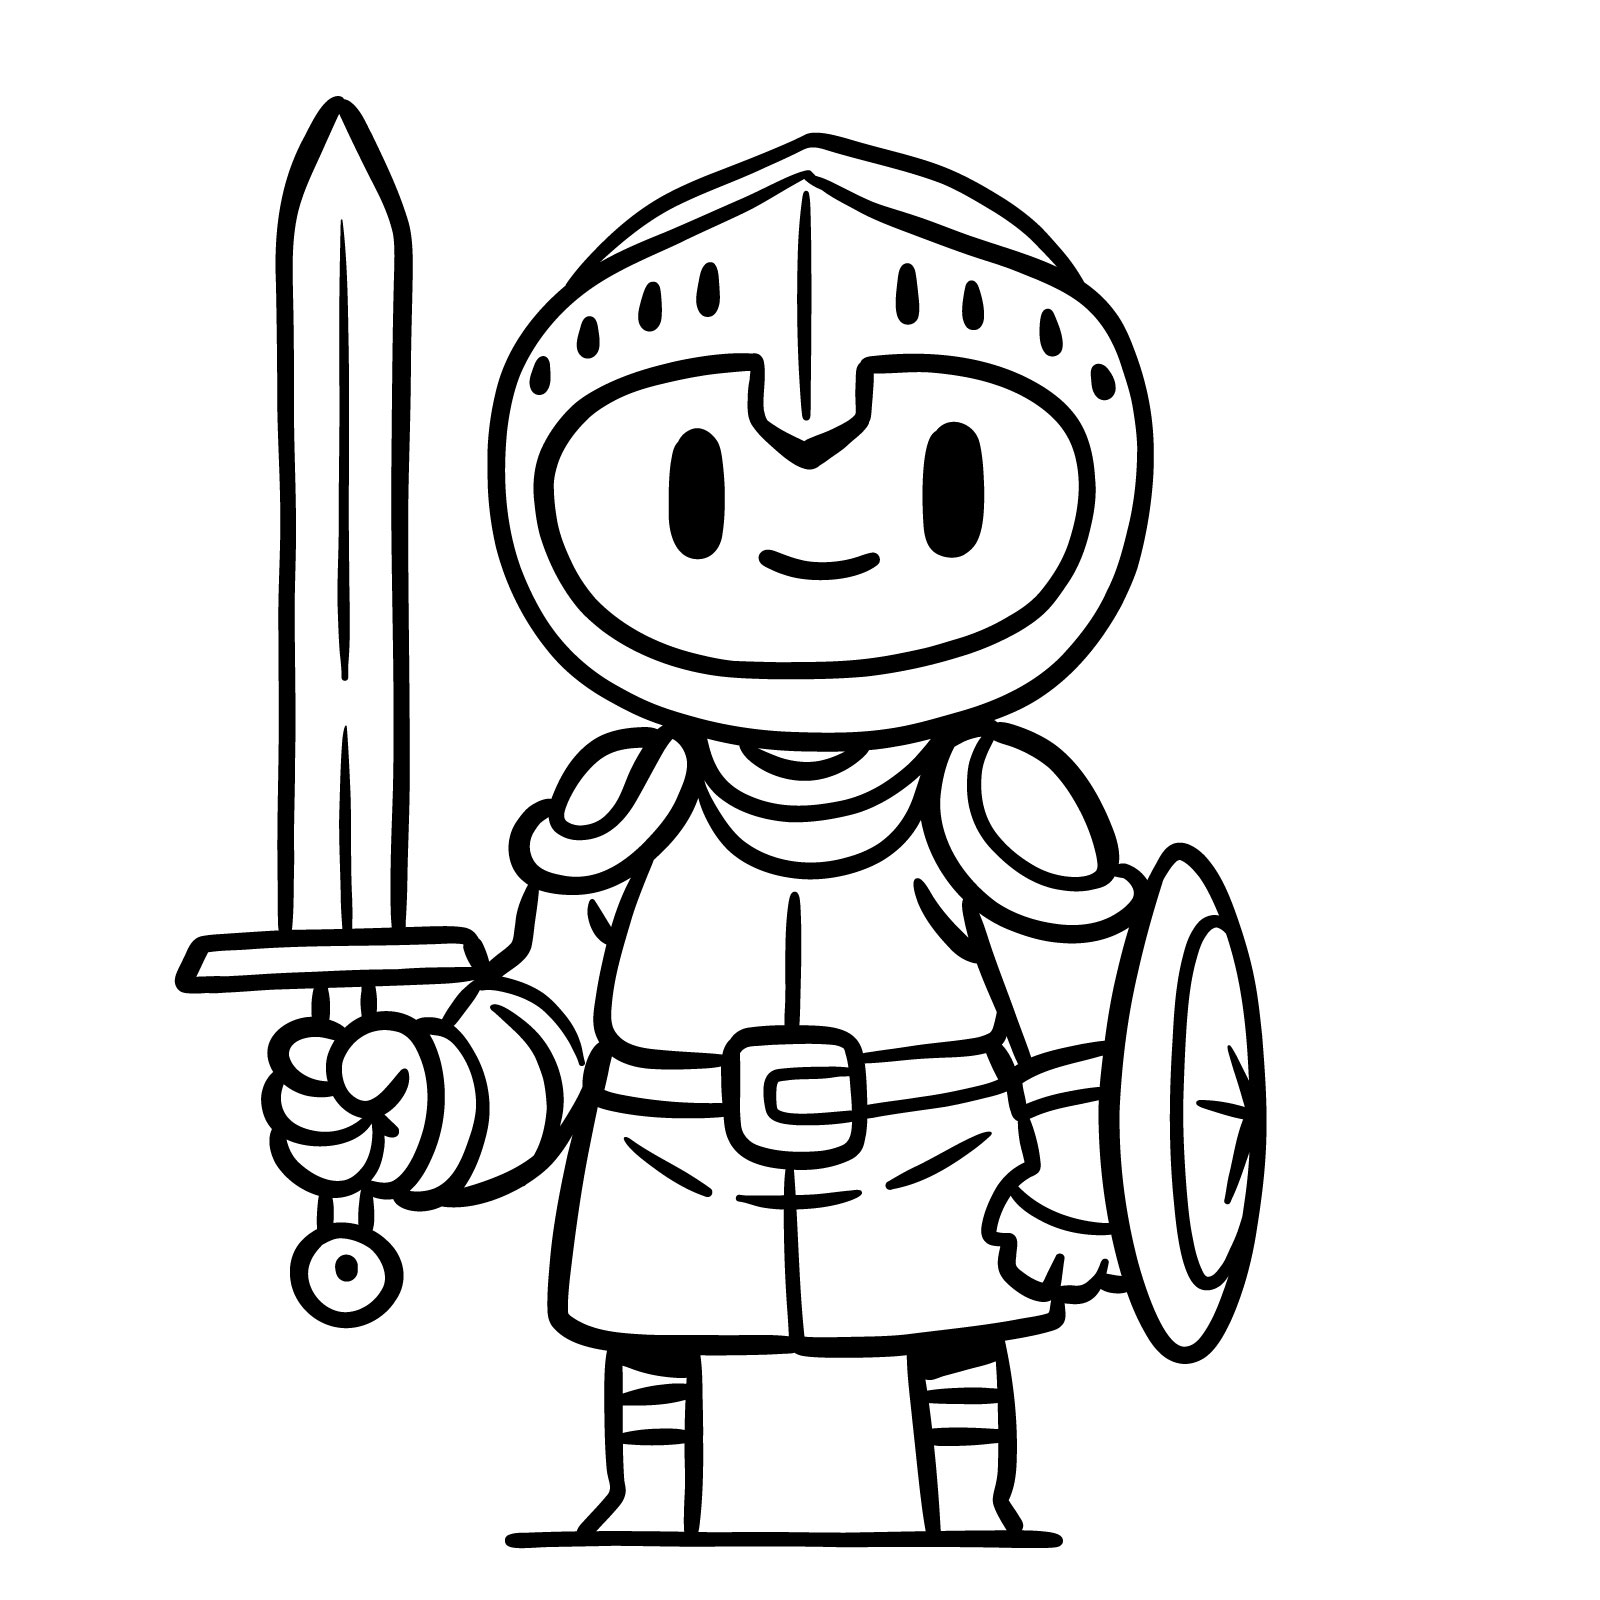
Step 15 – Your drawing is now complete! Review it for any final adjustments or additional details to personalize your cartoon paladin
Completing the paladin drawing
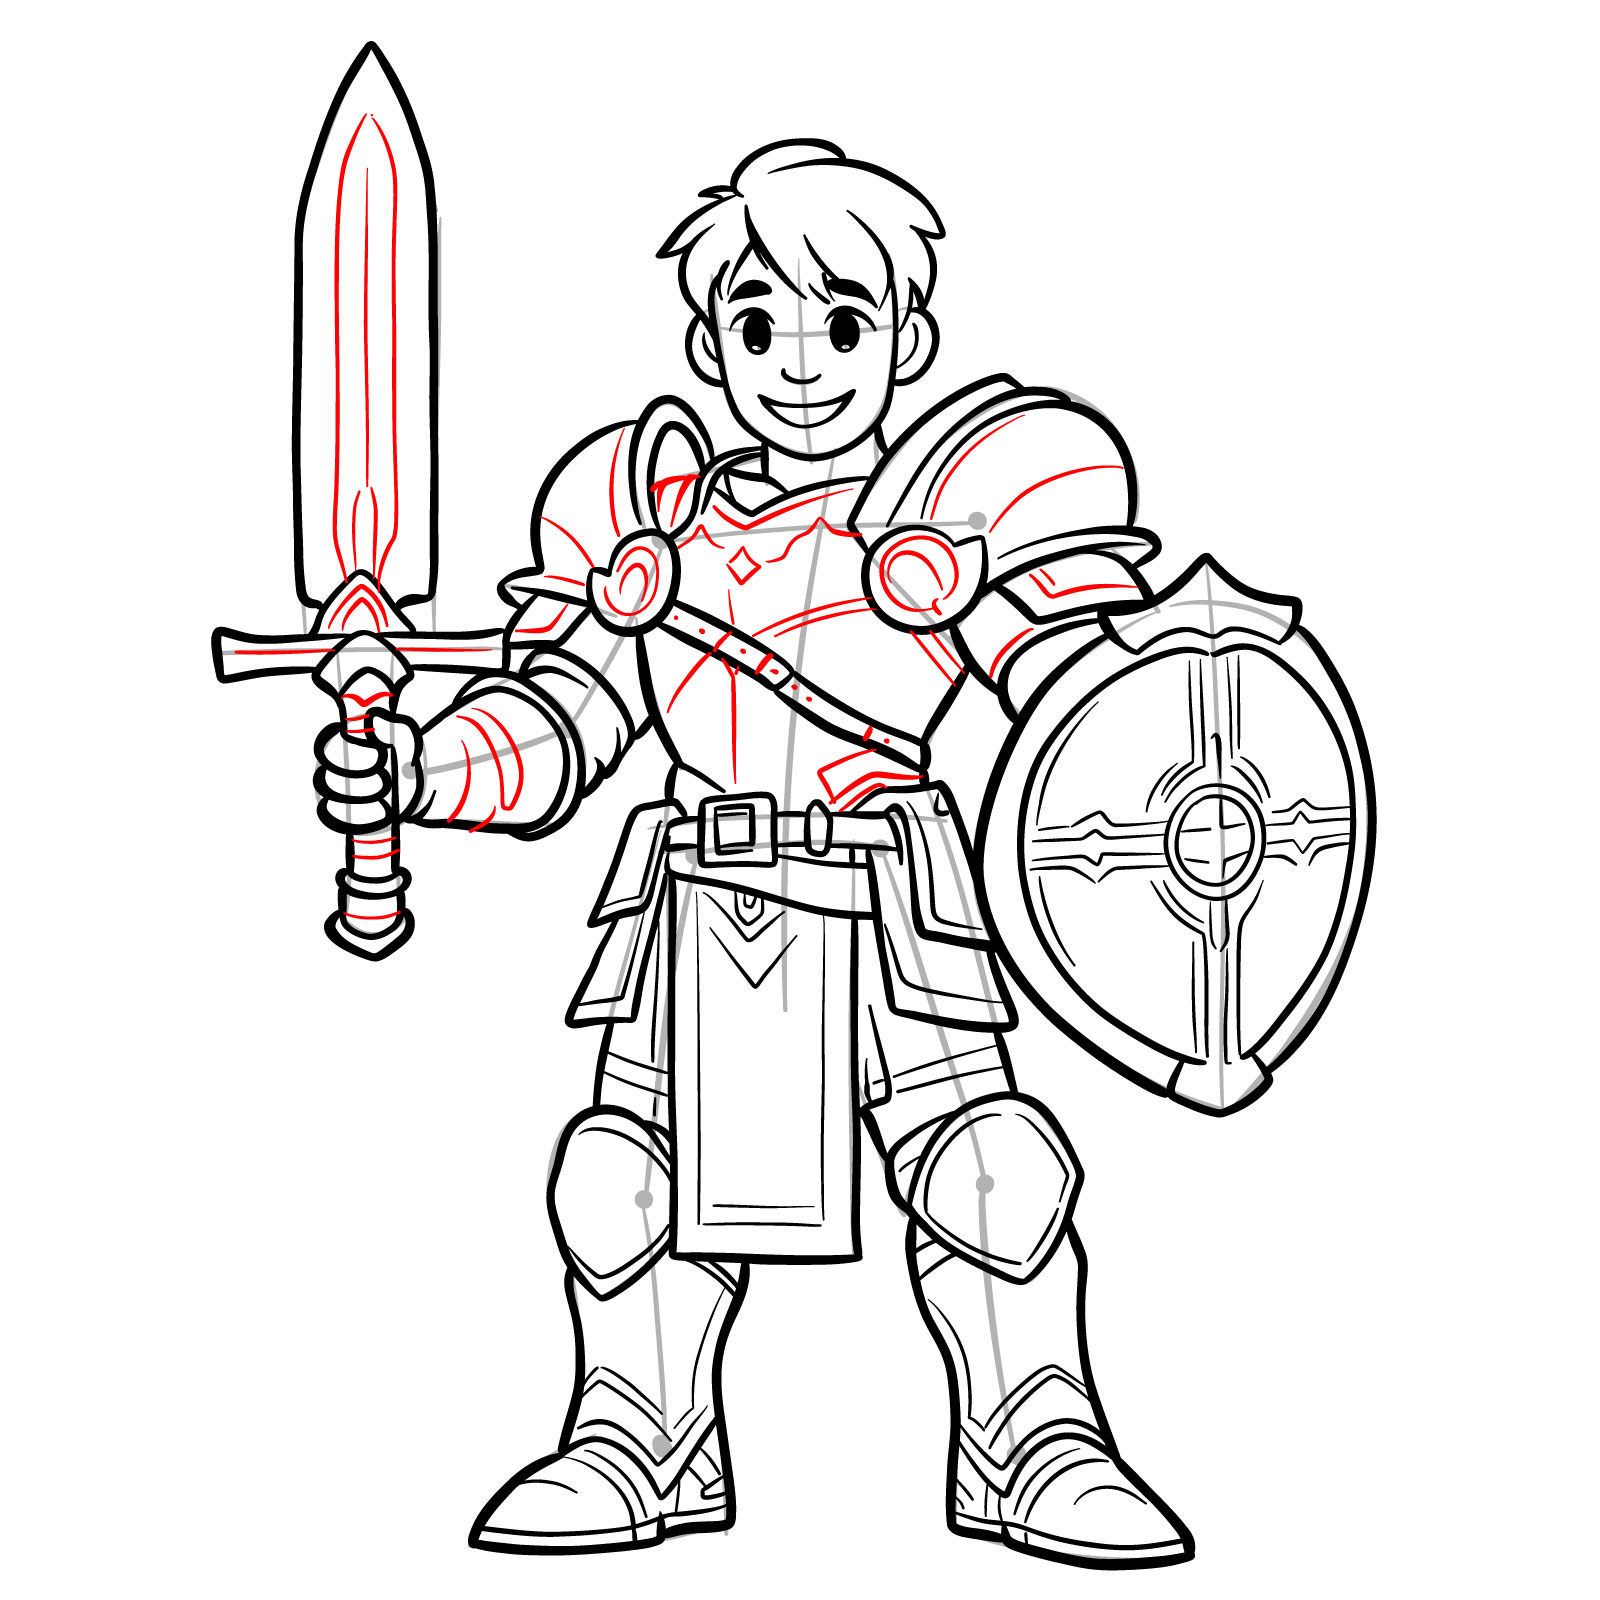
Detailed Cartoon Paladin
How to draw a Disney style cartoon Paladin
The second guide in our series takes you through a more elaborate process of drawing a cartoon paladin, suitable for those who have some prior experience. This guide expands on the simple cartoon style by incorporating more intricate armor design and expressive face.
With 23 steps, this guide allows you to refine your skills further, adding depth and character to your paladin. Each step is designed to build complexity gradually, ensuring that you can follow along comfortably. Let’s get started.
Step 01 – Begin by drawing a basic outline of the face and a simple stick figure to establish the pose of your paladin
Starting with the basic face and pose
Step 02 – Sketch the placement of the eyes, nose, mouth, and ears. Shape the shoulder armor, shield, and body down to the knees
Adding facial features and body armor
Step 03 – Add basic shapes for the legs below the knees, sketch the outline of the hand holding the sword, and divide the shield vertically into two parts
Outlining lower legs, hand, and sword
Step 04 – Define the outline of the face more clearly to prepare for detailed facial features
Refining the face outline
Step 05 – Draw the outline of the hair, considering the style and flow that complements the character’s head shape
Sketching the hair outline
Step 06 – Sketch two filled-in ovals for the eyes with small blank spaces for highlights. Add the nose, mouth, and ears to the face
Adding eyes, nose, mouth, and ears
Step 07 – Draw the eyebrows and the upper eyelids to express the character’s emotion or mood. Add inner lines to the ears for depth
Drawing eyebrows and eyelids
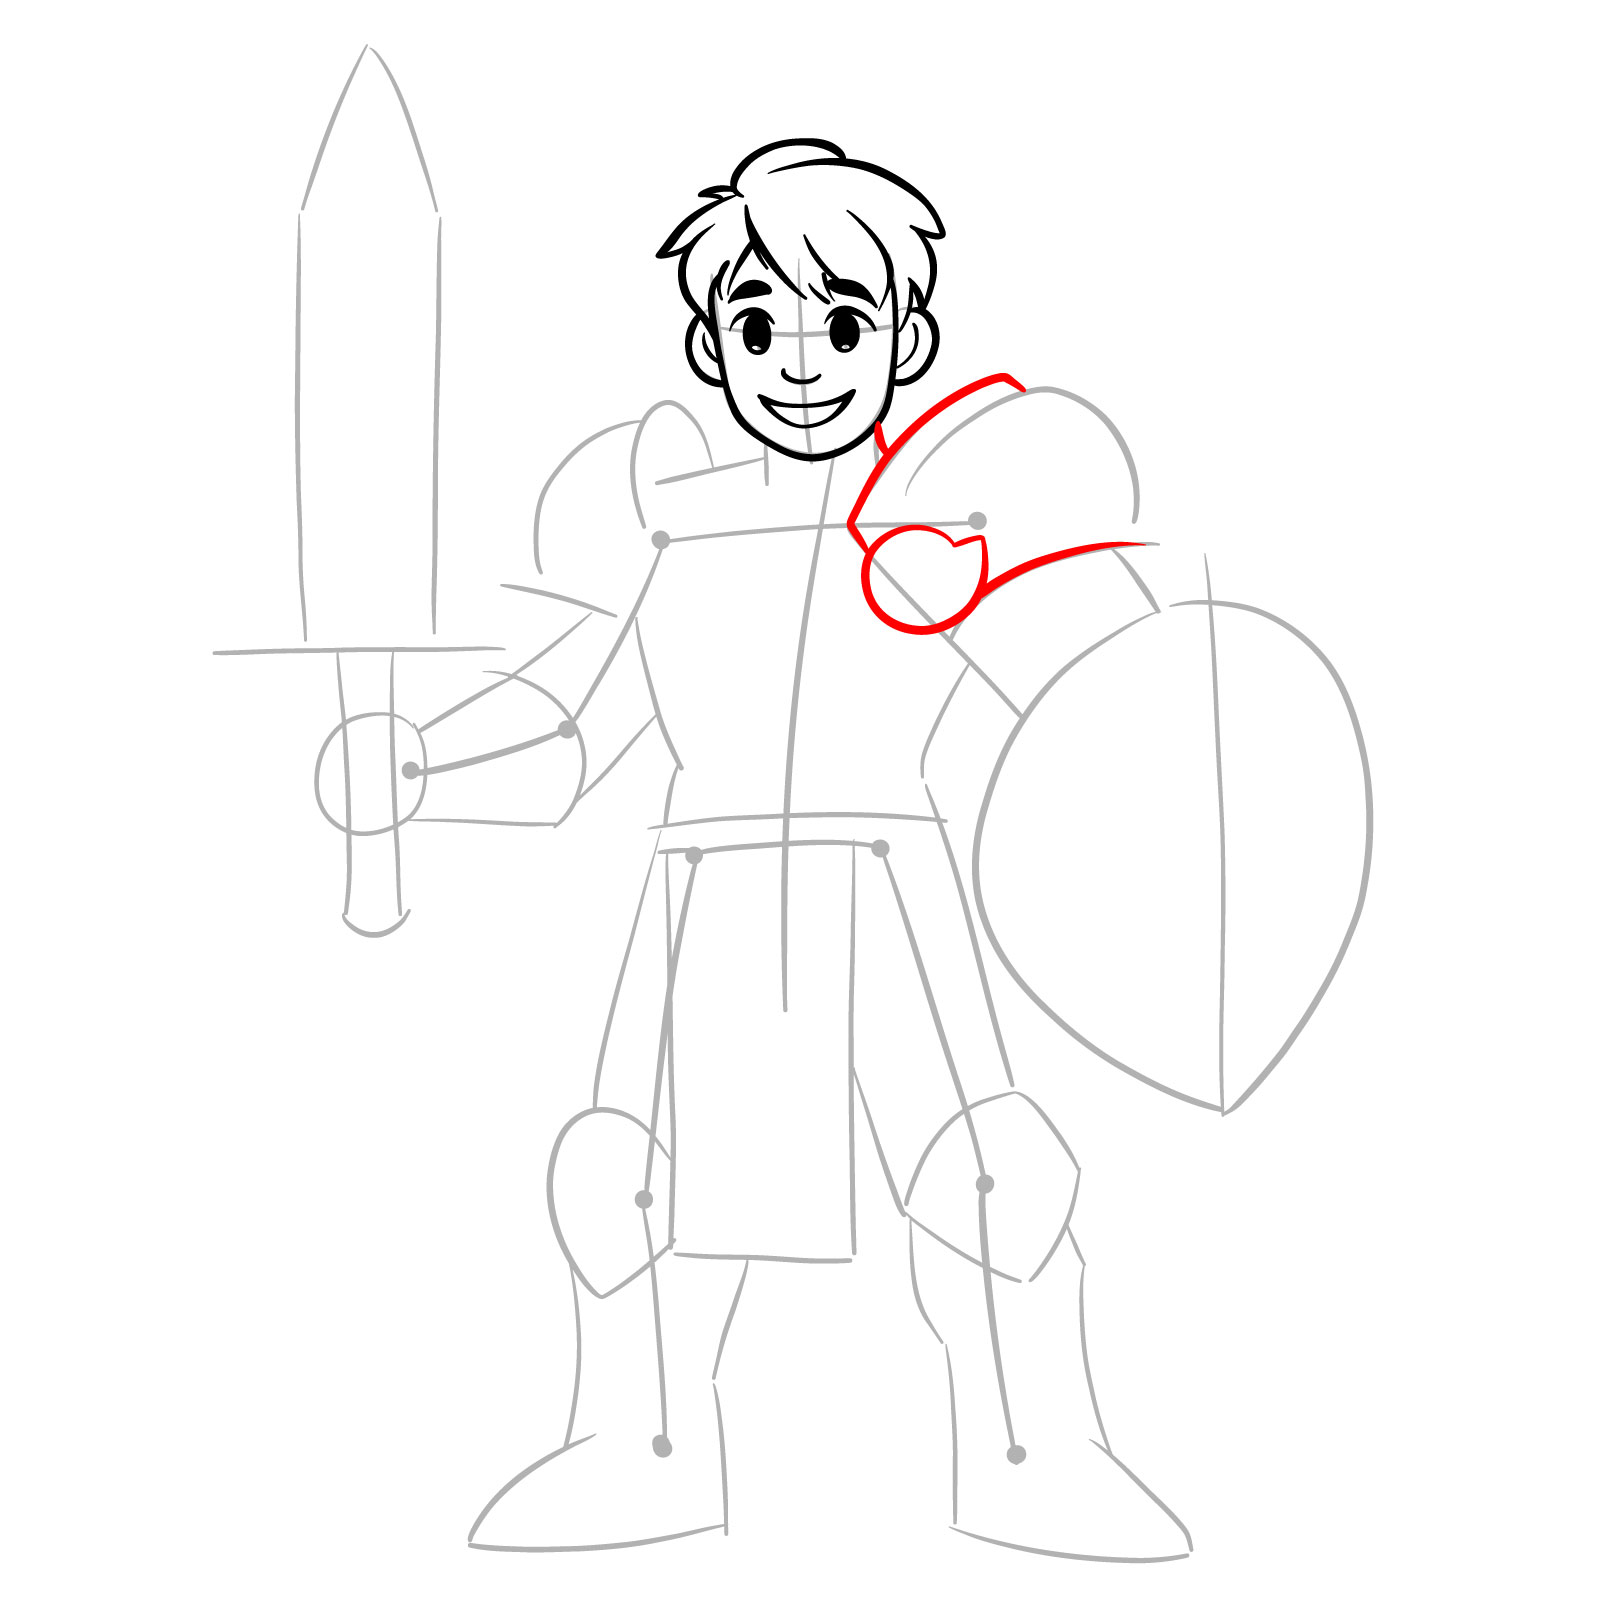
Step 08 – Begin outlining the first piece of shoulder armor, making sure it’s bulky and protective in appearance
Outlining the first shoulder armor
Step 09 – Draw the neck connecting the head to the torso. Begin sketching the neck part of the armor, ensuring it complements the shoulder armor
Sketching the neck and neck armor
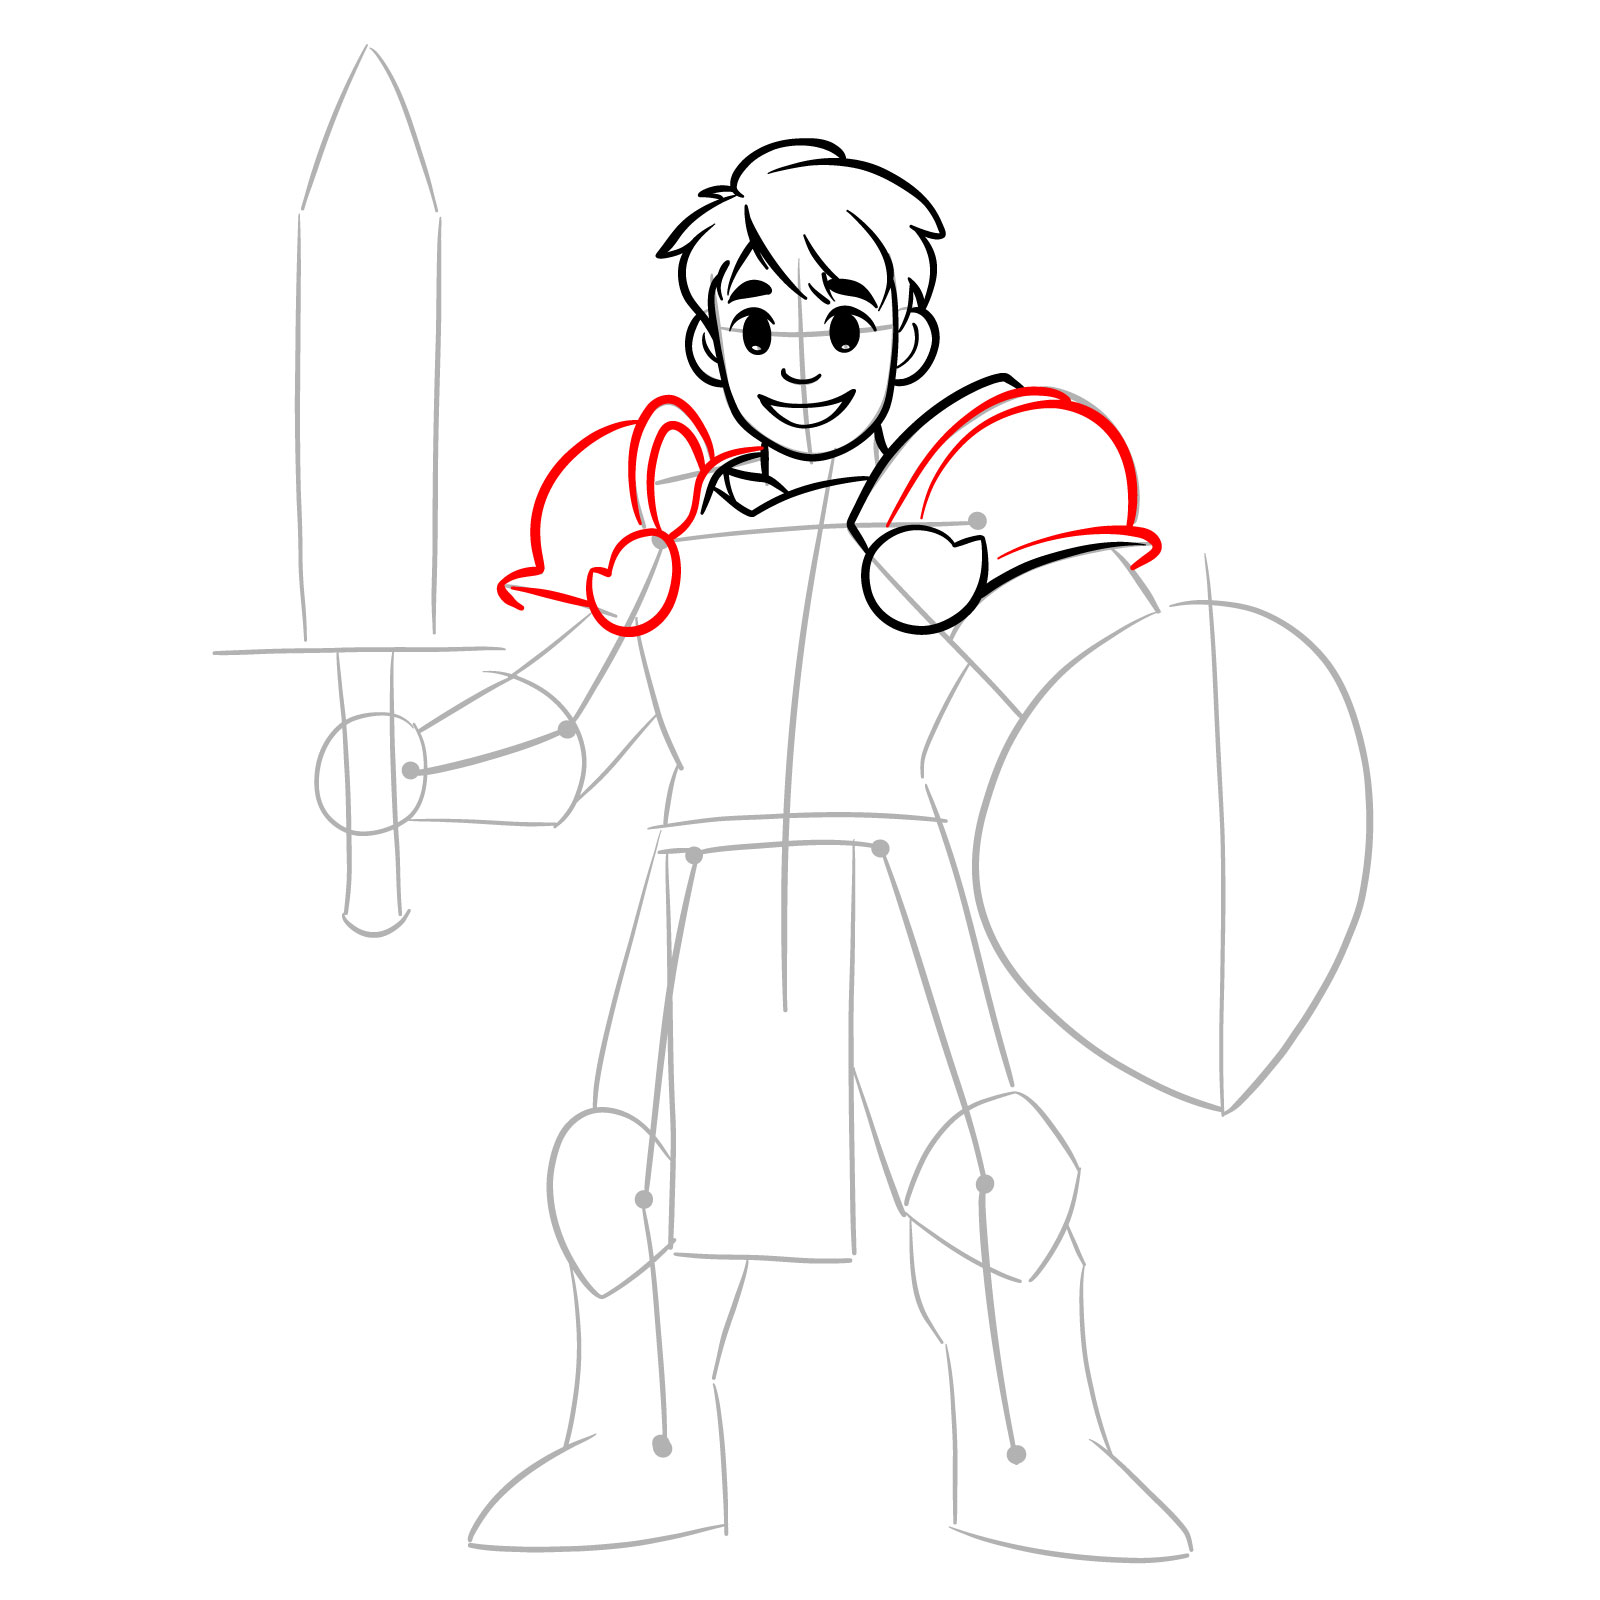
Step 10 – Complete the details of the first shoulder armor. Sketch the second shoulder armor to match the first
Finalizing the first shoulder armor
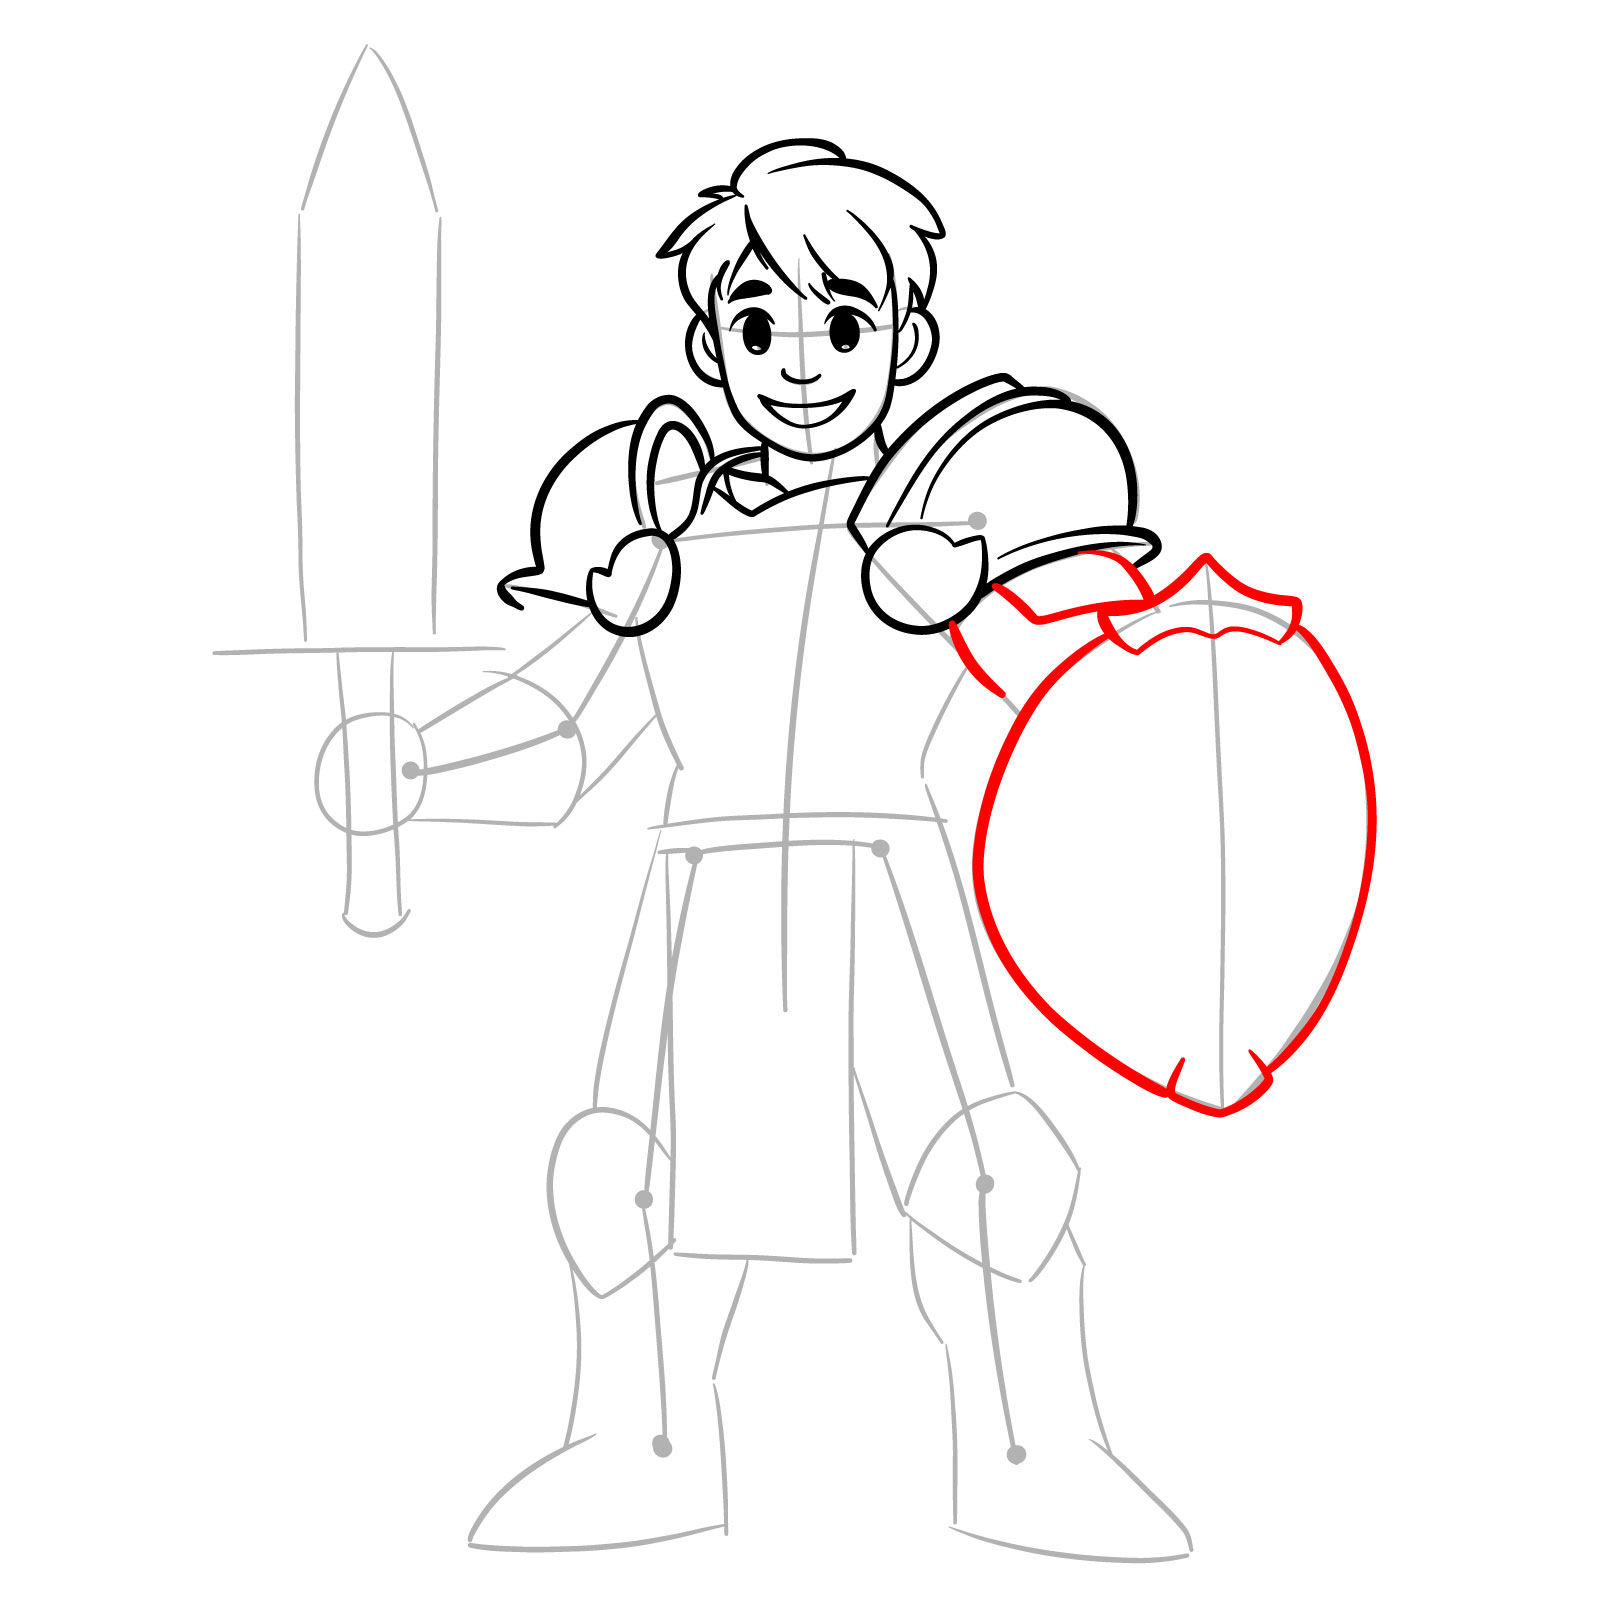
Step 11 – Sketch the visible part of the hand that holds the shield and outline the shield as well
Outlining the shield-holding hand and shield
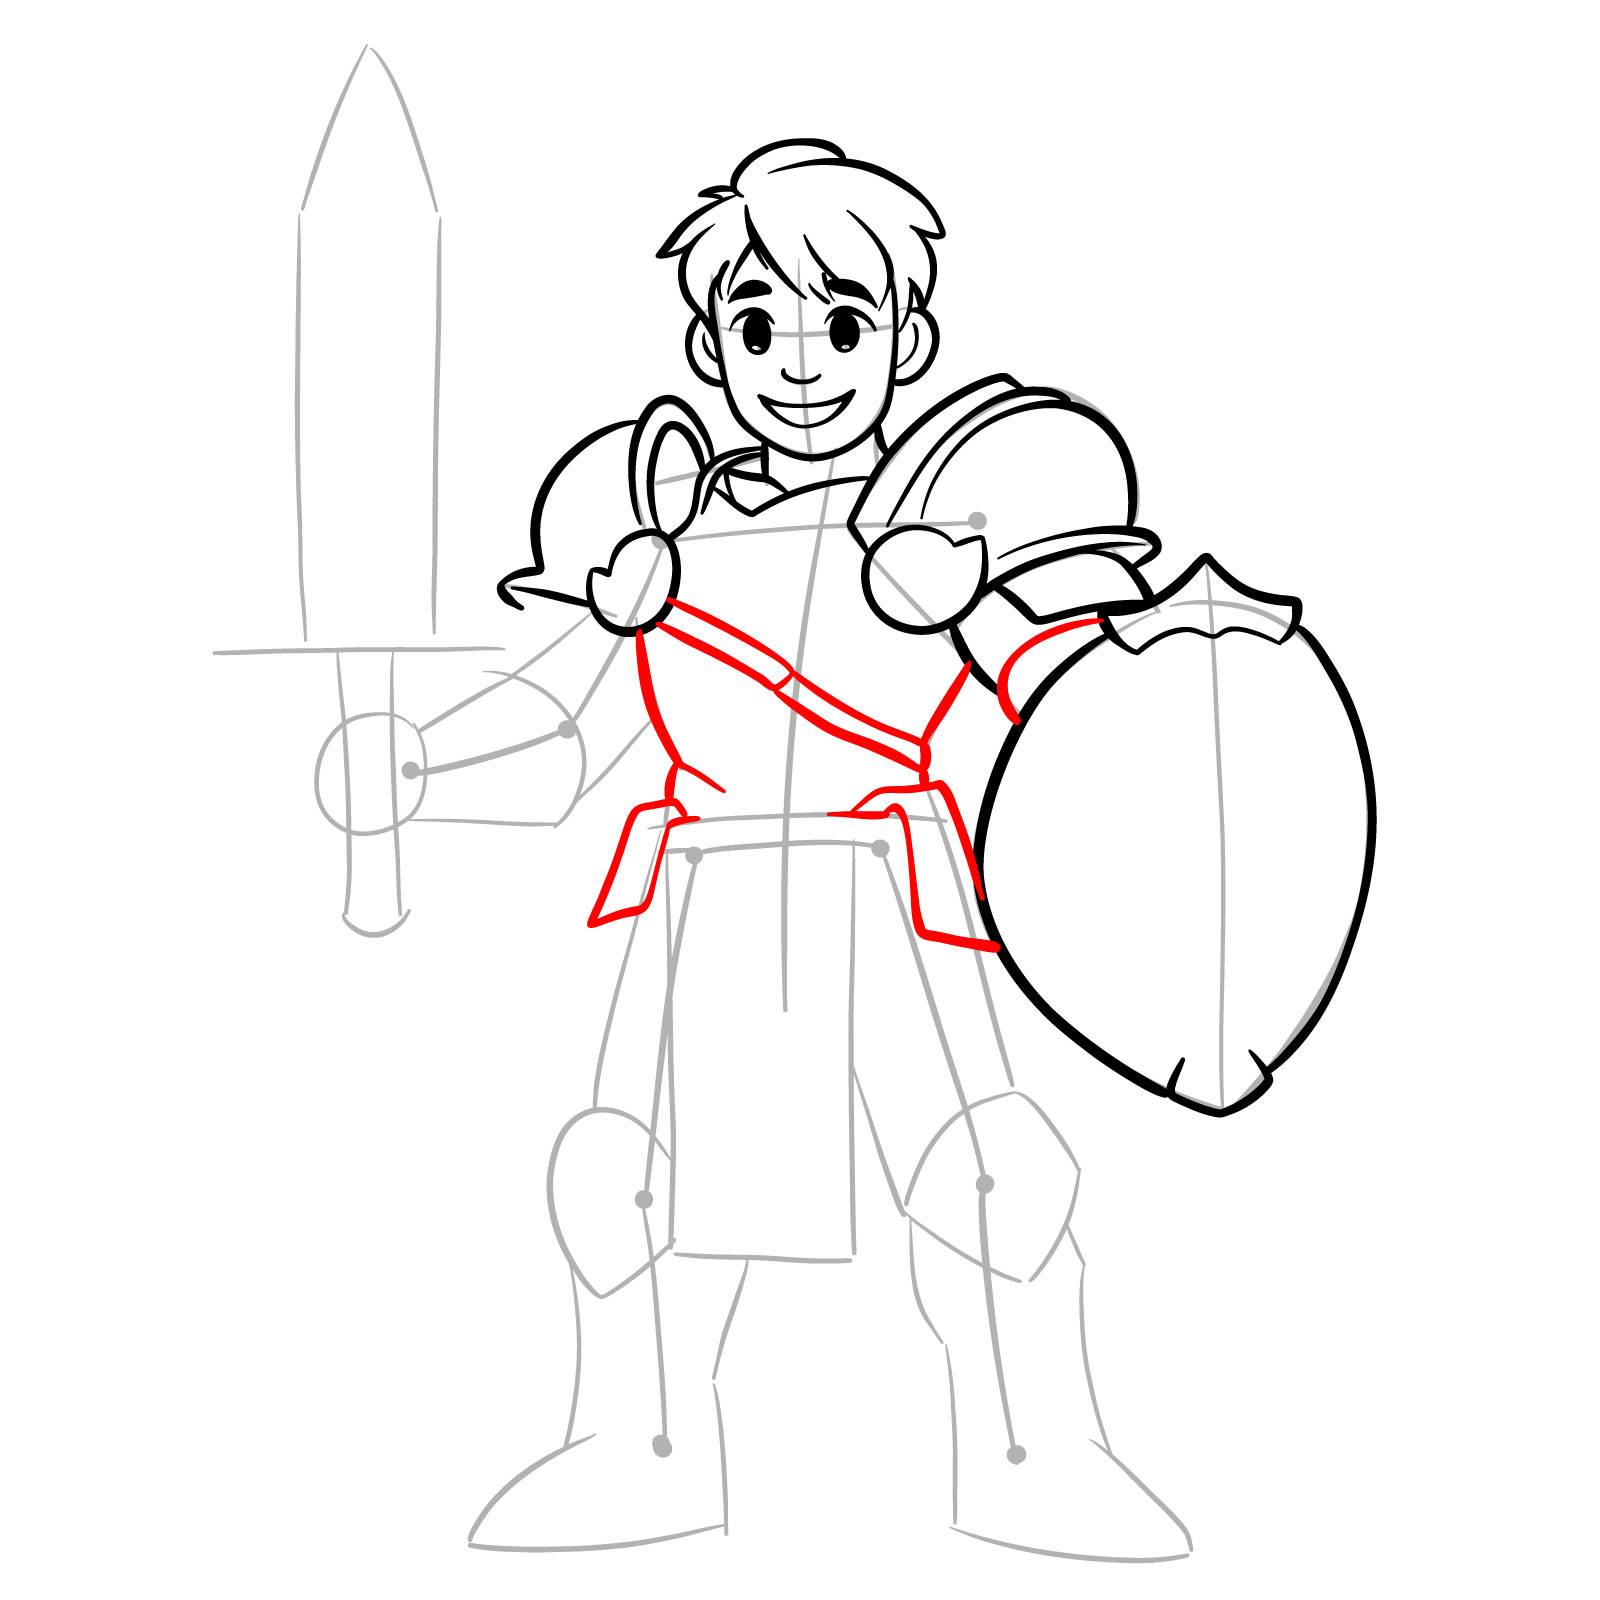
Steps 12 and 13 – Outline the body shape, ensuring it is proportionate and well-balanced. Add accessories like belts, sashes around the waist and a piece of cloth flowing down to the knee area
Drawing body shape and waist accessories
Step 13
Detailing accessories
Steps 14 and 15 – Begin sketching the second arm and hand, which will be holding the sword
Sketching the arm
Step 15
Outlining the hand
Step 16 – Sketch the handle of the sword held by the paladin. Ensure the handle is detailed and fits comfortably in the hand
Detailing the sword handle
Step 17 – Extend the lines from the sword handle to form the blade. Make the blade proportionate to the handle and character size, tapering it towards the tip
Drawing the sword blade
Step 18 – Draw the upper parts of the legs, ensuring they appear strong and capable of supporting the armor. Outline the knee protection as well
Sketching the upper legs and knees
Steps 19 – Sketch the lower part of the legs / boots
Outlining the legs
Step 20 – 22 – Add details and patterns to the armor, sword and shield, enhancing their visual appeal and paladin design
Adding details to the armor
Step 21
Even more details
Step 22
Finalizing the paladin sketch
Step 23 – Review your drawing for any necessary adjustments. Erase the preliminary sketches and any extraneous marks. Optionally, you can ink the drawing to define and finalize the lines
Completing the paladin drawing
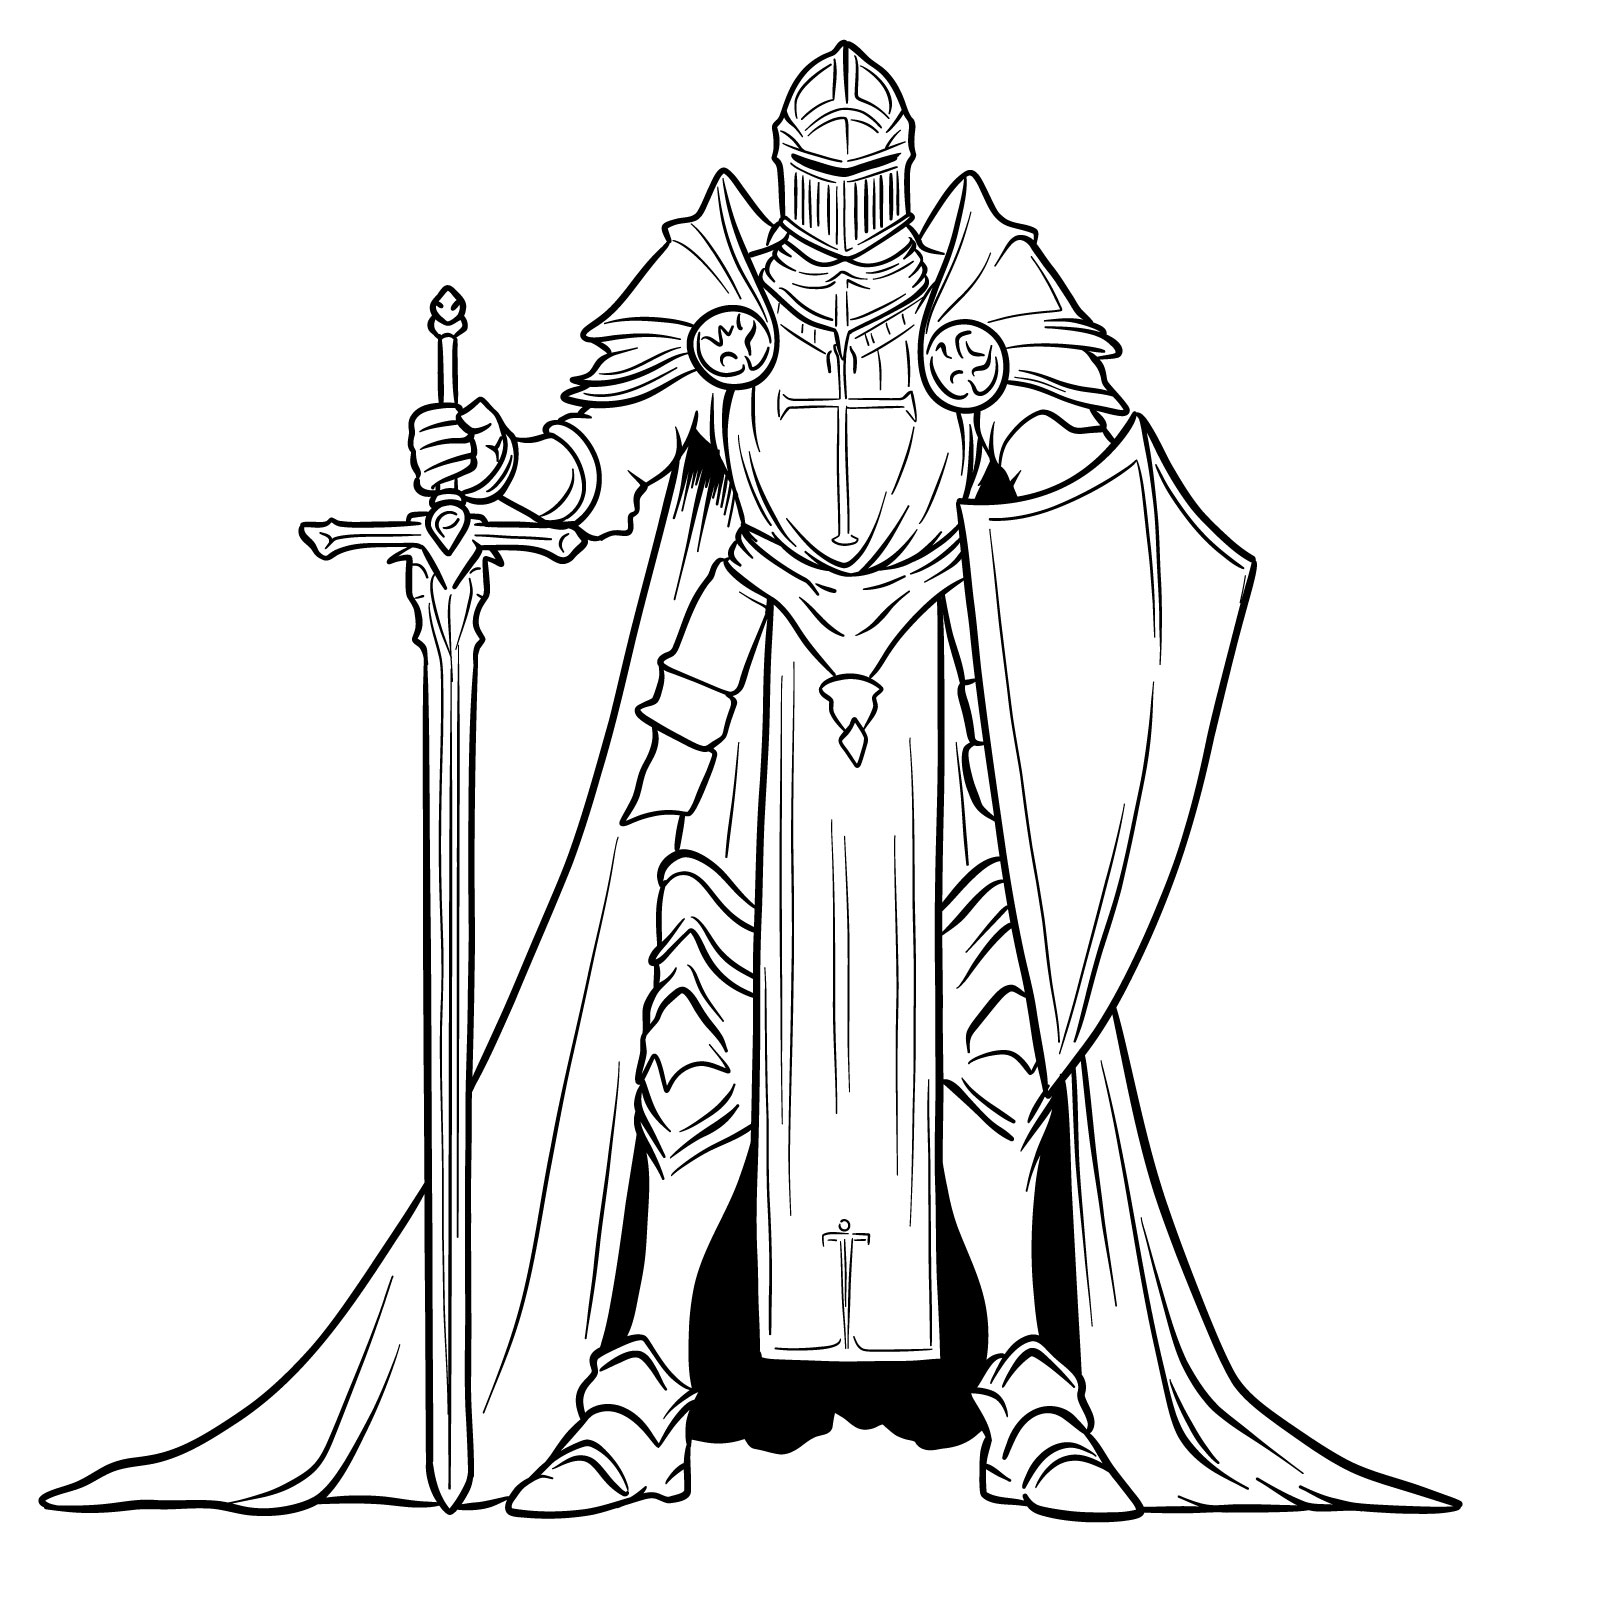
Realistic Paladin with Helmet
How to draw a realistic paladin in helmet
The third guide in our series introduces a more realistic approach to drawing a paladin, featuring a knightly helmet and detailed armor. This guide is ideal for artists who are comfortable with cartoon styles and are looking to explore more complex and realistic renderings.
Comprising 23 steps, this guide carefully guides you through each phase of drawing, from the initial layout of the body and pose to the polished finish of a helmeted paladin. Let’s learn how to draw our third male paladin.
Step 01 – Draw a vertical line from the top of the head to the ground to establish the paladin’s height. Add a short horizontal line at the top and a longer horizontal line at the bottom for the ground level. Sketch a basic helmet shape and a stick figure to define the pose
Starting with the basic pose and helmet
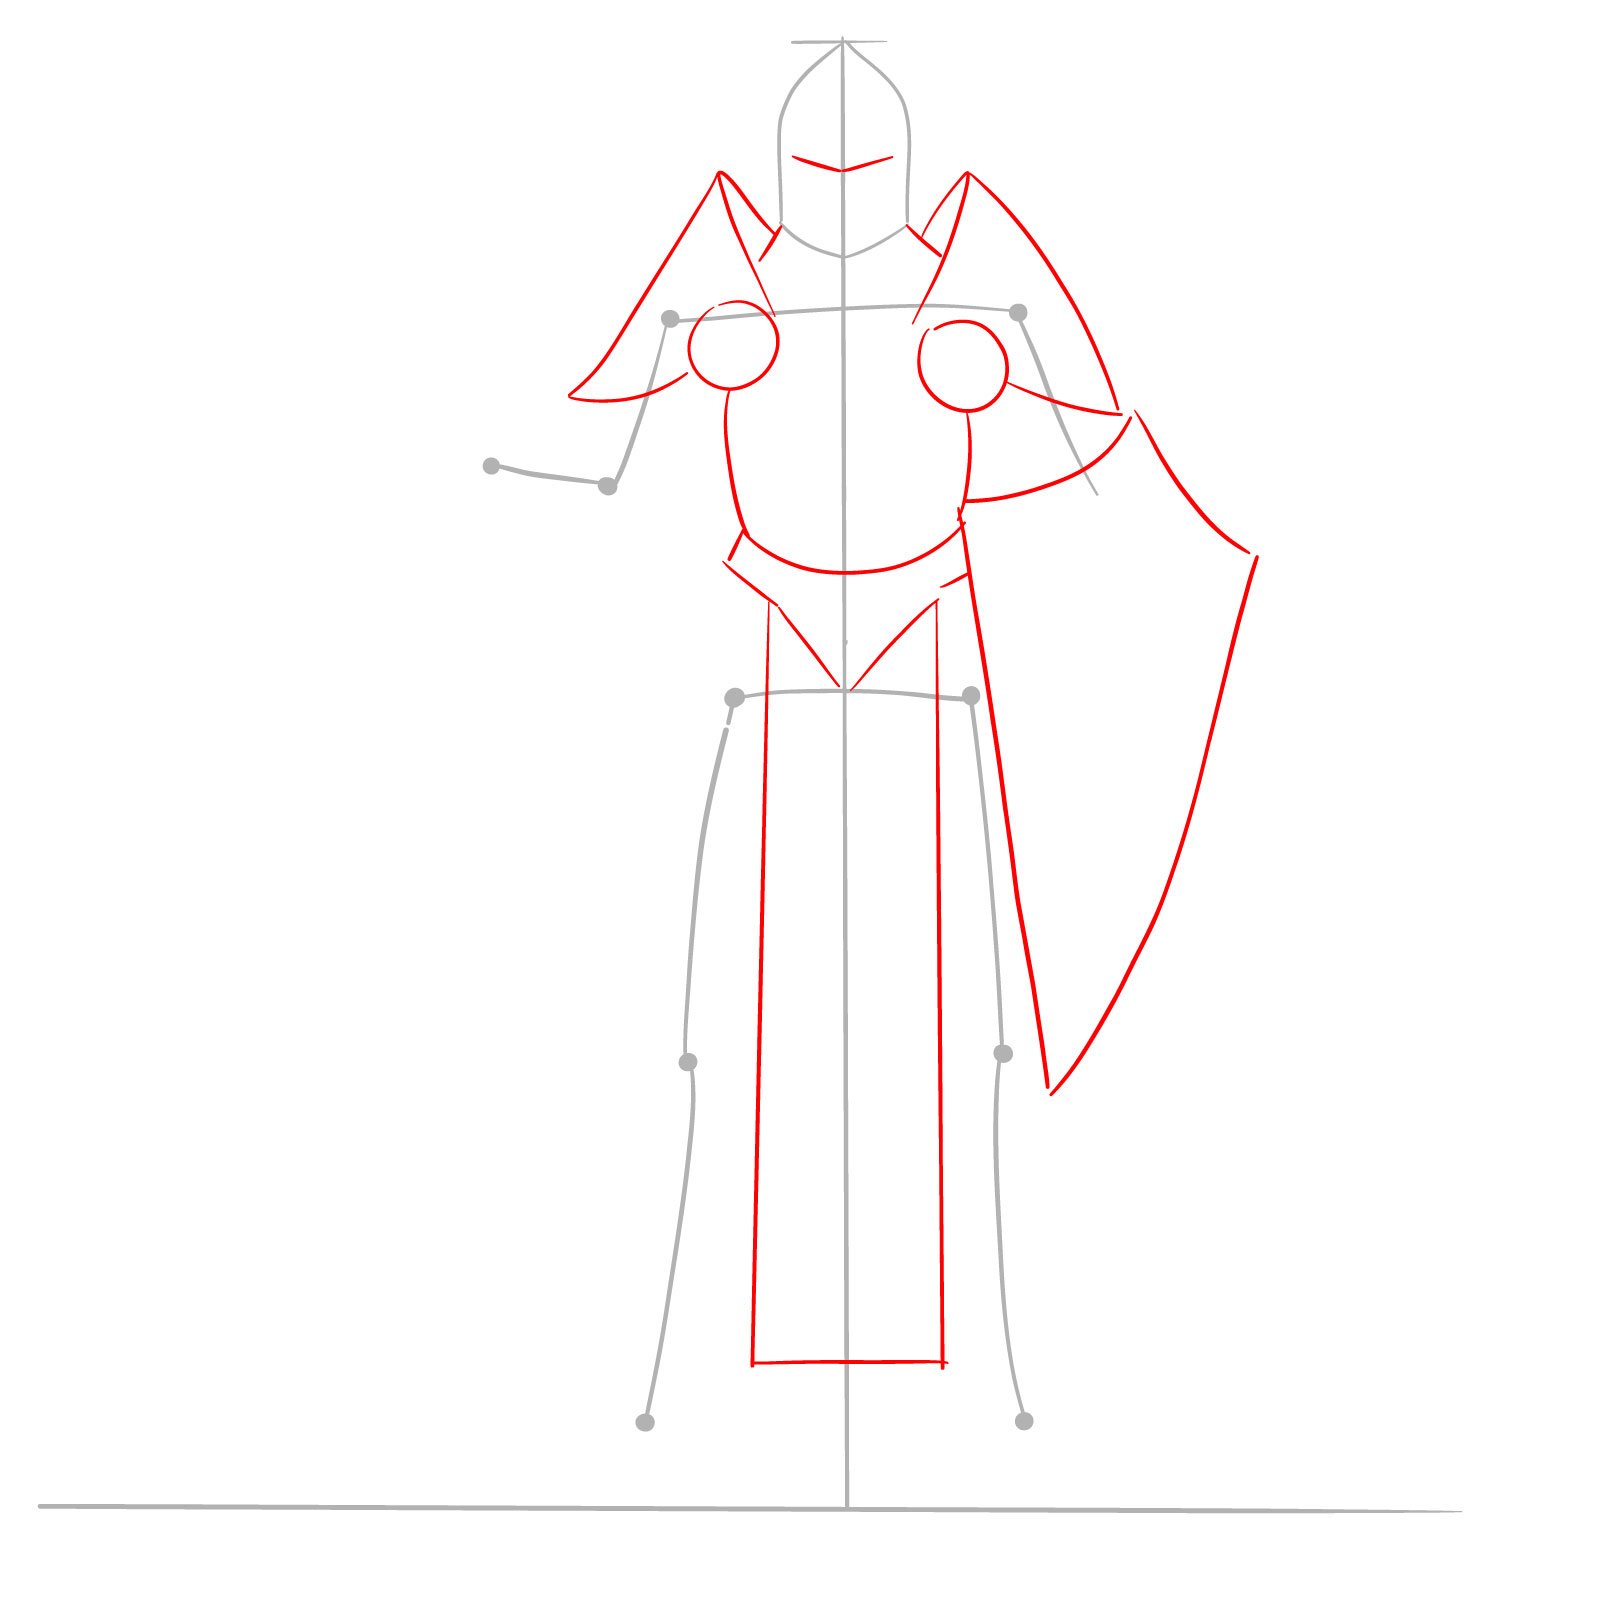
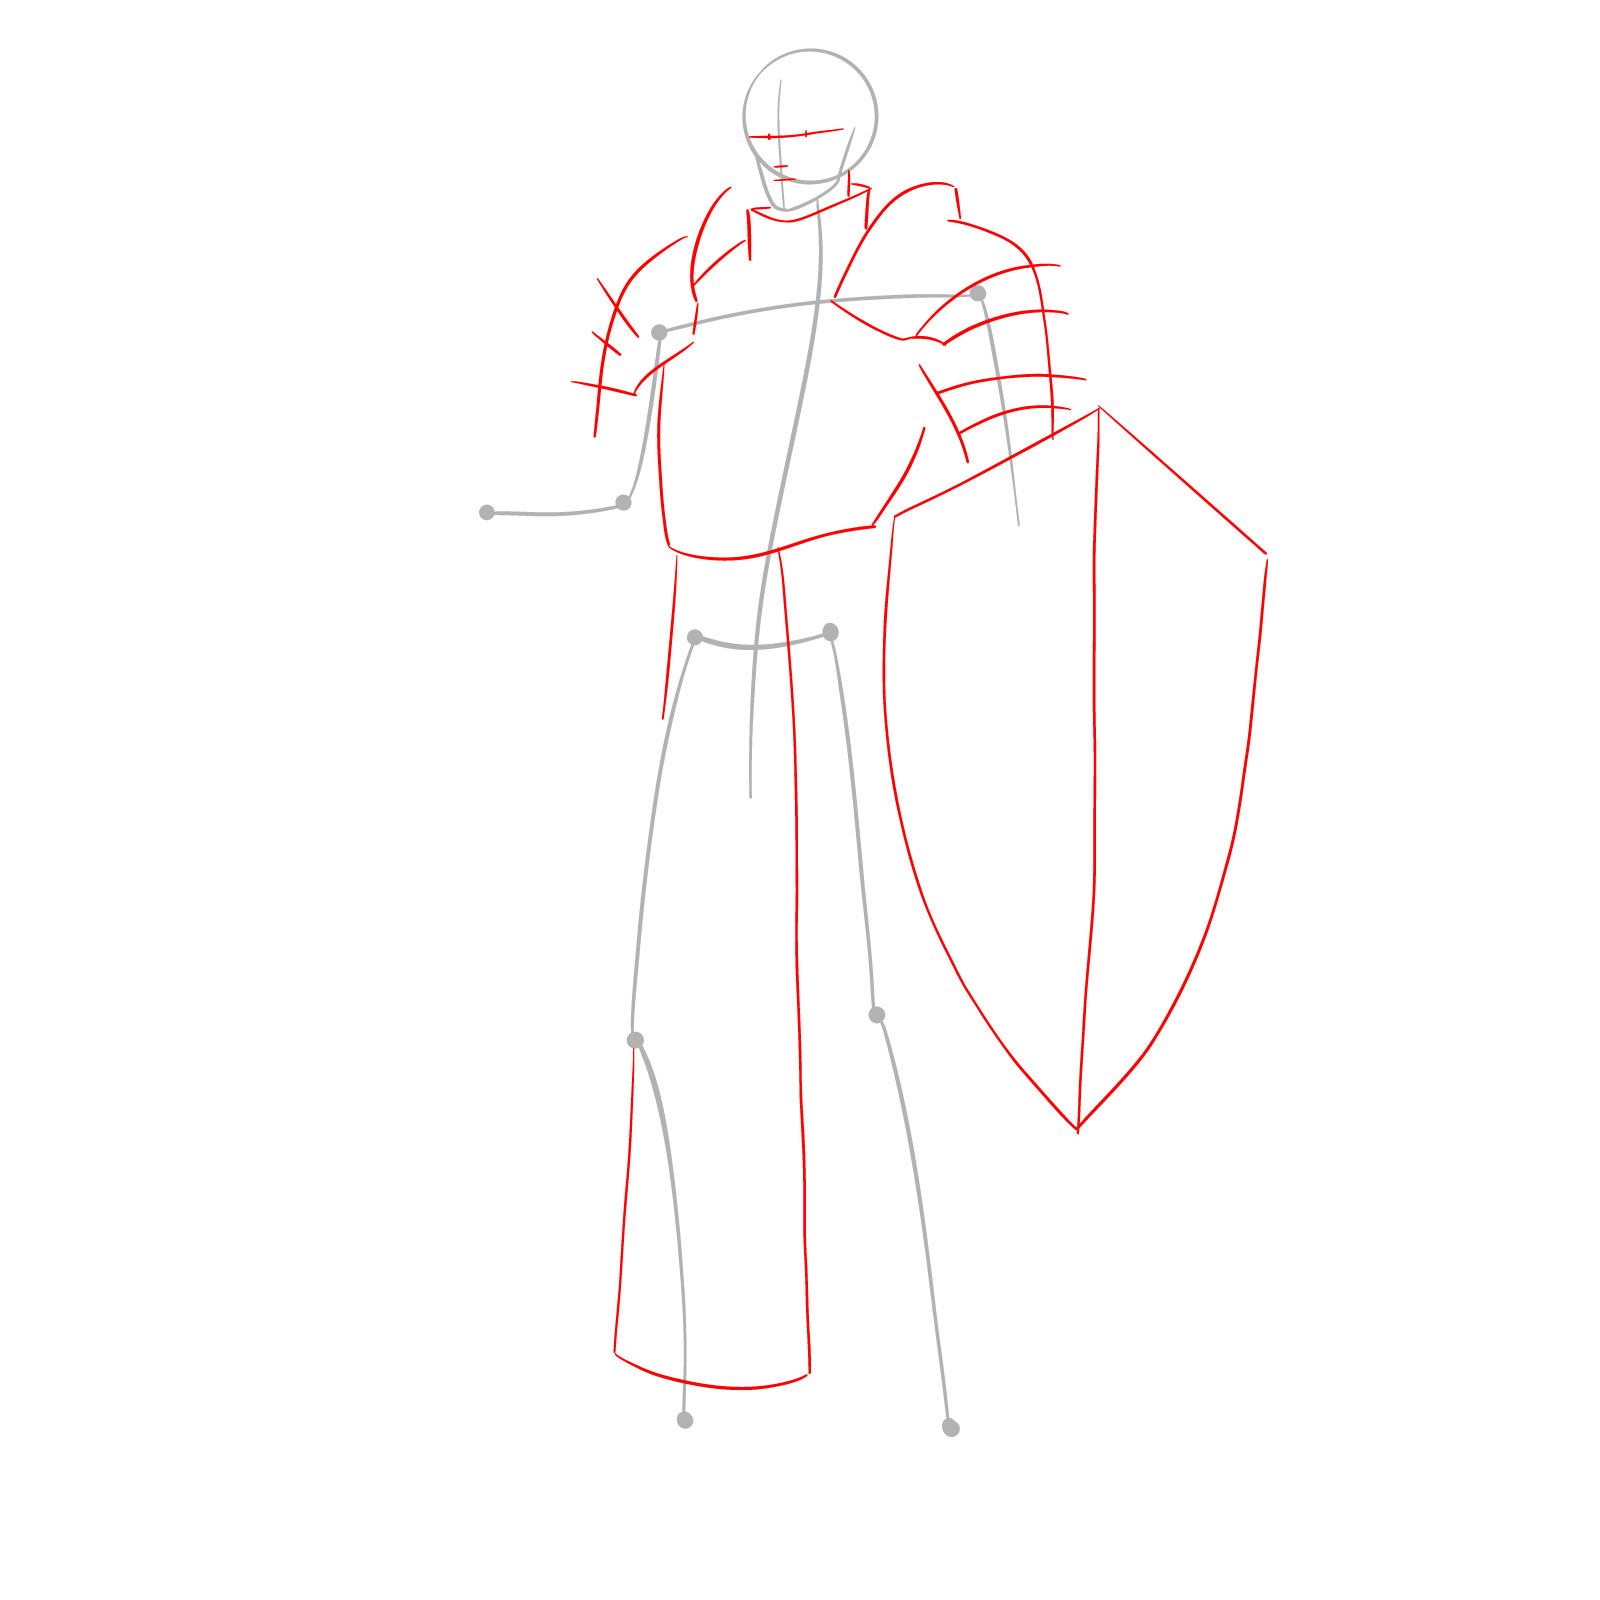
Step 02 – Draw basic outlines for the shoulder armor and the body structure down to the waist. Include a long, narrow vertical rectangle from the waist almost to the feet, representing a piece of cloth, a part of our paladin design. Sketch the outline of the shield
Sketching shoulder armor and body structure
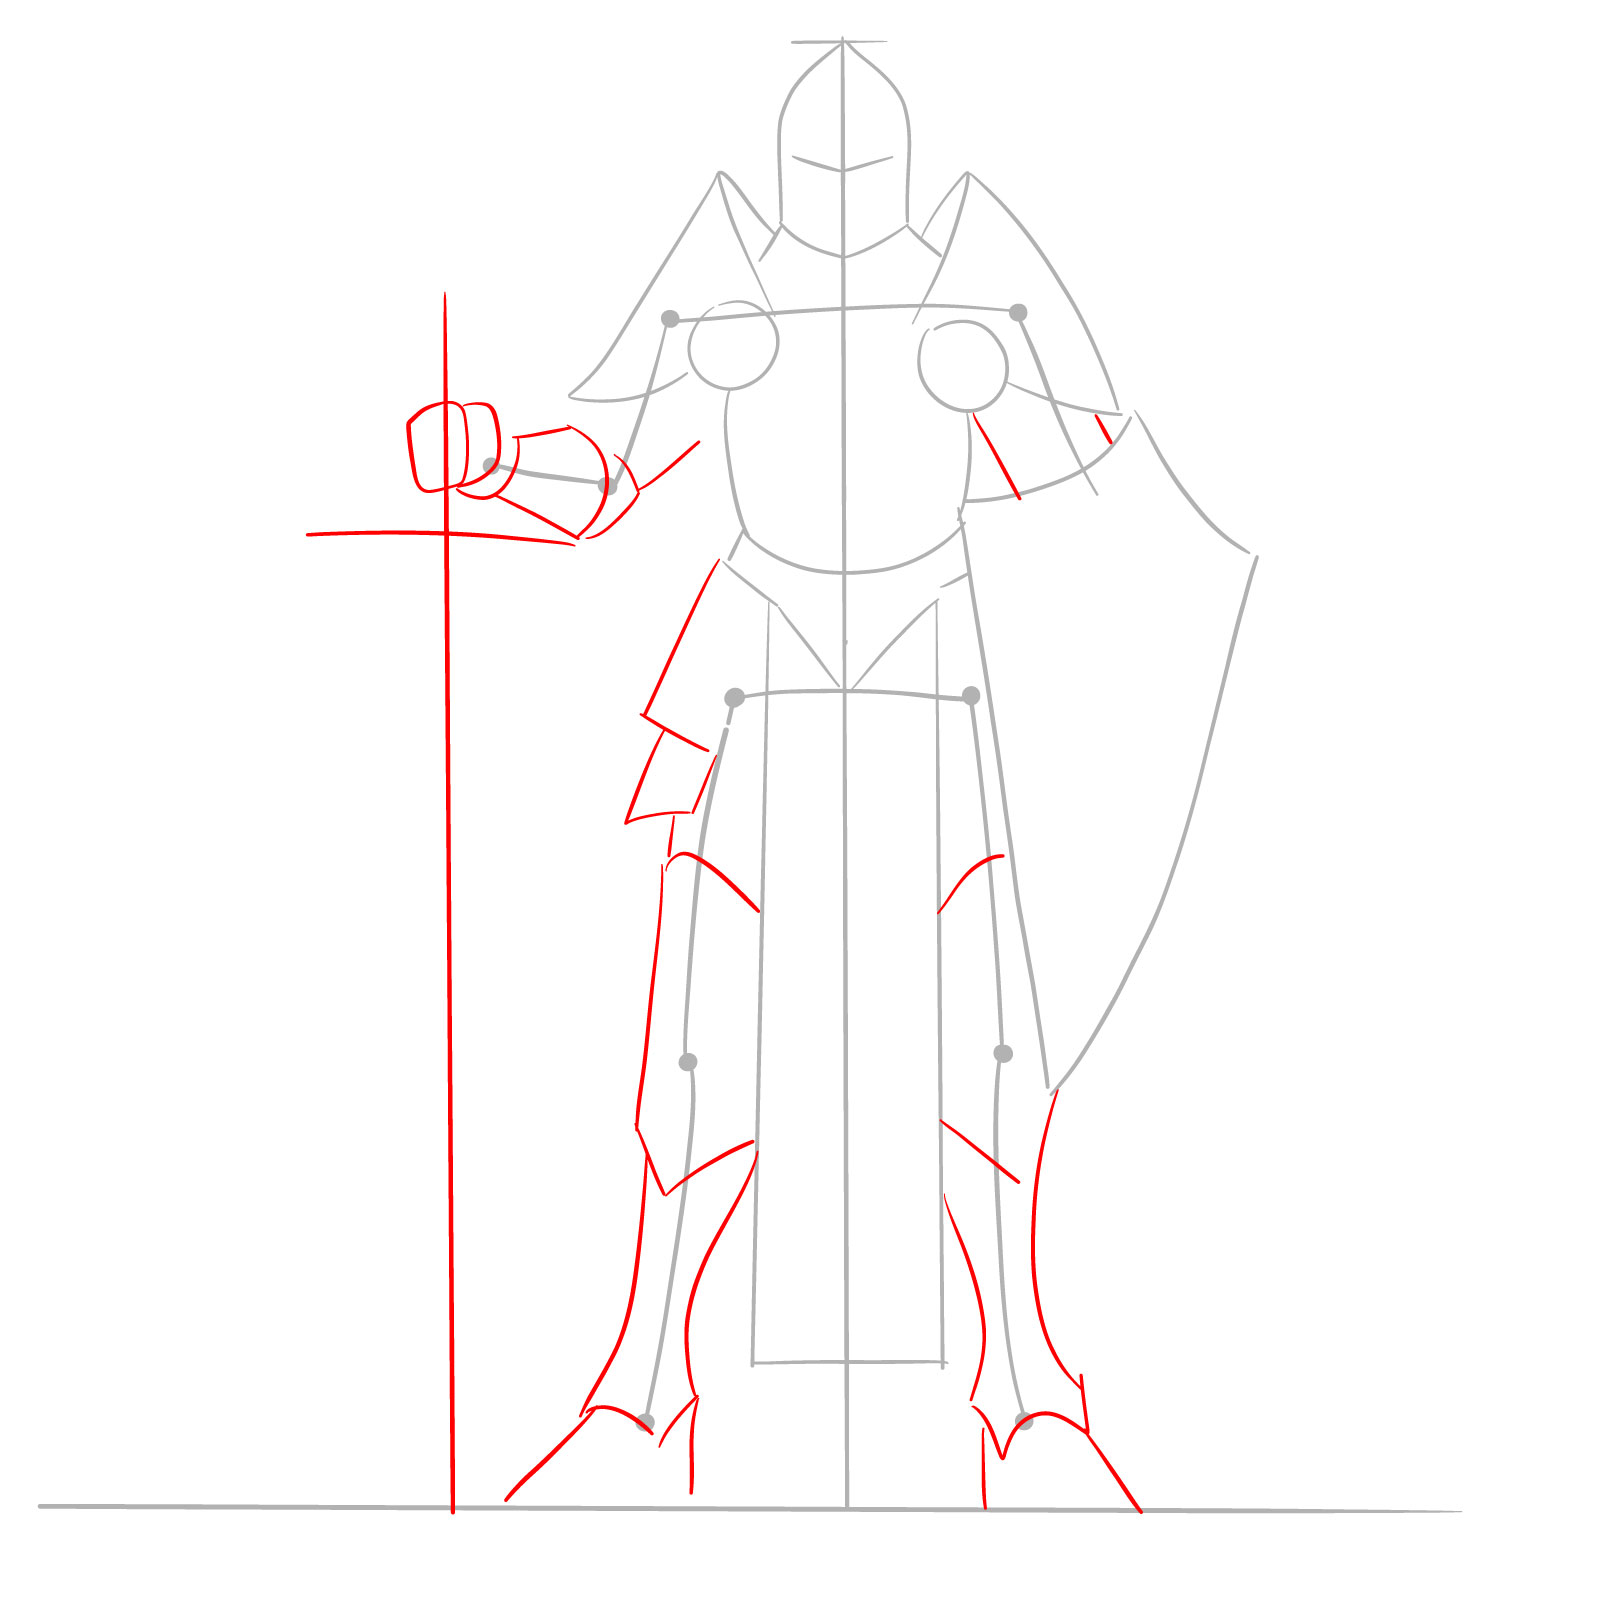
Step 03 – Sketch the basic structure of the legs and the visible part of the arm holding the shield. Outline the hand that will hold the sword and draw lines to indicate the sword’s position
Placing legs, arms, and sword
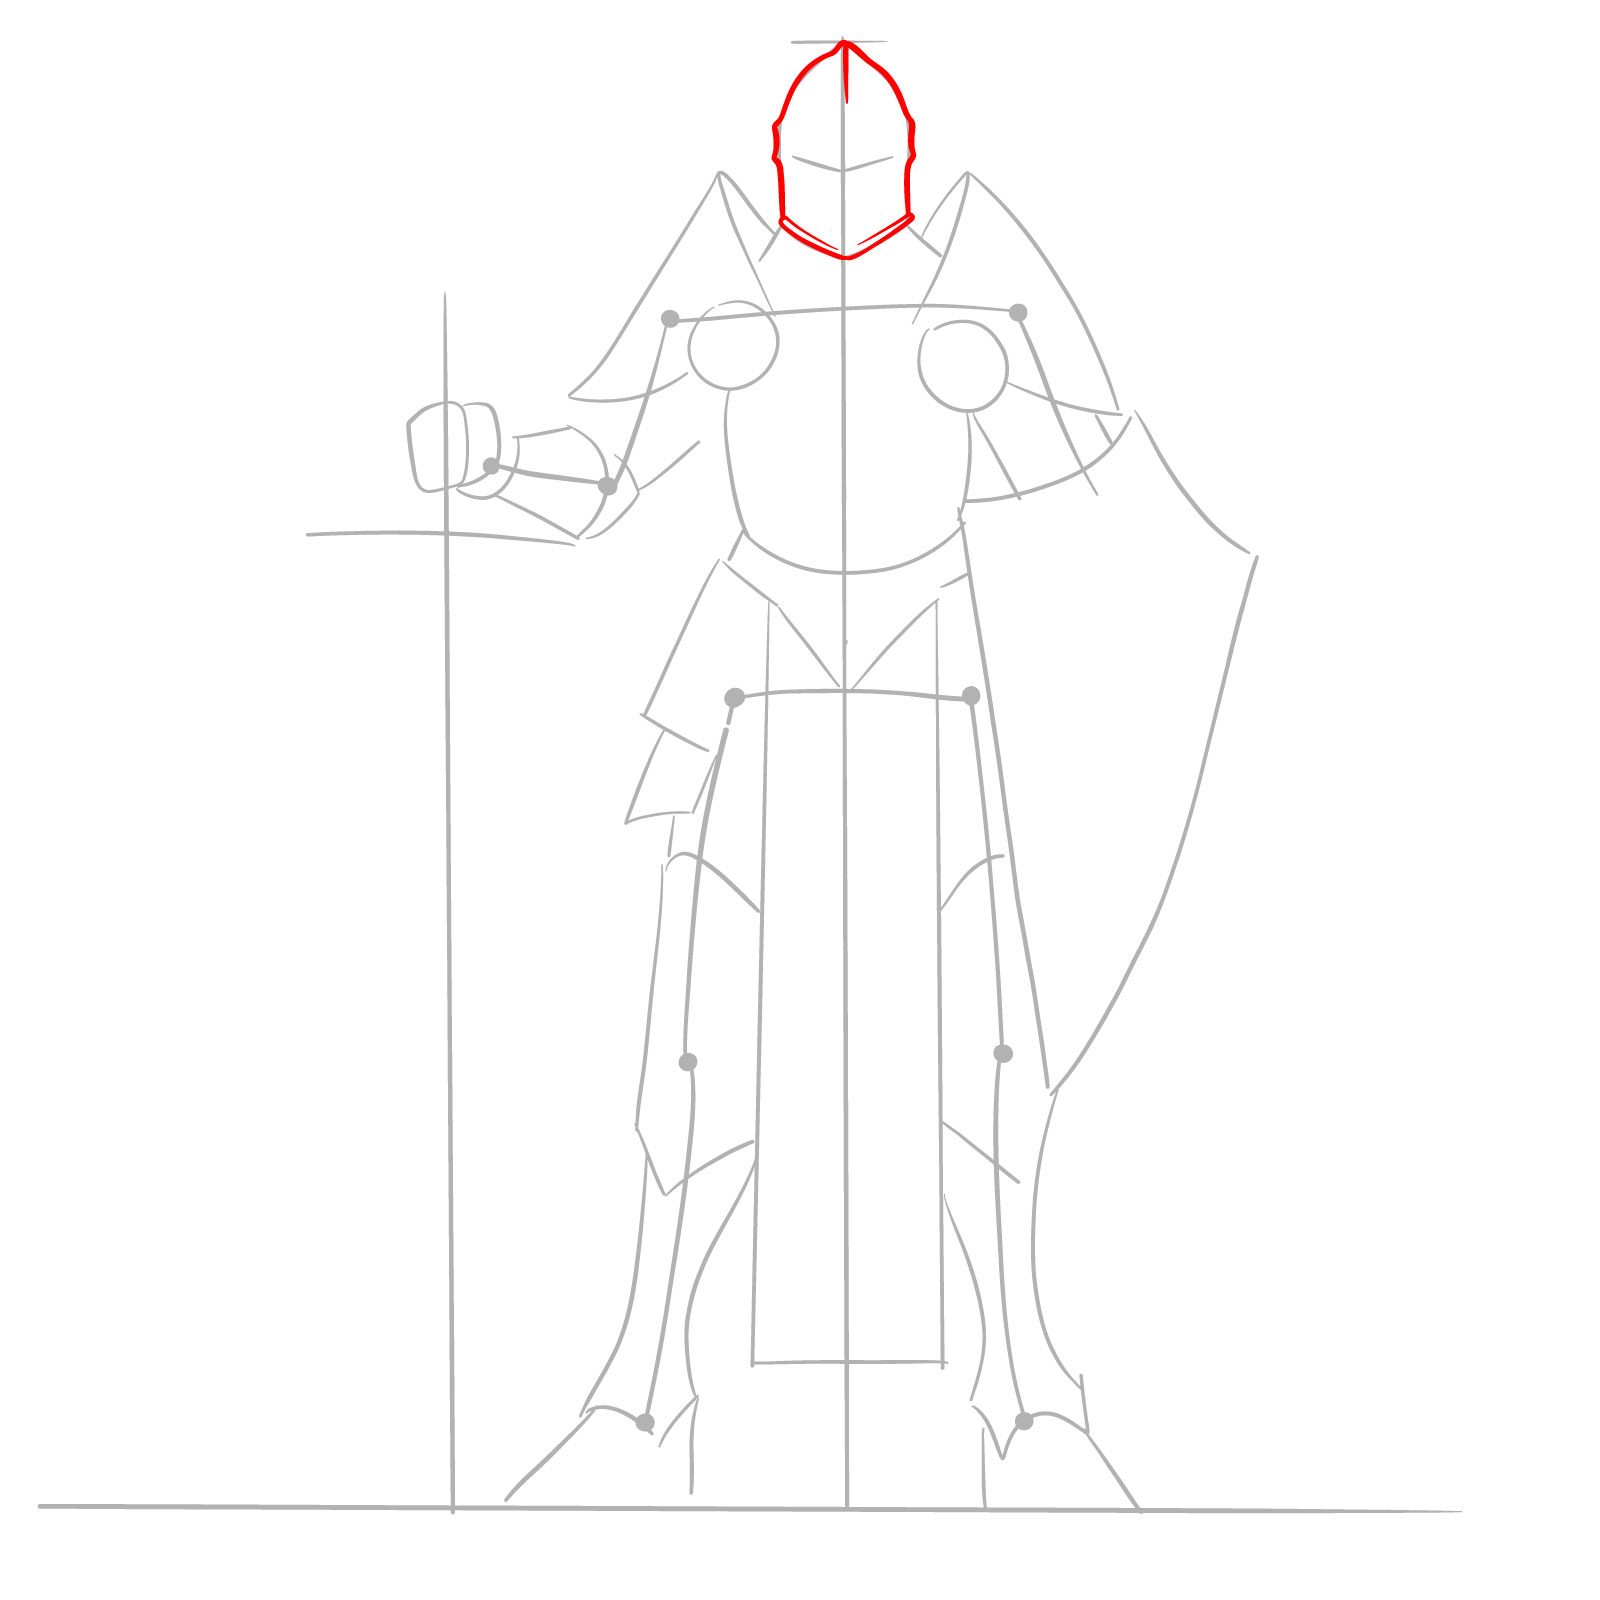
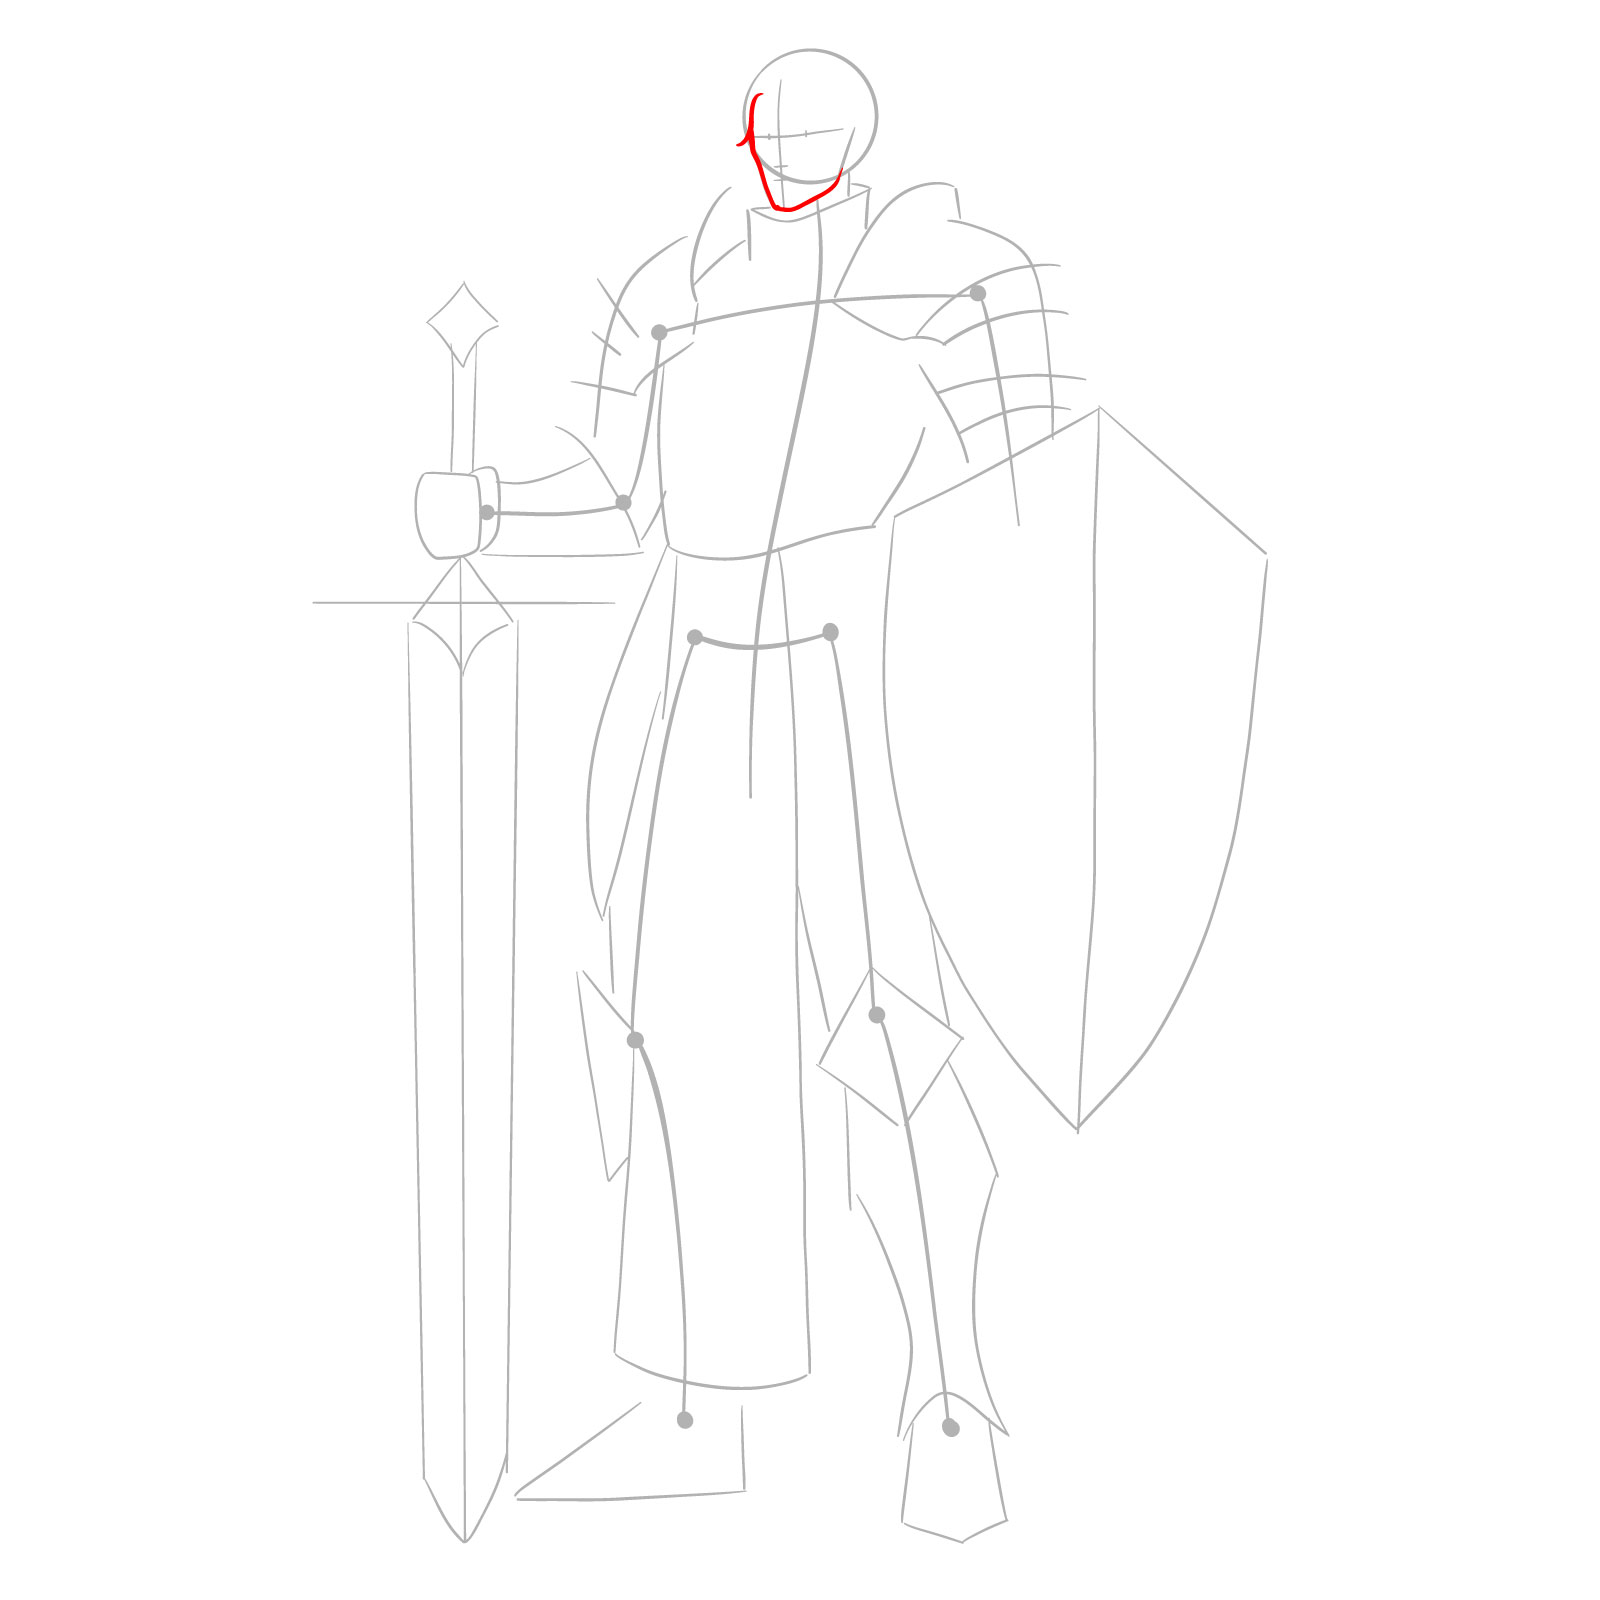
Step 04 – Define the helmet’s outline more clearly, refining its shape and structure
Refining the helmet outline
Step 05 – Draw a horizontal slot for the eyes, allowing visibility through the helmet. Add a series of vertical lines below it for ventilation and breathing
Adding eye slot and ventilation to the helmet
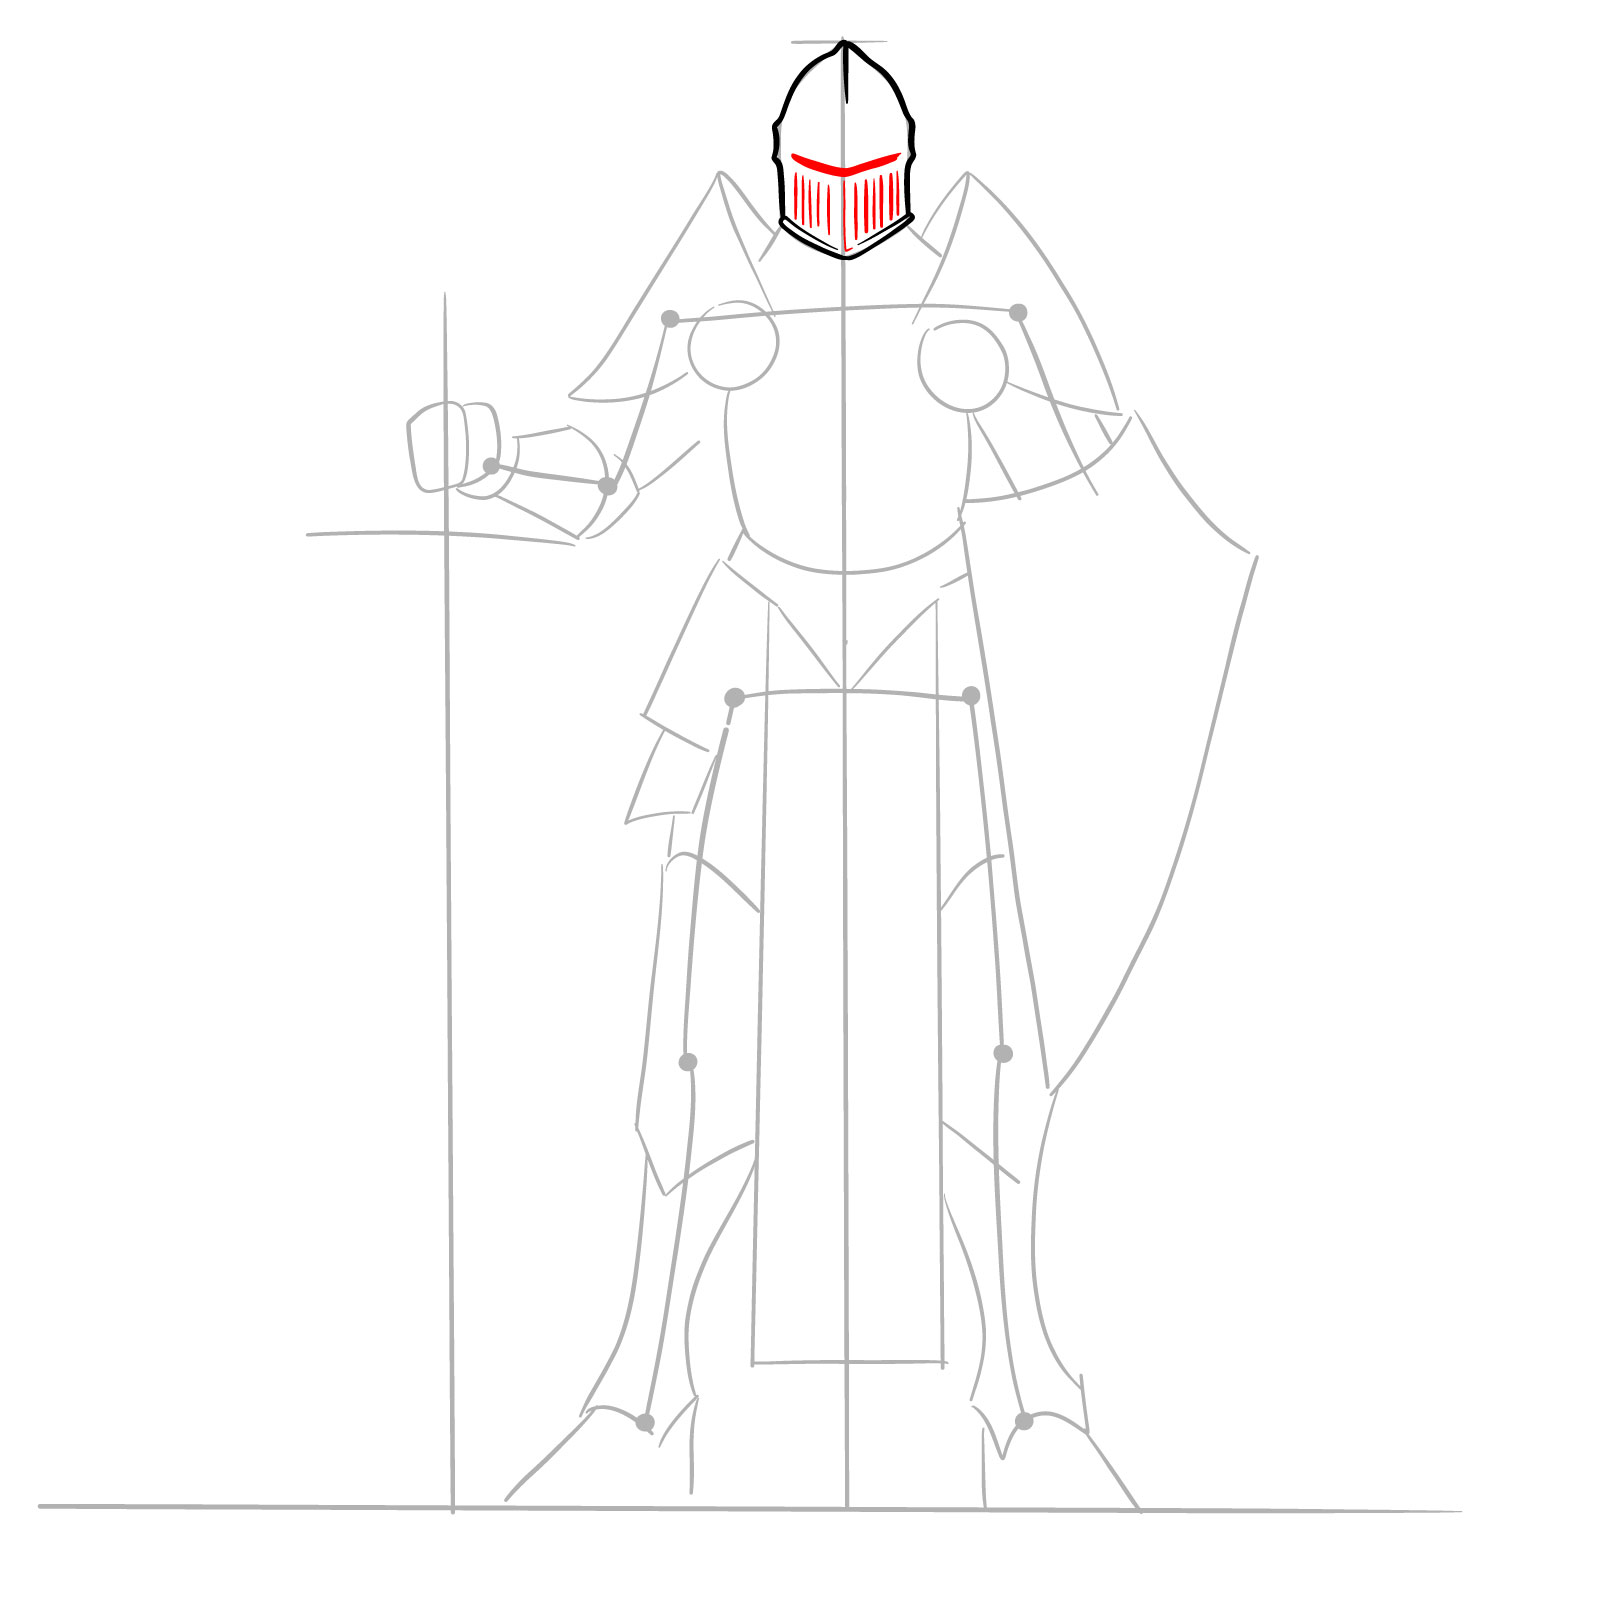
Step 06 – Draw the neck connecting the head to the torso. Begin outlining the neck part of the armor
Sketching neck and neck armor
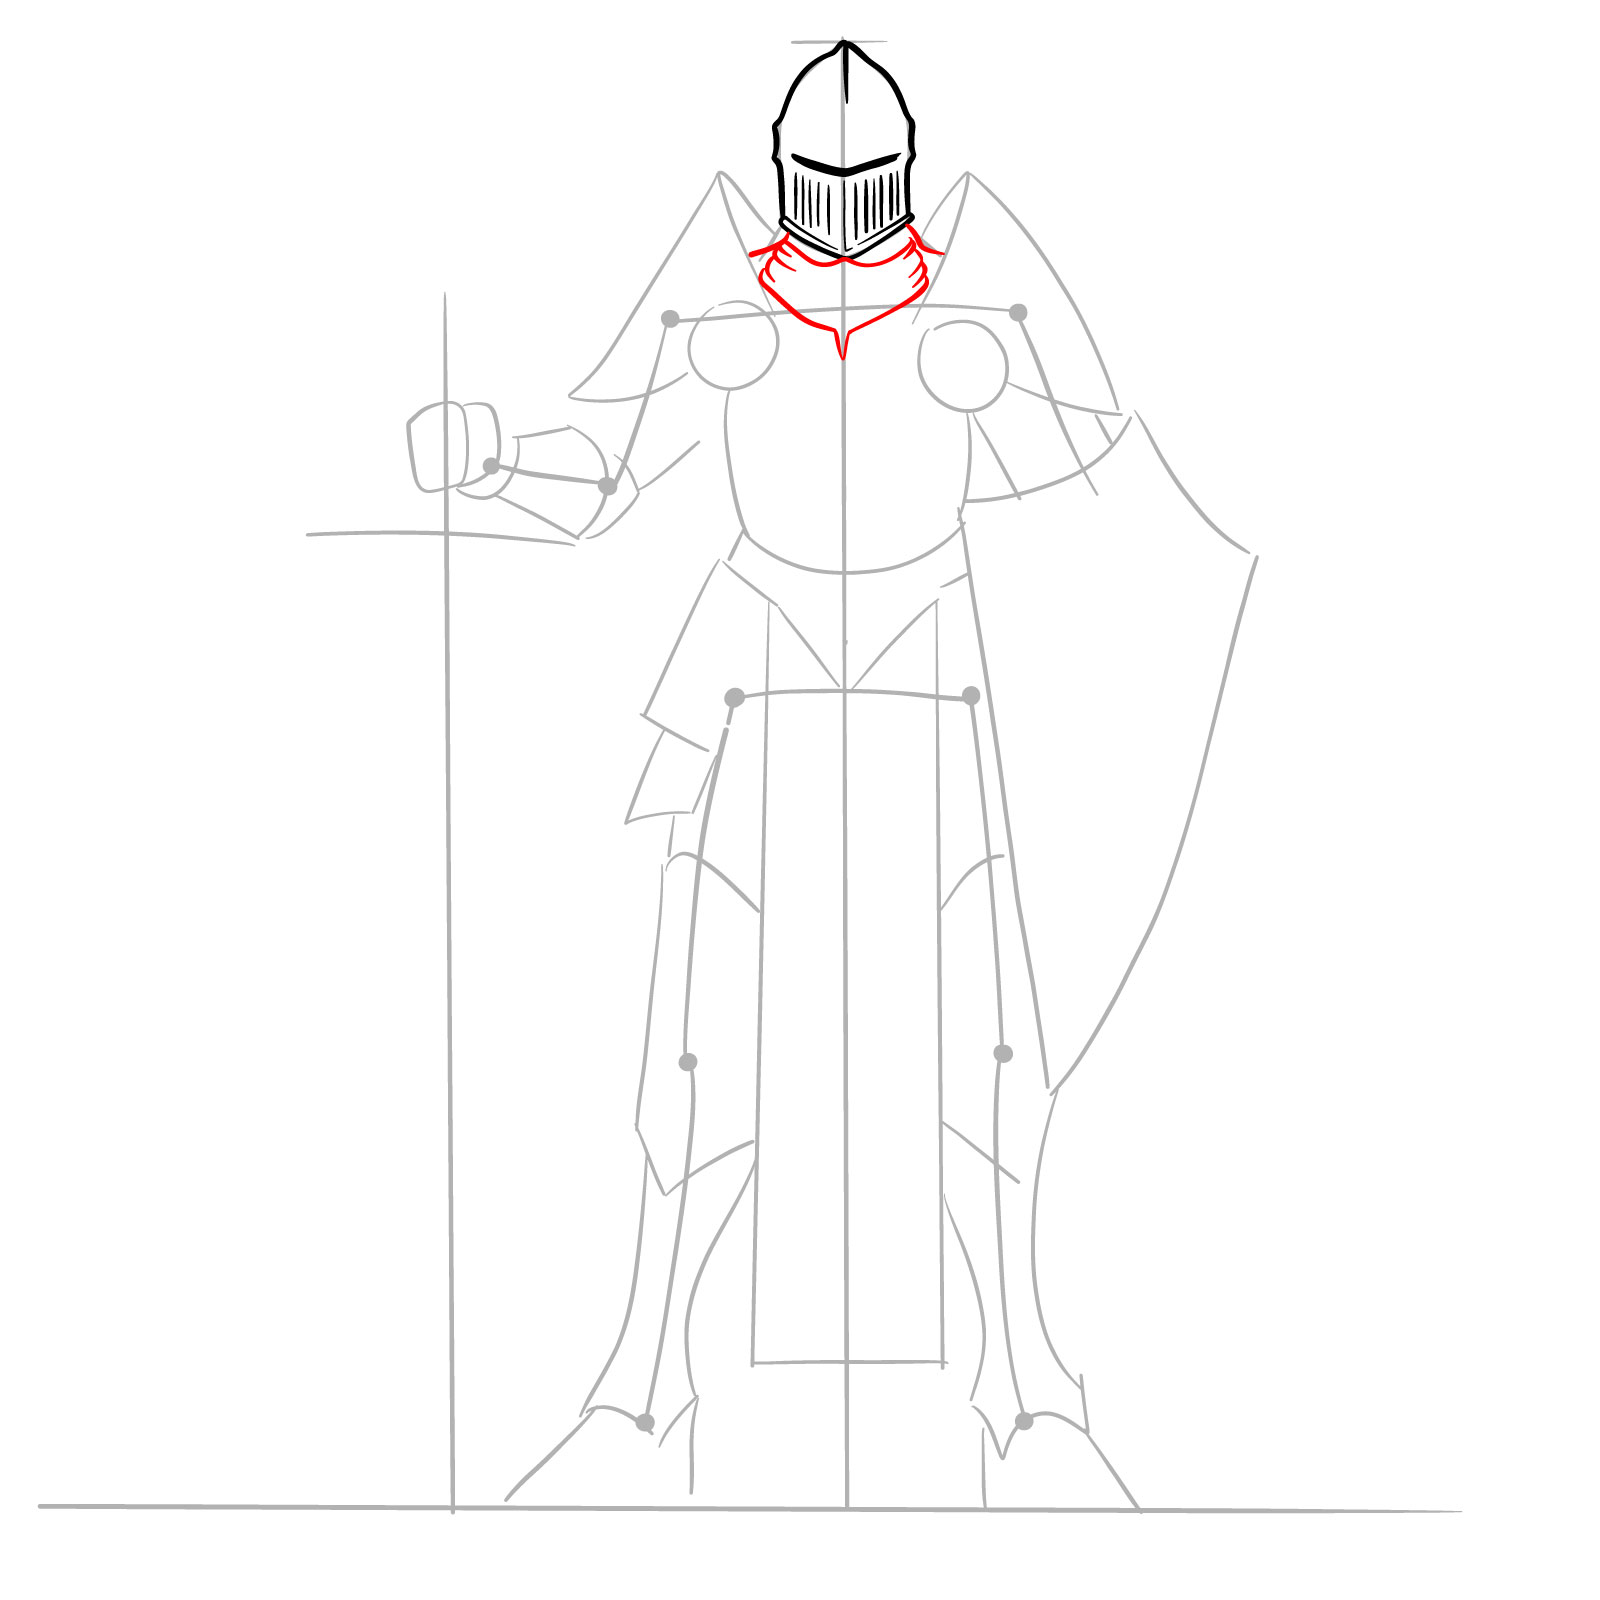
Step 07 – Begin sketching the initial shapes of the shoulder armor, making sure it appears robust and protective
Starting the shoulder armor
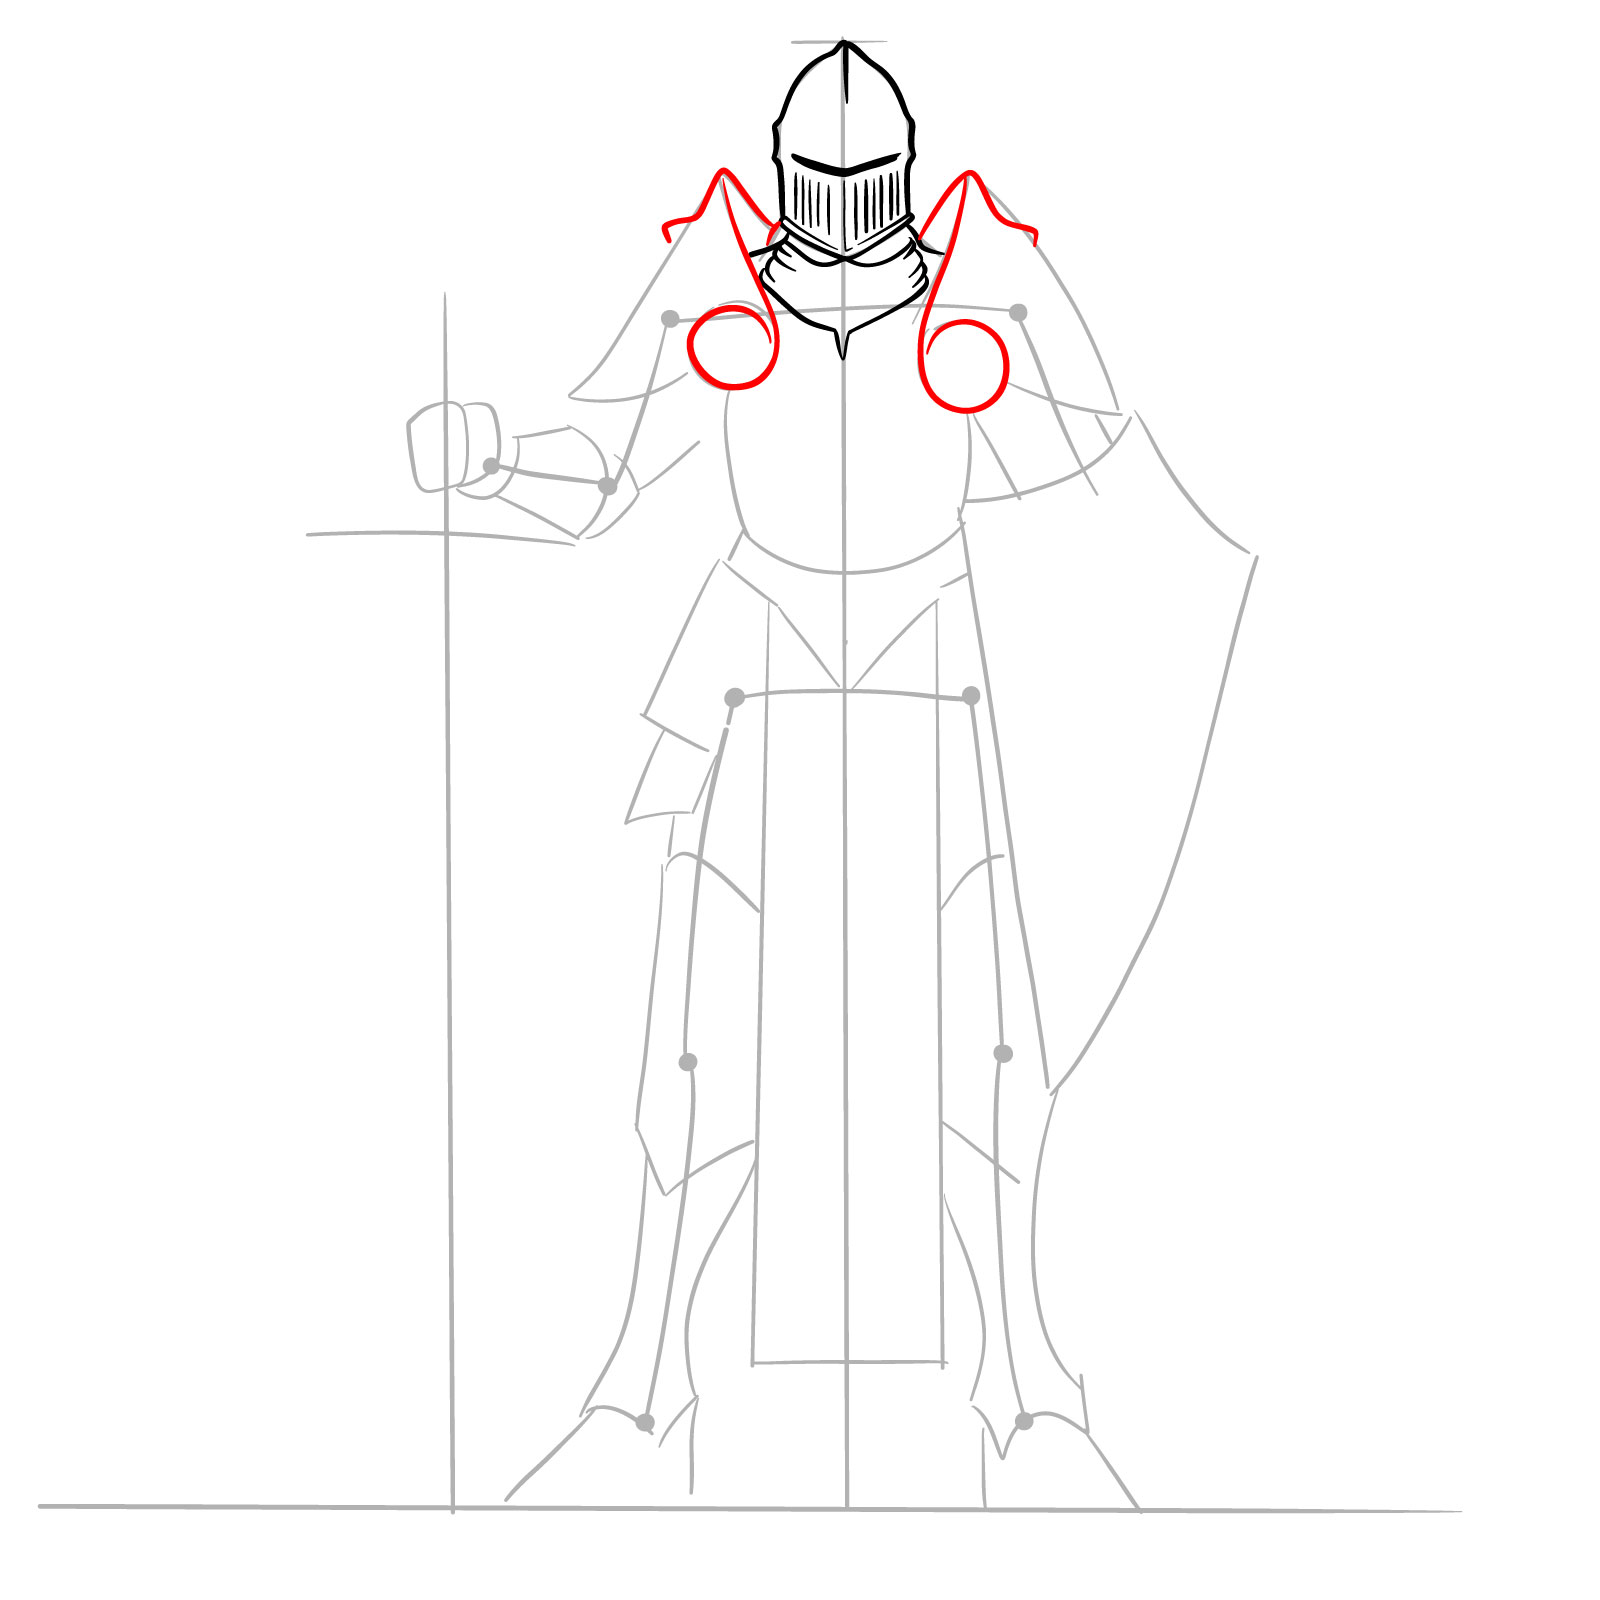
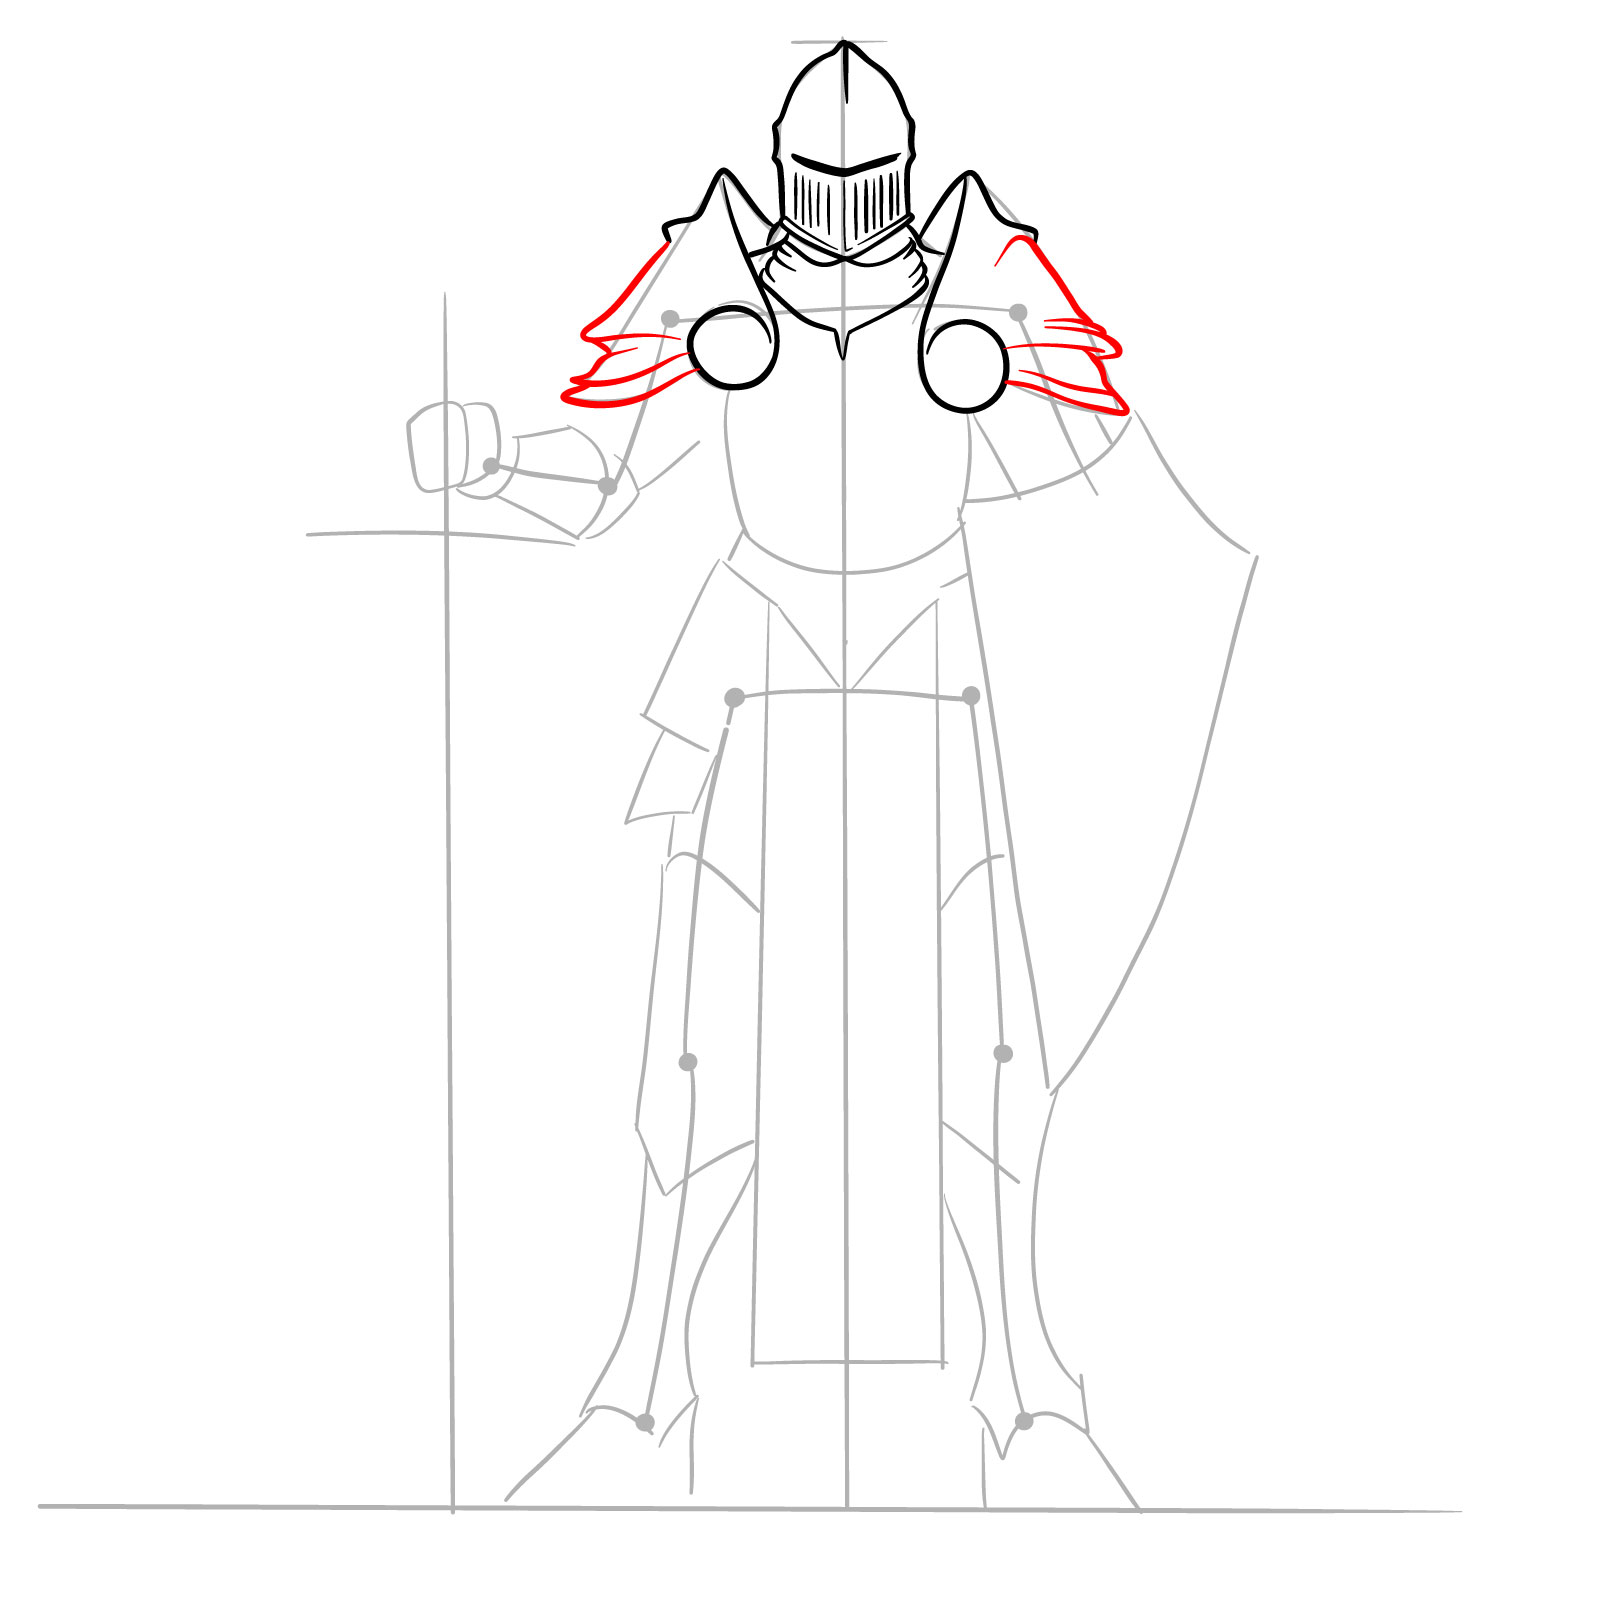
Step 08 – Complete the shoulder armor detailing, ensuring it integrates well with the previously drawn neck armor
Completing the shoulder armor
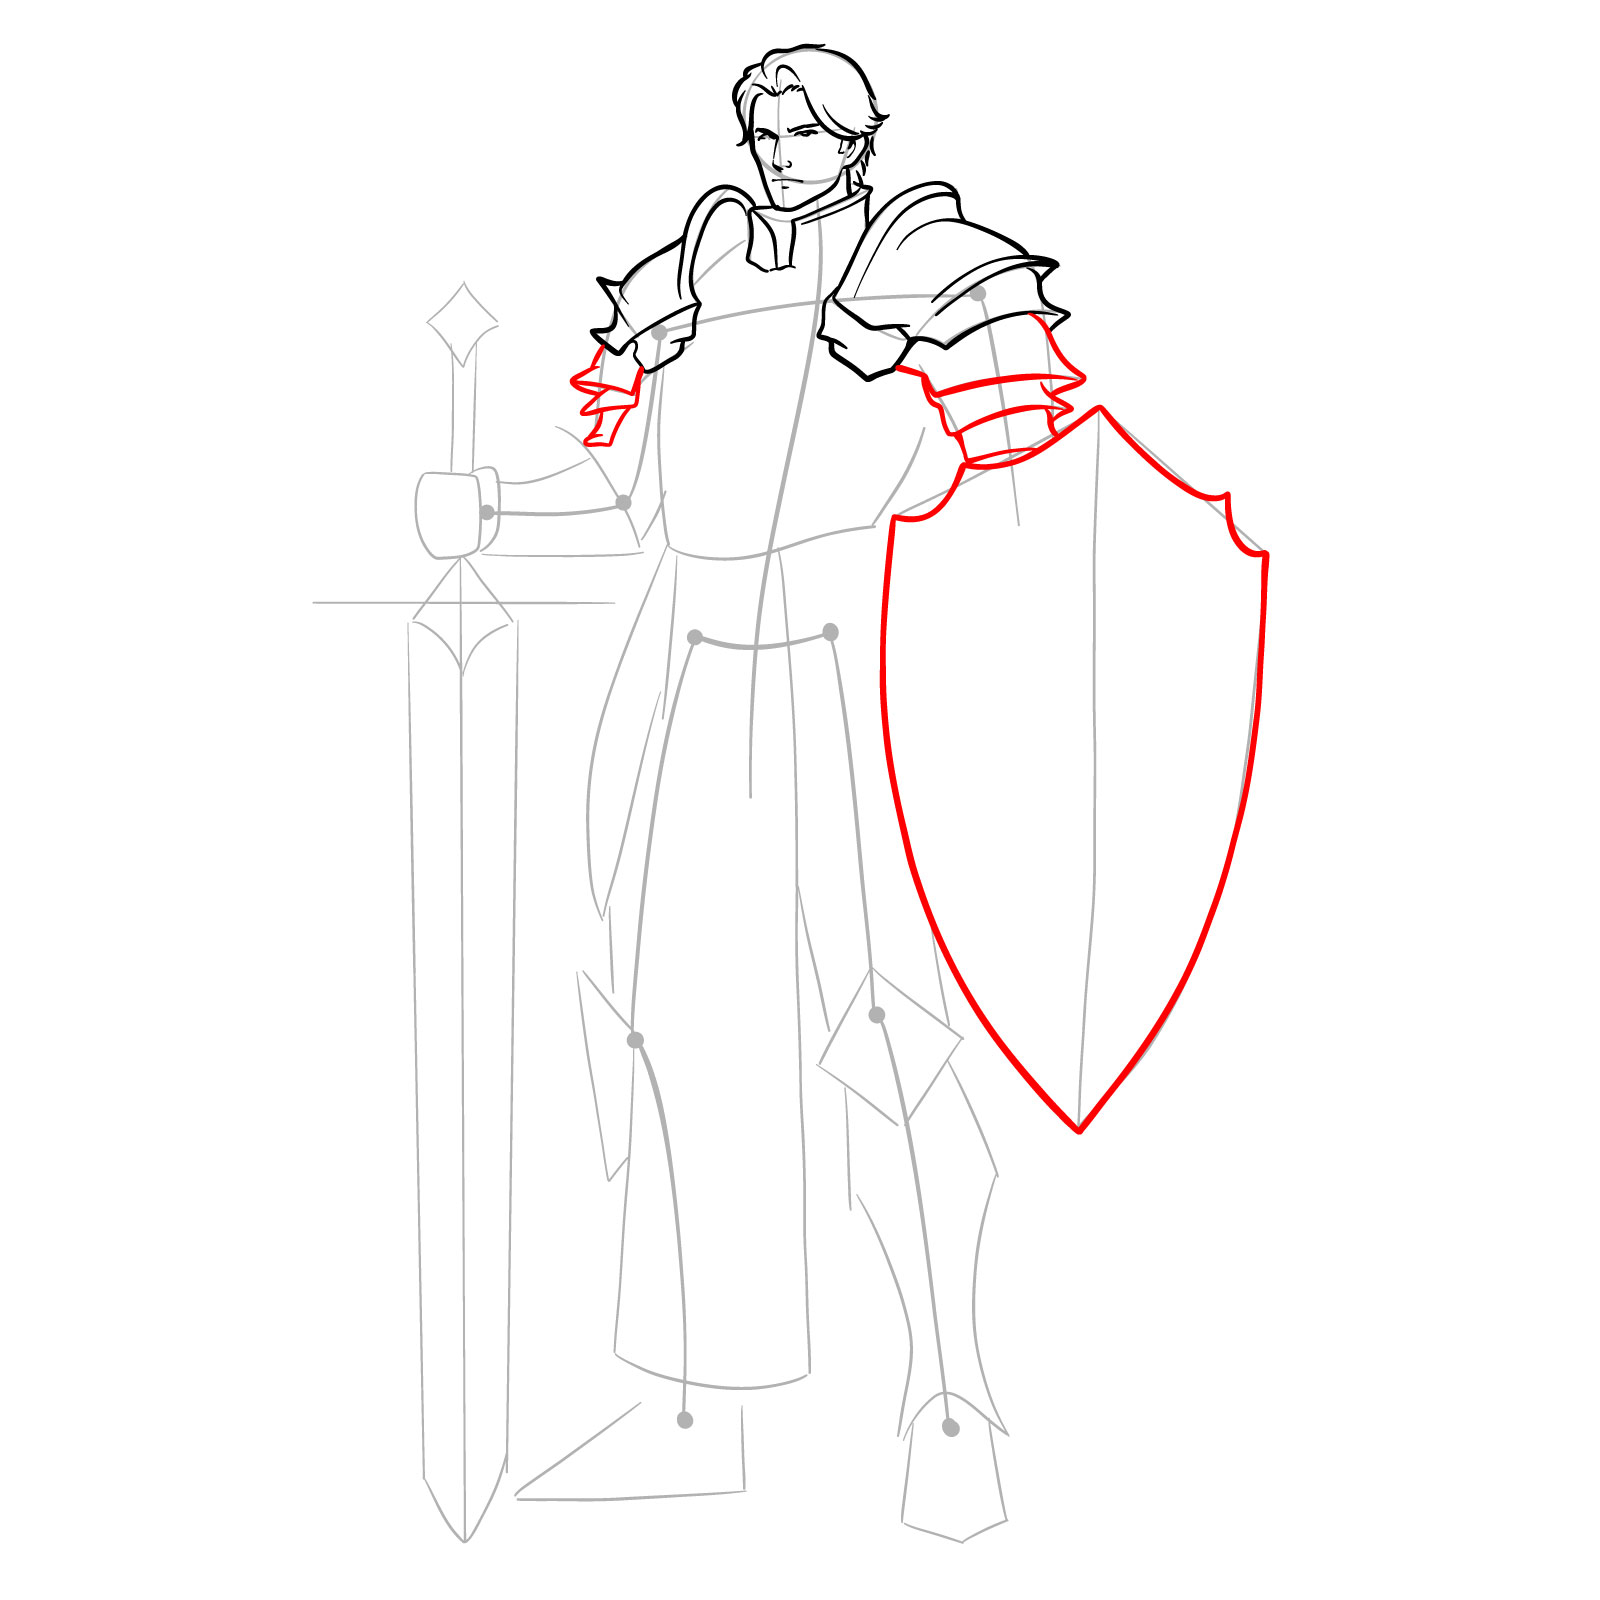
Step 09 – Sketch the visible part of the arm that is hidden behind the shield and draw the upper half of the shield’s outline
Outlining the arm and upper shield
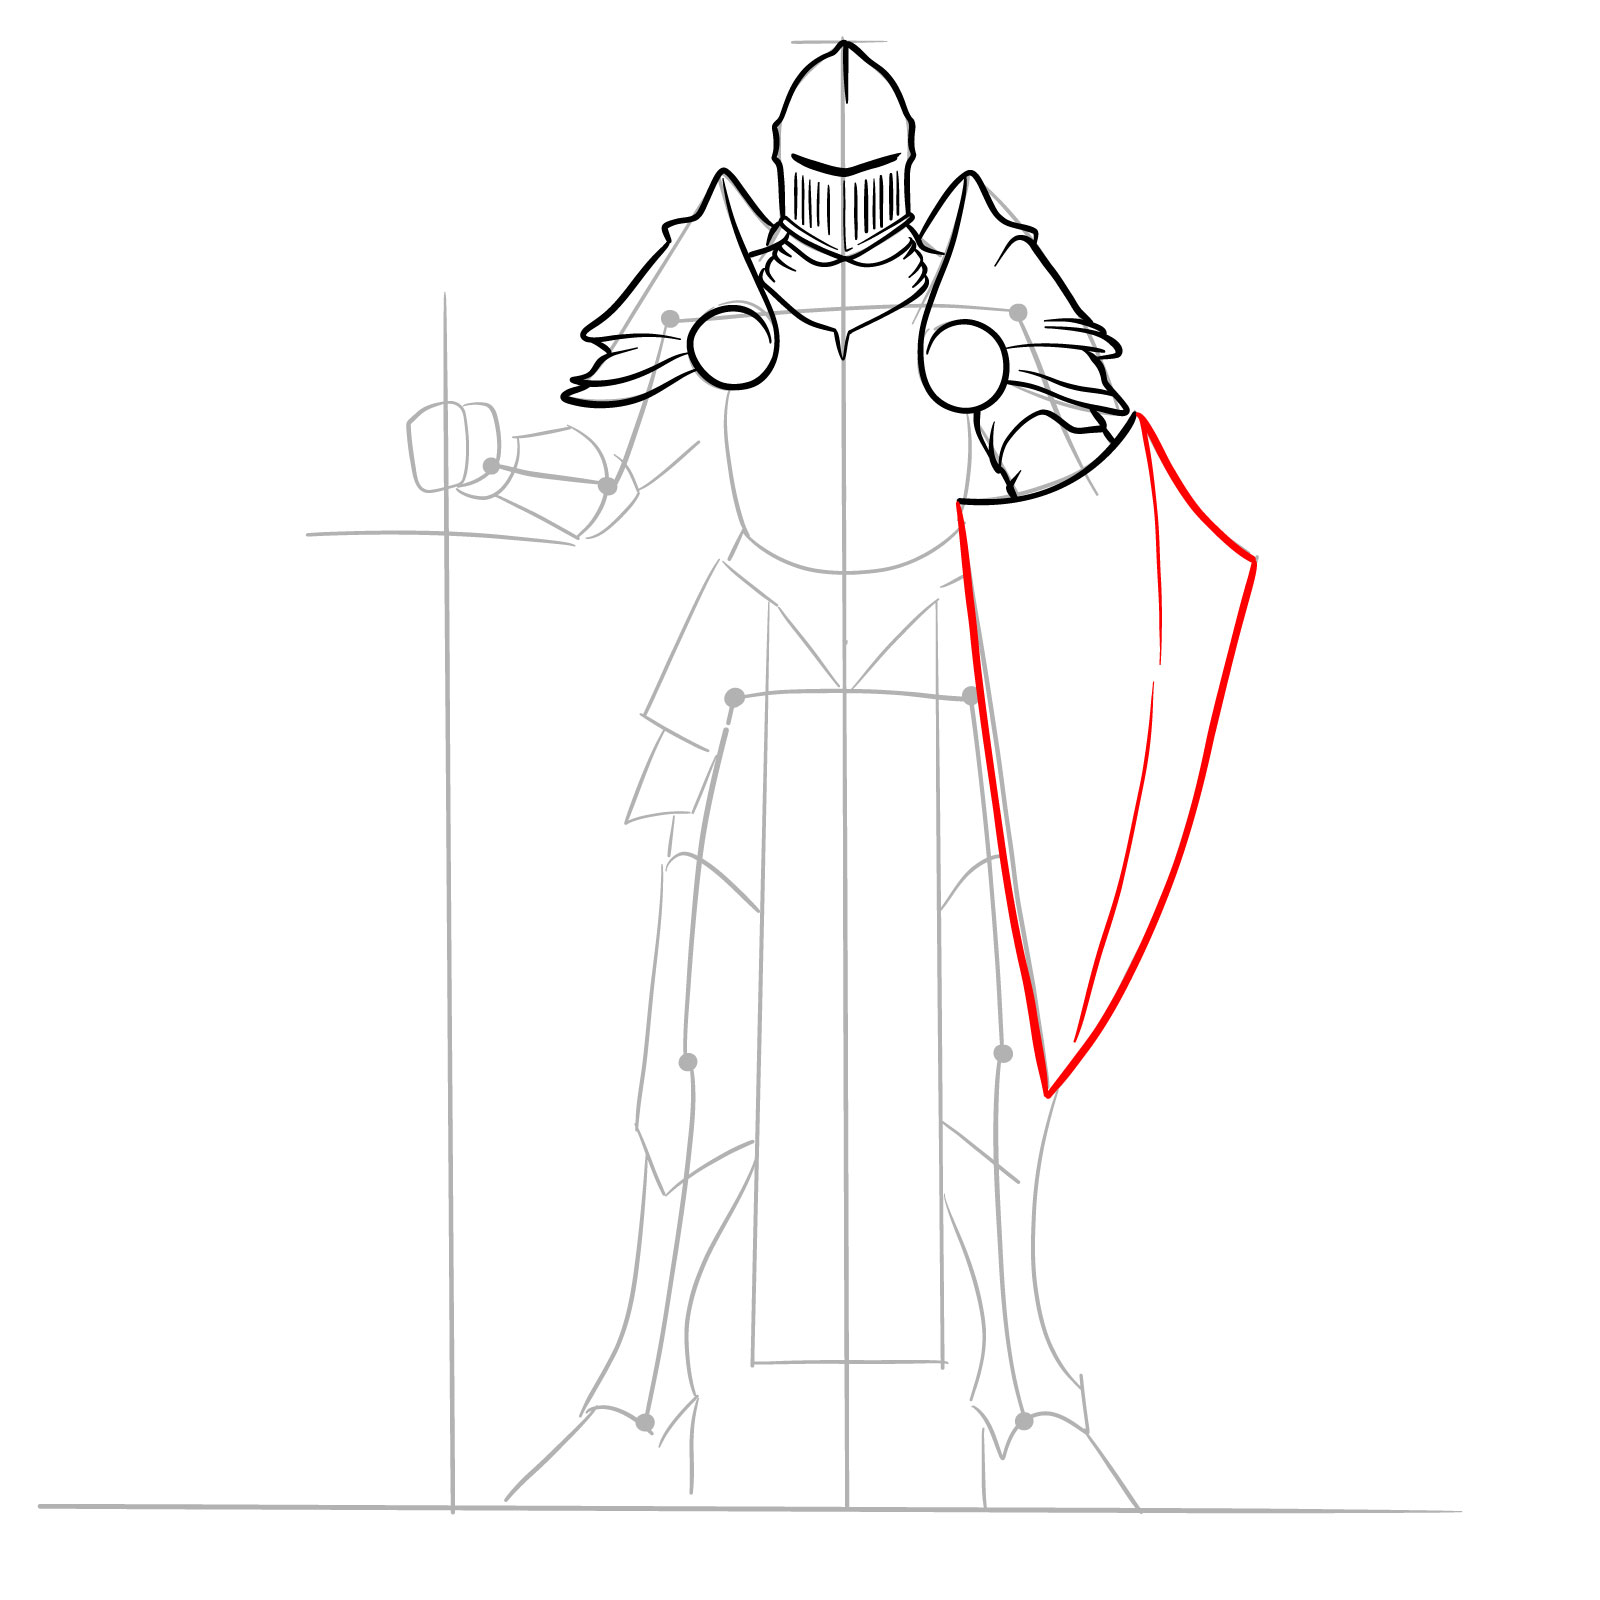
Step 10 – Finish the full outline of the shield, detailing its shape
Completing the shield outline
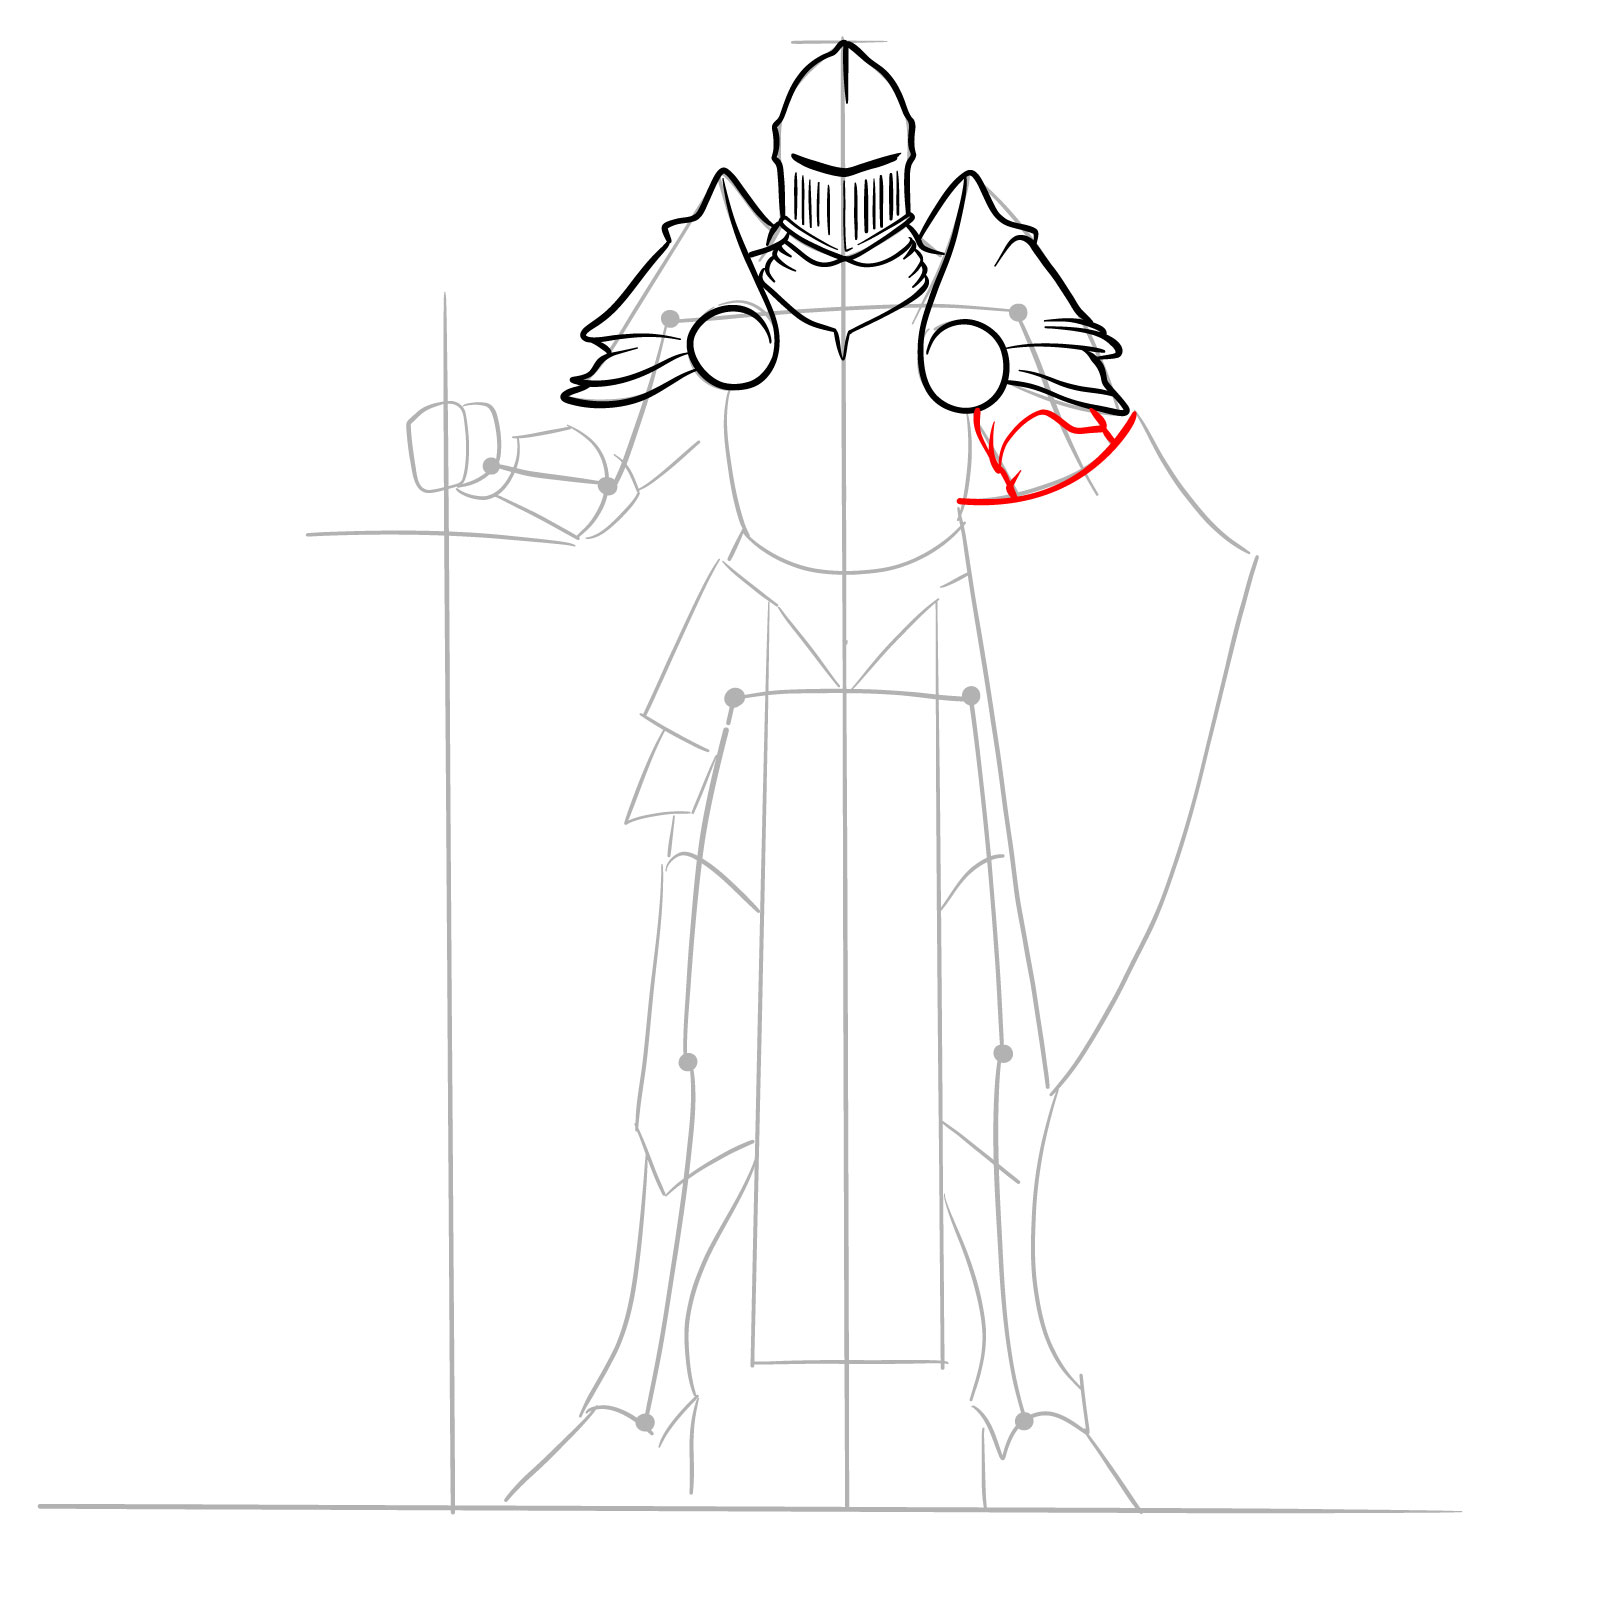
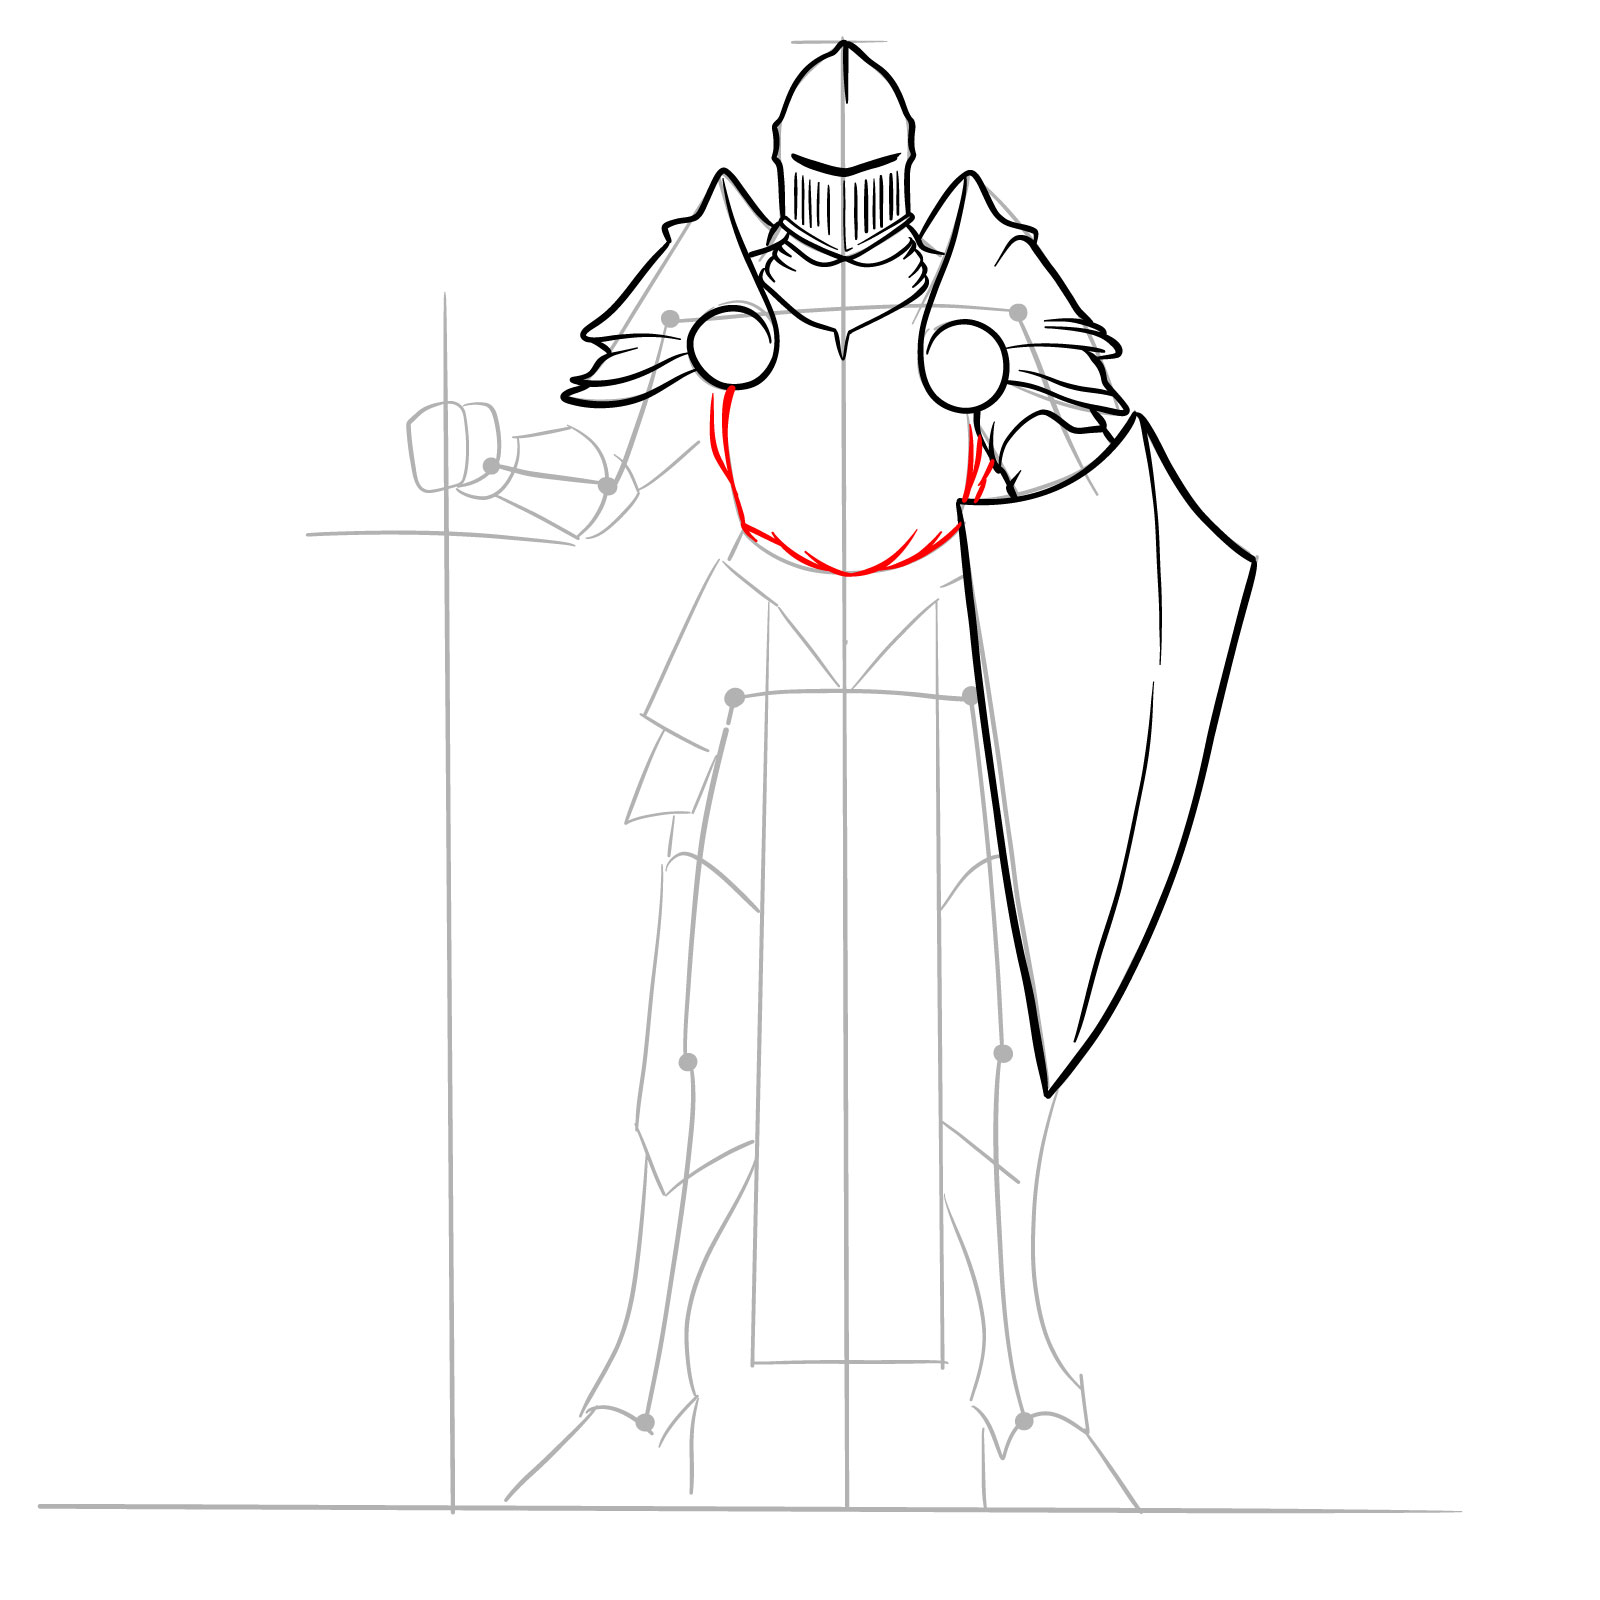
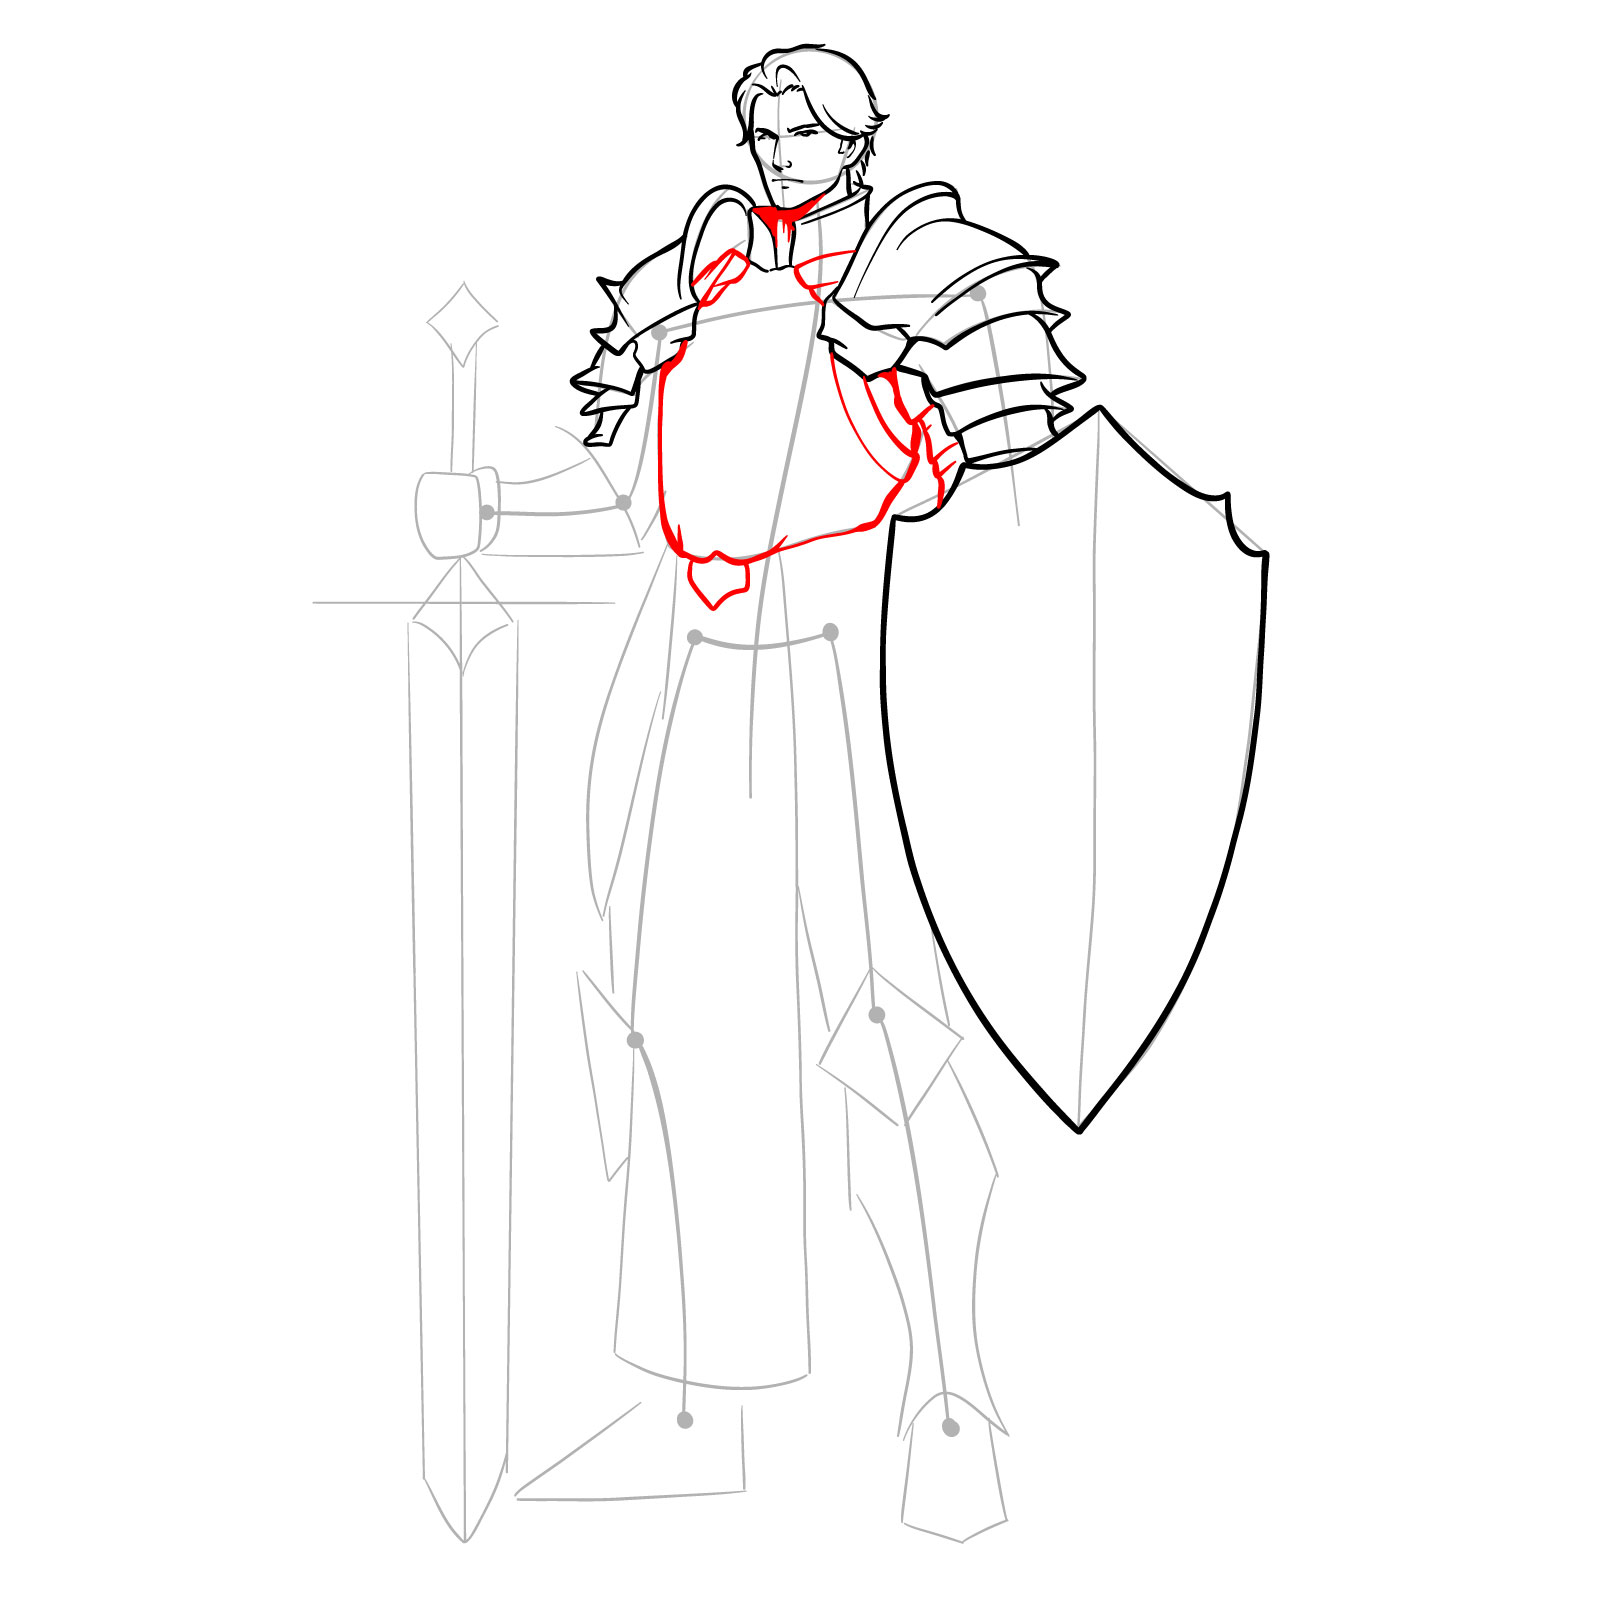
Step 11 – Draw the upper body down to the waist, ensuring the armor and fabrics integrate smoothly
Defining the body to the waist
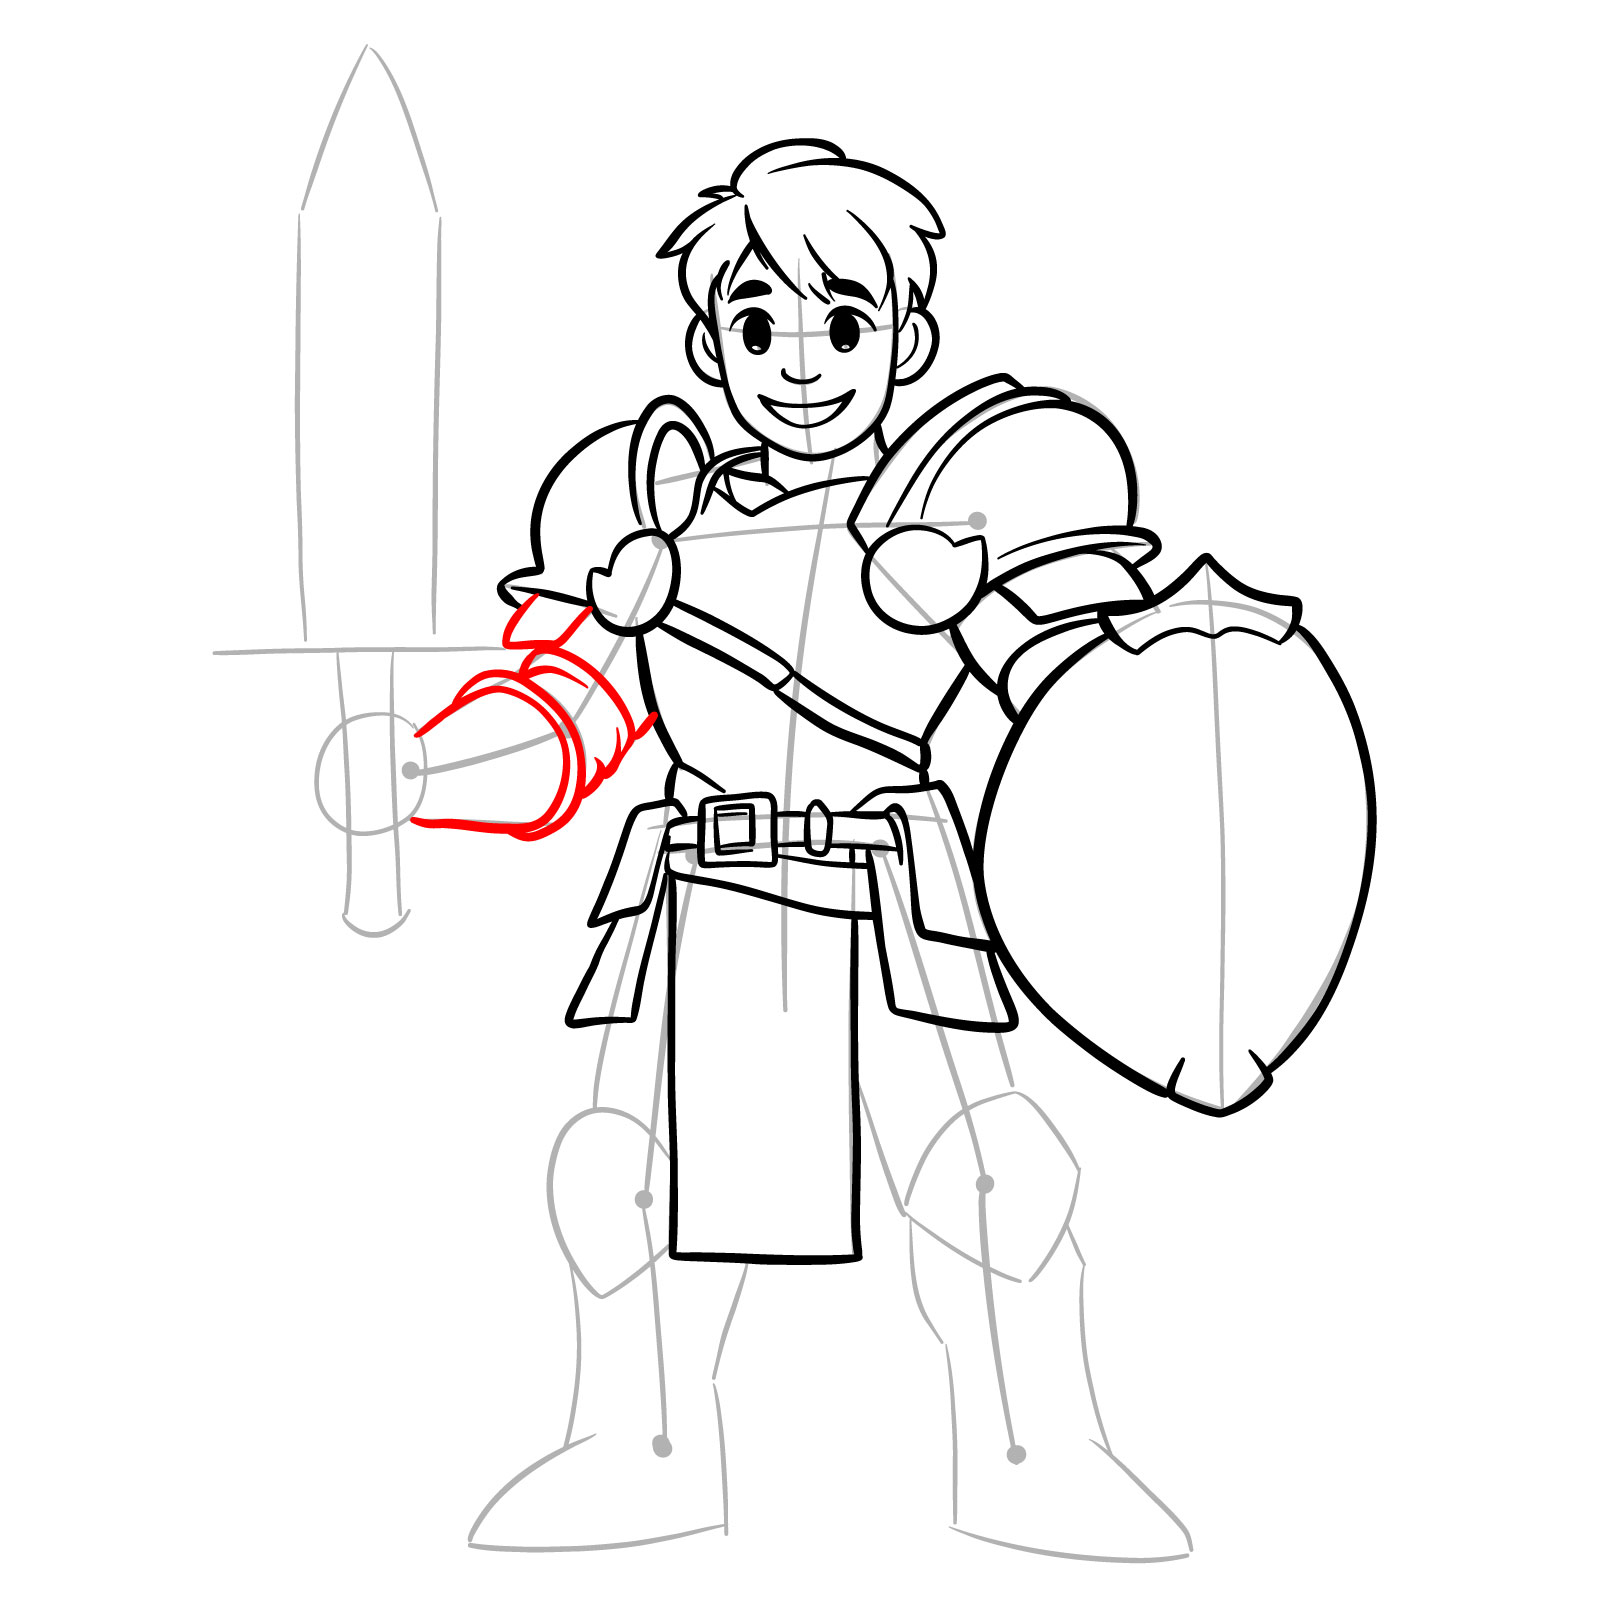
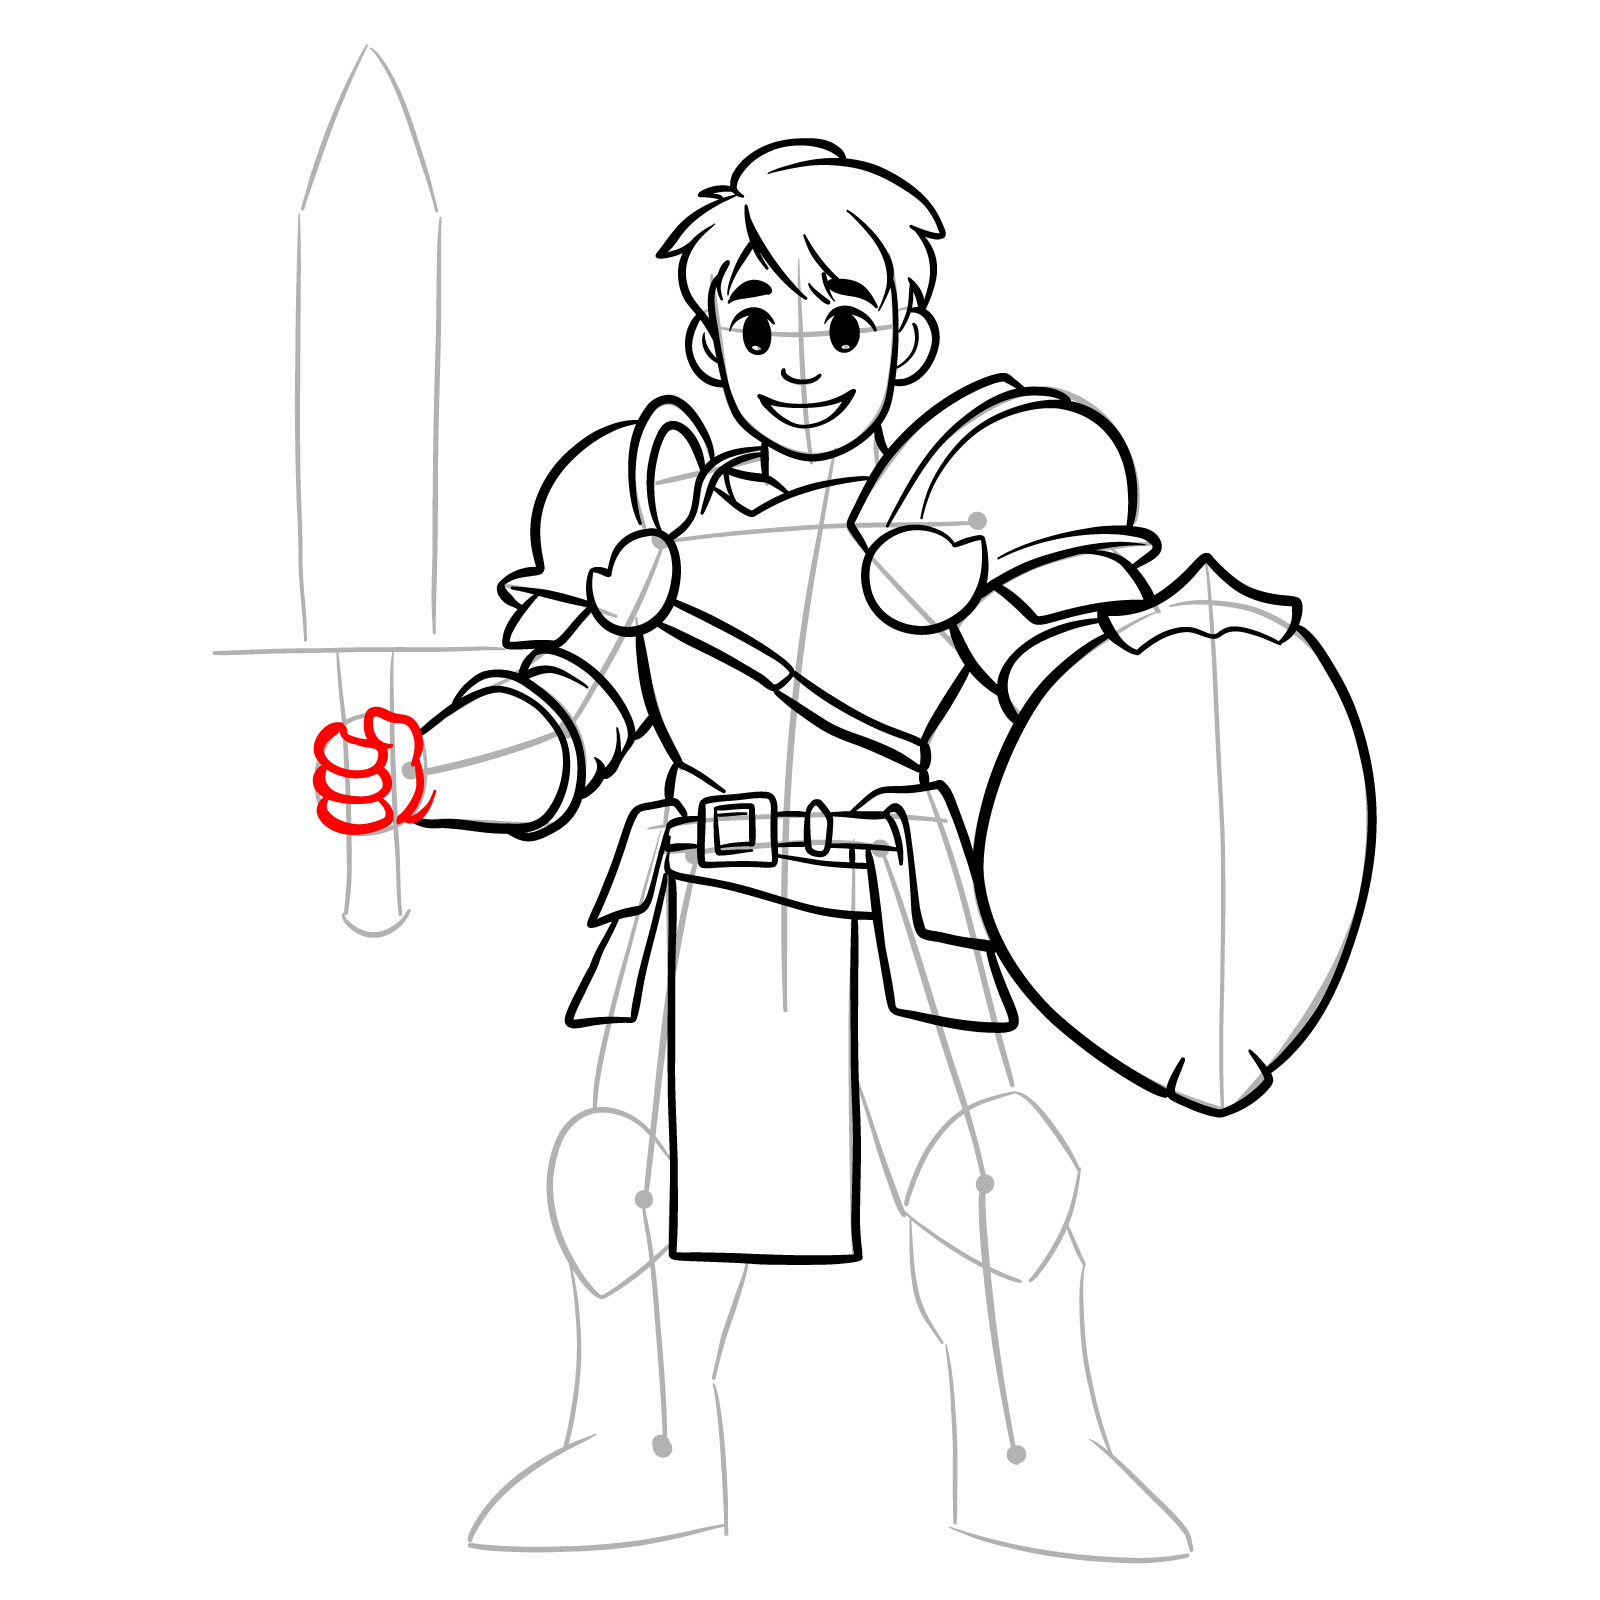
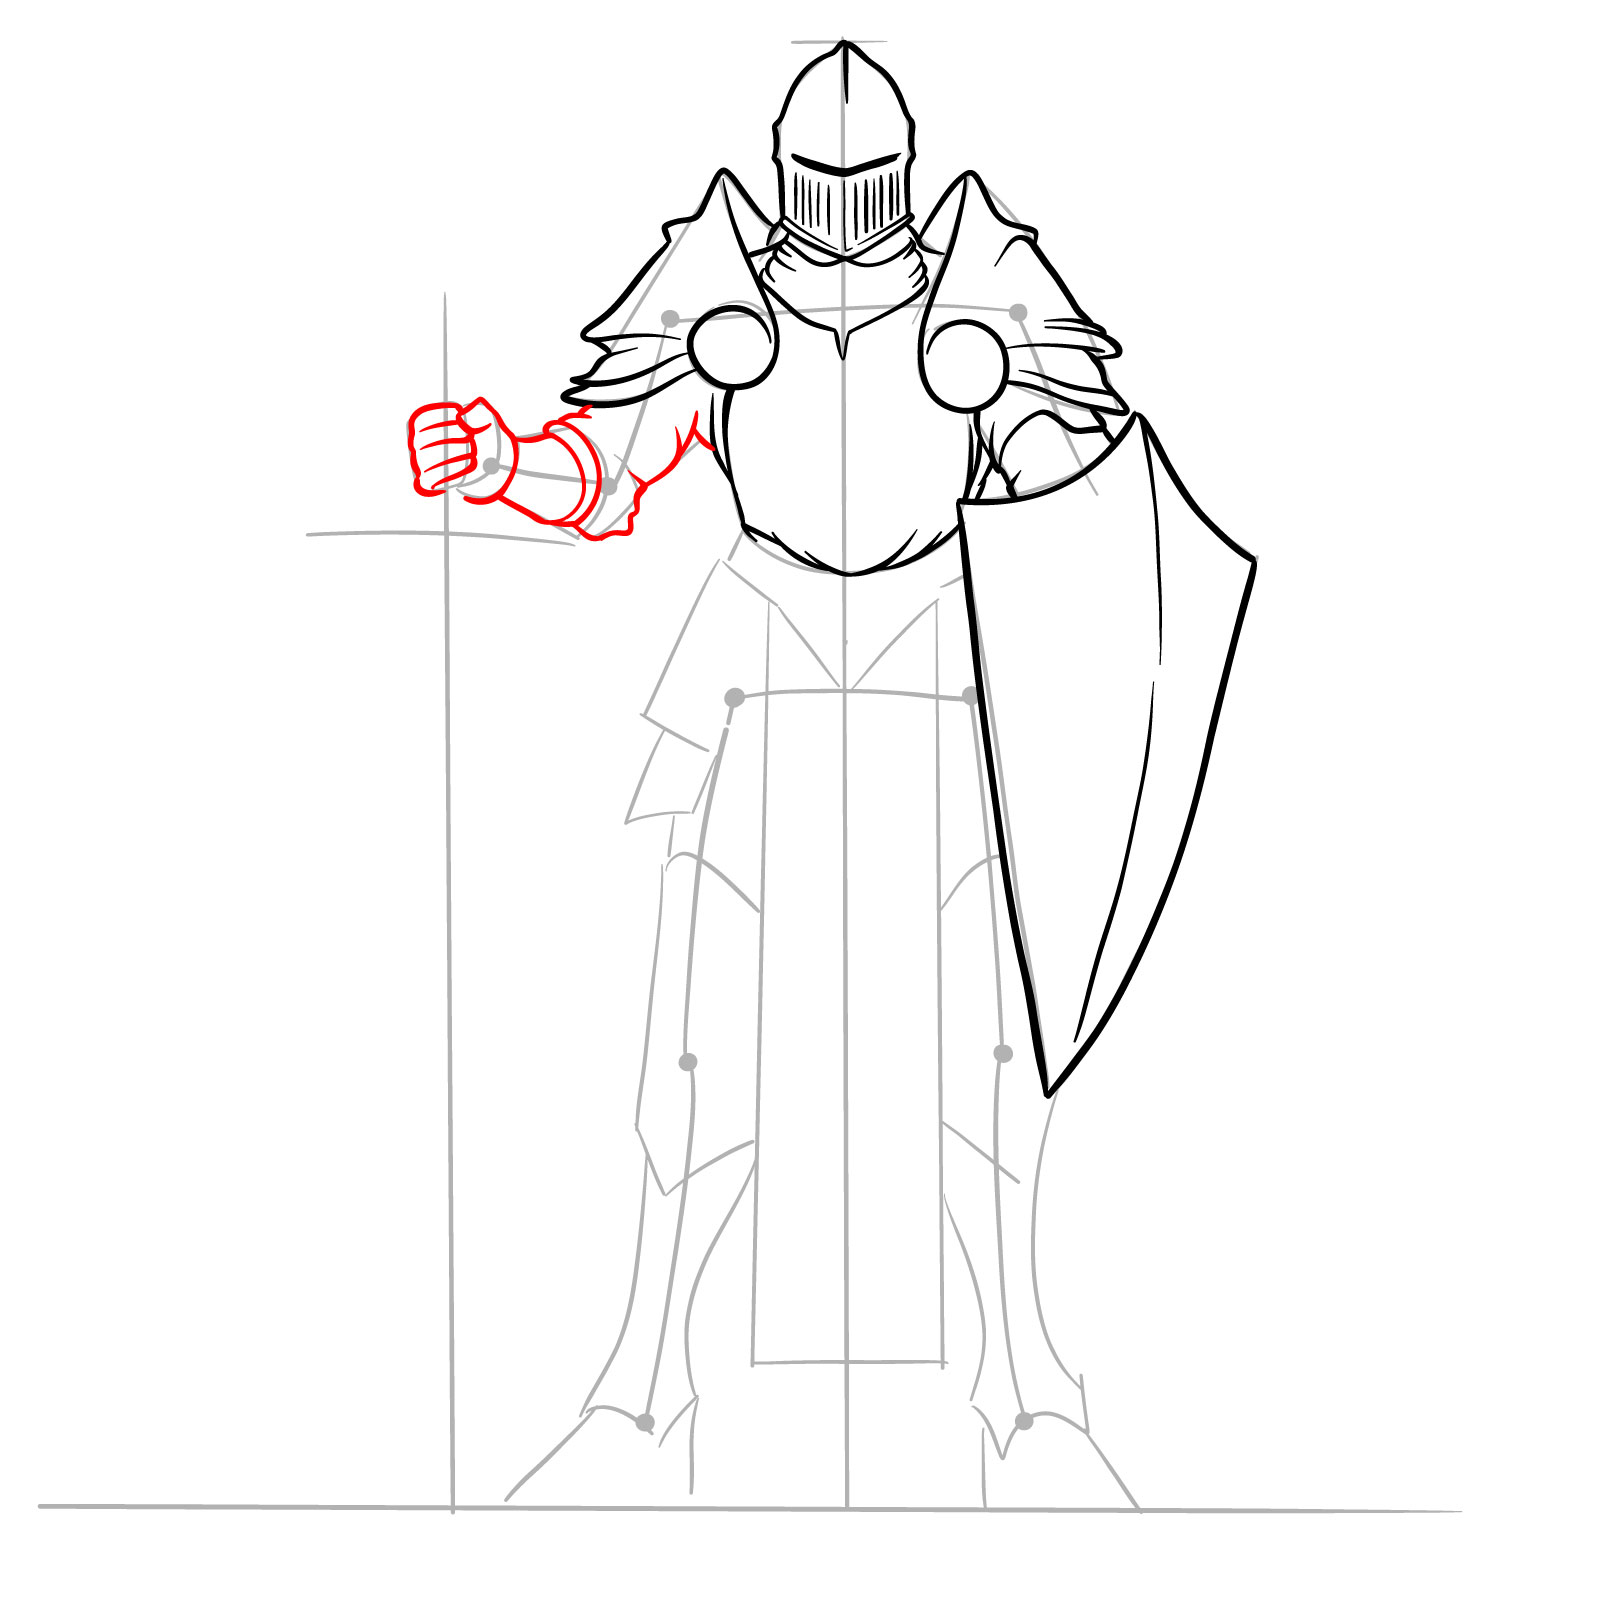
Step 12 – Outline the arm and hand that will be holding the sword
Sketching the sword-holding arm
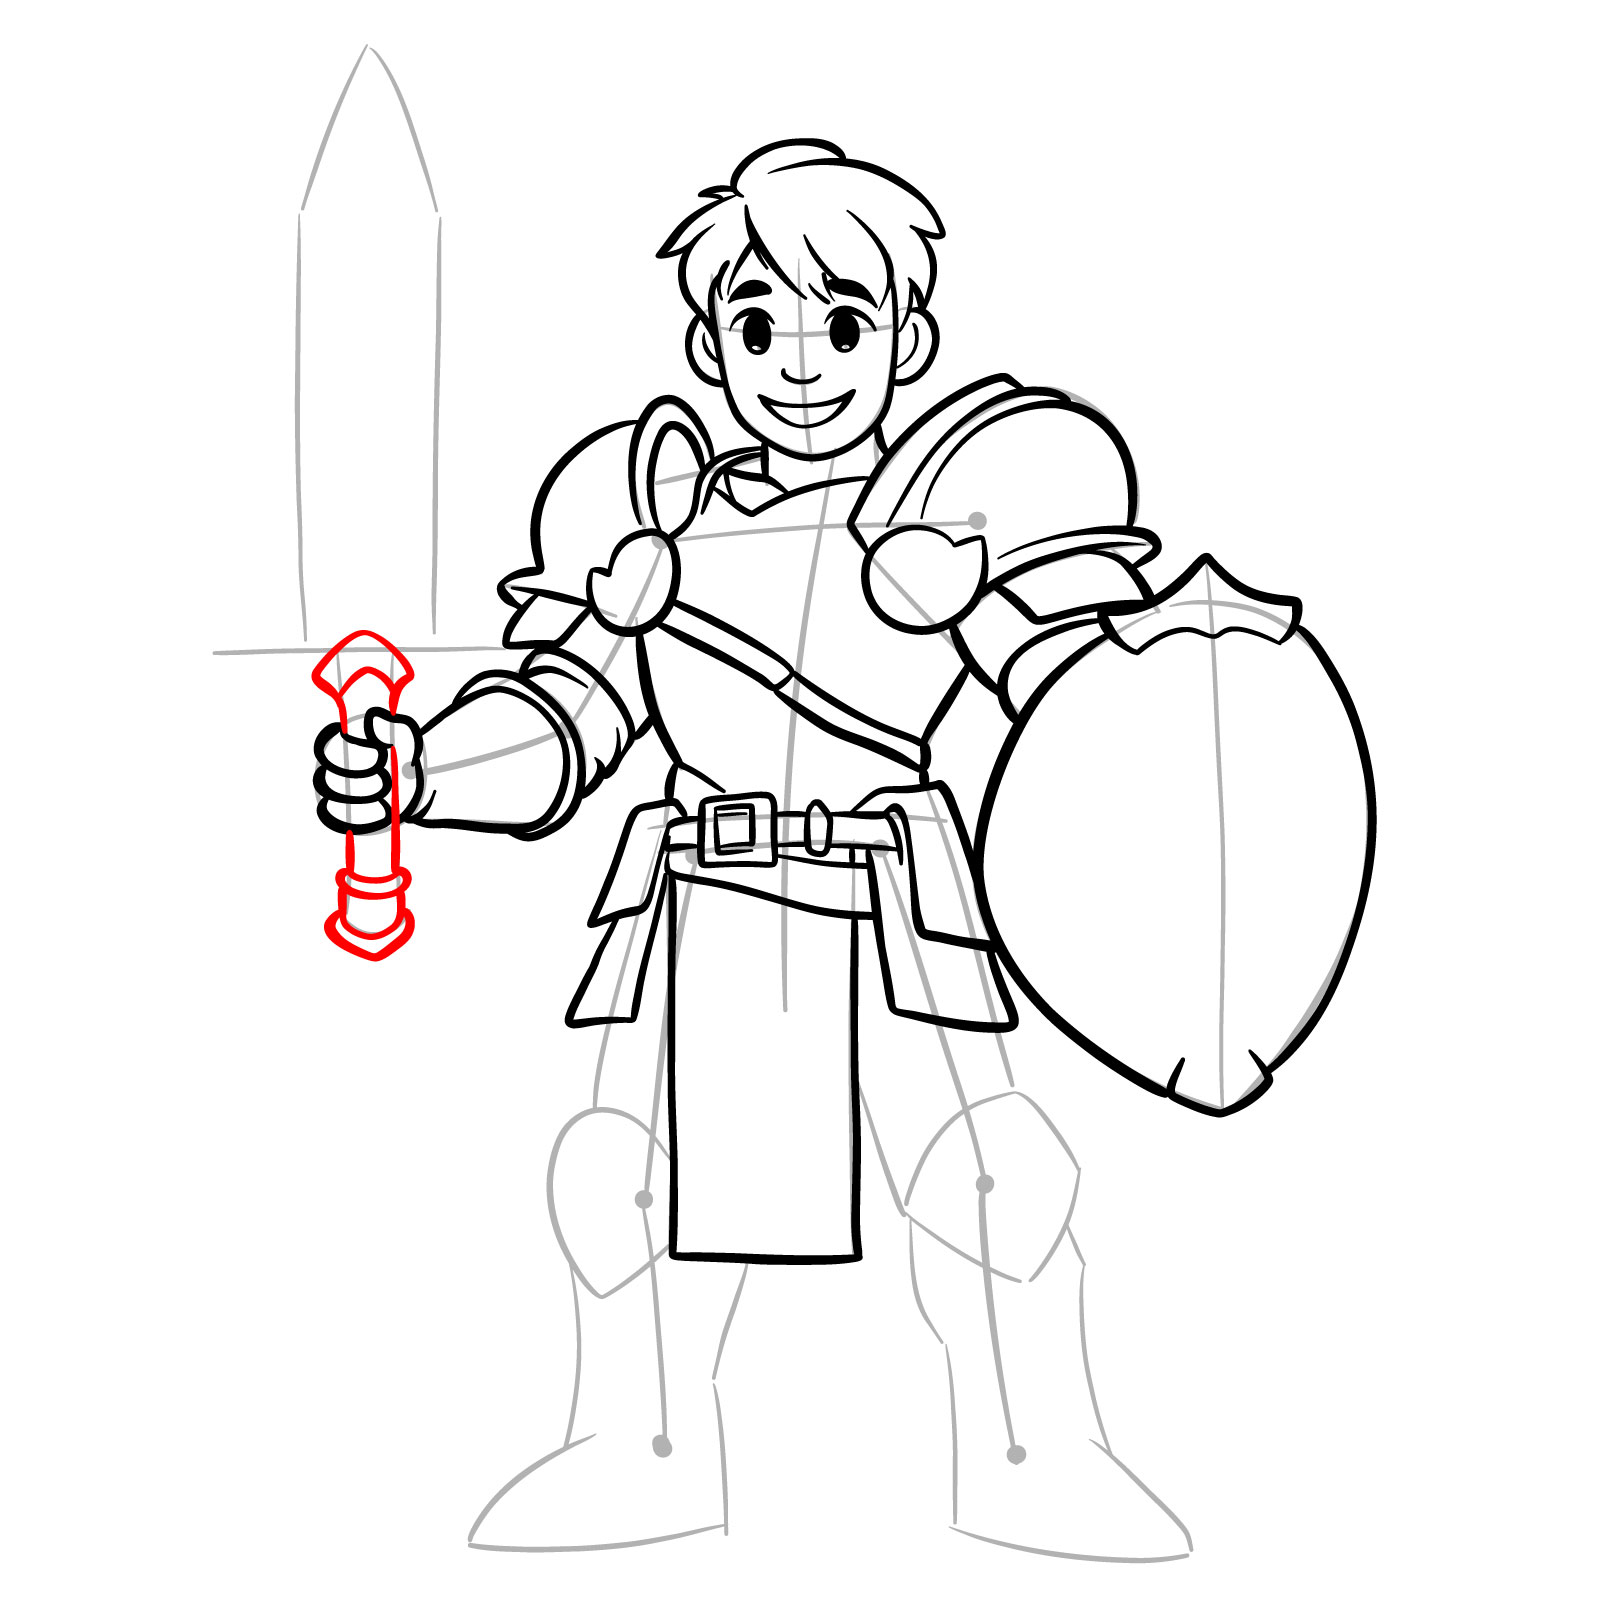
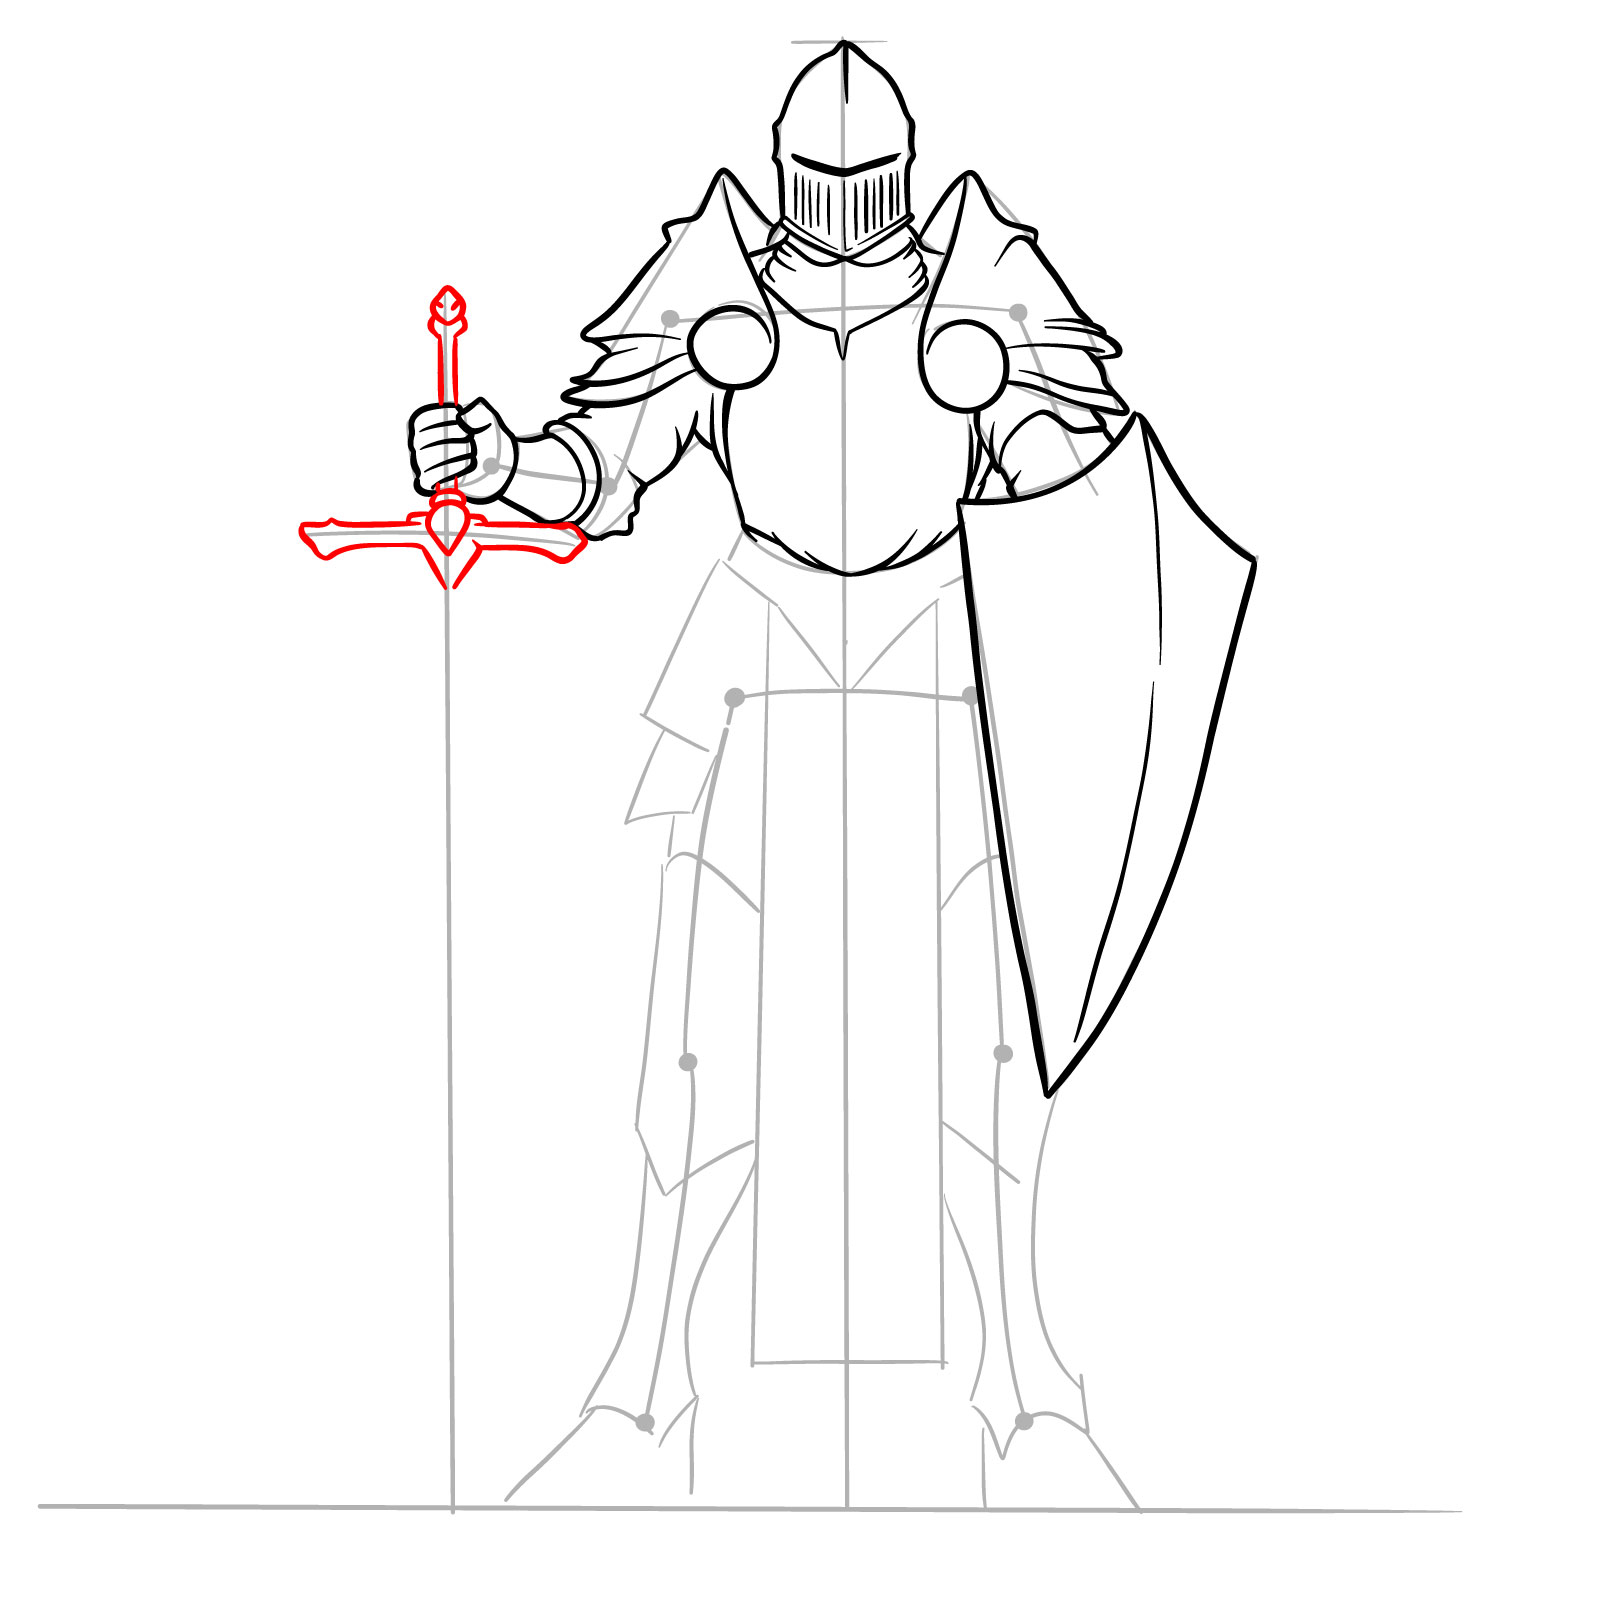
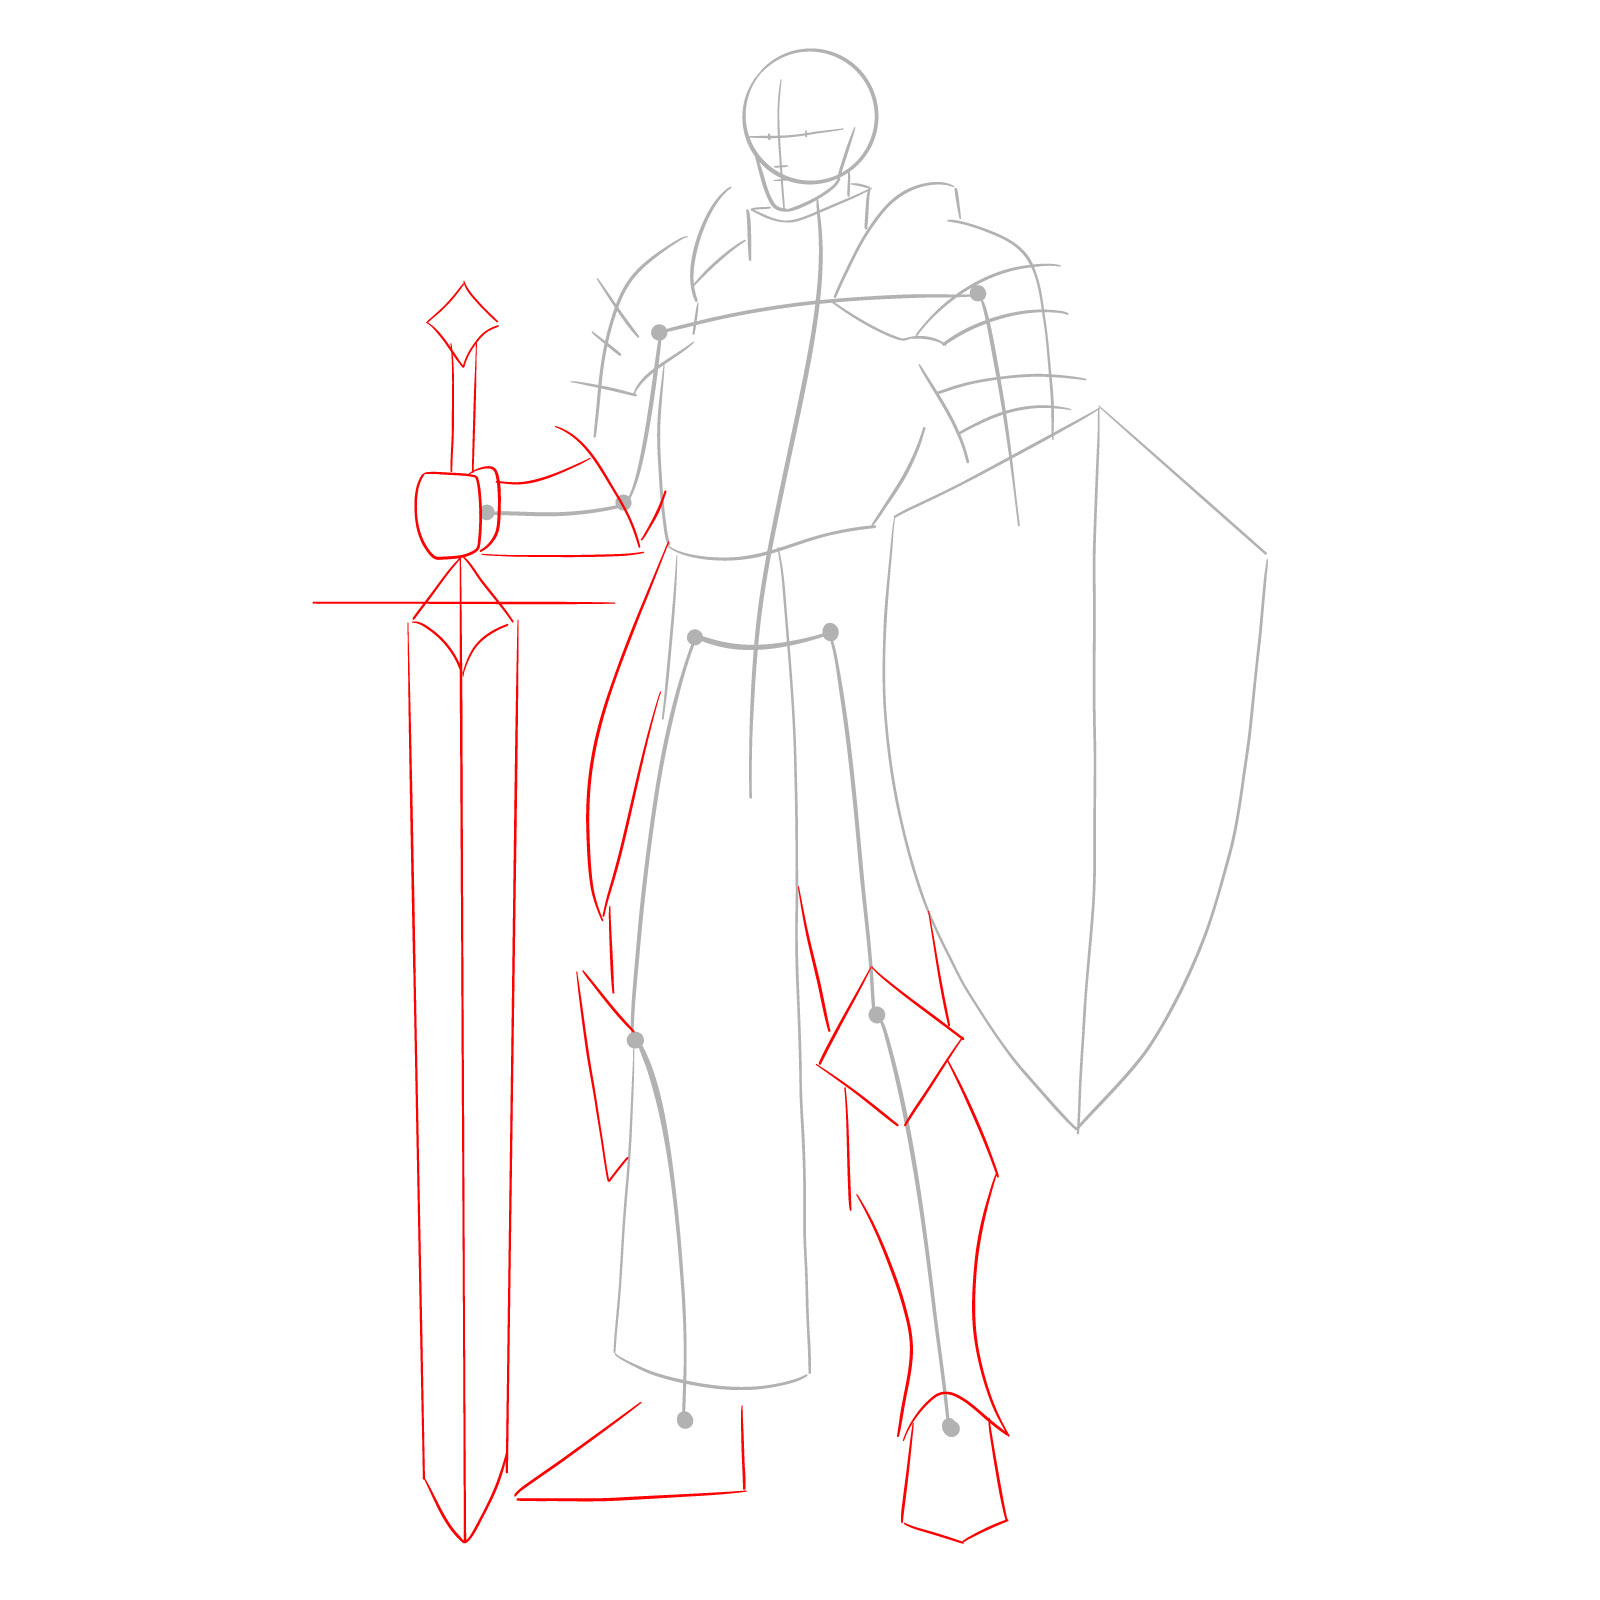
Step 13 – Sketch the handle of the sword, ensuring the handle is firm and detailed
Drawing the sword handle
Step 14 – Extend the lines from the handle to form the sword blade, ensuring it is straight and proportionate
Sketching the sword blade
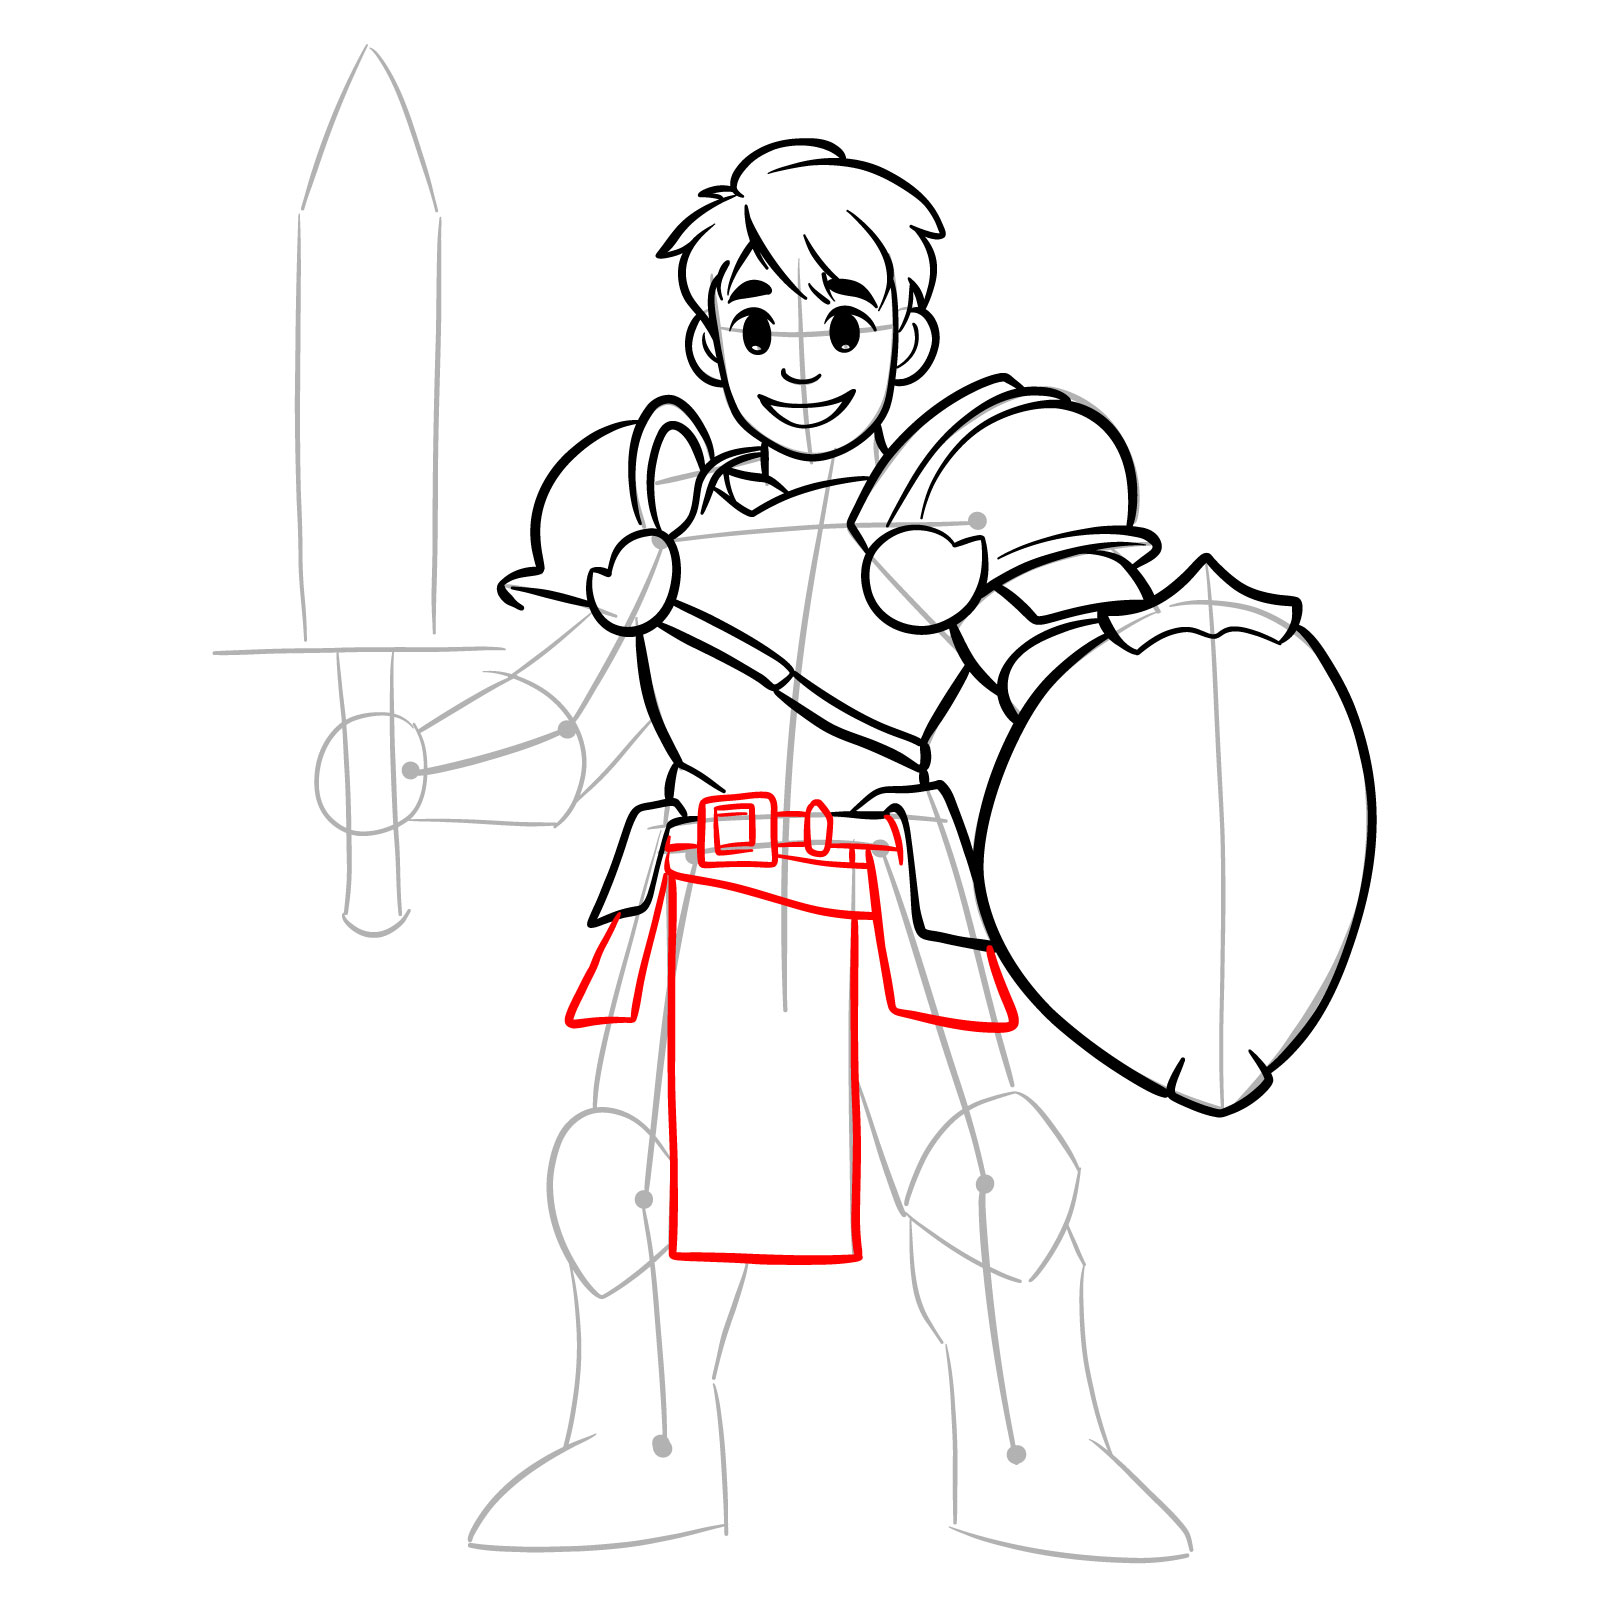
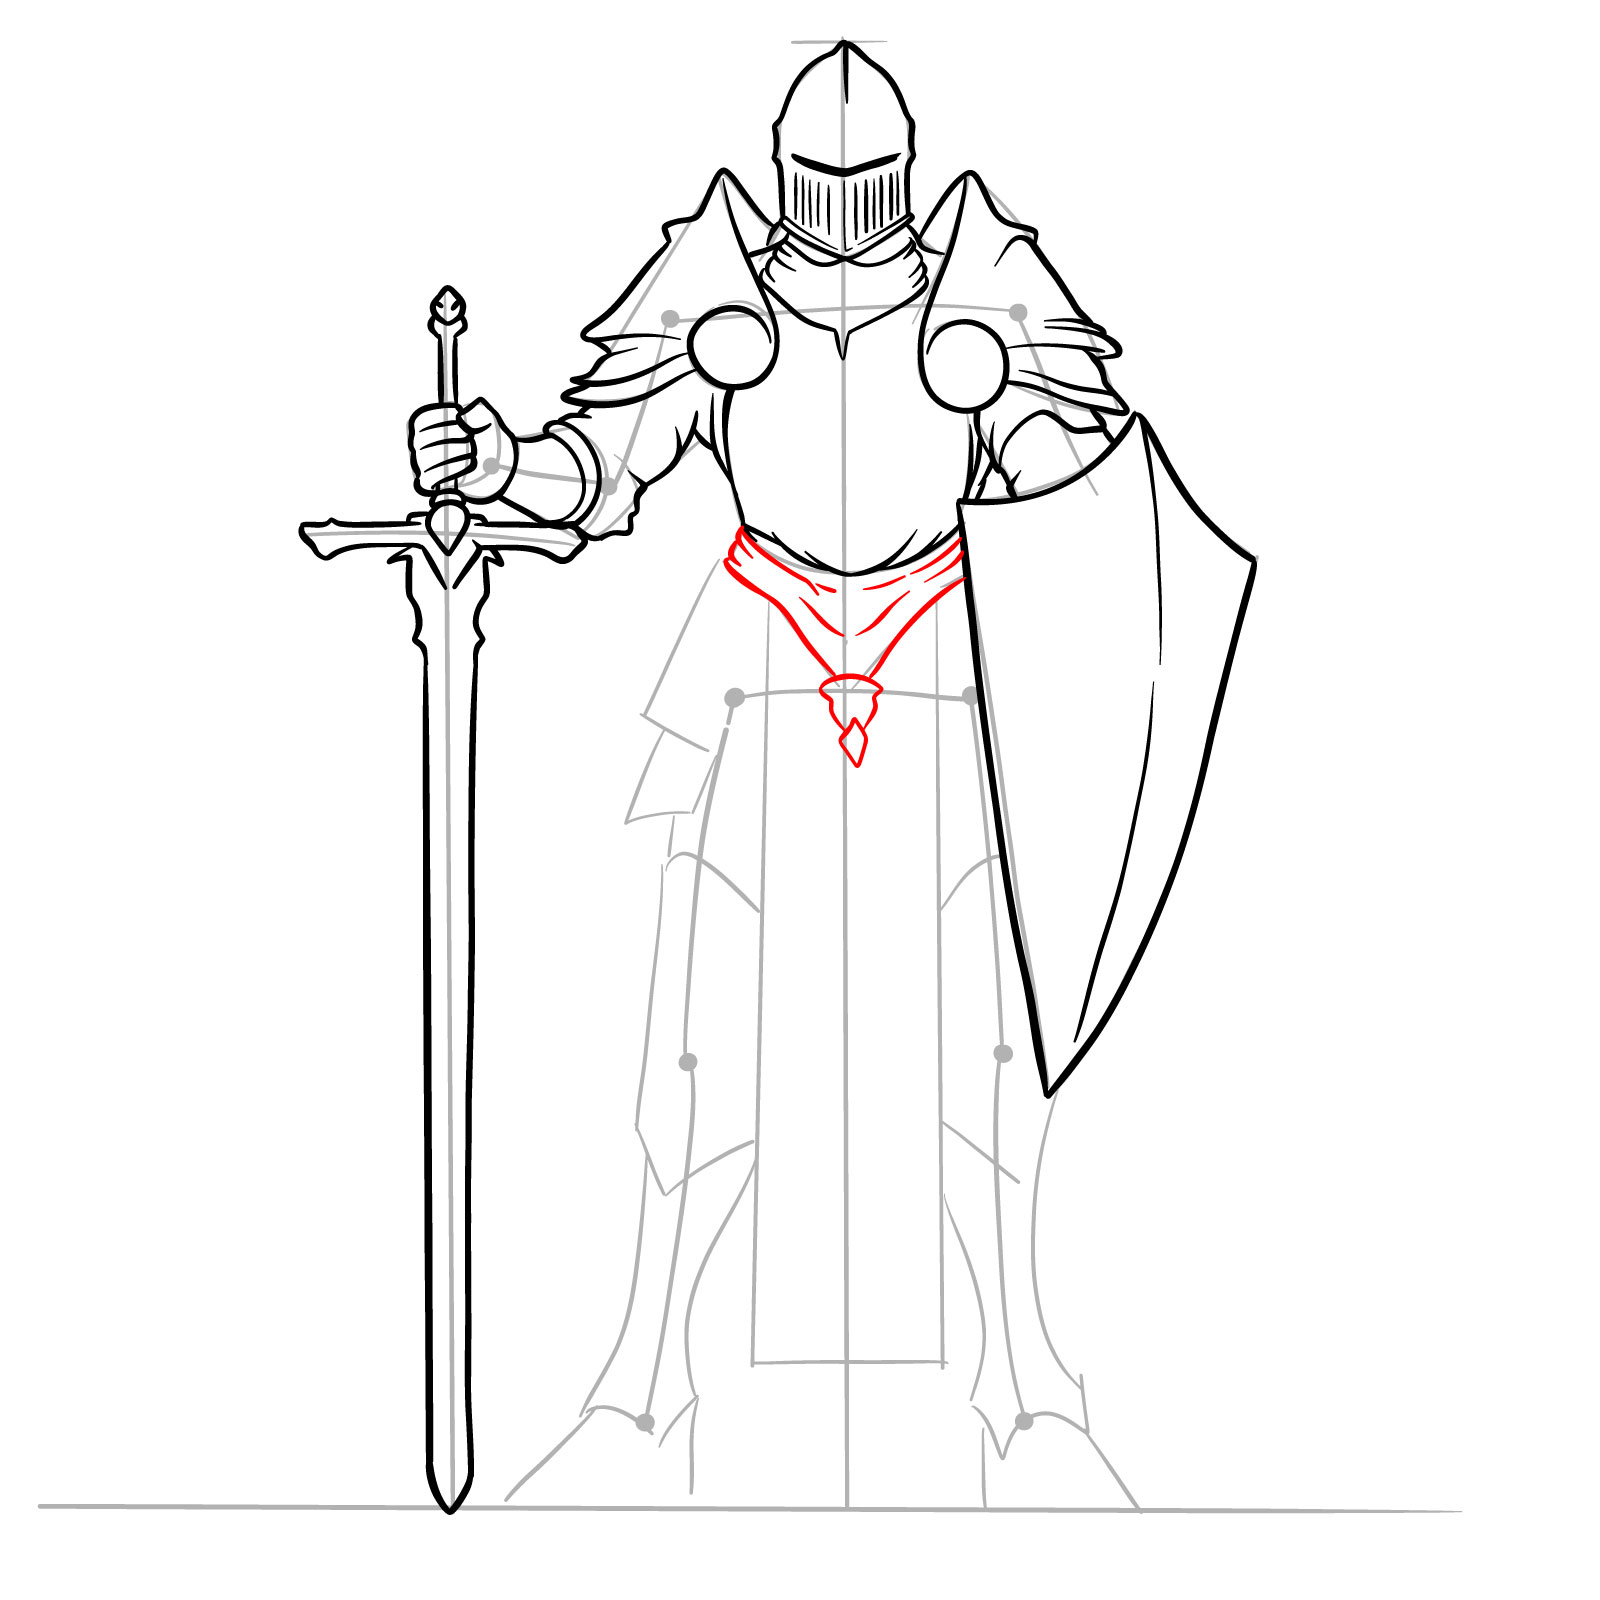
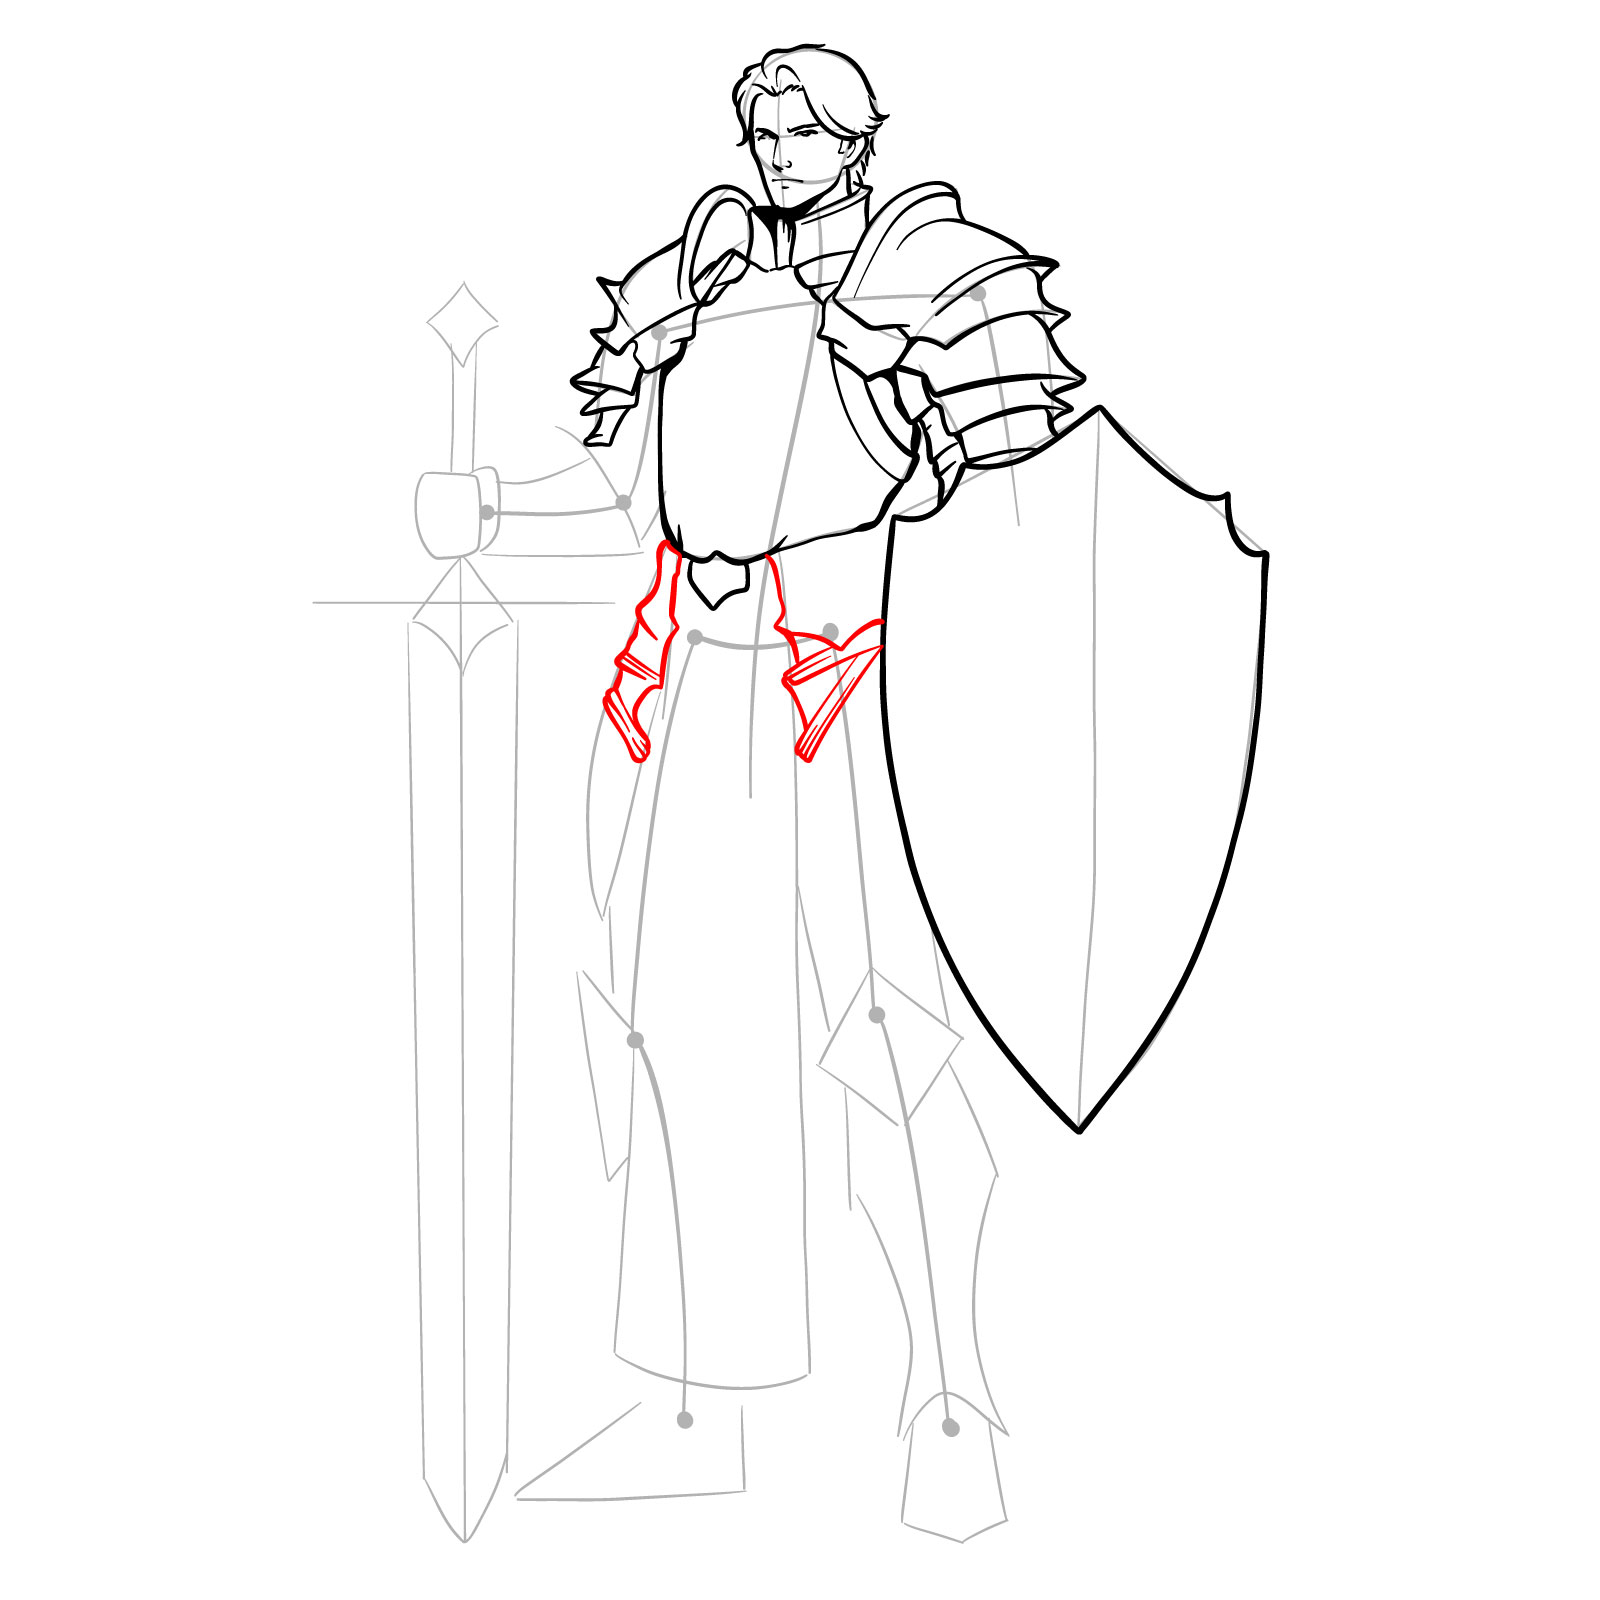
Step 15 Add detailing to the waist accessory as it’s shown below
Adding waist accessory
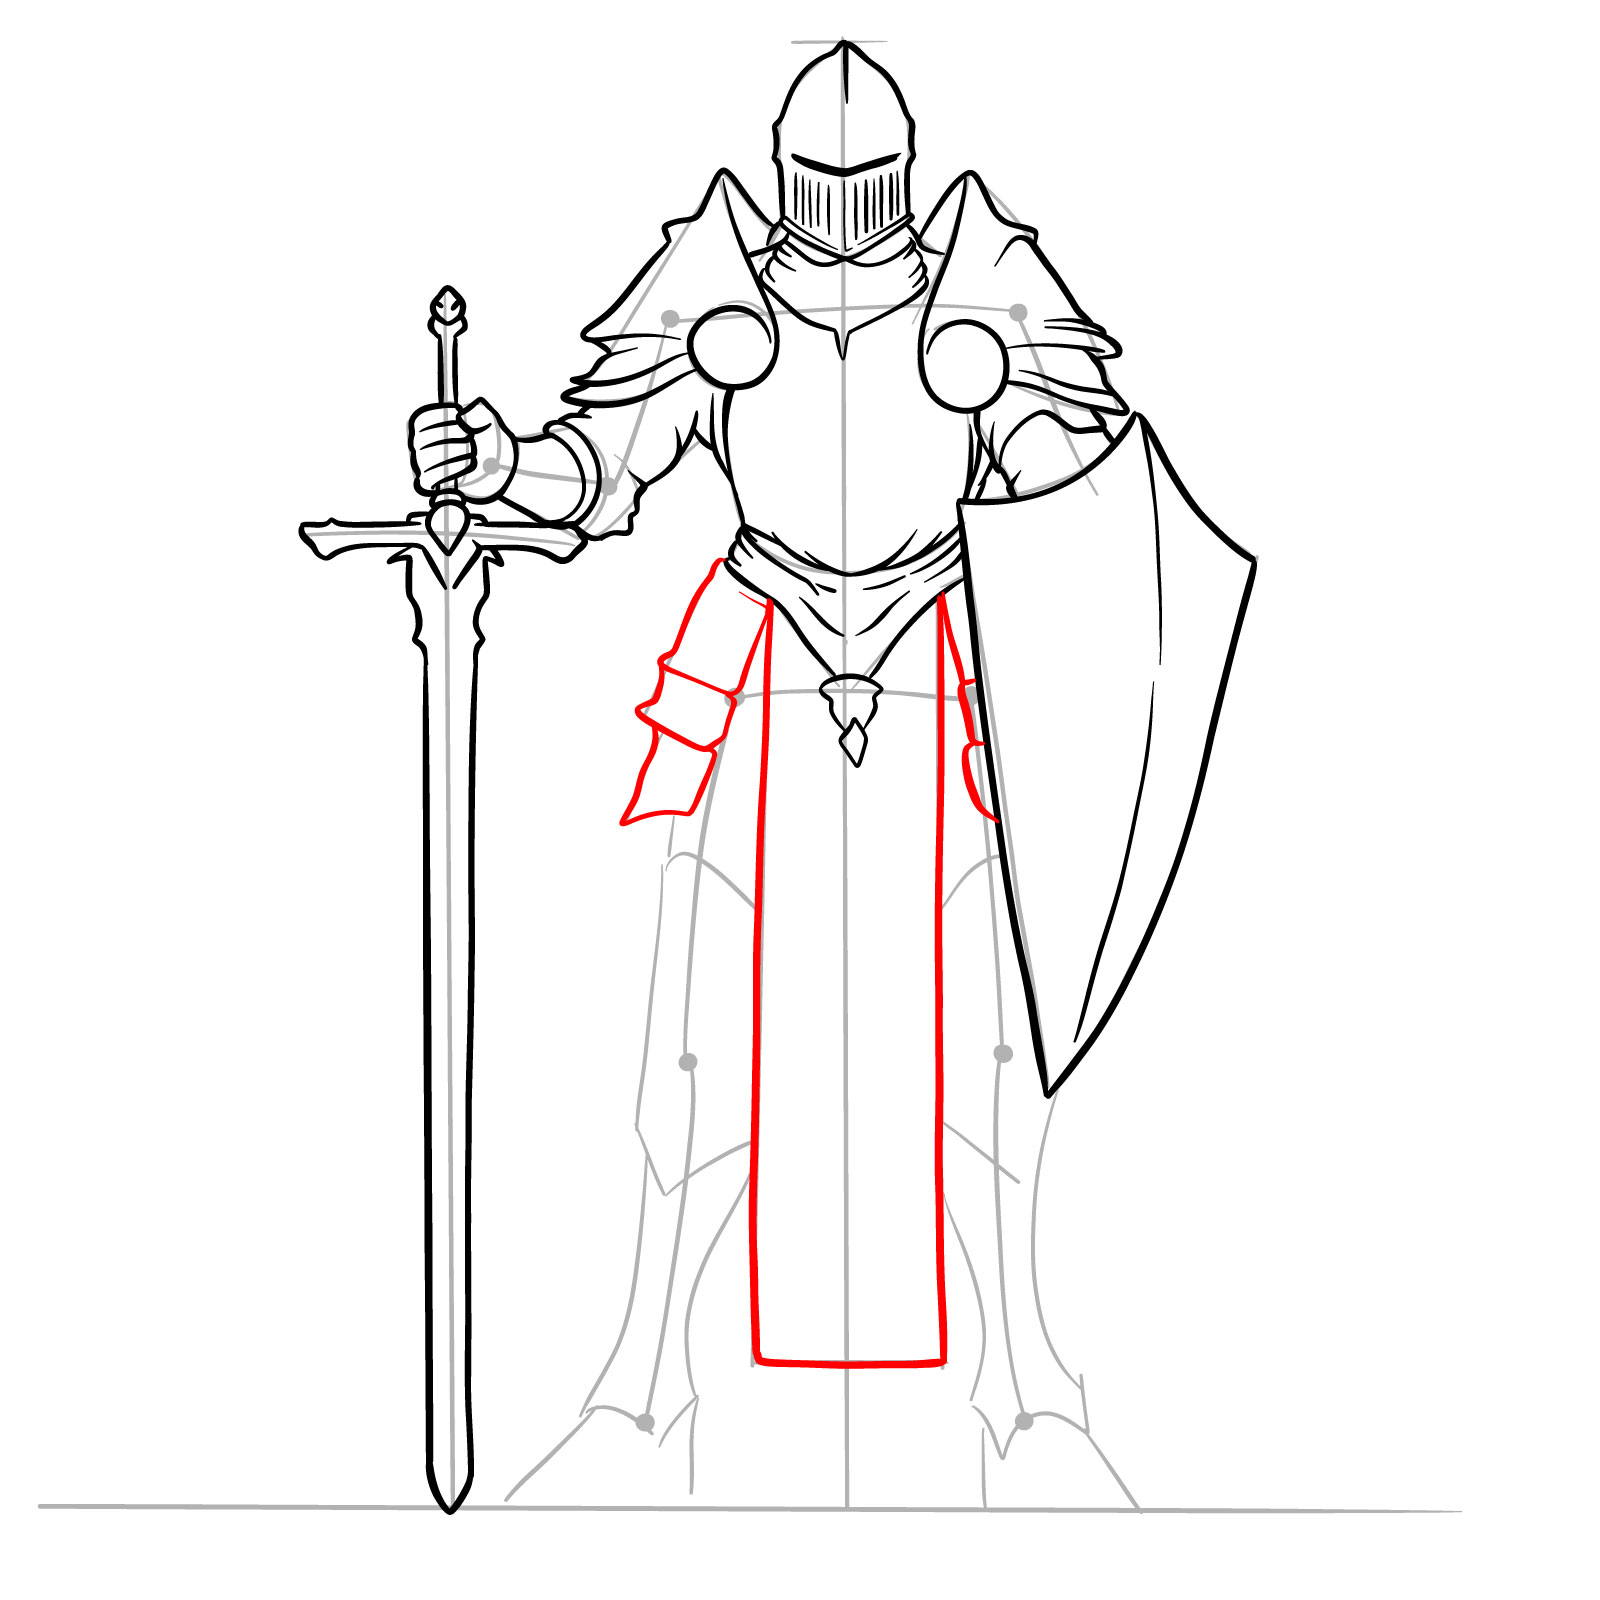
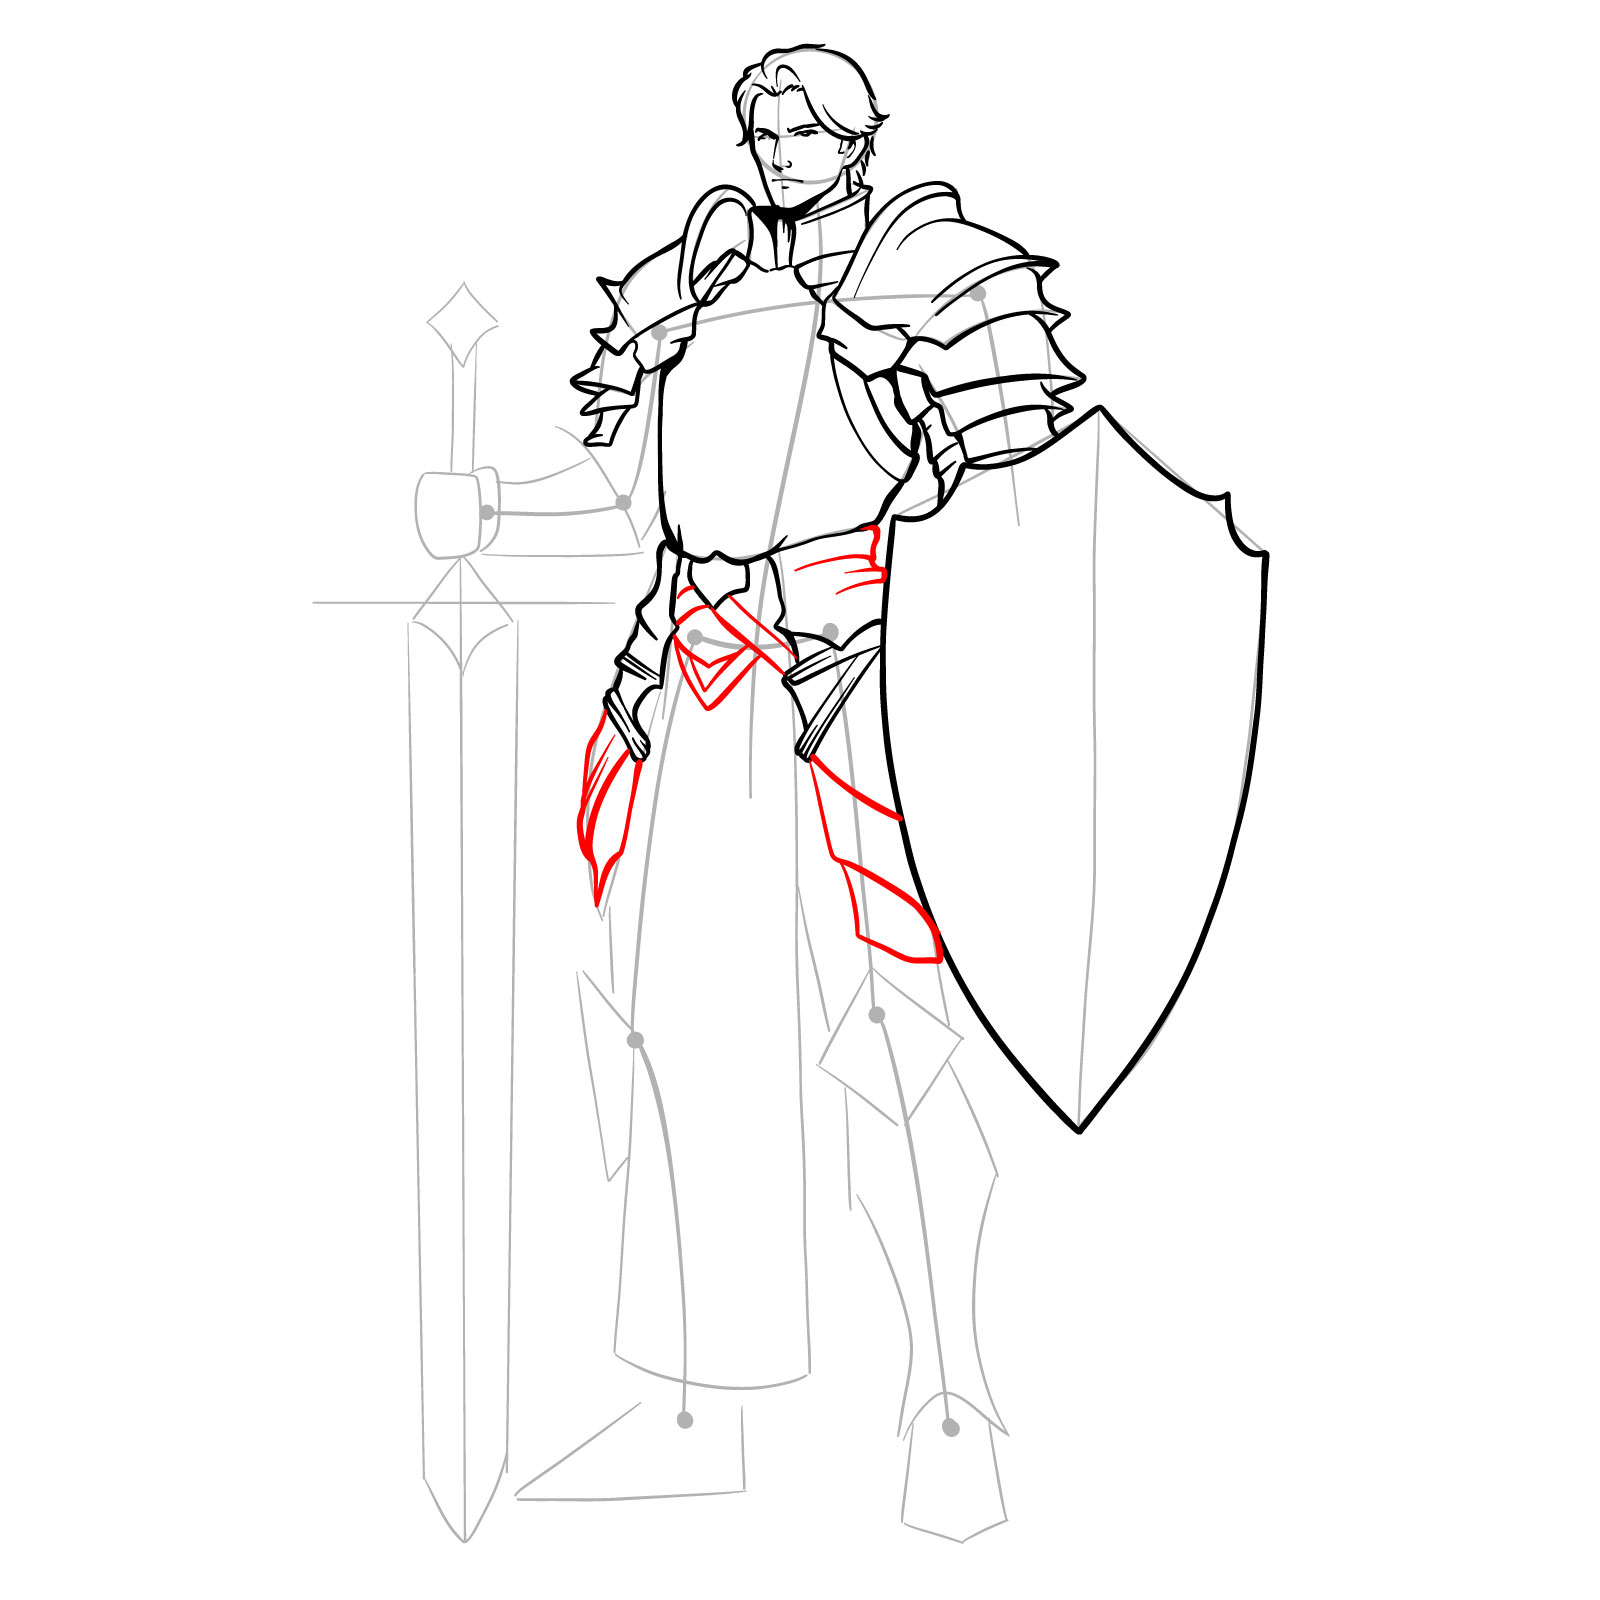
Step 16 – Sketch the armor protecting the hips, integrating it with the vertical rectangle cloth drawn earlier, which hangs from below the waist accessory from step 15
Detailing hips protection and cloth
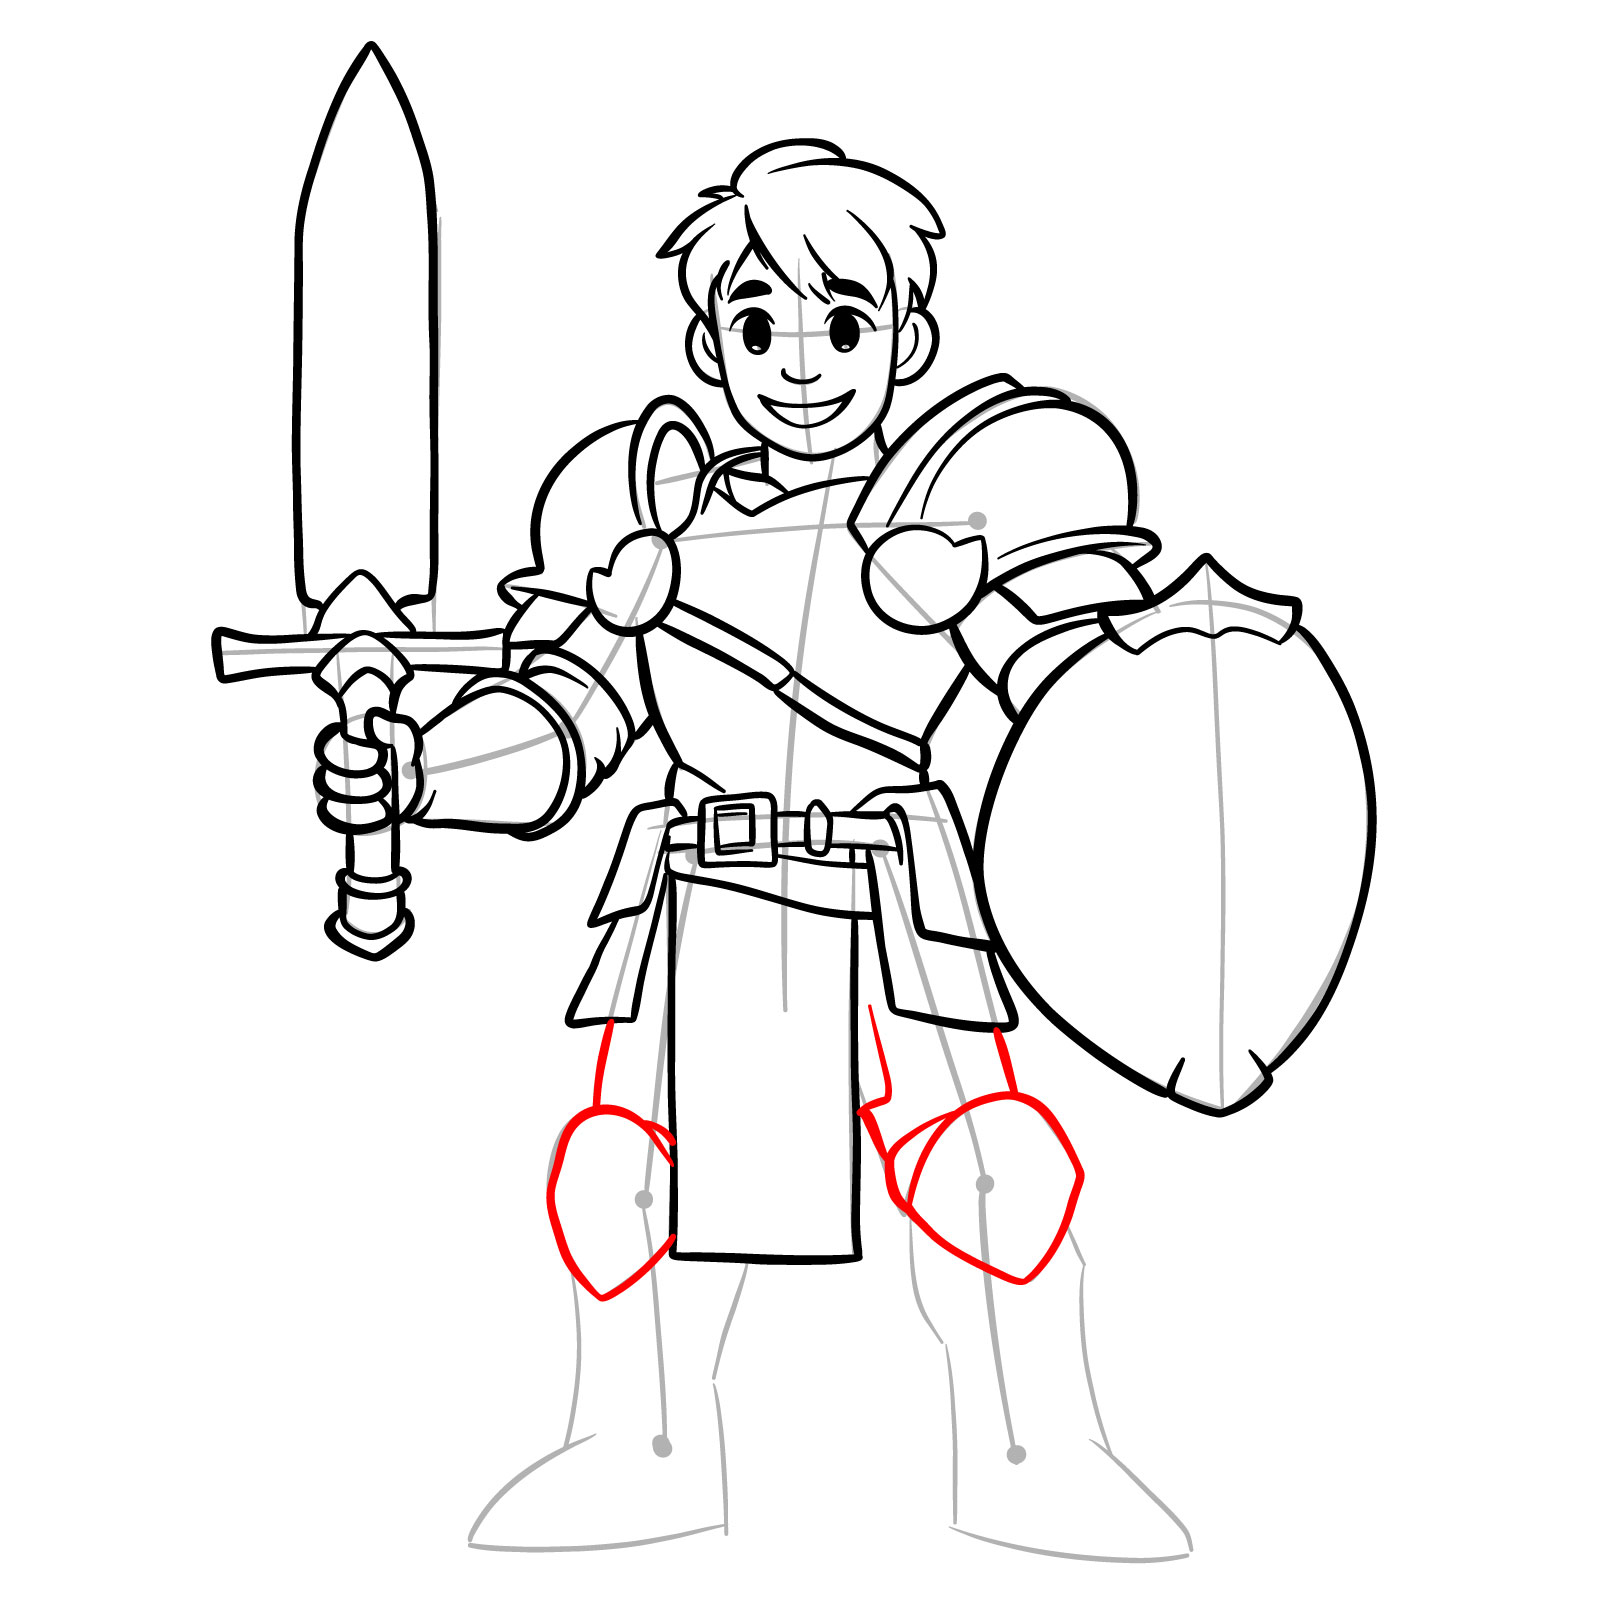
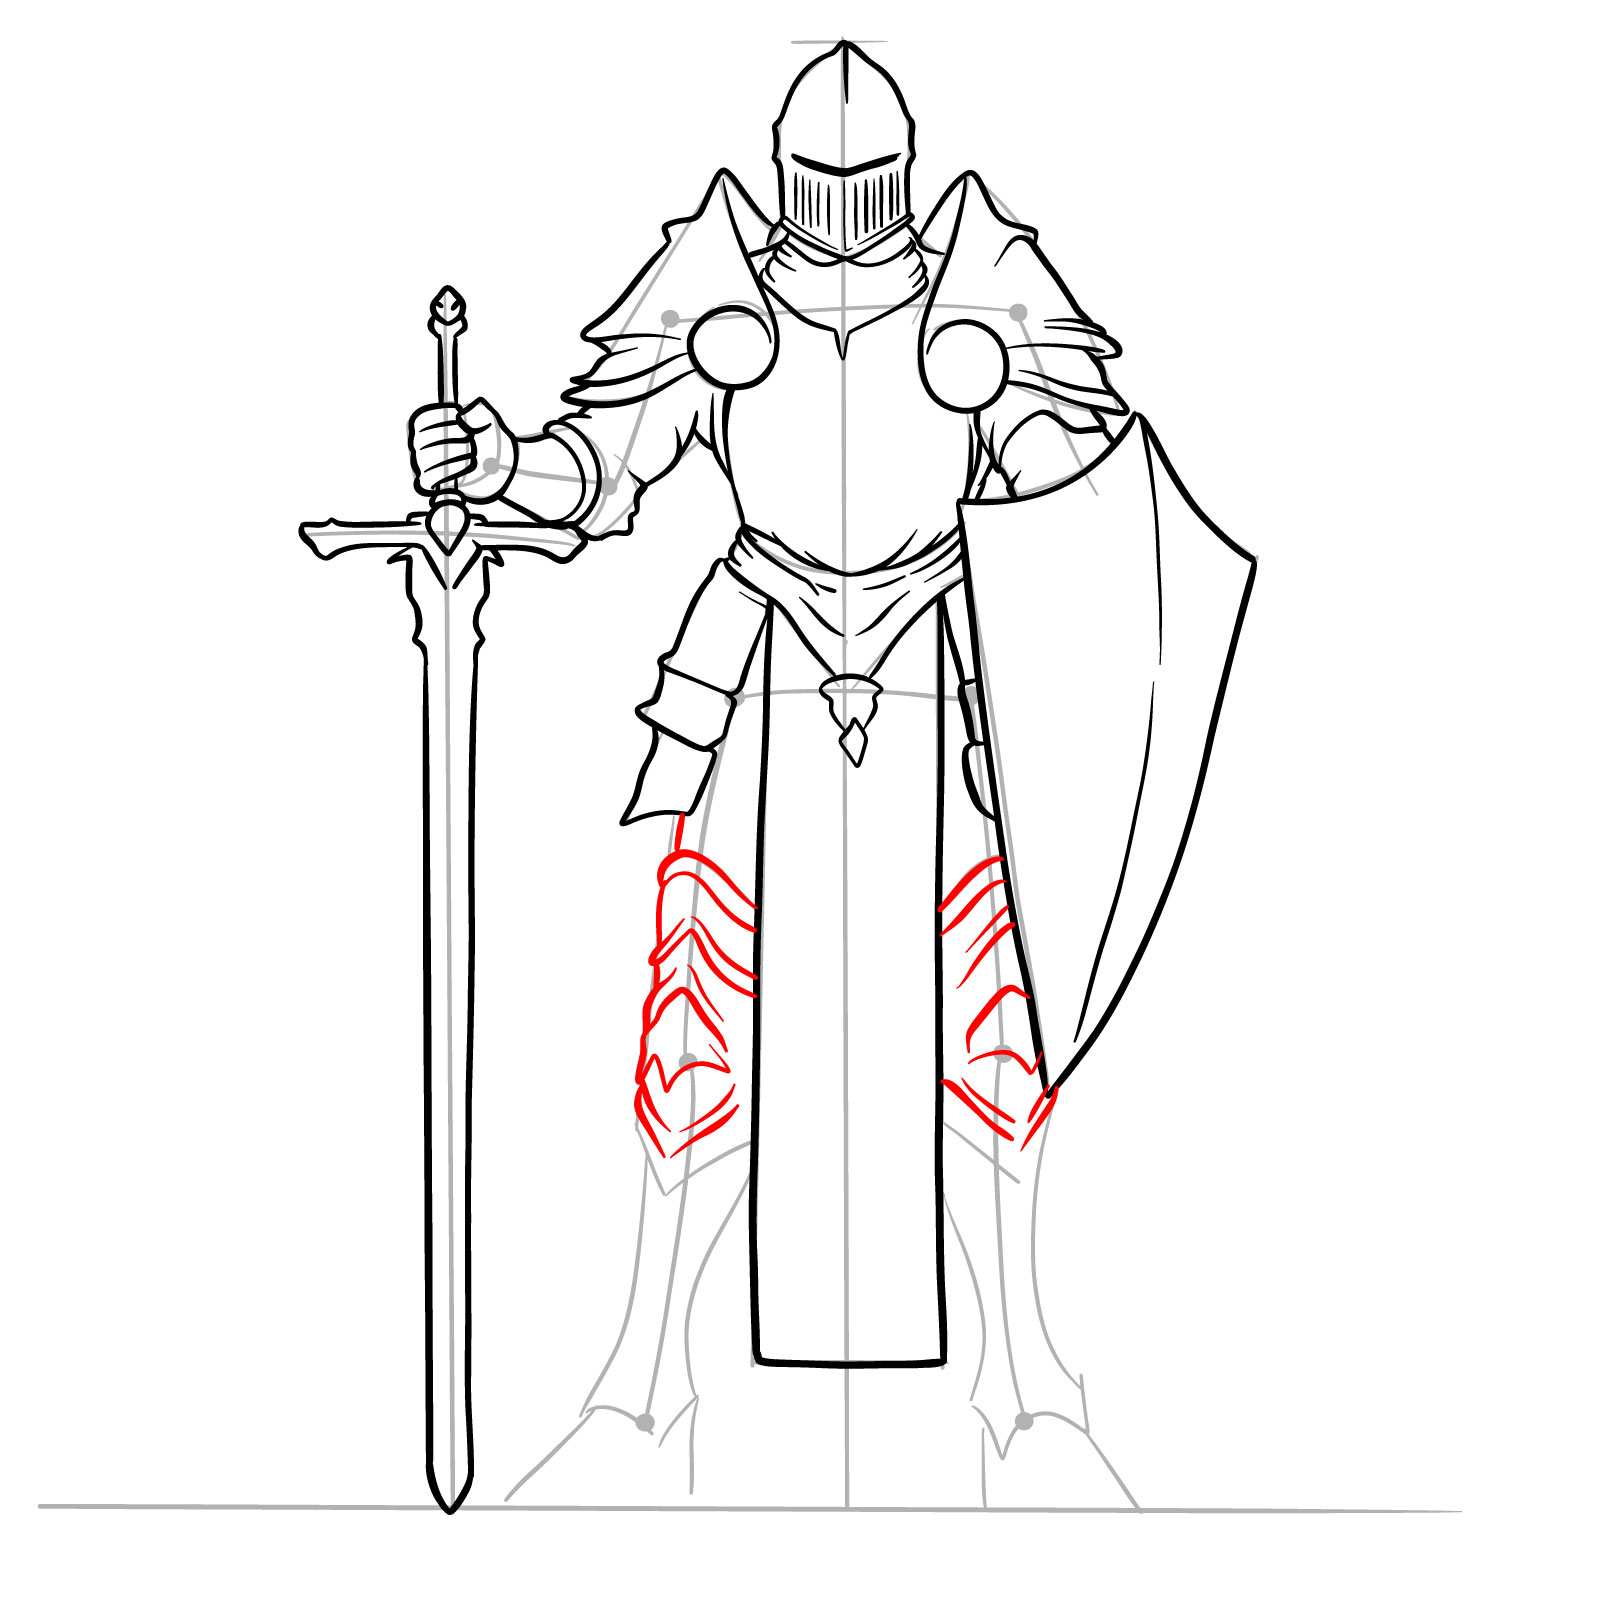
Step 17 – Draw the protective armor on the legs extending down to the knees, ensuring it looks sturdy and fits the leg’s contours
Outlining leg armor to the knee
Step 18 – Continue the leg armor from the knees down to the ankles, detailing each segment for mobility and protection
Sketching armor from knees to ankles
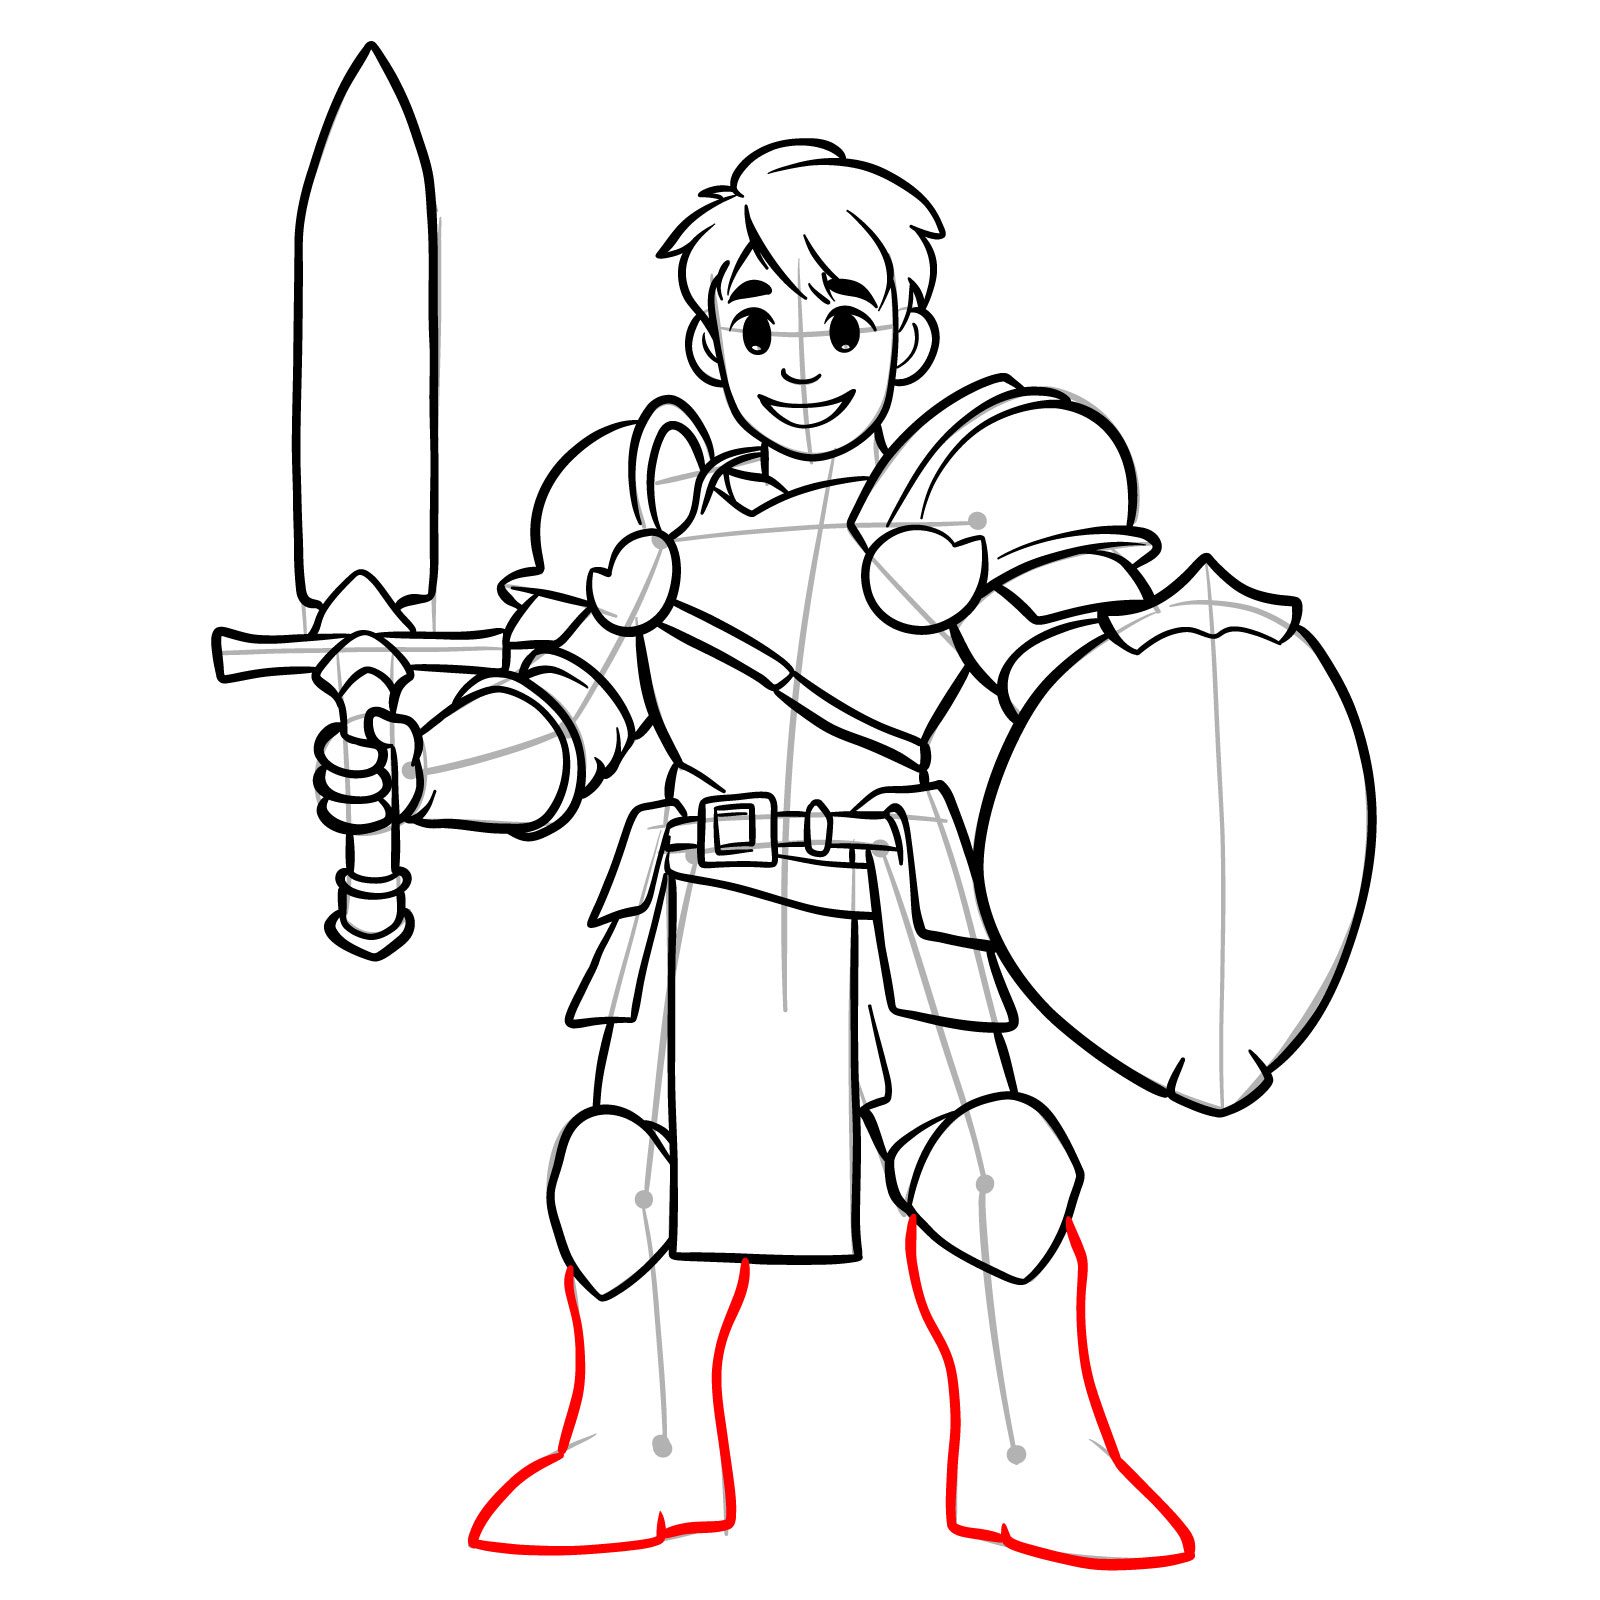
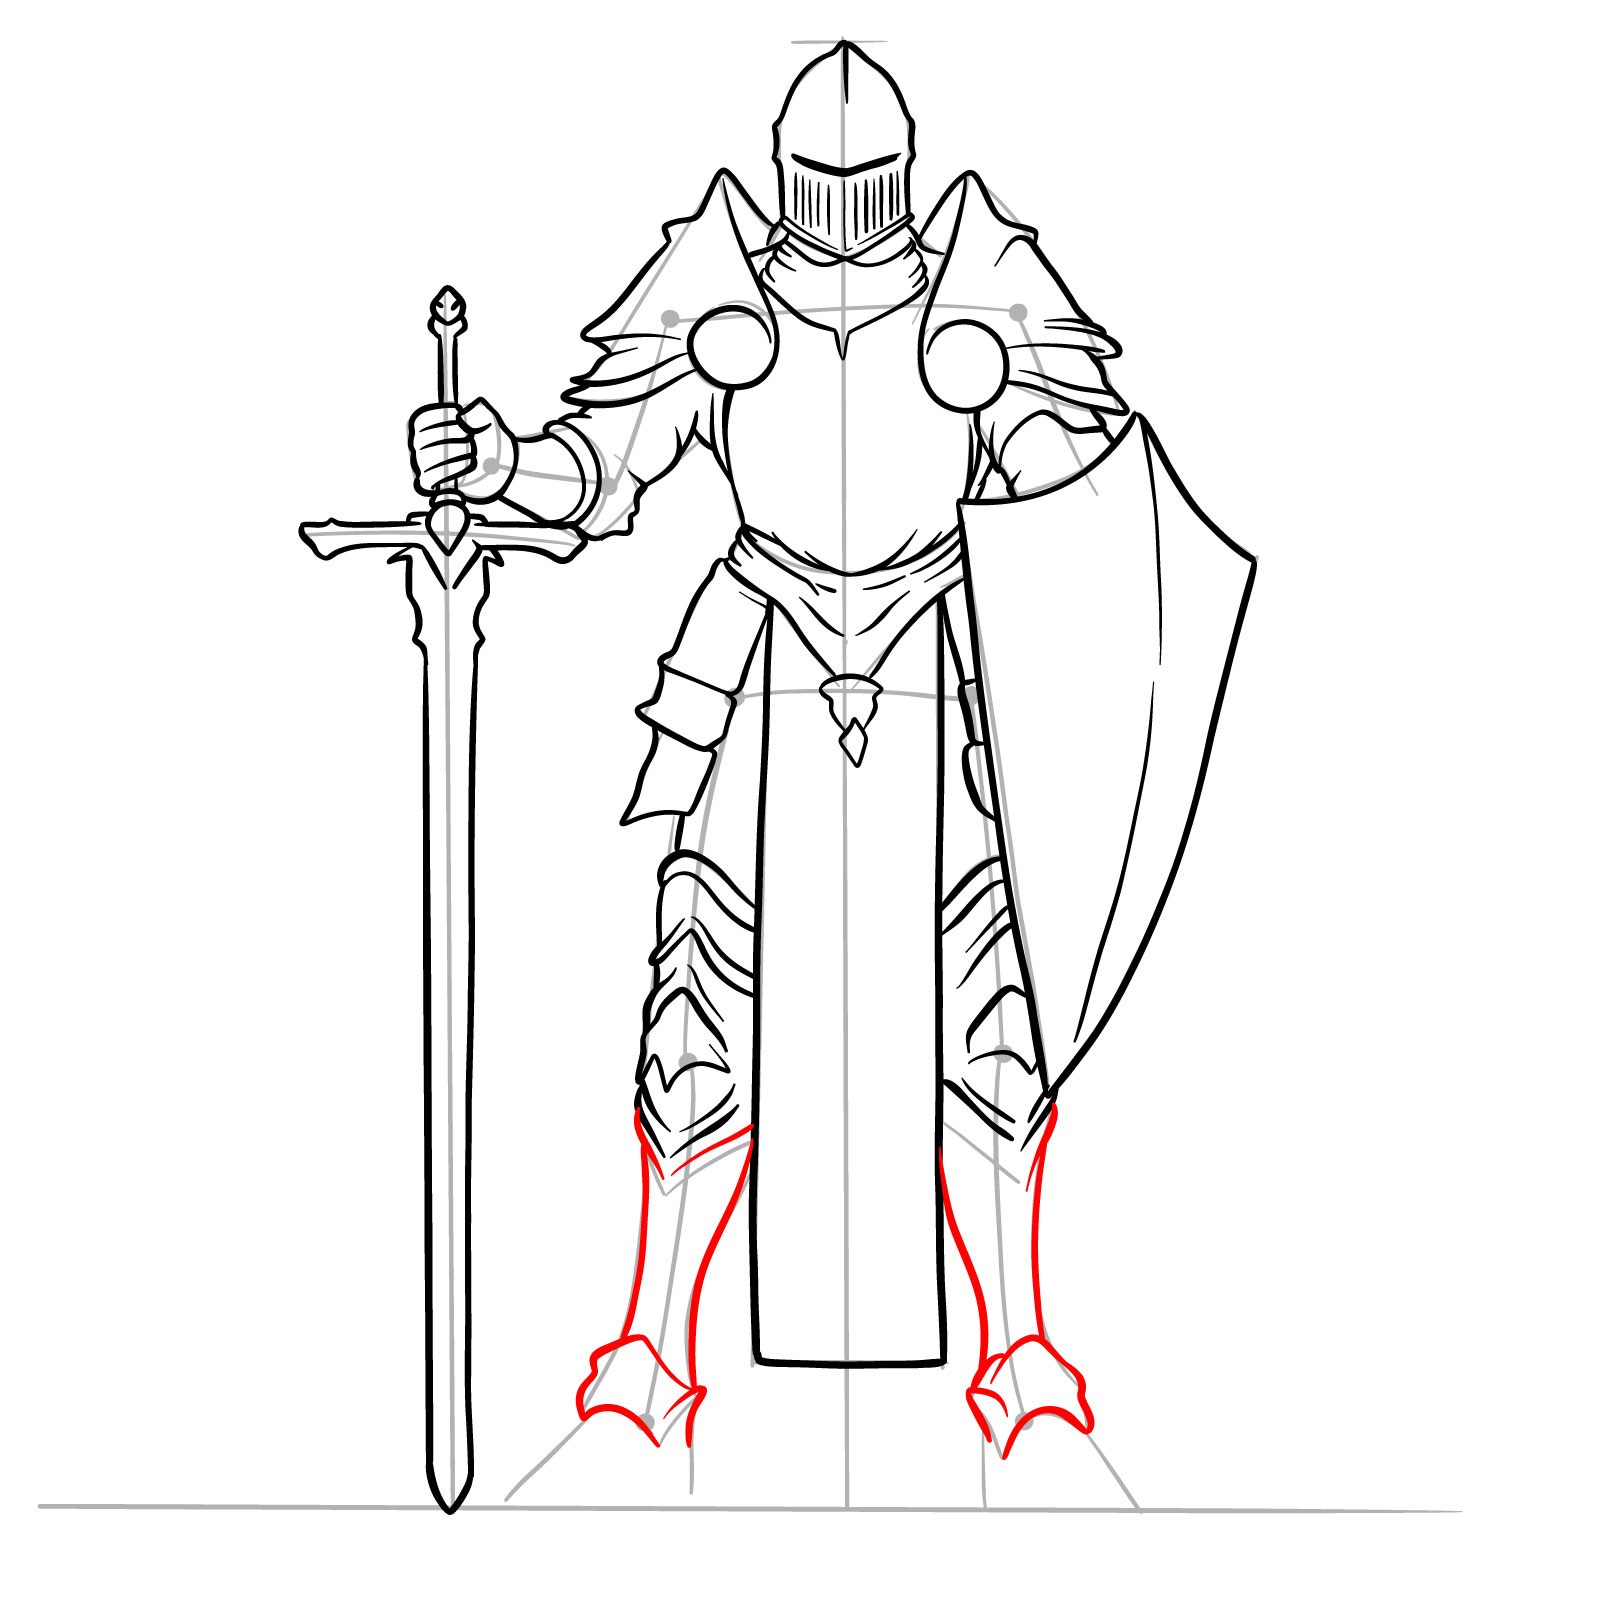
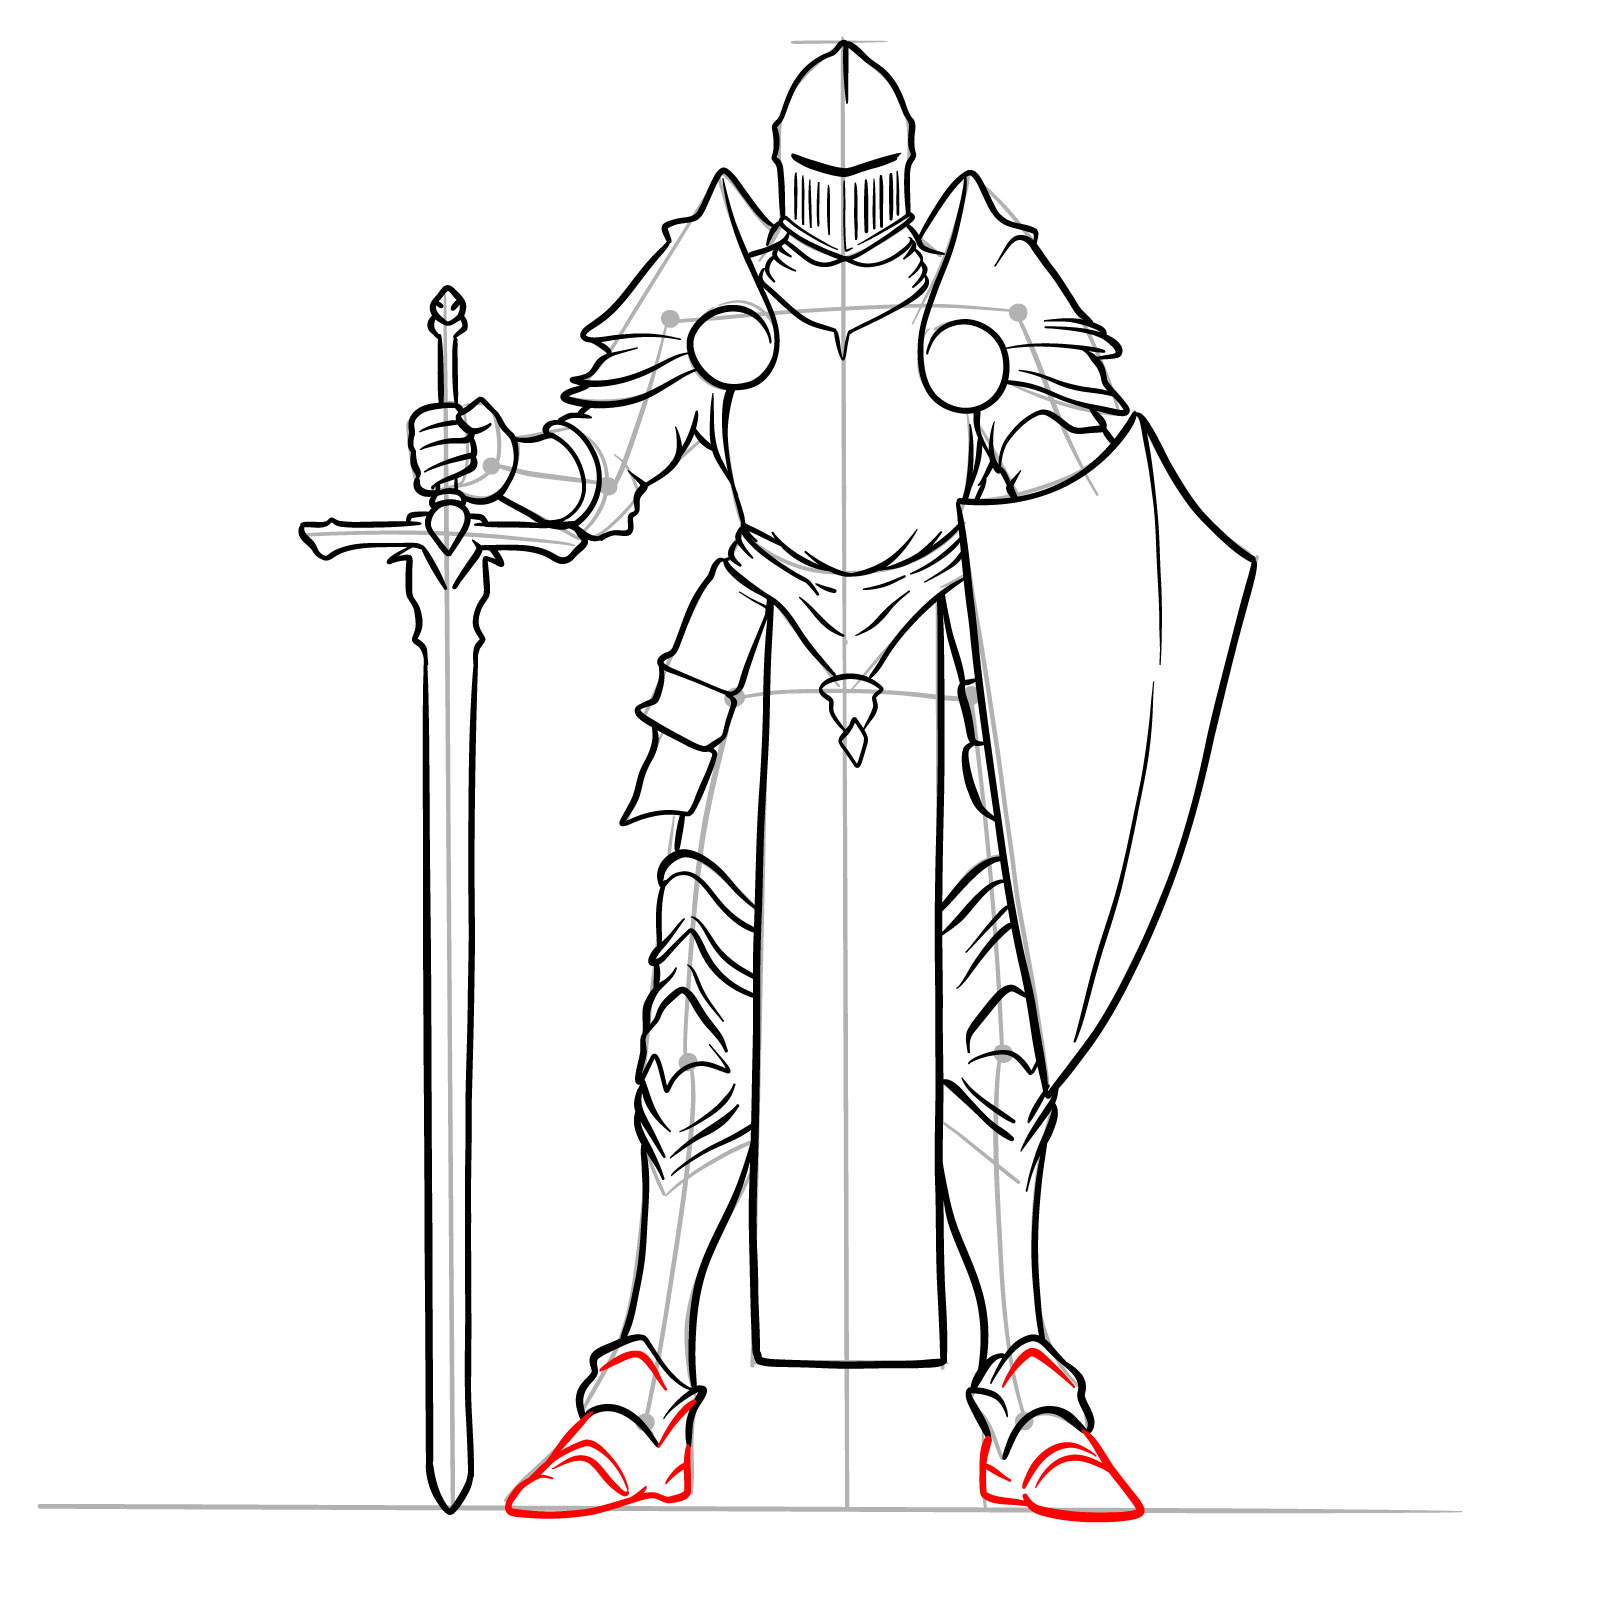
Step 19 – Outline the armor covering the feet, making sure it matches the style of the leg armor
Drawing the foot armor
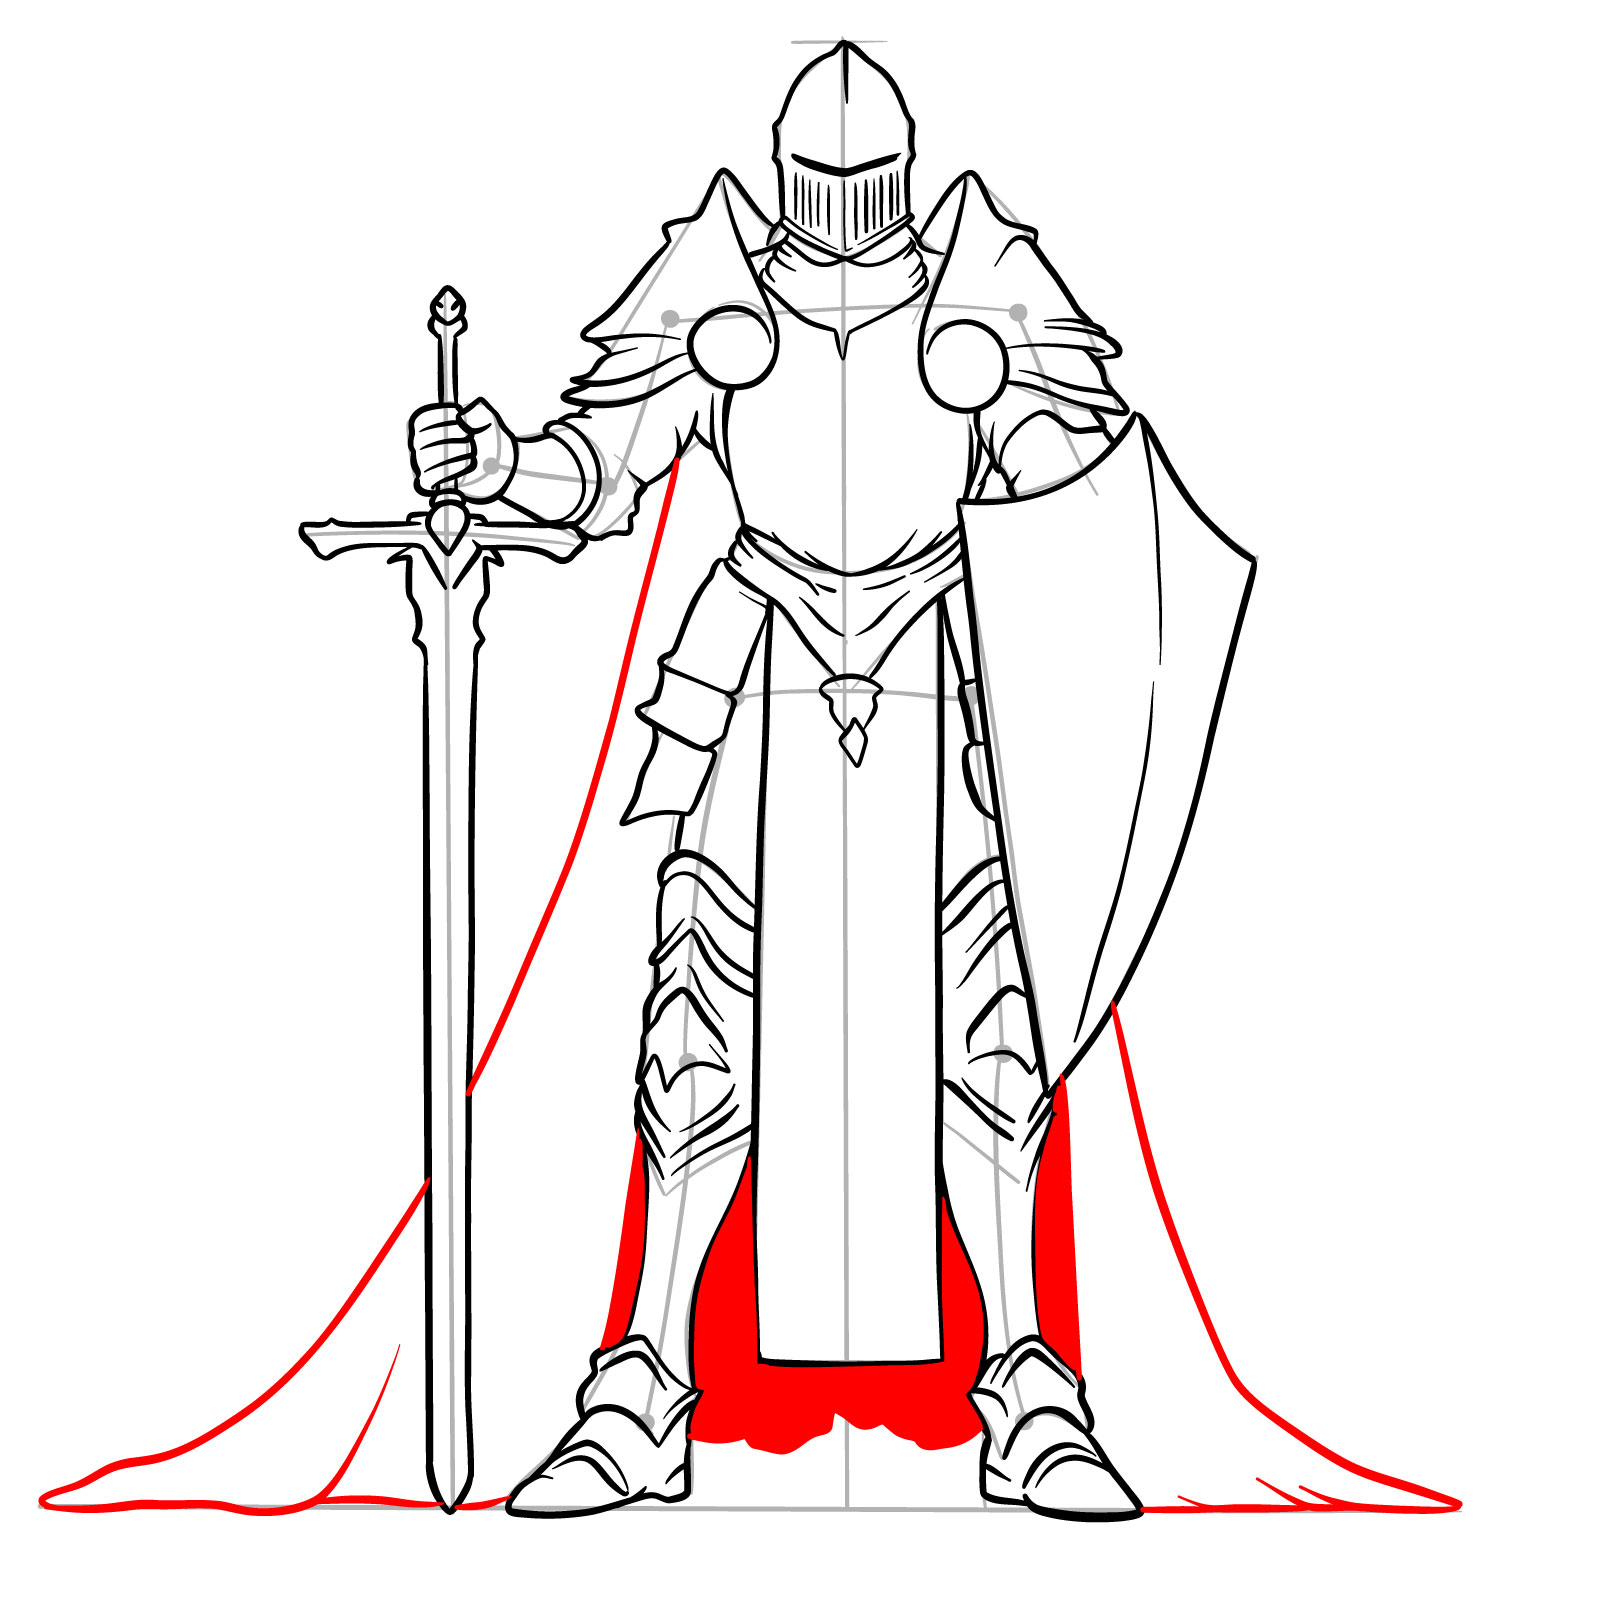
Step 20 – Sketch a cape flowing from the back down to the ground. Fill the inner part visible behind the legs with black to add shading and depth
Adding a flowing cape
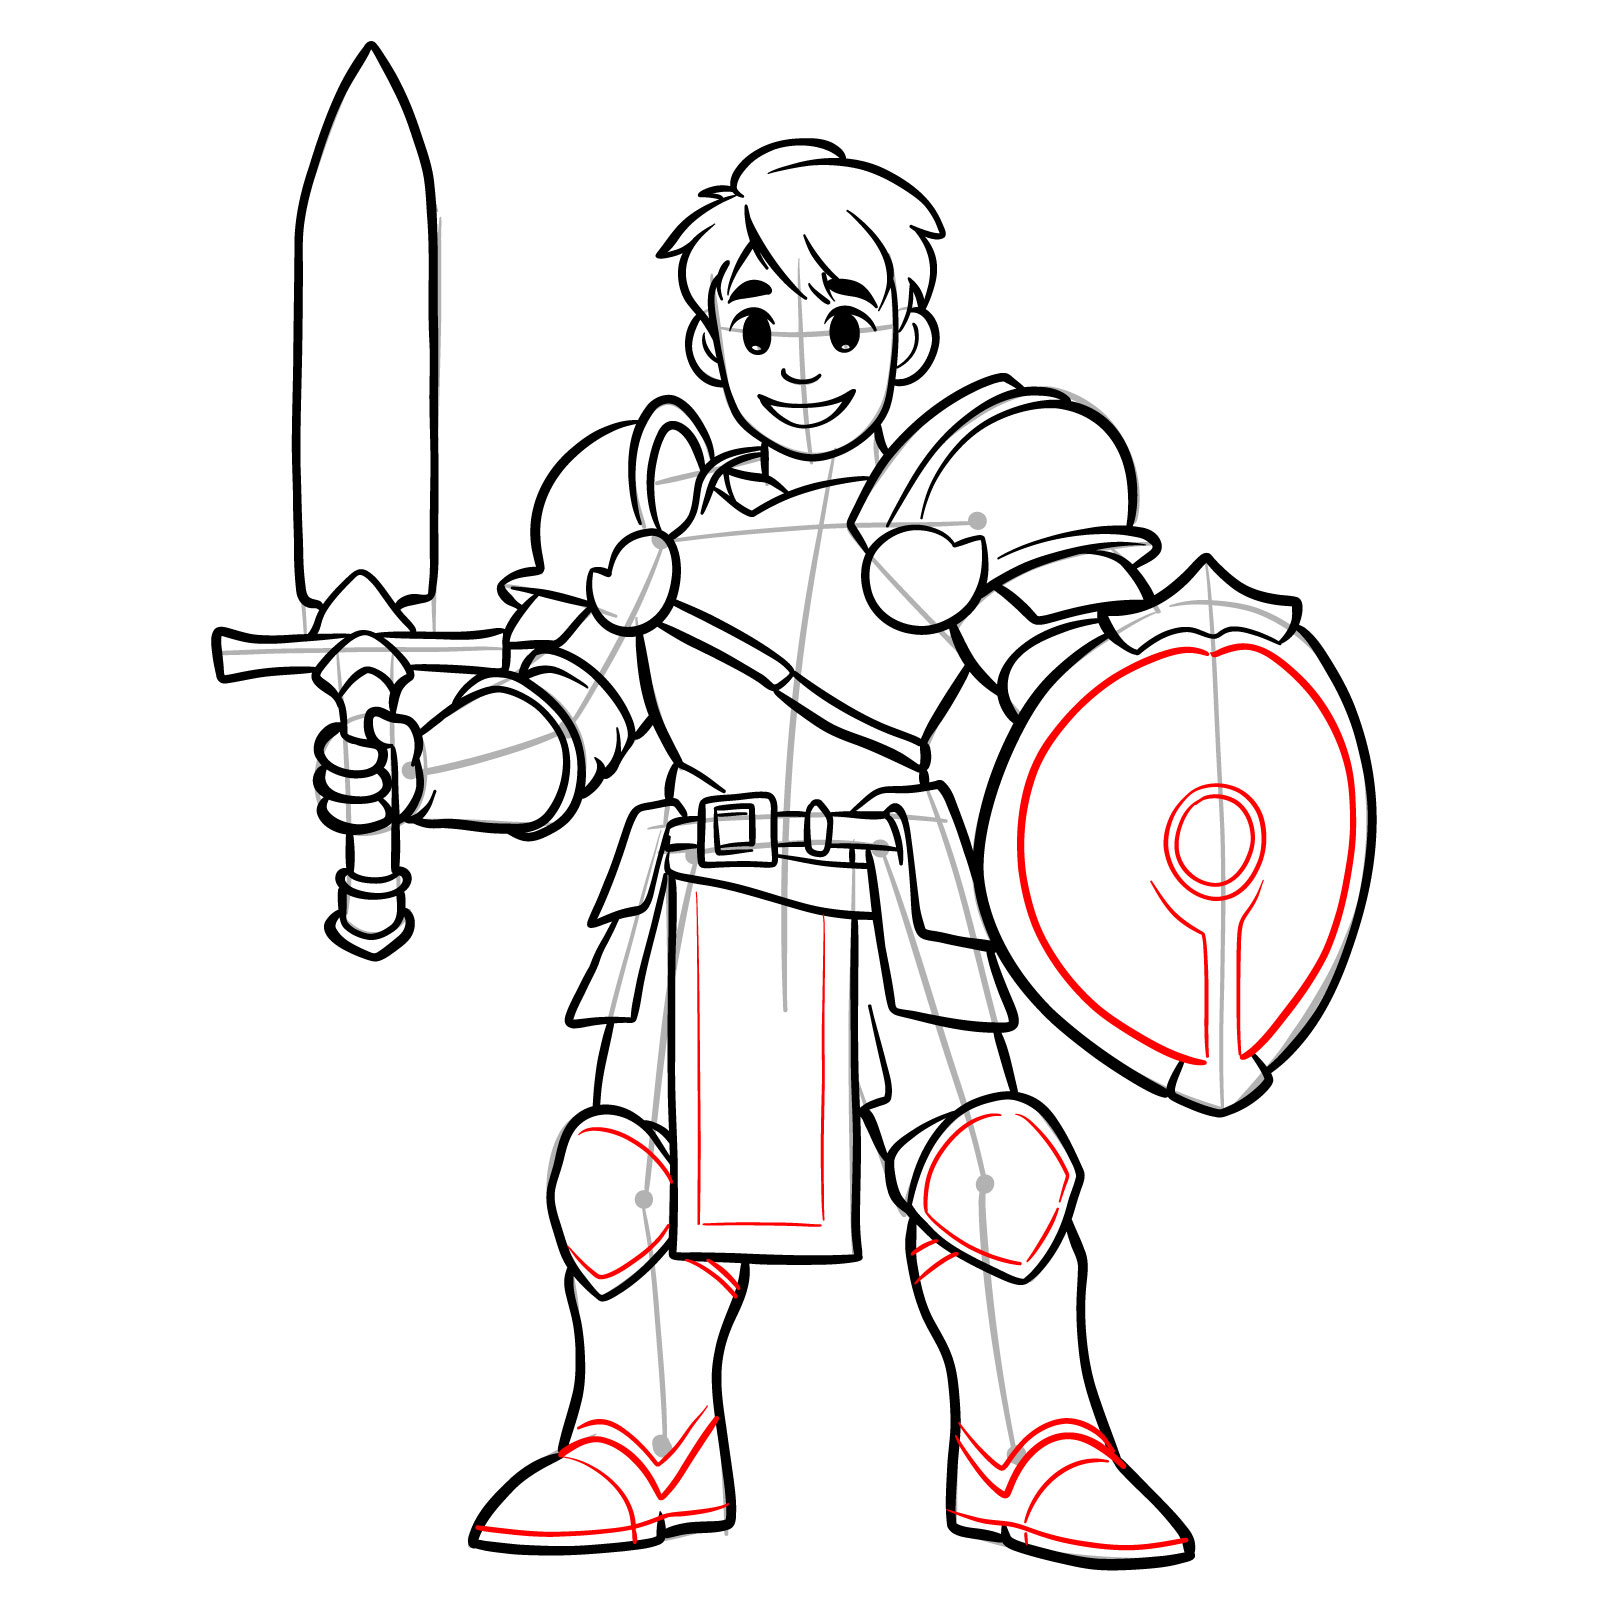
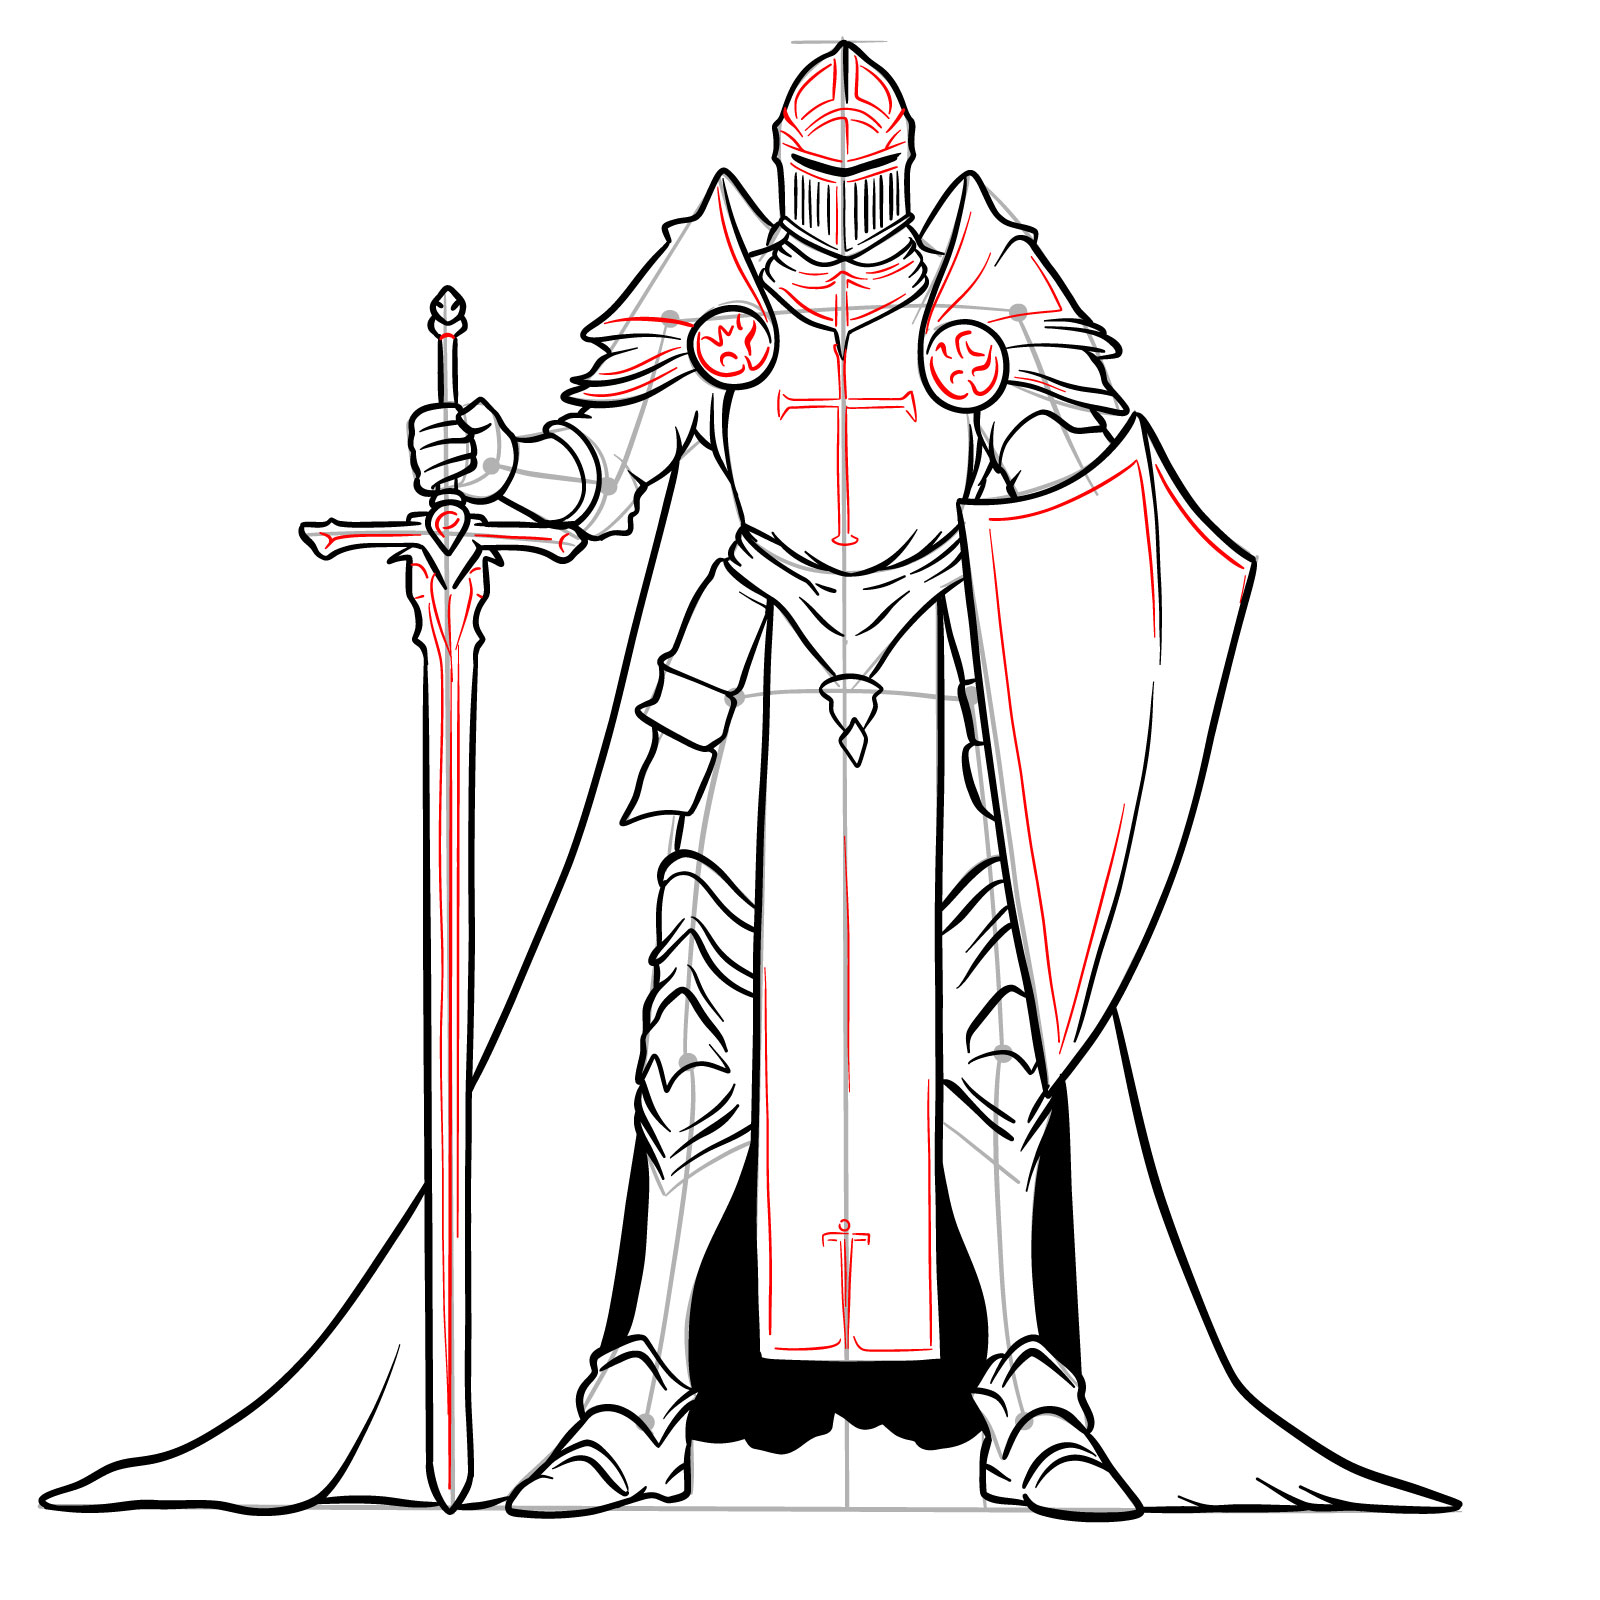
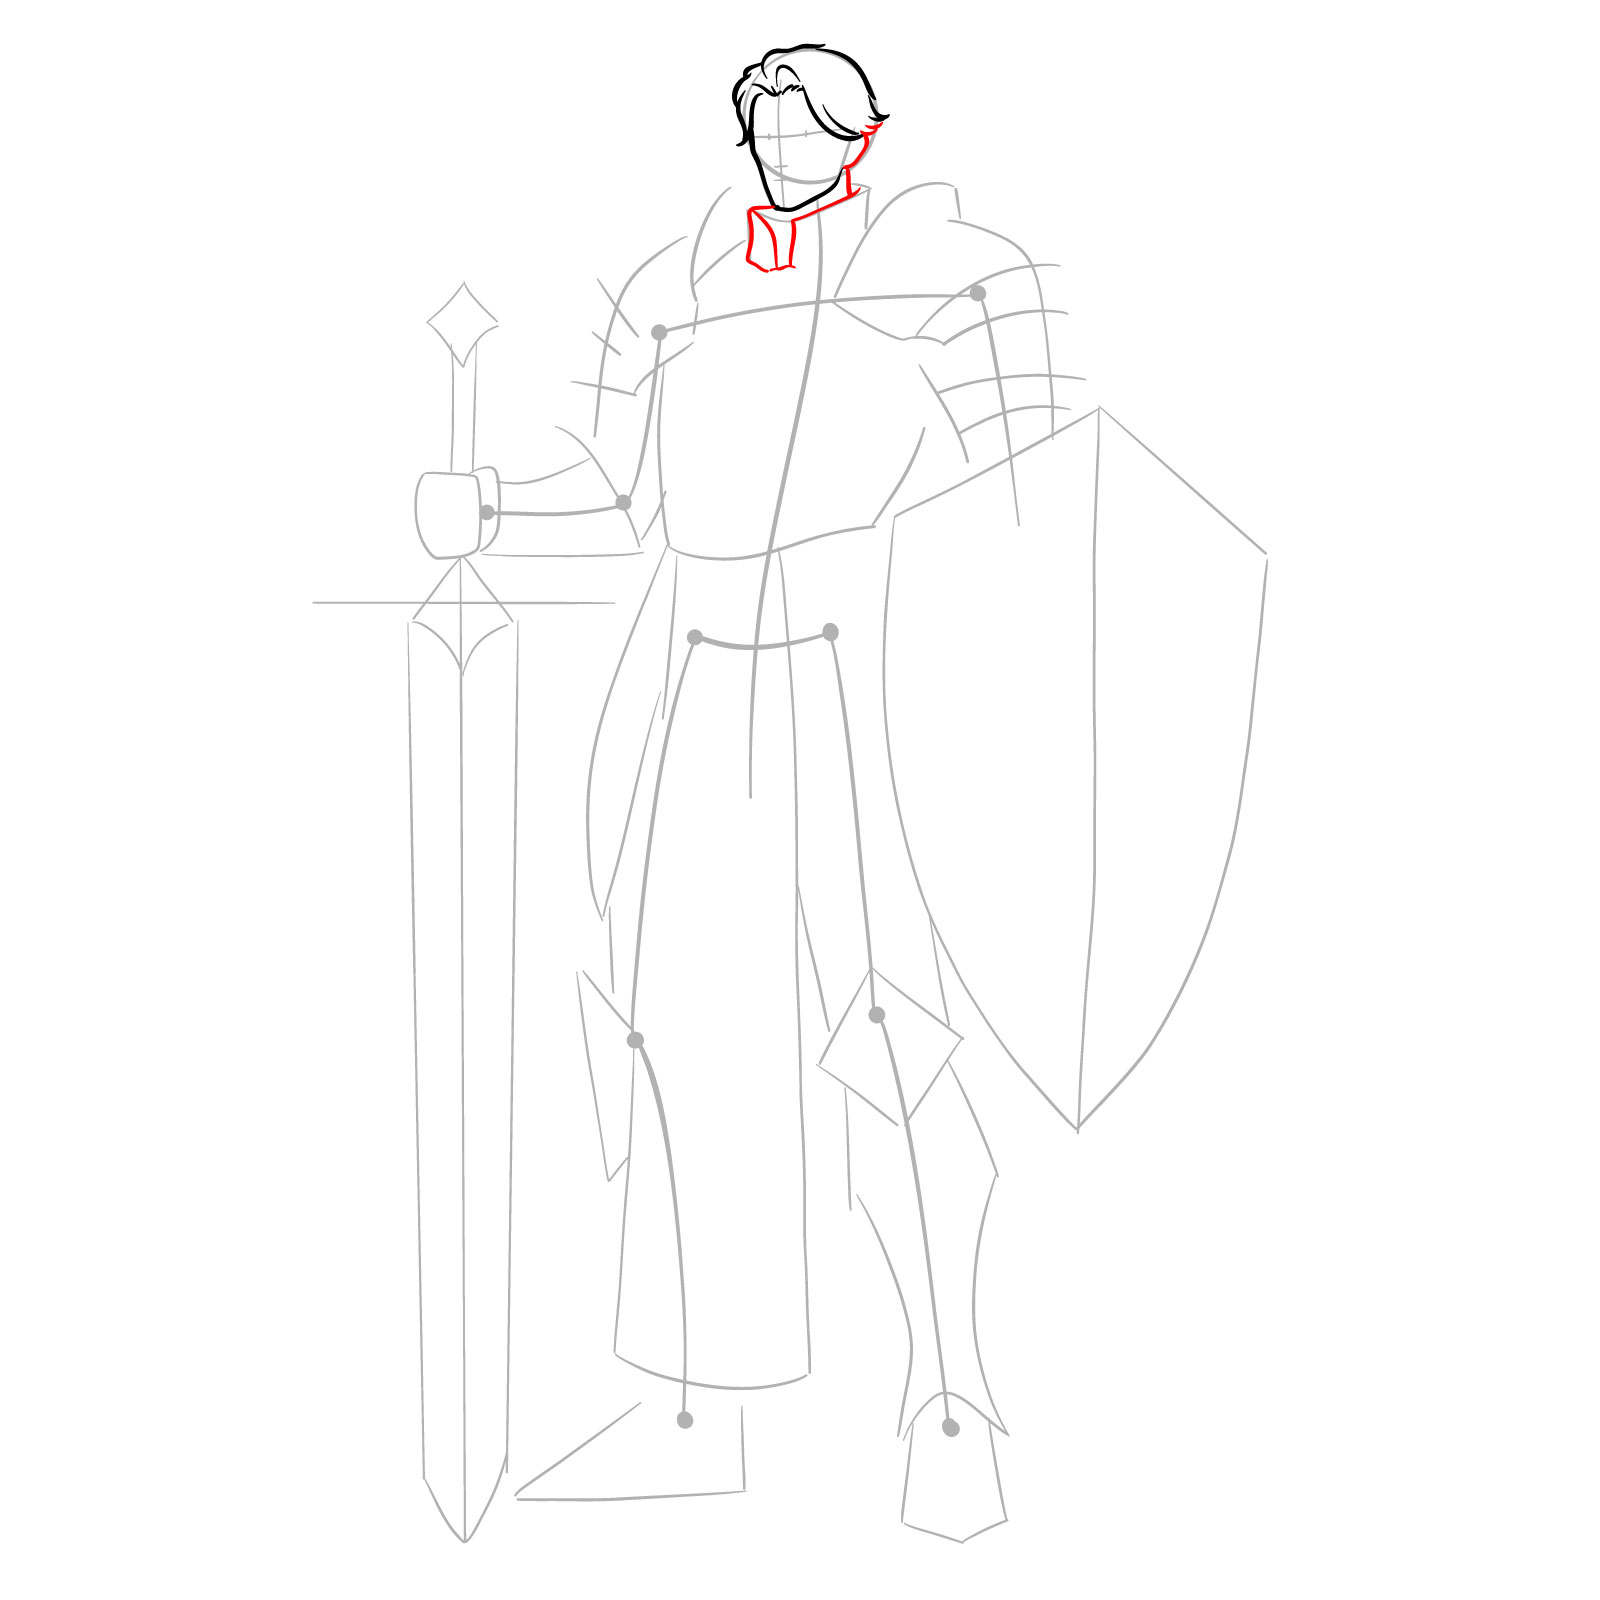
Step 21 – Add intricate details to the helmet, neck, and shoulder armor. Incorporate a pattern into the piece of cloth from the waist, add inner frame lines to the shield, detail the sword, and draw a thin large cross on the chest
Enhancing details on armor and cloth
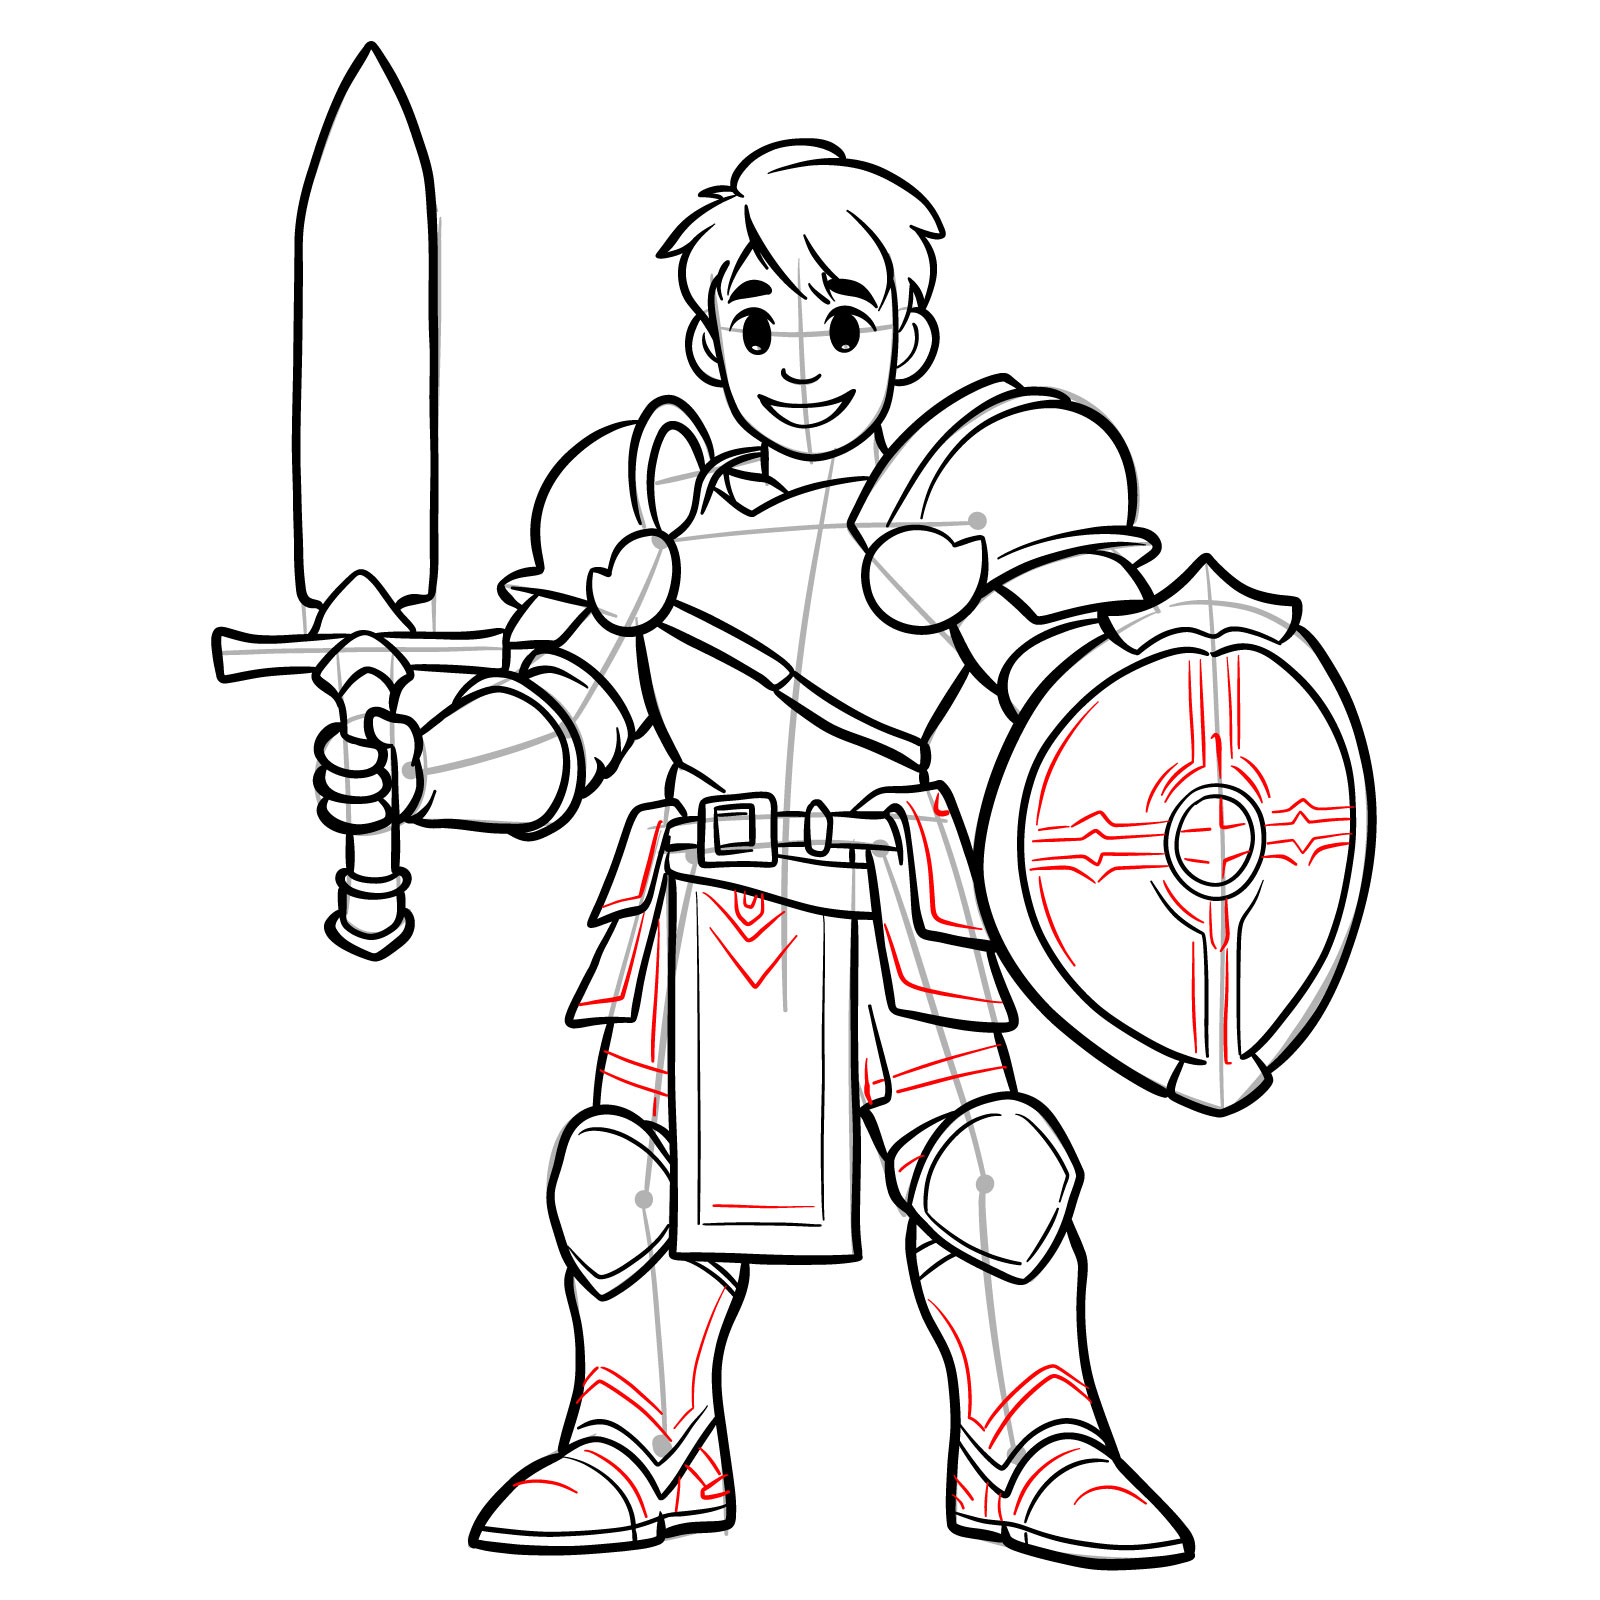
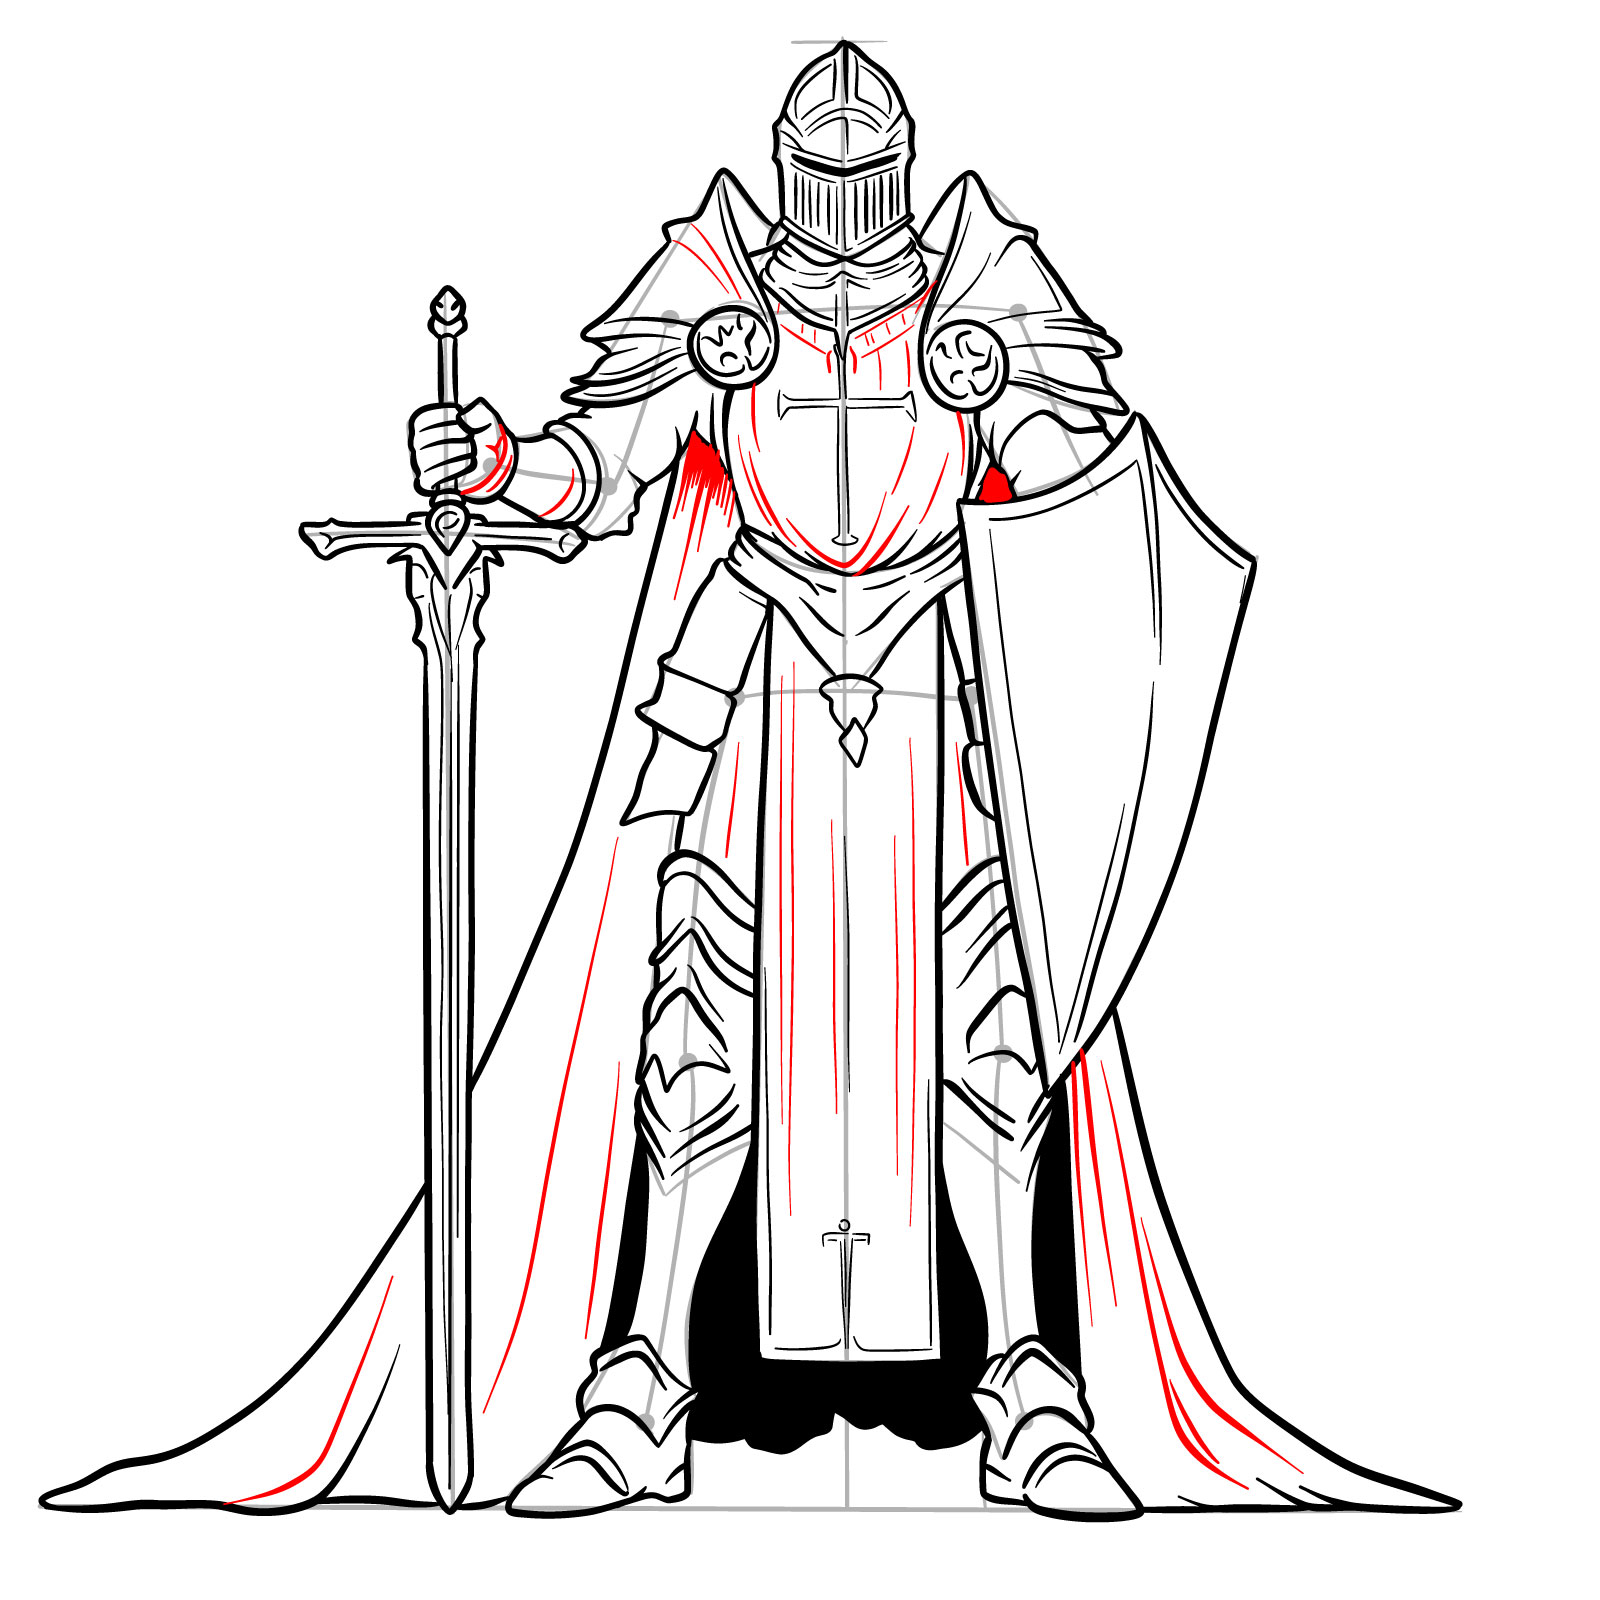
Step 22 – Sketch folds in the fabric, add some shading below the armpits for depth, and complete the details on the sword-holding arm and its shoulder armor
Finalizing fabric folds and shading
Step 23 – Review the entire sketch for any needed adjustments. Gently erase any unnecessary lines and marks to clean up the drawing. Optionally, you can ink your sketch to finalize it, emphasizing clean, bold lines that bring out the details of your male paladin in a helmet
Reviewing and completing the drawing
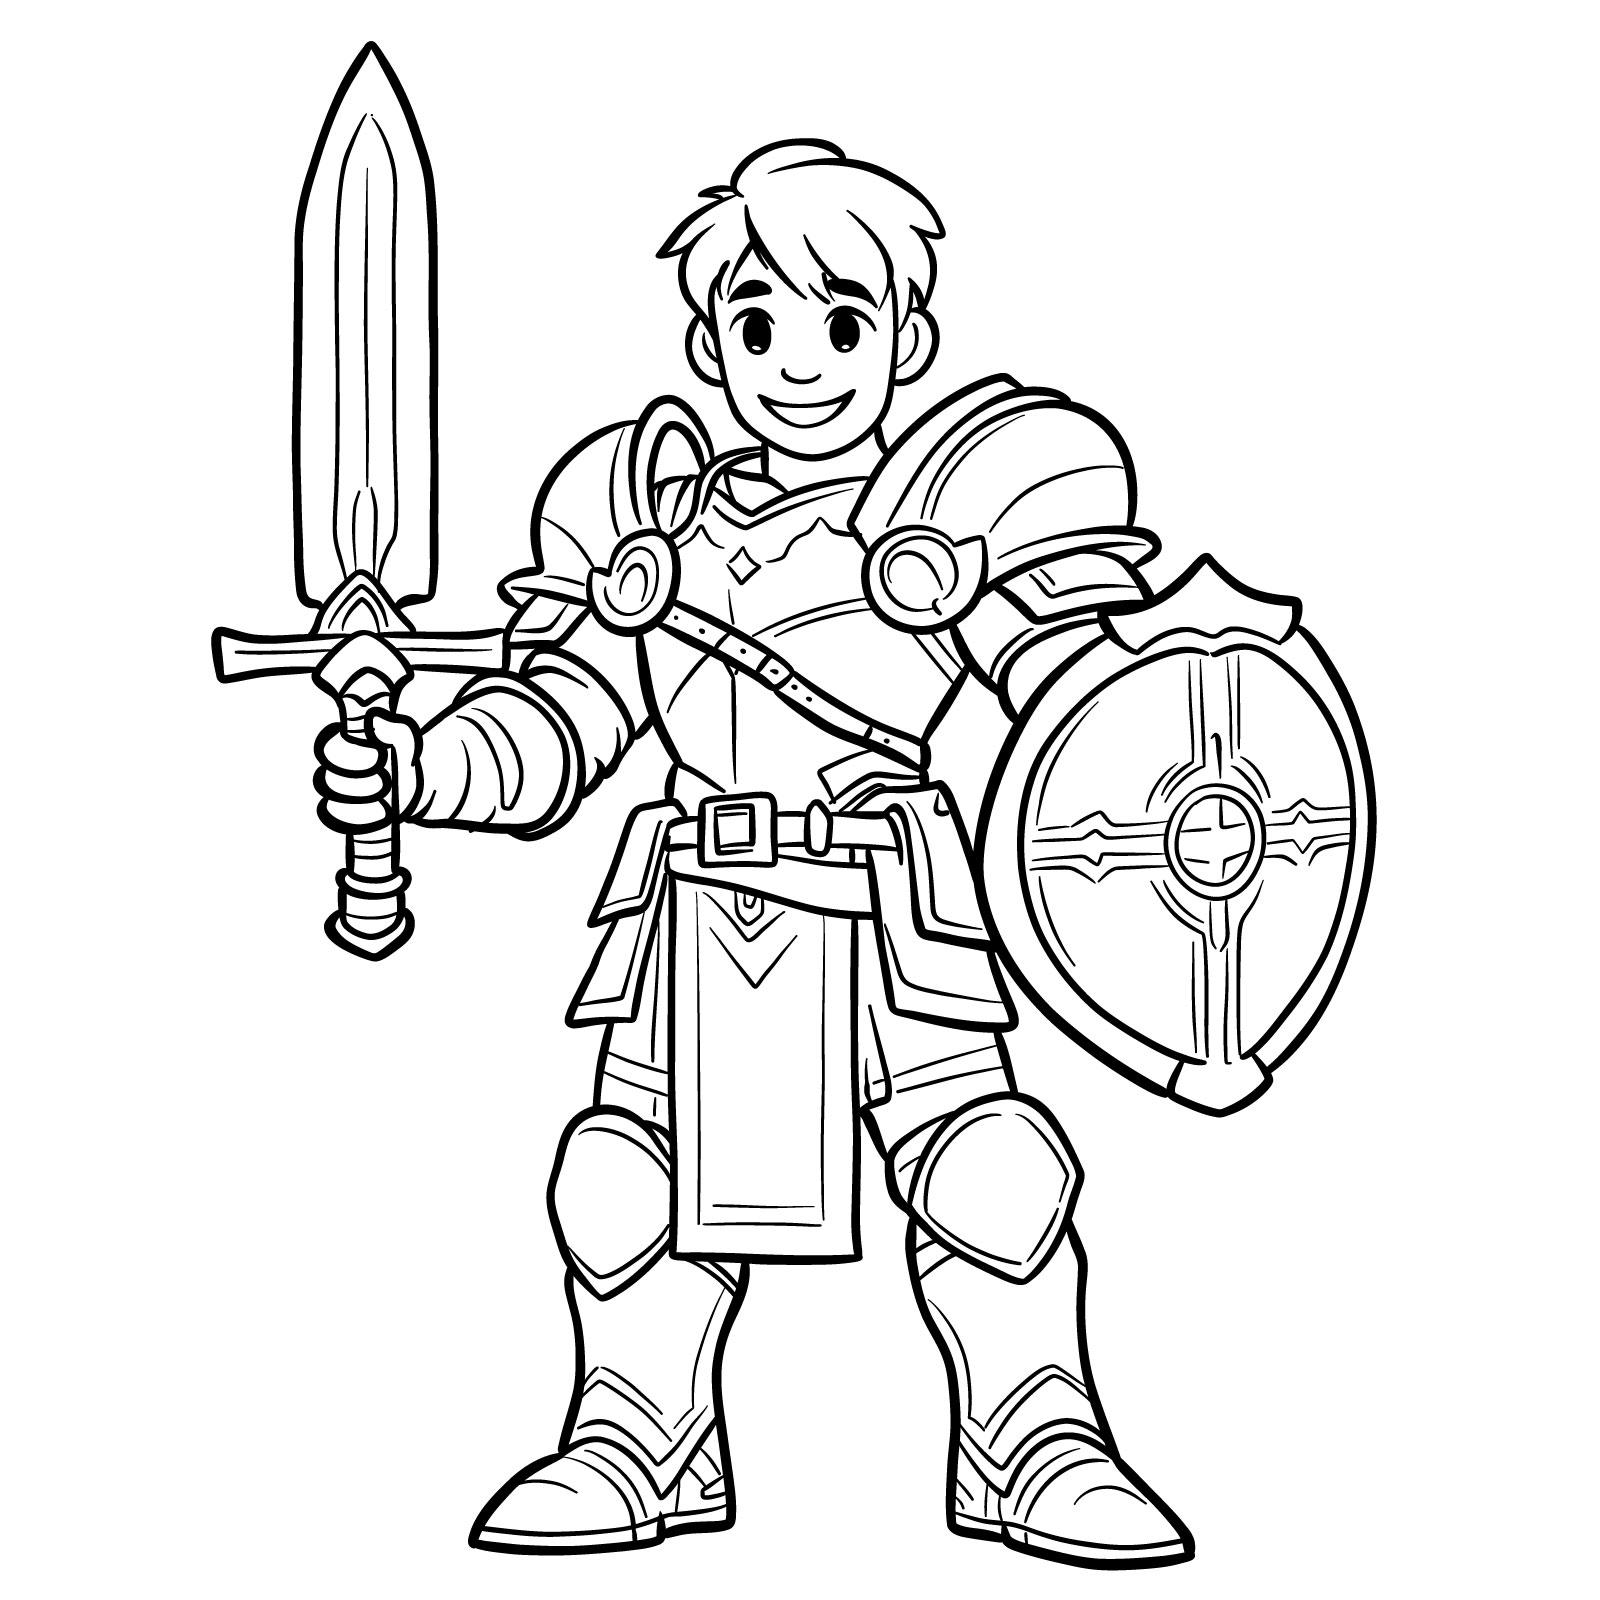
Complex Paladin without Helmet
How to draw a realistic male paladin
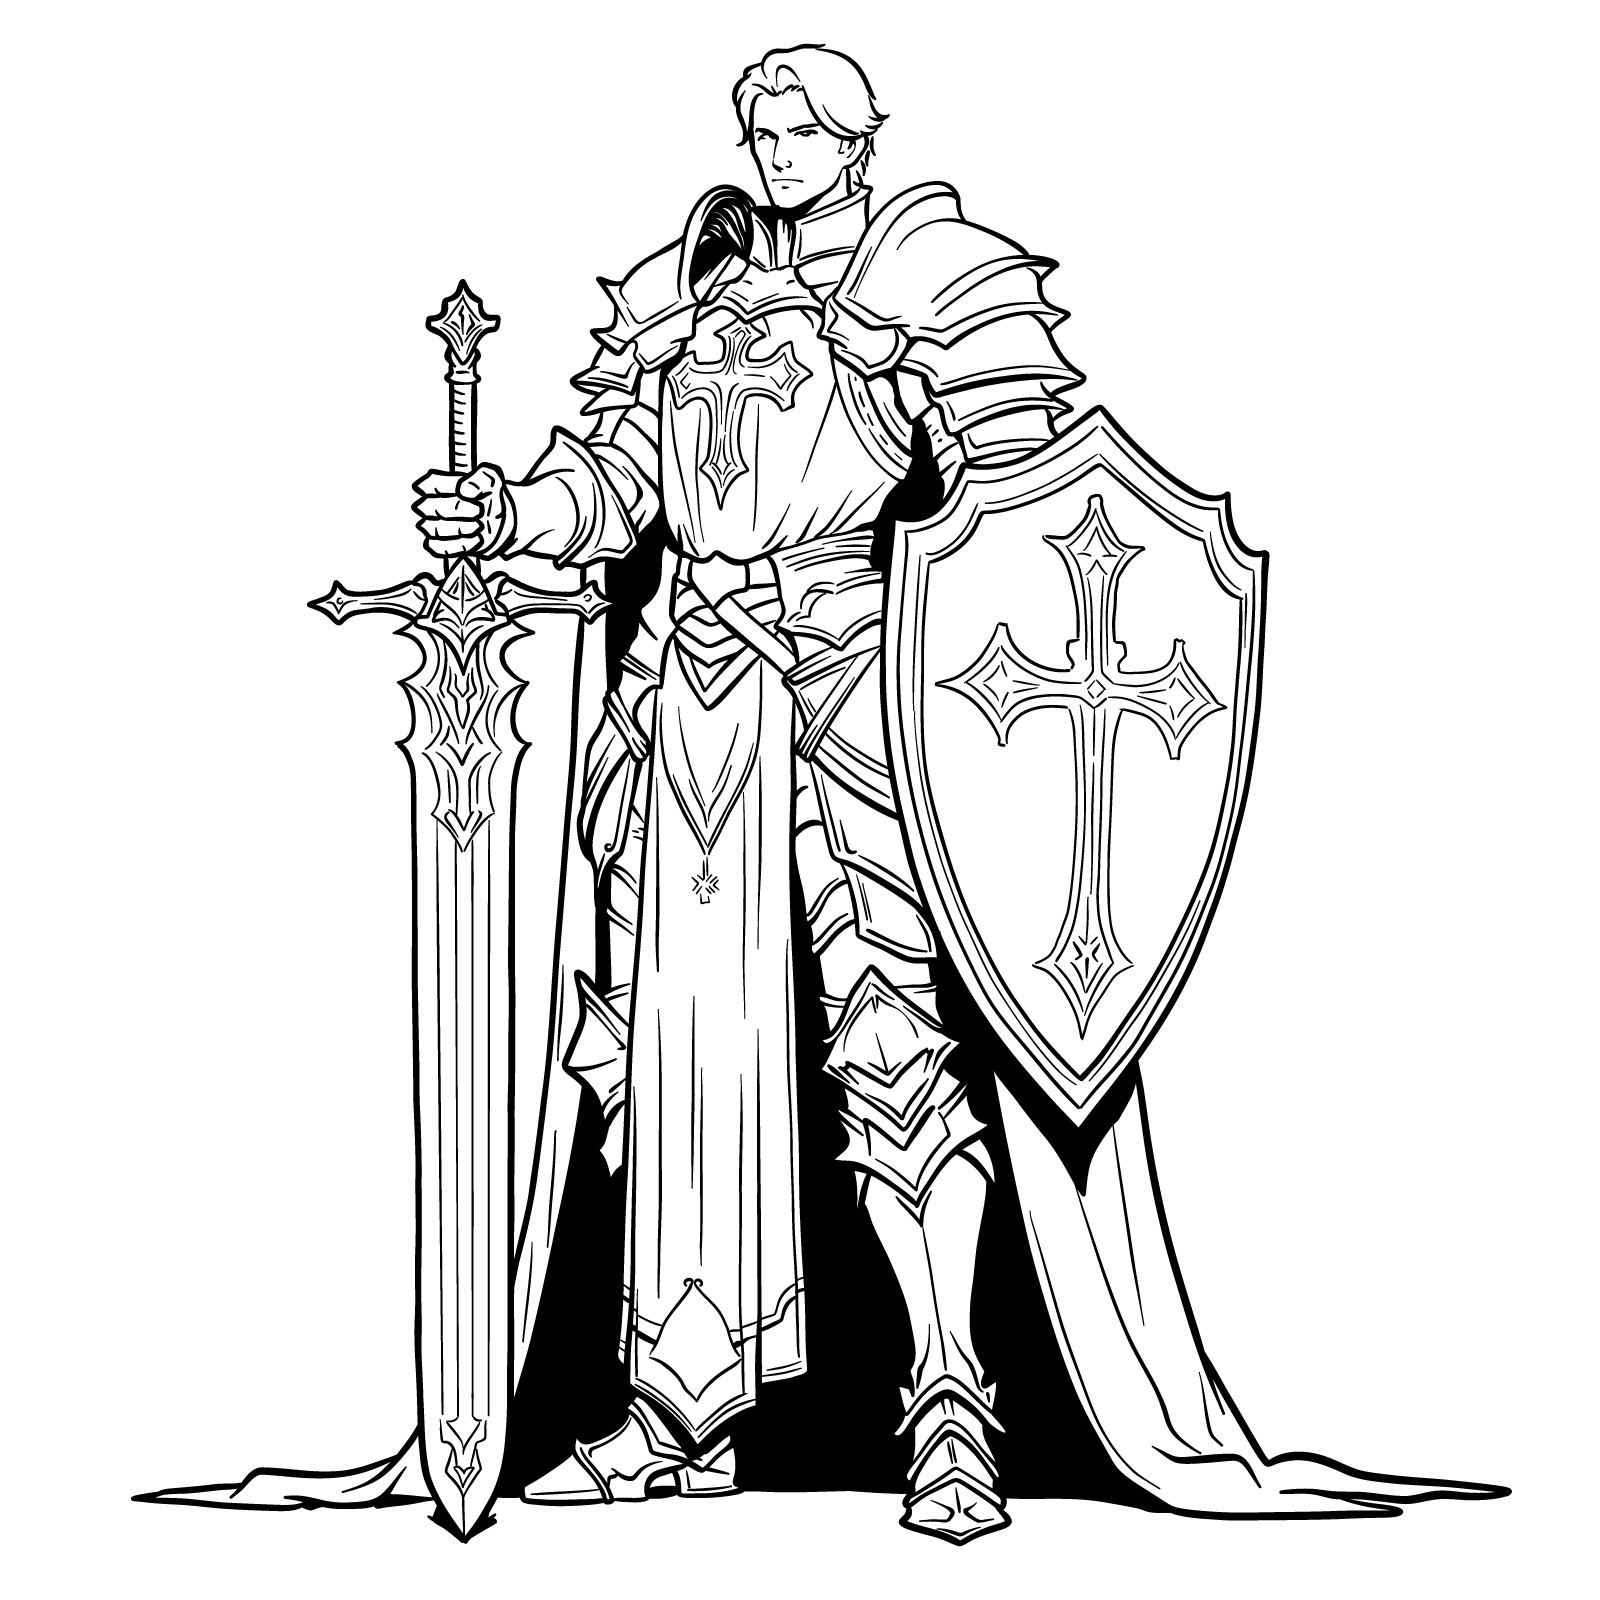
The fourth and final guide of our series is the most detailed and challenging, perfect for artists who want to practice the intricacies of medieval fantasy art. This guide focuses on a paladin without a helmet, exposing the character’s detailed facial features and hair, alongside a more complex armor design.
With 28 steps, this tutorial covers the creation of a paladin with elaborate details like crosses on the shield and chest, intricate patterns on the sword, and sophisticated armor detailing. Each step is crafted to help you focus on these fine elements, enhancing both your ability to handle complex designs in your drawings.
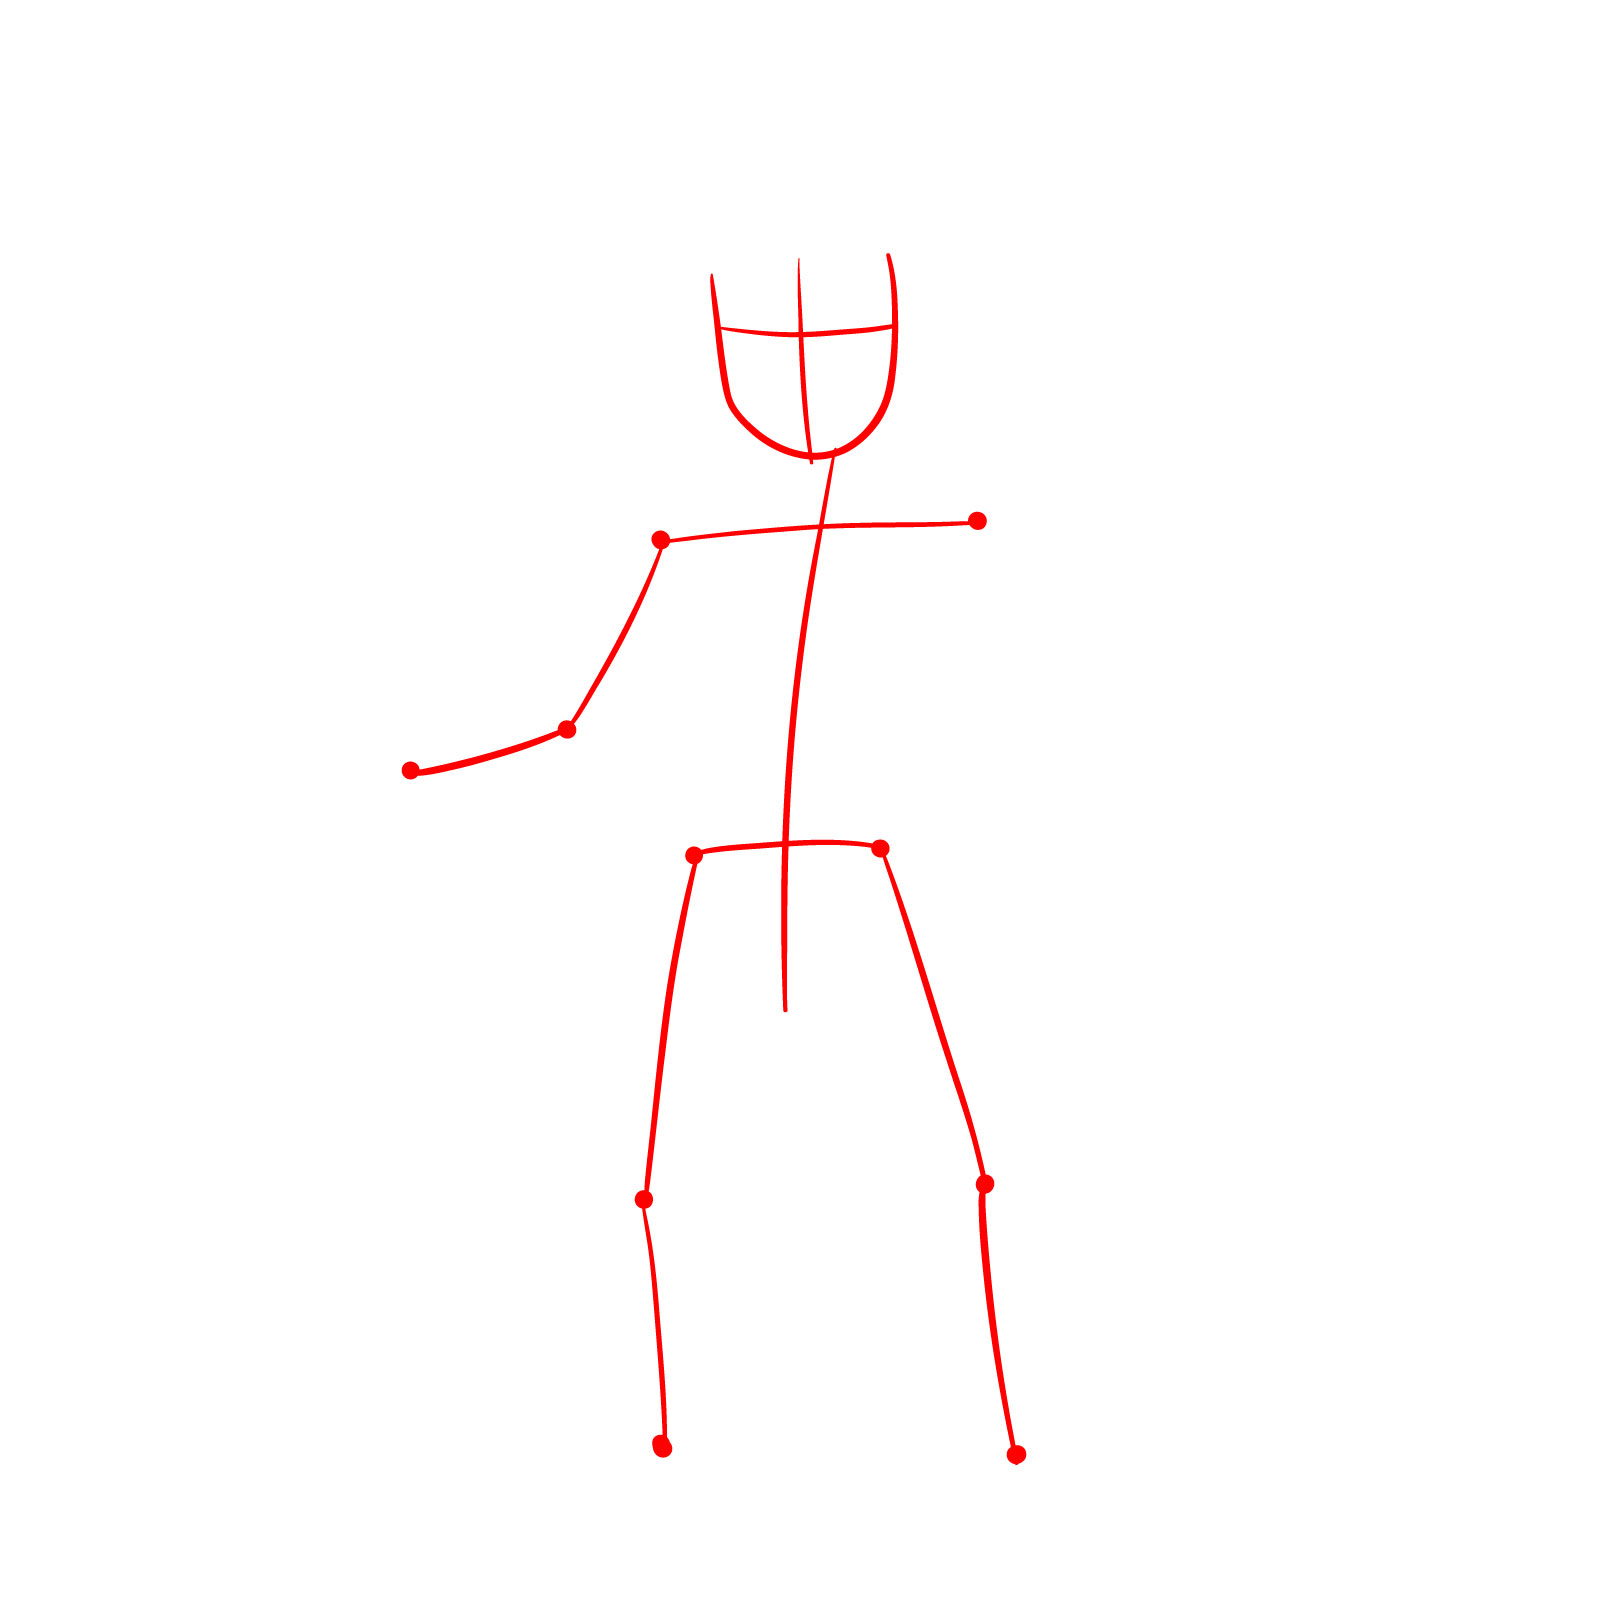
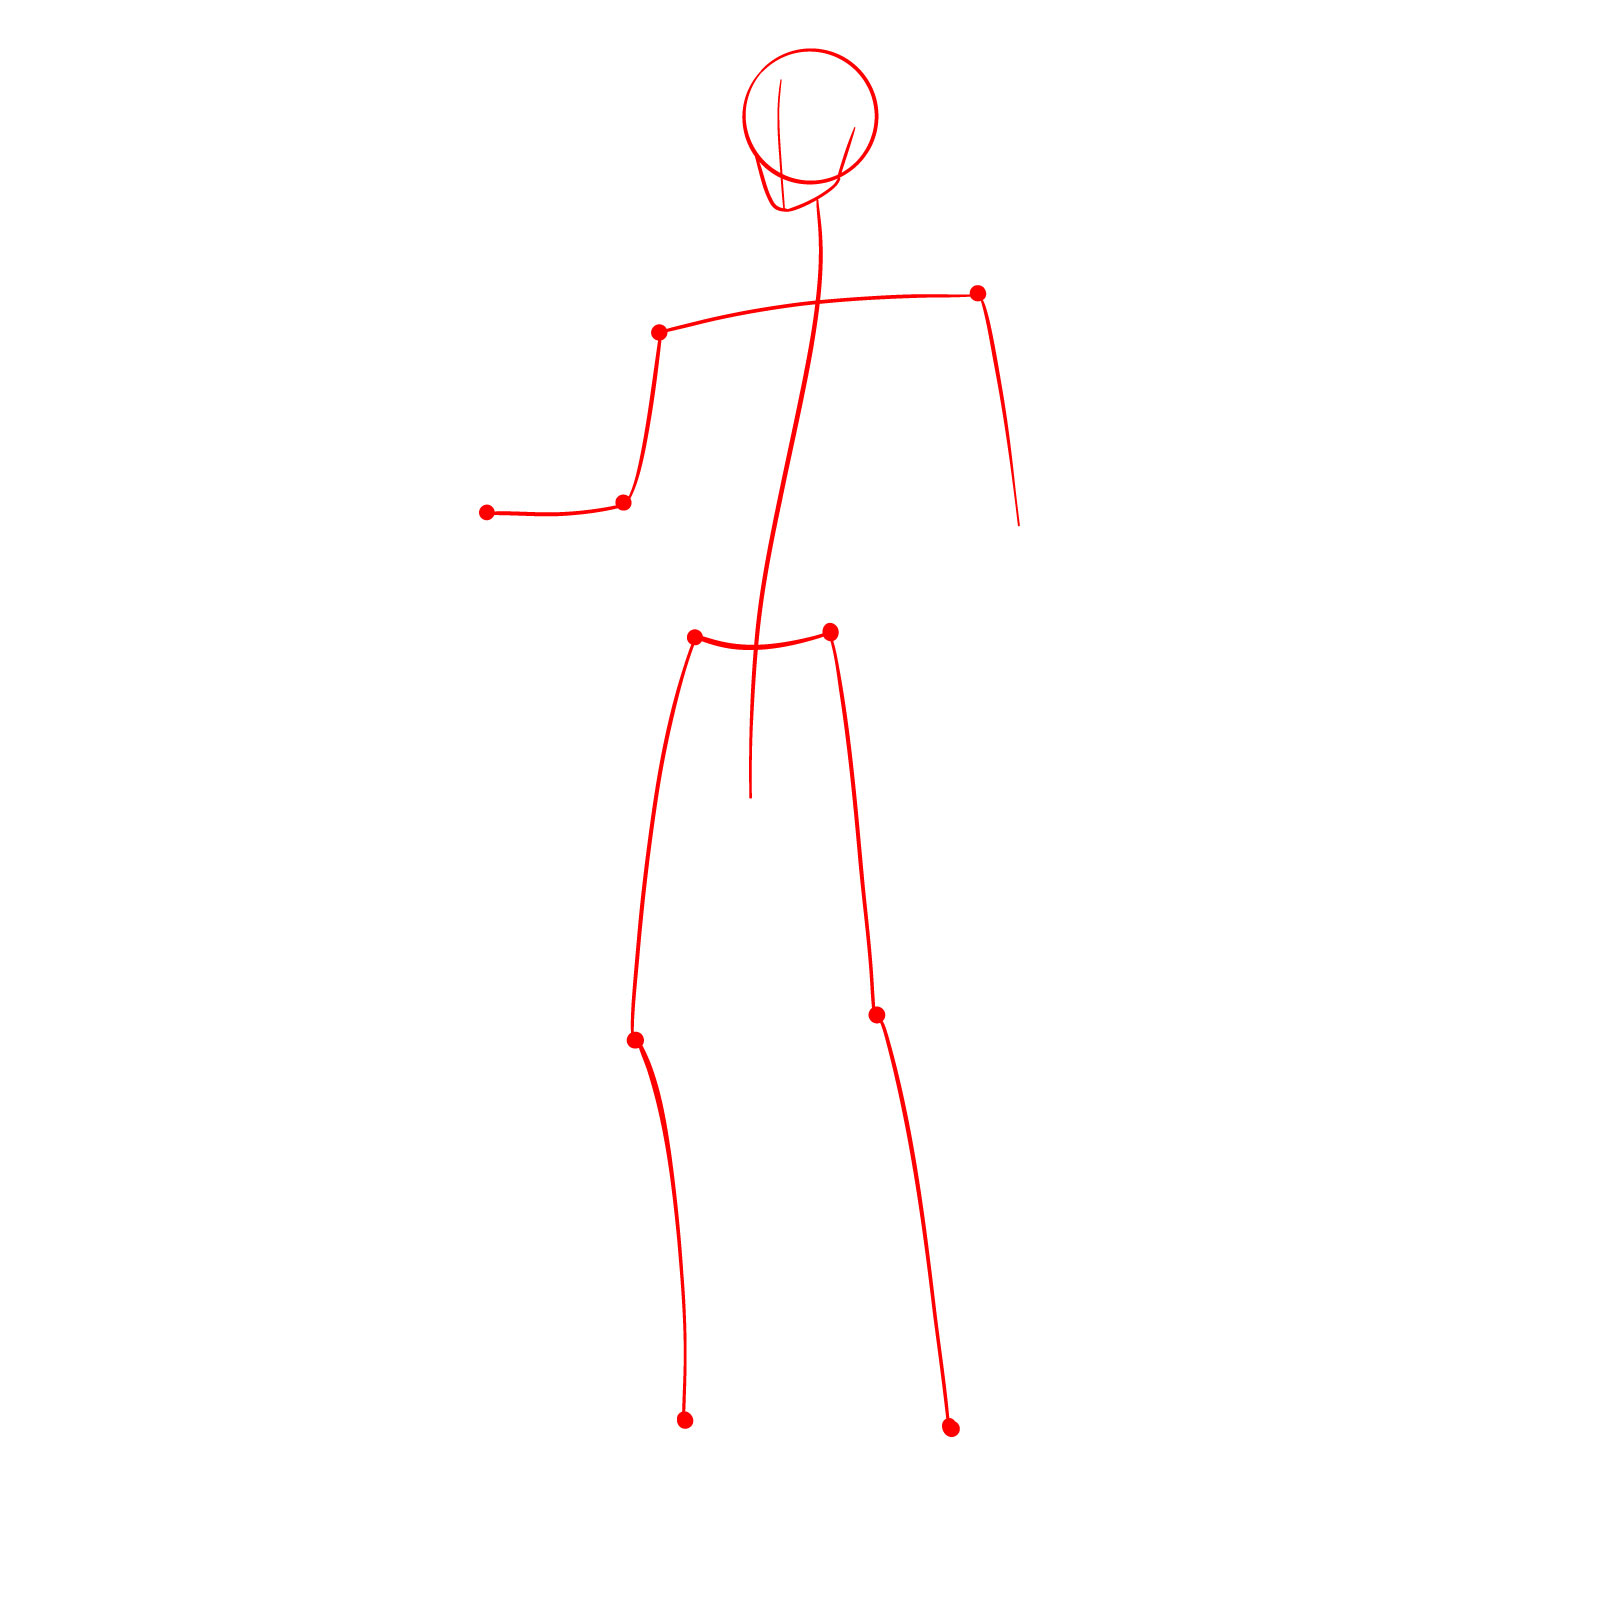
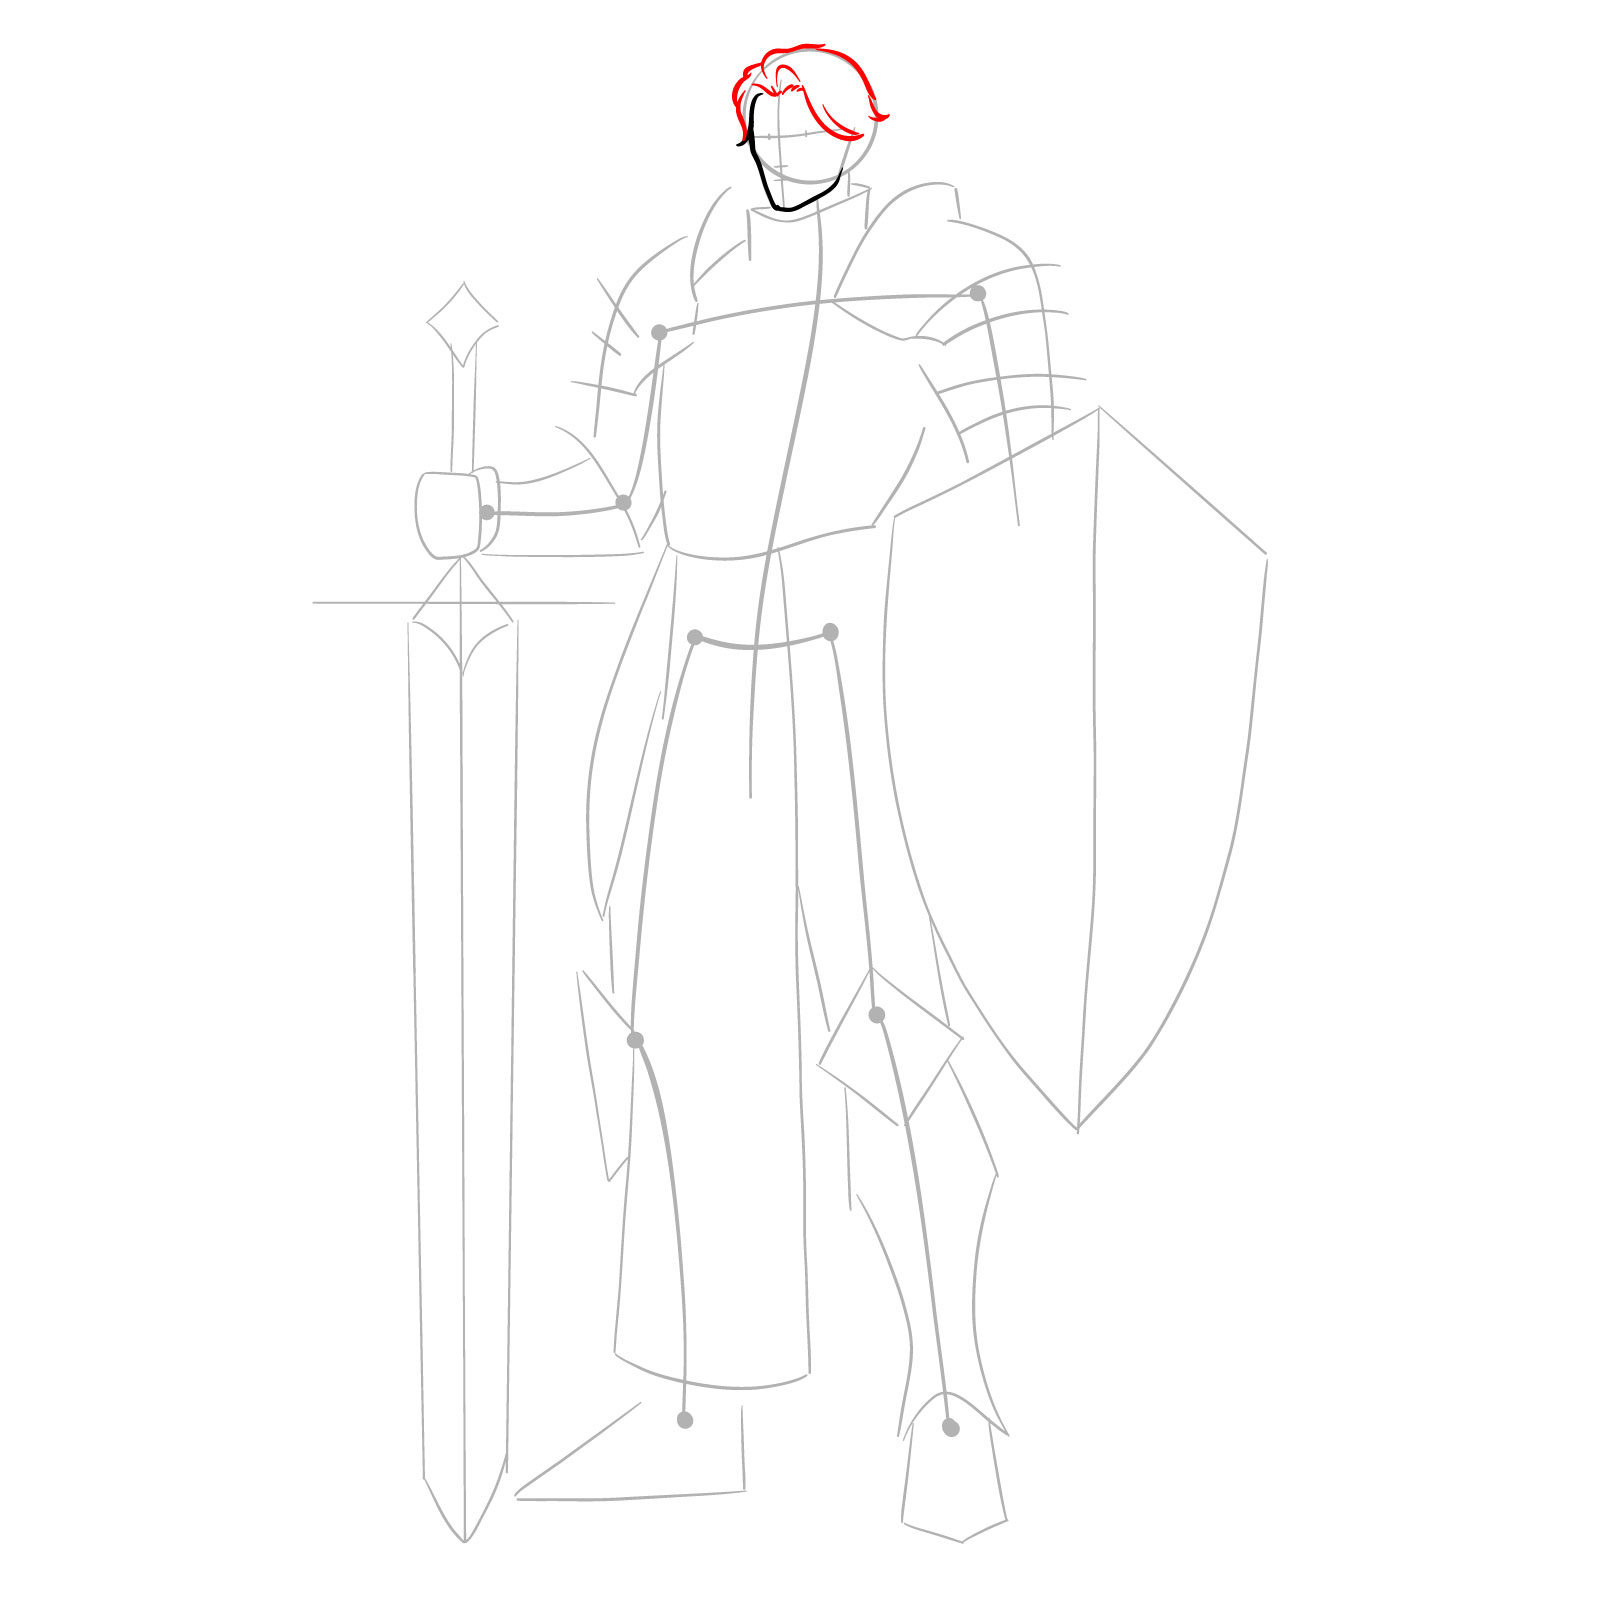
Step 01 – Begin by sketching a basic circle for the head with a chin shape. Add a vertical line for symmetry. Below it, draw a simple stick figure to establish the pose of the paladin. The stick figure should include lines for the arms, legs, and torso, suggesting the stance of the character
Initial sketch of head and pose
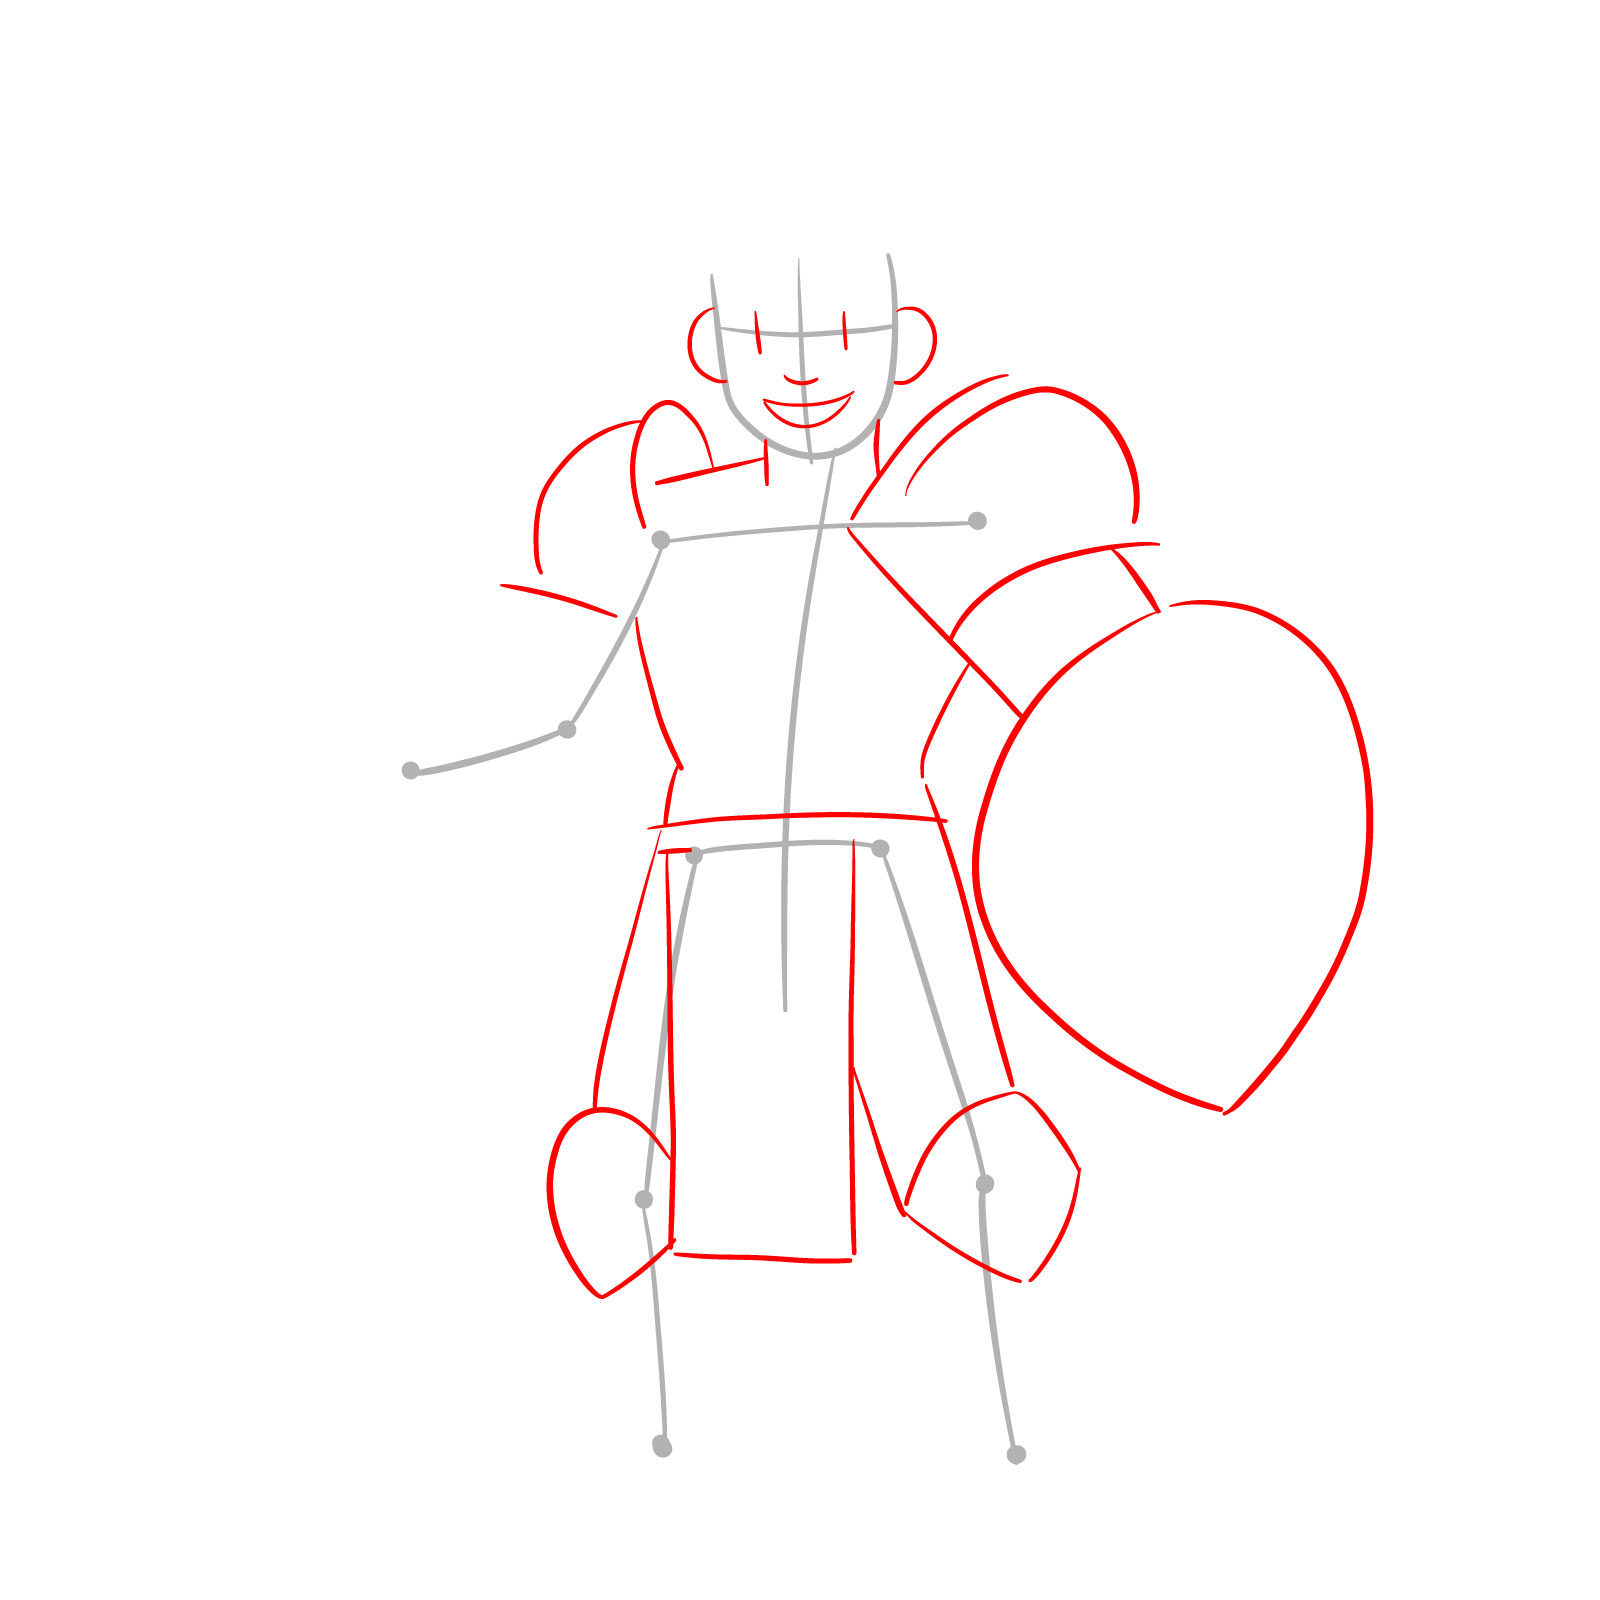
Step 02 – Draw placeholders for the eyes, nose, and mouth on the head. Sketch the neck and add basic shapes for the shoulders and body armor. Outline a shield shape next to the body and a rectangular cloth flowing from the waist to the feet
Placing facial features and armor
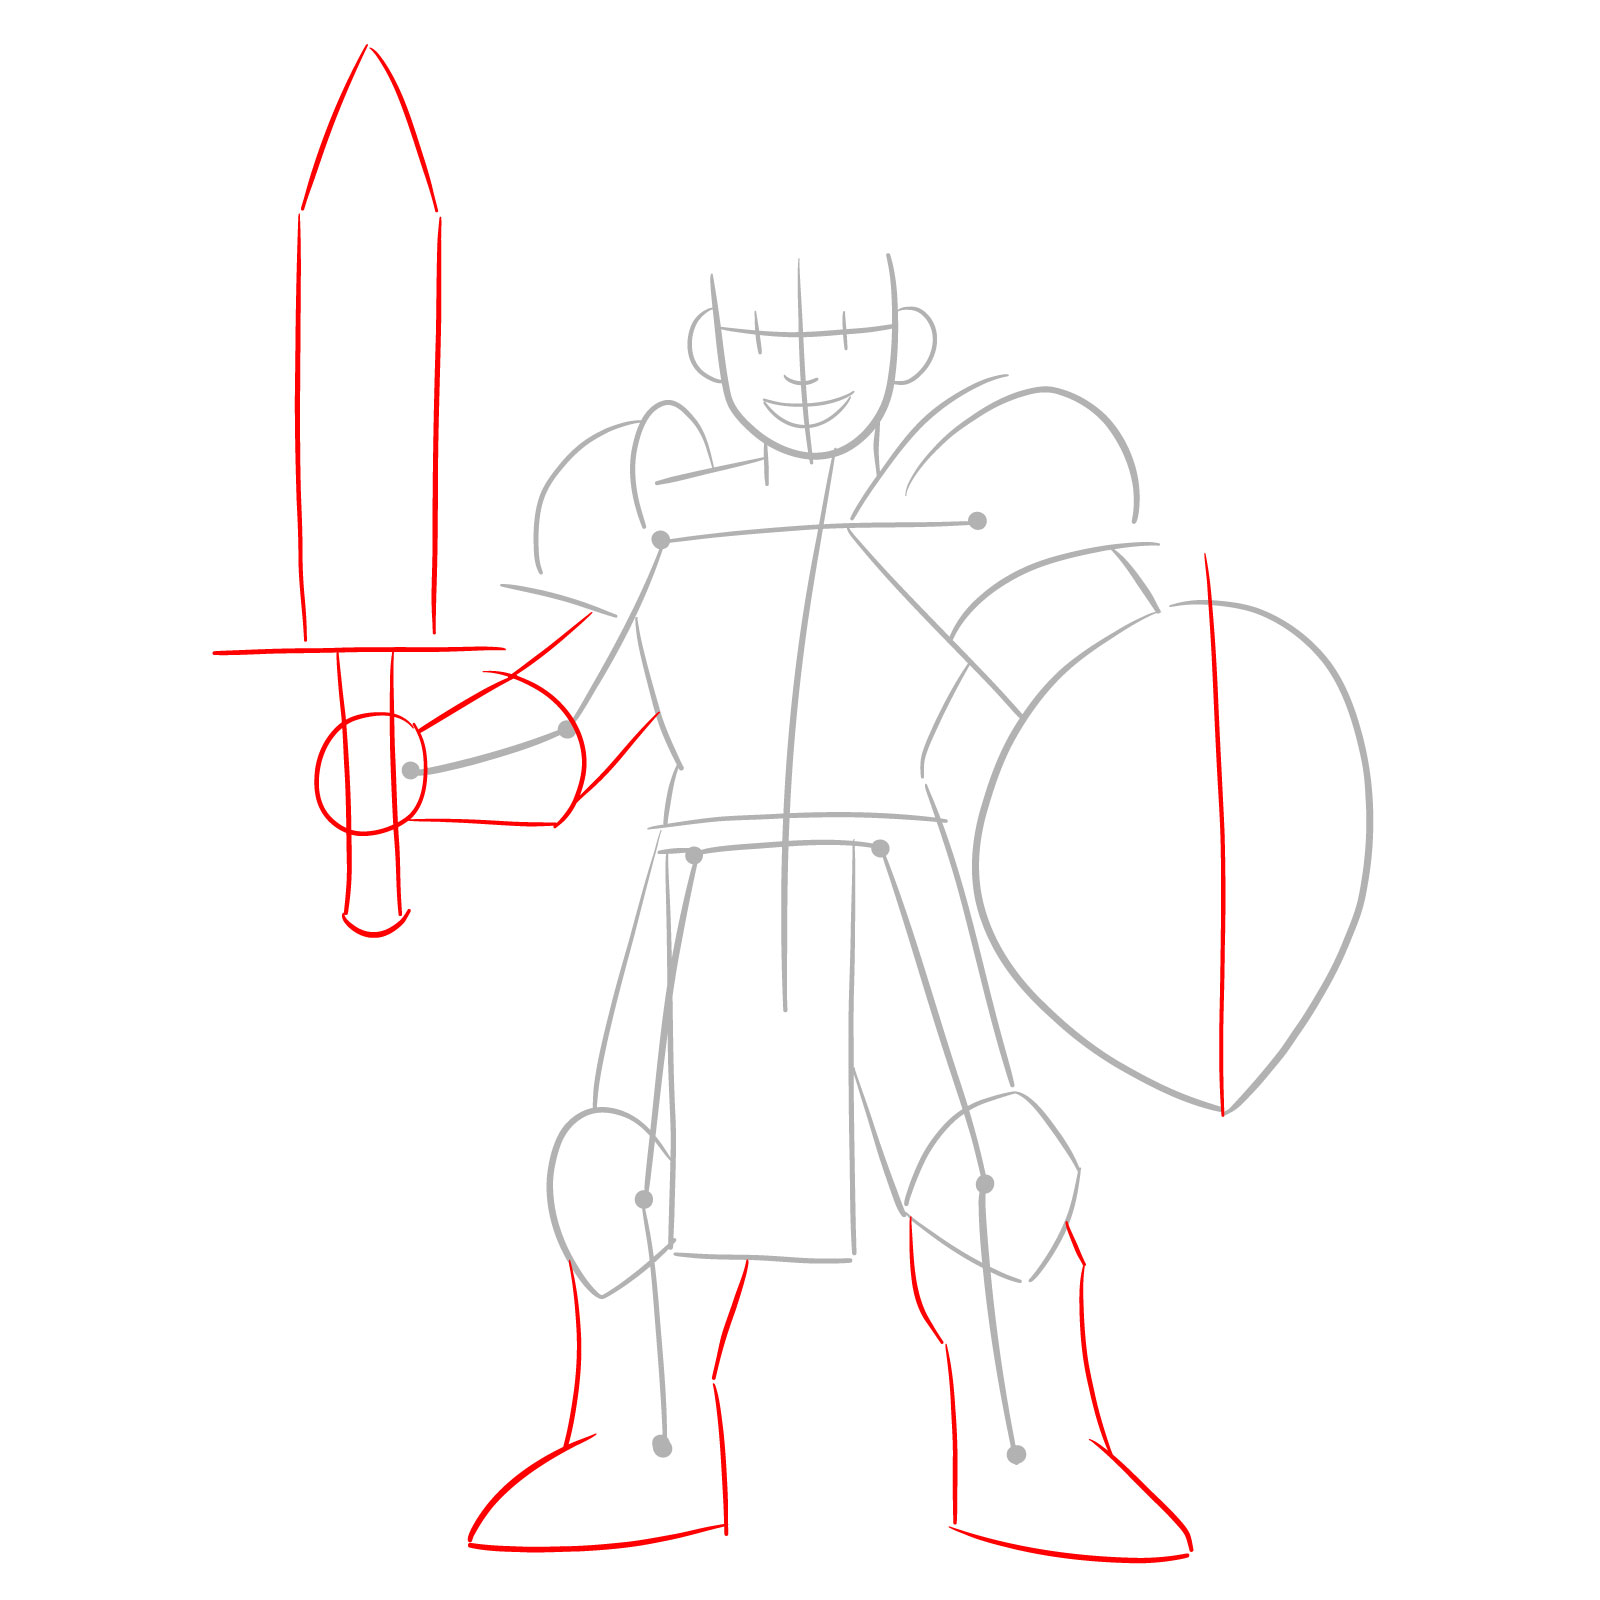
Step 03 – Add outlines for the leg armor. Sketch the hand that will be holding the sword, along with the basic outline of the sword itself, ensuring it aligns with the paladin’s pose
Detailing legs, sword, and hand
Step 04 – Refine the outline of the face to more closely resemble the final shape, adjusting the jawline and forehead
Refining the face shape
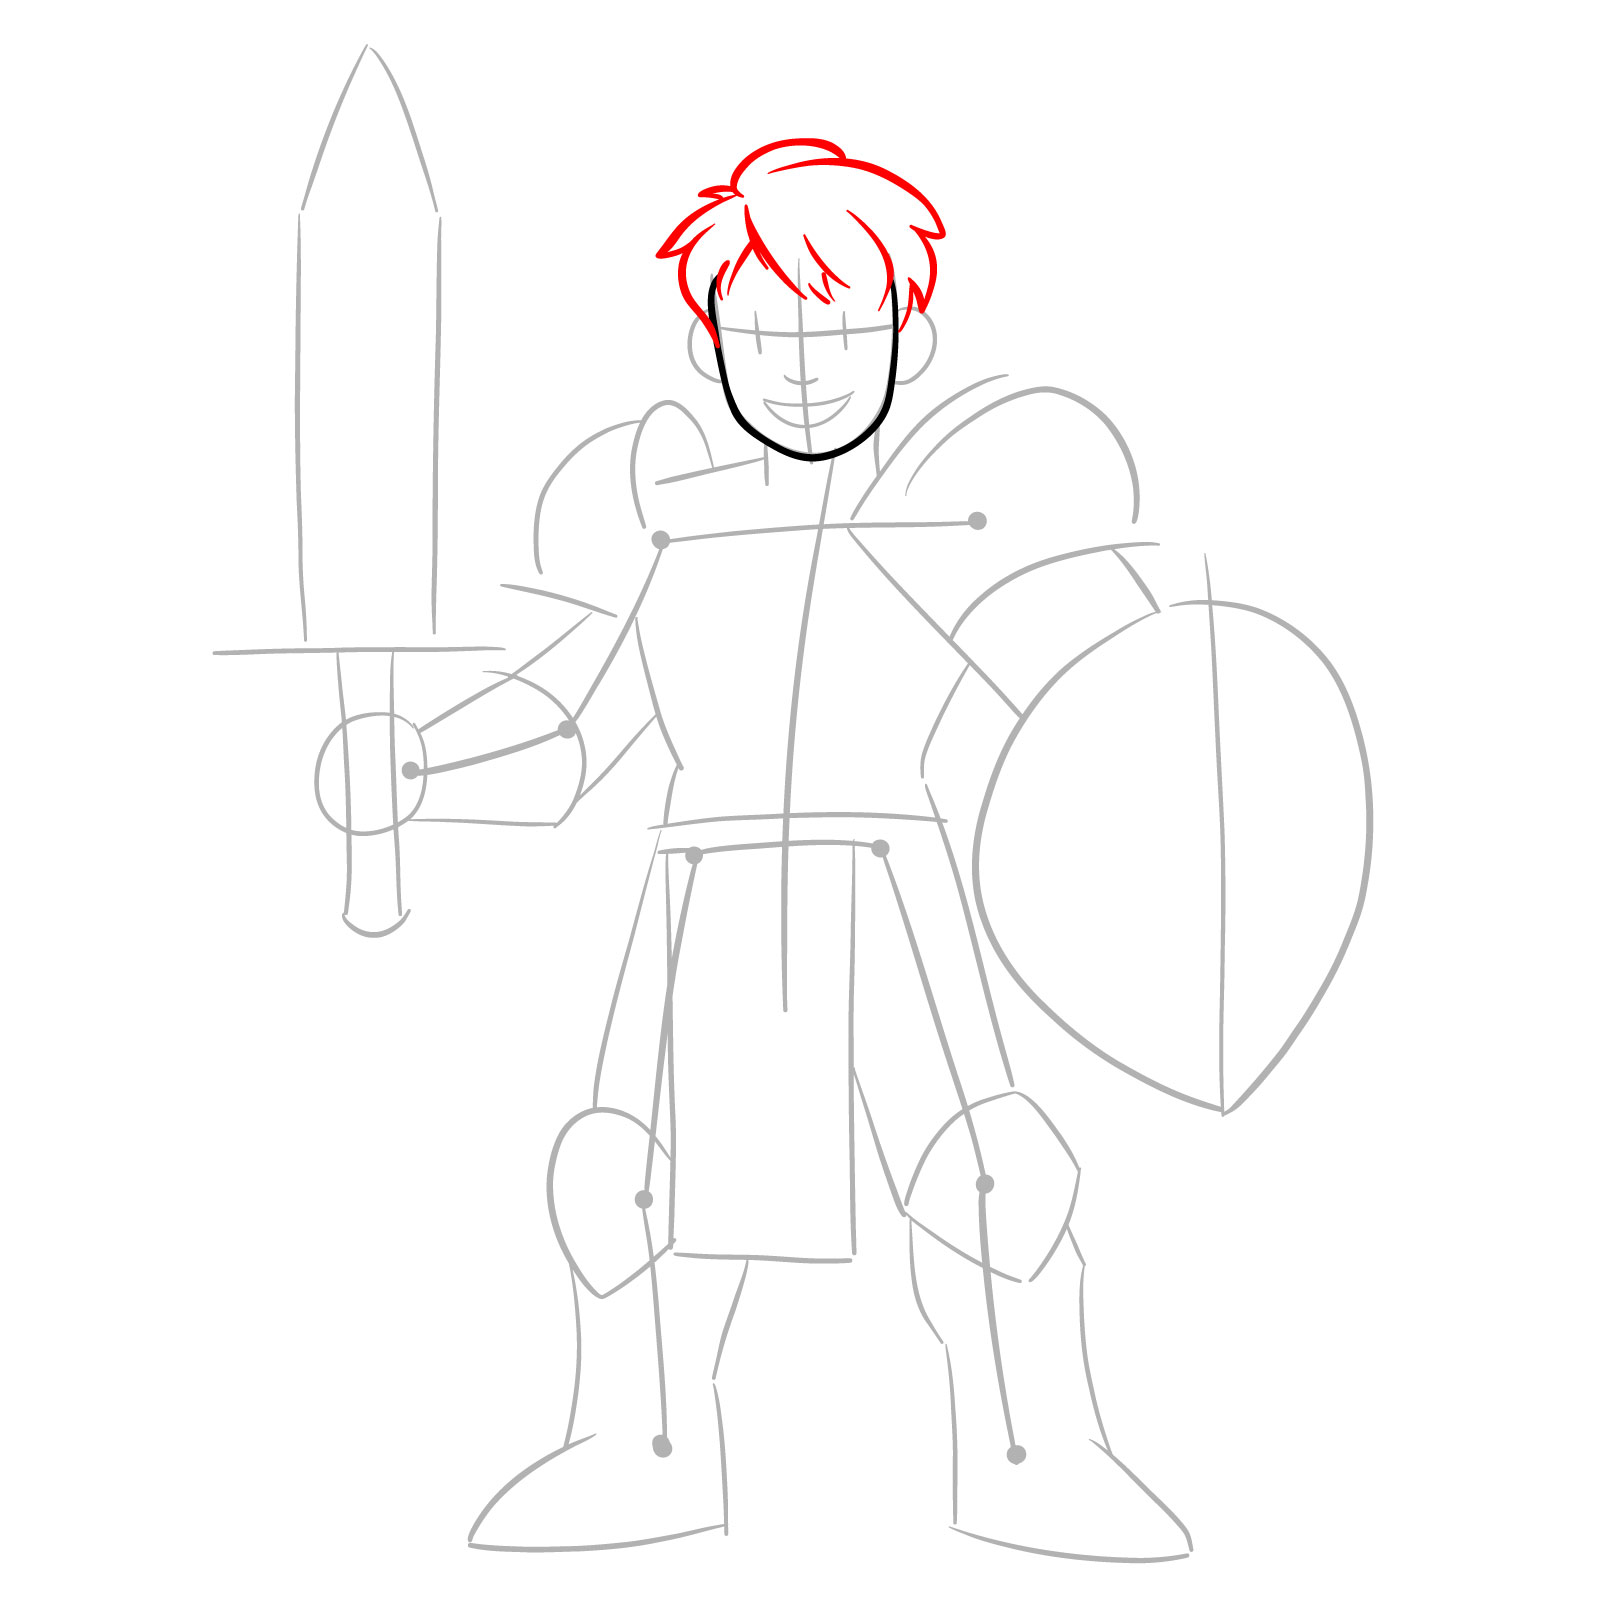
Step 05 – Draw the outline of the hair, considering the style and flow
Outlining the hair
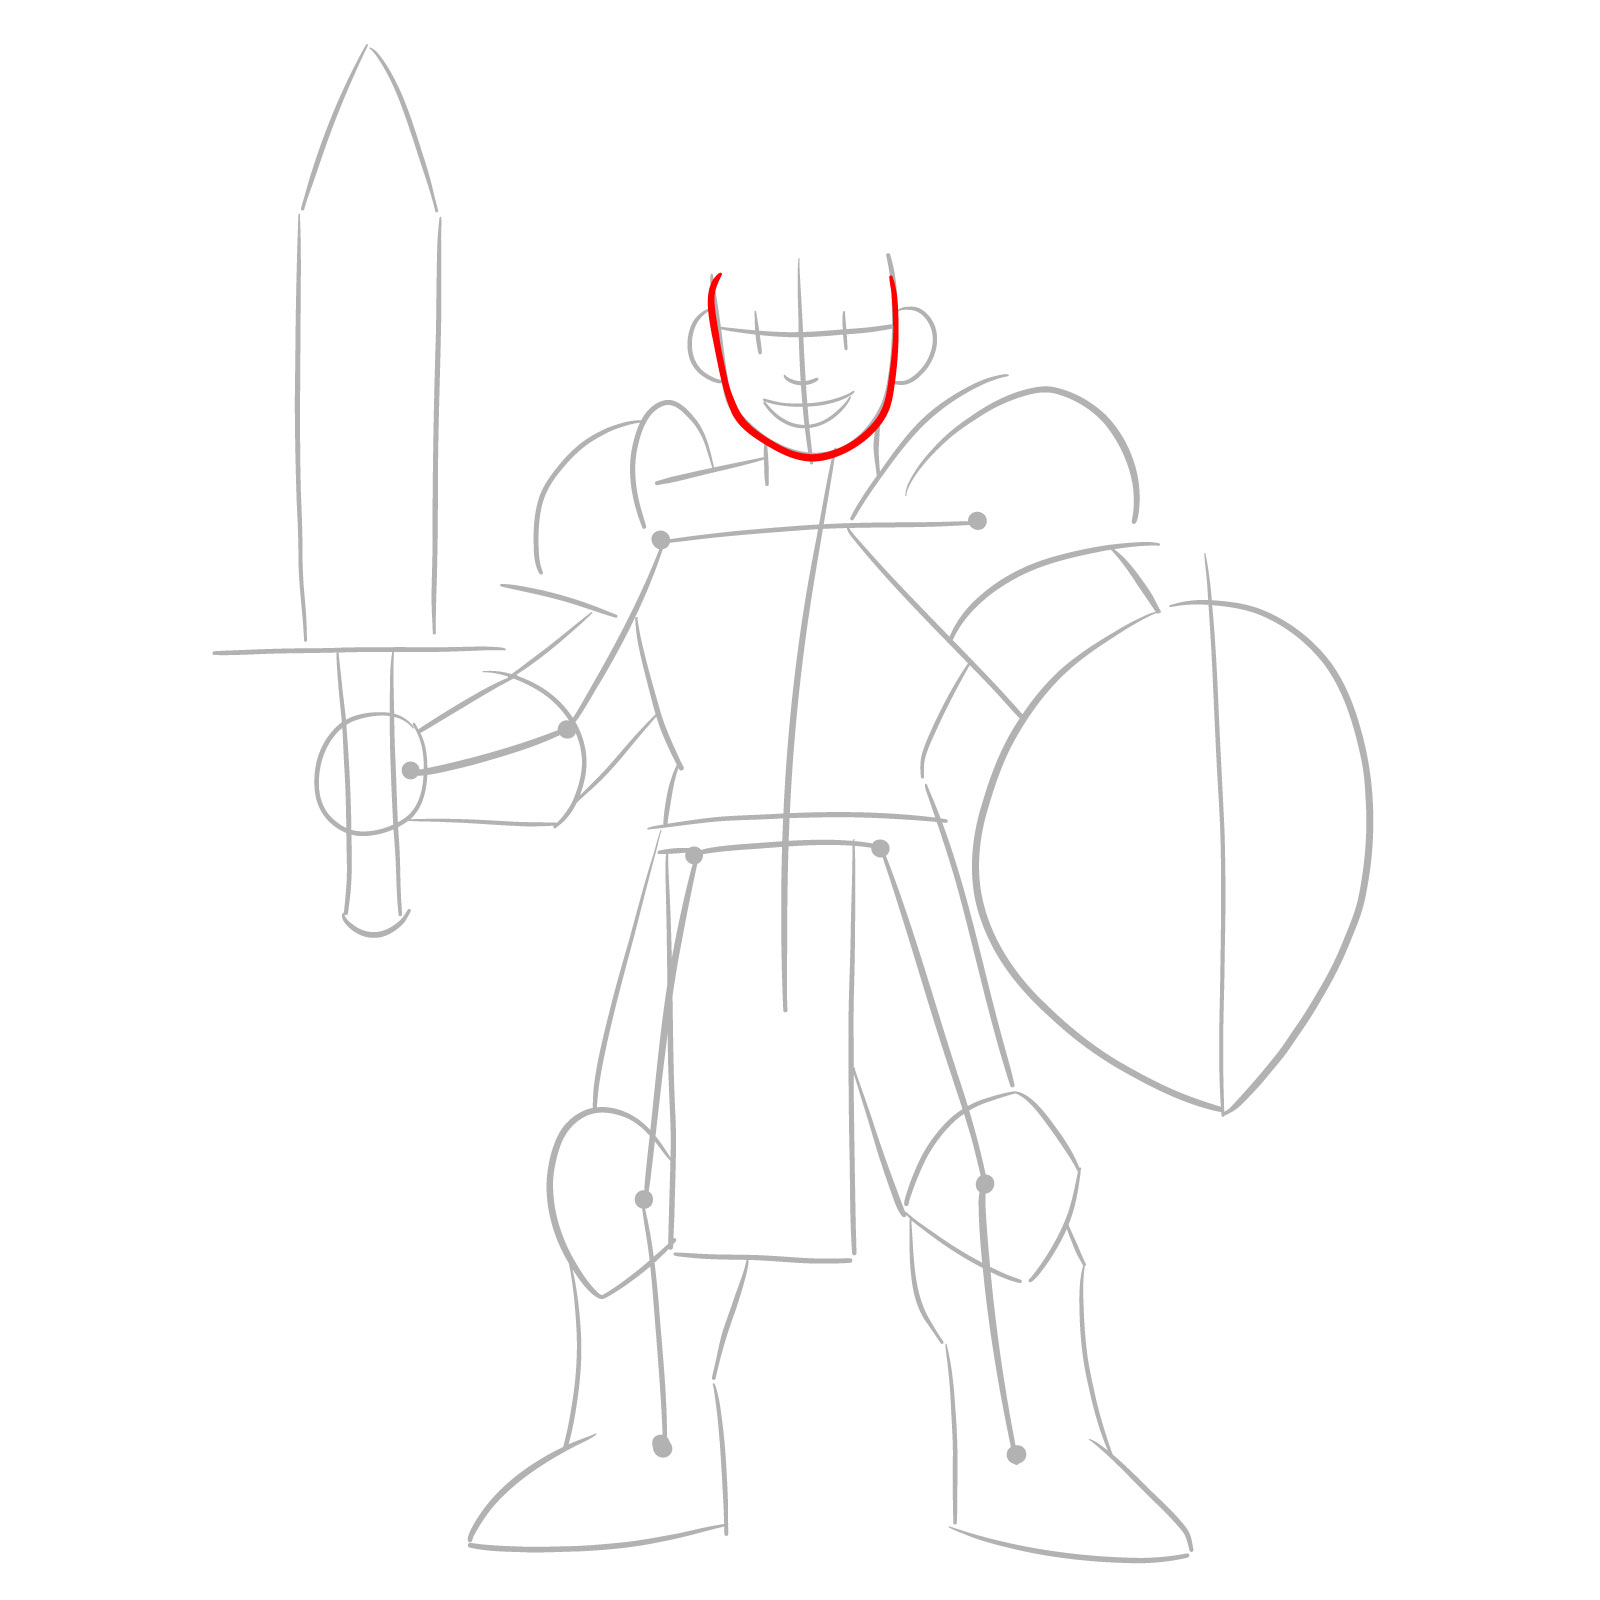
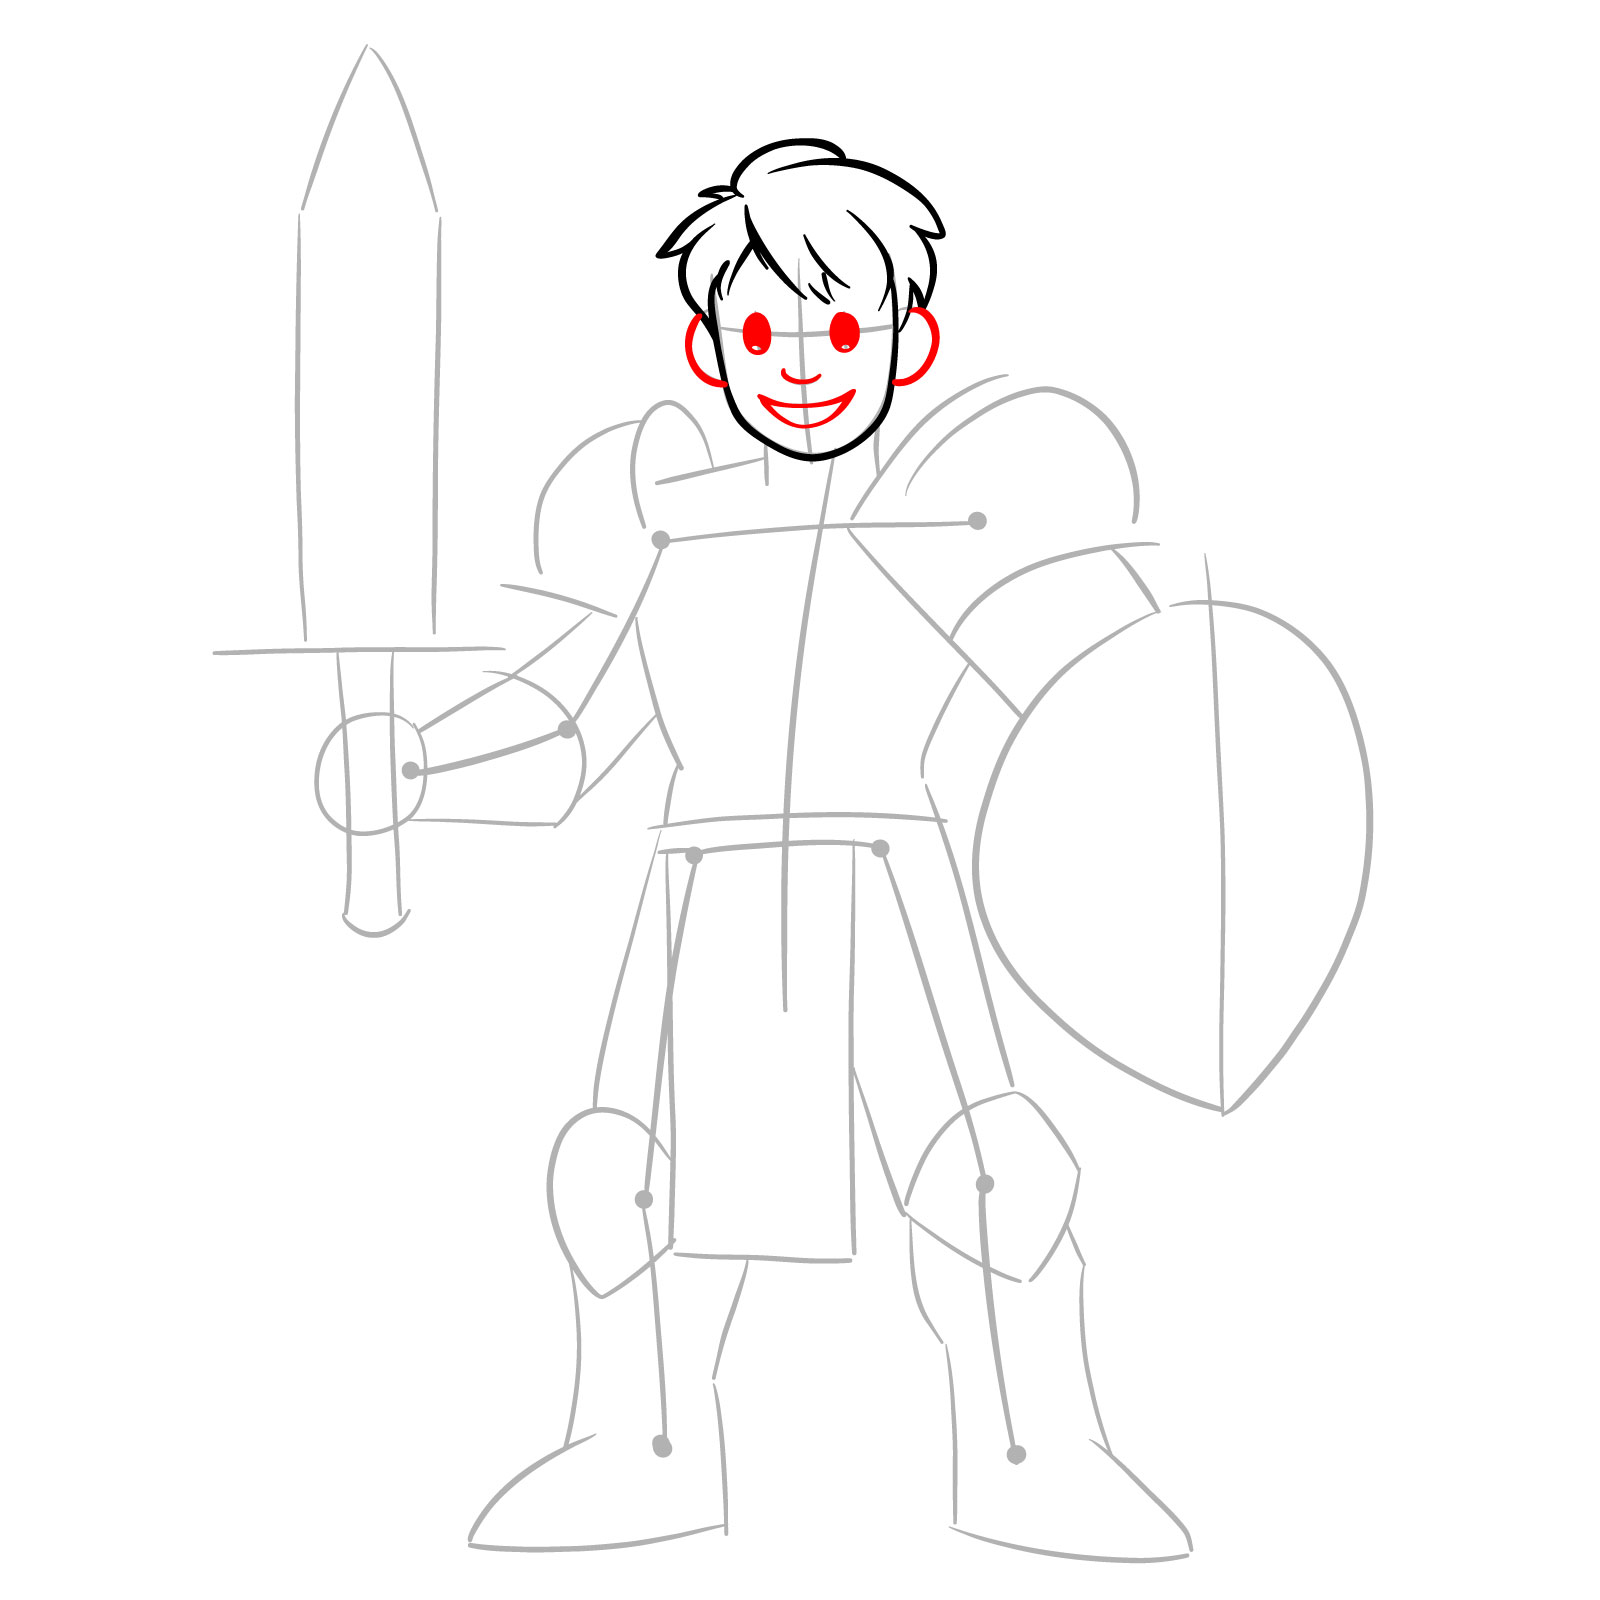
Step 06 – Sketch the ear and refine the neck. Add the initial outlines for the armor around the neck, considering how it connects to the body armor
Detailing ear and neck armor
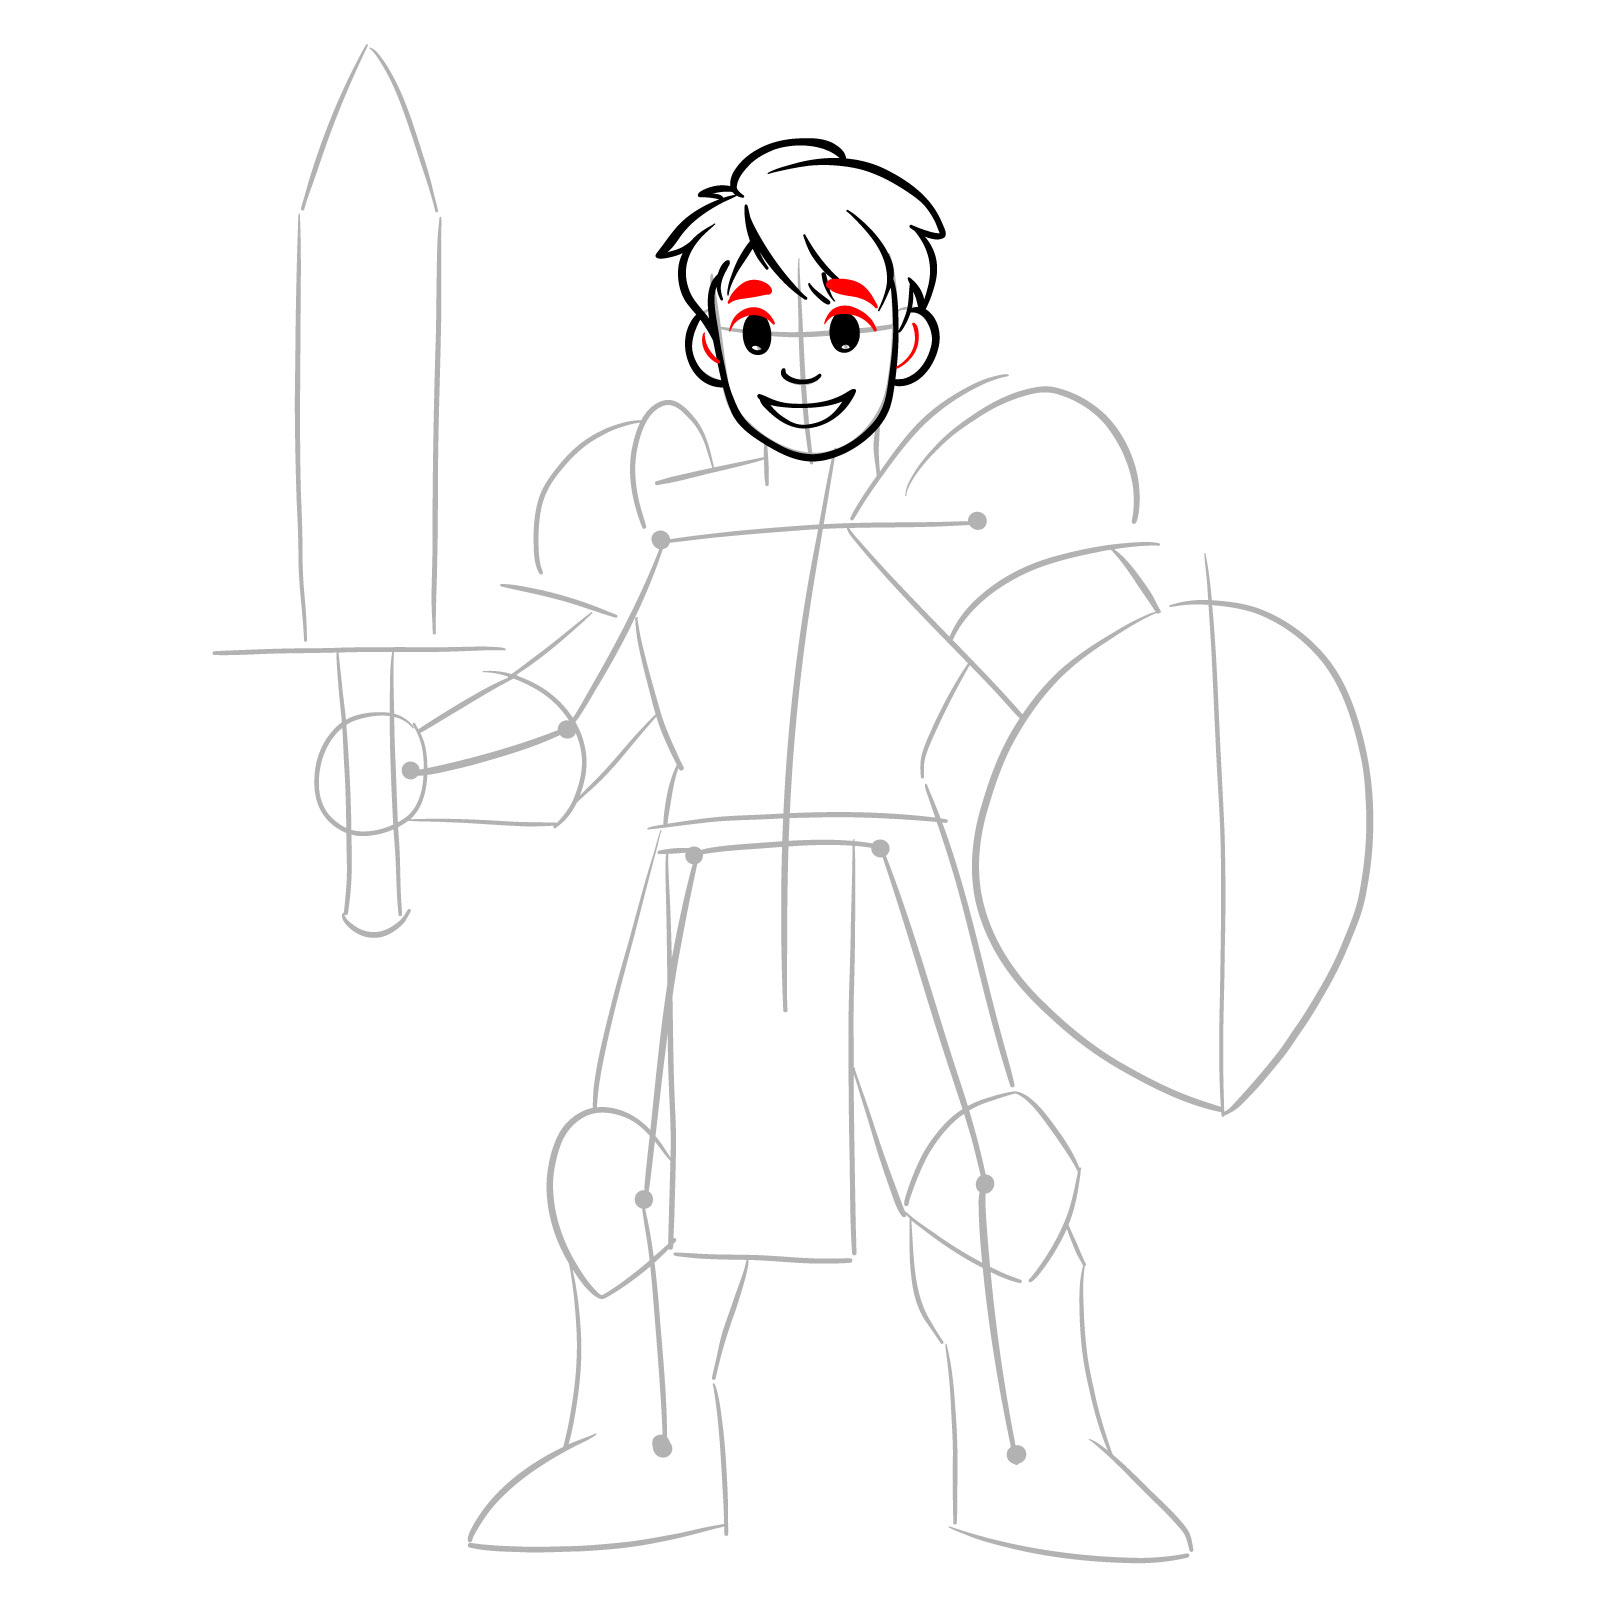
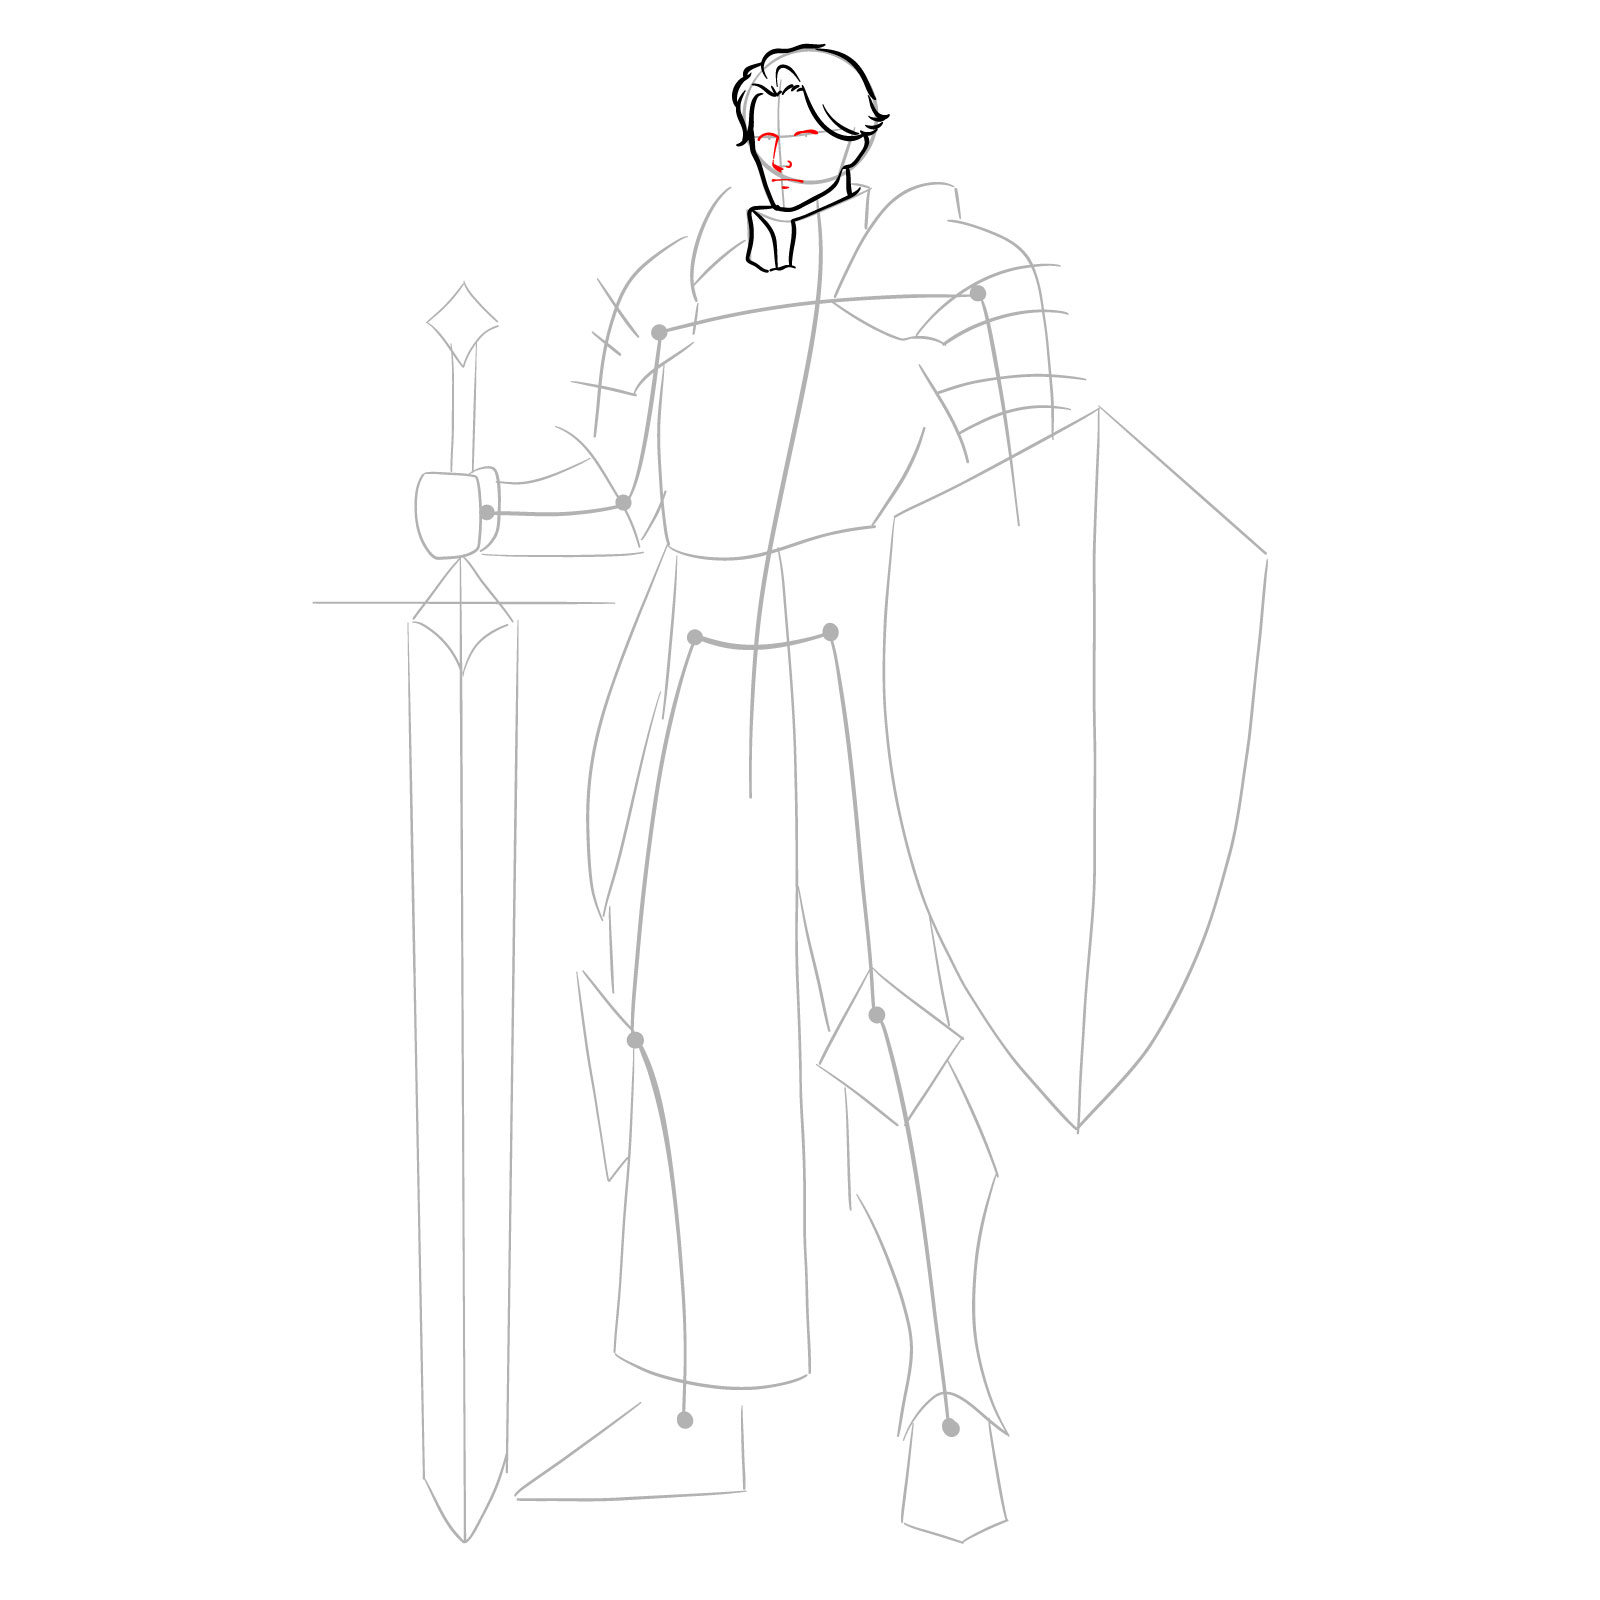
Step 07 – Draw the upper eyelids, refining the shape of the eyes. Sketch the nose and mouth to begin forming the facial expression
Sketching facial expressions
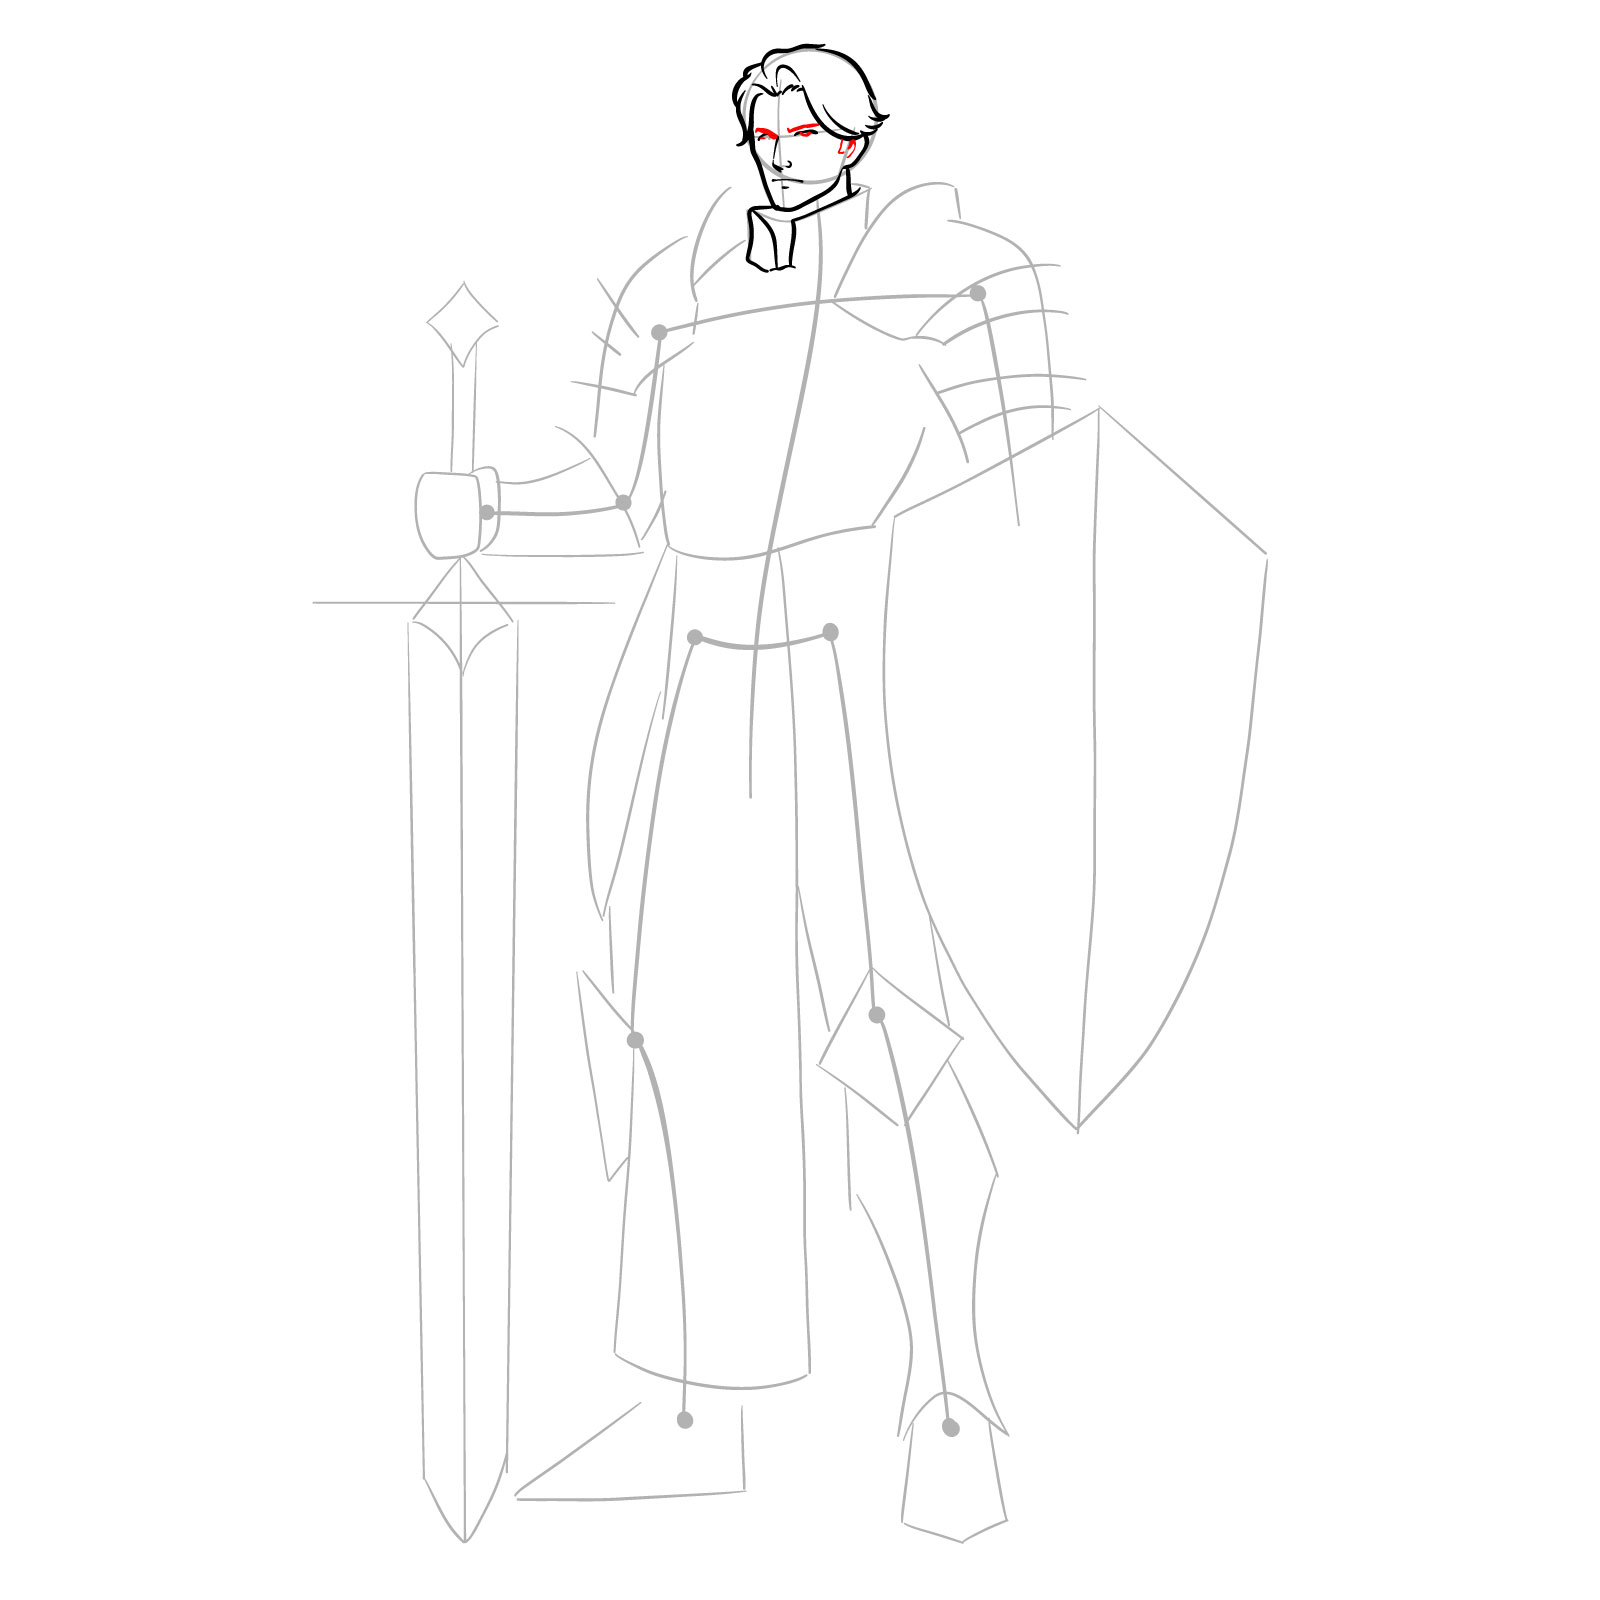
Step 08 – Complete the eyes and add eyebrows. Detail the inner lines of the ear to give depth
Adding facial details
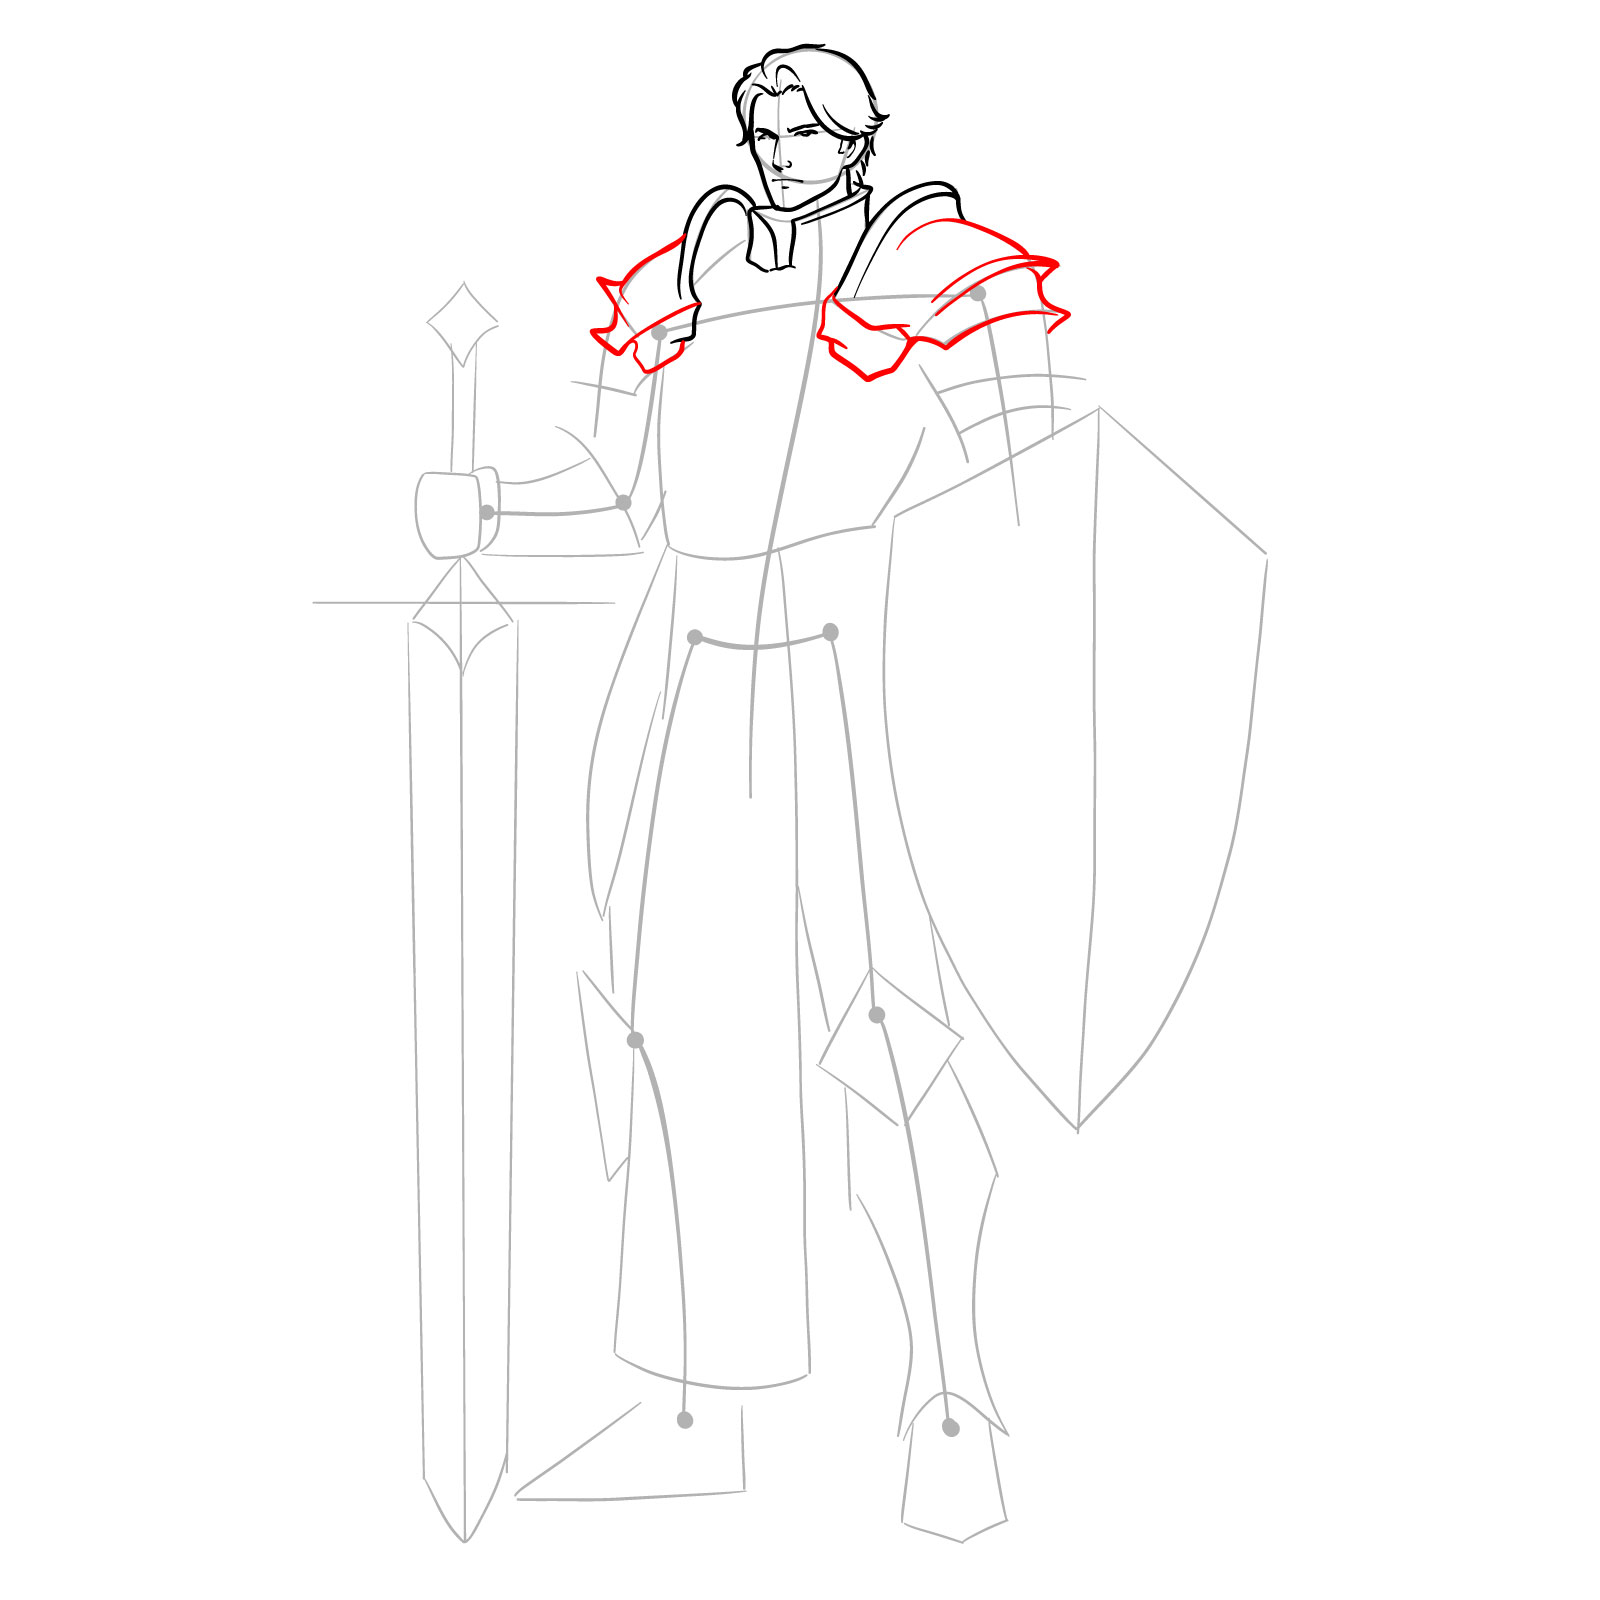
Step 09 – Finish the neck armor by adding details for realism. Start sketching the shape of the shoulder armor
Enhancing armor details
Step 10 – Complete the shoulder armor by adding additional protection layers
Completing shoulder armor
Step 11 – Draw the arm armor extending from below the shoulder pieces. Refine the outline of the shield to prepare for detailing in later steps
Detailing arm armor and shield
Step 12 – Add shadows inside the neck armor to create depth. Detail the body shape and shoulders. Sketch the belt buckle and finish the arm holding the shield
Adding shadows and body details
Step 13 – Start adding detailed elements to the waist armor, considering how each piece interlocks and overlays
Starting waist armor
Step 14 – Draw waist straps and detail the hip armor, ensuring each element aligns with the overall armor design
Finalizing waist armor
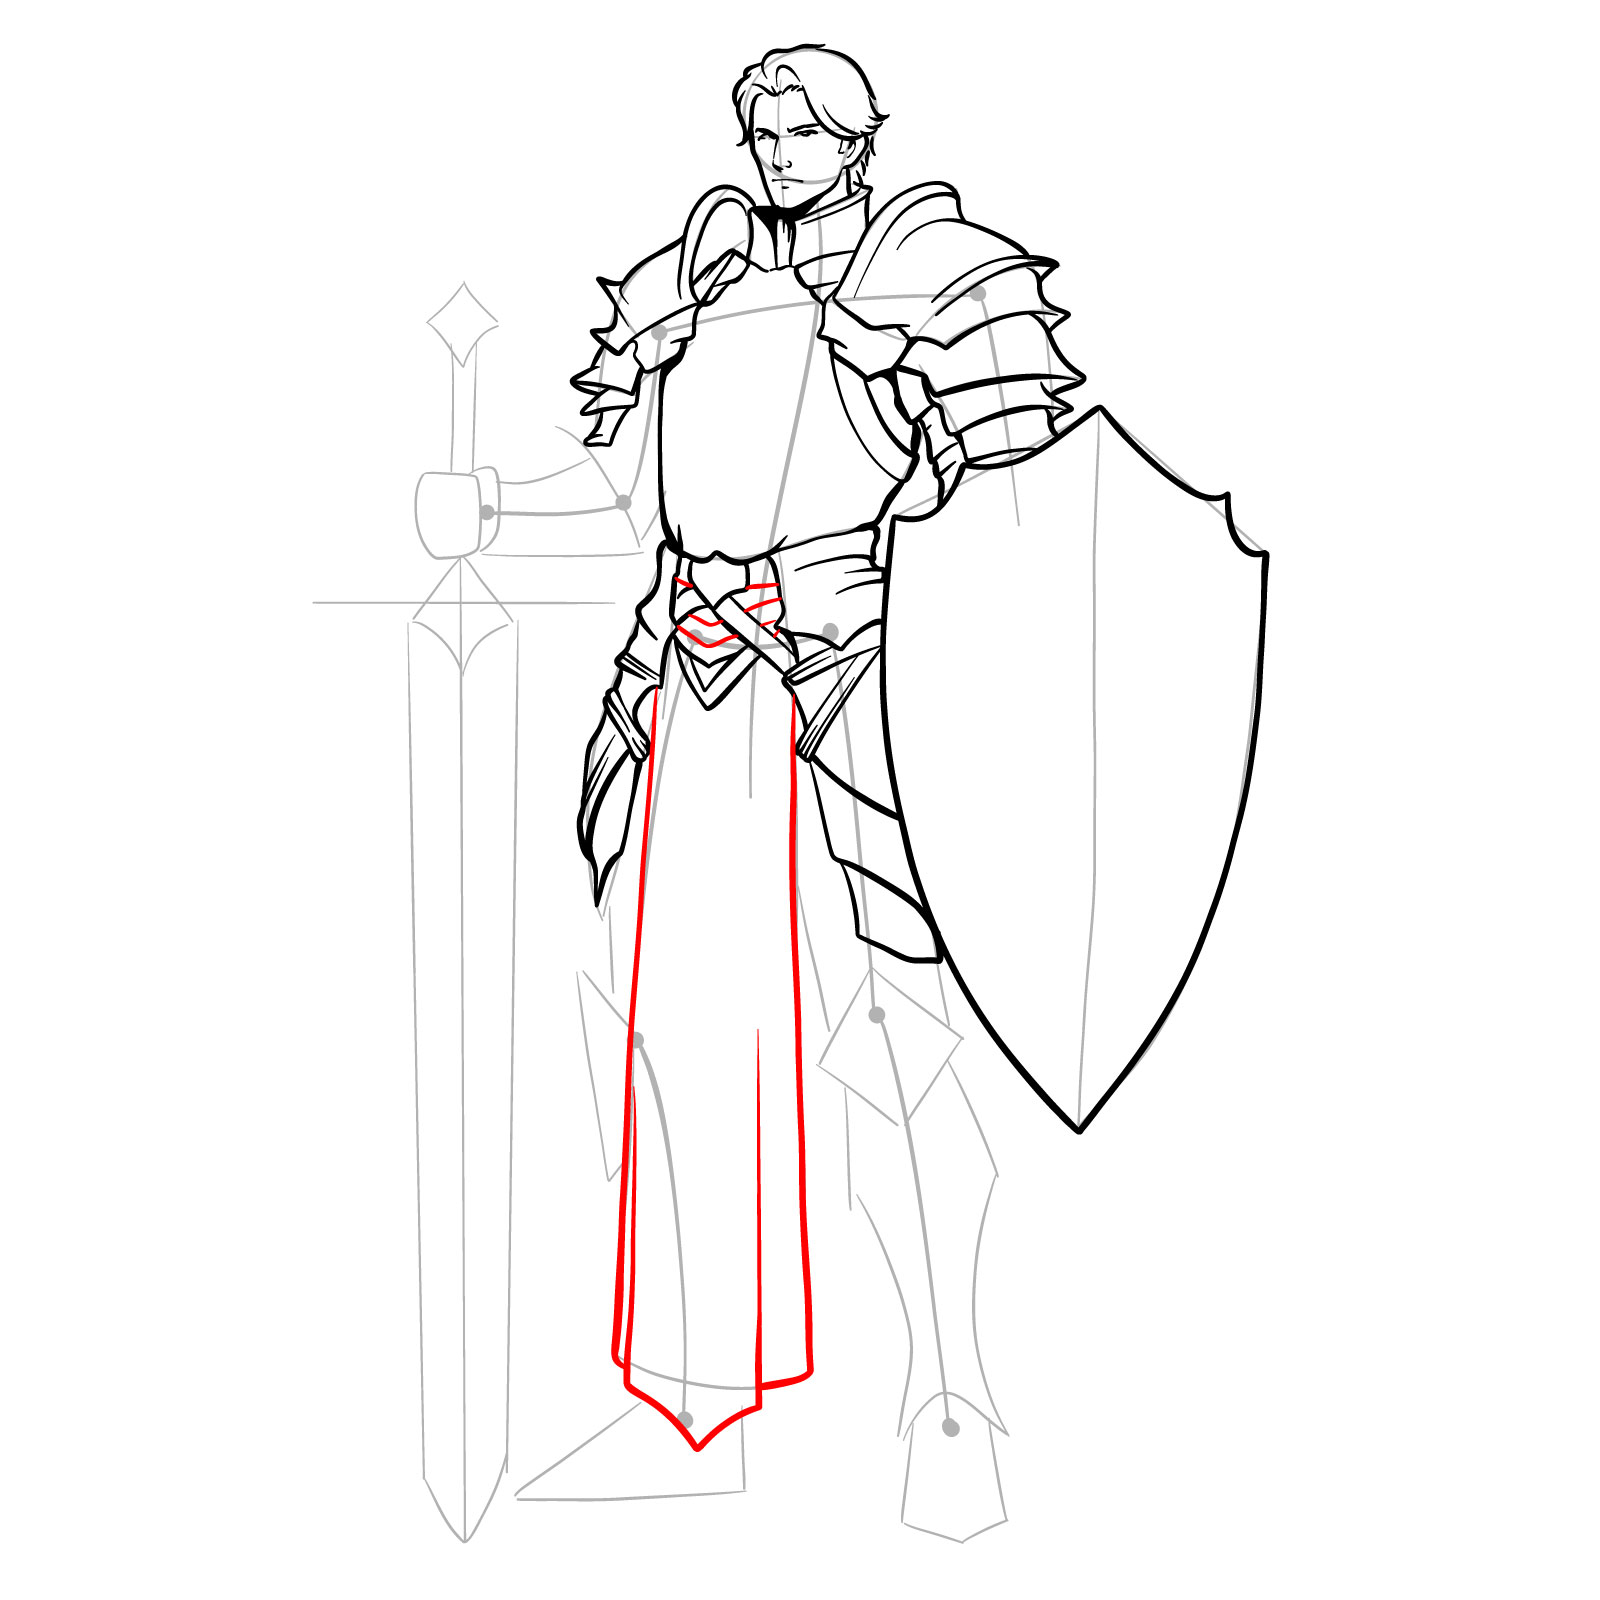
Step 15 – Sketch a piece of cloth flowing from the waist, falling in the middle towards the ground. Add straps at the top of this cloth to attach it securely to the armor
Detailing waist cloth and straps
Step 16 – Outline the leg armor, ensuring to add knee protectors. Focus on the shape and fit of the armor around the legs
Drawing leg armor and knees
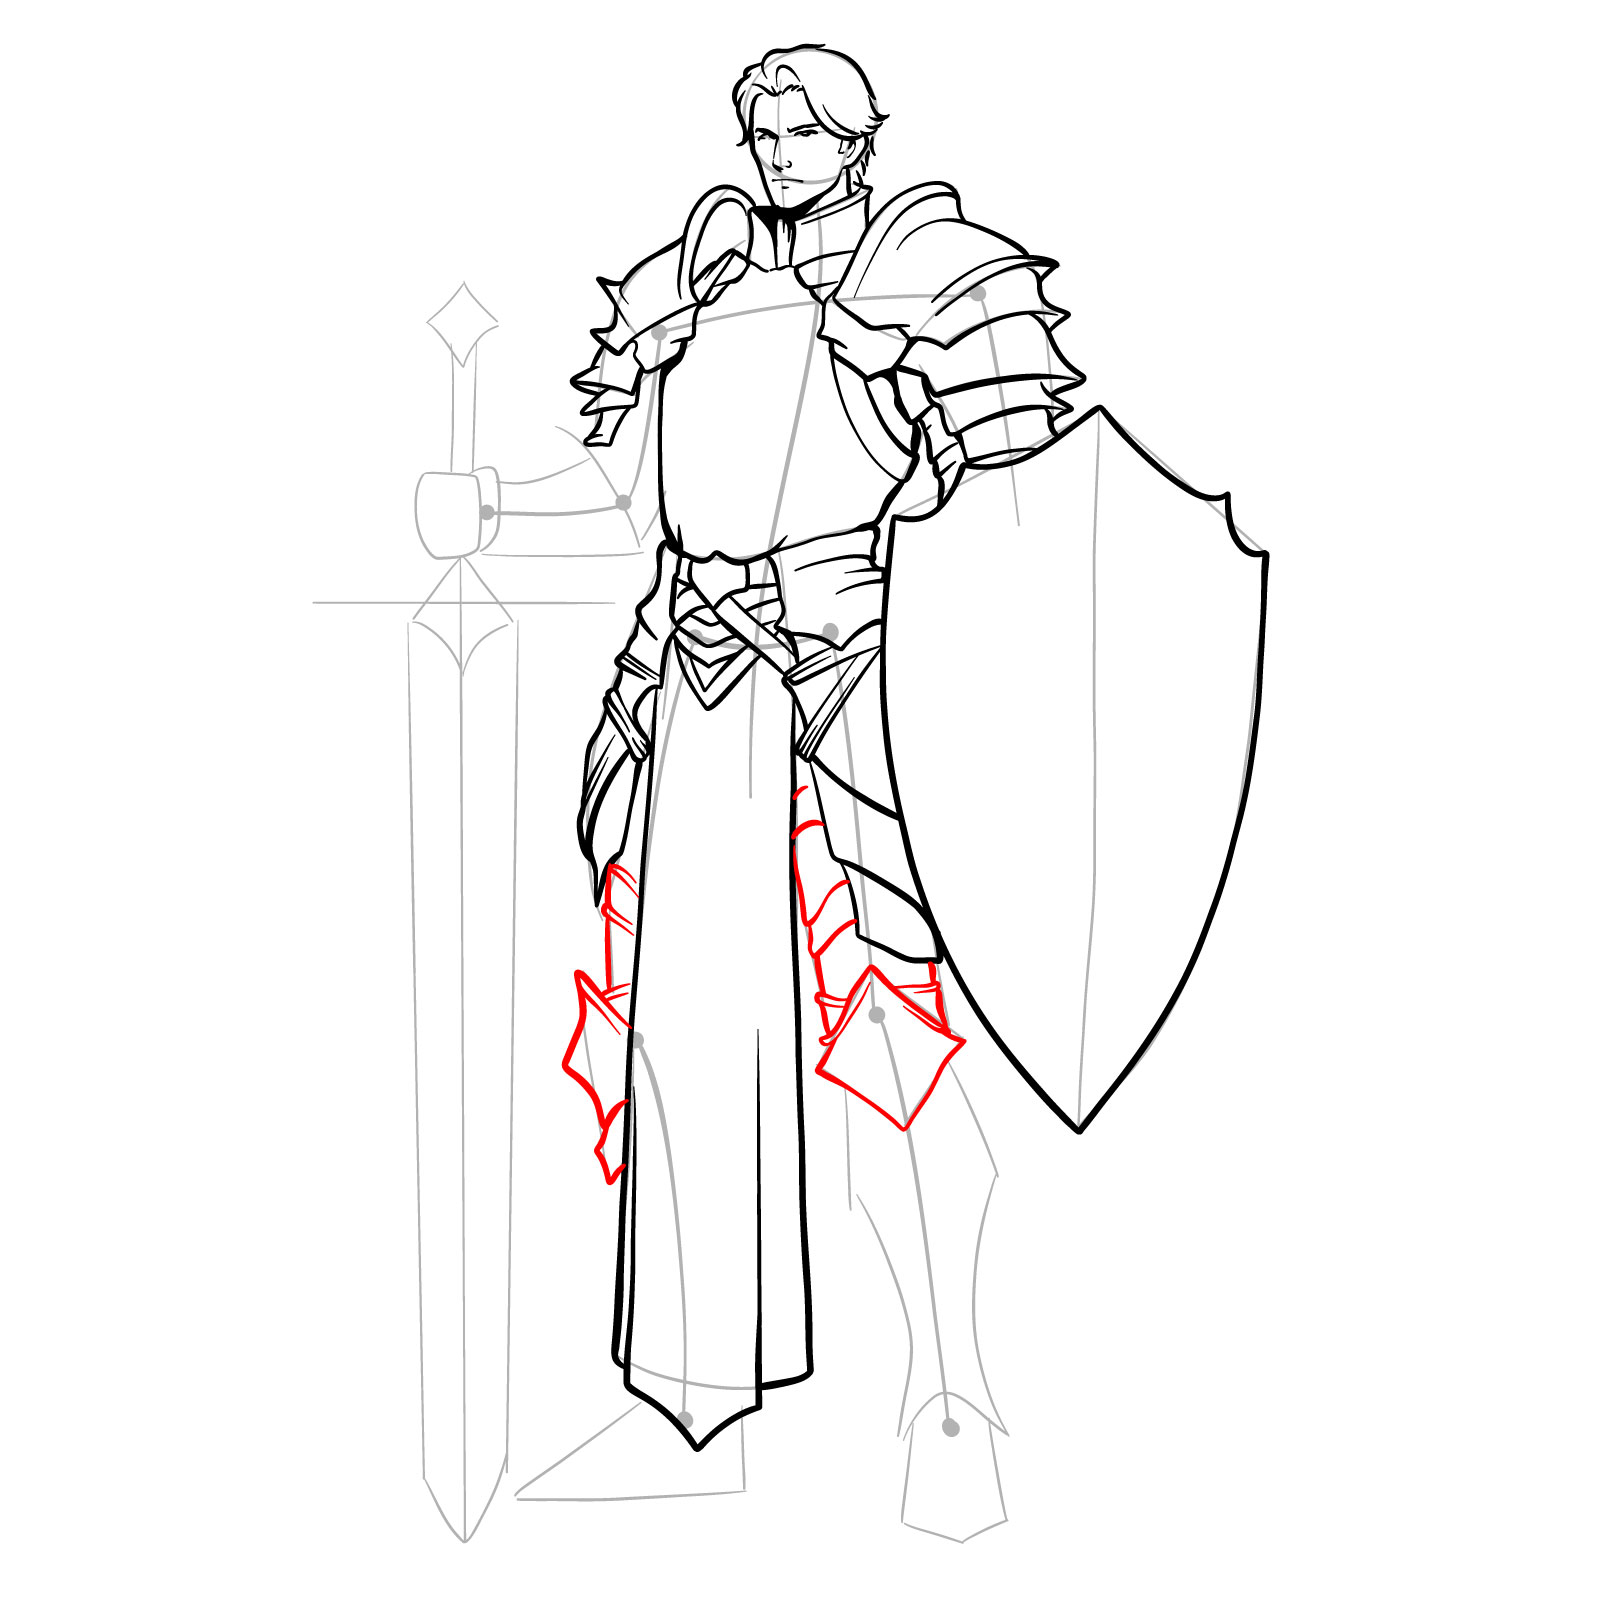
Step 17 – As the right leg is partially obscured by the cloth, sketch the armor on the visible leg, focusing up to the upper calf
Detailing visible leg armor
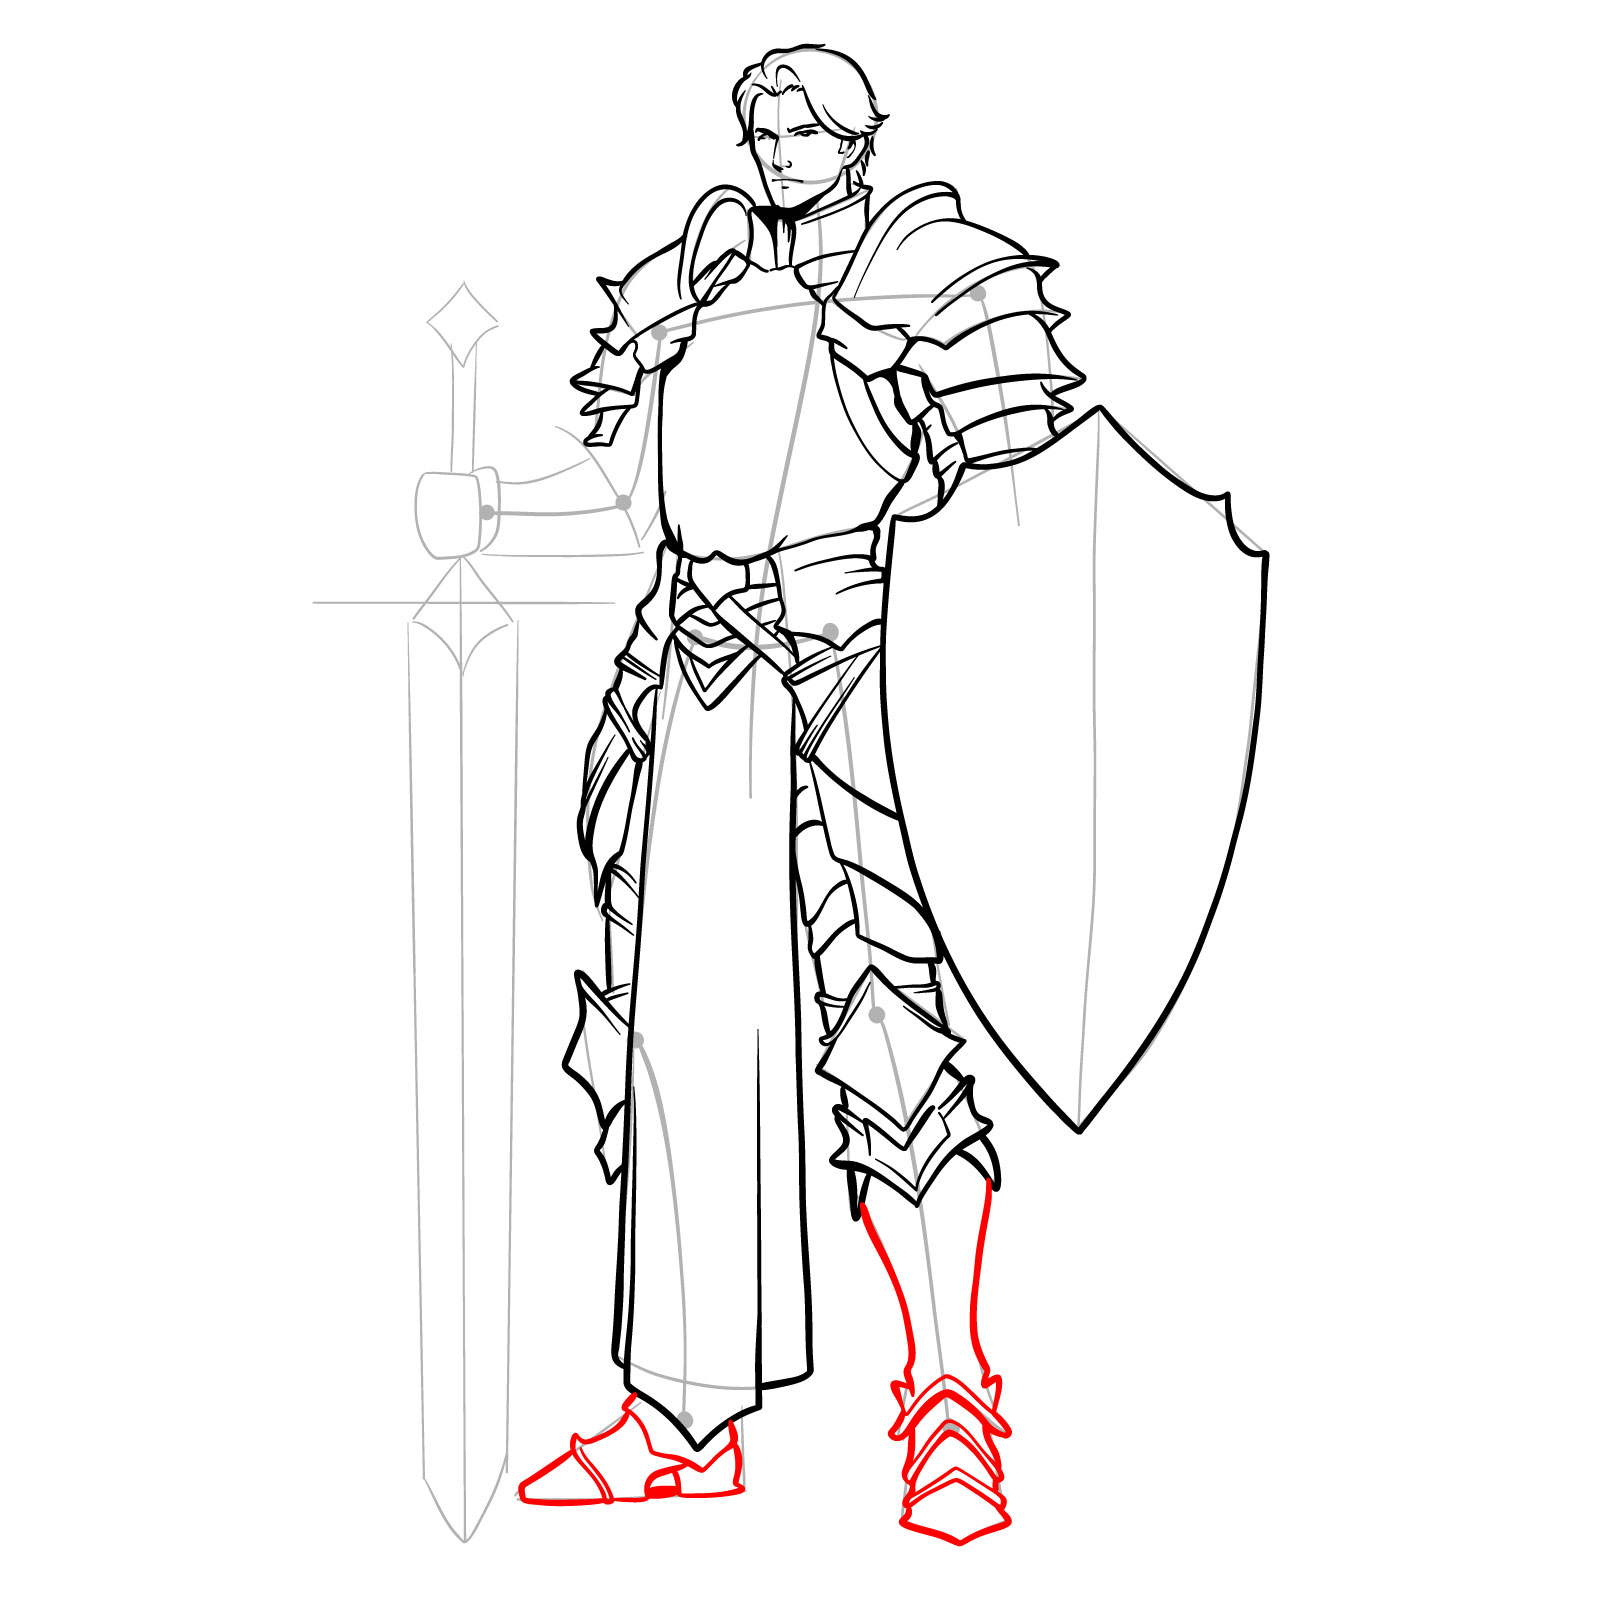
Step 18 – Sketch the remaining armor details on both legs and the feet, ensuring continuity in design and fit
Finalizing leg and foot armor
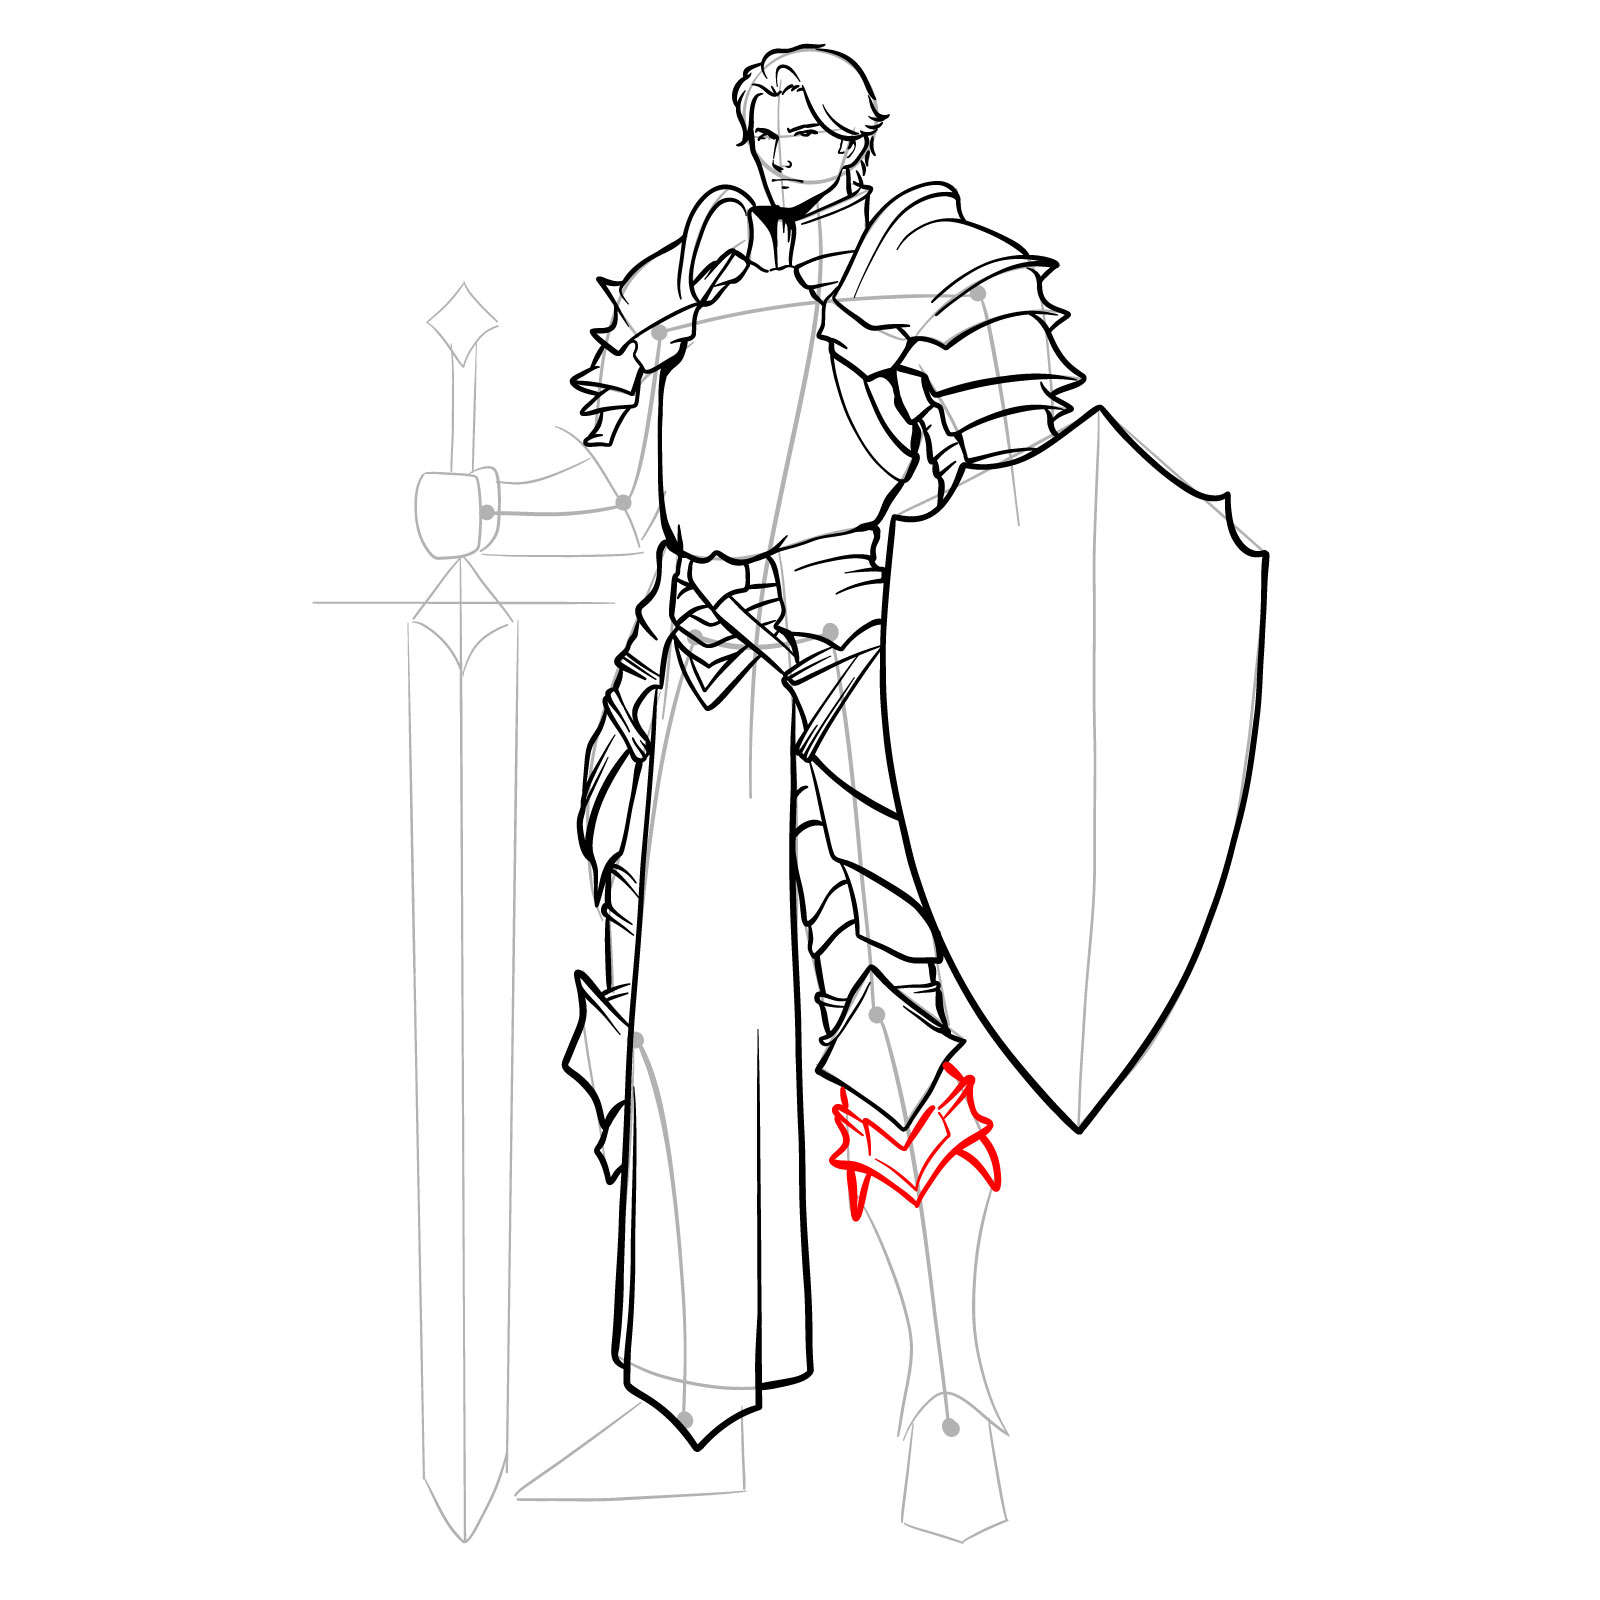
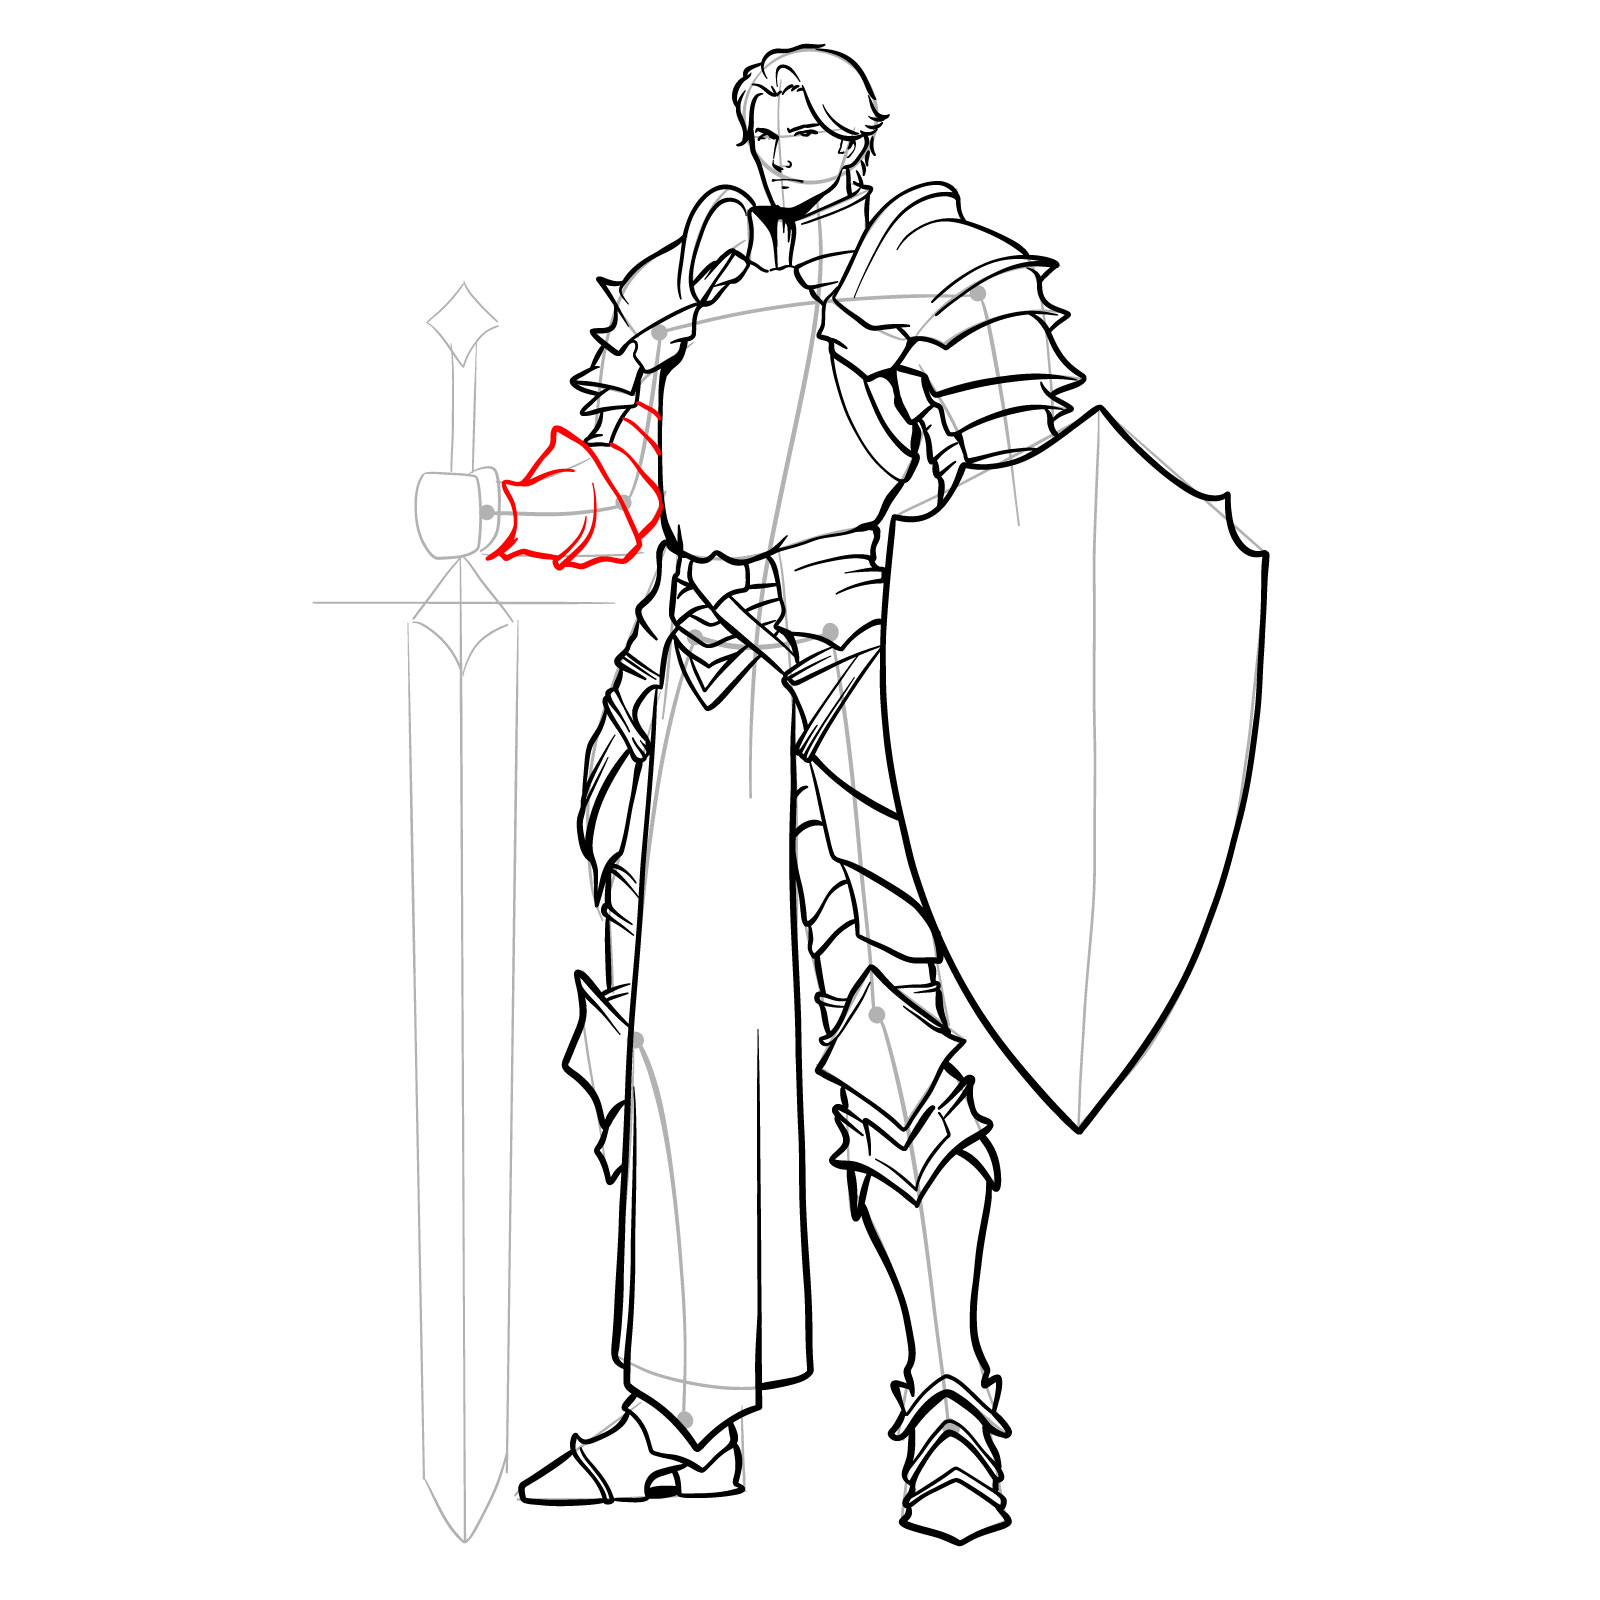
Step 19 – Outline the armor on the arm up to the wrist, preparing for the hand that will hold the sword
Detailing sword arm armor
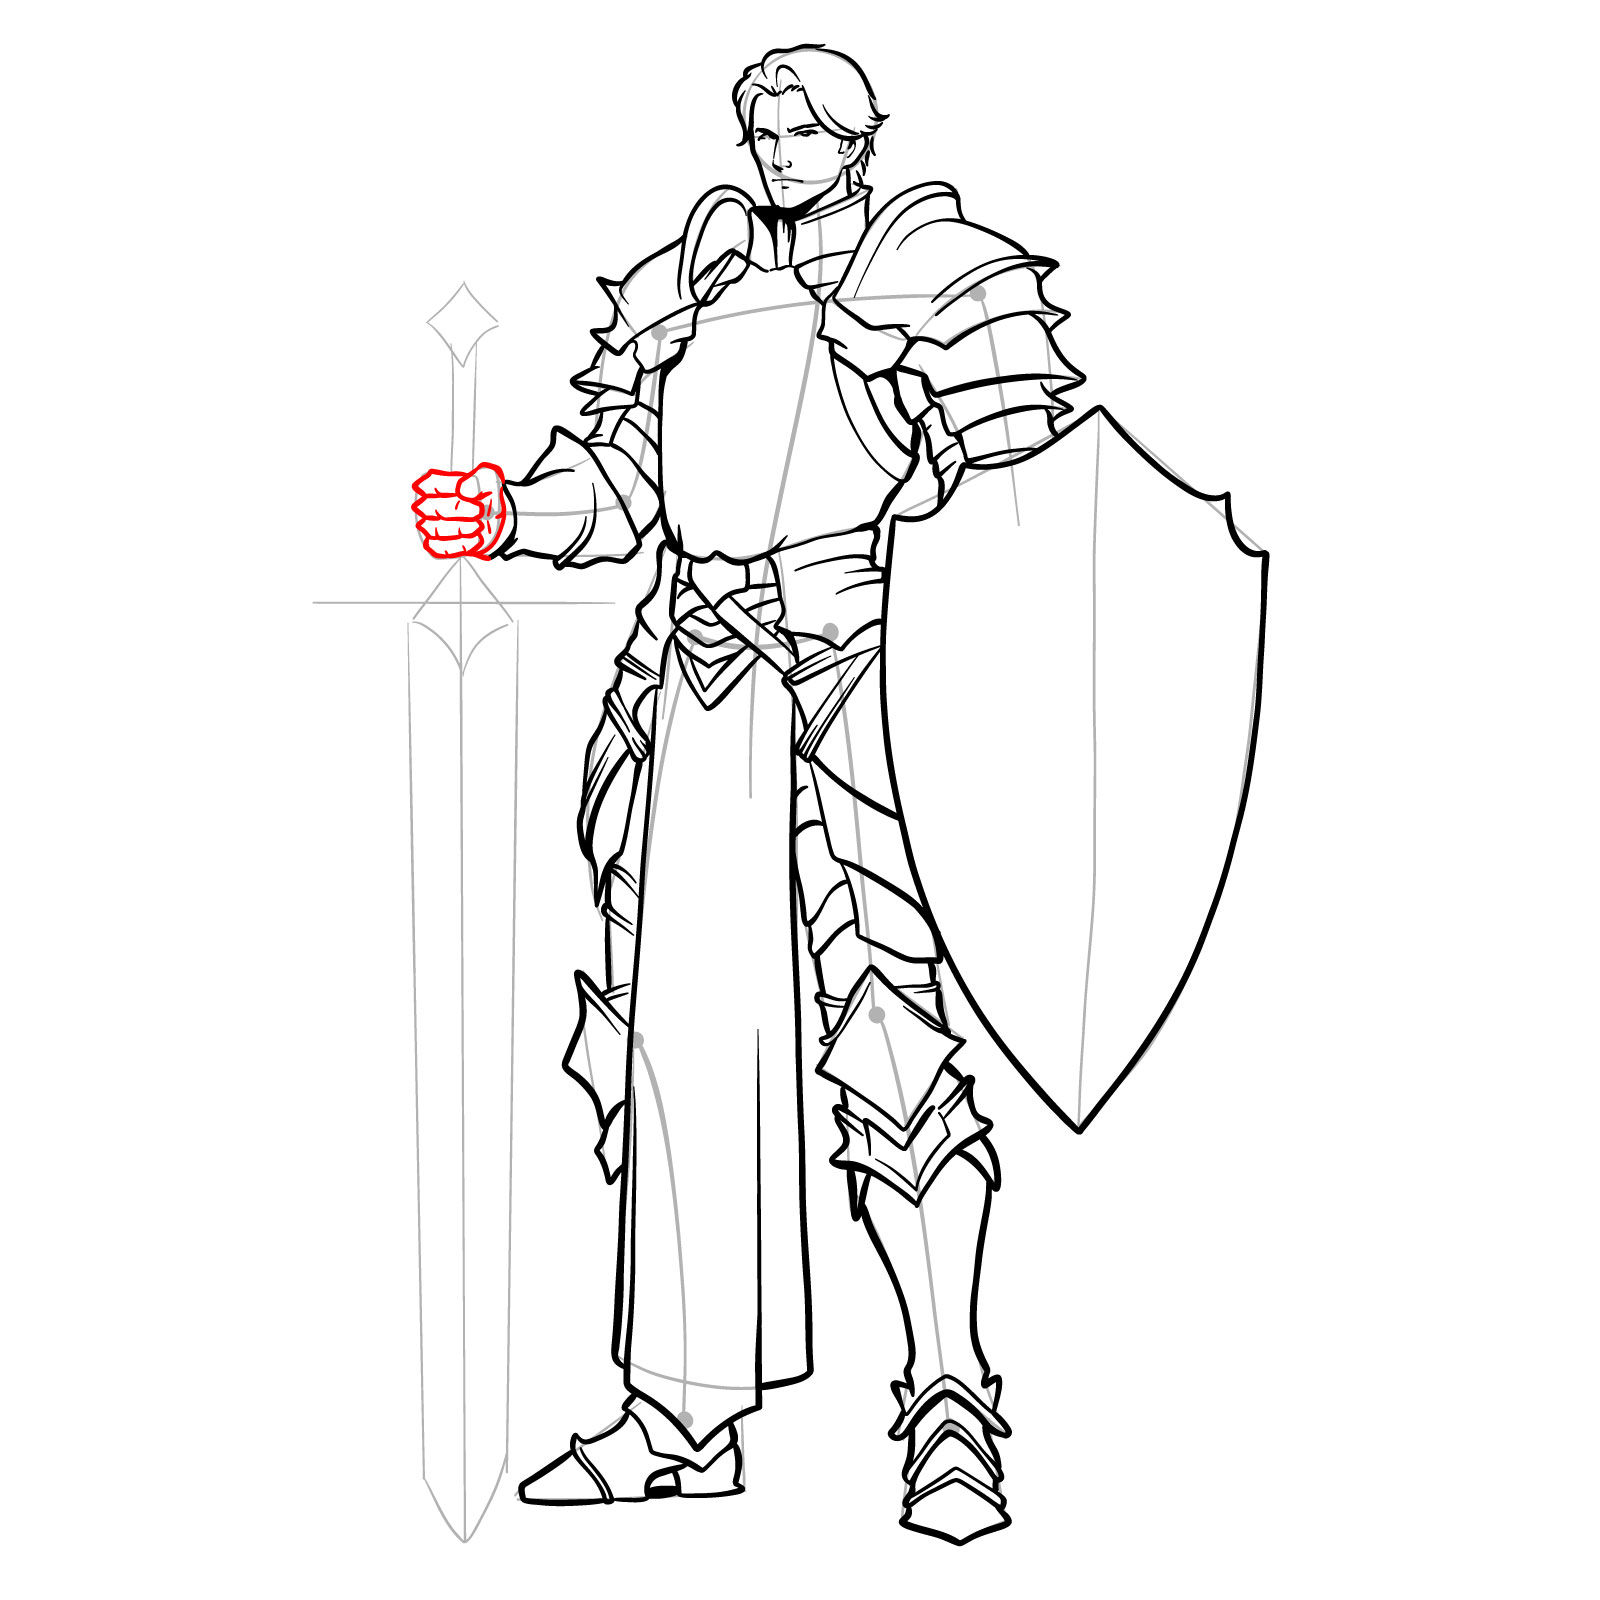
Step 20 – Draw the hand that will grip the sword, focusing on the position and alignment with the fingers
Drawing the sword hand
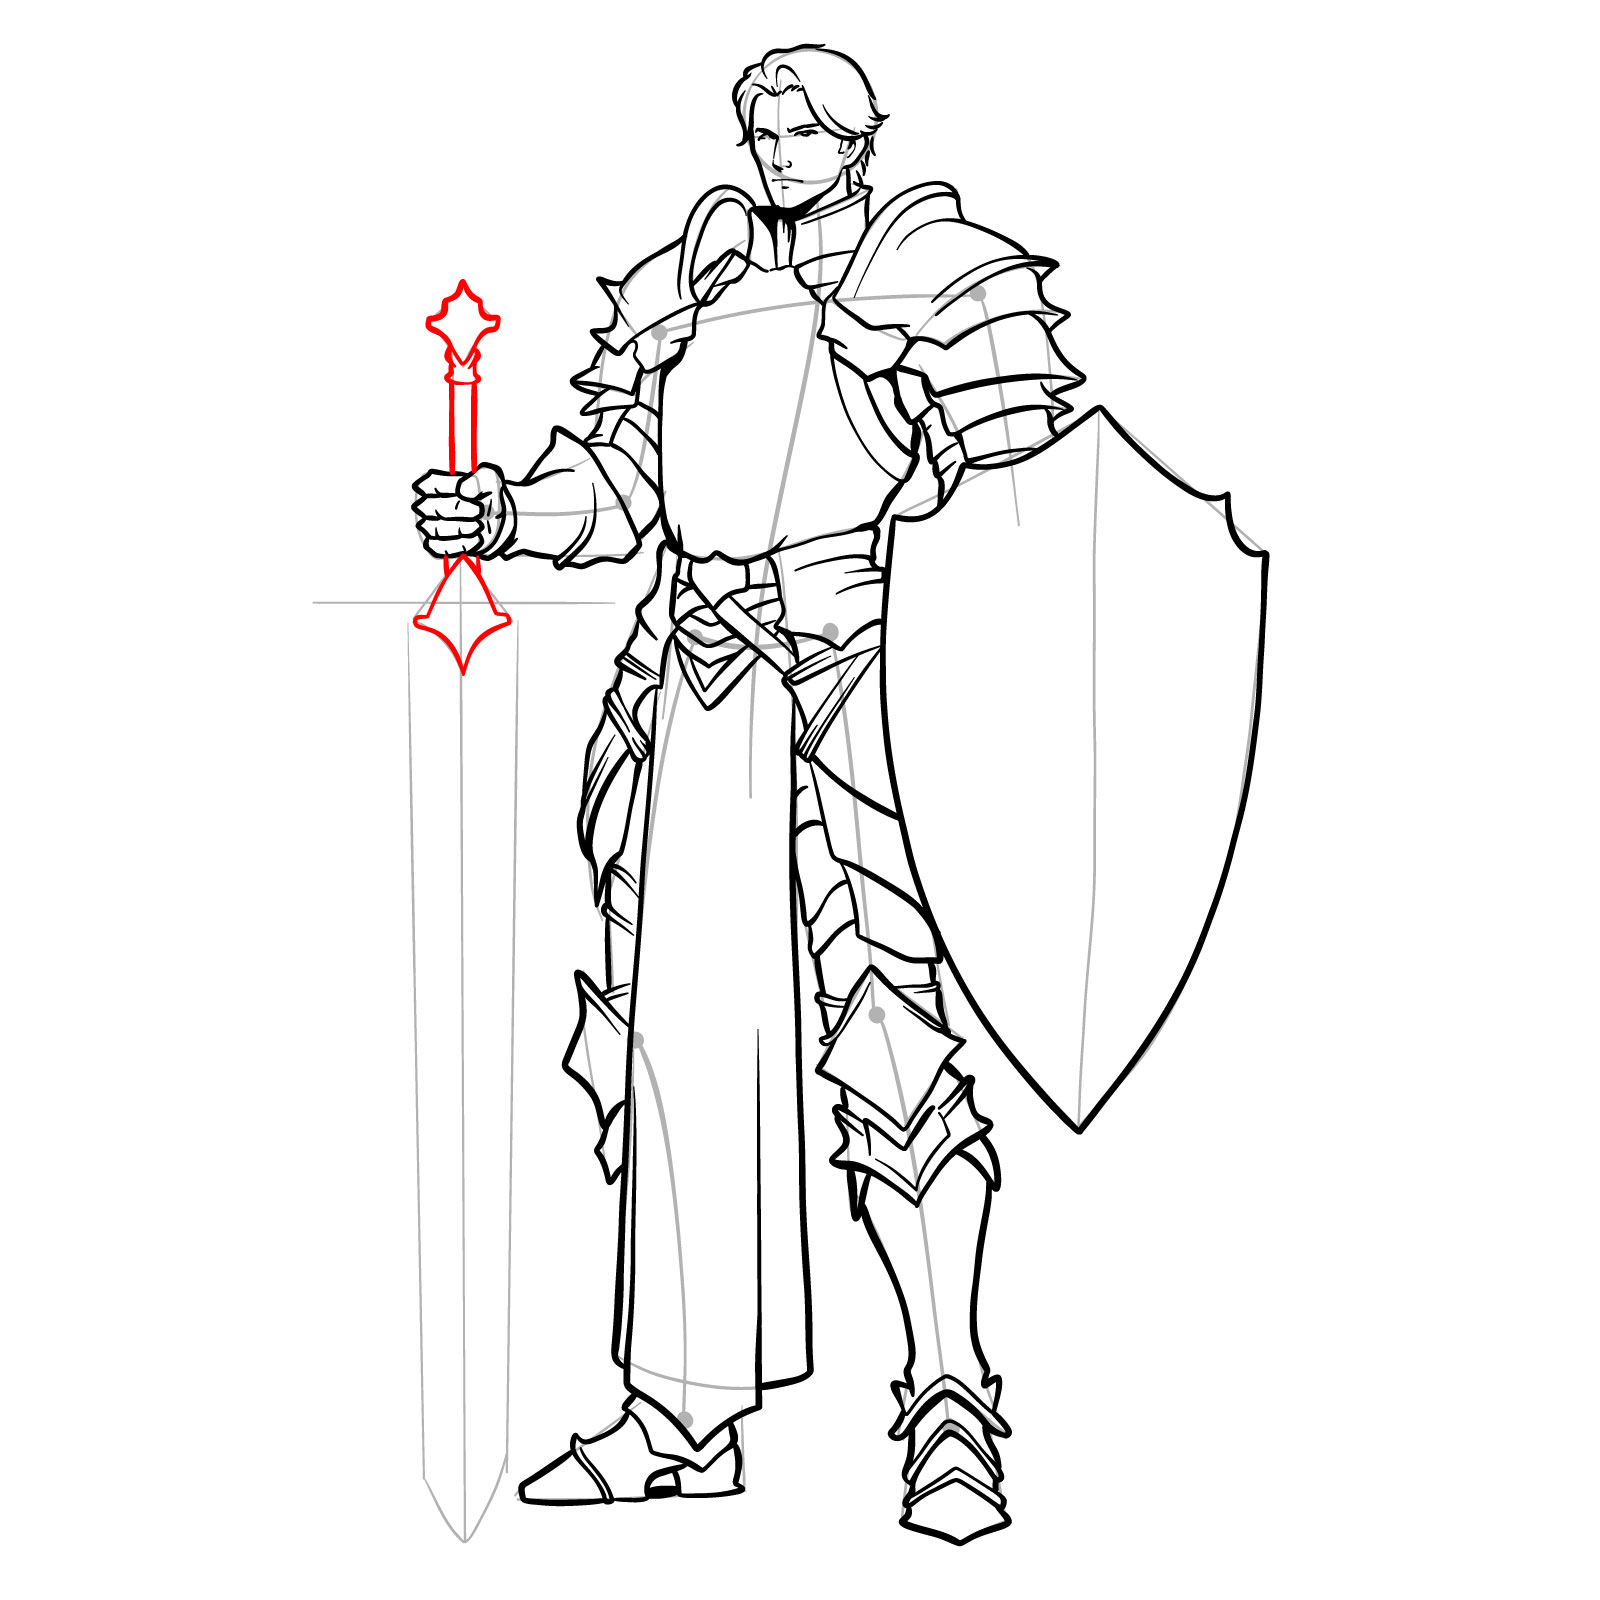
Step 21 – Sketch the handle of the sword, ensuring it matches the style and era of the paladin’s overall design
Sketching the sword handle
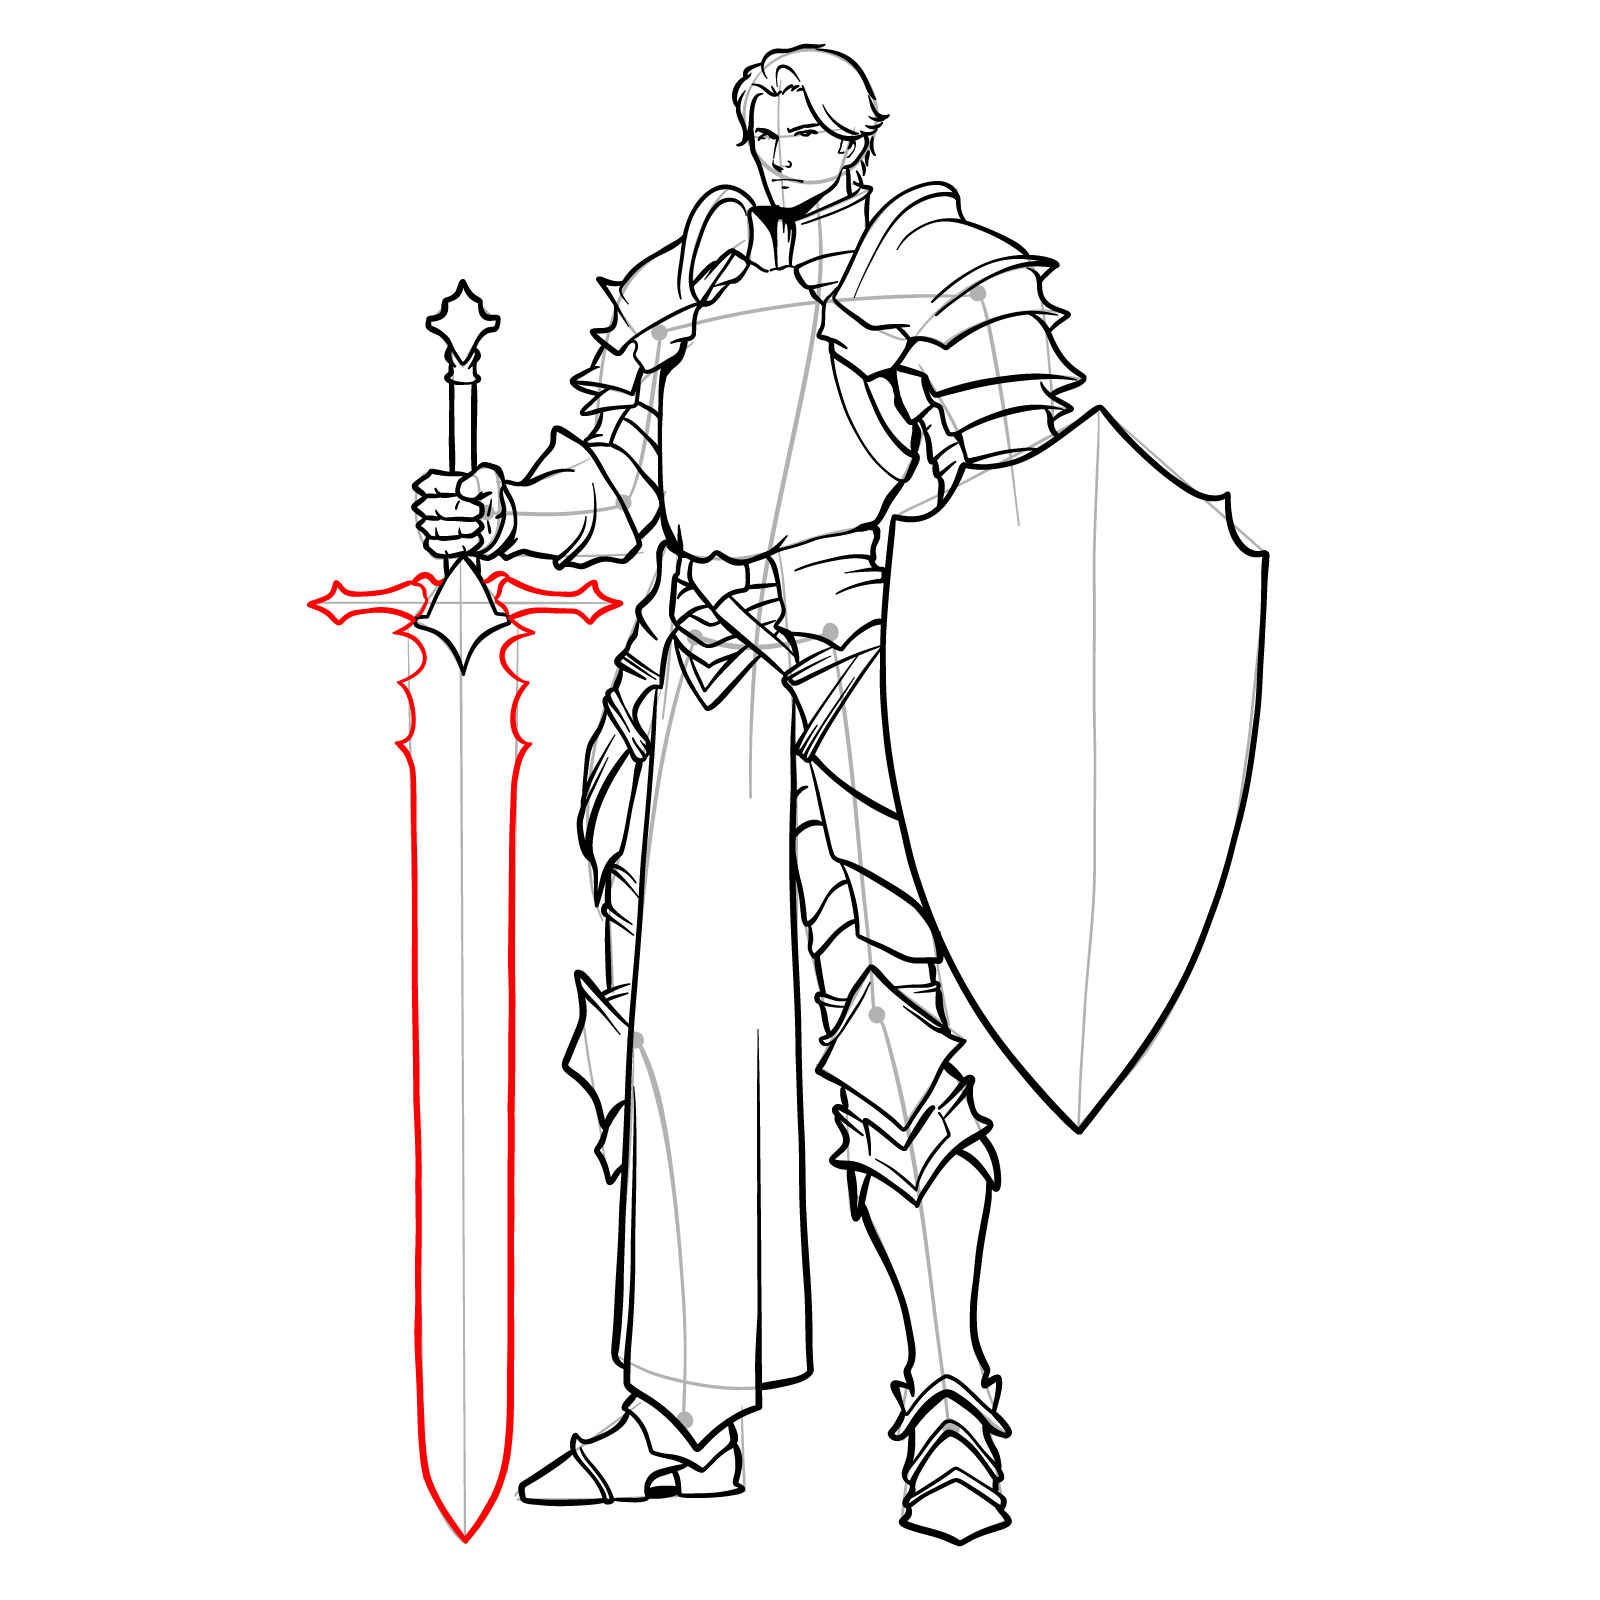
Step 22 – Draw the blade of the sword, extending from the handle, with attention to its length and sharpness
Drawing the sword blade
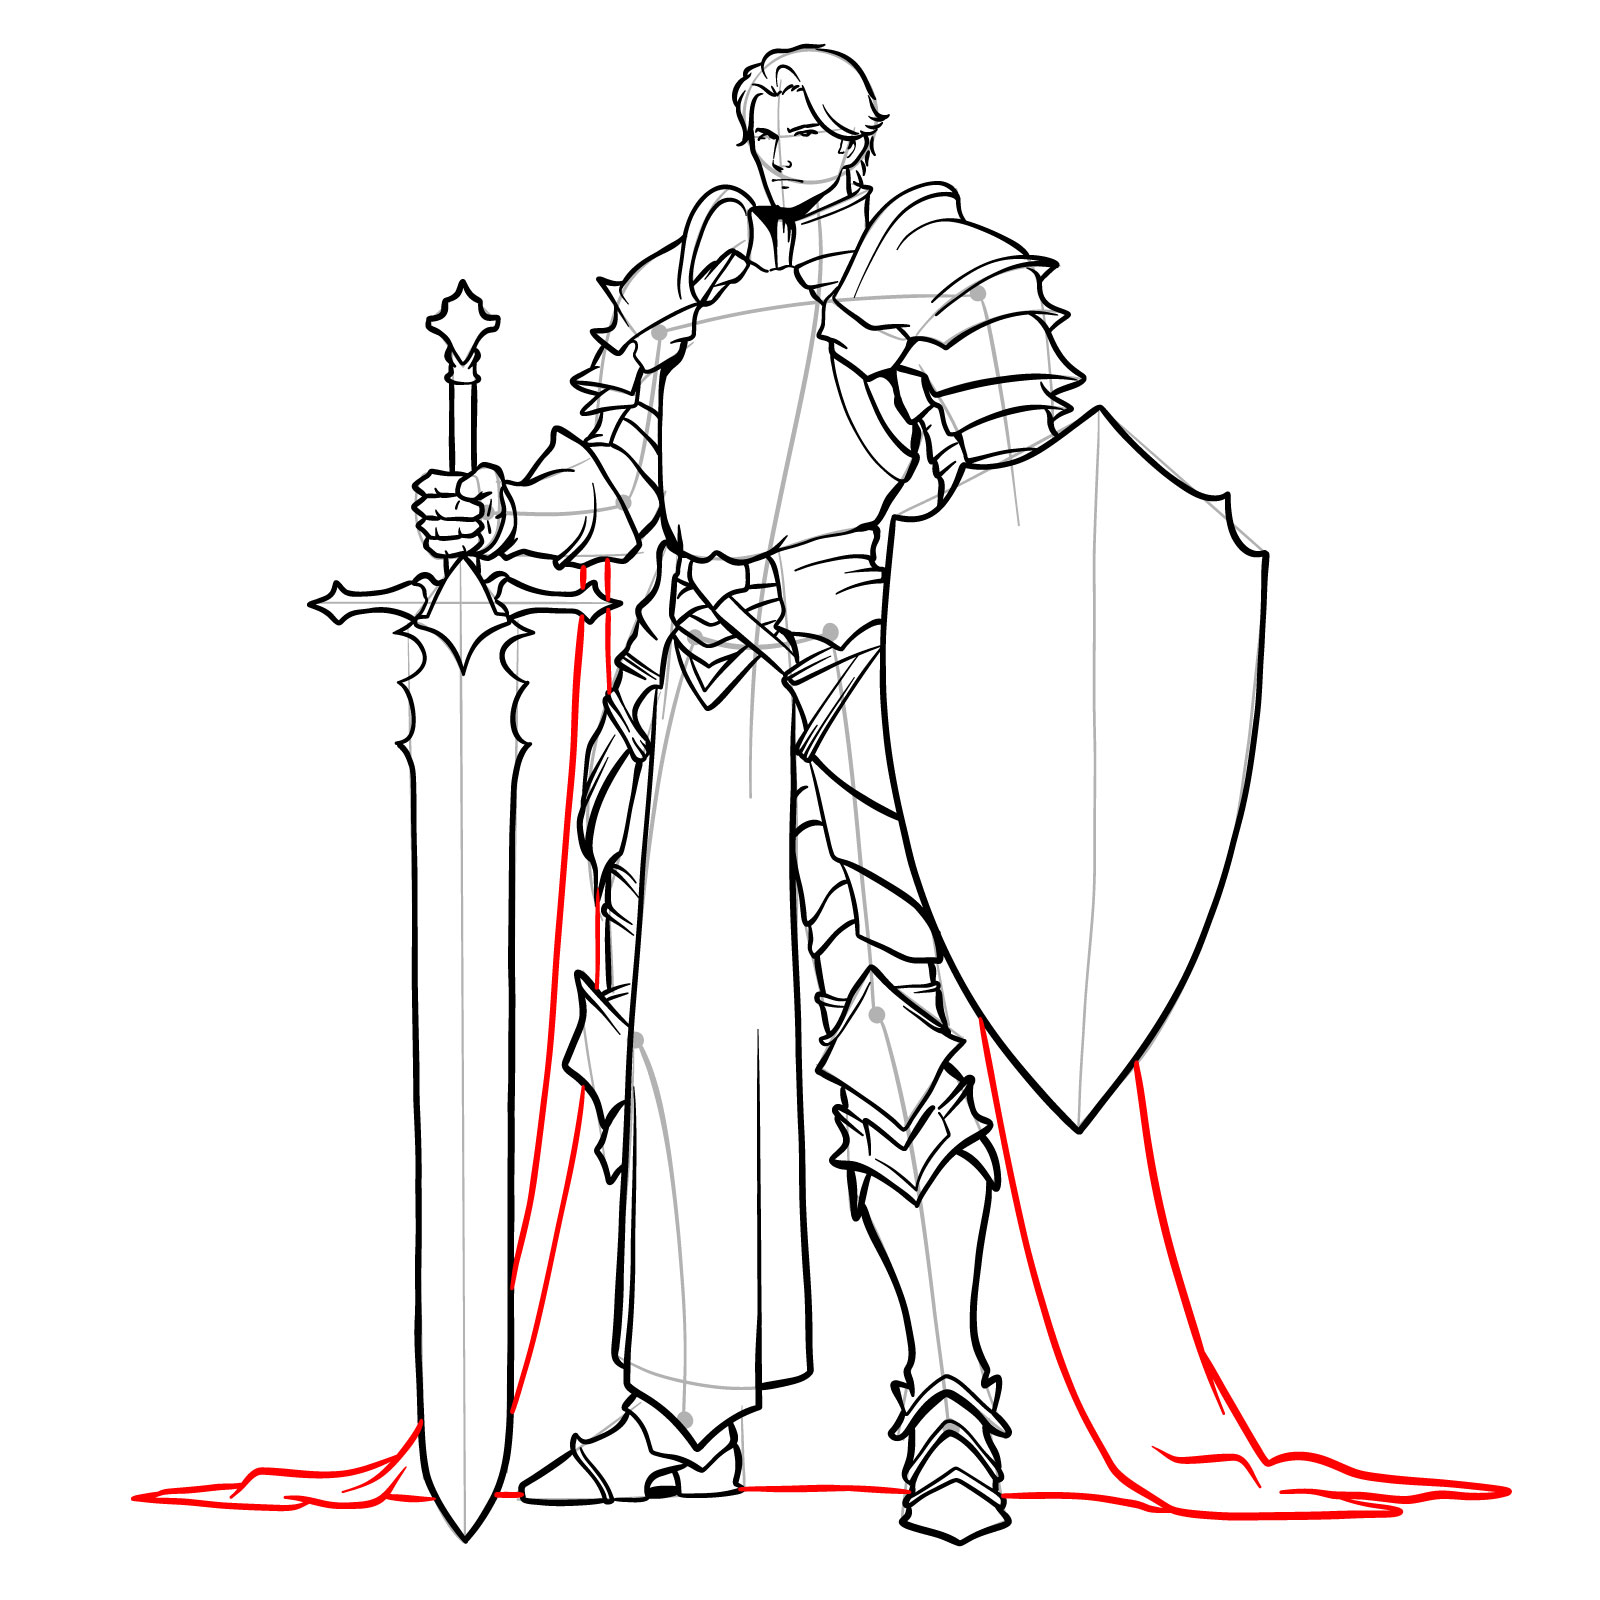
Step 23 – Draw a cape that flows from the shoulders down to the ground, adding drama to the pose
Adding the cape
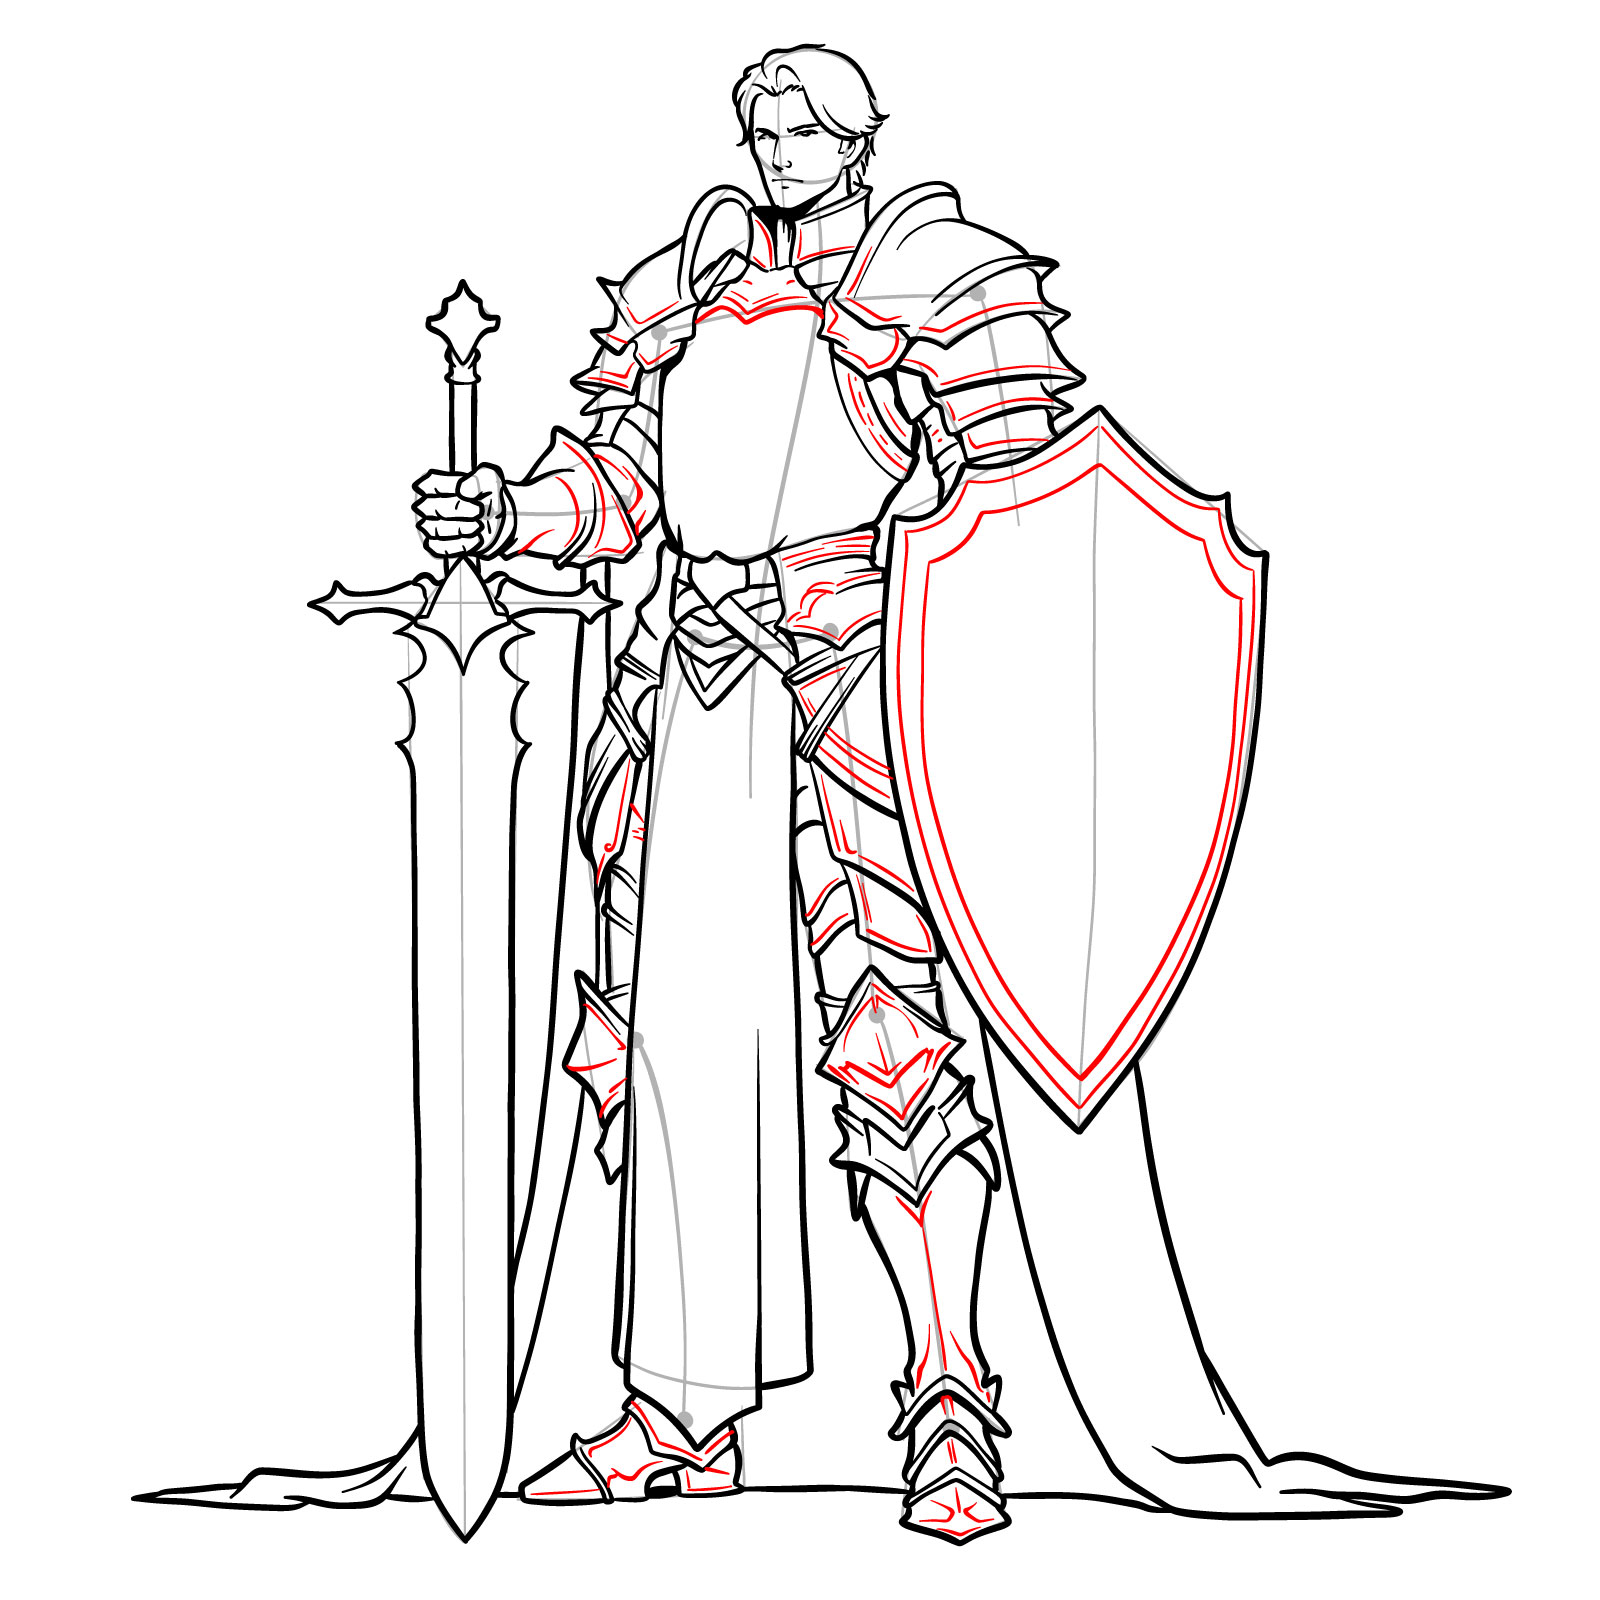
Step 24 – Add detailed lines and frames to the shield and armor pieces, enhancing their three-dimensional appearance
Enhancing shield and armor details
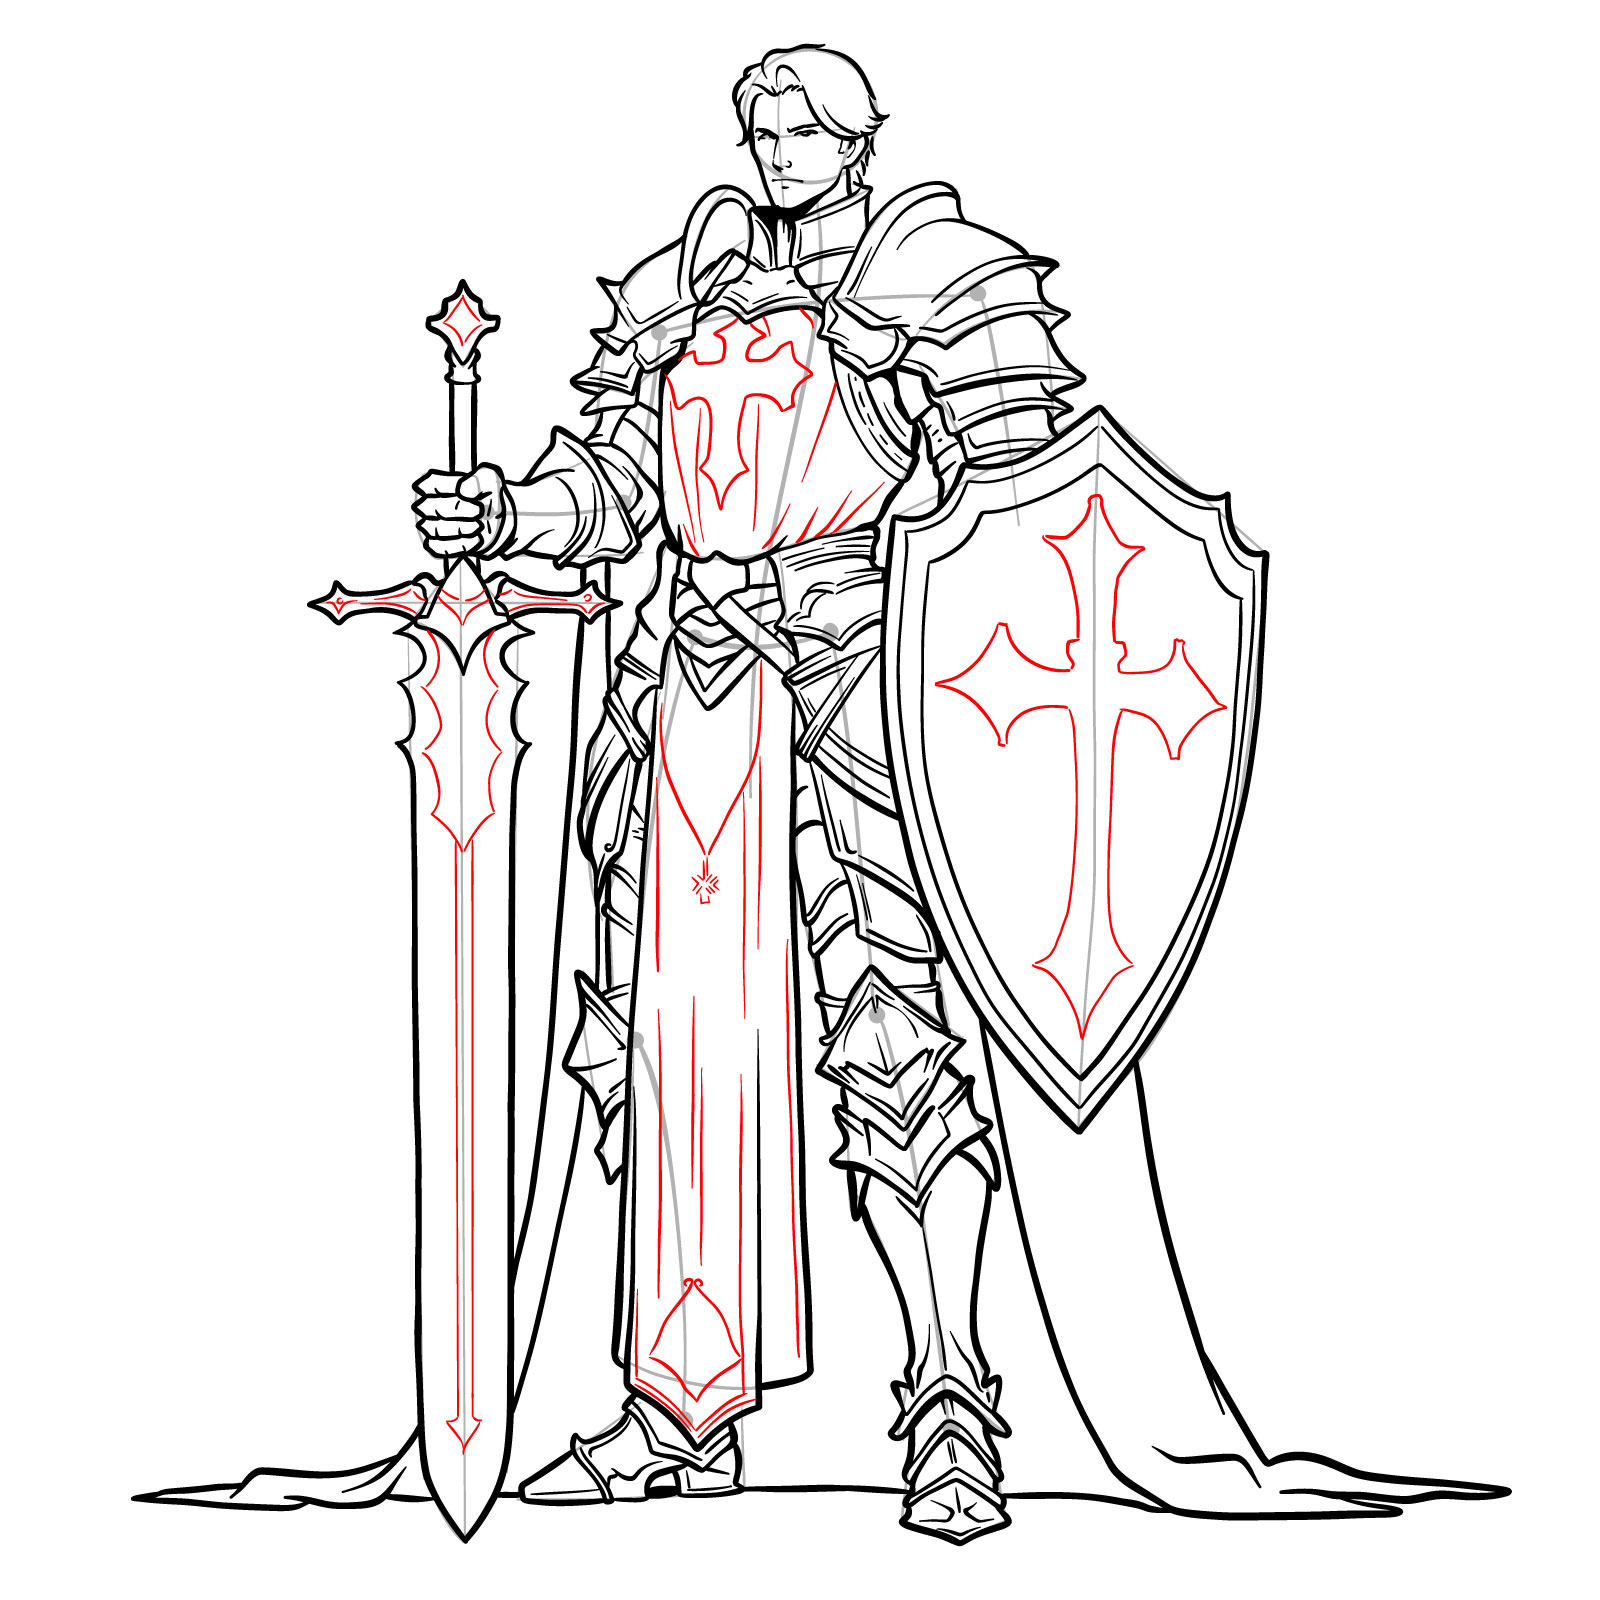
Step 25 – Sketch crosses on the shield and the paladin’s chest. Add intricate patterns to the sword’s blade and handle, and folds and creases to the fabric
Detailing shield, chest, and sword
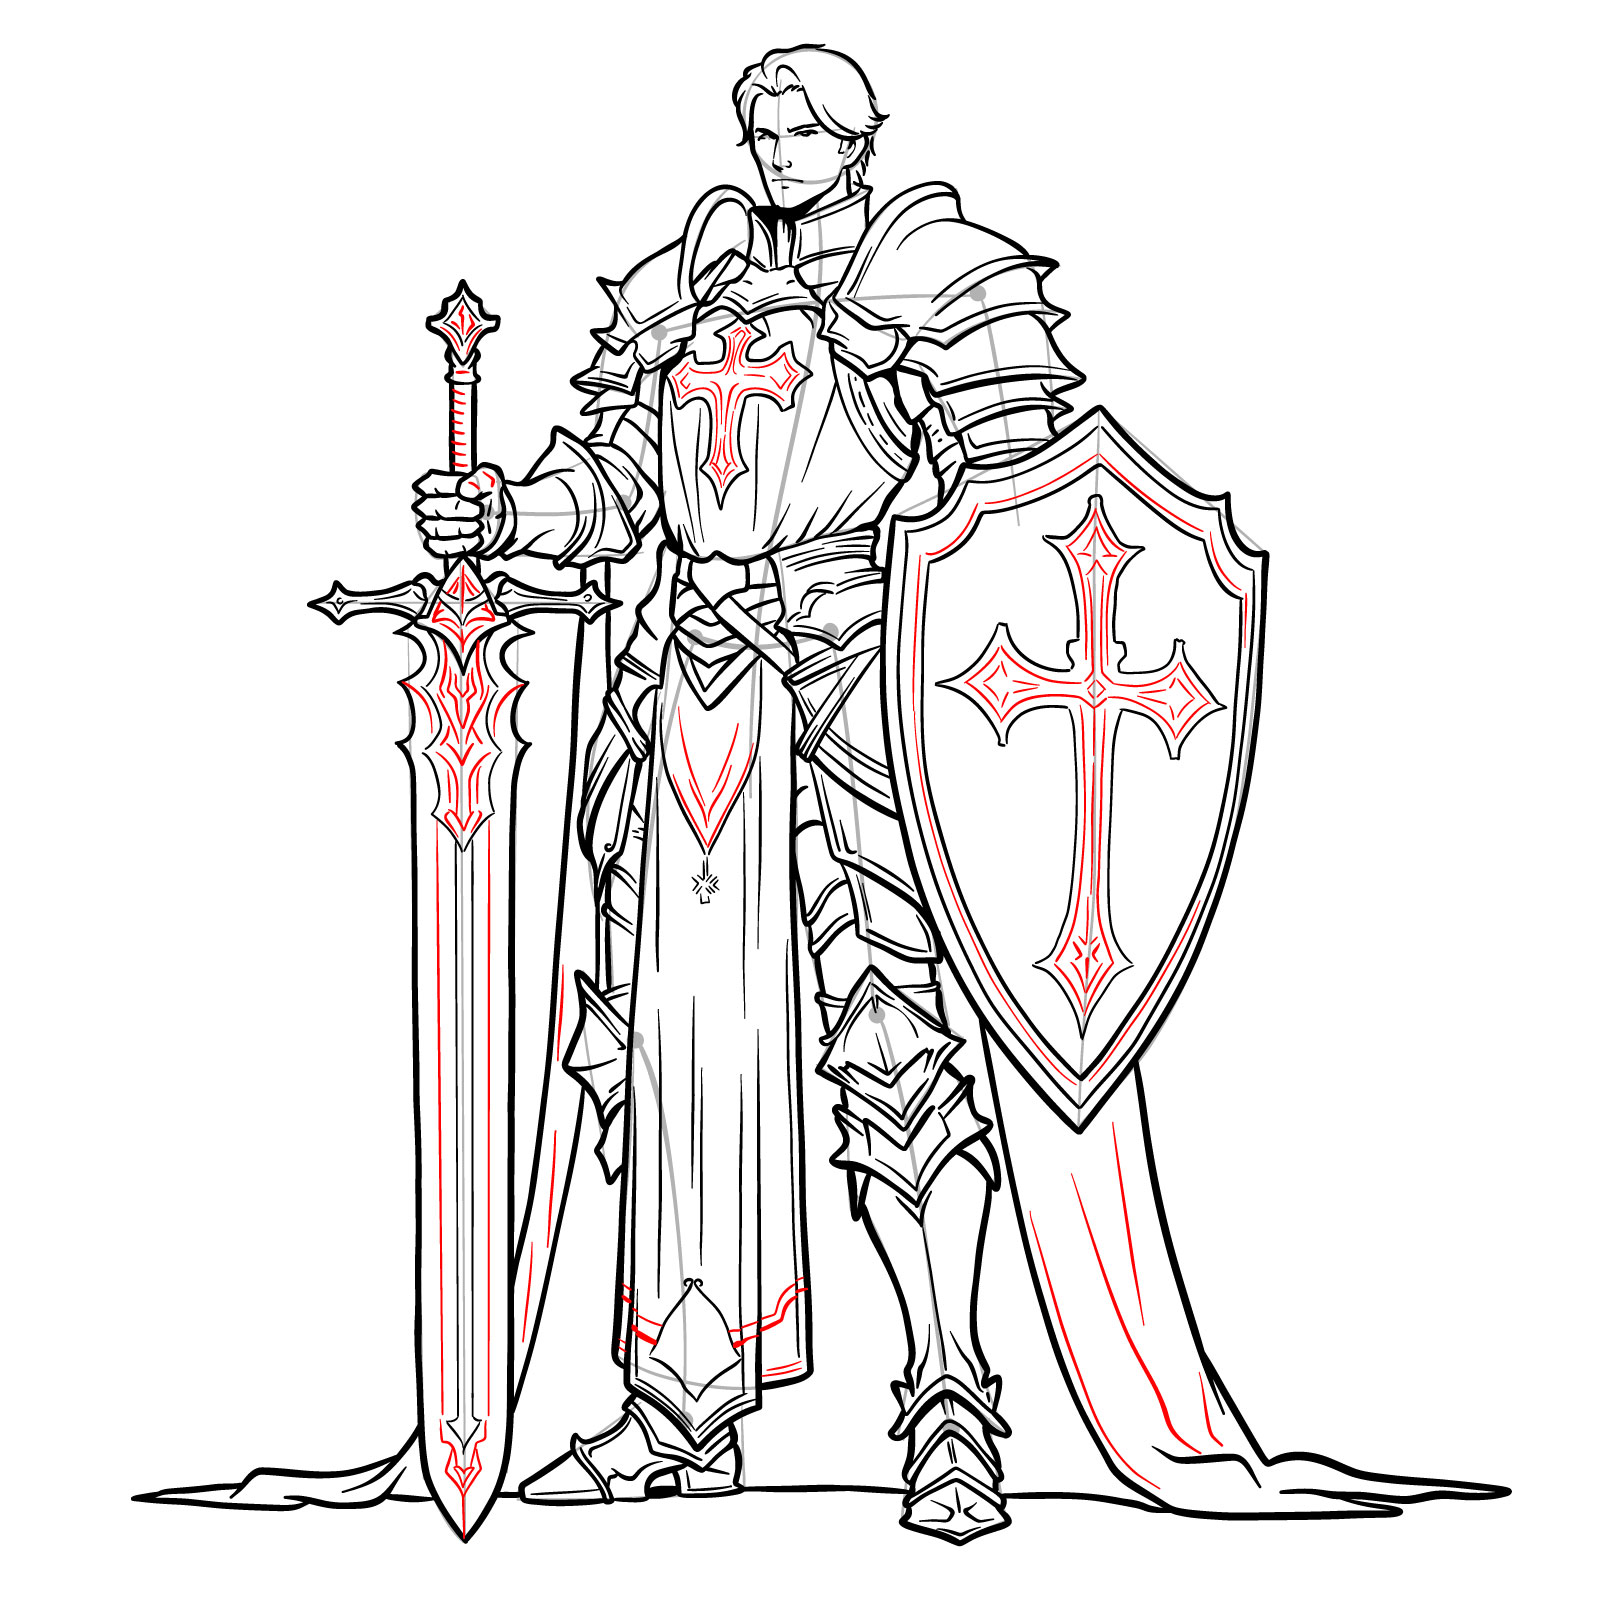
Step 26 – Enhance the smaller details on the crosses, the sword’s blade and handle, and the flowing cloth, emphasizing their design
Final detailing on decorations
Step 27 – Fill in the inside of the cape area and add shadows behind the sword, shield, and visible inner part of the right shoulder armor to create depth
Deepening shadows and details
Step 28 – Gently erase the basic sketches and any pencil marks to clean up the drawing, presenting a finished and polished look of a male paladin
Don't Miss New Tutorials! Follow SketchOk
I publish new step-by-step drawing guides every single day. Follow on your favorite platform so you never miss a tutorial. Thousands of artists are already drawing along and I can't wait you to join in!
On my Patreon you can grab unique hand-made coloring pages: each one drawn by me personally. Every purchase directly supports the creation of new drawing tutorials. It's the best way to practice your skills, keep the site going, and get something truly original at the same time.
Thank you for joining me in this detailed exploration of how to draw male paladins. Whether you started with the simplest cartoon style or ventured into the more complex realistic and detailed drawings, I hope you found this guide helpful and inspiring. Drawing paladins is a rewarding challenge that can help you practice your skills and bring your medieval fantasies to life.
To keep this guide handy and refer back to it whenever you need, I strongly encourage you to pin it on Pinterest. This will not only save the tutorial for future reference but also support and spread our artistic community.
Follow us on Pinterest for more tutorials and inspirational content.
Check out our YouTube channel for video tutorials.
Engaging with these platforms will keep you connected with a like-minded community and provide regular updates to fuel your passion for drawing. So don’t hesitate—start following SketchOk today and take your drawing skills to the next level!
Disclaimer: This is a non-commercial, fan-made educational site. All characters belong to their respective owners. We are not affiliated with any rights holders.
Read full Disclaimer