Welcome to my step-by-step tutorial on how to draw wolves 🐺 in various styles and poses! Whether you’re looking to sketch a simple wolf head or dive into more intricate designs, this huge tutorial has got you covered. SketchOk’s approach simplifies each stage, making it easy and enjoyable for you to follow along, regardless of your artistic skill level. From adorable kawaii styles to realistic depictions, we’ll explore 14 different ways to bring these magnificent creatures to life on paper.
Each guide in this tutorial is crafted to help you draw wolves with ease and precision. Unlike the cat drawing tutorial I created earlier, which had a consistent style, the creation of this tutorial began a long time ago, leading to a variety in styles. Let’s dive into the structure of these guides!
Step-by-Step Visual Instructions
The heart of each guide lies in a series of images, each representing a step in the drawing process. By following these steps sequentially, you’ll watch as your wolf drawing comes to life. This methodical approach ensures that you can easily track your progress and understand the evolution of your artwork.
Color Coding and Guidelines
Understanding the color coding in the guides is key to following along effectively:
Red Color: Highlights the current step you’re working on.
Black Color: Shows the lines from previous steps.
Grey Color: Indicates the initial basic sketch (where applicable).
Inking and Final Touches
Upon completing the pencil sketch, you have the option to ink your drawing. Inking involves going over the pencil lines with ink to give your artwork a polished, defined look. It’s crucial to let the ink dry completely before erasing any pencil marks to avoid smudging. This final step transforms your sketch into a refined drawing, bringing your artistic creation to its full potential.
Simple Wolf Head Drawing in 5 Steps
PinSimple Wolf Head Drawing
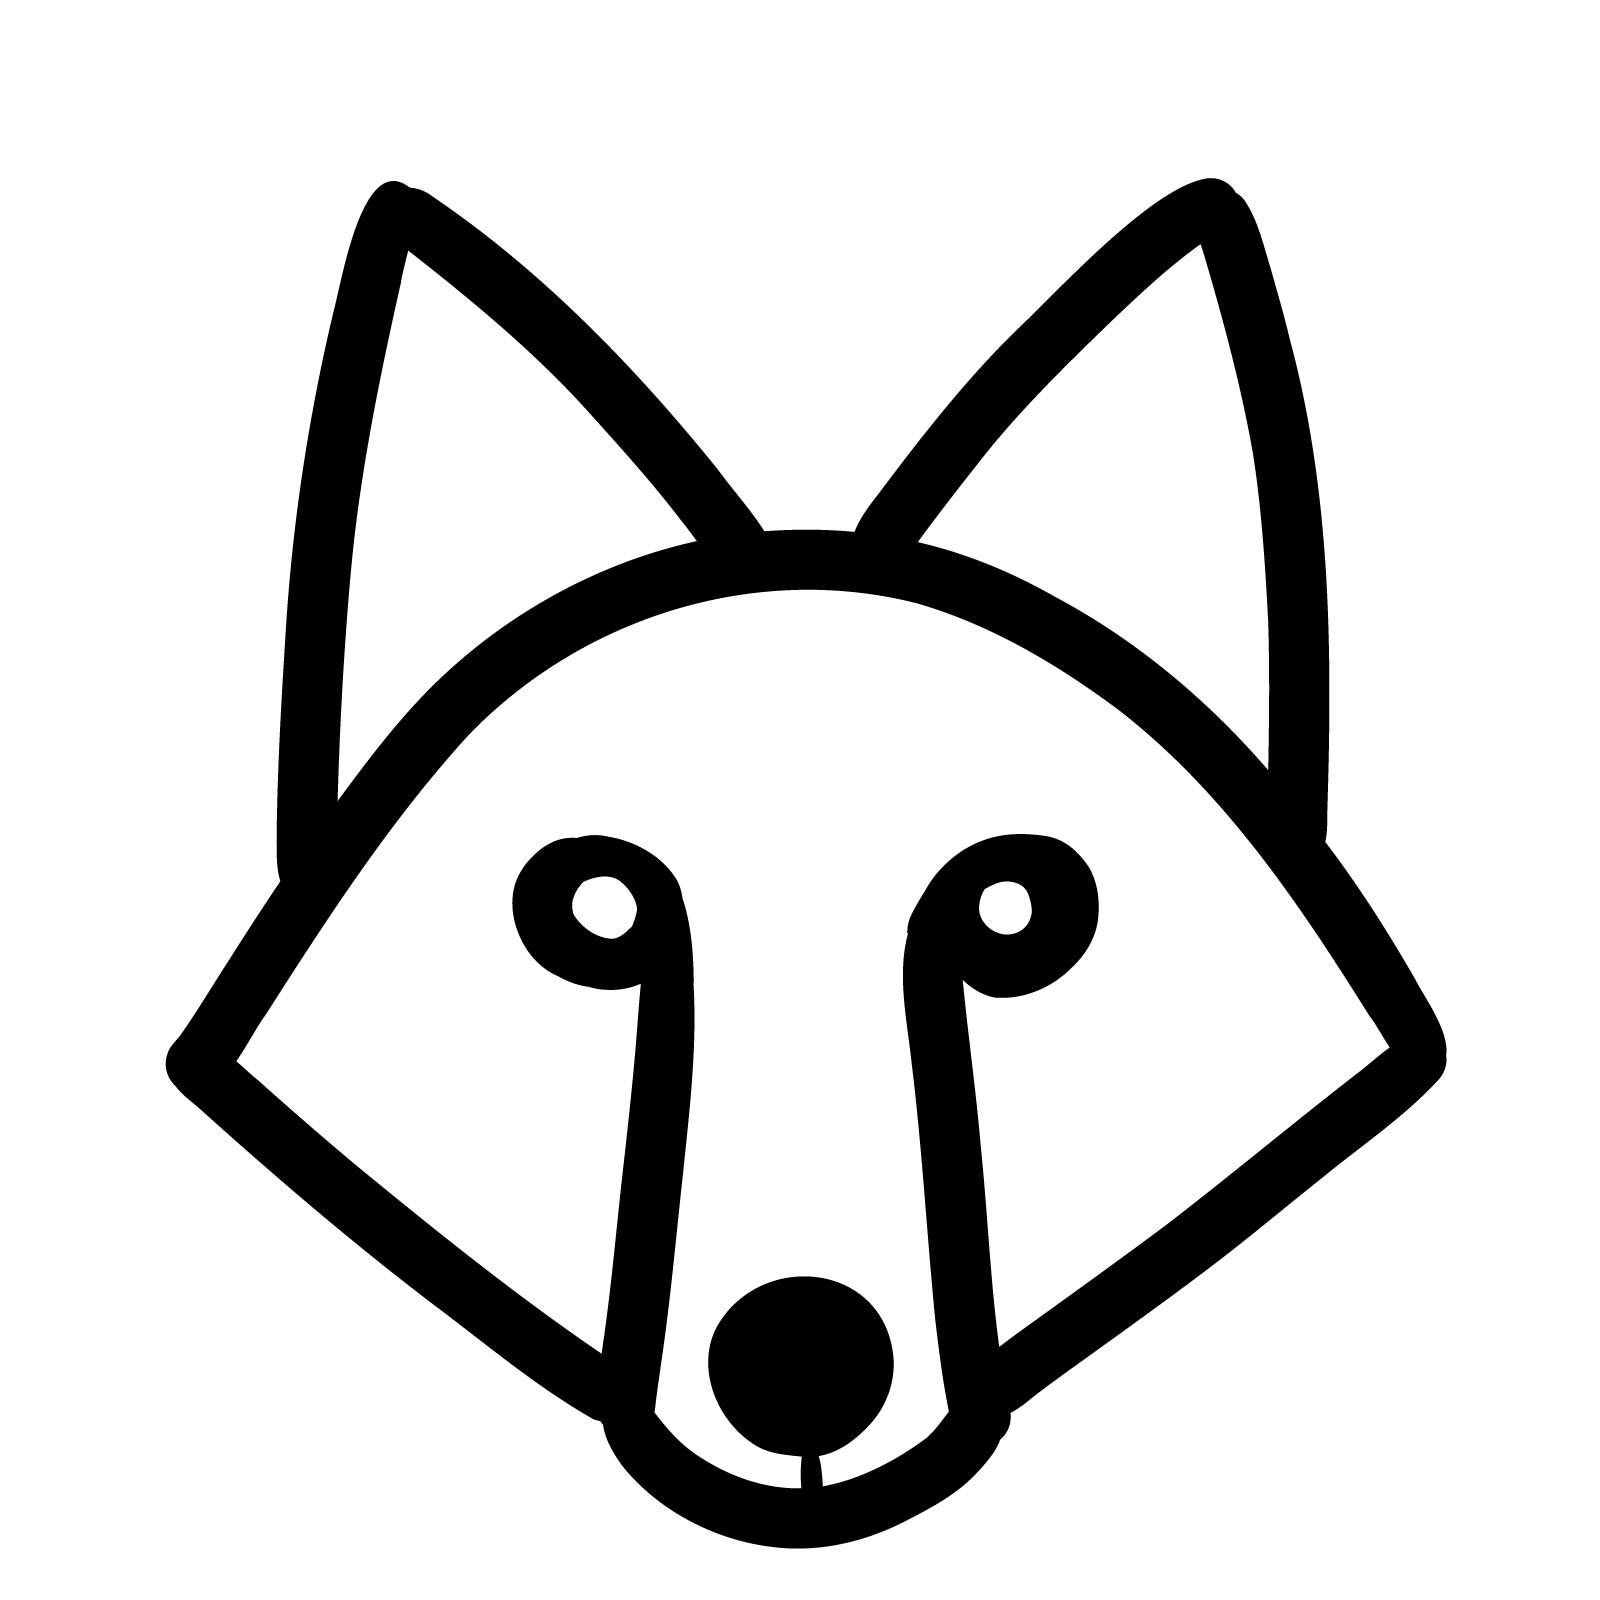
In the first guide, you will see how to draw a simple wolf face/head that’s perfect for beginners and for drawing with kids. This design simplifies the wolf’s features into bold, easy-to-draw shapes. With only five steps and no basic sketch required, this guide is ideal for those looking to quickly capture the essence of a wolf without getting bogged down in detail. The final drawing features a stylized wolf face with pointed ears, circular eyes, a prominent snout, and a straightforward expression. This minimalist approach conveys the wolf’s features with clarity and charm, making it a delightful starting point for any aspiring artist.
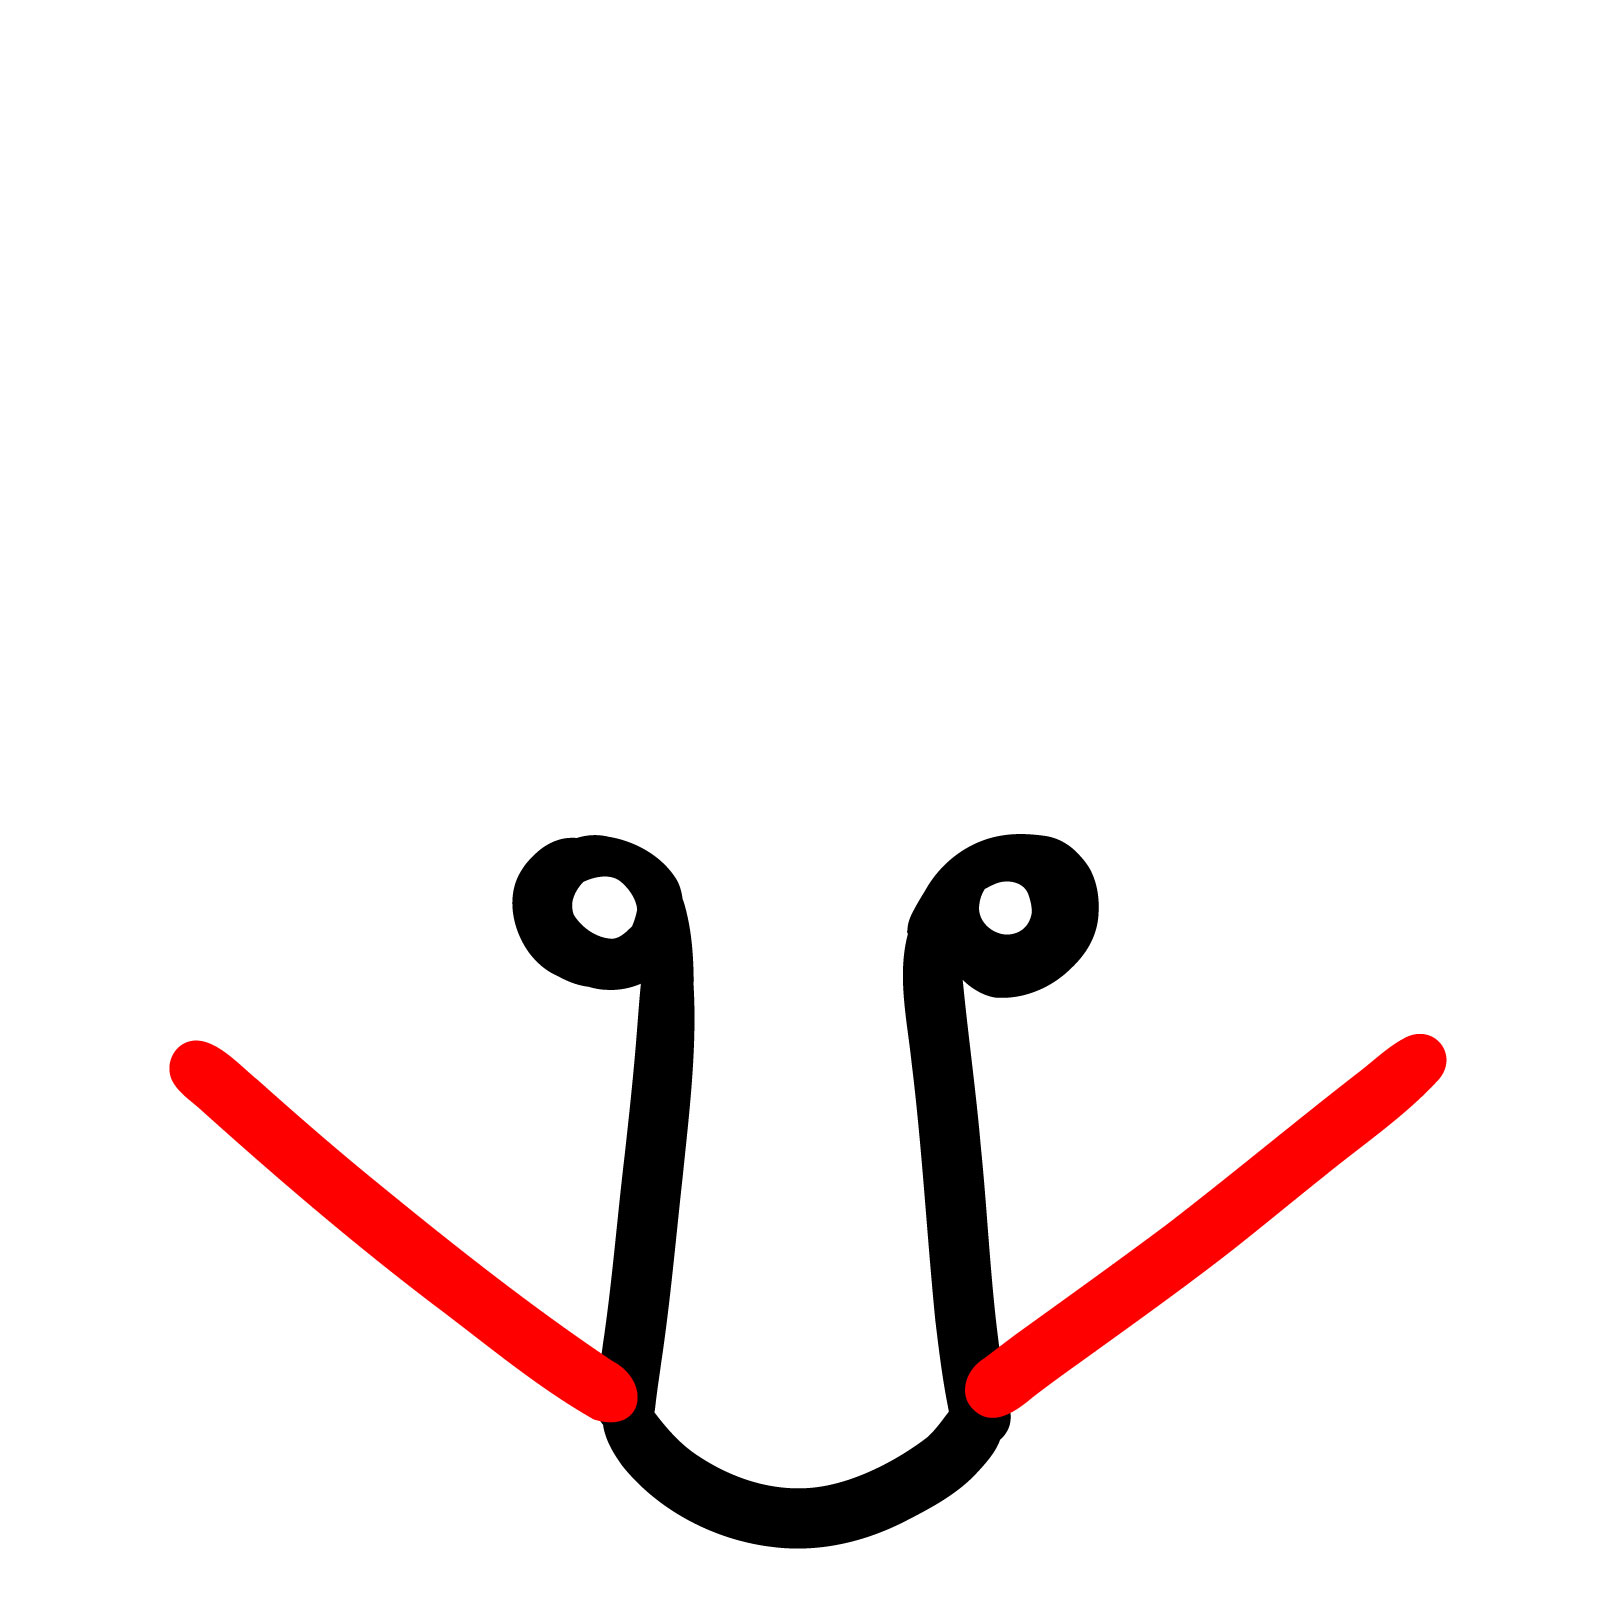
Step 01 – Start by drawing a wide ‘U’ shape. This represents the snout of the wolf. Make sure the ‘U’ shape is slightly rounded at the bottom. At each end of the ‘U’, add a small circle. These circles will serve as the wolf’s eyes
PinBeginning the wolf head sketch with the snout
Step 02 – From the bottom of the sides of ‘U’ we made in the previous step, extend a diagonal line upwards and outwards. These lines will form the lower sides of the wolf’s head
PinSketching the bottom part of the wolf head
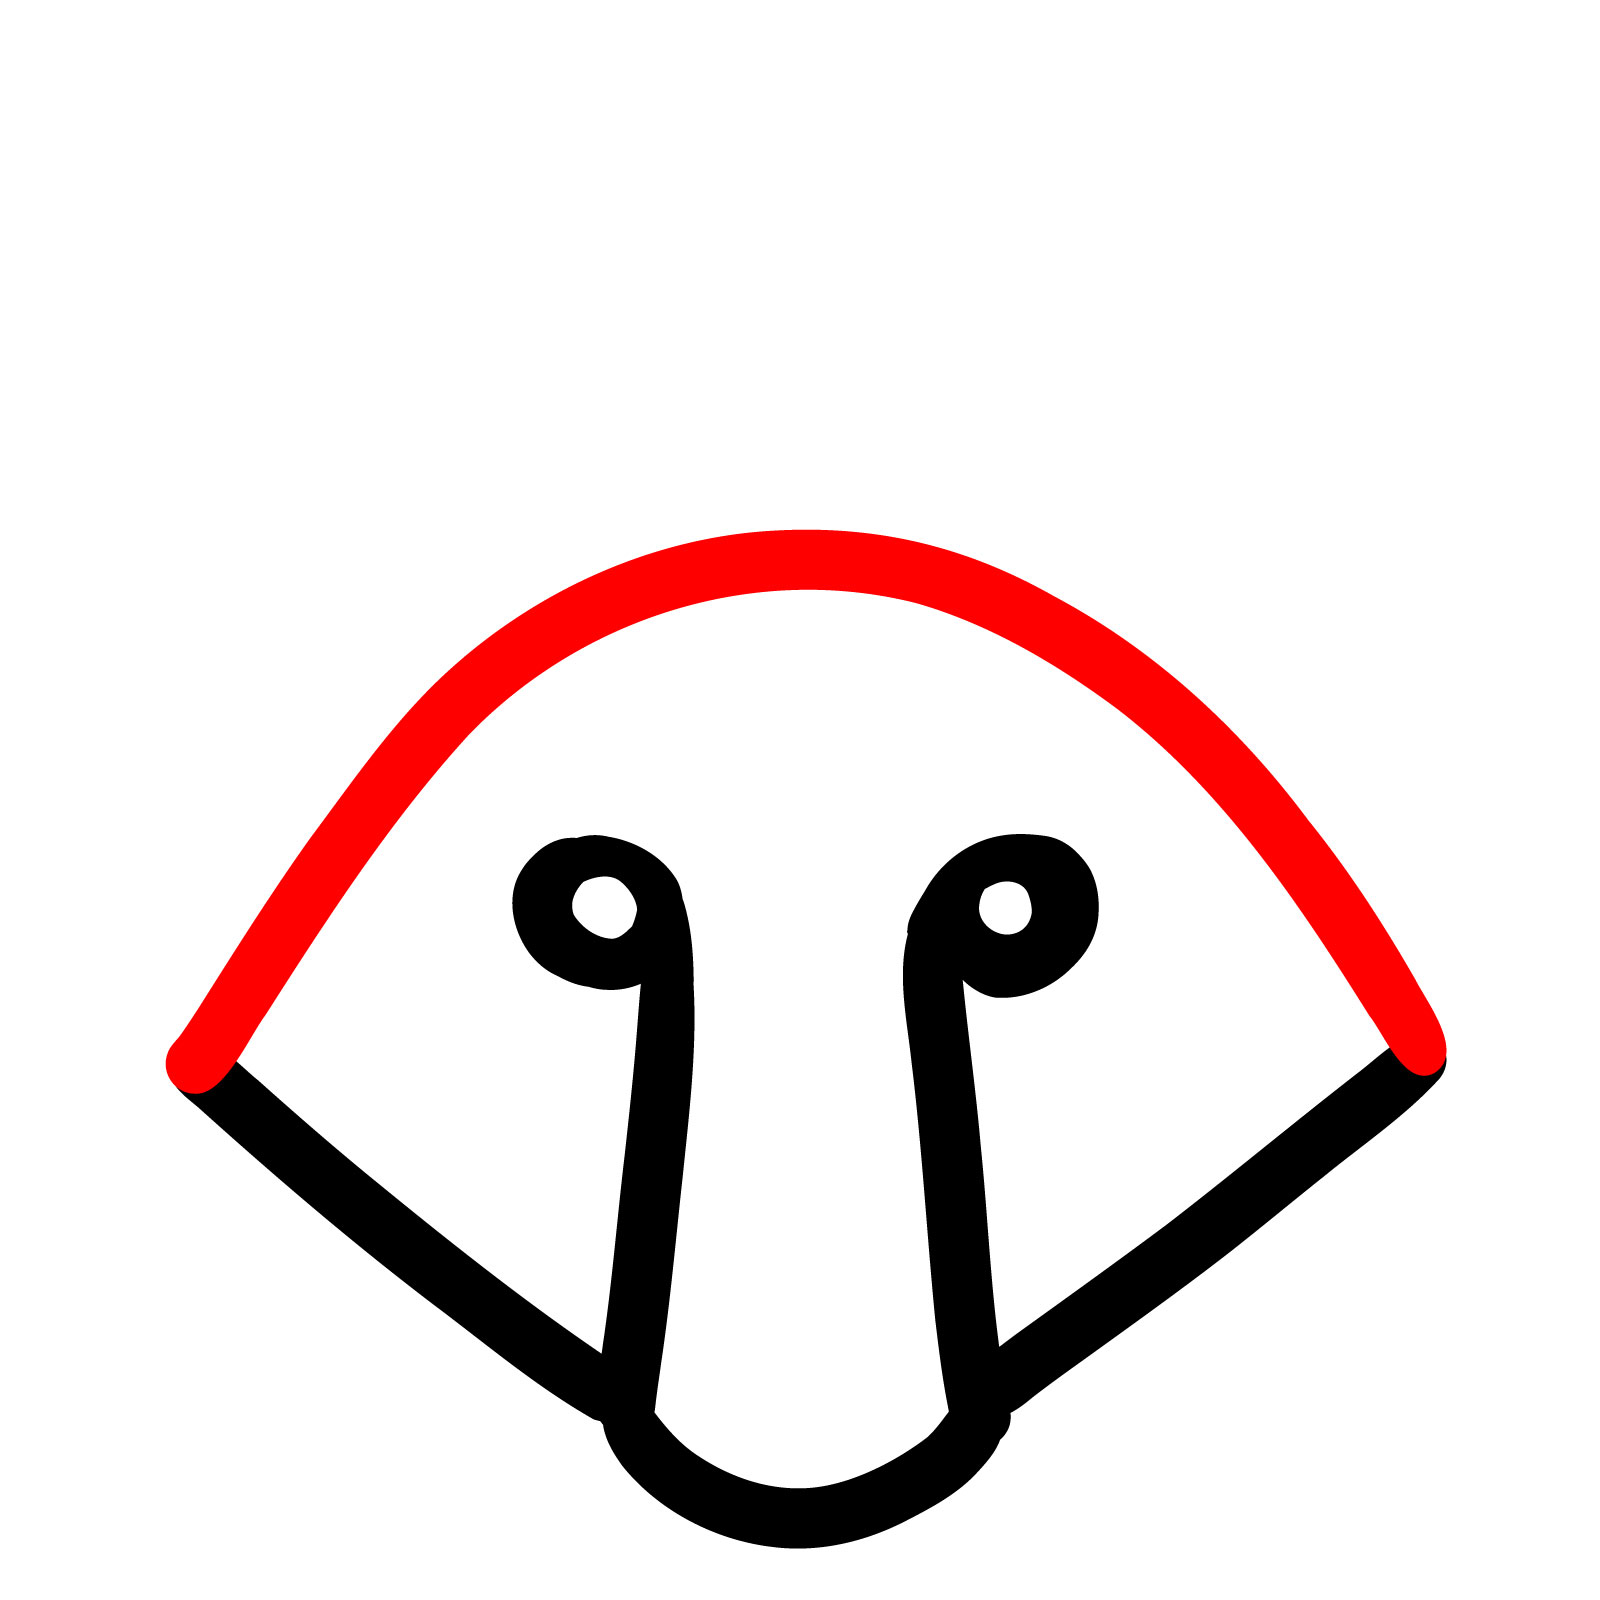
Step 03 – Connect the diagonal lines drawn in step 2 with a long, curved line that arches upwards. This line will create the top of the wolf’s head, completing the main outline of the head structure
PinCompleting the upper head structure of the wolf
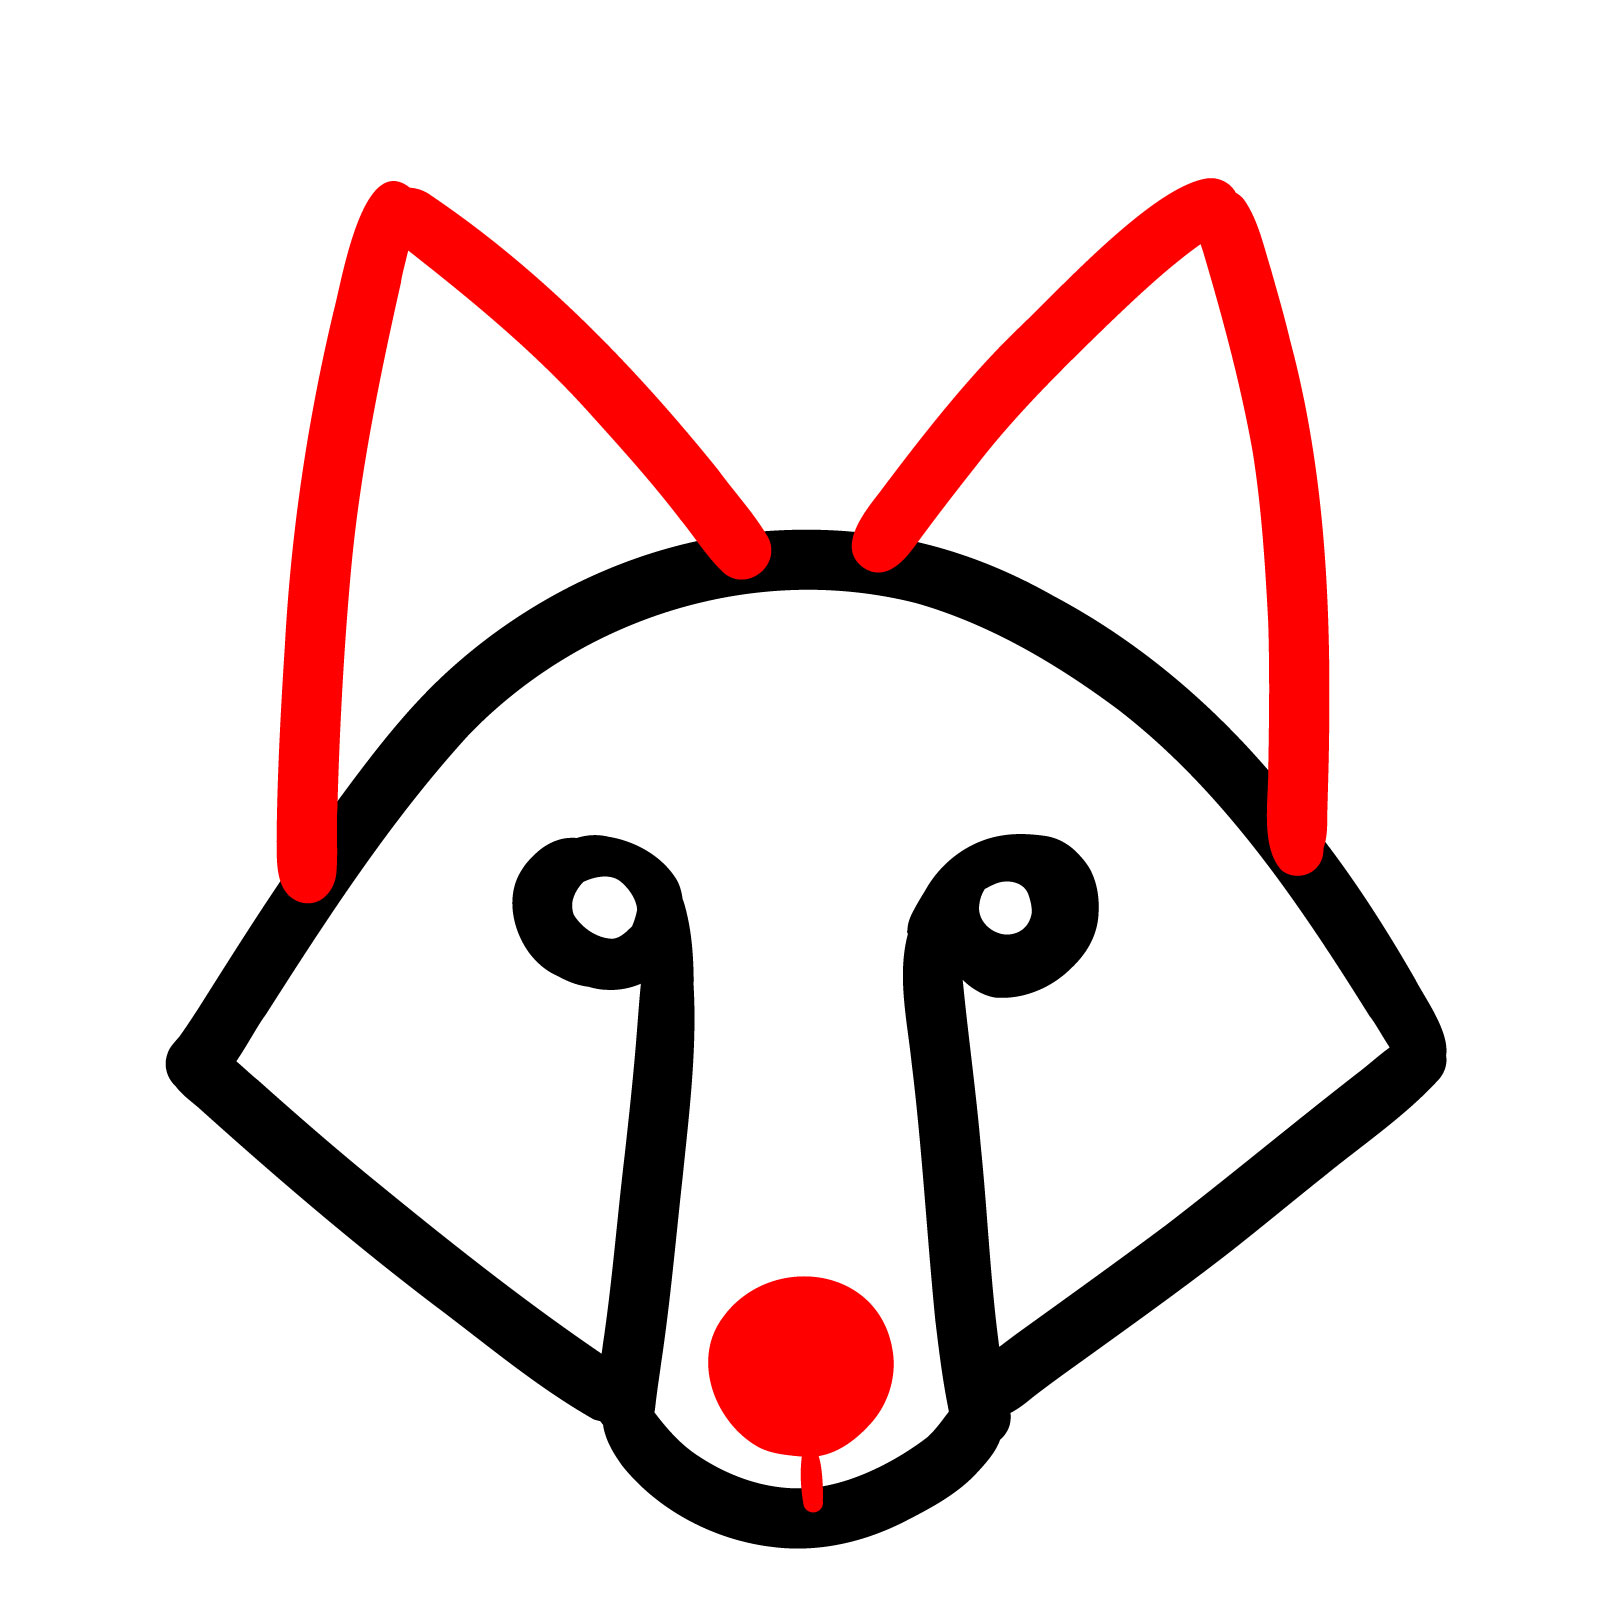
Step 04 – At the center bottom of the ‘U’ shape, draw a filled-in circle to represent the wolf’s nose. Just below the nose, add a short vertical line for the lower part of the snout. For the ears, sketch two equilateral triangles at the top of the head. These triangles should be angled slightly outwards and upwards, mimicking the alert posture of a wolf’s ears
PinAdding the nose and ears to the wolf head sketch
Step 05 – With the head structure and basic features in place, it’s time to review and add the finishing touches to your wolf head drawing if needed. This completes your simple wolf head drawing, capturing the essence of the animal’s alert and noble demeanor. Use this guide to practice and refine your skills in creating stylized animal sketches
PinRefining the simple wolf head drawing with additional details if prefered
Draw a Charming Kawaii Wolf in 7 Simple Steps
PinEasy drawing of a wolf in kawaii style
Ready for something adorable? The second guide in our tutorial series teaches you how to draw a simplified kawaii wolf. This style is all about capturing the cuteness and charm of our subject. In just seven straightforward steps, you’ll bring to life a delightful wolf with large, expressive eyes, a tiny nose, and a playful tail. The finished drawing exudes a sense of warmth and joy, featuring the wolf in a friendly, approachable pose with a soft, rounded body. It’s a style that’s sure to bring a smile to your face and brighten up any collection of drawings.
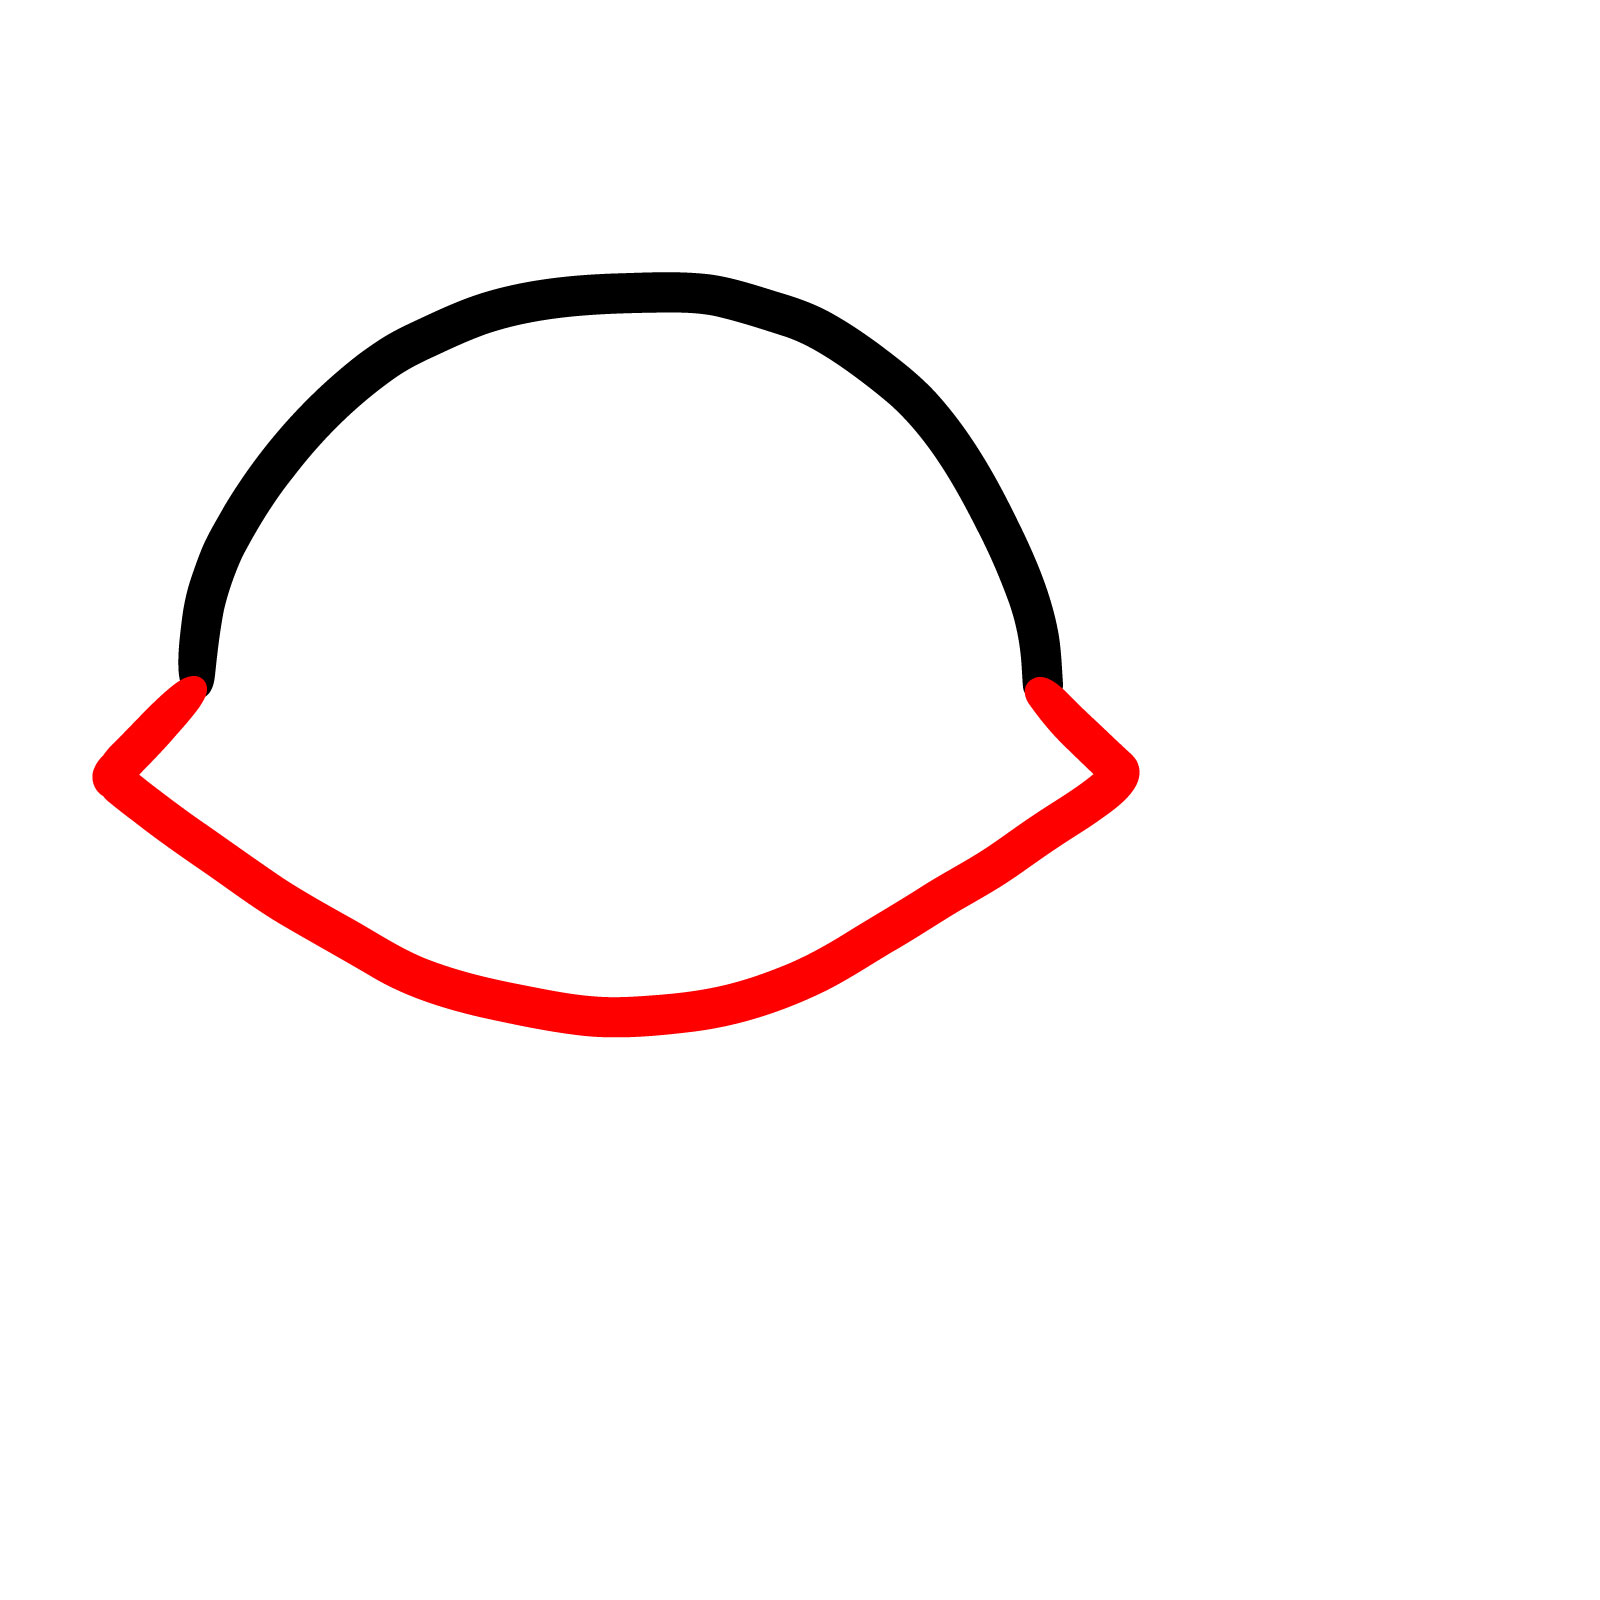
Step 01 – Begin your kawaii wolf drawing by creating a wide half-circle. This shape forms the top part of the wolf’s head. Ensure that the curve is smooth and even to capture the kawaii style’s characteristic softness
PinInitiating a kawaii wolf head with the top of the head
Step 02 – To craft the lower part of the wolf’s head, draw a wide, curved line beneath the half-circle. The ends of this line should have pointed tips. This outlines the wolf’s cheek and jaw area, providing a foundation for the face
PinOutlining the lower part of the kawaii wolf head
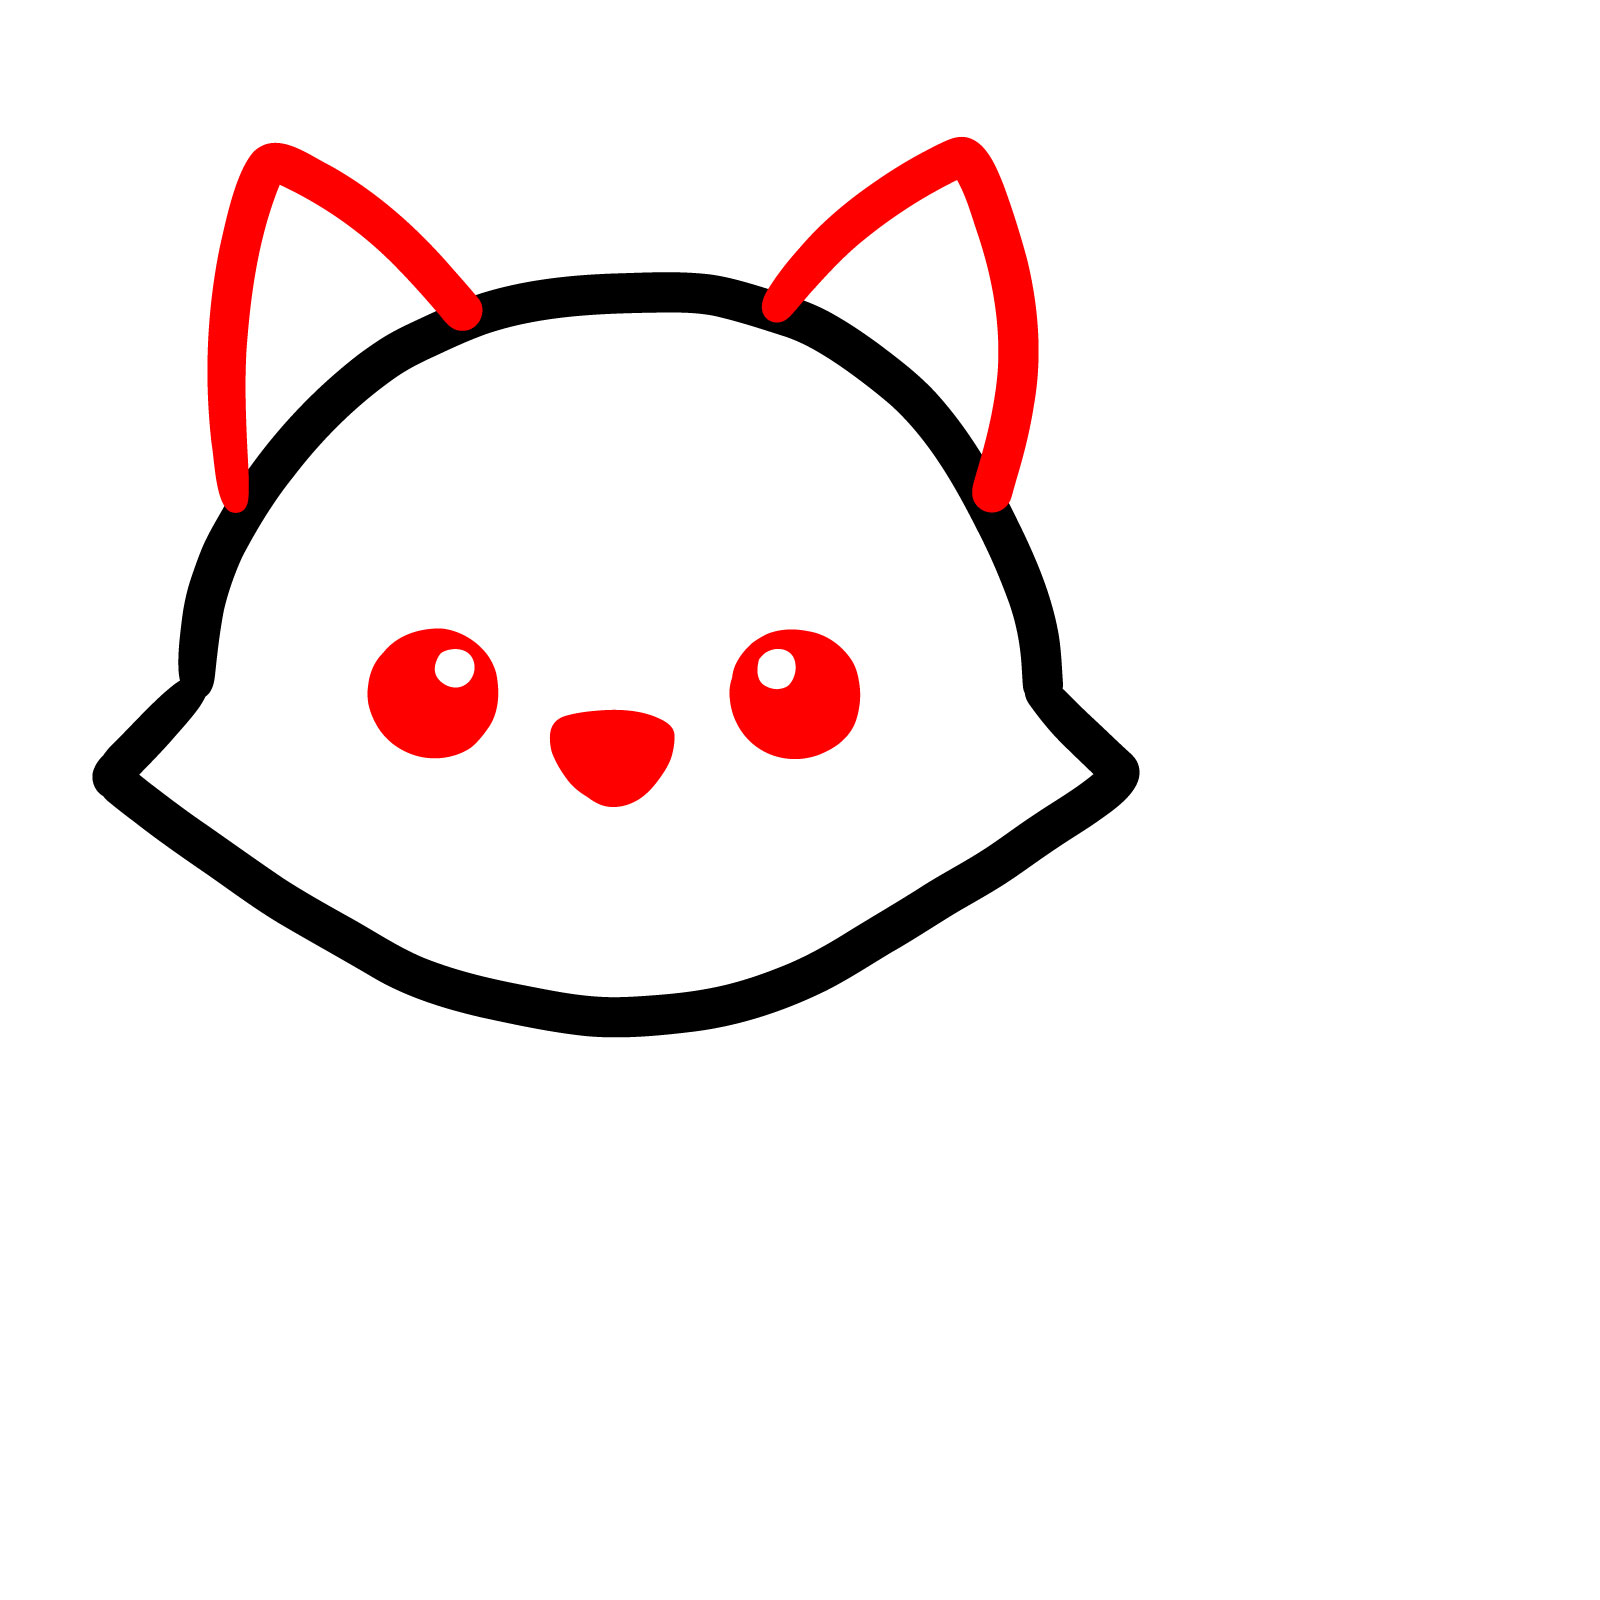
Step 03 – For the ears, sketch two equilateral triangles at the top of the head, ensuring they are symmetrical. Create the wolf’s eyes by drawing two large circles with smaller blank circles inside to suggest highlights, giving the eyes a sparkly look. Then, draw a rounded, downward-pointing triangle in the center of the face for the nose, giving it a cute and friendly appearance
PinAdding ears and nose to the kawaii wolf head
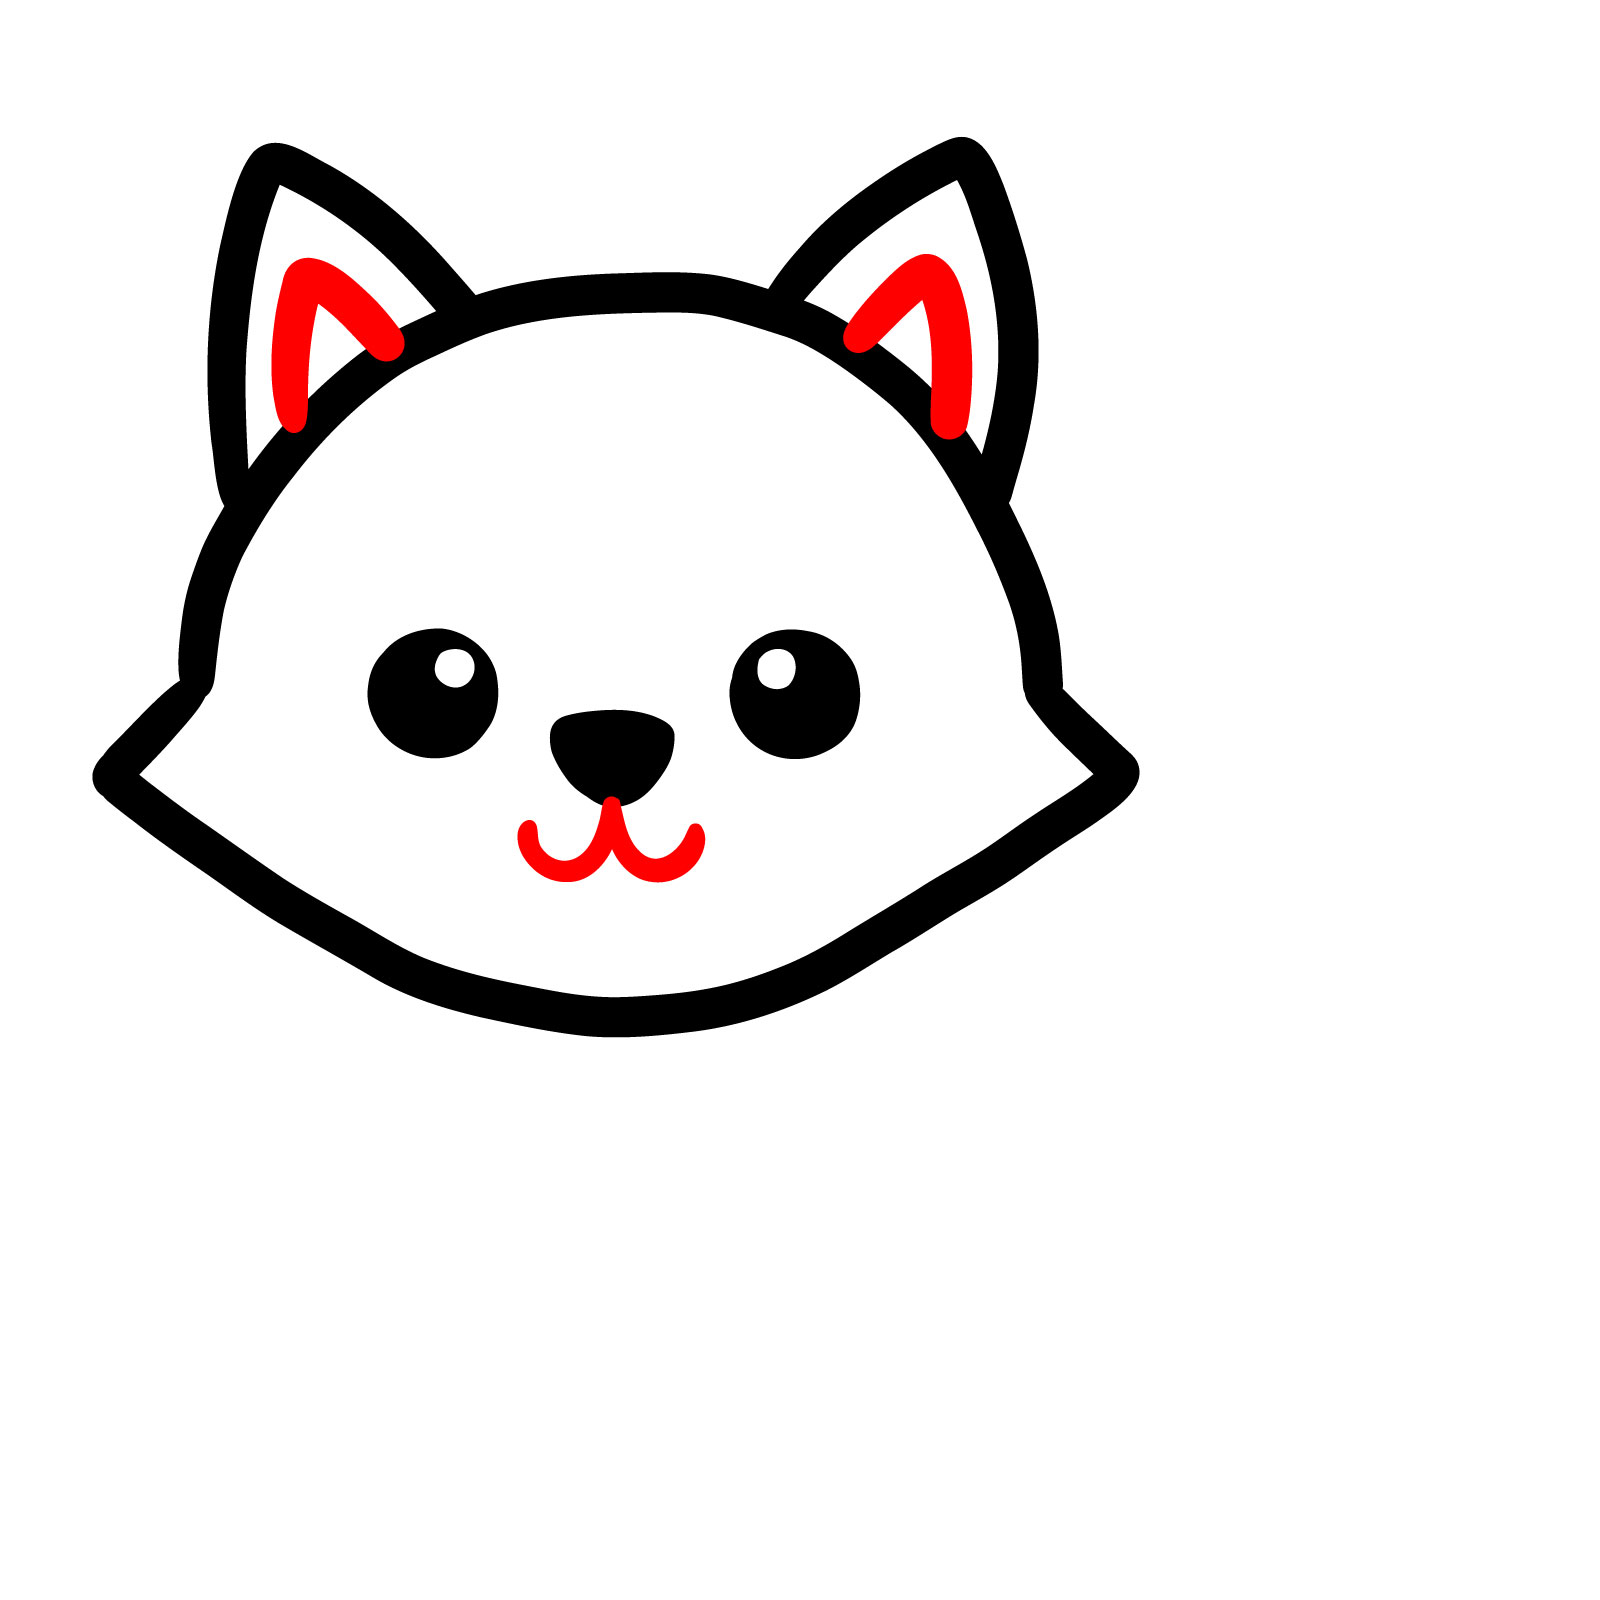
Step 04 – Inside each ear, add another smaller triangle for the inner ear detail, which provides depth. Then, draw a curved ‘W’ shape below the nose to represent the wolf’s snout. This gives your kawaii wolf a happy, smiling expression, completing the adorable and simple rendition of a kawaii-style wolf head
PinDetailing the inner ears and snout of the kawaii wolf
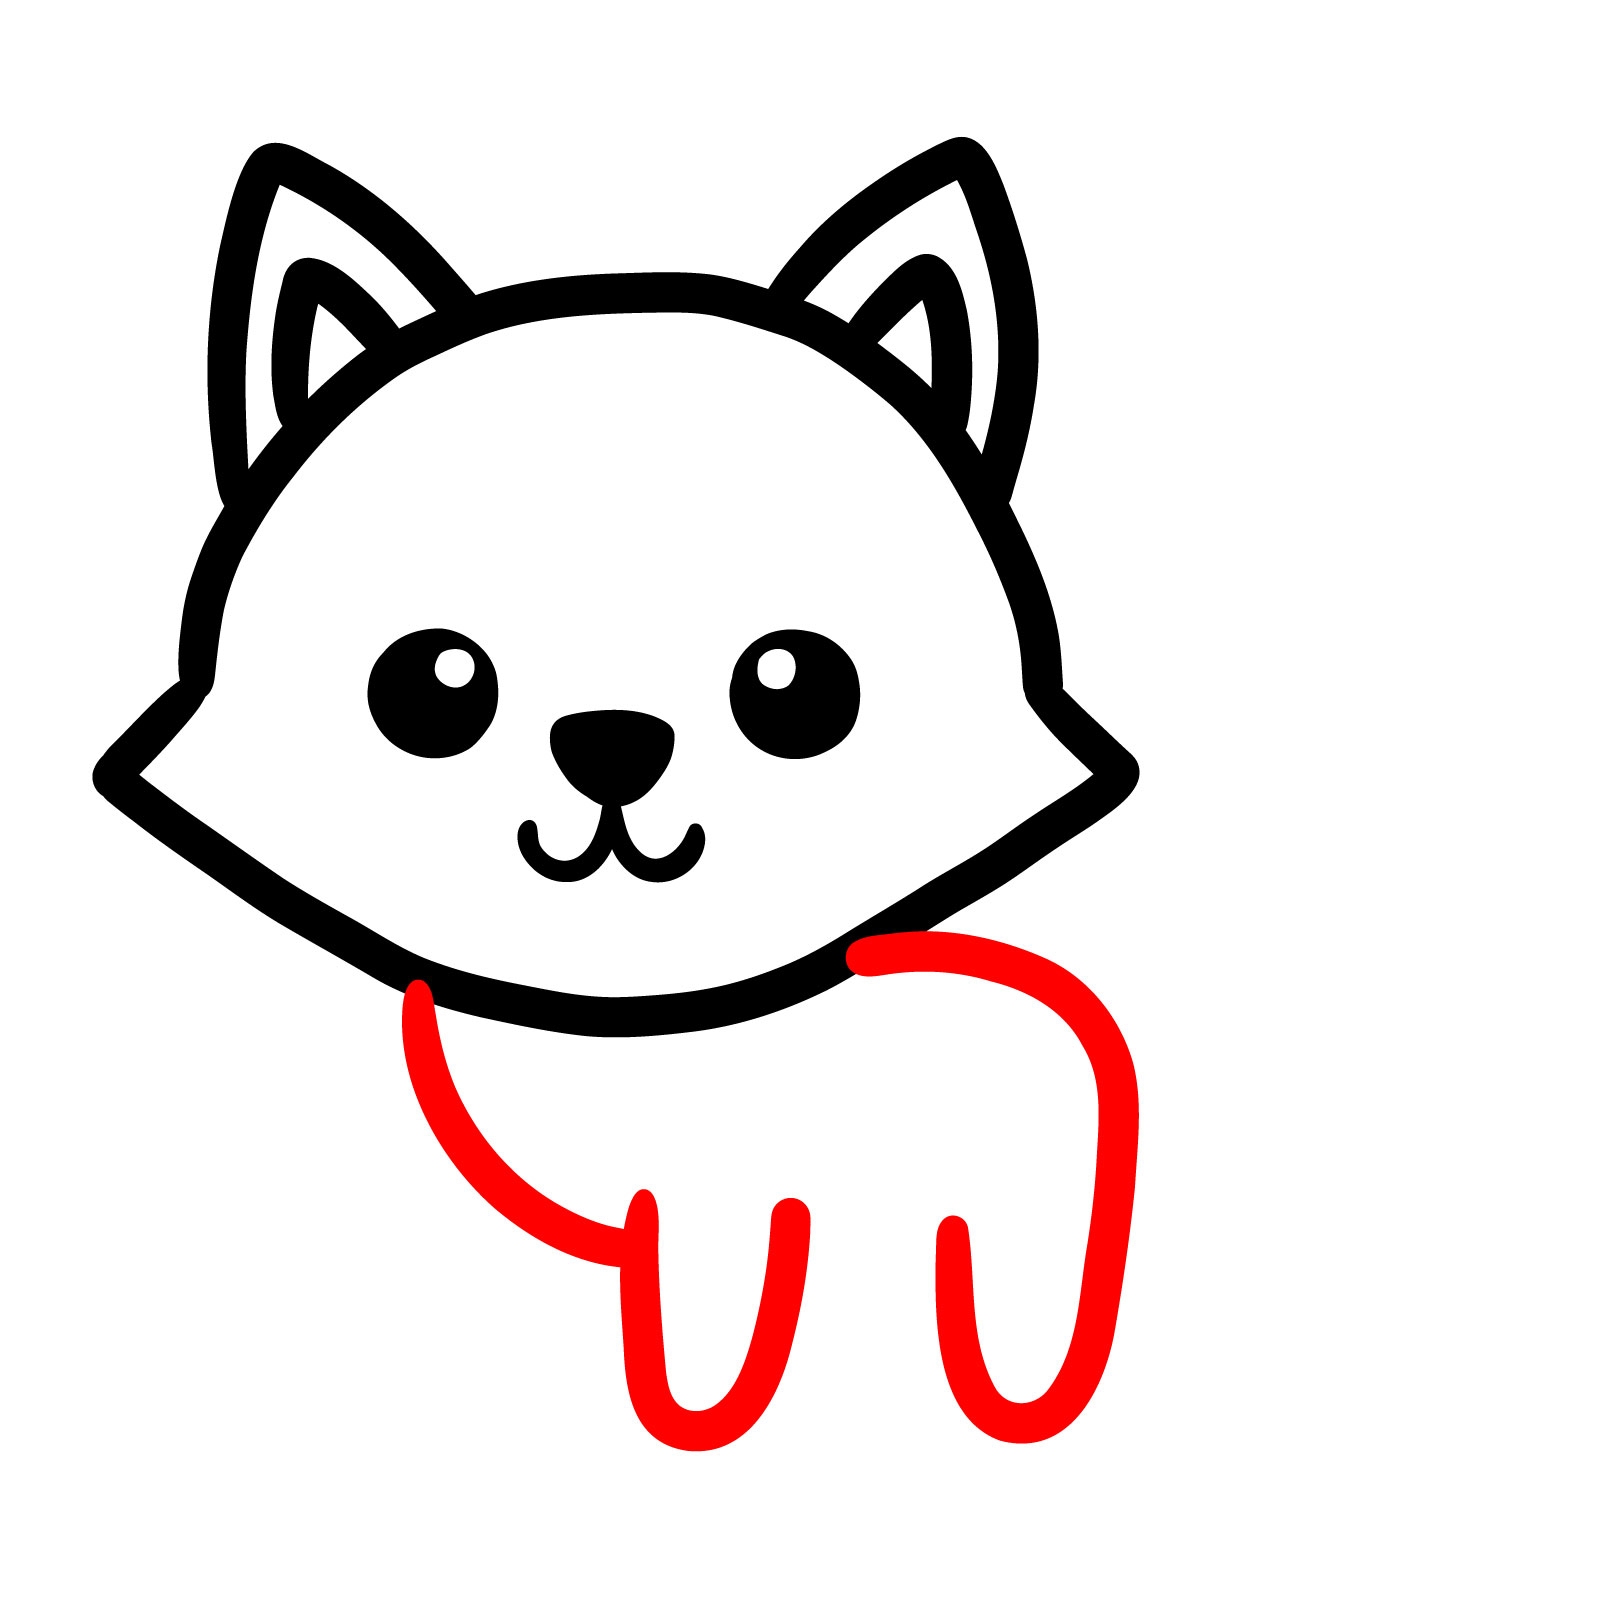
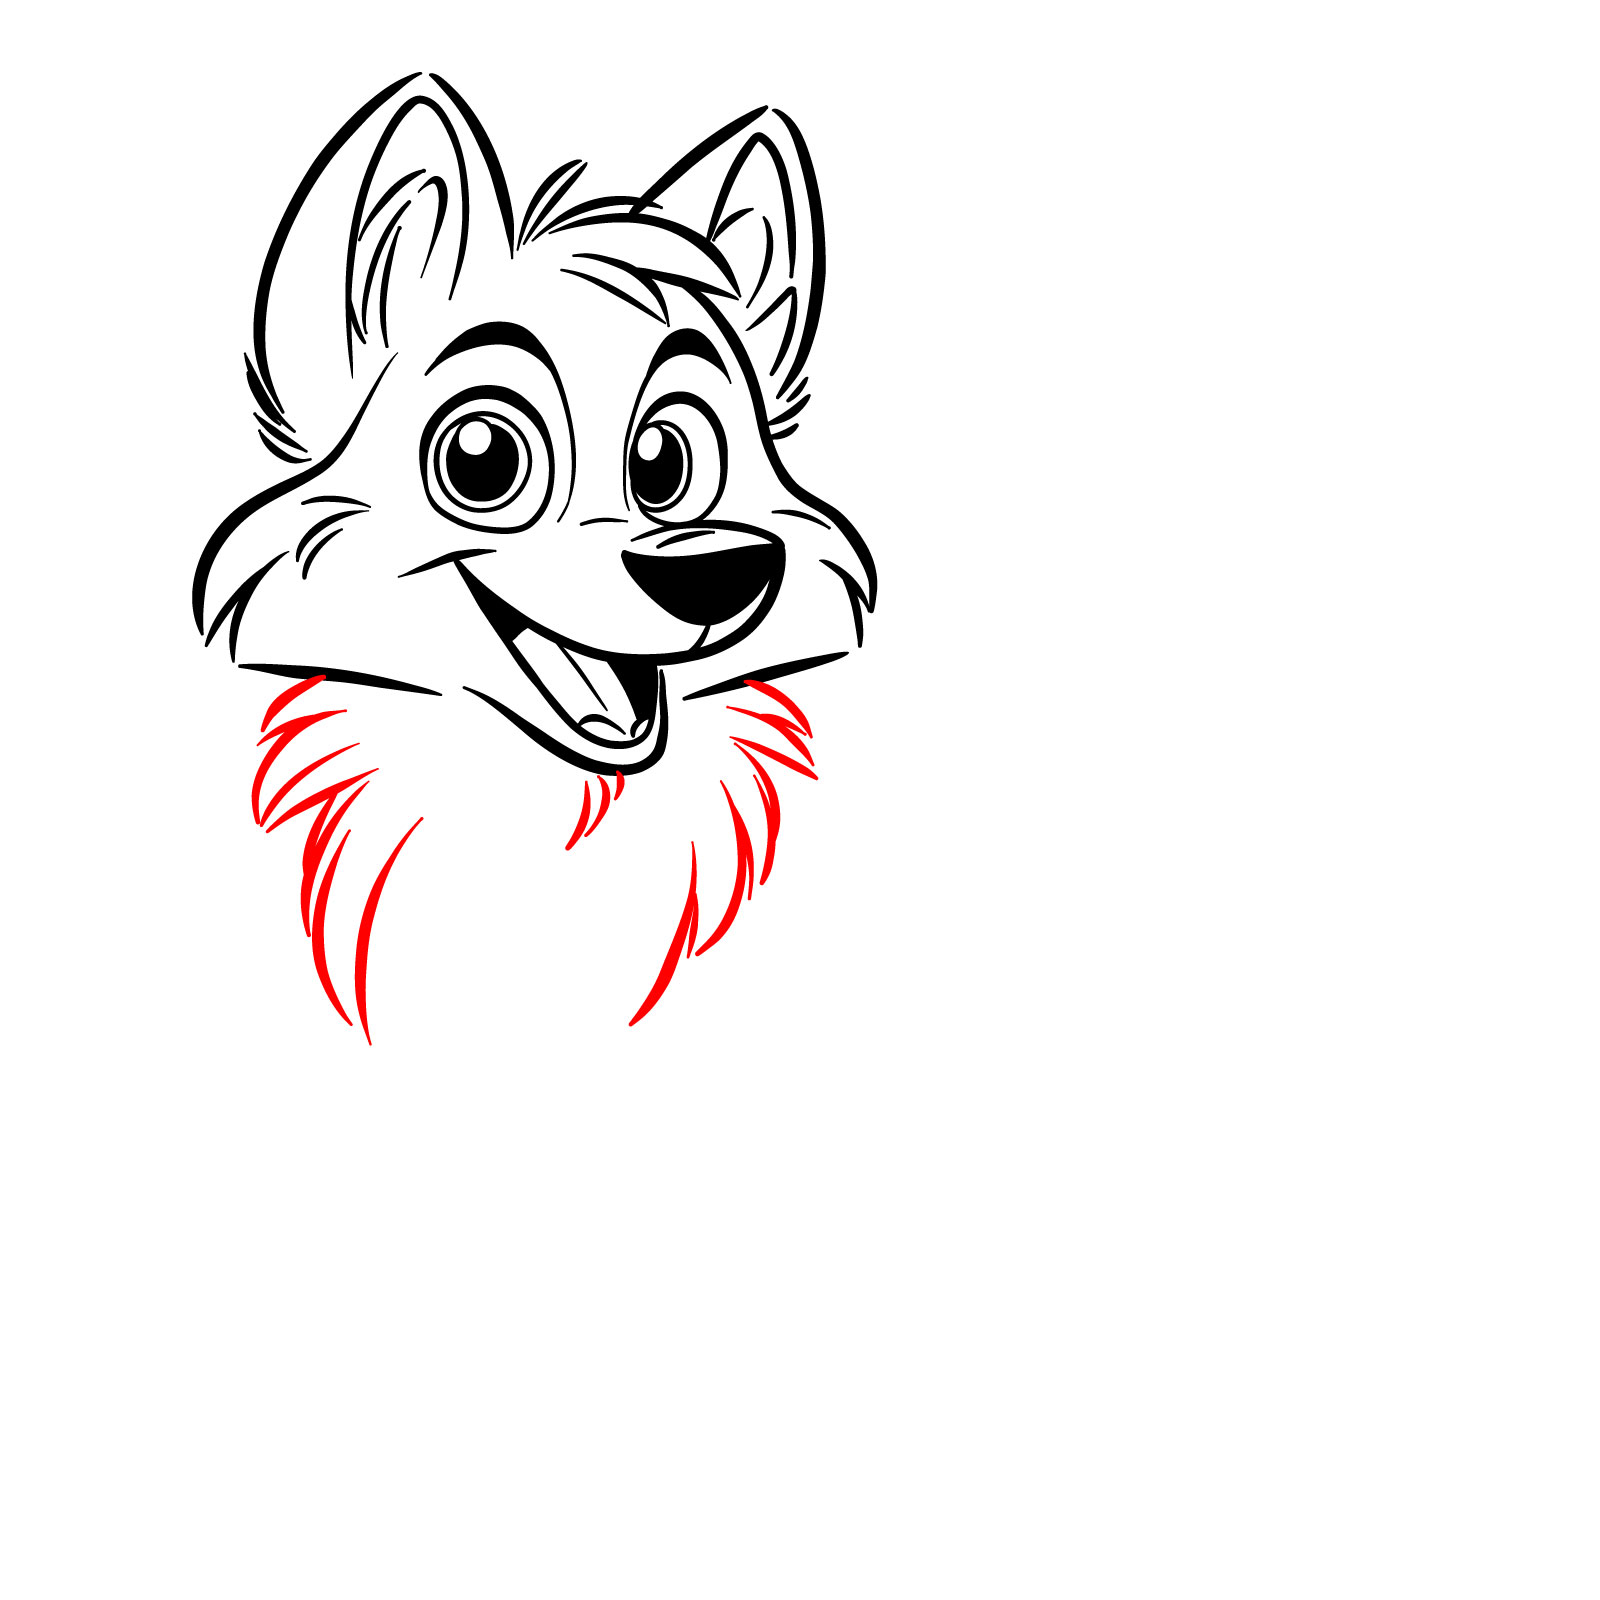
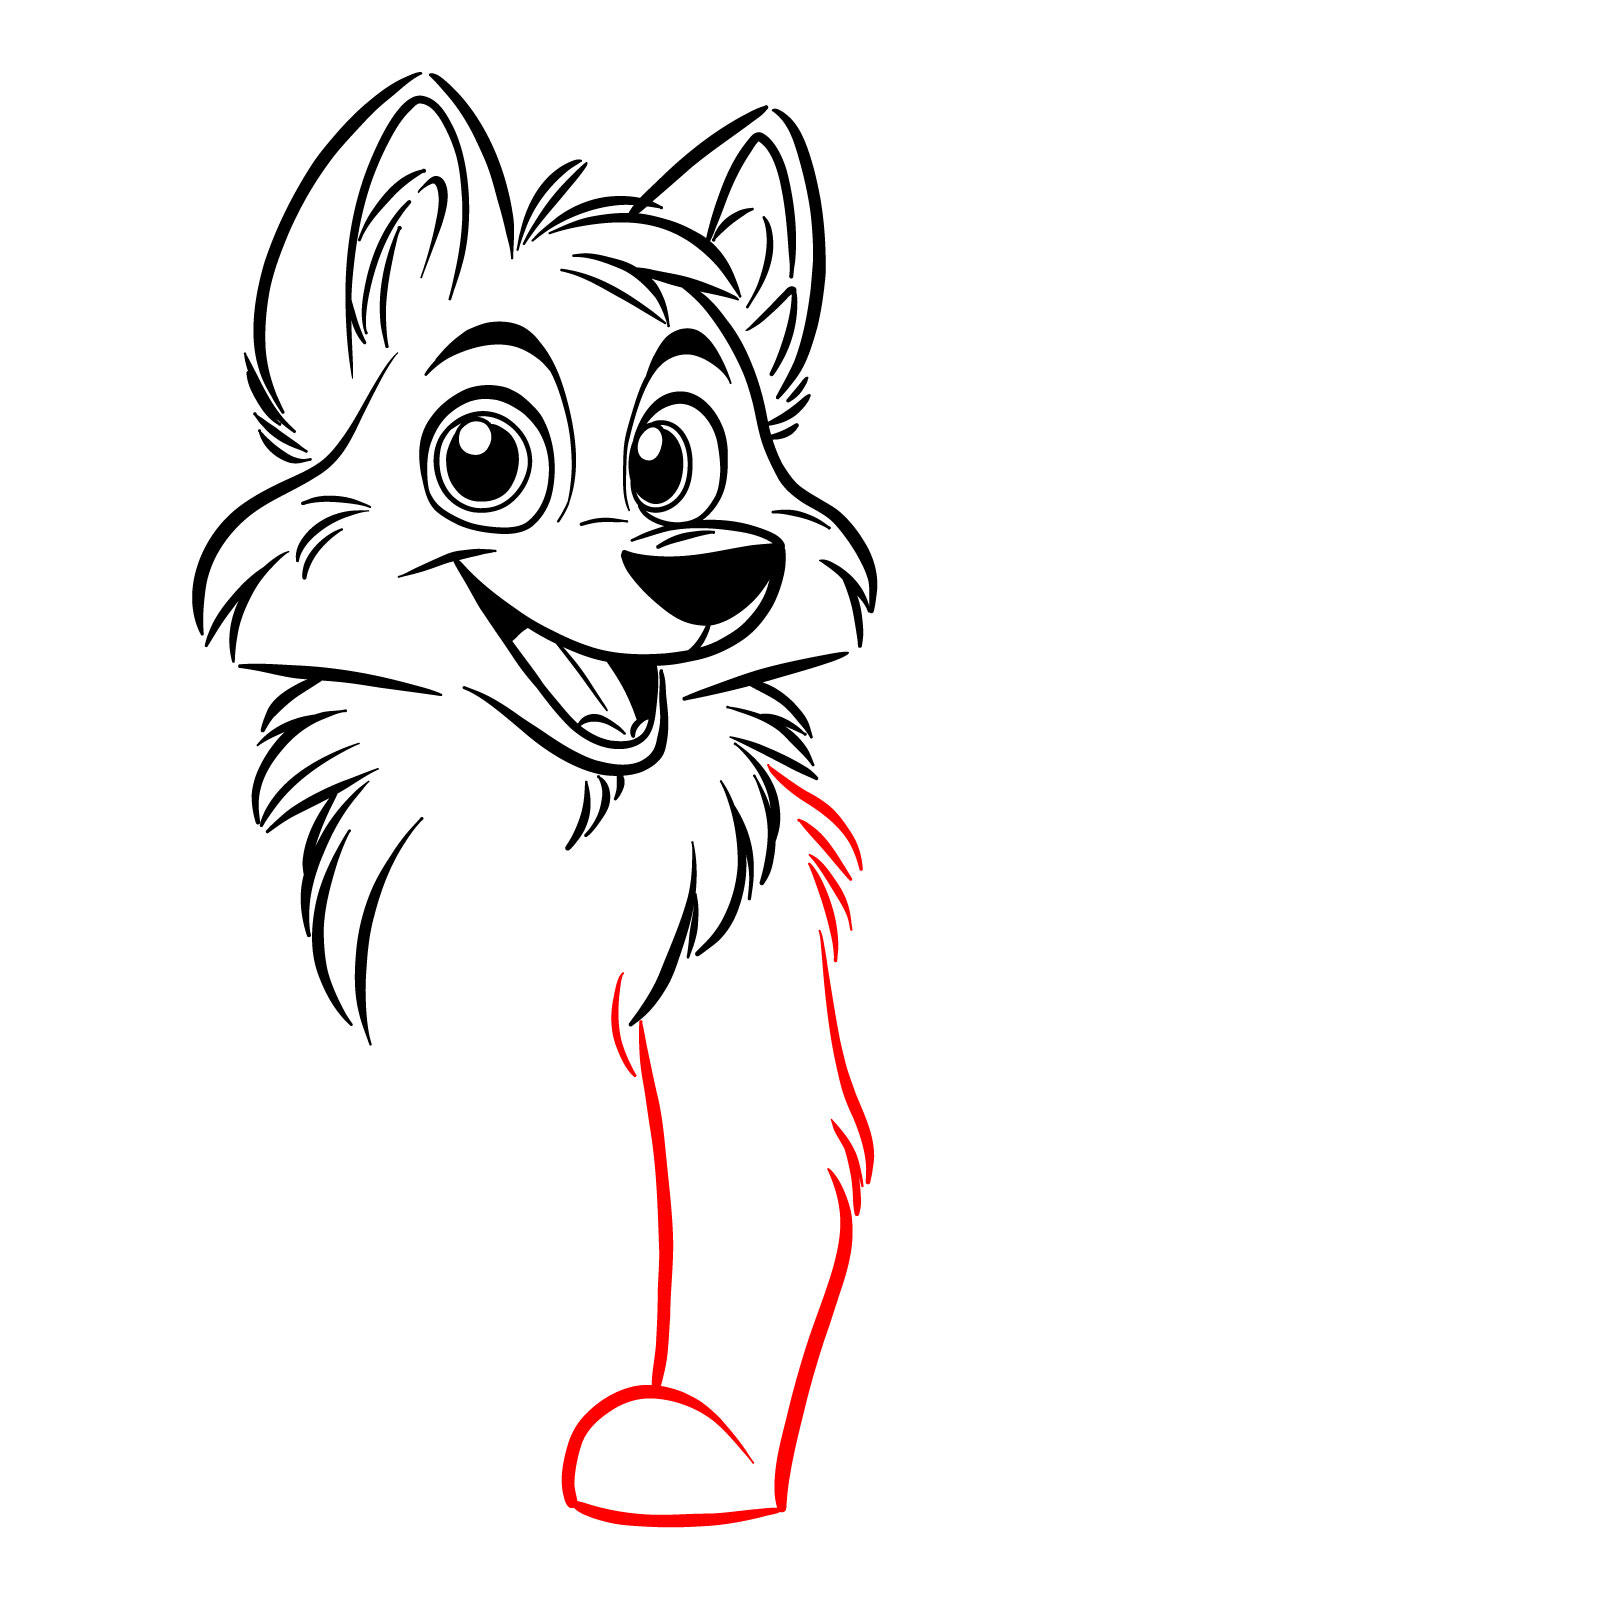
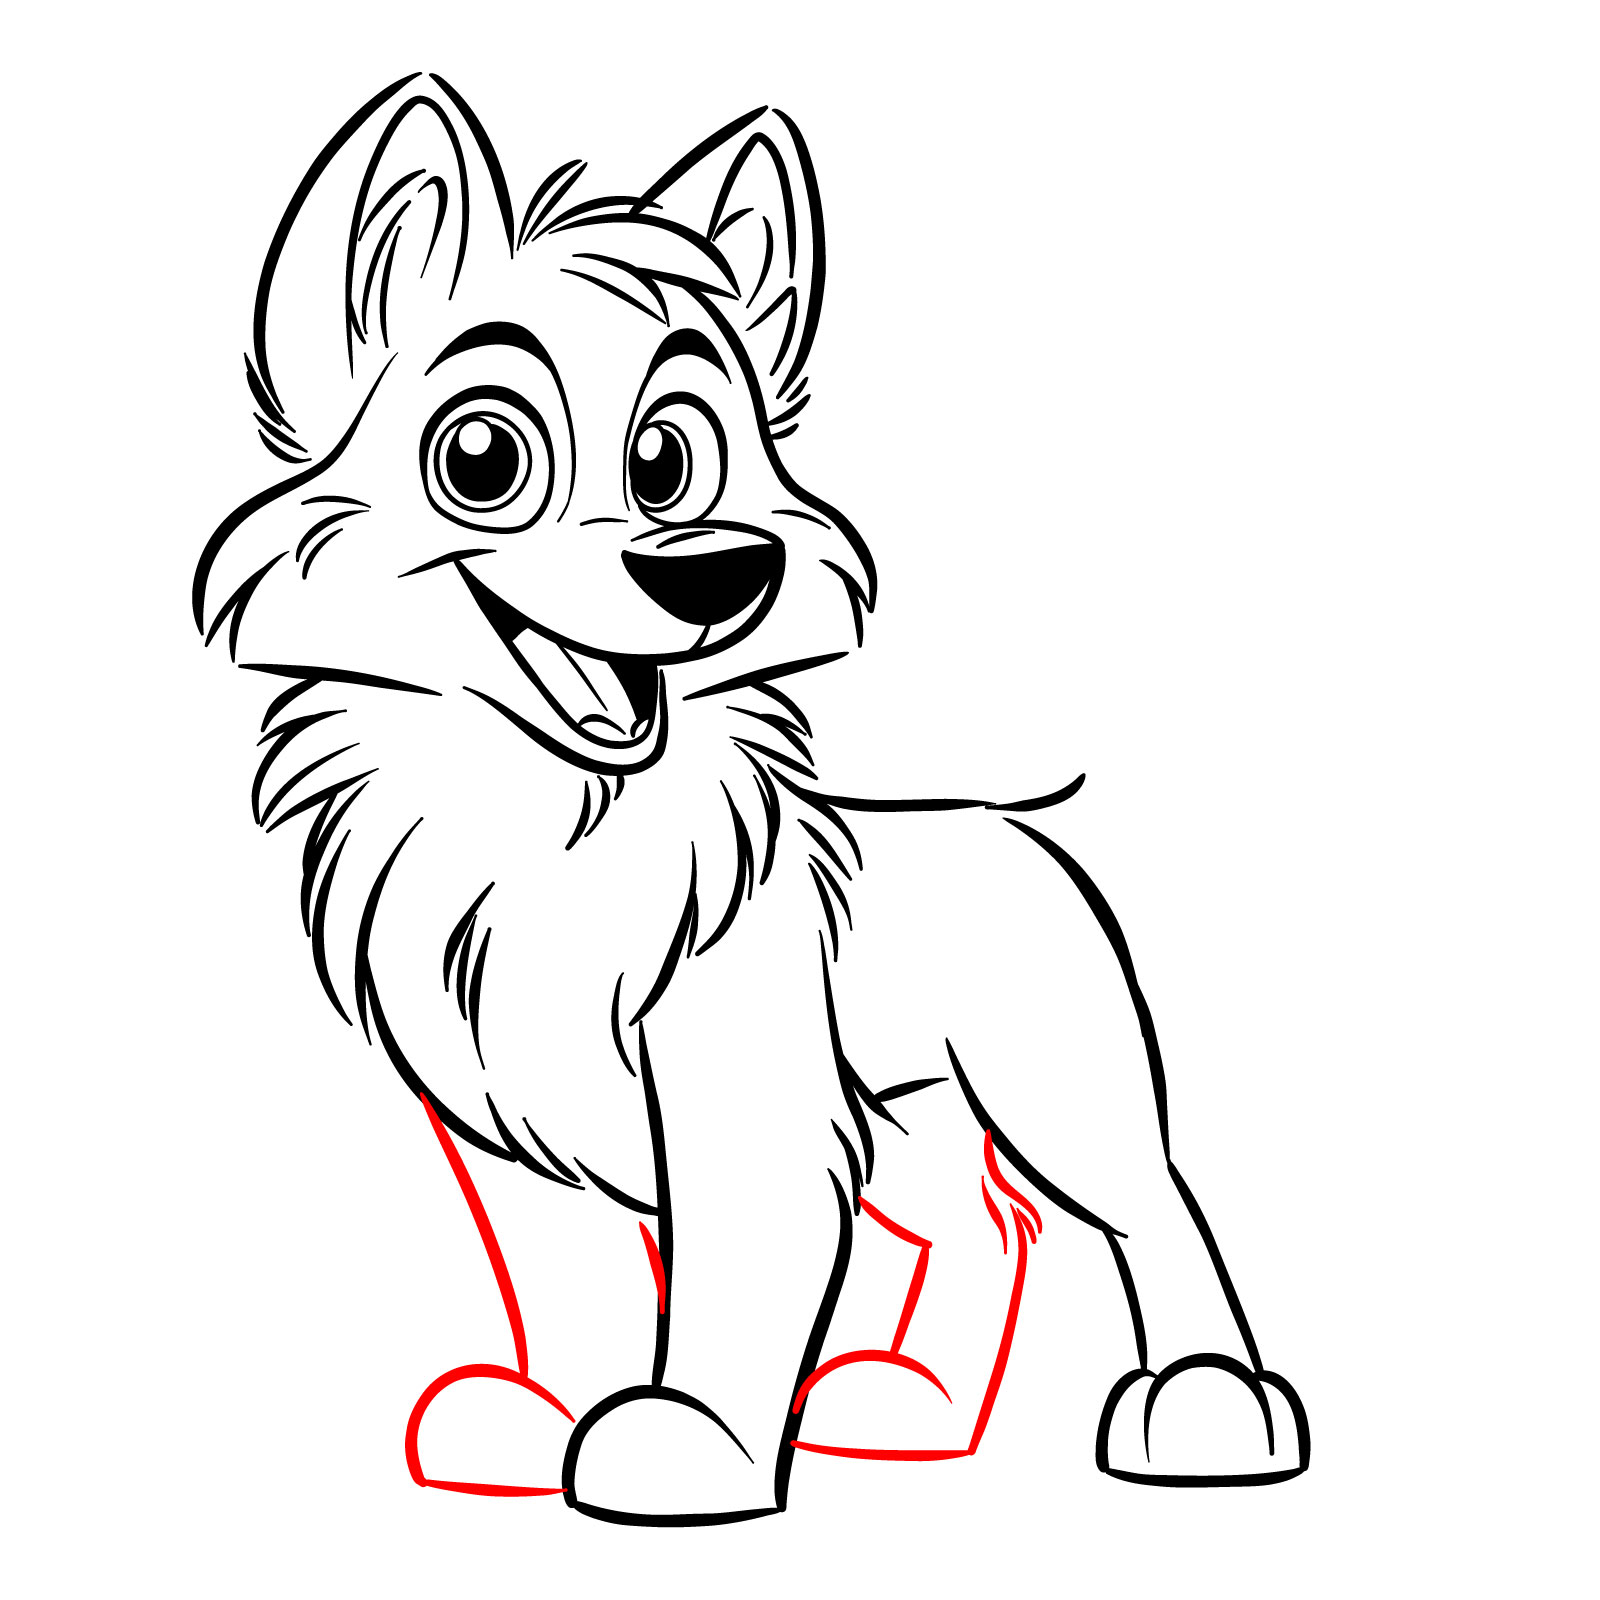
Step 05 – To add the body to your simple wolf drawing, draw a curved line that extends from the back of the head down and around to form the back and the rear leg. Then, from the bottom of the head, draw another curved line coming down to represent the chest and the front leg. The lines should be smooth and rounded, giving the appearance of a plump and fluffy body
PinSketching the body of a kawaii wolf, illustrating the back and two legs
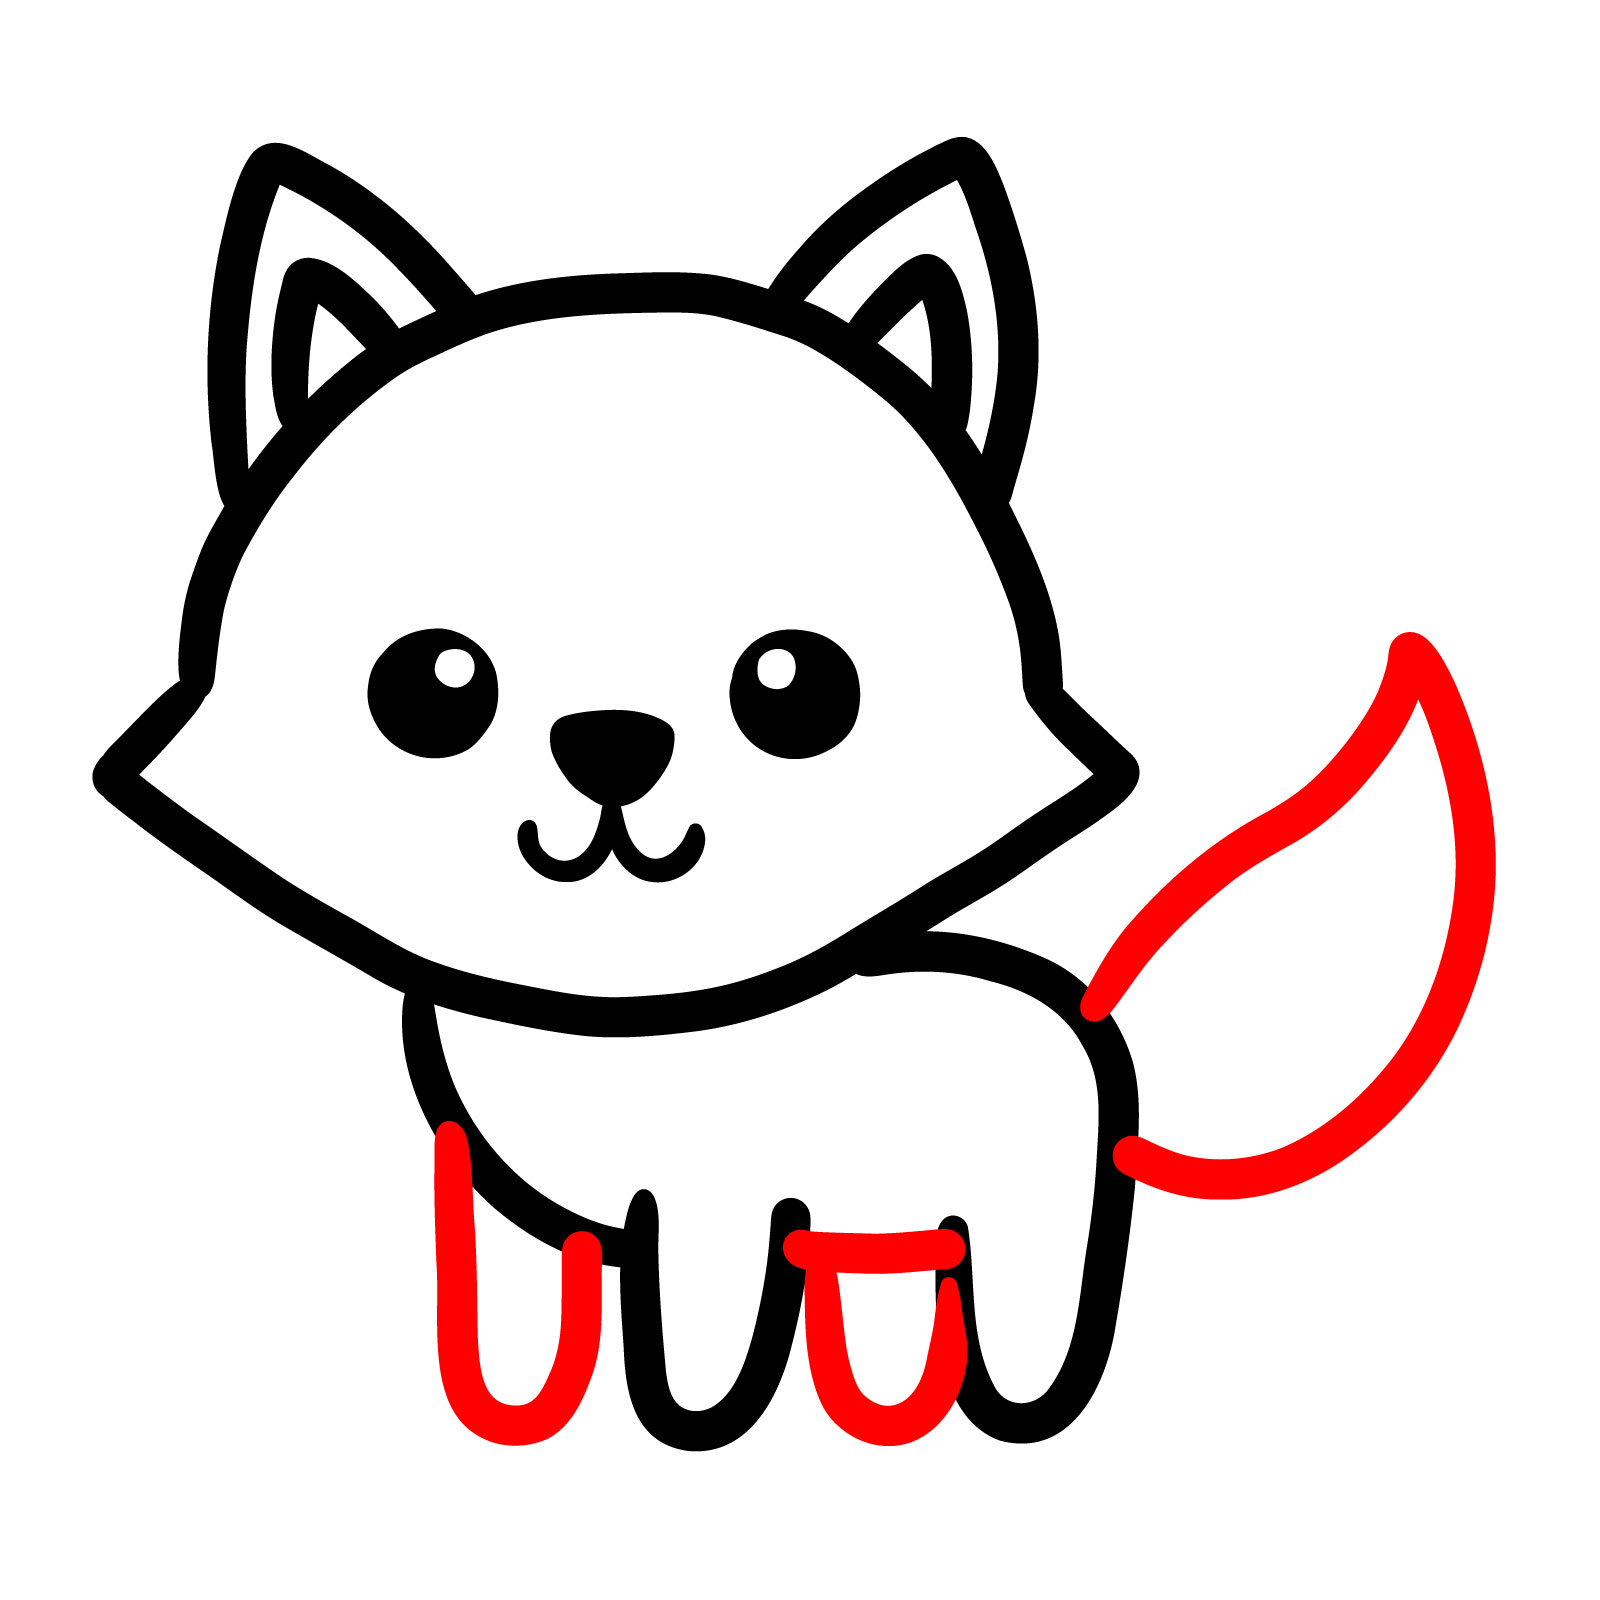
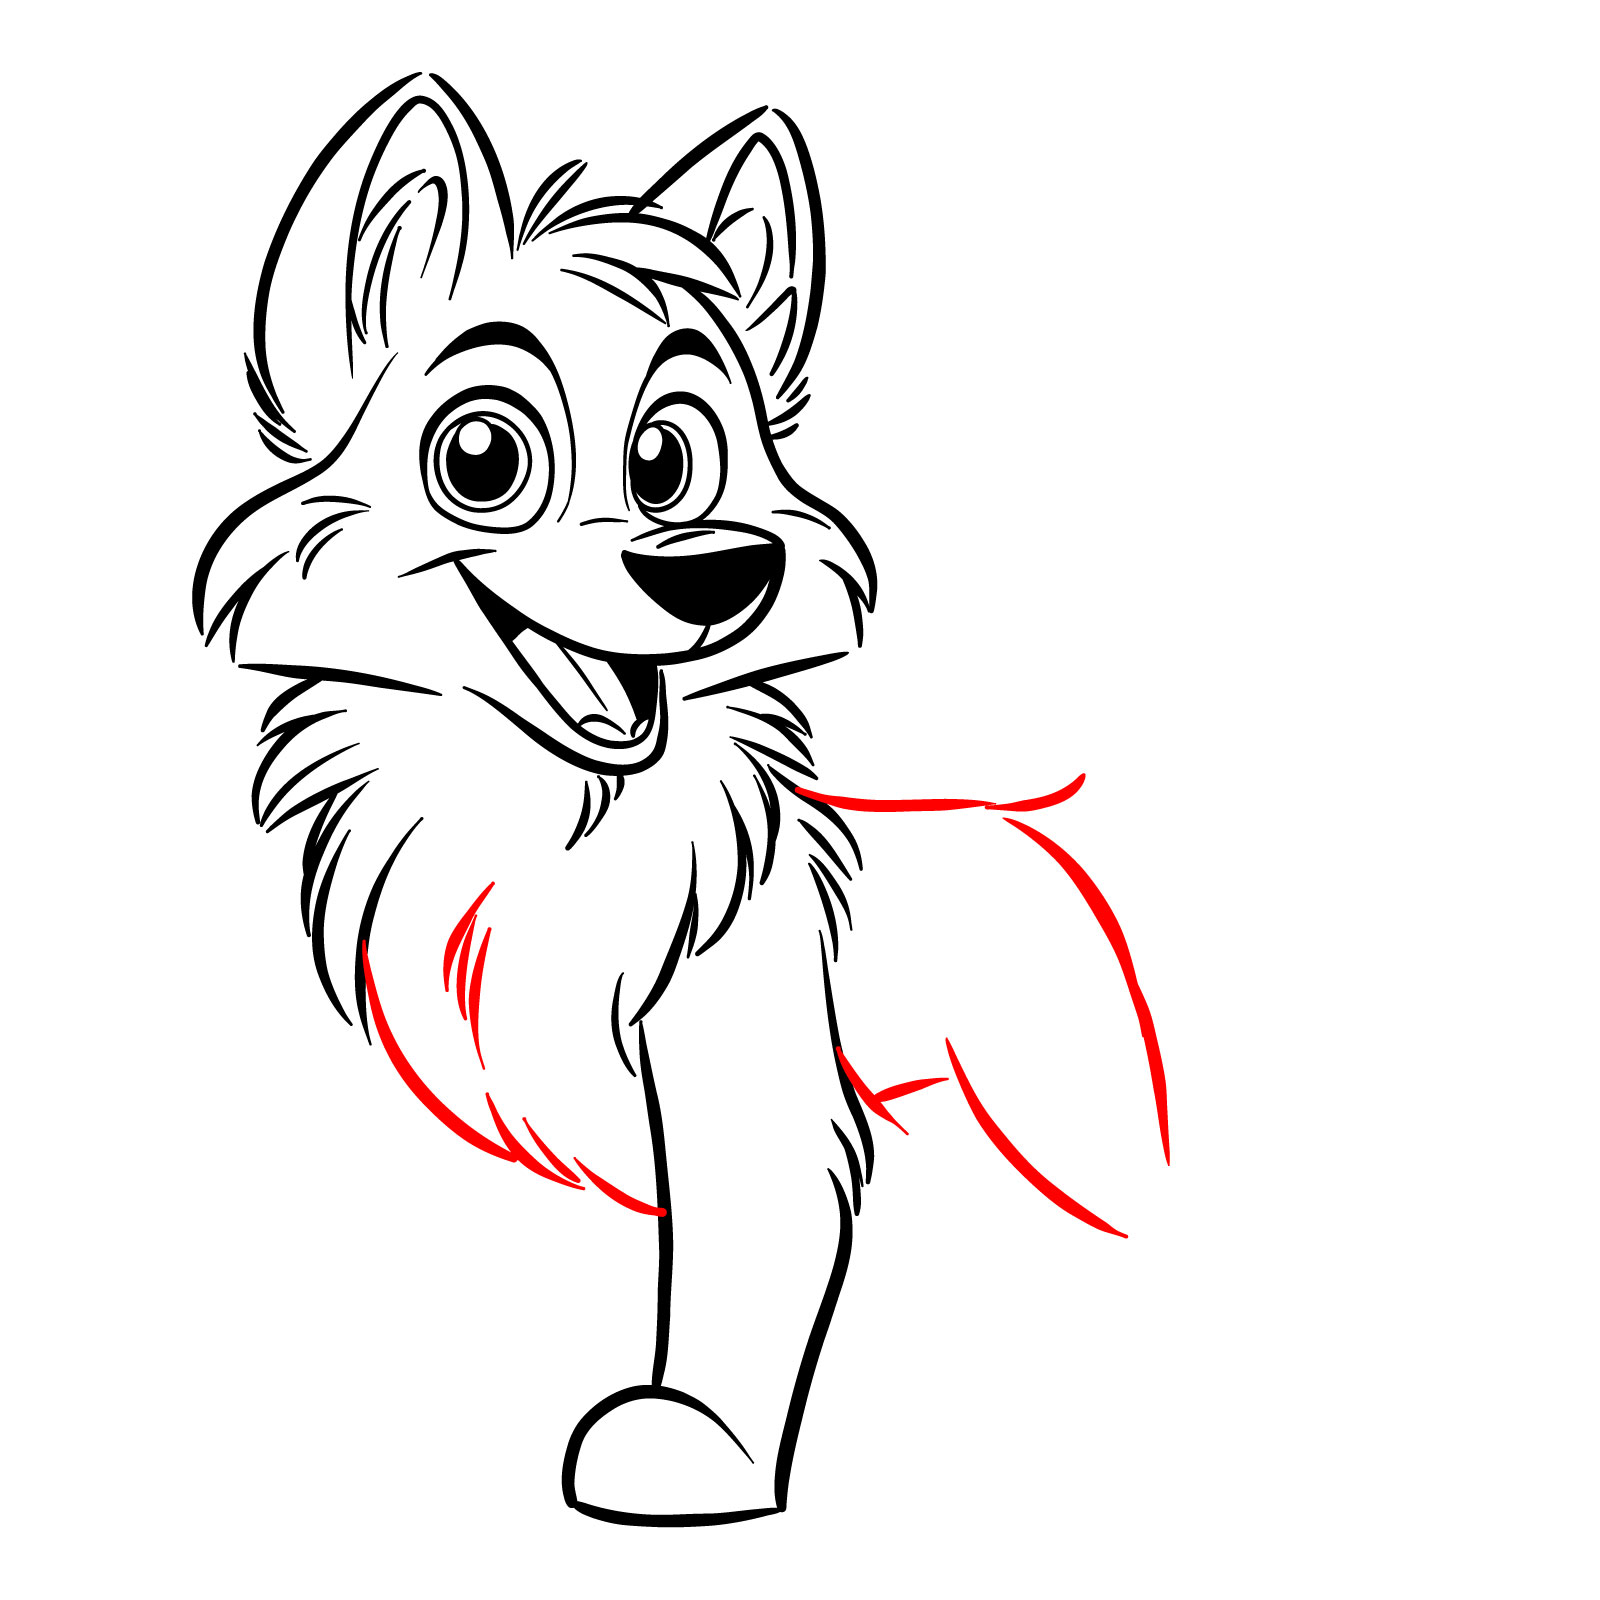
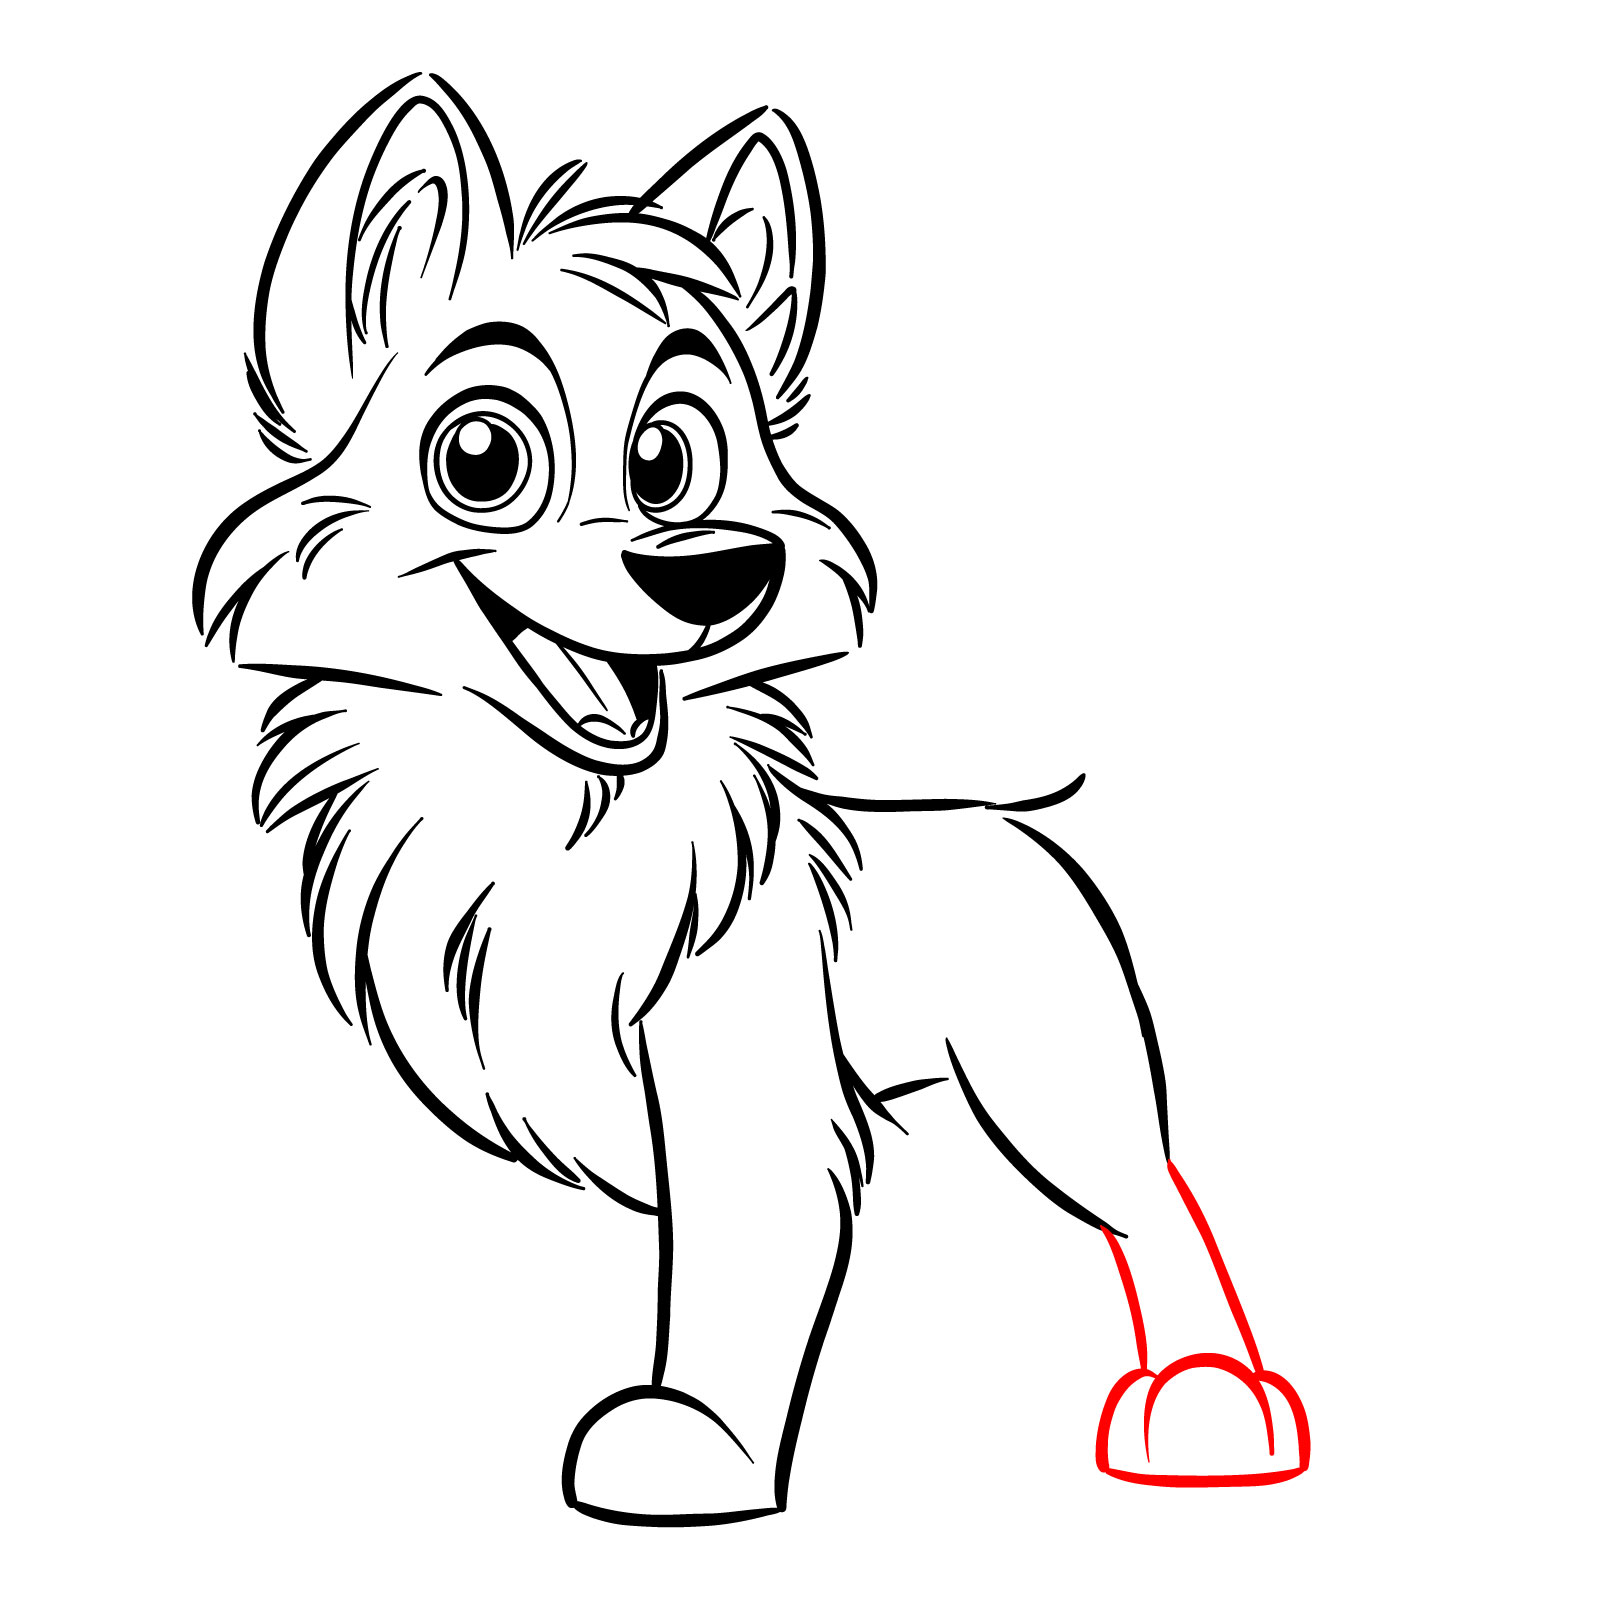
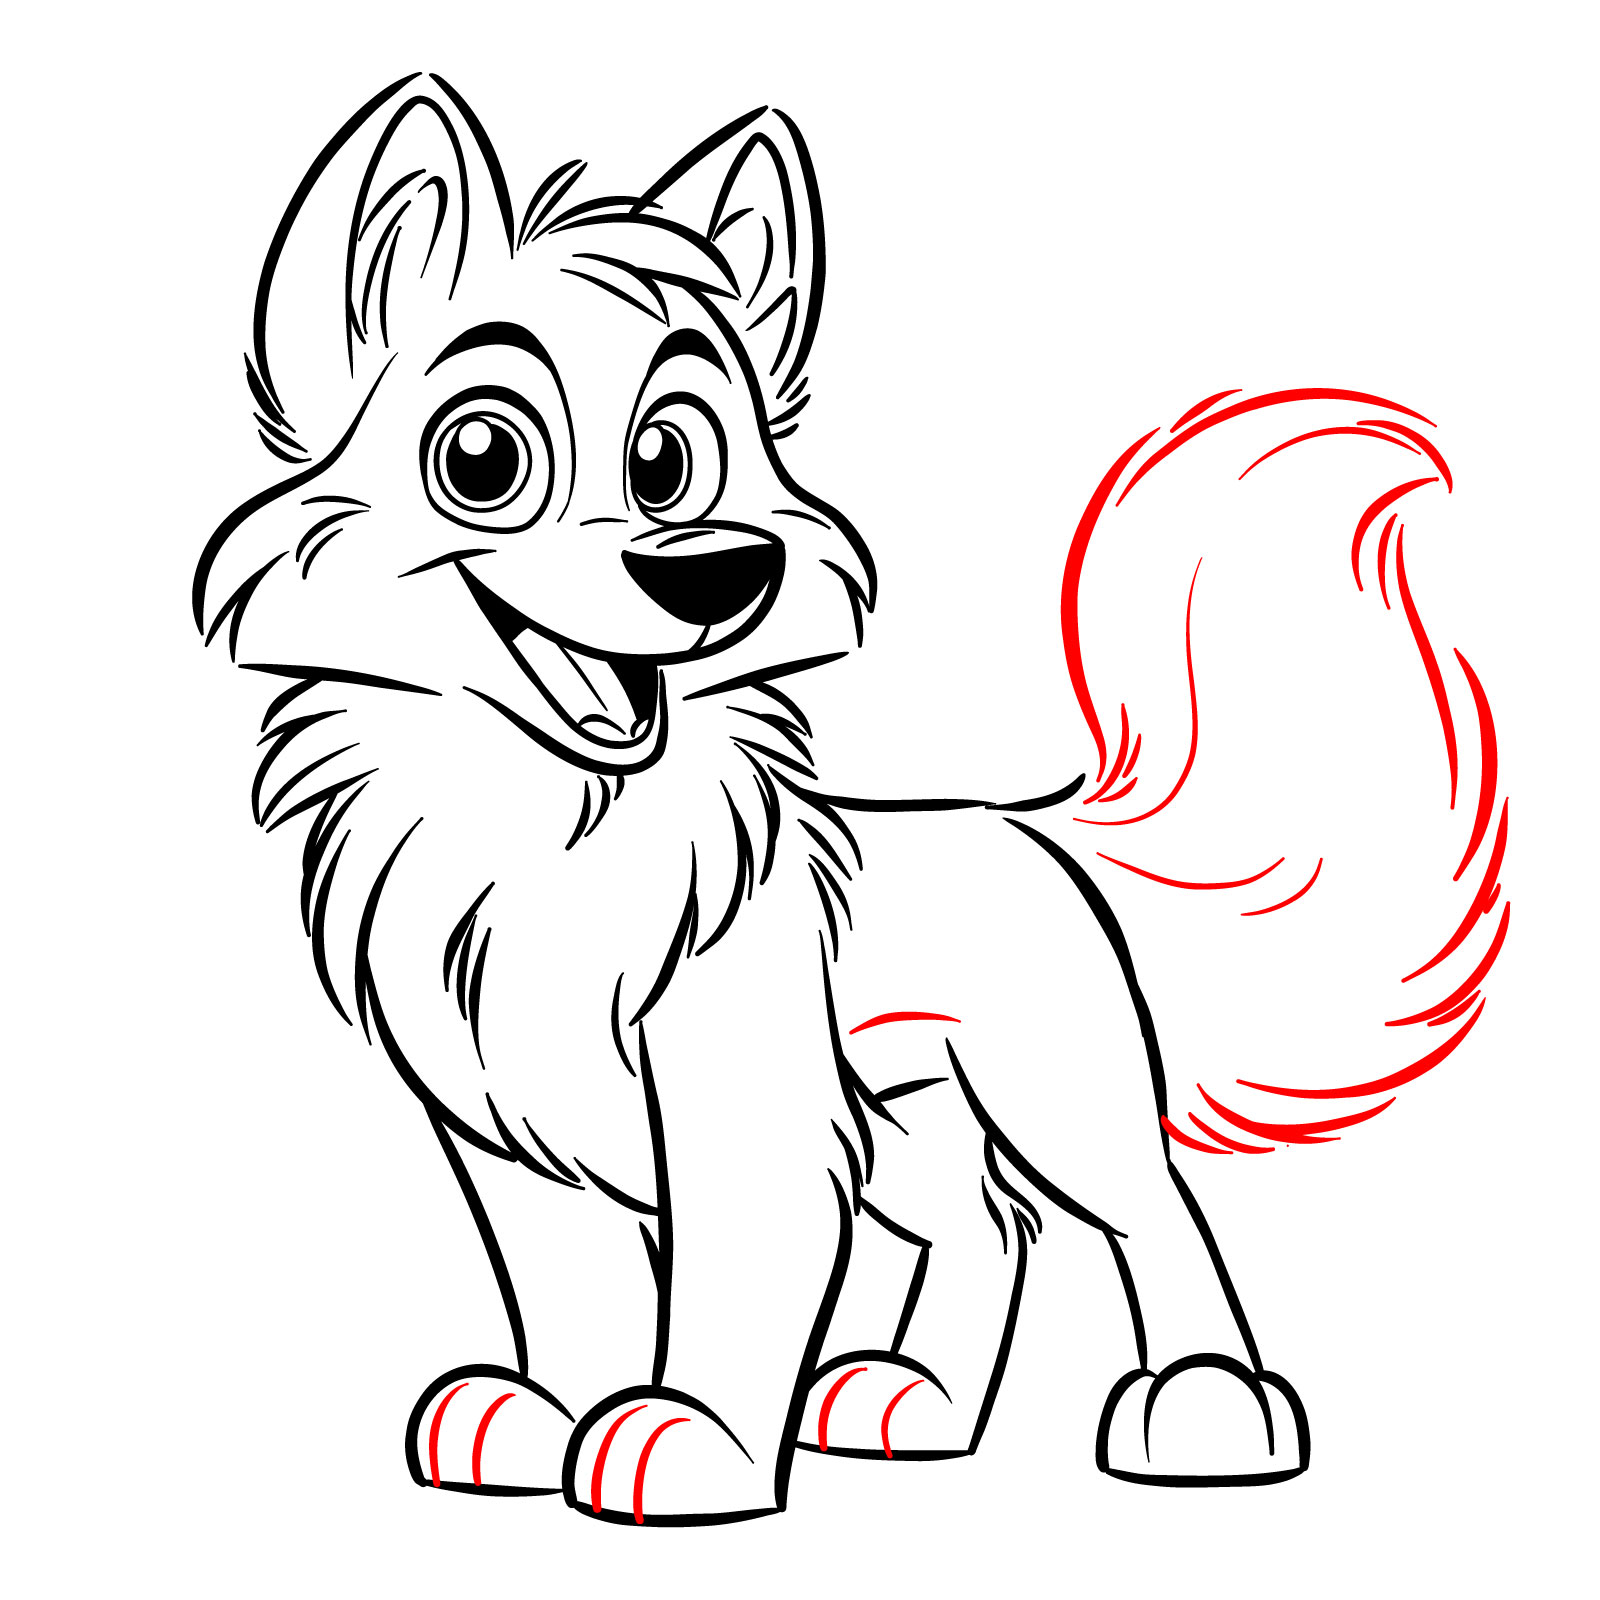
Step 06 – Now, draw the two remaining legs. Start with the leg on the far side, mirroring the shape of the front leg you’ve already drawn. For the rear leg, add a horizontal line for the bottom body first, then add a ‘U’ shape for the leg. Lastly, add a large, bushy tail with a broad base that tapers to a point, giving your kawaii wolf a playful and dynamic look
PinAdding the final legs and bushy tail to the kawaii wolf drawing
Step 07 – Your easy wolf drawing in kawaii style is now complete. Now you have a charming and cheerful wolf sketch with a big, fluffy tail, standing happily. This drawing captures the essence of the kawaii aesthetic with its exaggerated features and clear, clean lines that make it accessible to artists of all skill levels. The simplicity of the shapes combined with the expressive face makes this a perfect example of how to create a cute and easy wolf drawing in kawaii style
PinThe completed easy wolf drawing in kawaii style, showcasing a friendly and adorable character
Drawing a Wolf in Cartoon Style – 16 Steps
PinCartoon wolf drawing
Moving to the third guide, let’s try to make a drawing of a wolf in a cartoon style. This guide comprises 16 steps, each meticulously designed to help you capture the dynamic and jovial essence of a cartoon wolf. There’s no need for a basic sketch here; you’ll jump straight into defining the wolf’s lively character. The finished illustration features a wolf with an animated expression, fluffy fur, and a bushy tail, all contributing to its lively and engaging personality. This cartoon rendition is not just fun to look at but equally enjoyable to draw.
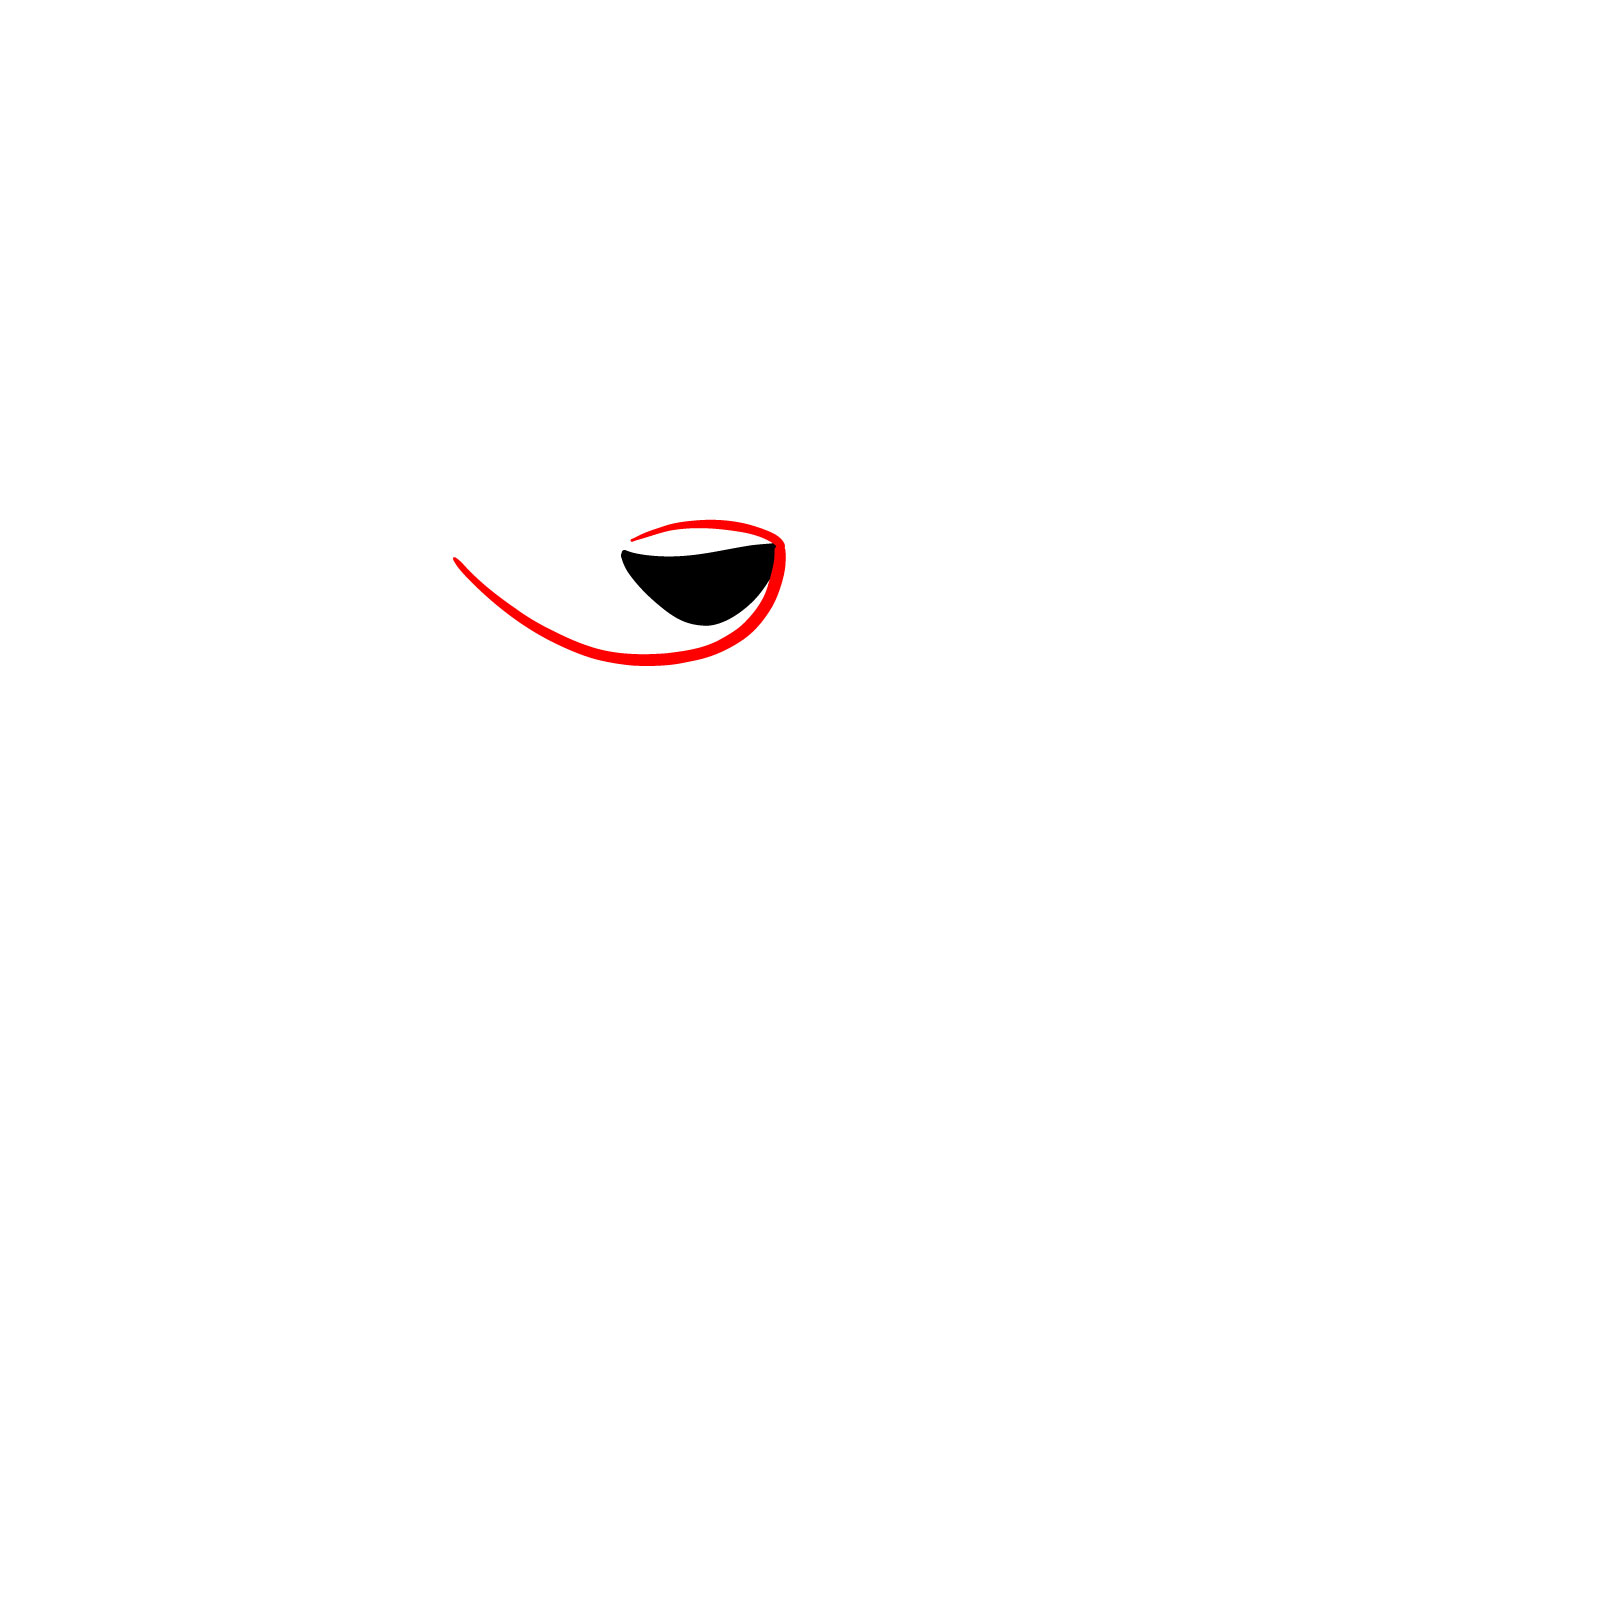
Step 01 – Begin by drawing a small, rounded triangle shape for the nose, positioned slightly on the left from the center of your page. Fill this shape with black to give contrast and establish the focal point of your cartoon wolf’s face
PinStarting the cartoon wolf with the nose
Step 02 – Just below the nose, draw a curved line that stretches outwards to the left and slightly upwards on both sides to form the upper part of the mouth. Add a short curved line above the nose, following the same contour as the top of the nose to create the upper outline of the snout
PinOutlining the upper part of the mouth and snout
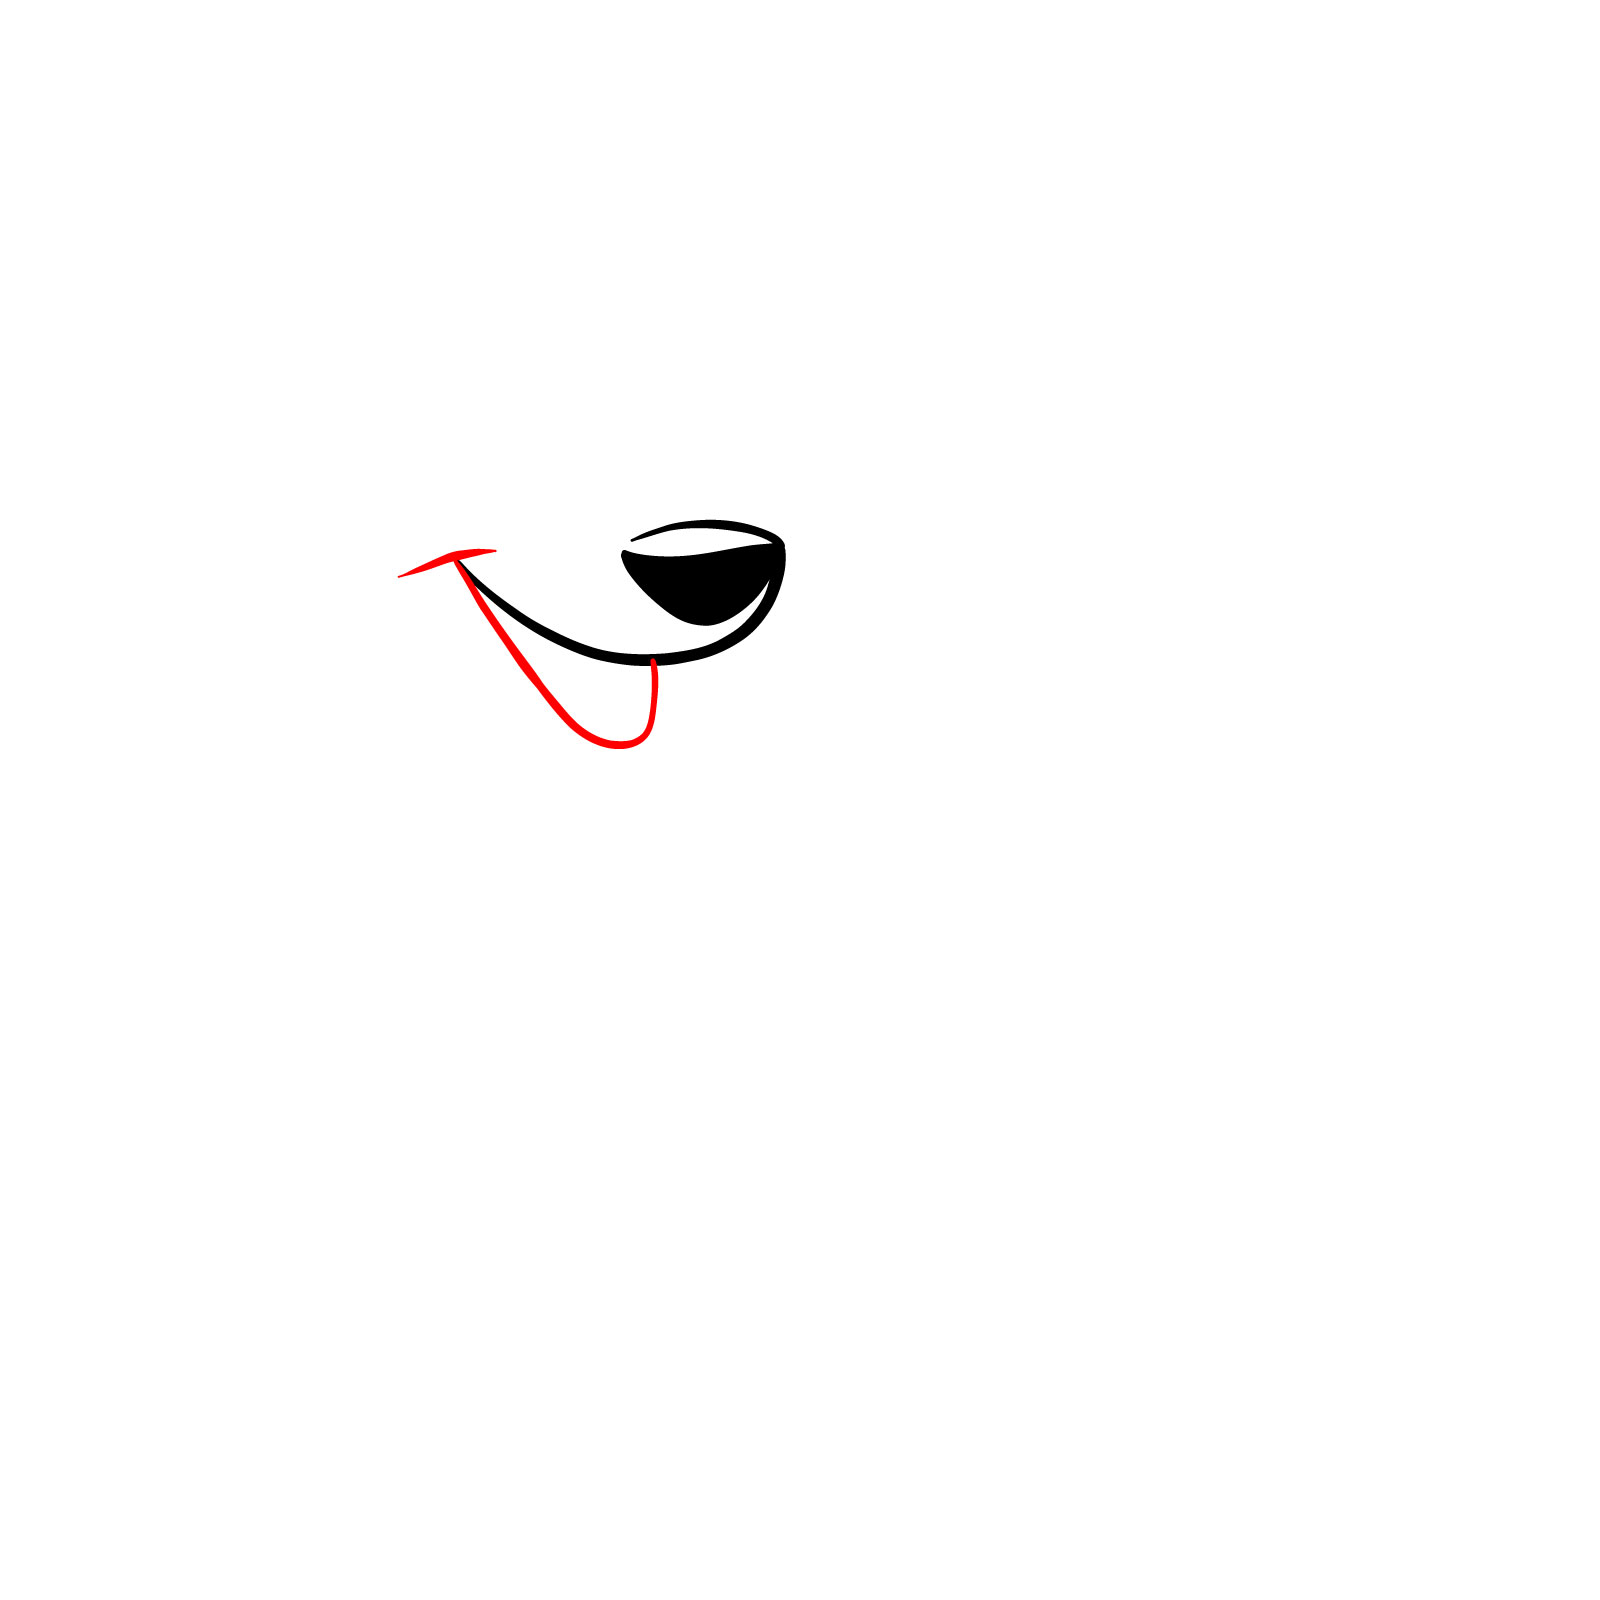
Step 03 – Outline the mouth by extending the lines from step 2 downwards and then curving them inward to meet at a point below the nose, creating the lower part of the mouth
PinDefining the mouth of the cartoon wolf
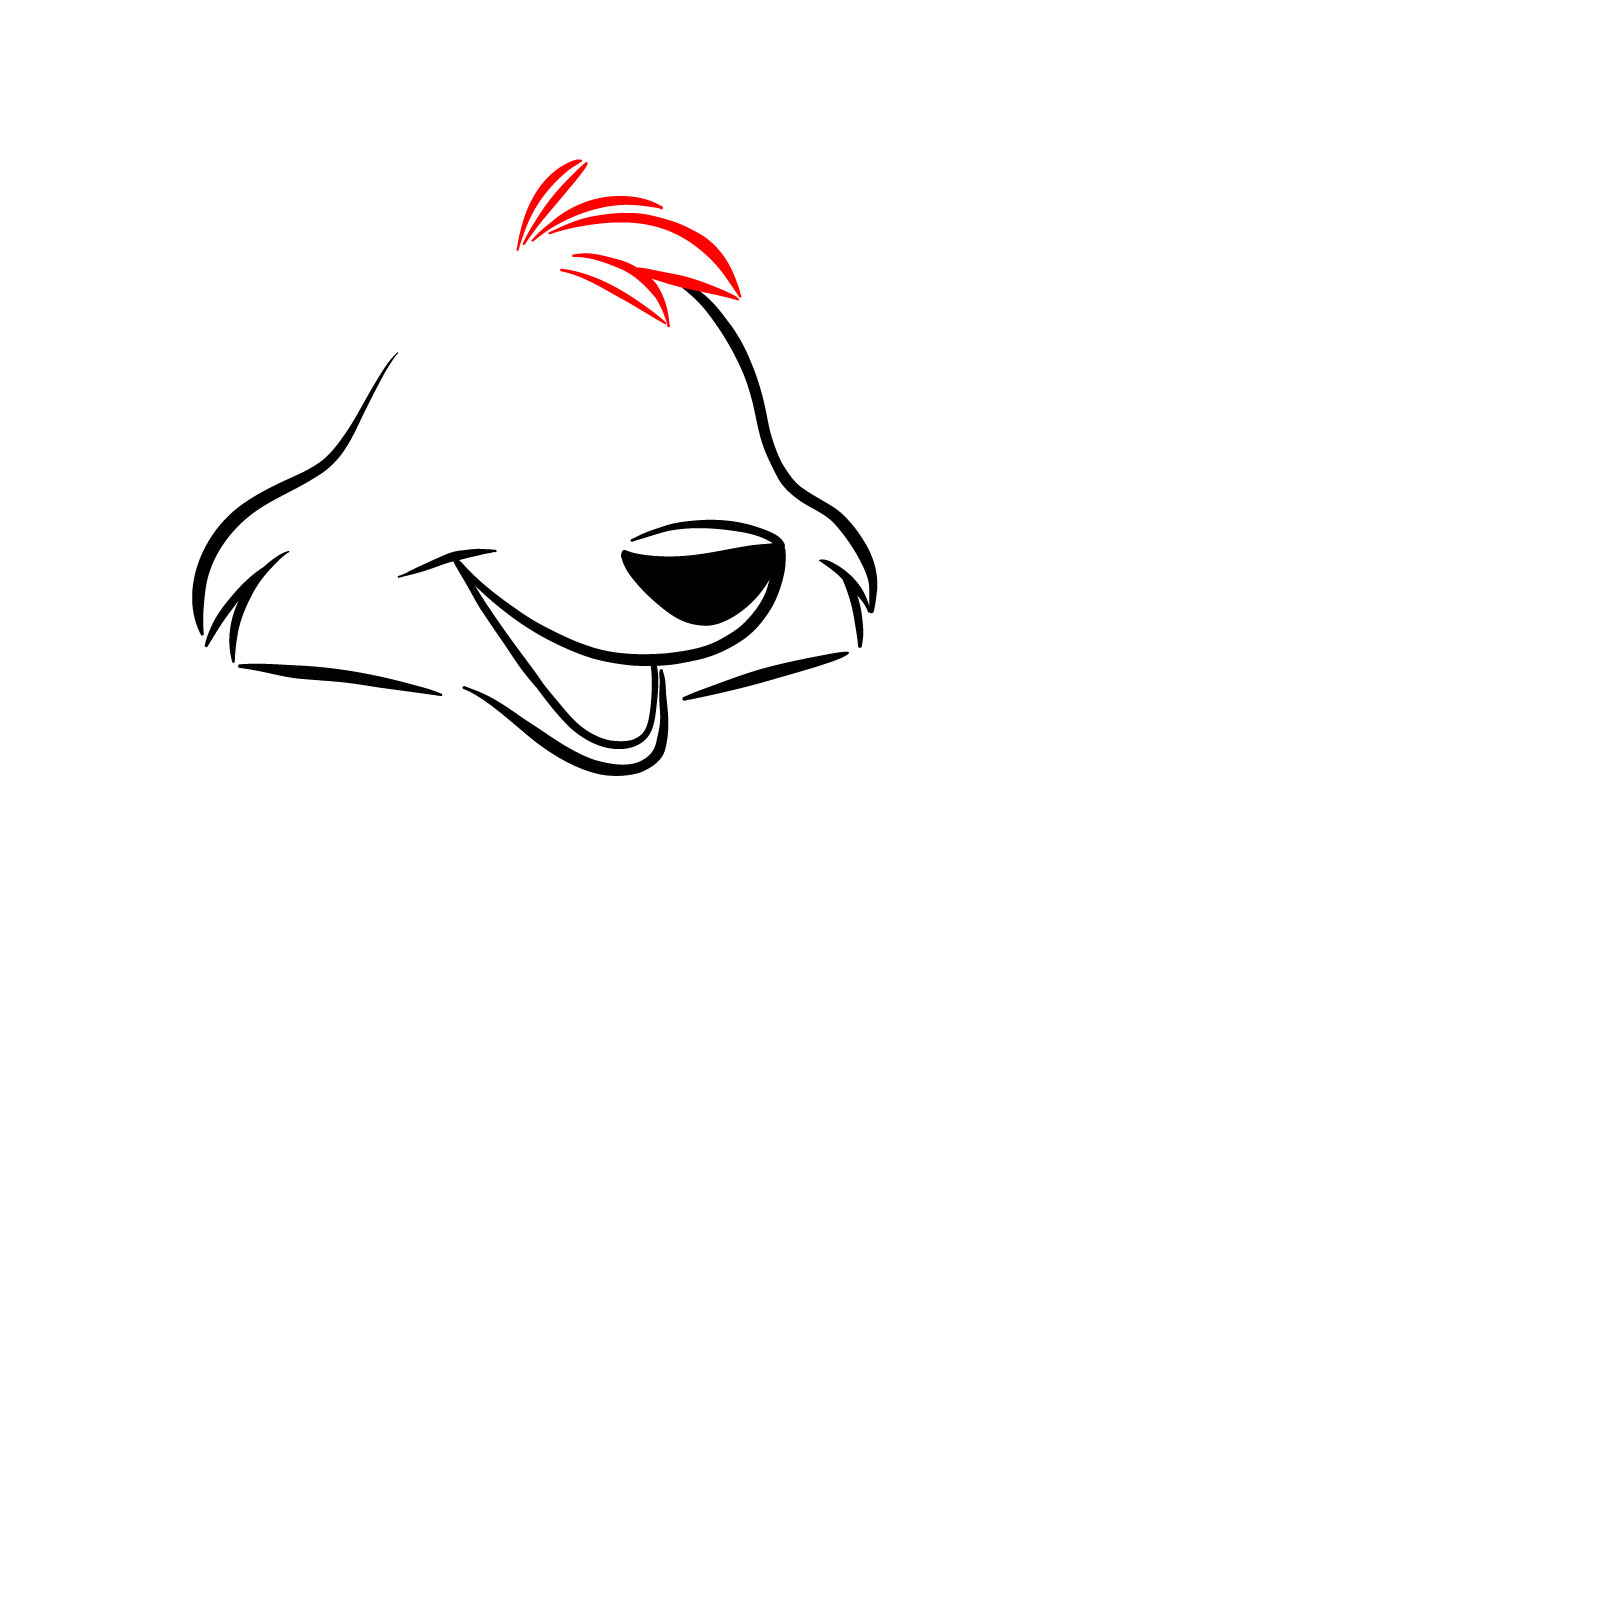
Step 04 – Frame the wolf’s head by first adding a ‘U’ shape around the mouth lines. Then extend smooth lines to form the bottom of the head. For the sides, add curved lines to build a cartoonish shape and some tufts of fur like it is shown in the image
PinCreating the head frame of the cartoon wolf
Step 05 – For the forelock, add a few short, jagged lines at the top center of the head, between the ears area, to represent tufts of fur
PinSketching the forelock of fur on the cartoon wolf
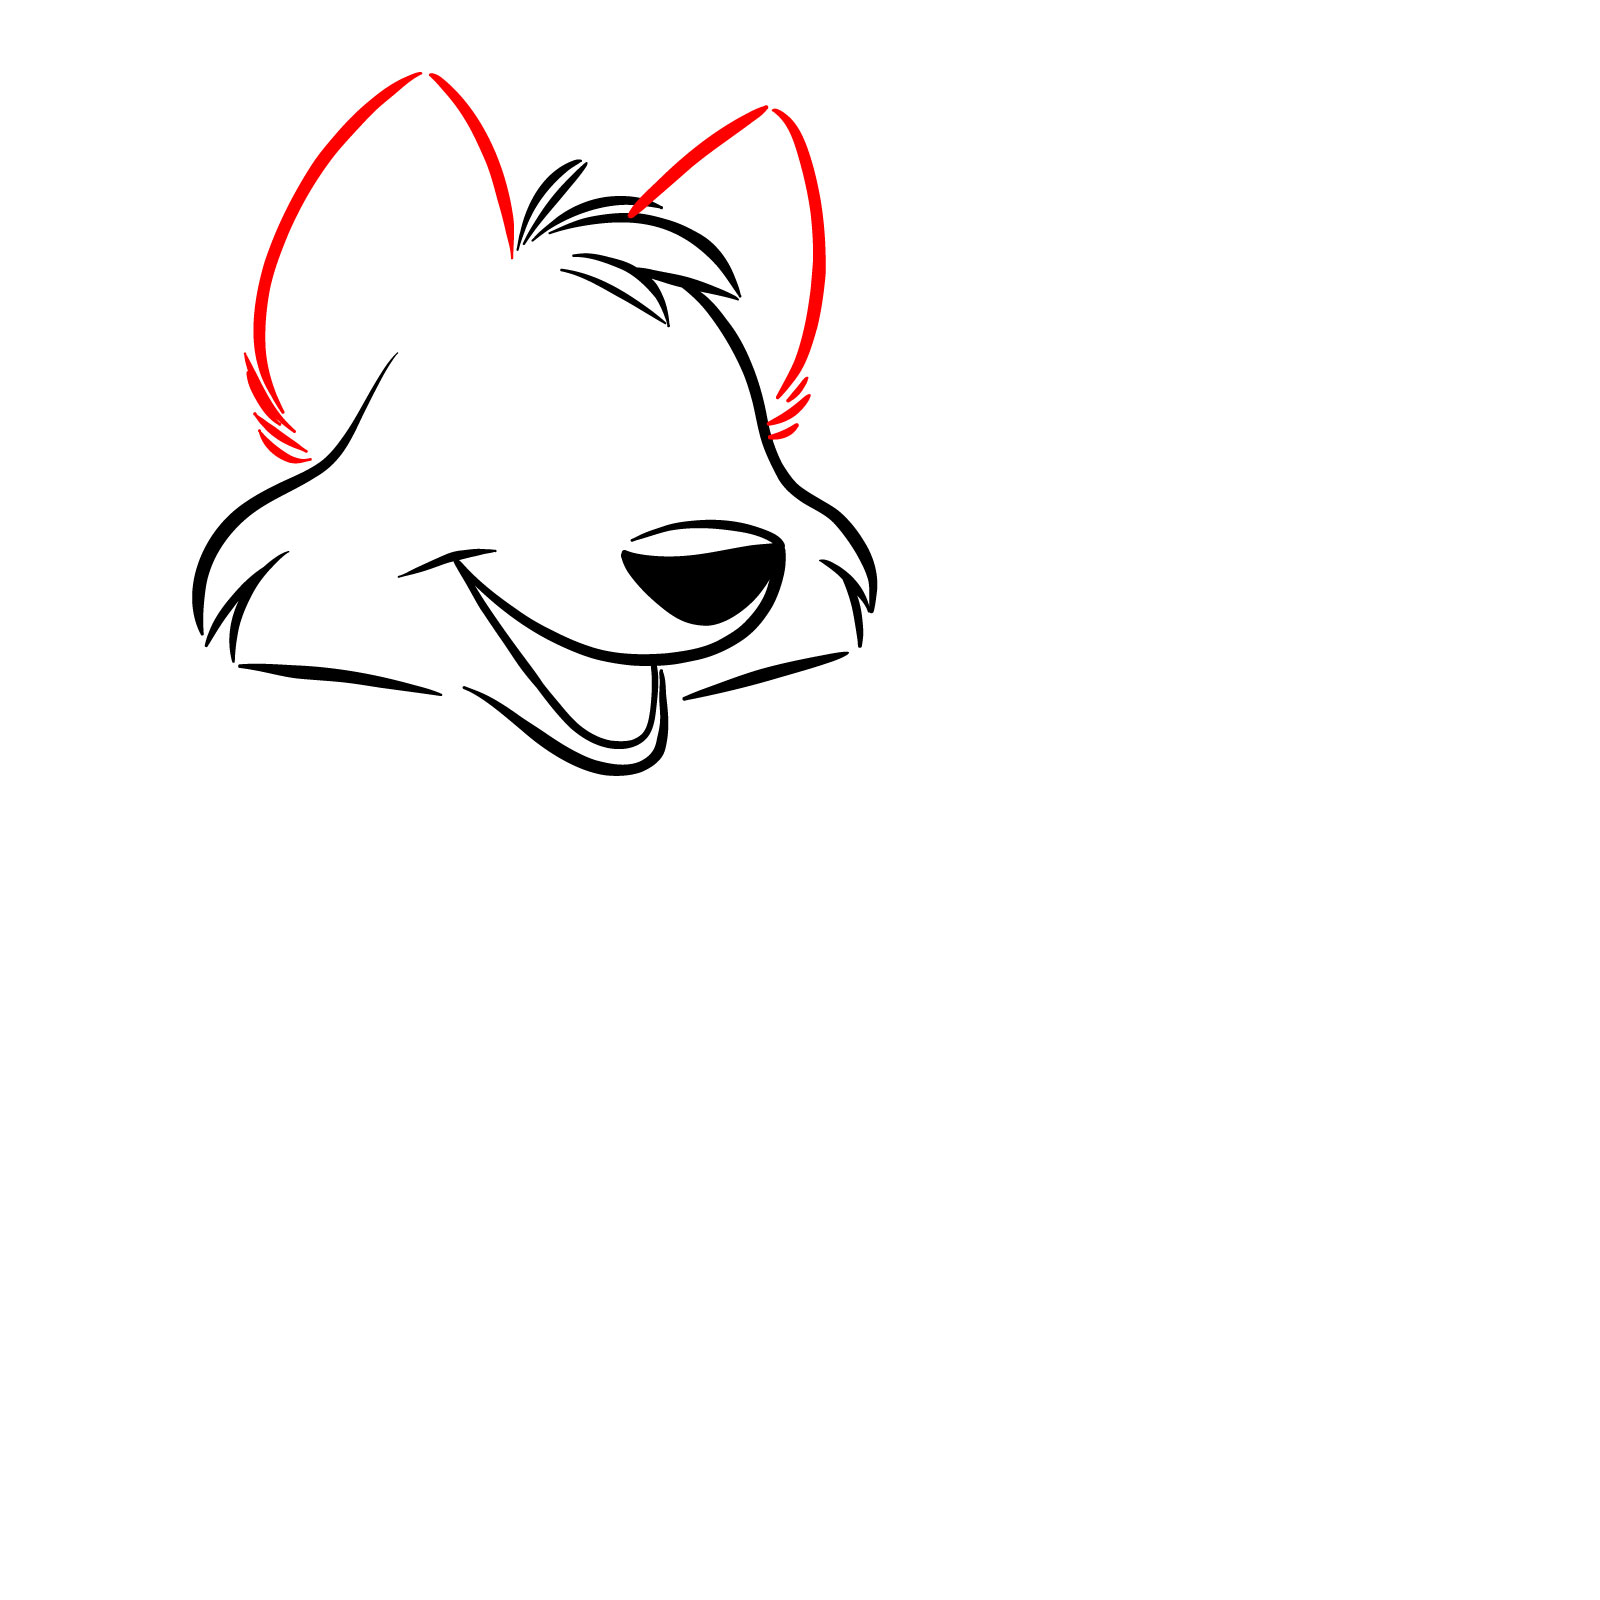
Step 06 – Draw two large, triangular ears on top of the head, one on each side of the forelock. The base of each ear should be wide, tapering to a point at the top
PinPlacing ears on the wolf
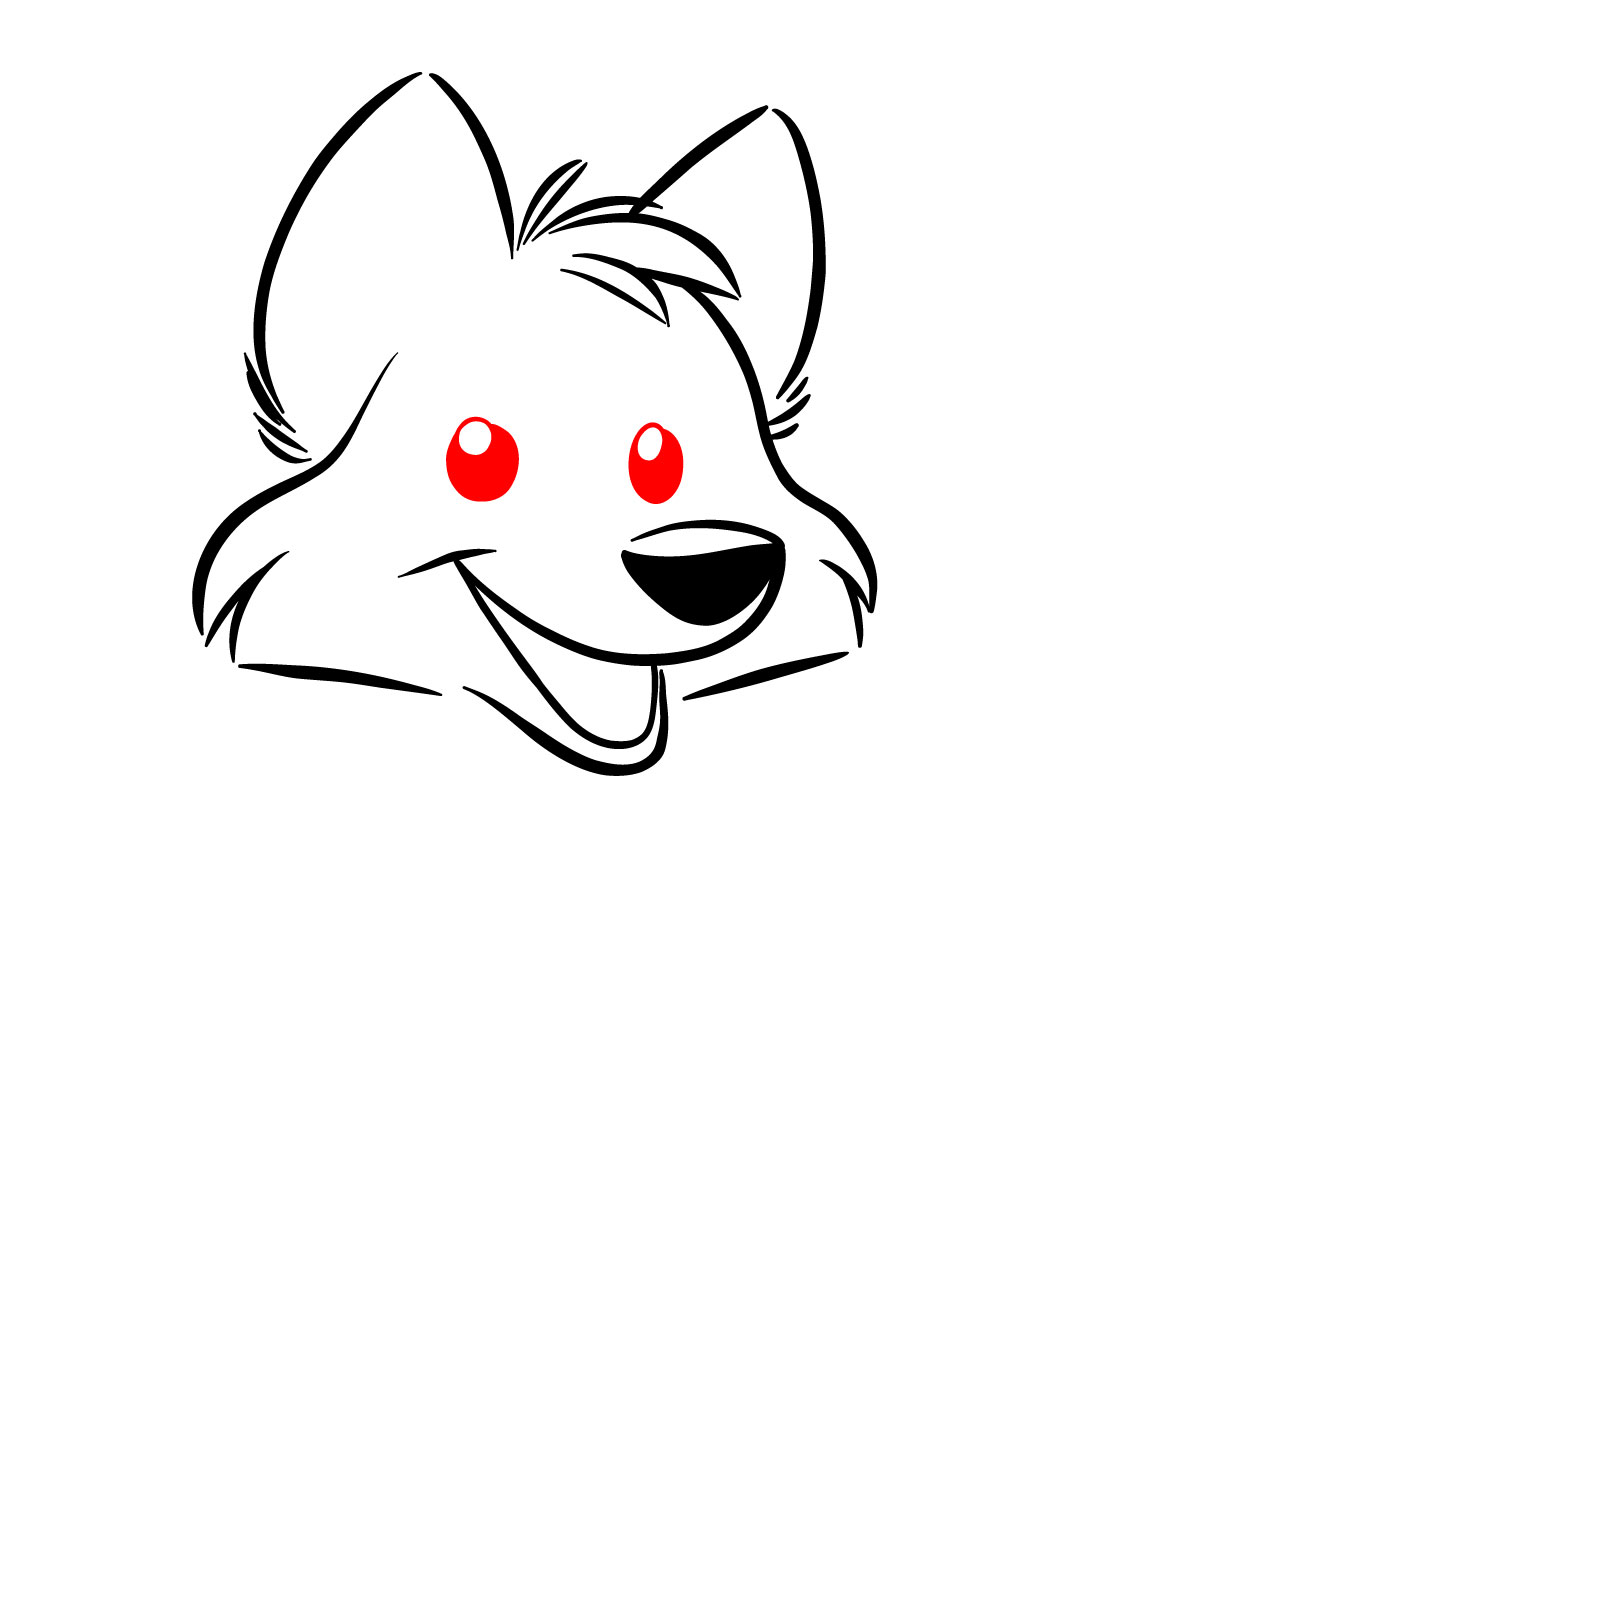
Step 07 – Inside the head outline, draw two ovals for the pupils and place a small blank circle inside each to represent the light reflecting in the wolf’s eyes
PinDrawing the pupils and highlights of the cartoon wolf’s eyes
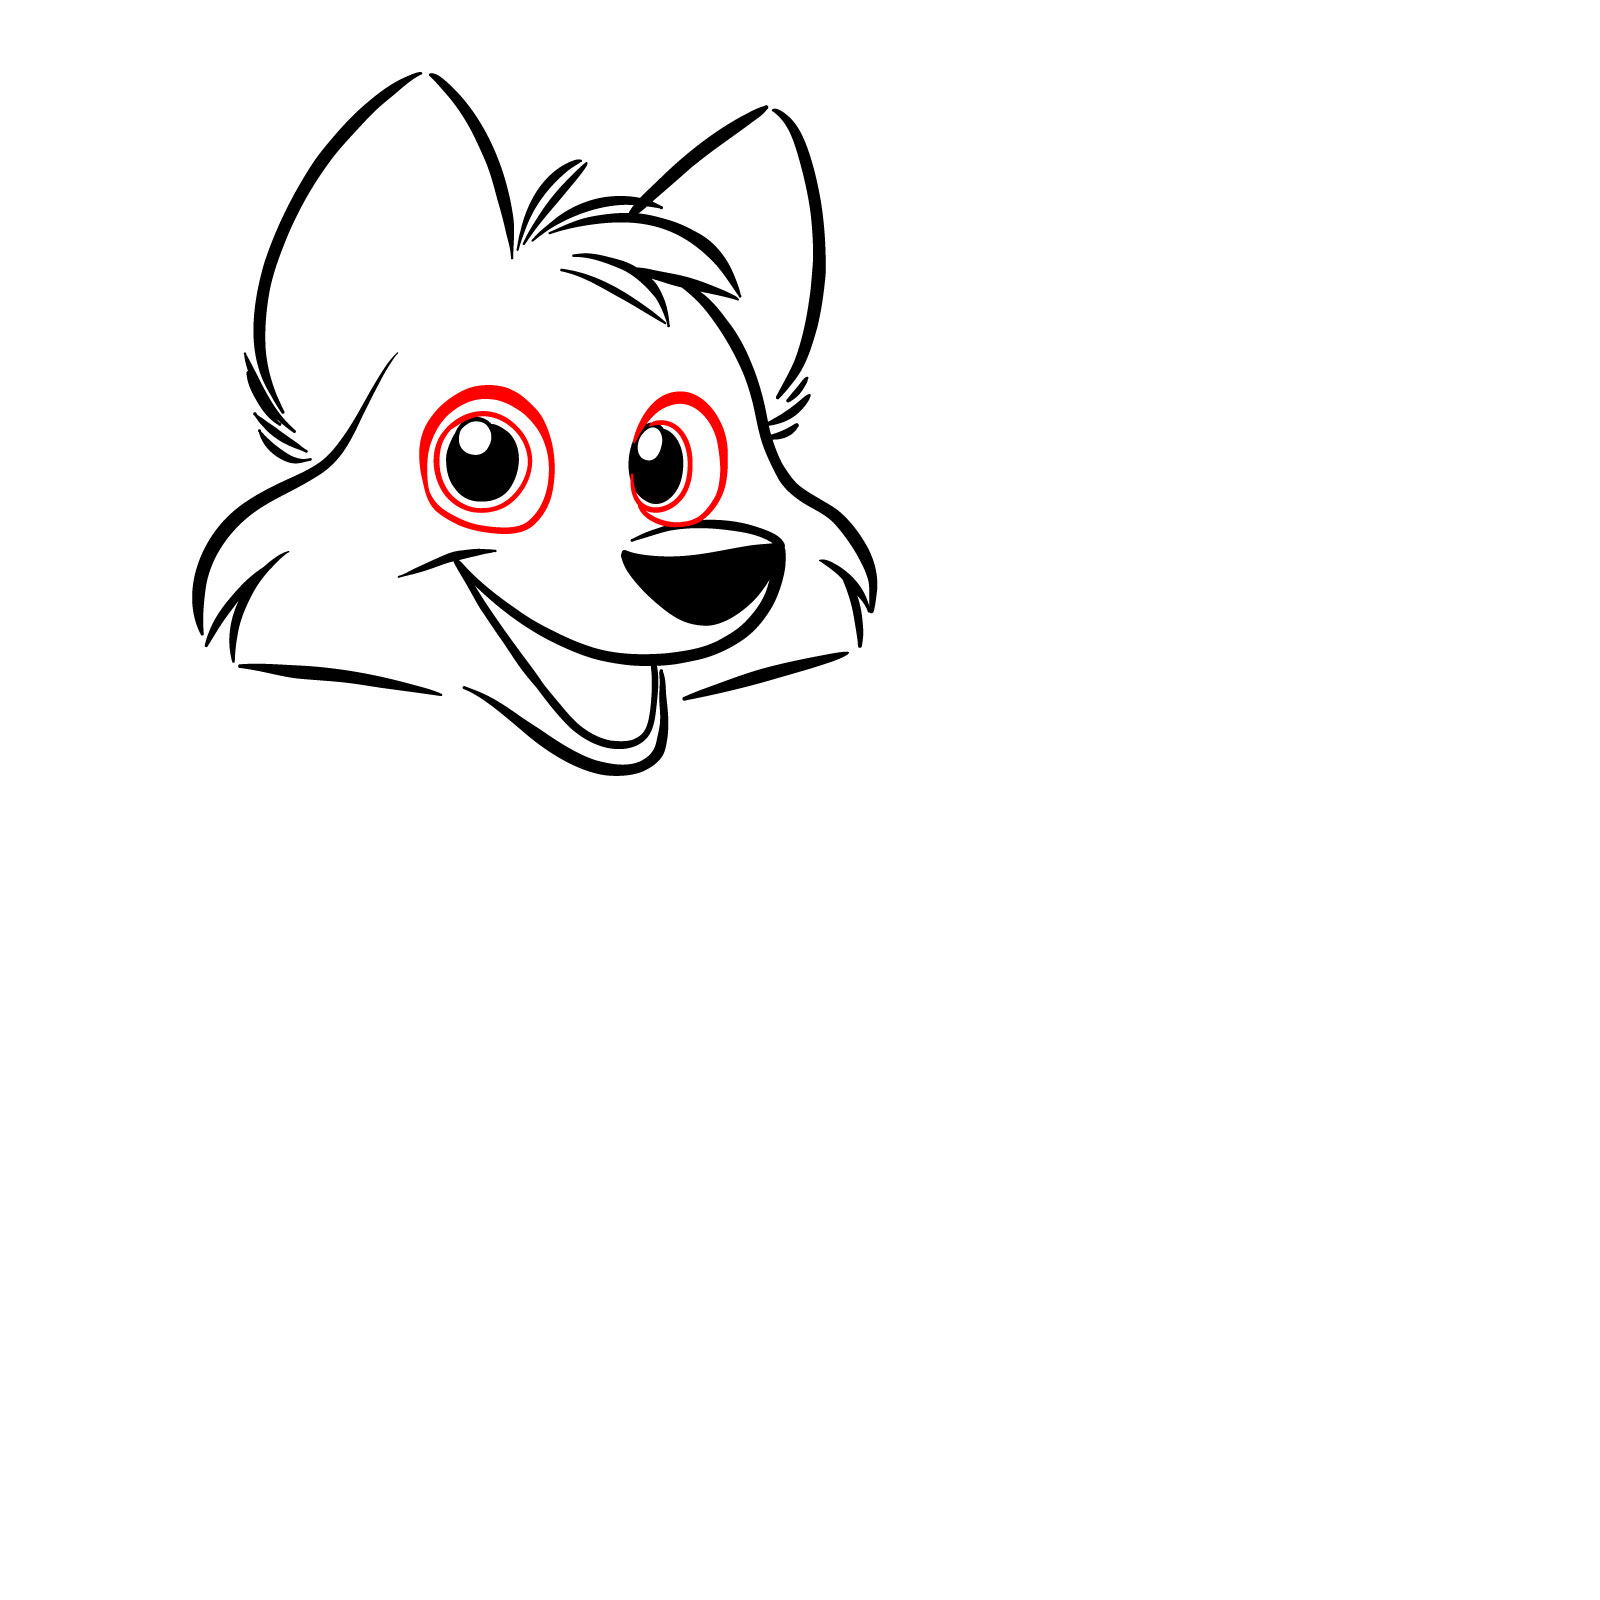
Step 08 – Around the pupils, draw another set of ovals to create the irises. Then, add two larger ovals encompassing these to form the outlines of the eyes, adding character to your cartoon wolf’s expression
PinCompleting the eyes
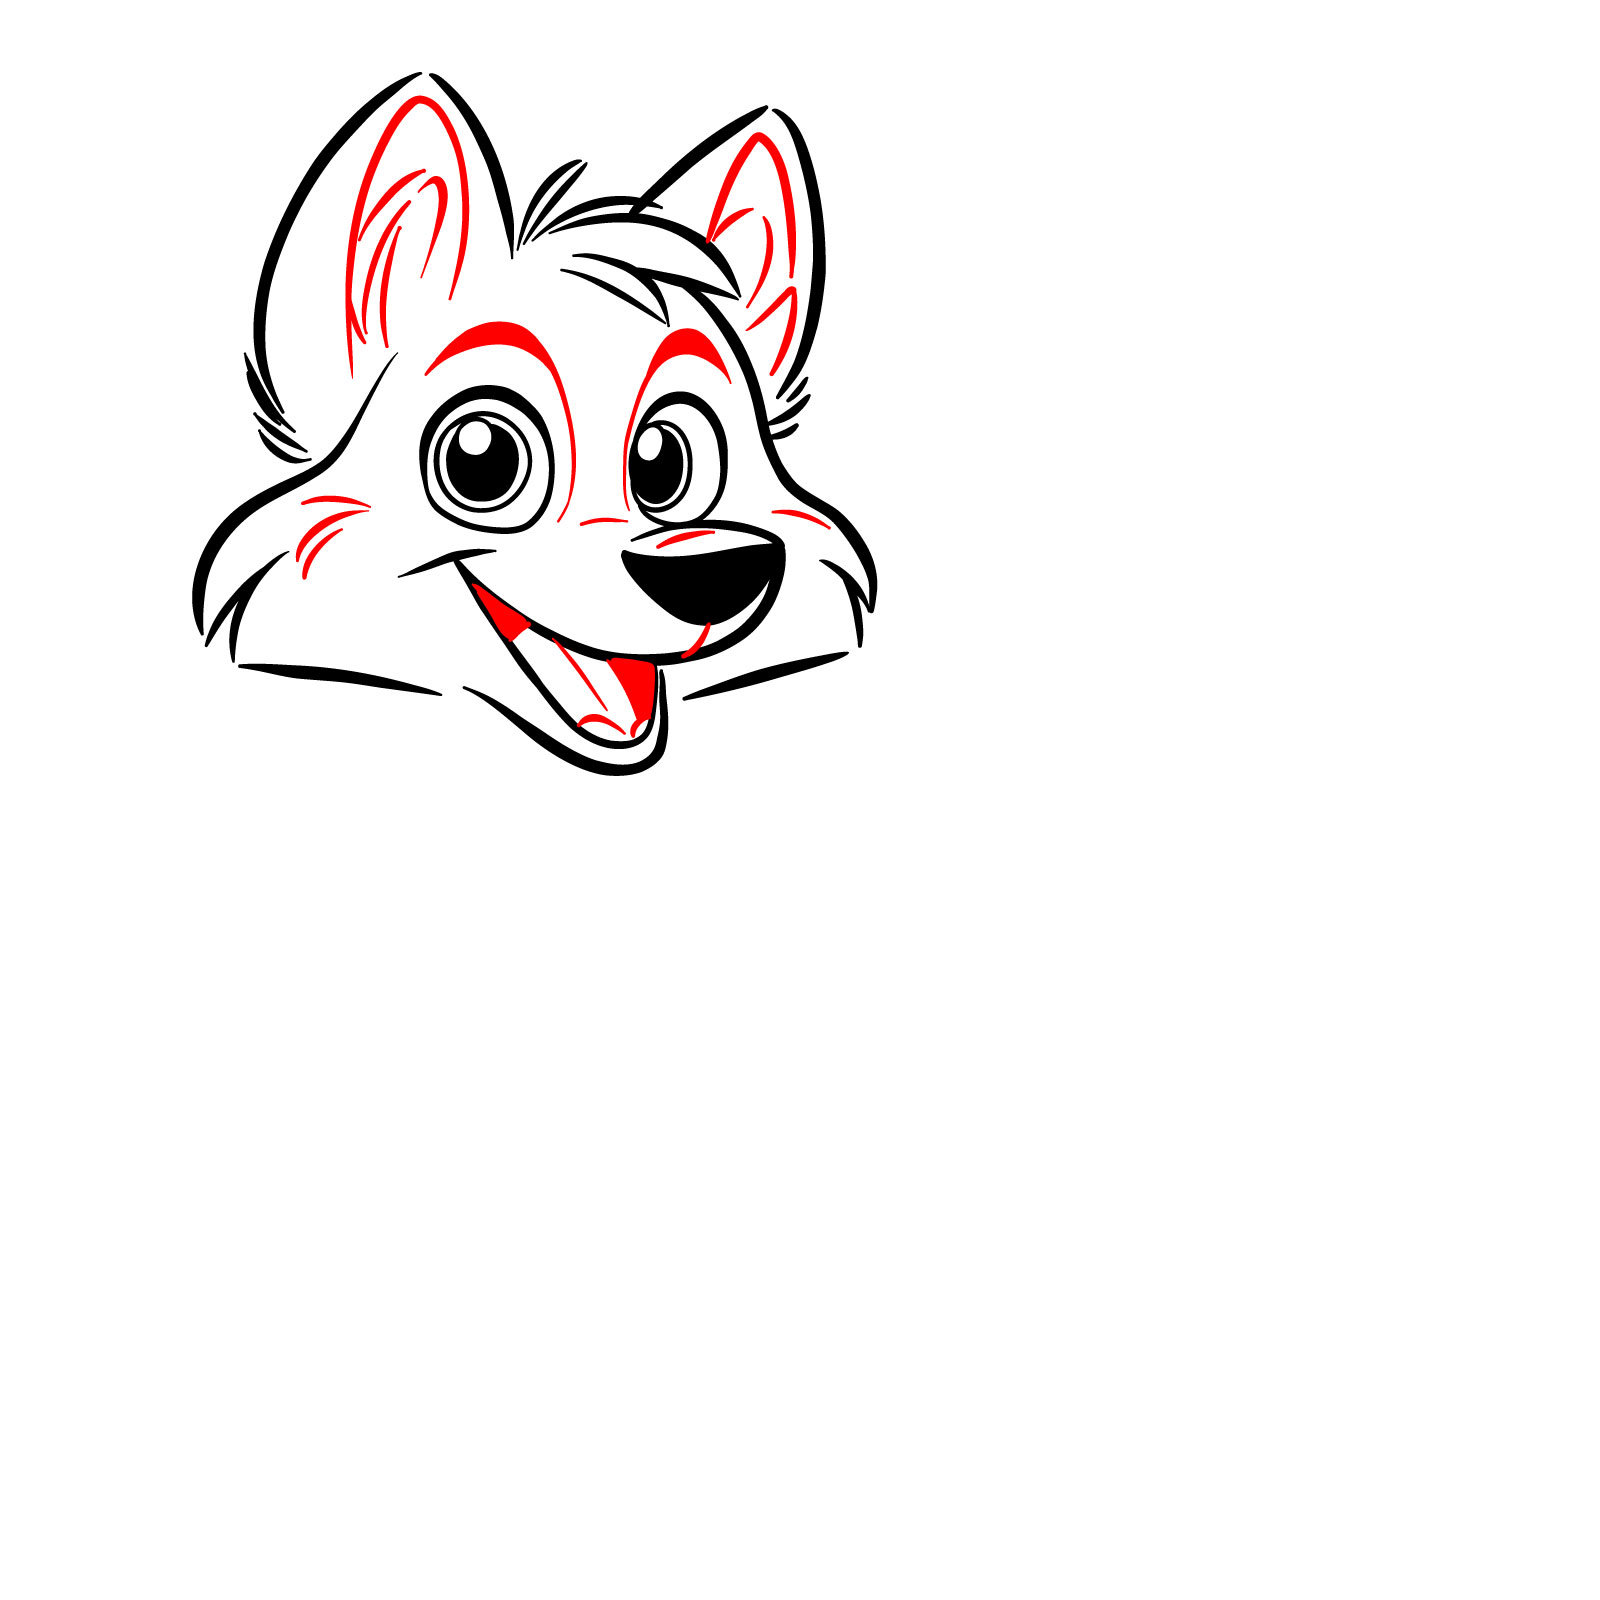
Step 09 – Enhance your cartoon wolf by adding eyebrows above the eyes for expression. Refine the snout with additional lines to define the cheeks and add a tongue and two front teeth protruding from the lower mouth to bring personality to your drawing. Sketch fur texture around the face and head, and include finer details inside the ears. This step is about adding more details than usual, so be patient and try not to miss any of them
PinEnhancing the features and expression
Step 10 – Draw a series of jagged lines below the head to represent the wolf’s furry neck. These lines should create a fluffy texture, adding to the playful nature of the cartoon wolf
PinDrawing the fur framing for the cartoon wolf’s neck
Step 11 – To draw the first front leg, extend a curved line from the bottom of the fur framing to form the leg’s upper portion and end it with a rounded shape for the paw, ensuring it looks sturdy and capable of supporting the wolf’s body
PinSketching the first front leg
Step 12 – Sketch the body of the wolf extending backward from the lower fur area. Add the beginning of the first rear leg with a line curving down from the body, indicating the thigh’s muscle structure
PinOutlining the body and the start of the rear leg of the cartoon wolf
Step 13 – Finish the rear leg by drawing the lower part extending down to a rounded paw. Add lines within the paw to suggest toes and give the leg a sense of depth
PinCompleting the first rear leg
Step 14 – Draw the remaining two legs, making sure the far leg is partially hidden behind the first front leg for perspective. The rear leg should be almost fully visible and end in a similar paw structure as the others
PinDrawing the second set of legs
Step 15 – For each paw, add small curved lines to divide them into sections, representing the toes. Sketch a large, bushy tail waving upwards with flowing lines
PinAdding paw divisions and tail to the cartoon wolf
Step 16 – Your wolf is now complete. It features a full body with expressive eyes, detailed fur, and a joyful posture. This result we have is the cartoon wolf in all its playful glory, with each step contributing to its charming character. The techniques used here emphasize the fun and whimsical nature of cartoon drawing, making it an accessible guide for artists to learn how to draw a cartoon wolf
PinThe final step of how to draw a cartoon wolf
Crafting an Anime Wolf Full Body in 17 Steps
PinHow to draw an Anime Wolf
As we progress to the fourth guide, we embrace the style of anime with a full-body depiction of a wolf. This guide unfolds through 17 detailed steps, starting with two initial steps that lay down a basic sketch. This foundational sketch is crucial for mapping out the wolf’s poised stance and proportions. In the completed drawing, you’ll admire a wolf that boasts the distinct anime style – large expressive eyes, stylized fur, and a sense of gentle strength in its posture.
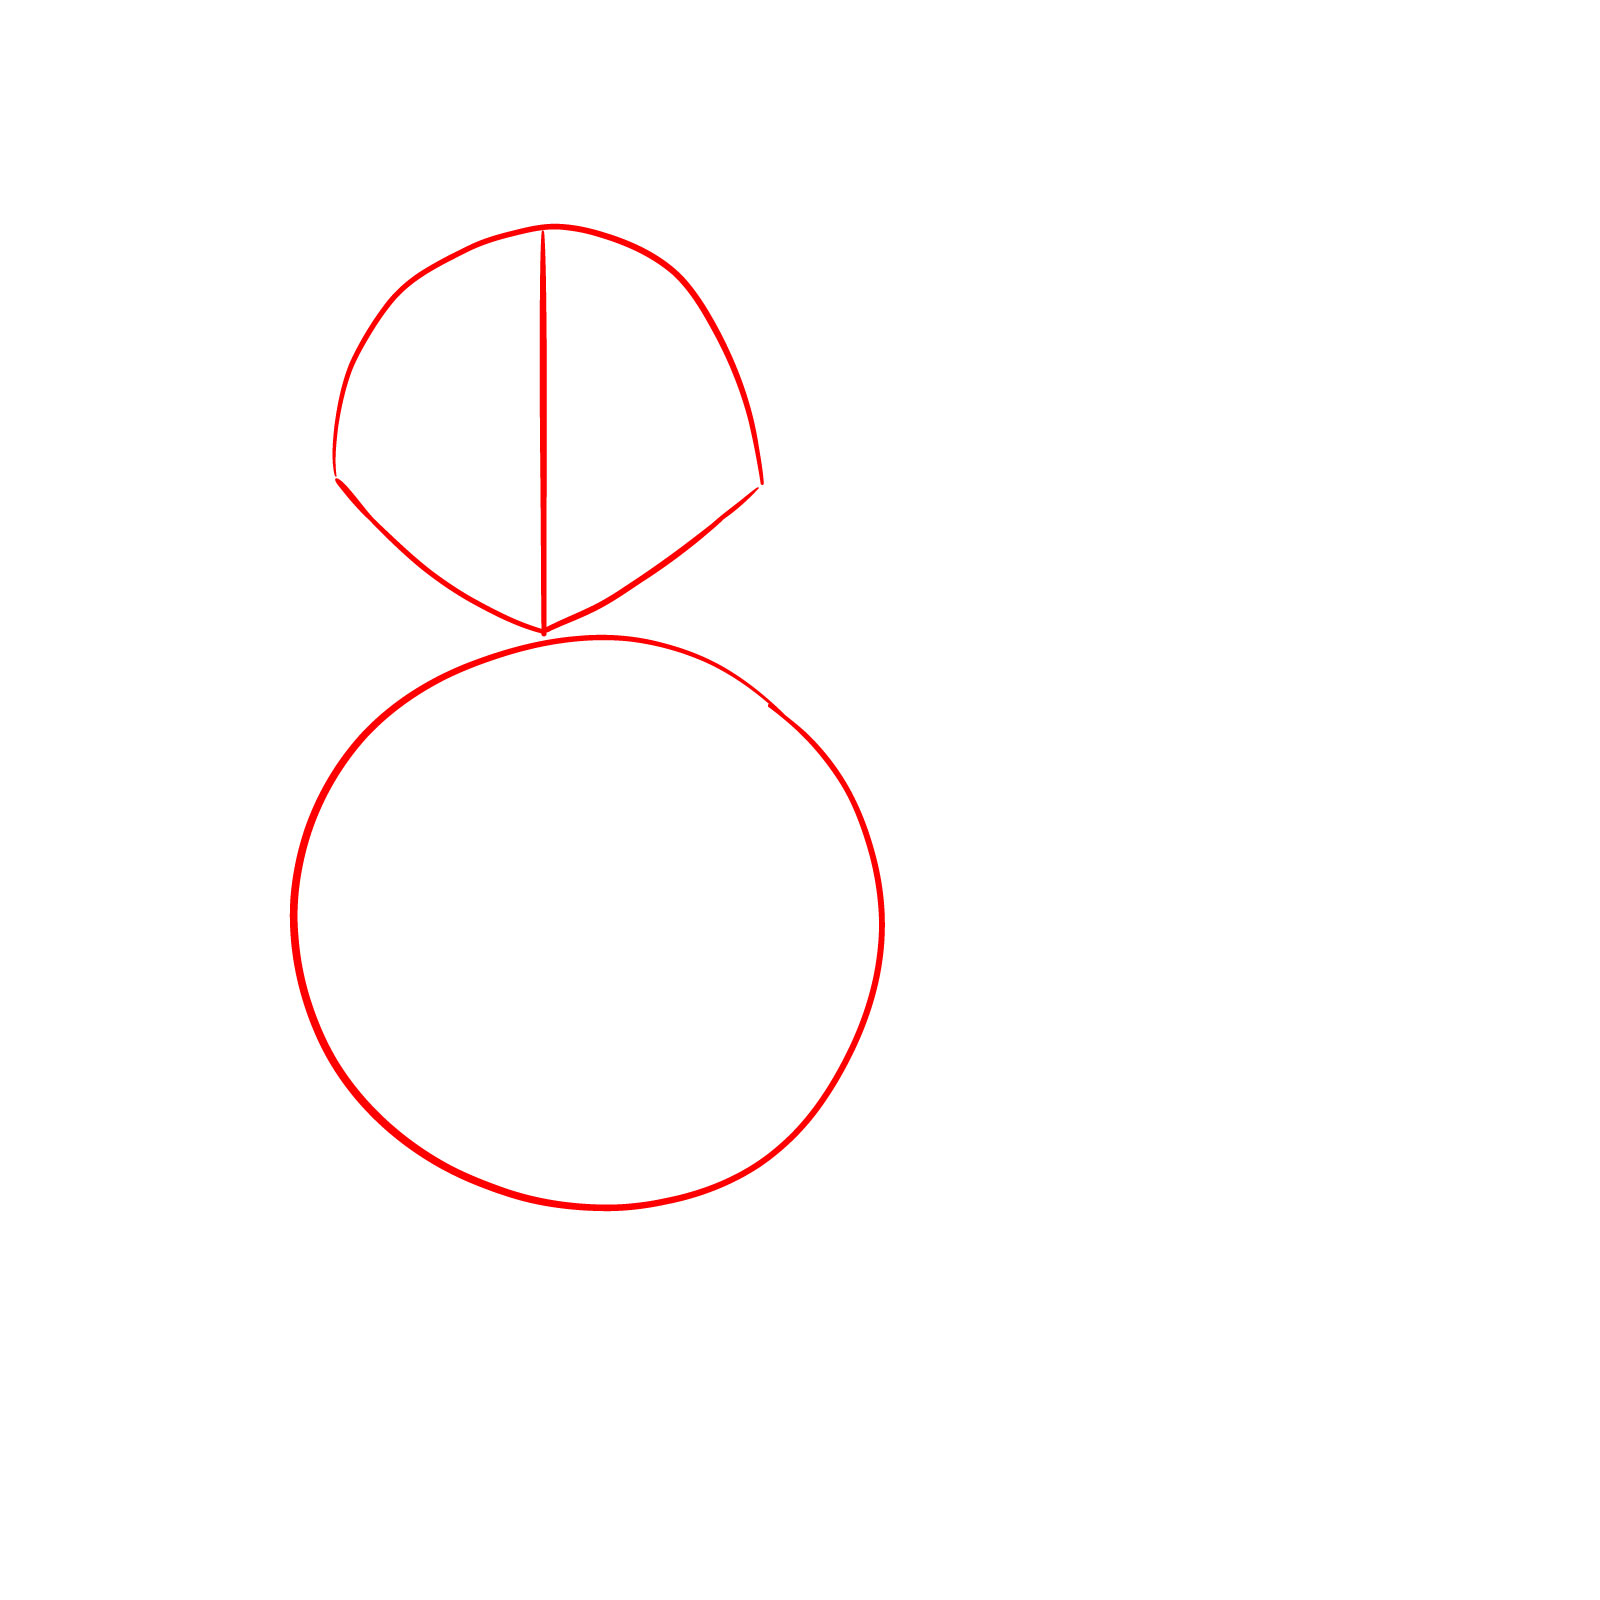
Step 01 – Begin your anime wolf drawing with a basic framework. Sketch a large circle for the chest and a smaller shape with rounded top and angular bottom divided in half for the head. This sets the foundation for the body proportions of your anime wolf
PinStarting the anime wolf drawing with the head and body outline
Step 02 – Add a vertical line through the center of the head shape to establish the eye line and map out where the nose and mouth will be. Then sketch in the basic shapes for the neck, legs, and the rest of the body to create a sense of structure and stance
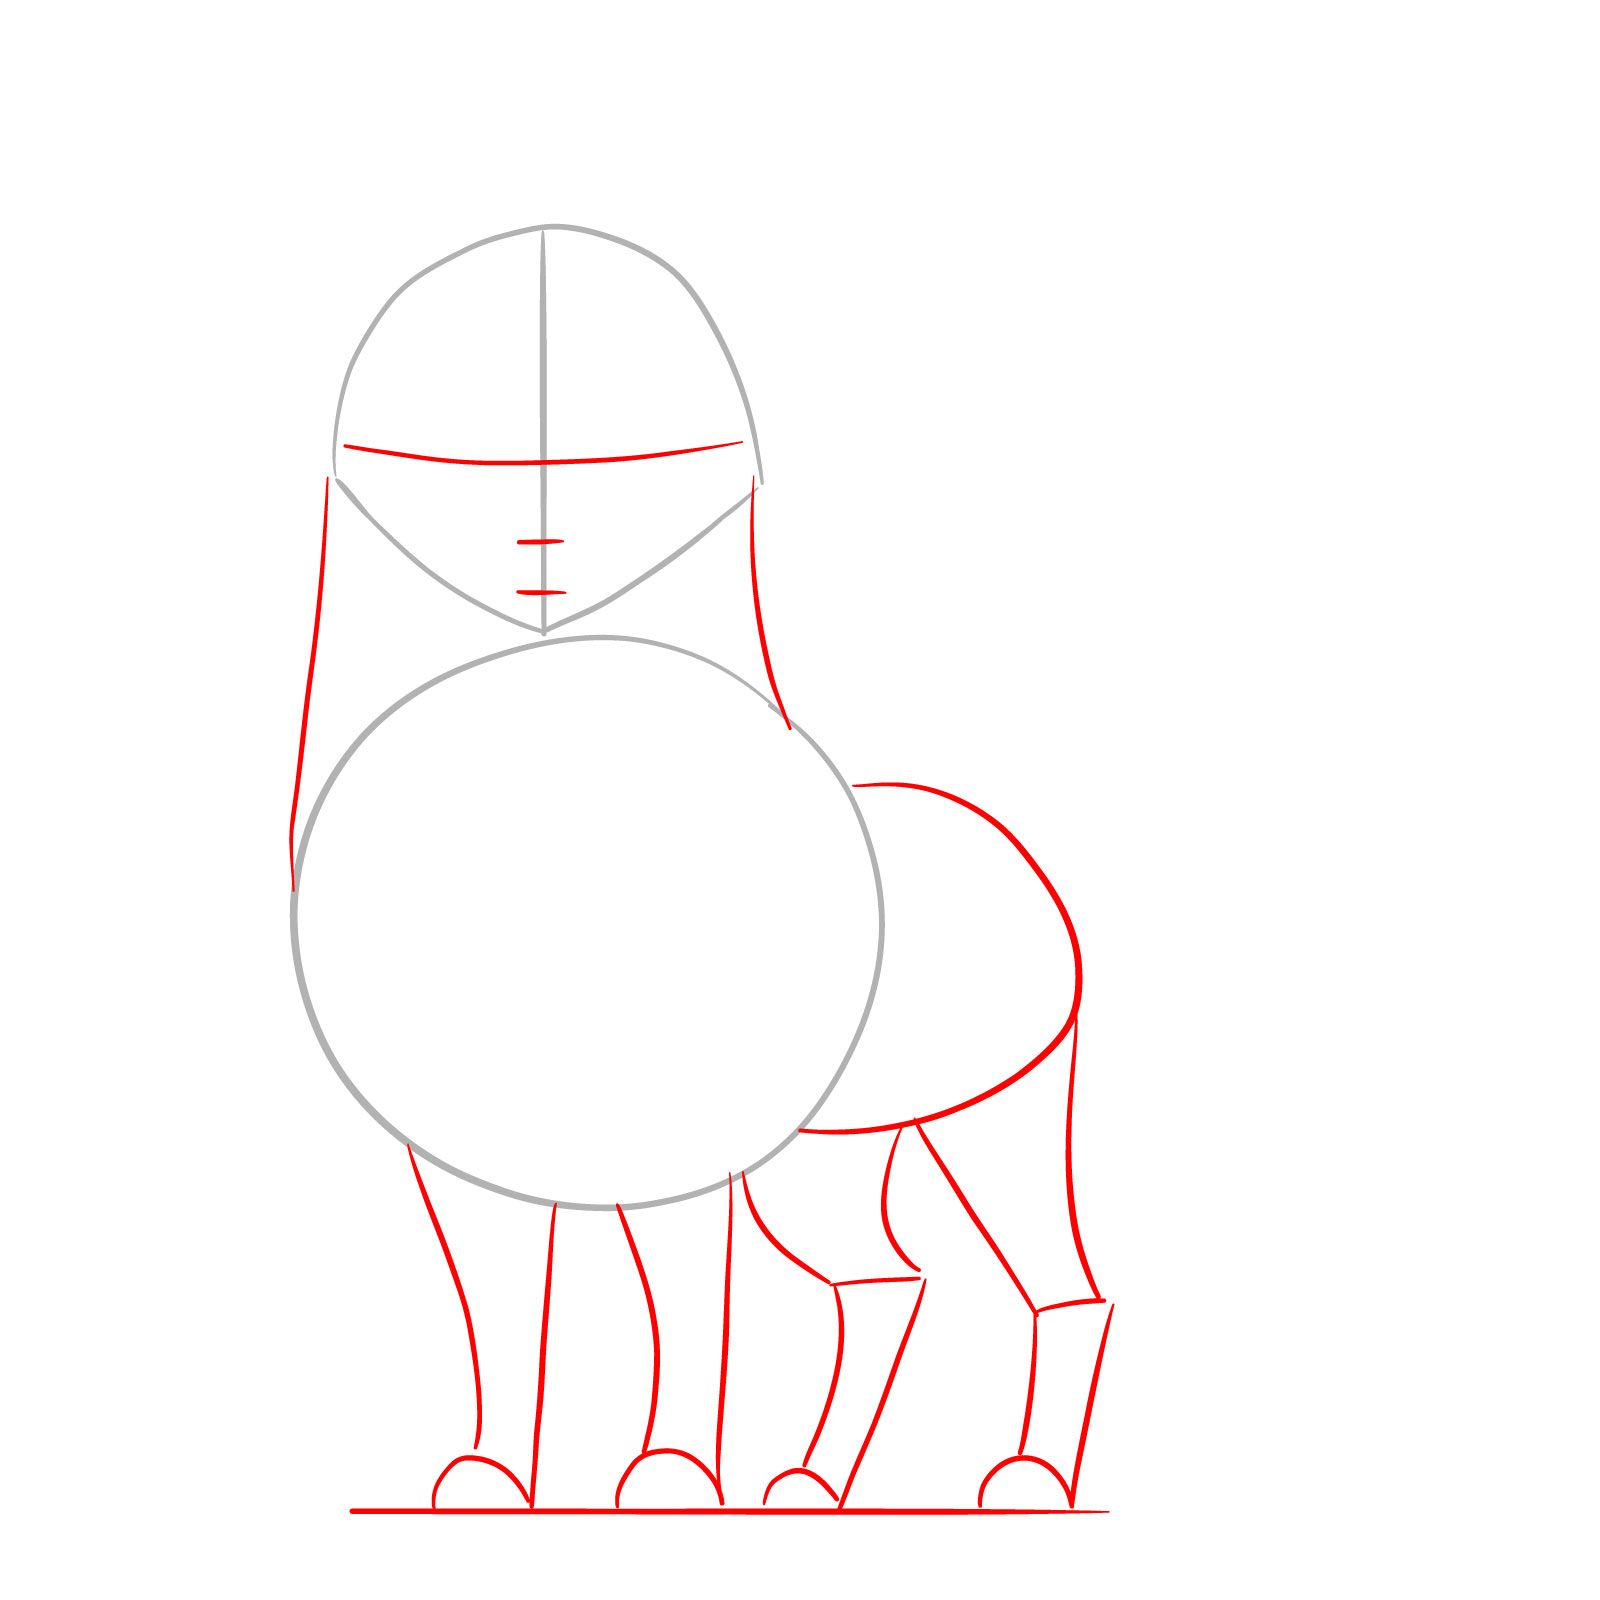
PinDefining the body and facial guidelines
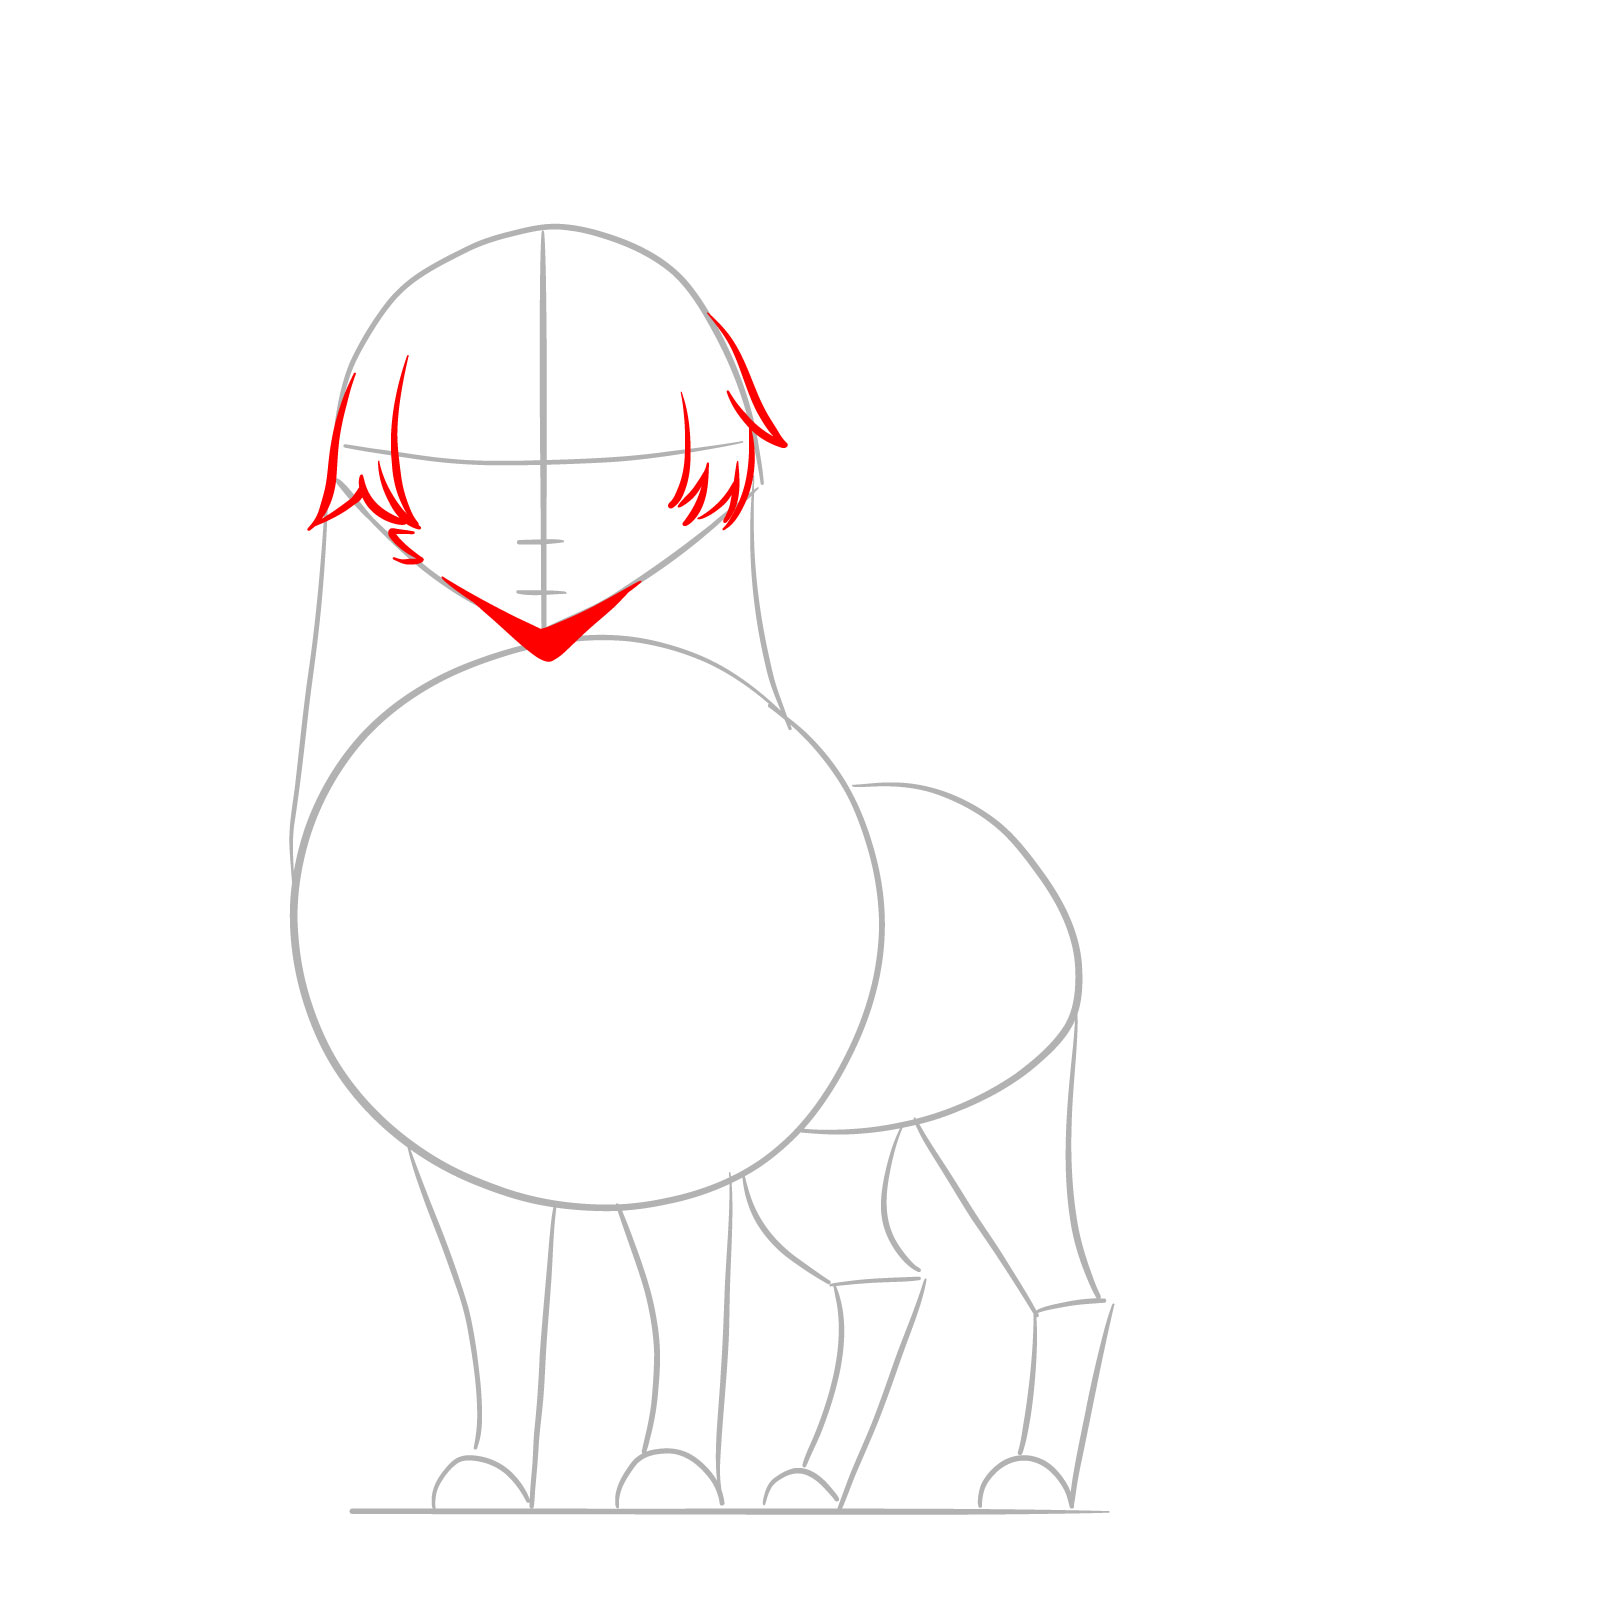
Step 03 – Draw the chin at the bottom of the head shape and add a small shaded area underneath to suggest depth. Illustrate the furry texture by adding pointed fur bangs at the sides of the head
PinRefining the head with chin and fur details for the anime wolf
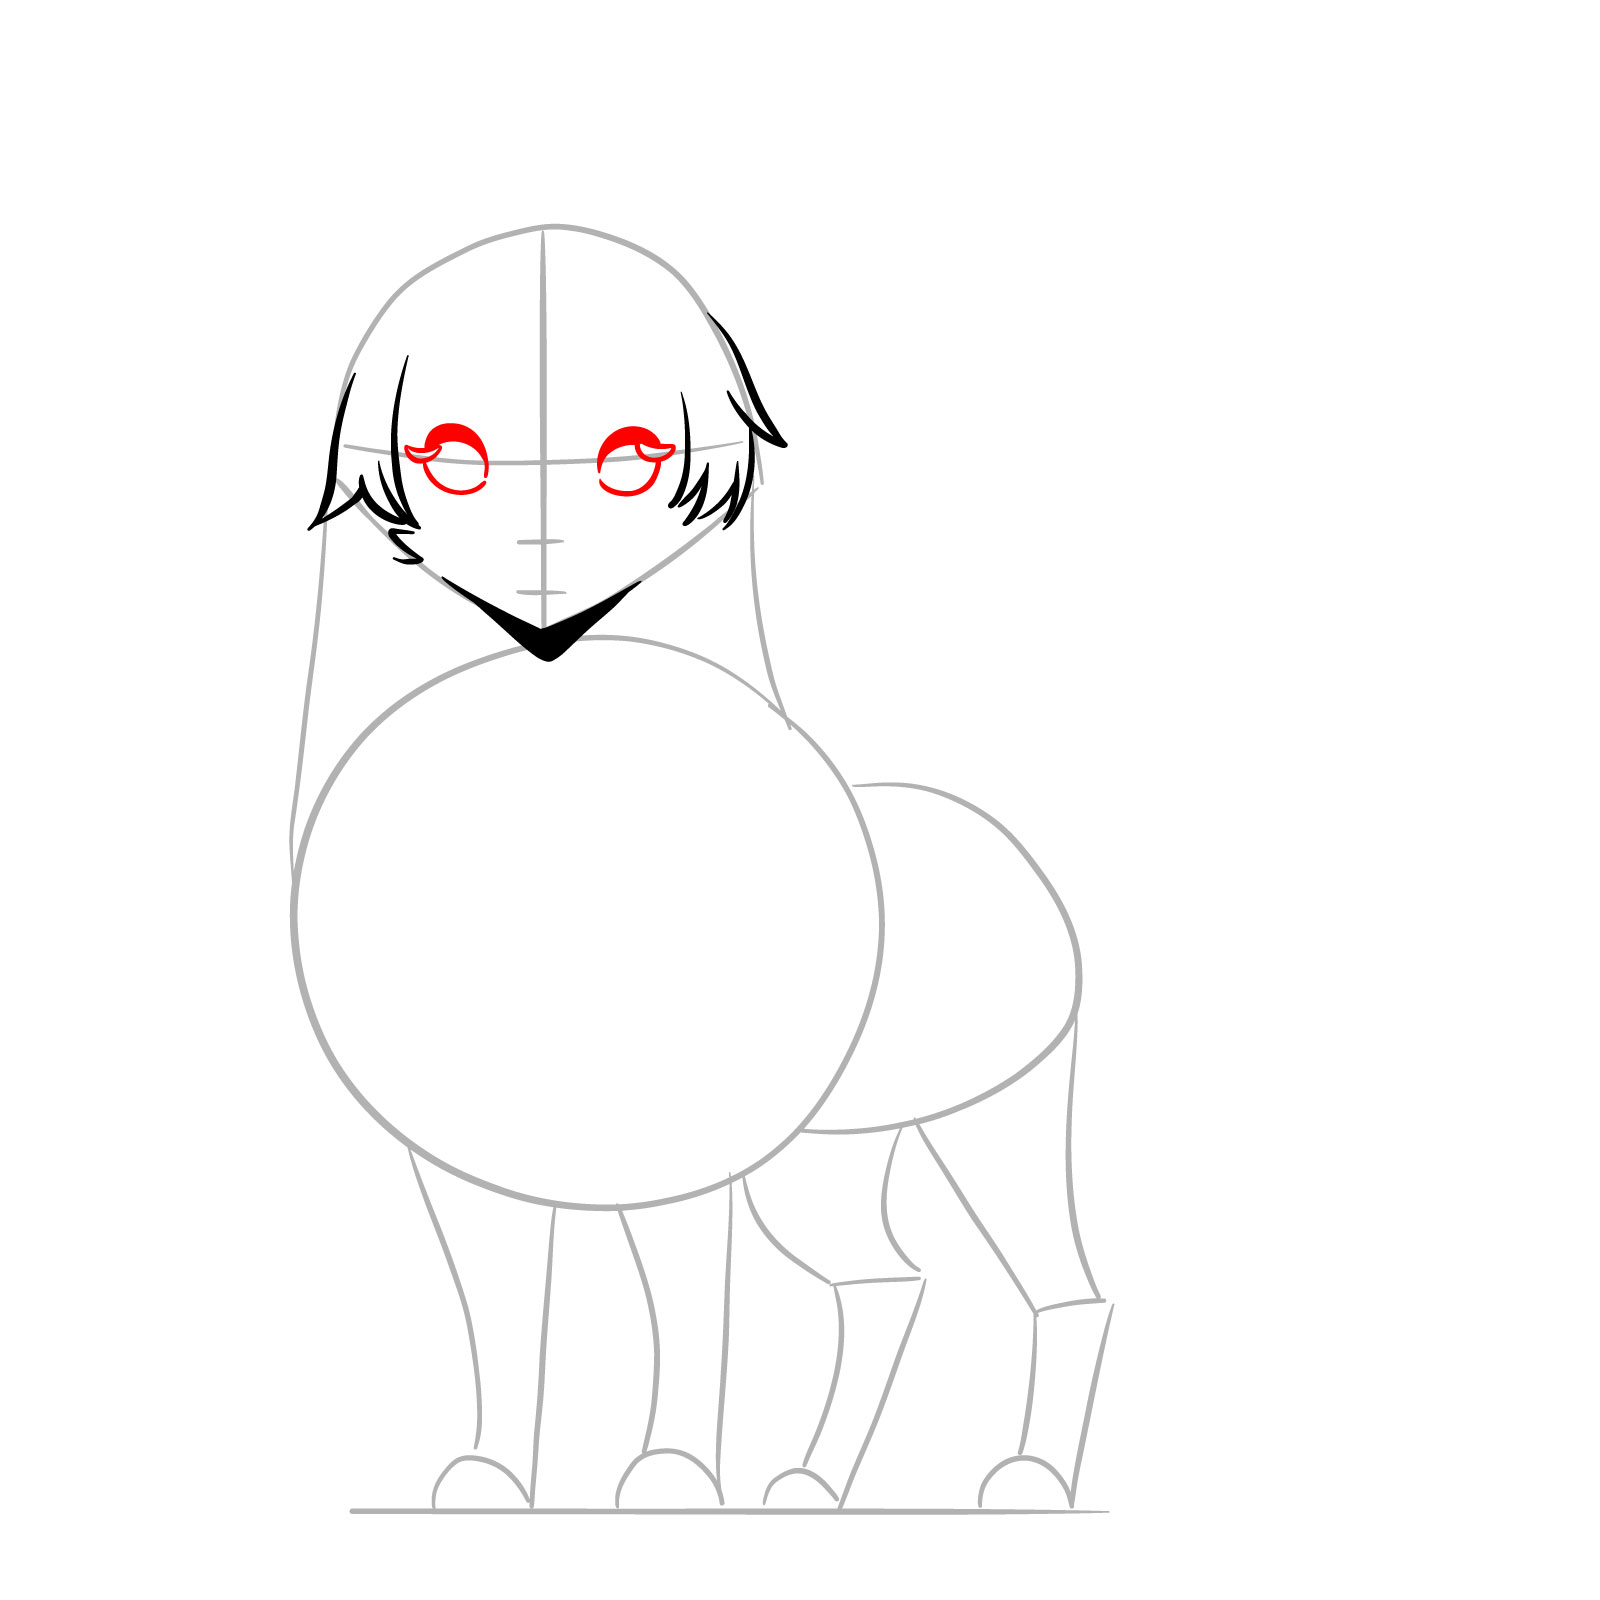
Step 04 – For the anime eyes, outline two large ovals with thicker lines at the top. Add crescent-like shapes on the outer sides of the eyes for the highlights to create that signature anime sparkle
PinSketching expressive anime eyes for the wolf
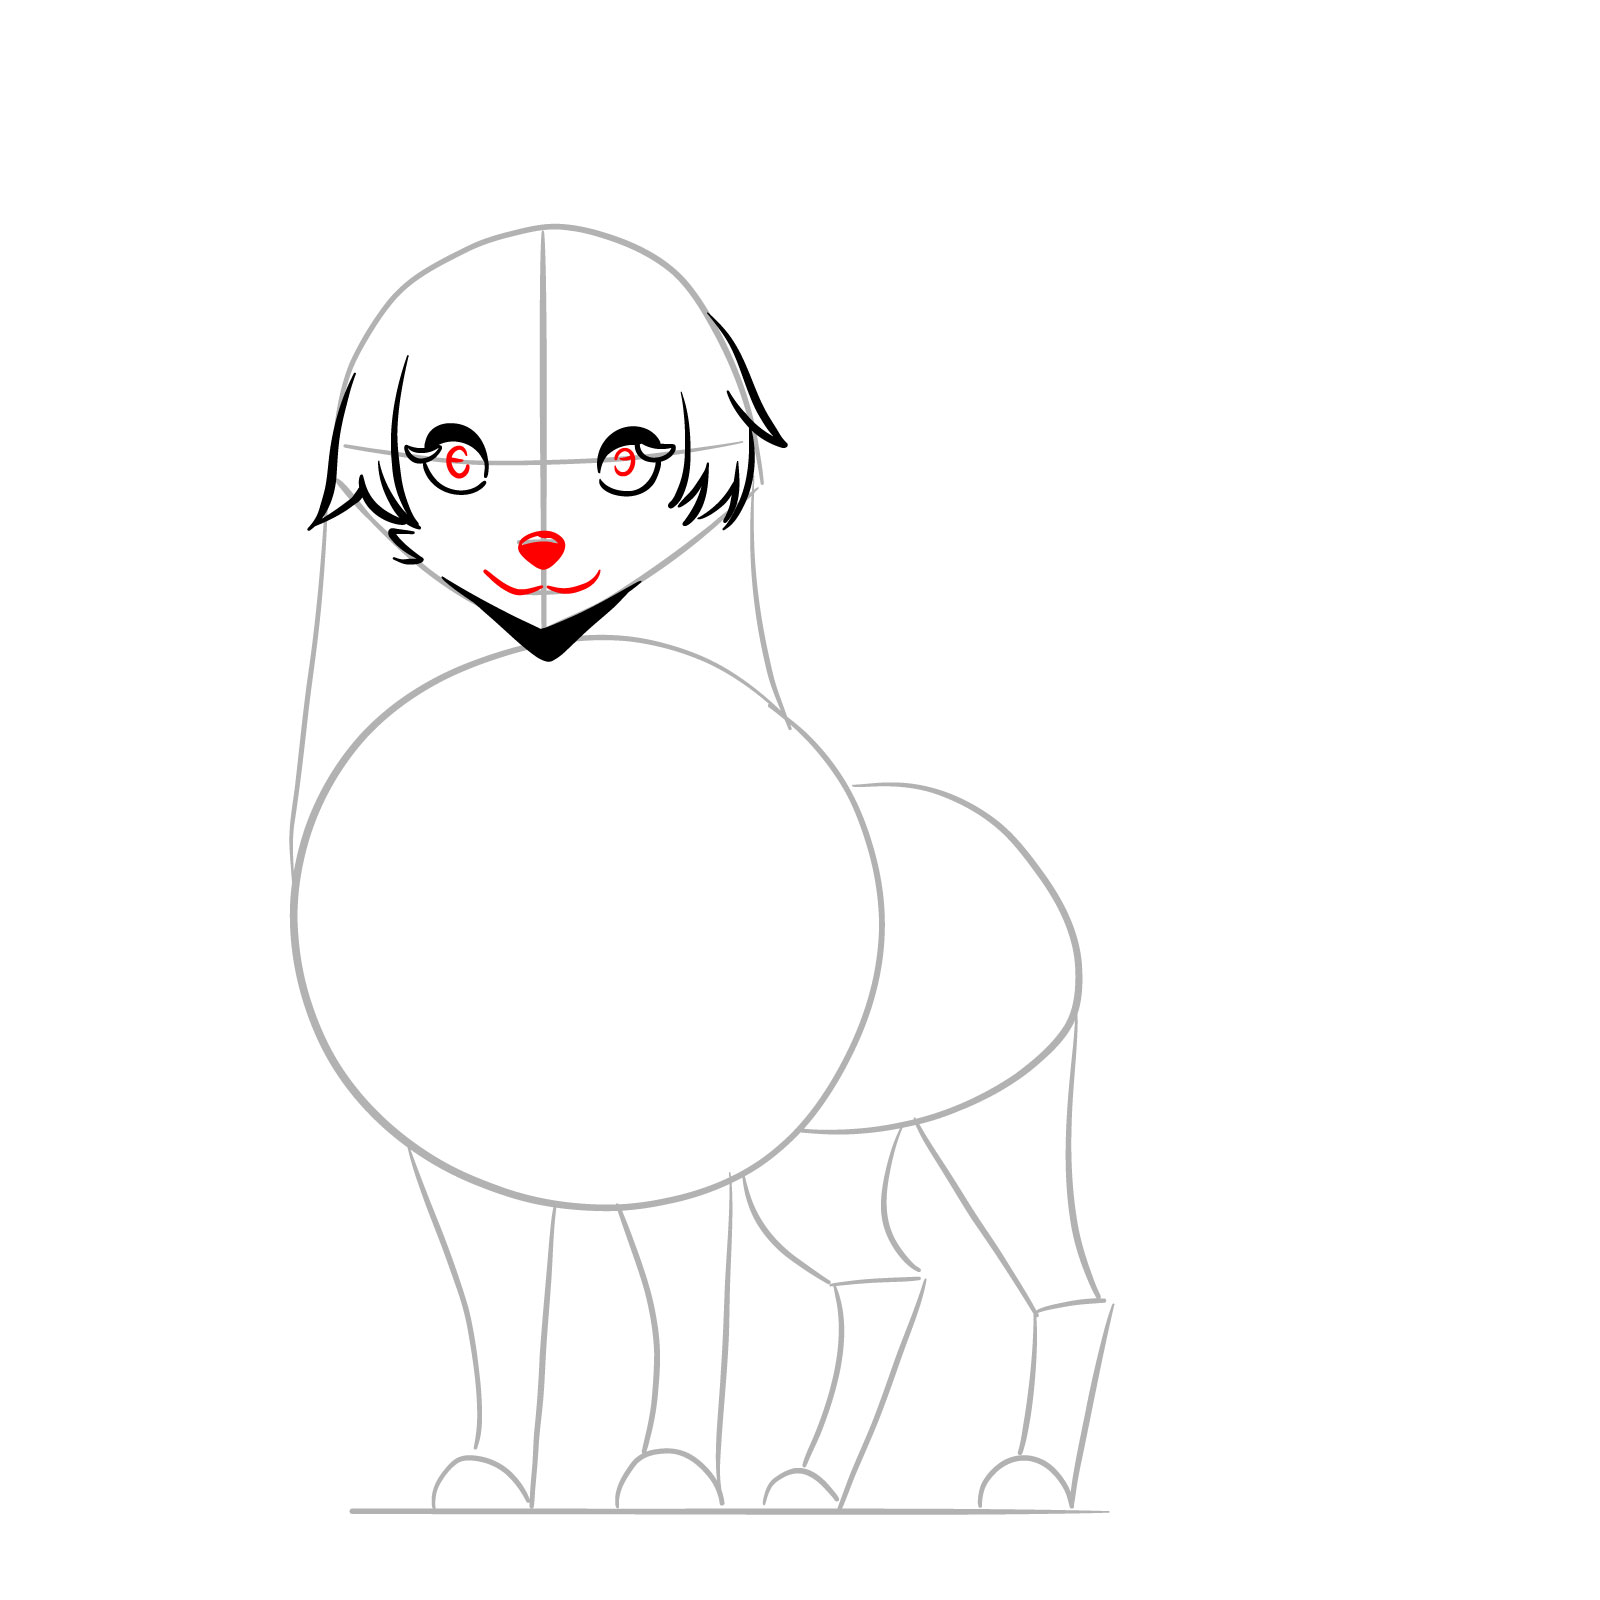
Step 05 – Draw the pupils in the center of the eyes, a filled-in nose with a tiny highlight at the top, and a simple mouth
PinDetailing the wolf’s face with pupils, nose, and mouth
Step 06 – Outline the eyes in a dramatic anime style, making them large and emotive. Although wolves don’t naturally have expressive eyebrows, we’re bending the rules to infuse our character with a distinct anime flair. By adding sleek eyebrows, we grant our wolf a touch of human-like expression, enhancing its personality and giving it a signature anime aesthetic
PinGiving character to the anime wolf with styled eyes and eyebrows
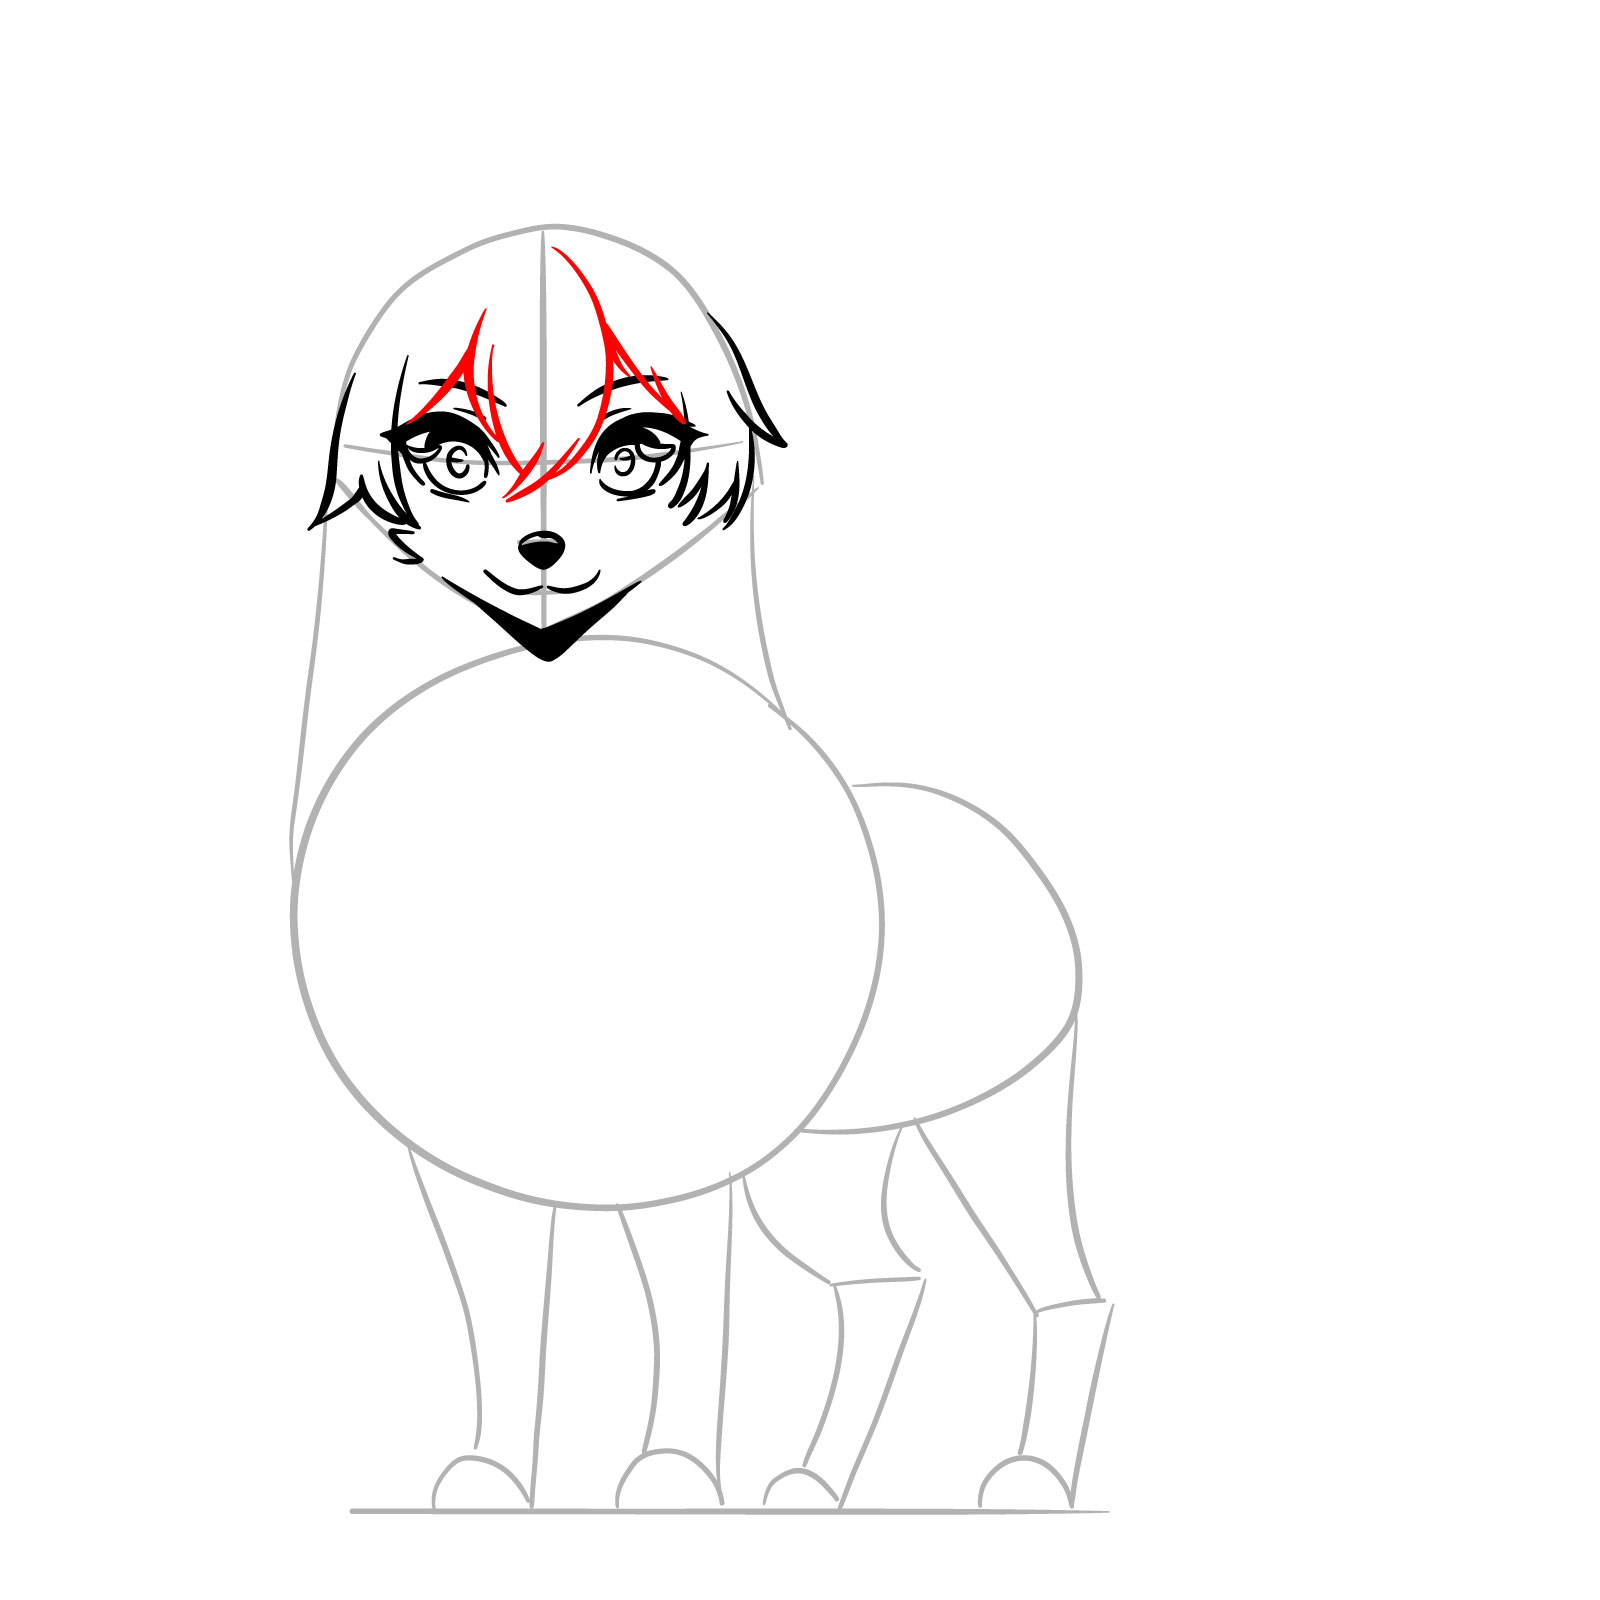
Step 07 – Create a front lock of fur with a few swift, jagged lines at the forehead, giving your anime wolf a stylish hairdo
PinAdding a front lock of fur to the forehead
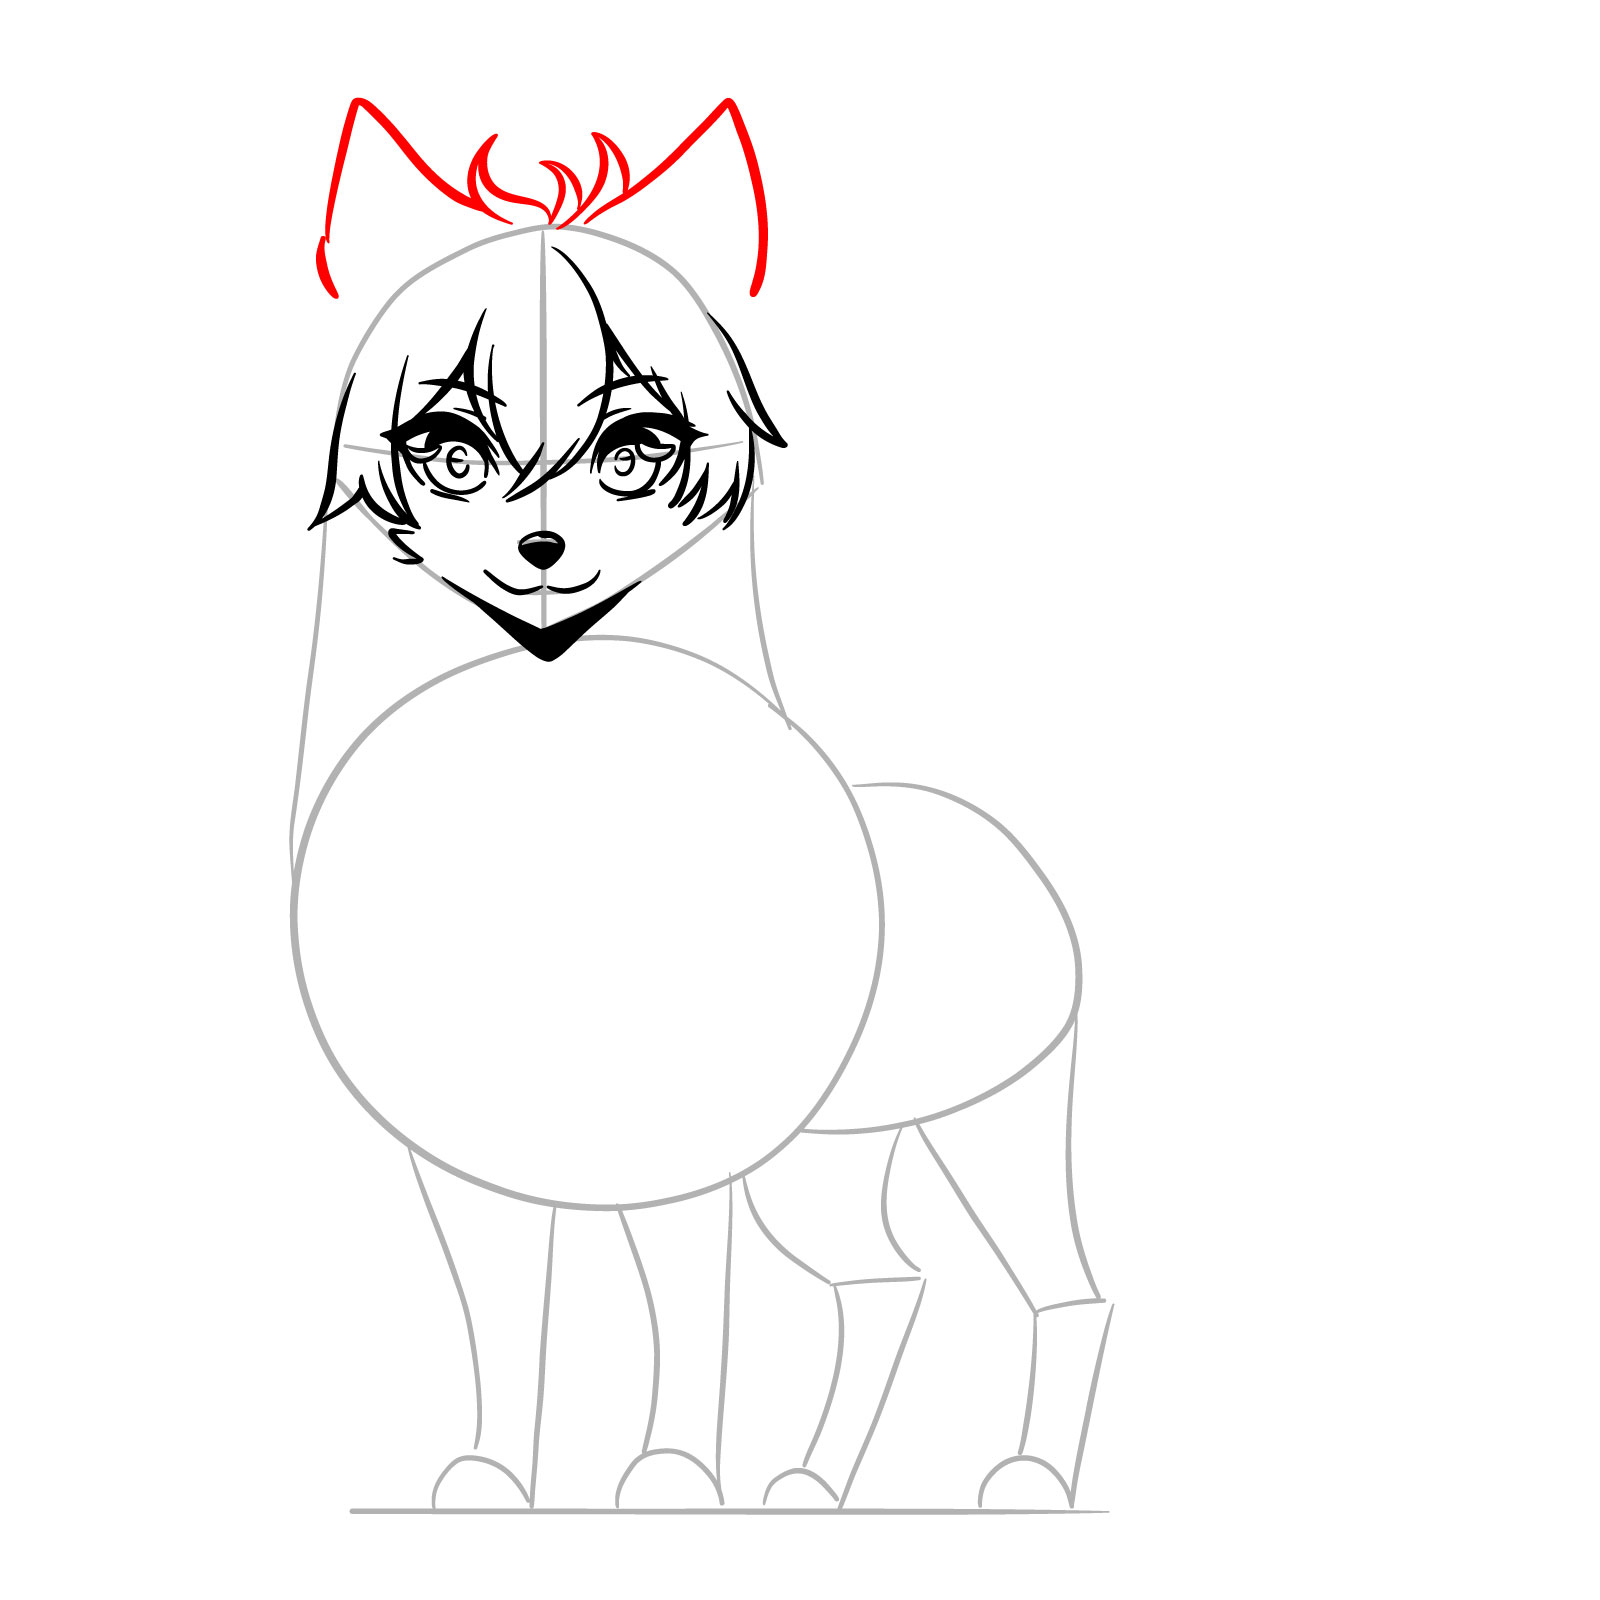
Step 08 – Sketch the ears with pointed tips and a small forelock between them
PinShaping the ears and a small forelock
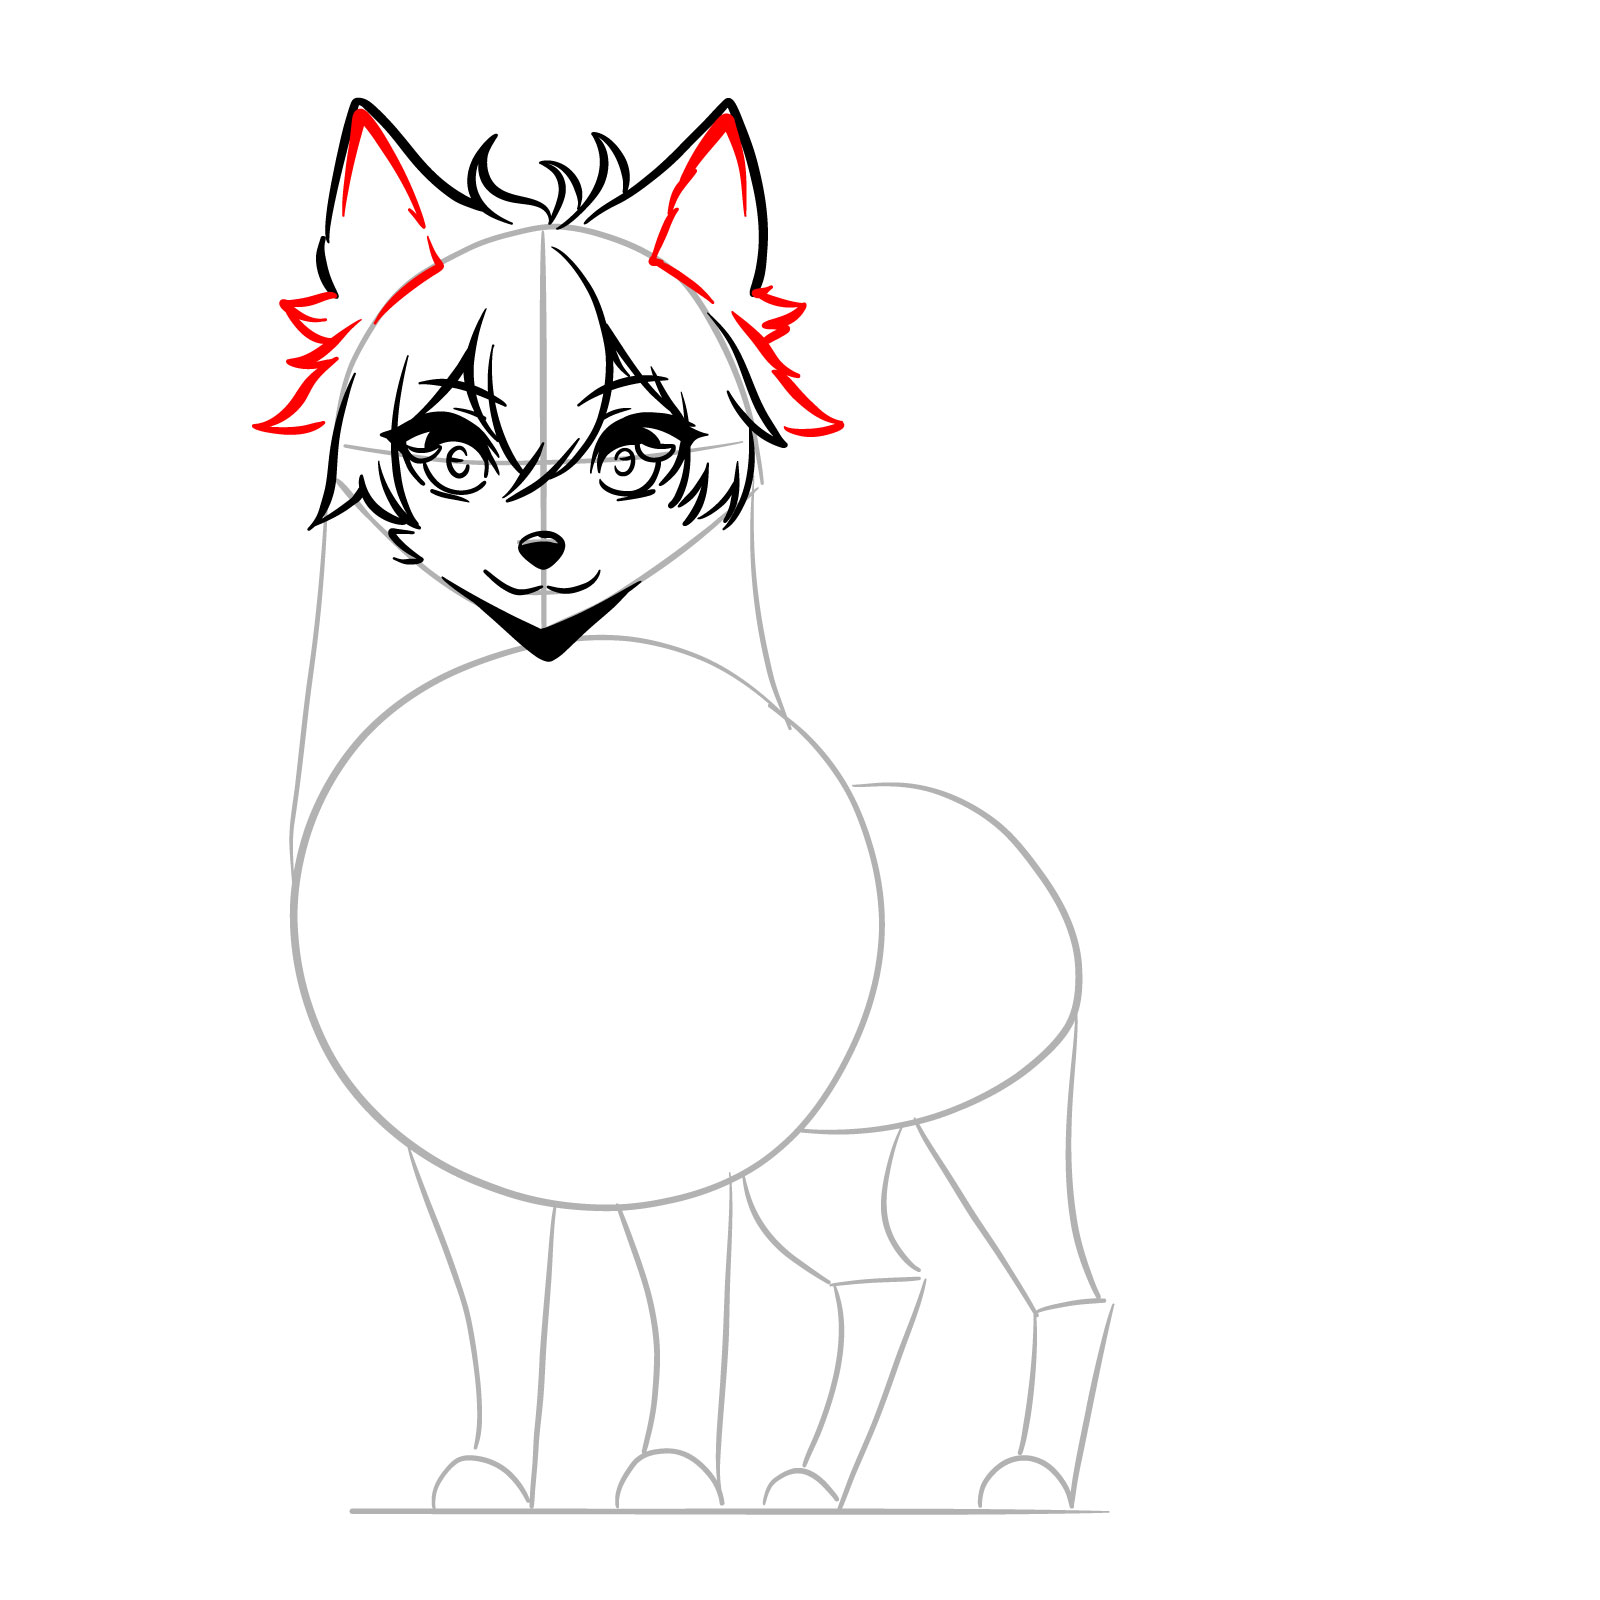
Step 09 – Add depth and texture to the ears with additional lines, and sketch more fur on the sides of the head
PinDetailing the anime wolf’s ears and adding fur texture
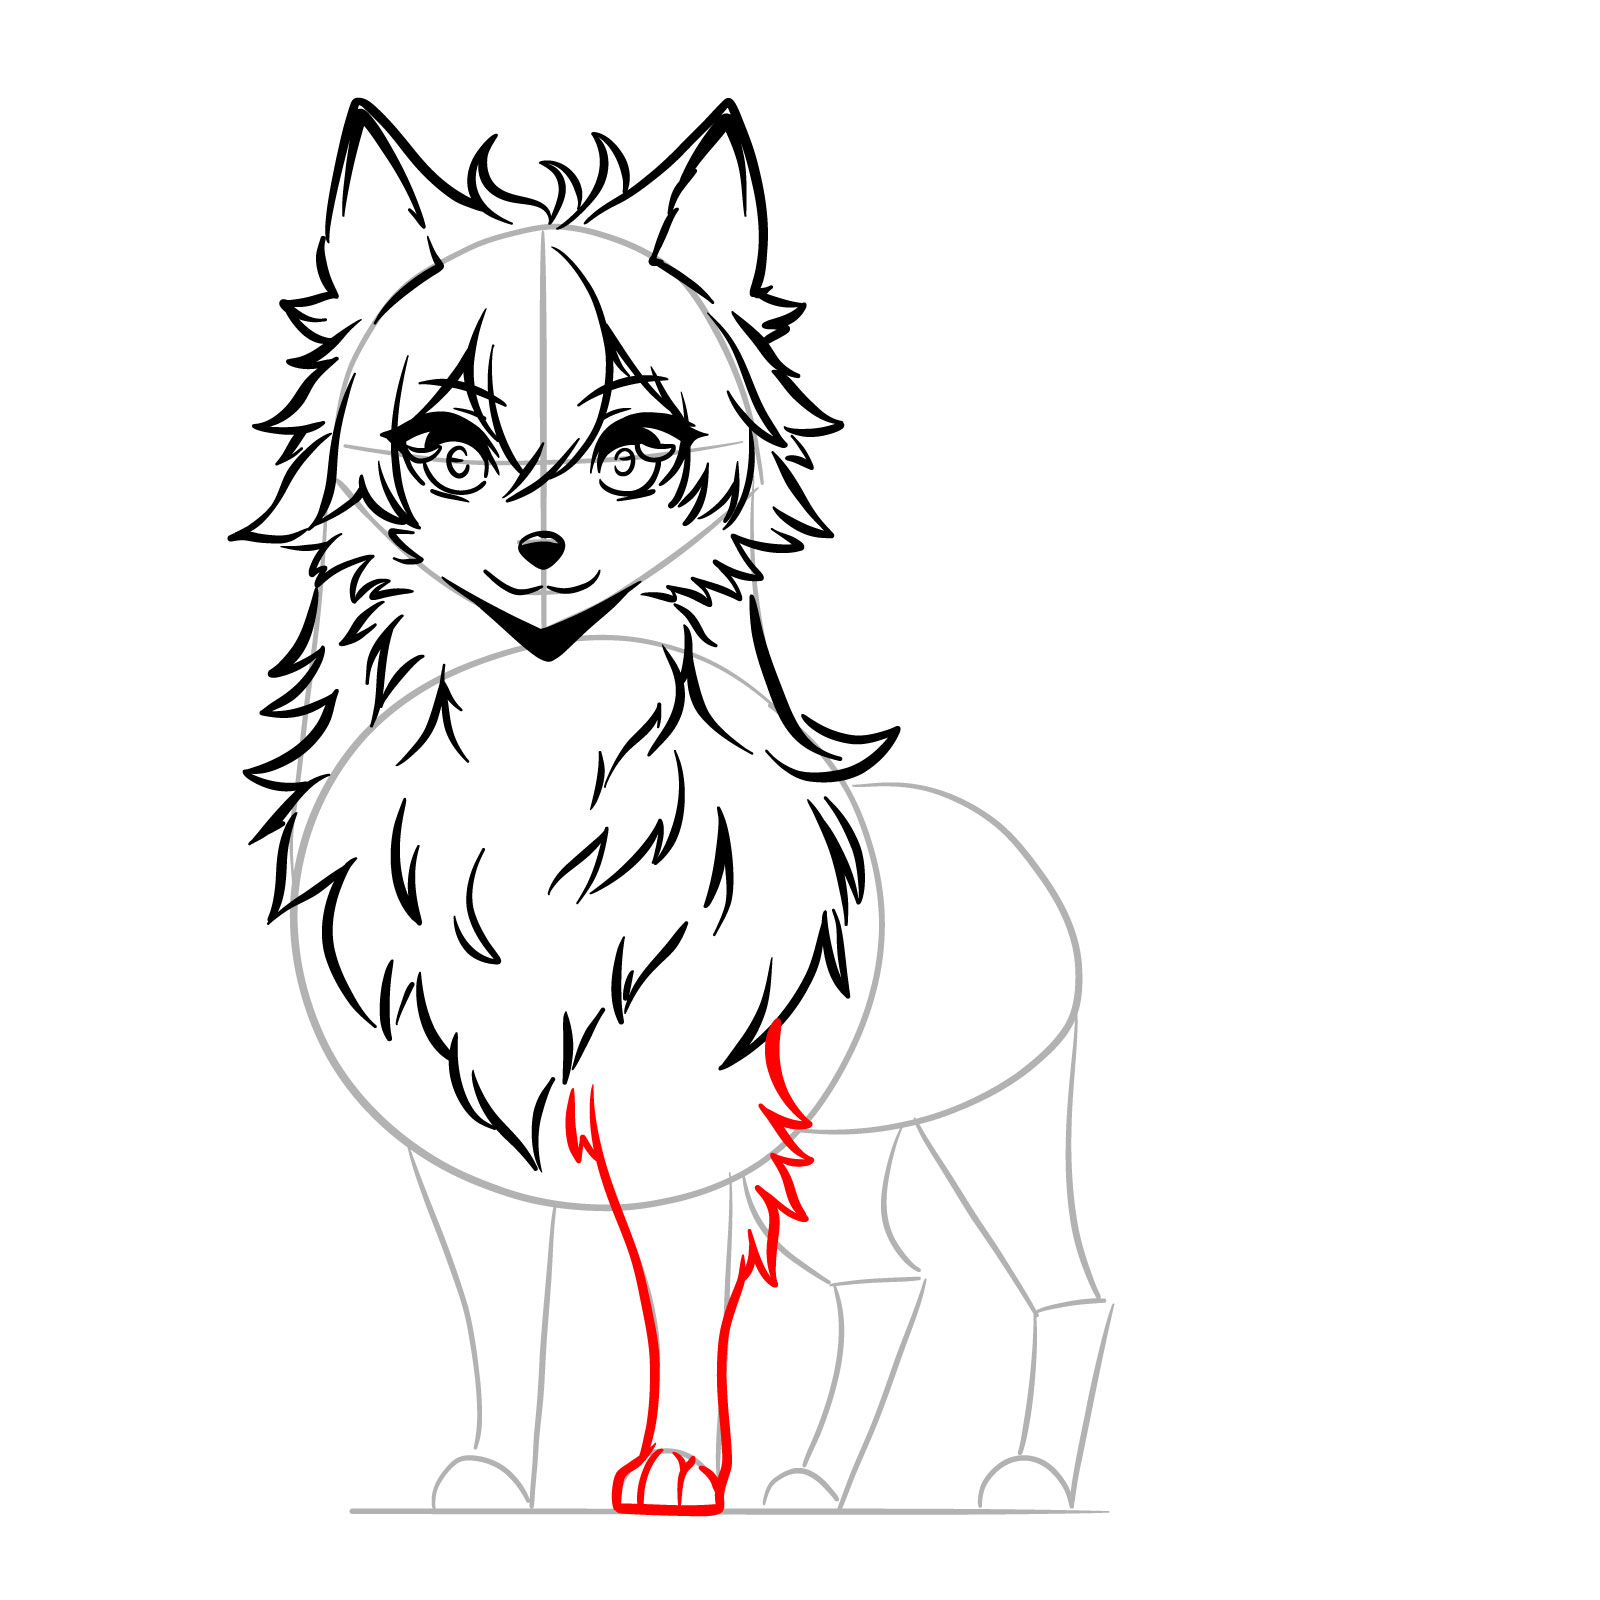
Step 10 – Start with detailing the wolf’s neck and chest area, sketching thick tufts of fur to emphasize the wolf’s fluffy texture. This step involves long, curved lines that suggest the natural flow and layering of fur
PinDrawing the anime wolf’s neck and chest fur
Step 11 – Here, we layer additional fur onto the wolf’s body to create a sense of depth and volume. Strategic strokes are used to mimic the way fur clumps and flows on the wolf’s body, paying close attention to the direction and length of each fur line for a realistic effect
PinLayering the fur for volume
Step 12 – Now, the focus shifts to the wolf’s anatomy, with the first front leg being outlined. The lines should be smooth and careful, ensuring they suggest muscle structure beneath the fur while keeping the overall anime style consistent
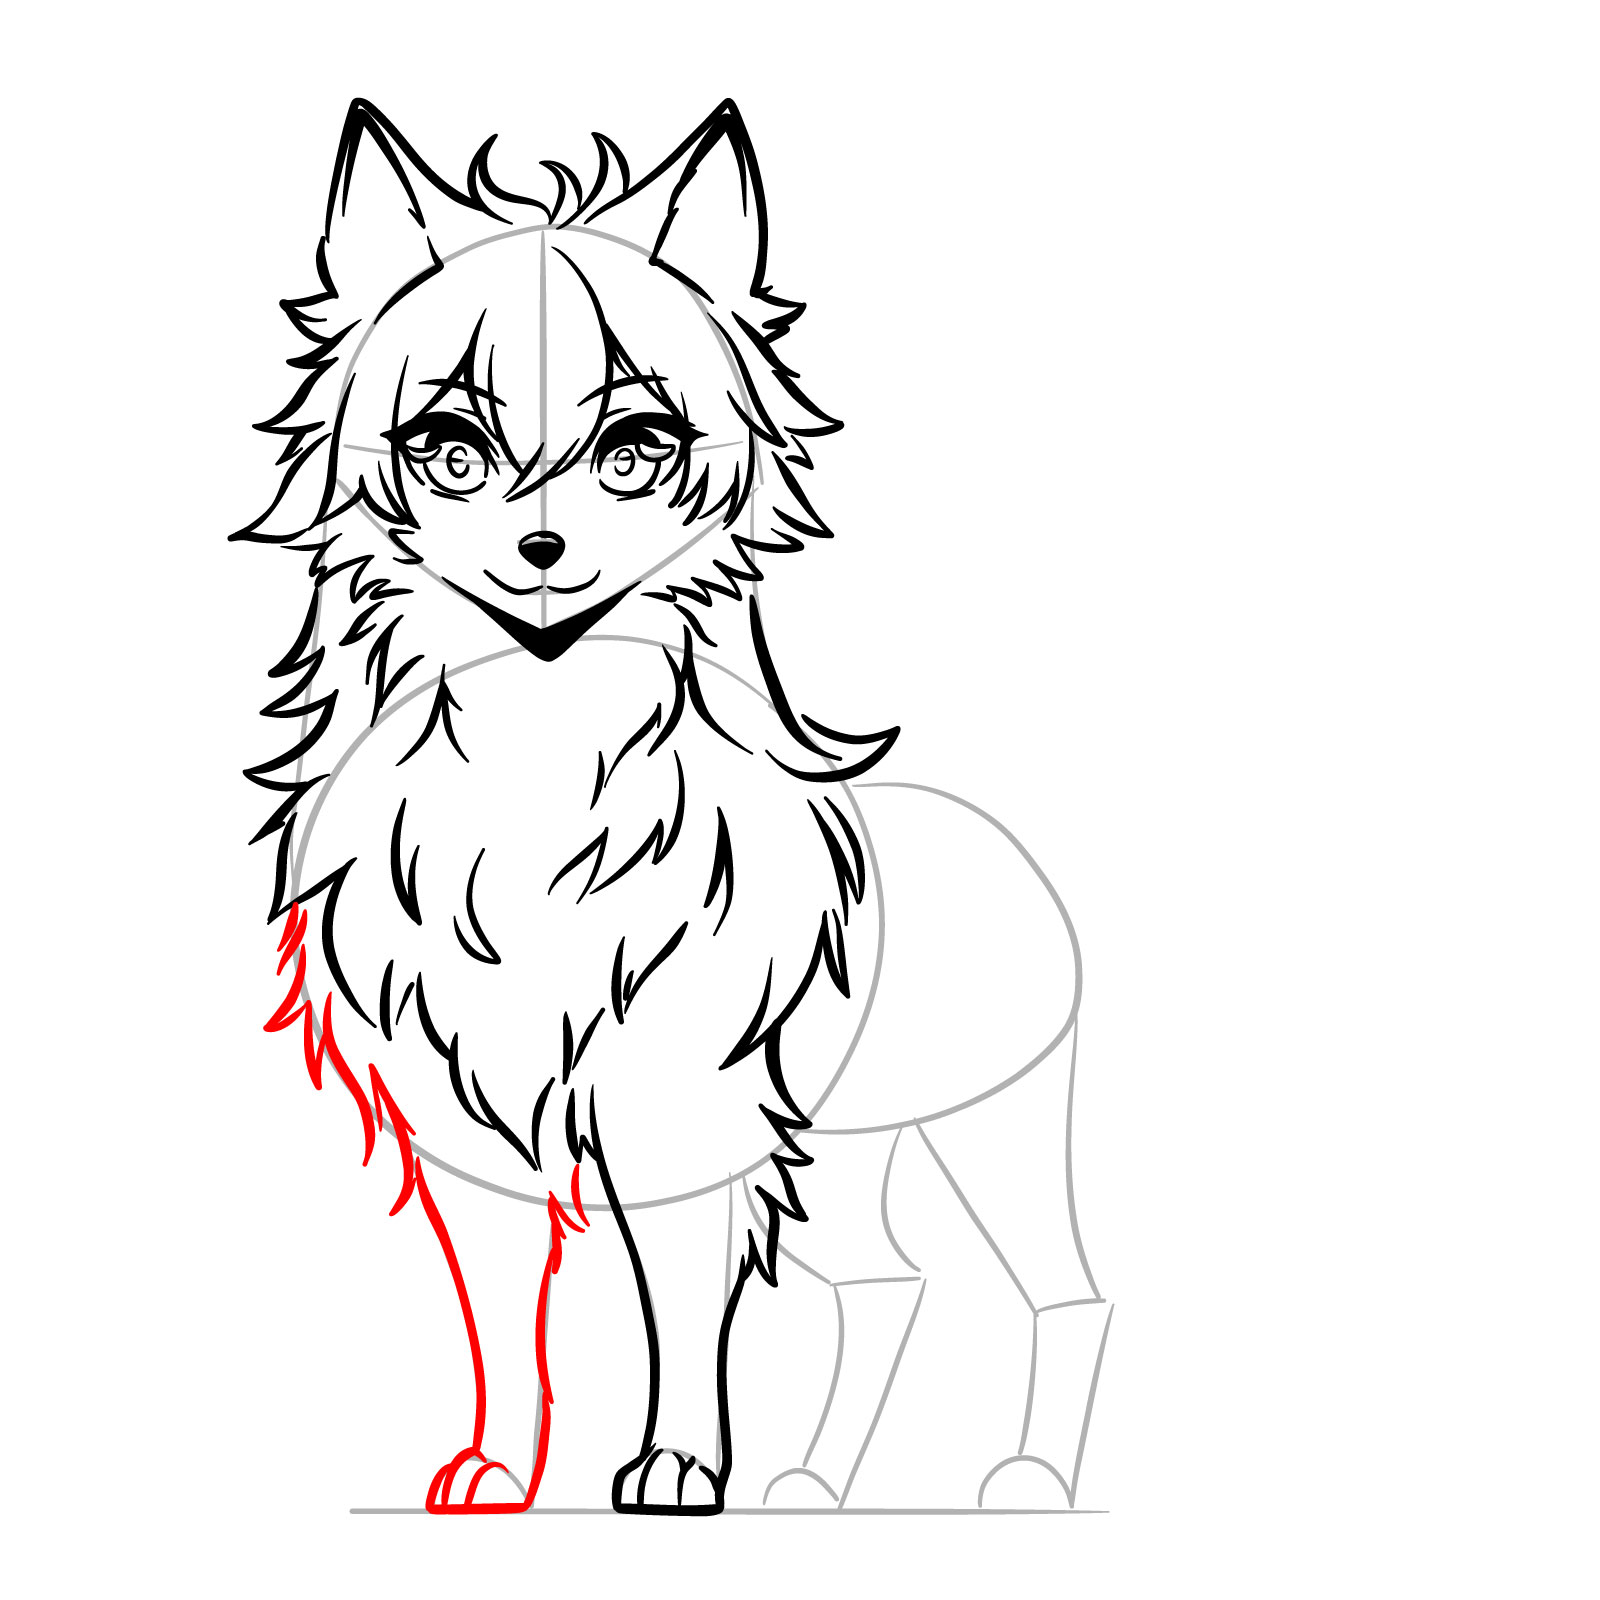
PinOutlining the first front leg
Step 13 – Mirroring the opposite leg, the second front leg is sketched with short gentle curves at the top and more smooth lines down to the paw. The positioning is key for balance and proportion, ensuring both front legs will support the wolf’s stance in the finished piece
PinSketching the second front leg
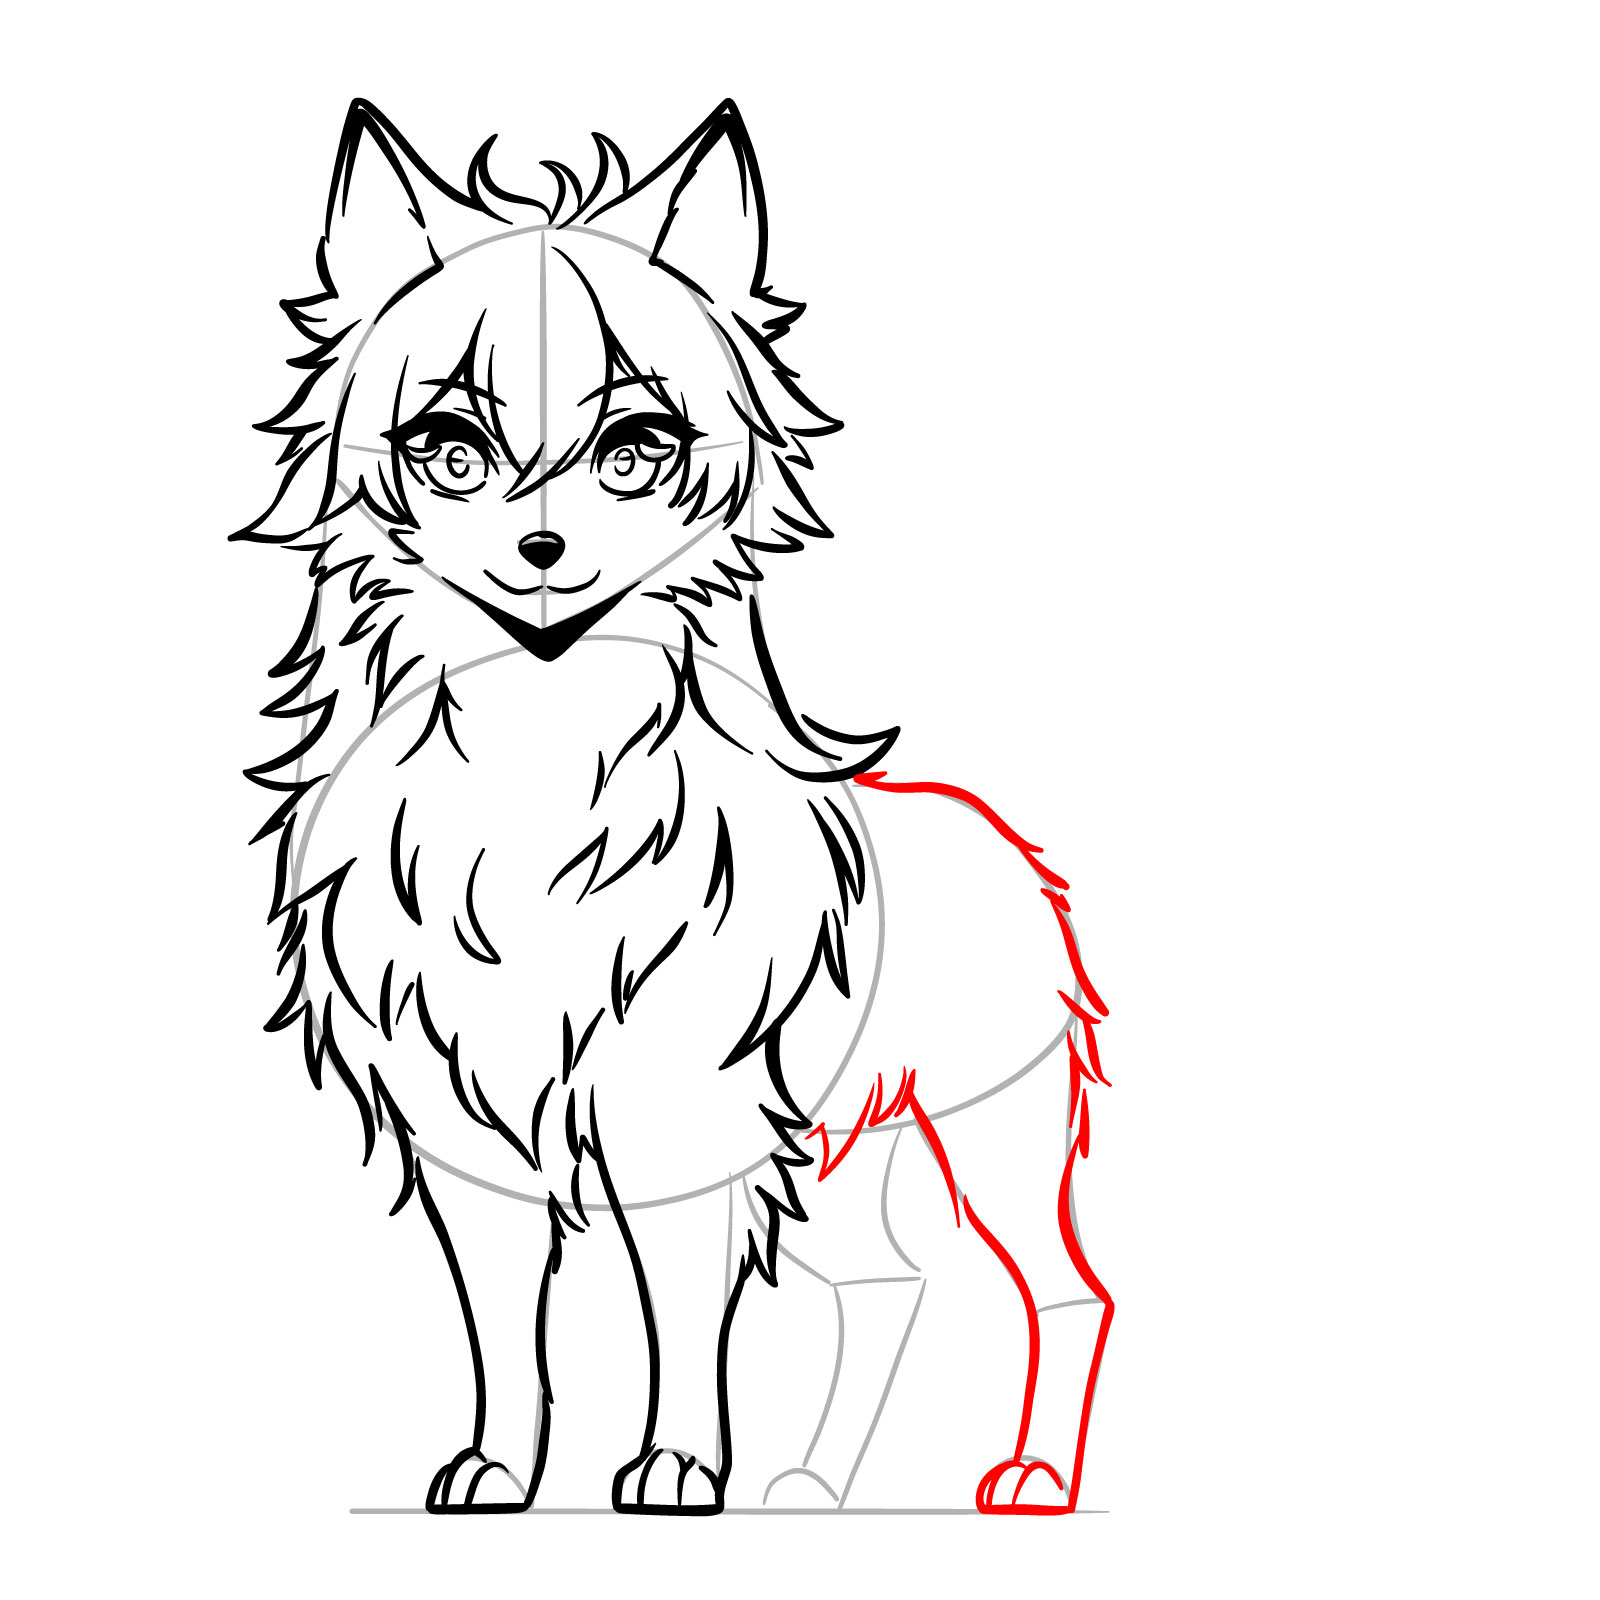
Step 14 – Continuing with the lower body, let’s sketch the rear leg which is closest to the viewer. This step might require adjusting proportions to match the front legs, achieving a dynamic but balanced posture
PinDrawing the body and first rear leg
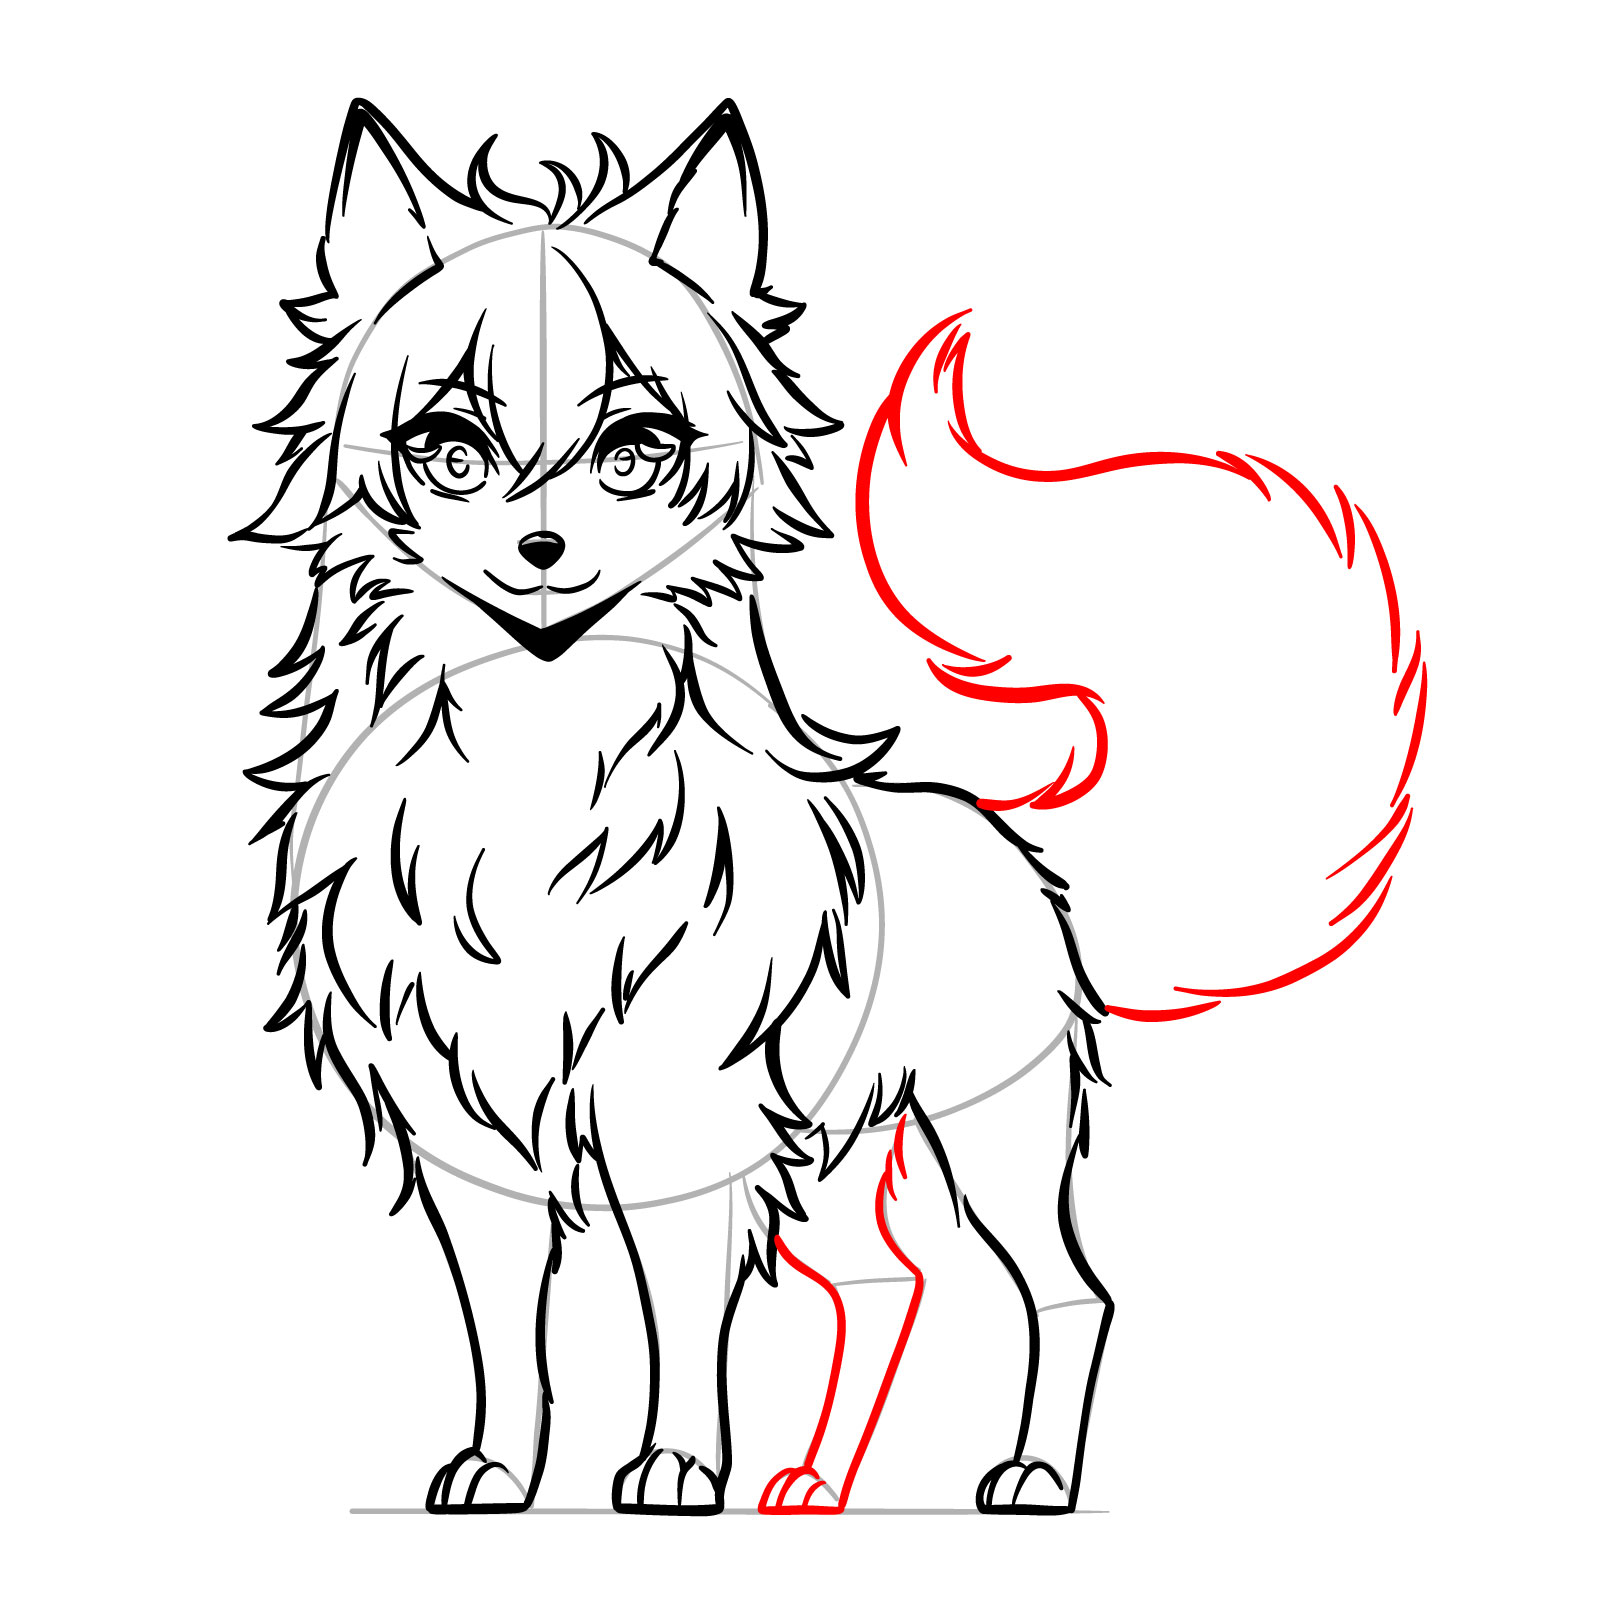
Step 15 – In this step, add the second rear leg and the bushy tail, with the tail being a focal point for expressing the wolf’s emotion and energy. The tail should be drawn with short, flowing, expressive lines to convey movement
PinCompleting the legs and tail
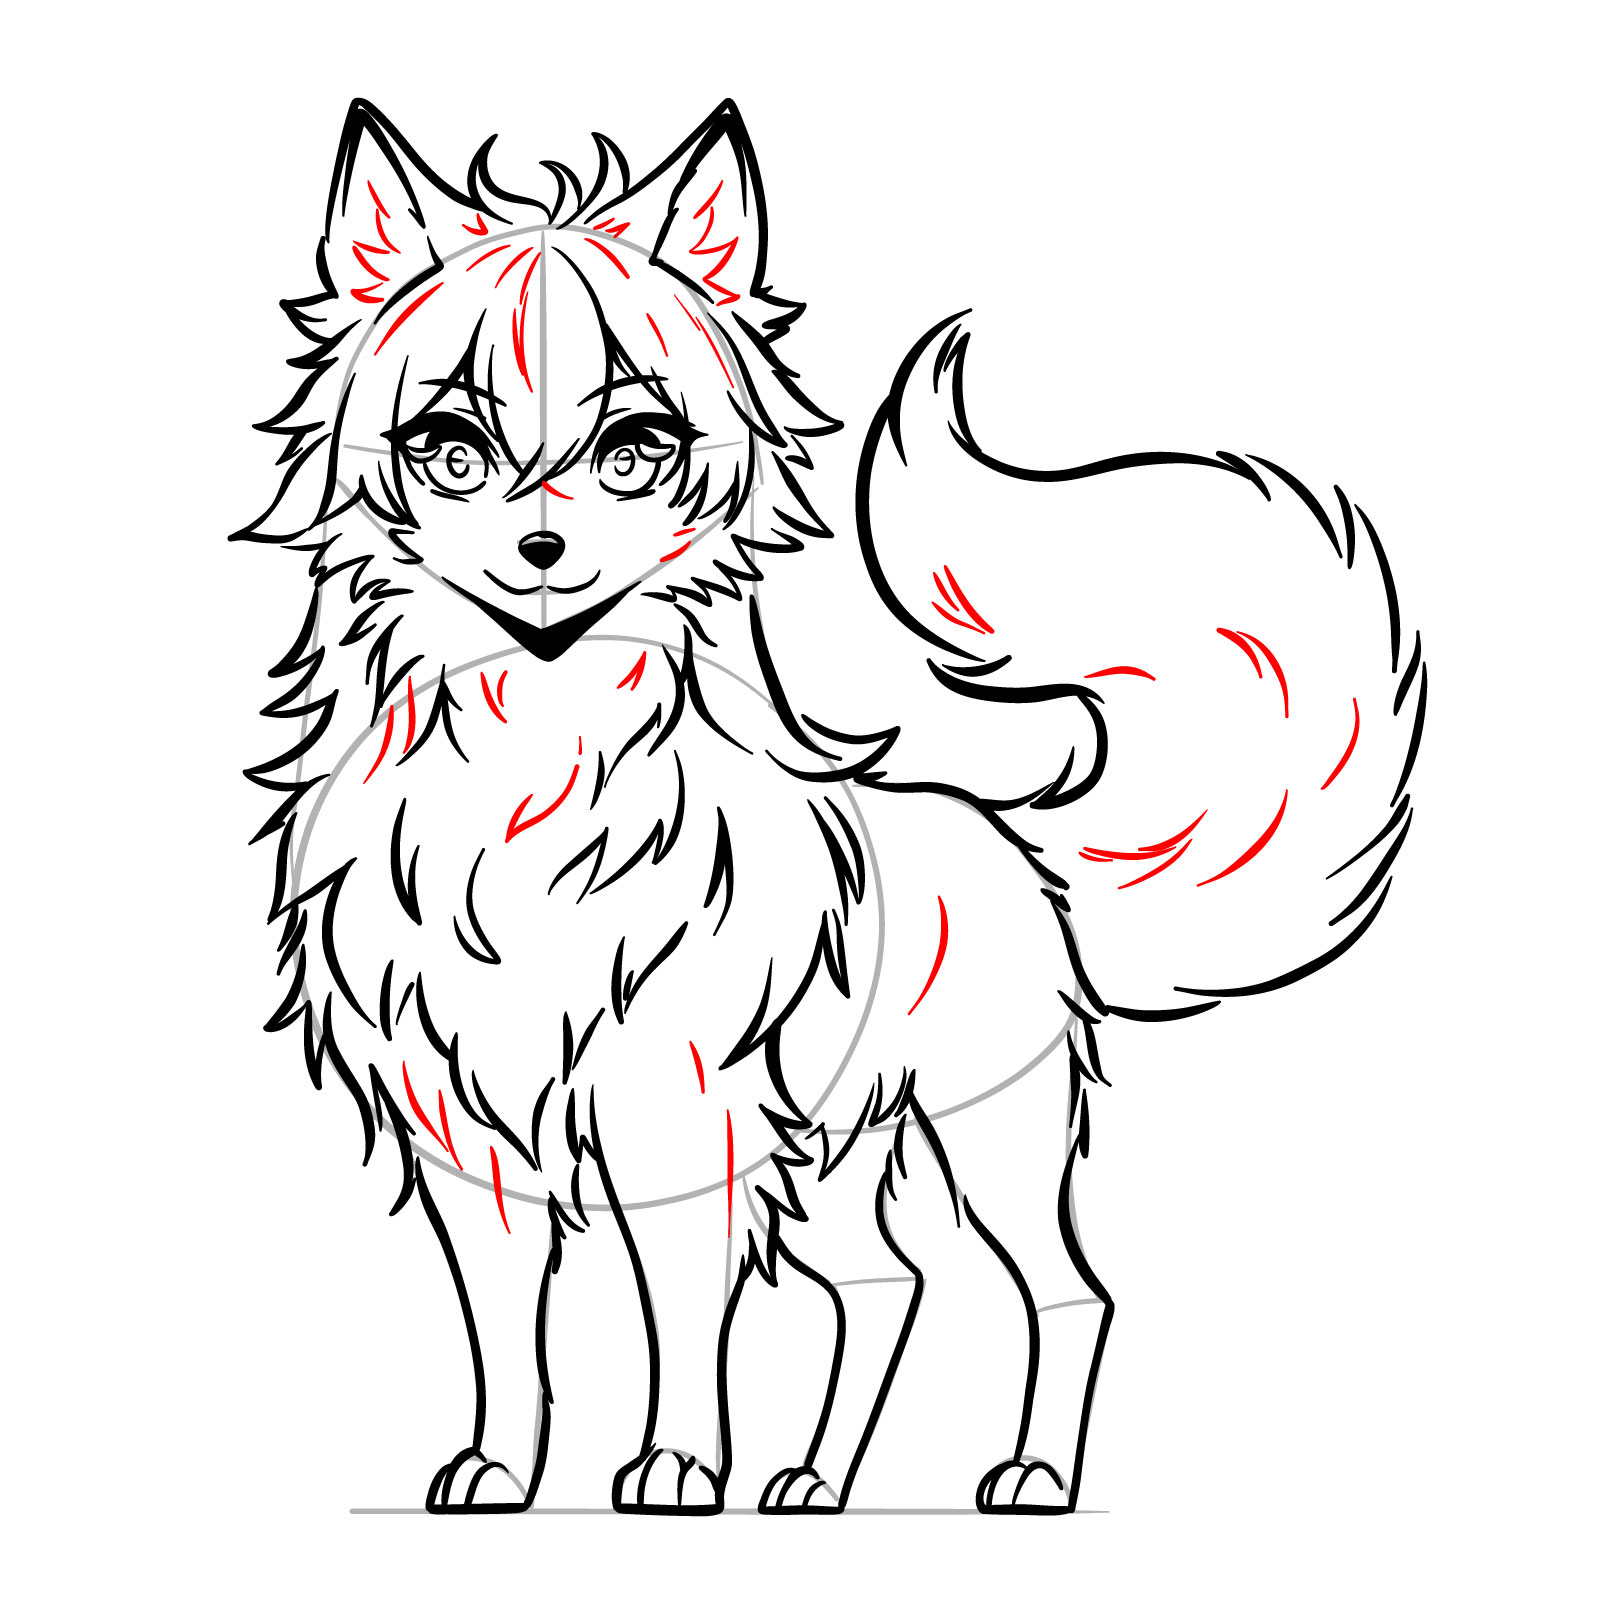
Step 16 – To bring the wolf to life, add texture to the fur. This involves a series of short strokes that follow the contours of the body, giving the impression of a thick coat
PinAdding fur textures
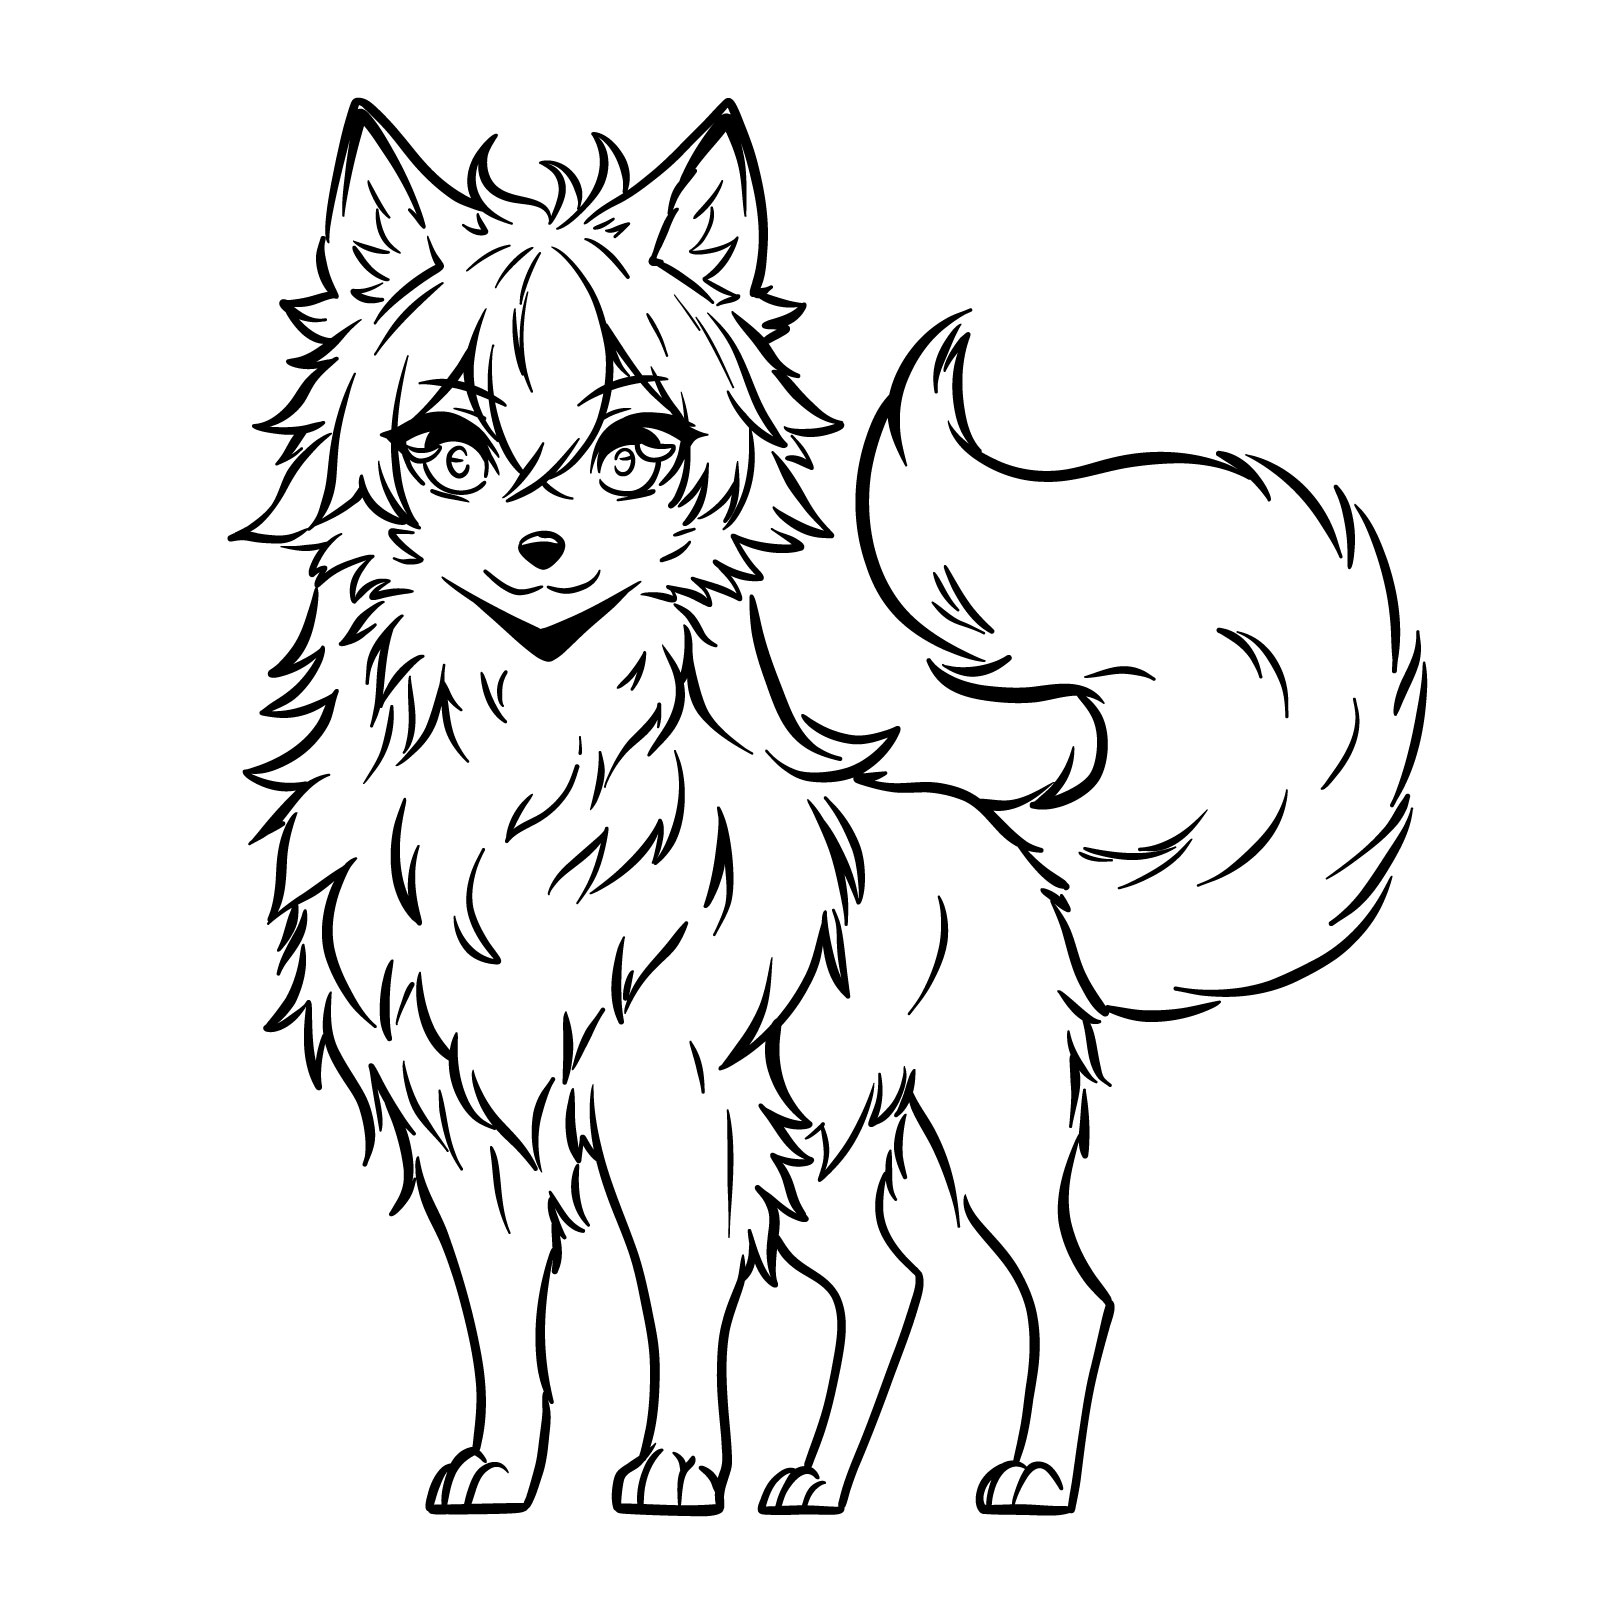
Step 17 – The final step is to review the entire drawing, refining any details for clarity and impact. Now you know how to draw an anime wolf, give yourself some time to enjoy your creation and let’s move forward to the next guide!
PinFinished anime wolf drawing
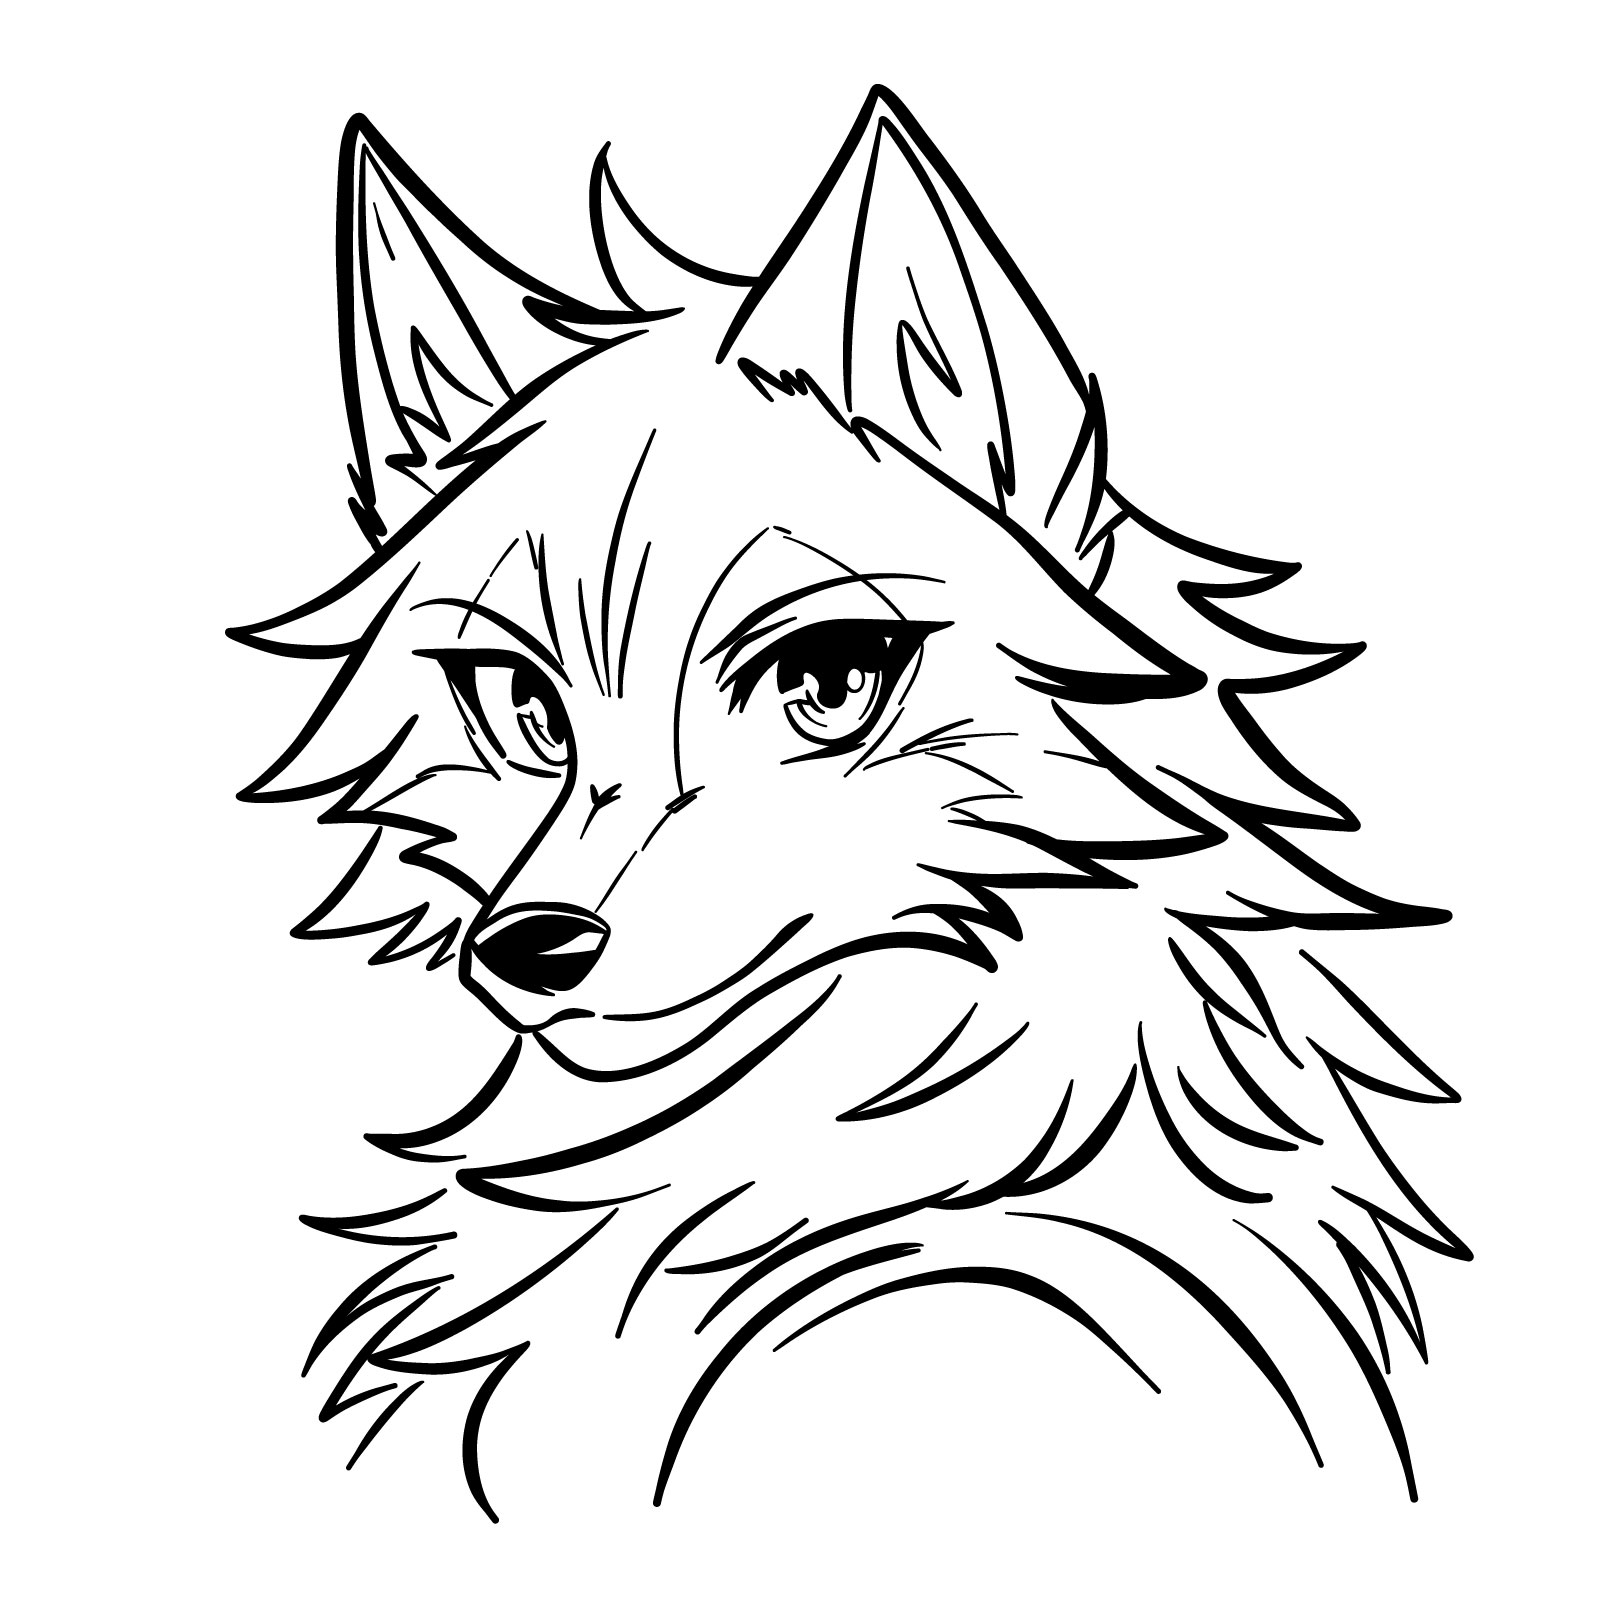
Drawing the Anime Wolf Face in 3/4 View with 11 Steps
PinHow to draw anime wolf’s face
Advancing to the fifth guide, you’ll learn how to draw an anime wolf face from a 3/4 view. This perspective adds depth and character to the wolf’s visage. Over the course of 11 steps, beginning with a couple of basic sketching stages, you’ll shape the wolf’s head and features. The guide helps you capture the alluring anime aesthetics, such as a sharp gaze and a gracefully arched neck. The final illustration presents a wolf with a soulful expression, framed by lush fur and refined lines, embodying the elegance and mystique that anime art is celebrated for.
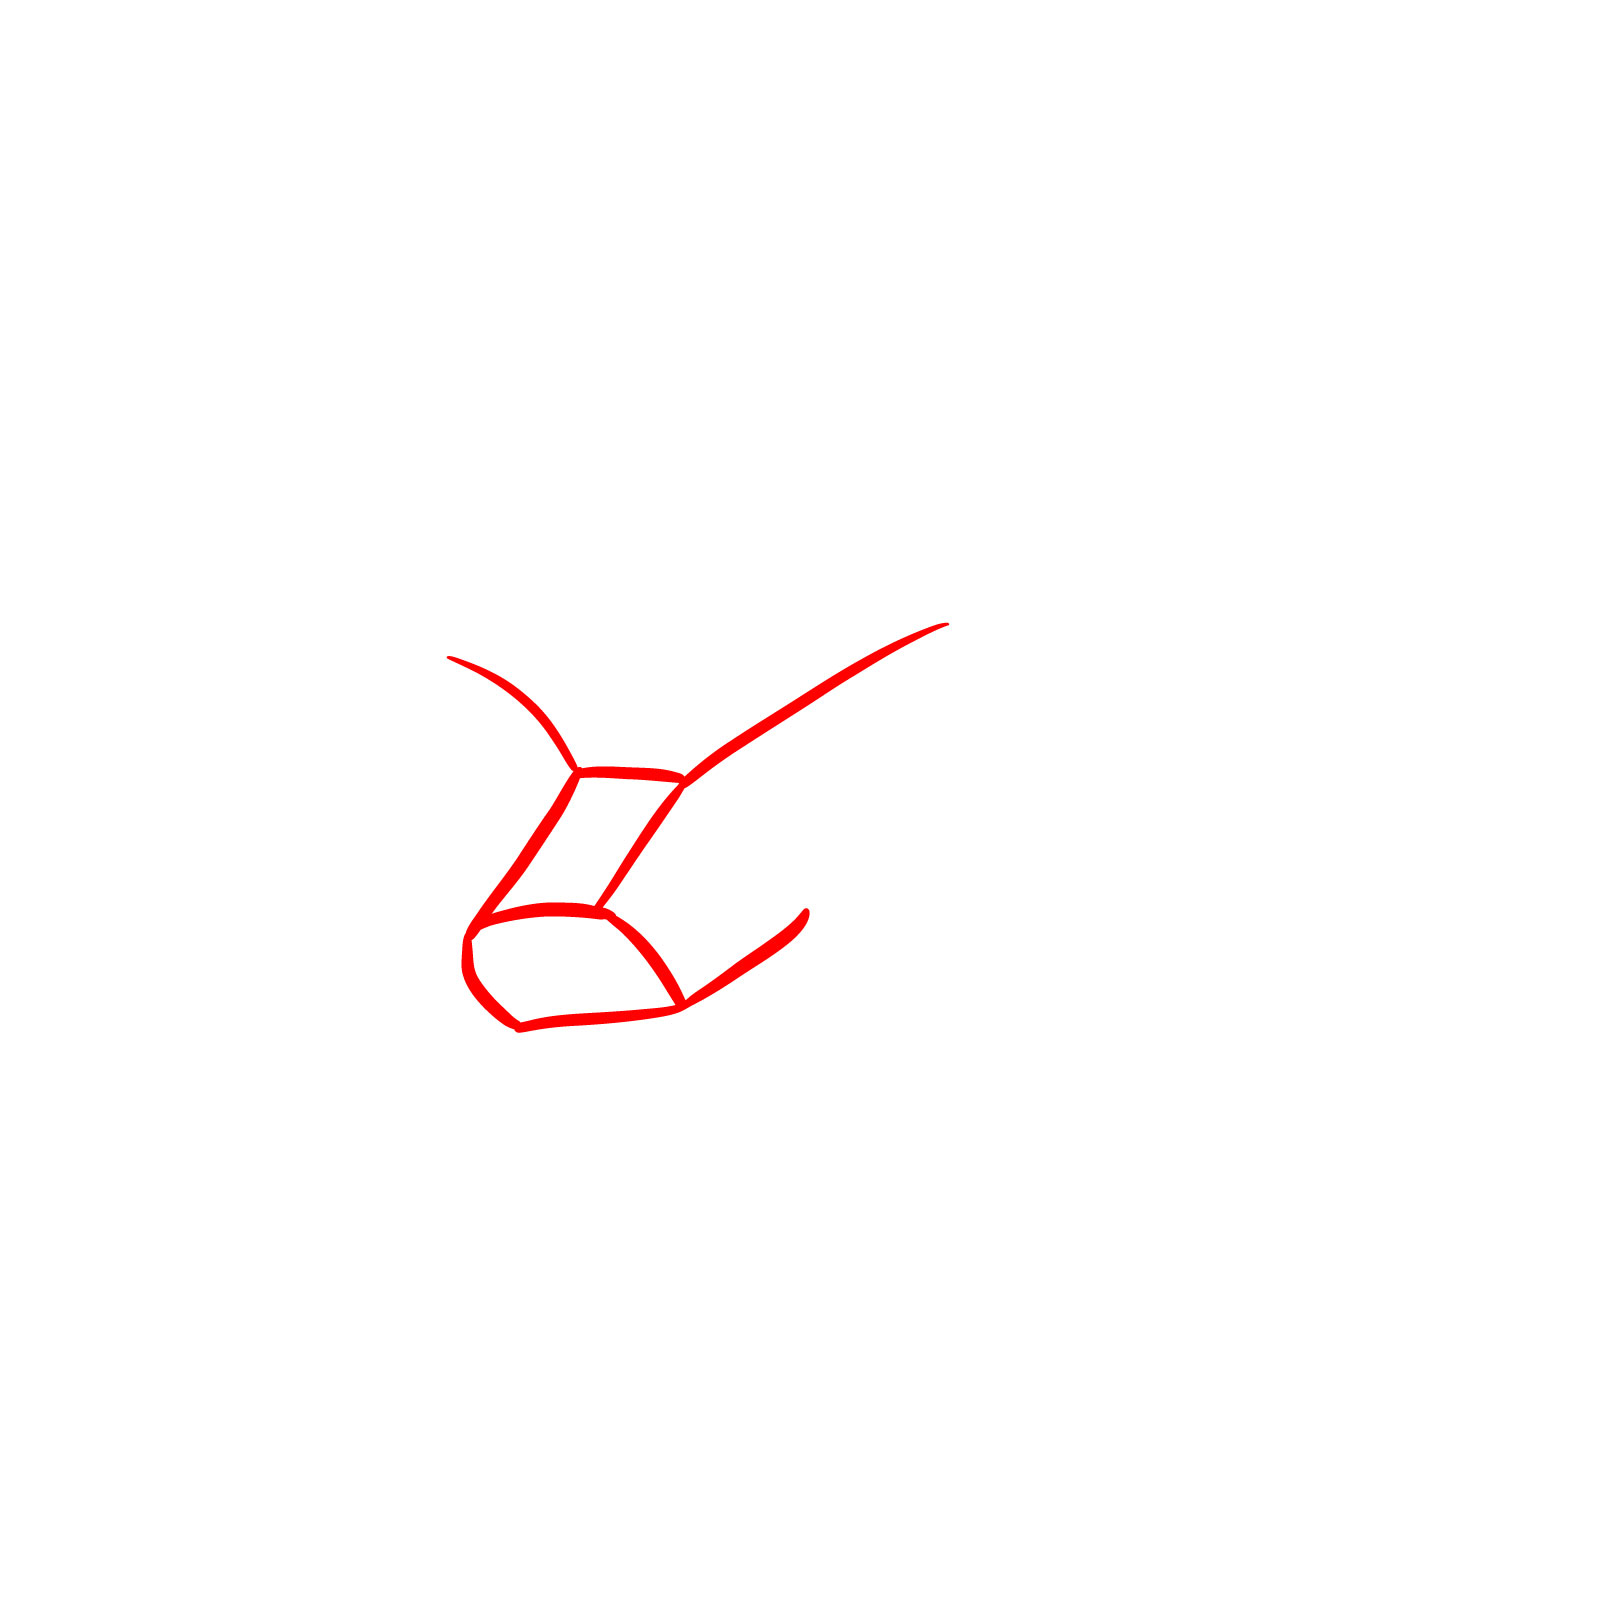
Step 01 – Start your anime wolf face drawing with the foundational shapes. Sketch a shape shown in the image to define the snout of the wolf. Add two curved lines above the snout to indicate where the eyes will be placed
PinBegin by sketching the initial contours for the snout and the placement lines for the eyes
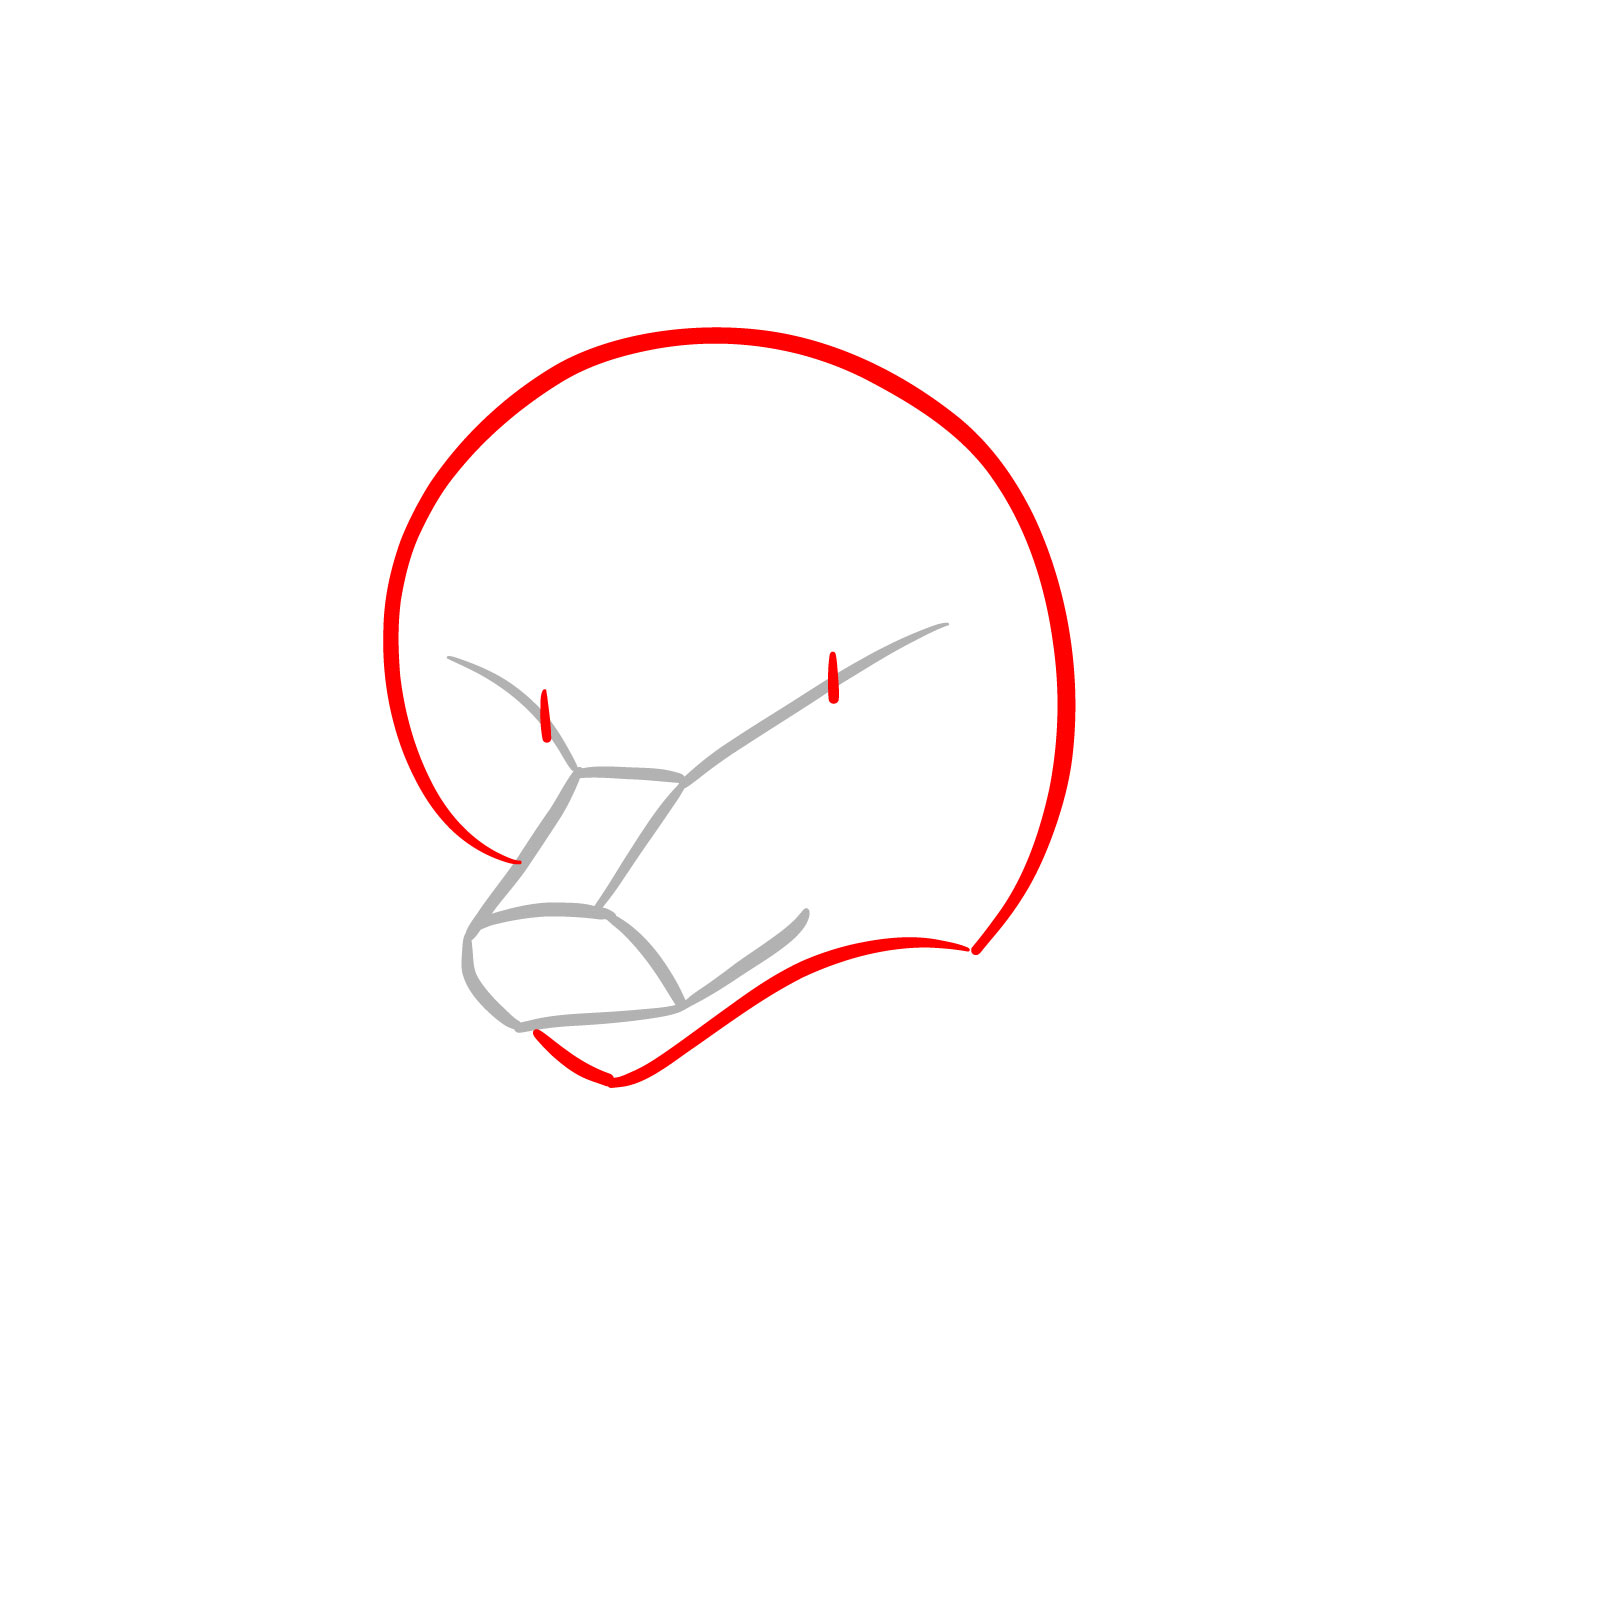
Step 02 – Now, draw a large, swirl-like outline around the initial snout shape to form the head of the wolf. Ensure the lines are soft and slightly curved to capture the anime style. Include a line at the bottom to indicate the chin area
PinOutline the head and define the chin to shape the wolf’s face
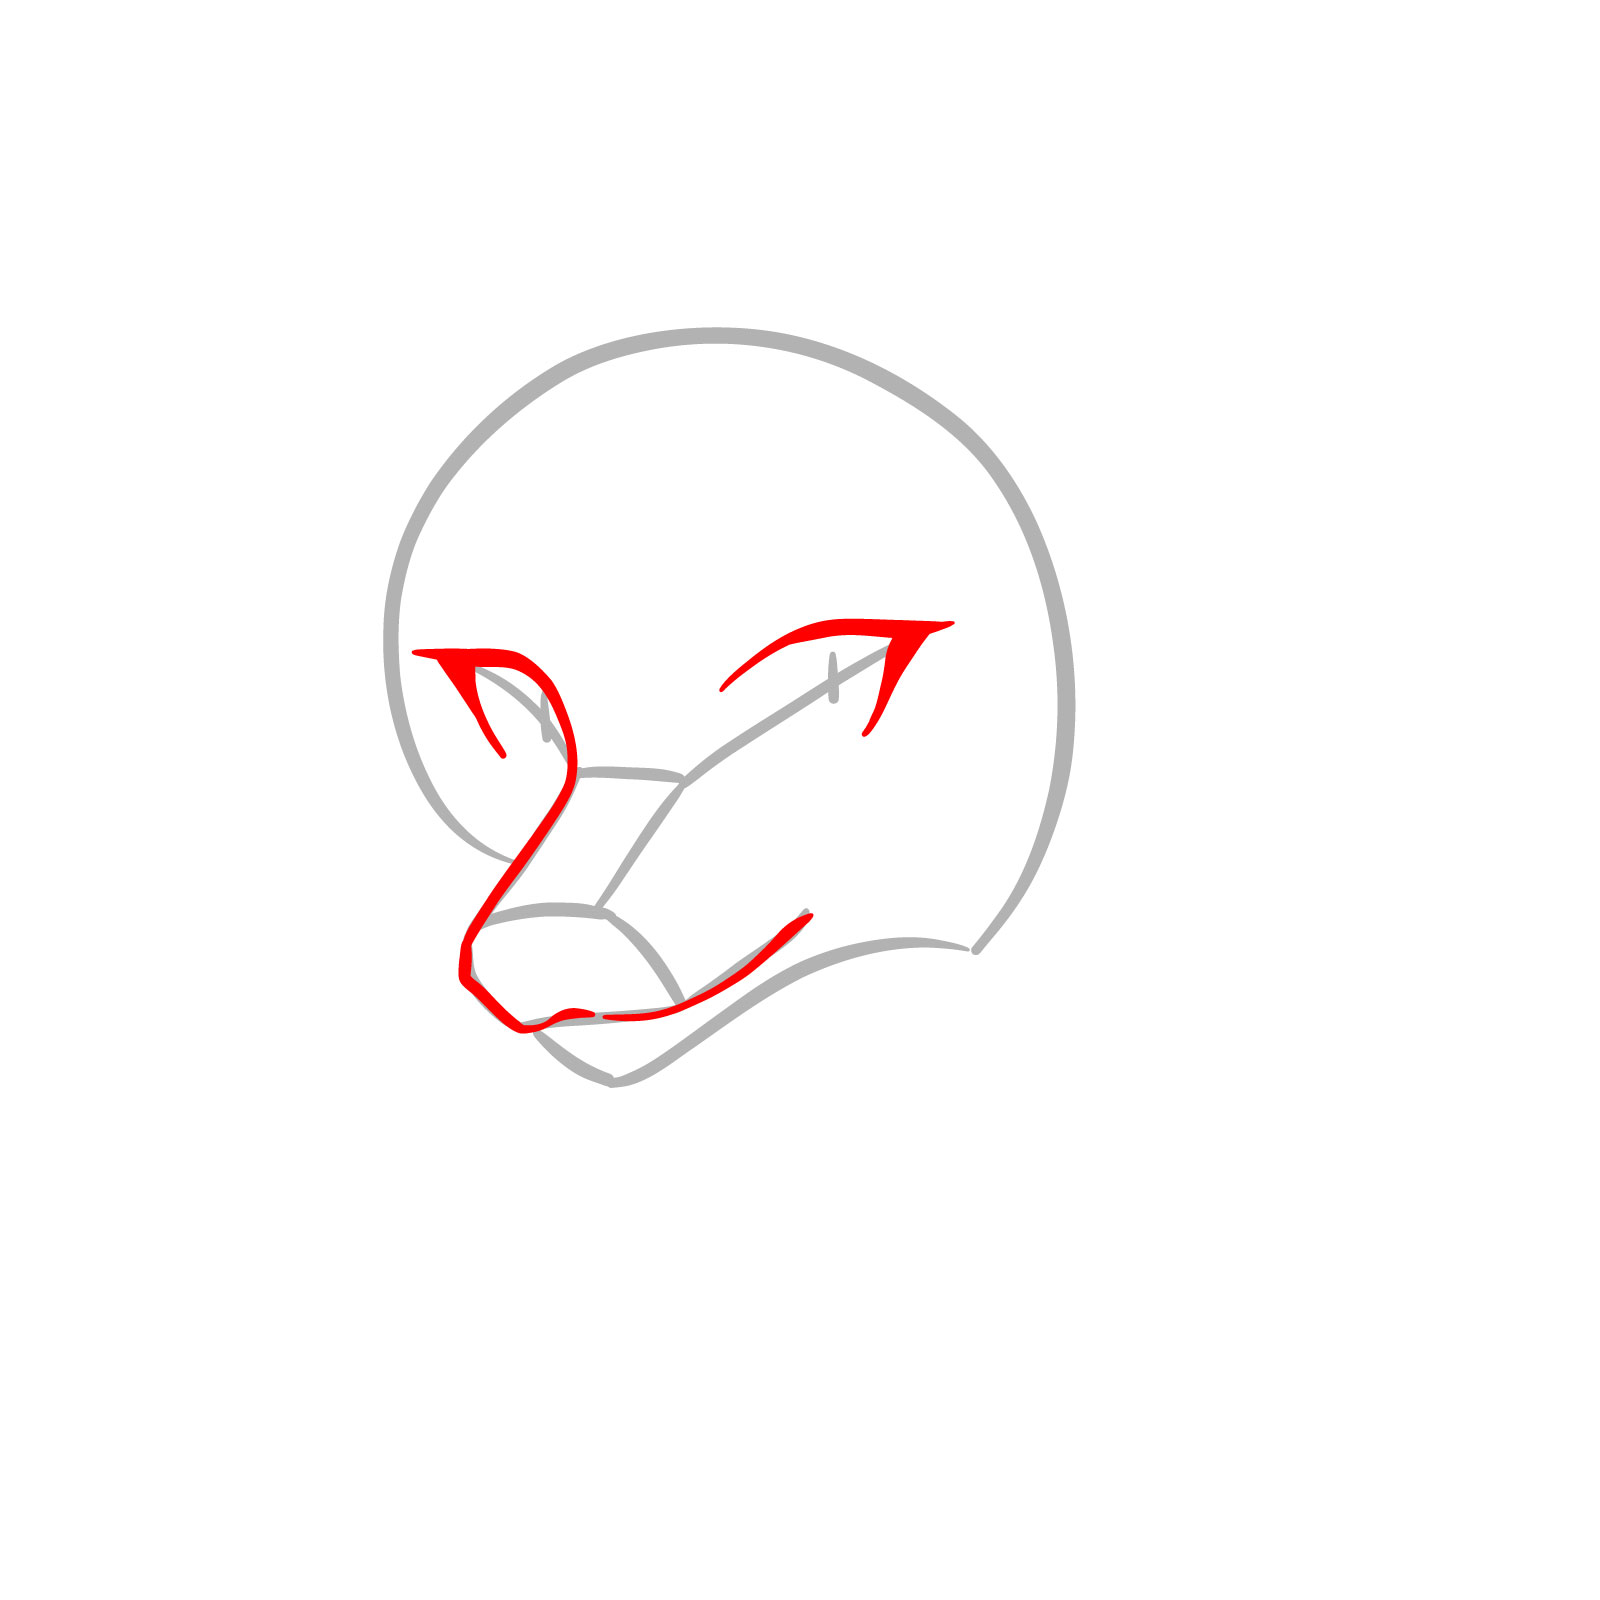
Step 03 – Refine the snout by adding the top part and the mouth line. Begin sketching the eyes with two large outlines that have a sharp corner on the outer edges, typical of anime characters
PinAdd definition to the snout and the initial outlines of the anime-style eyes
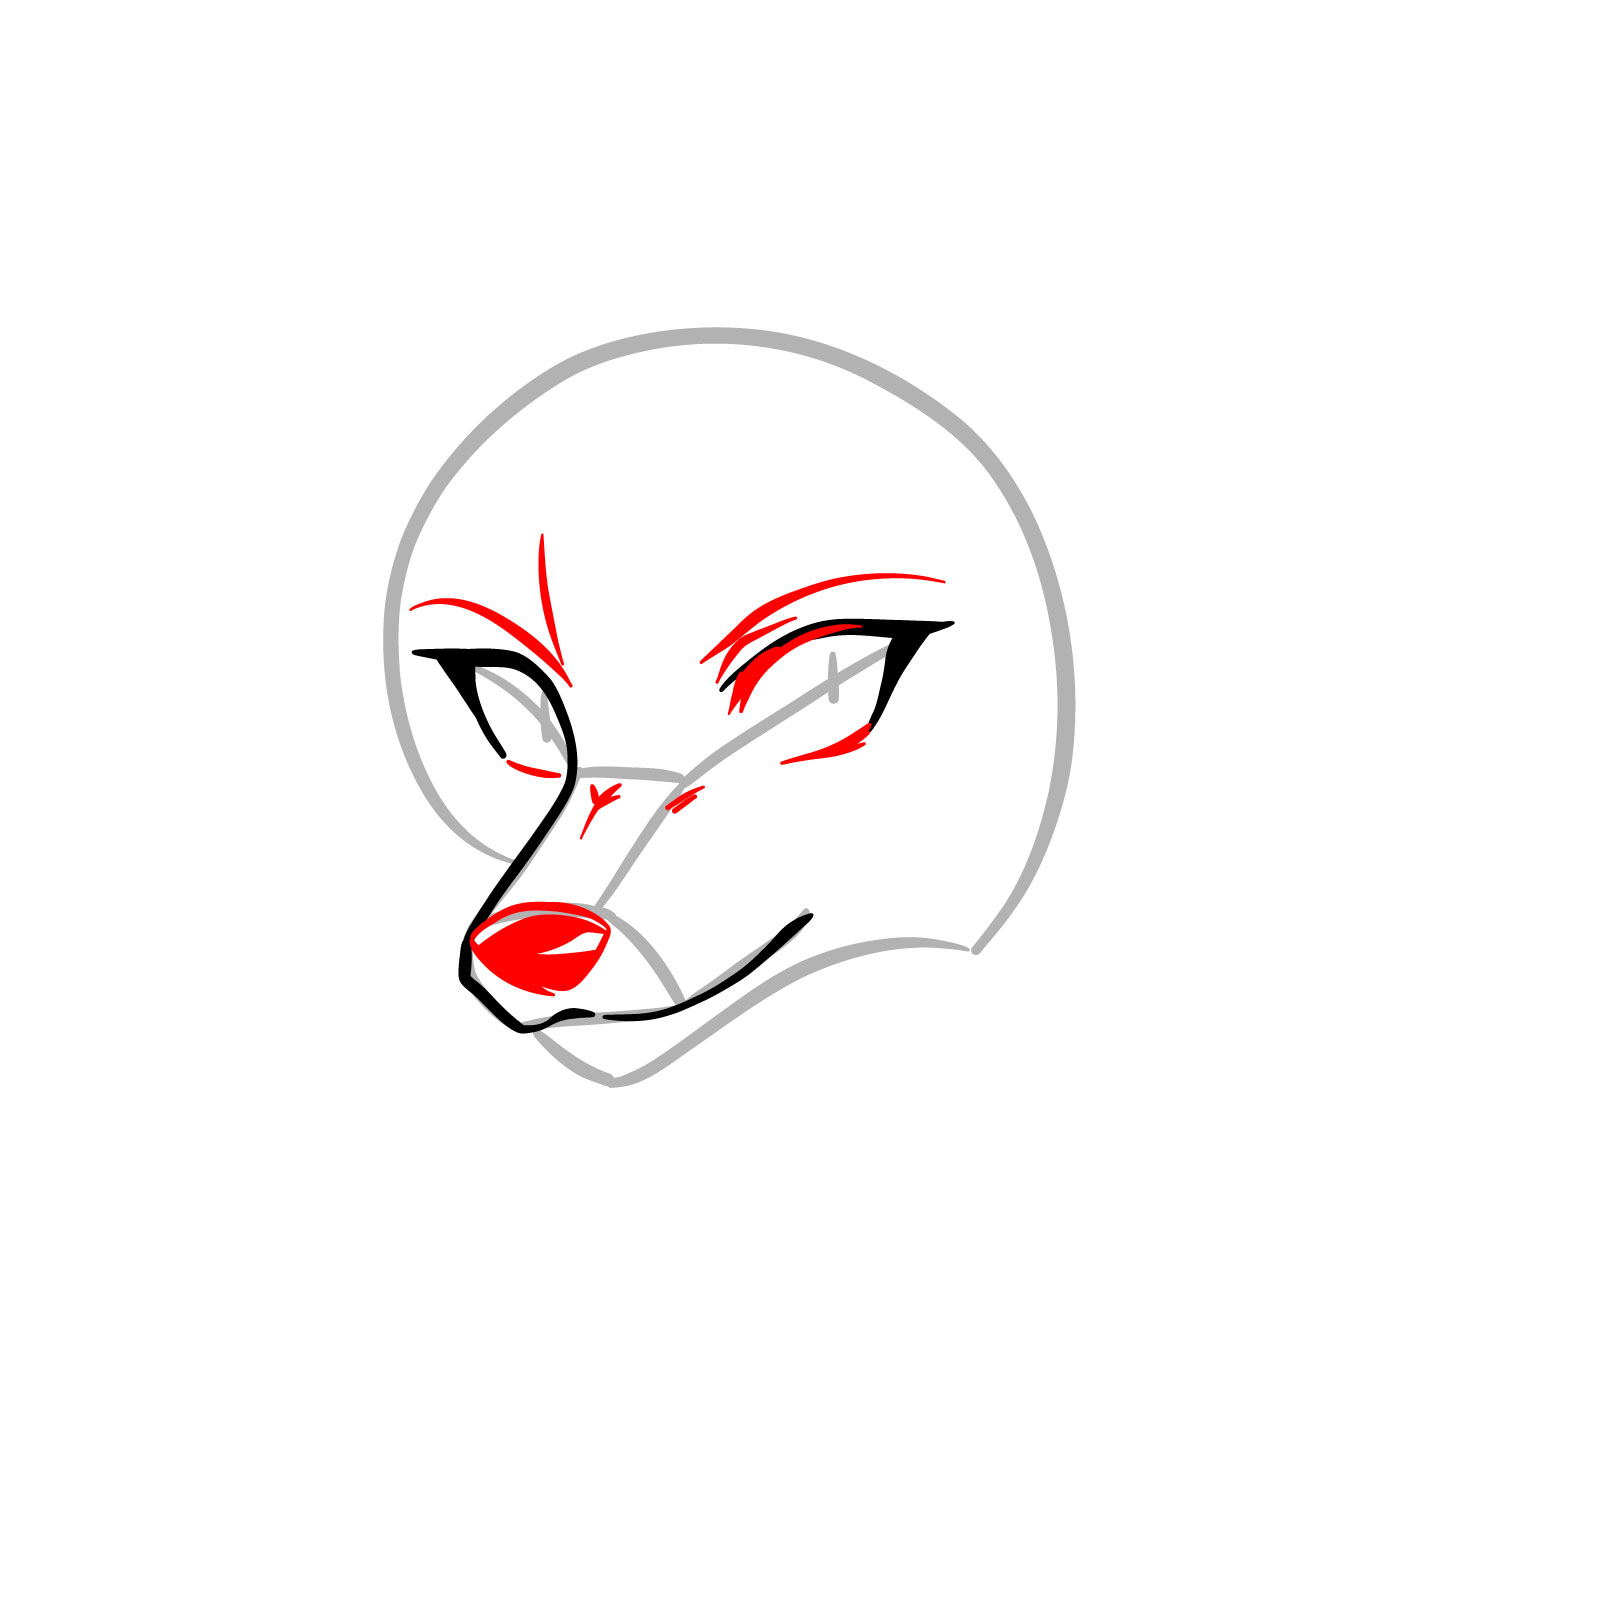
Step 04 – Focus on the eyes, refining their shape to make them more expressive. Draw a filled-in nose with spaces left blank for highlights, showing the light reflection typical in anime drawings. Sketch in the eyebrows and add small details to bring character to the face
PinRefine the eye outlines and add detailed features like the nose and eyebrows
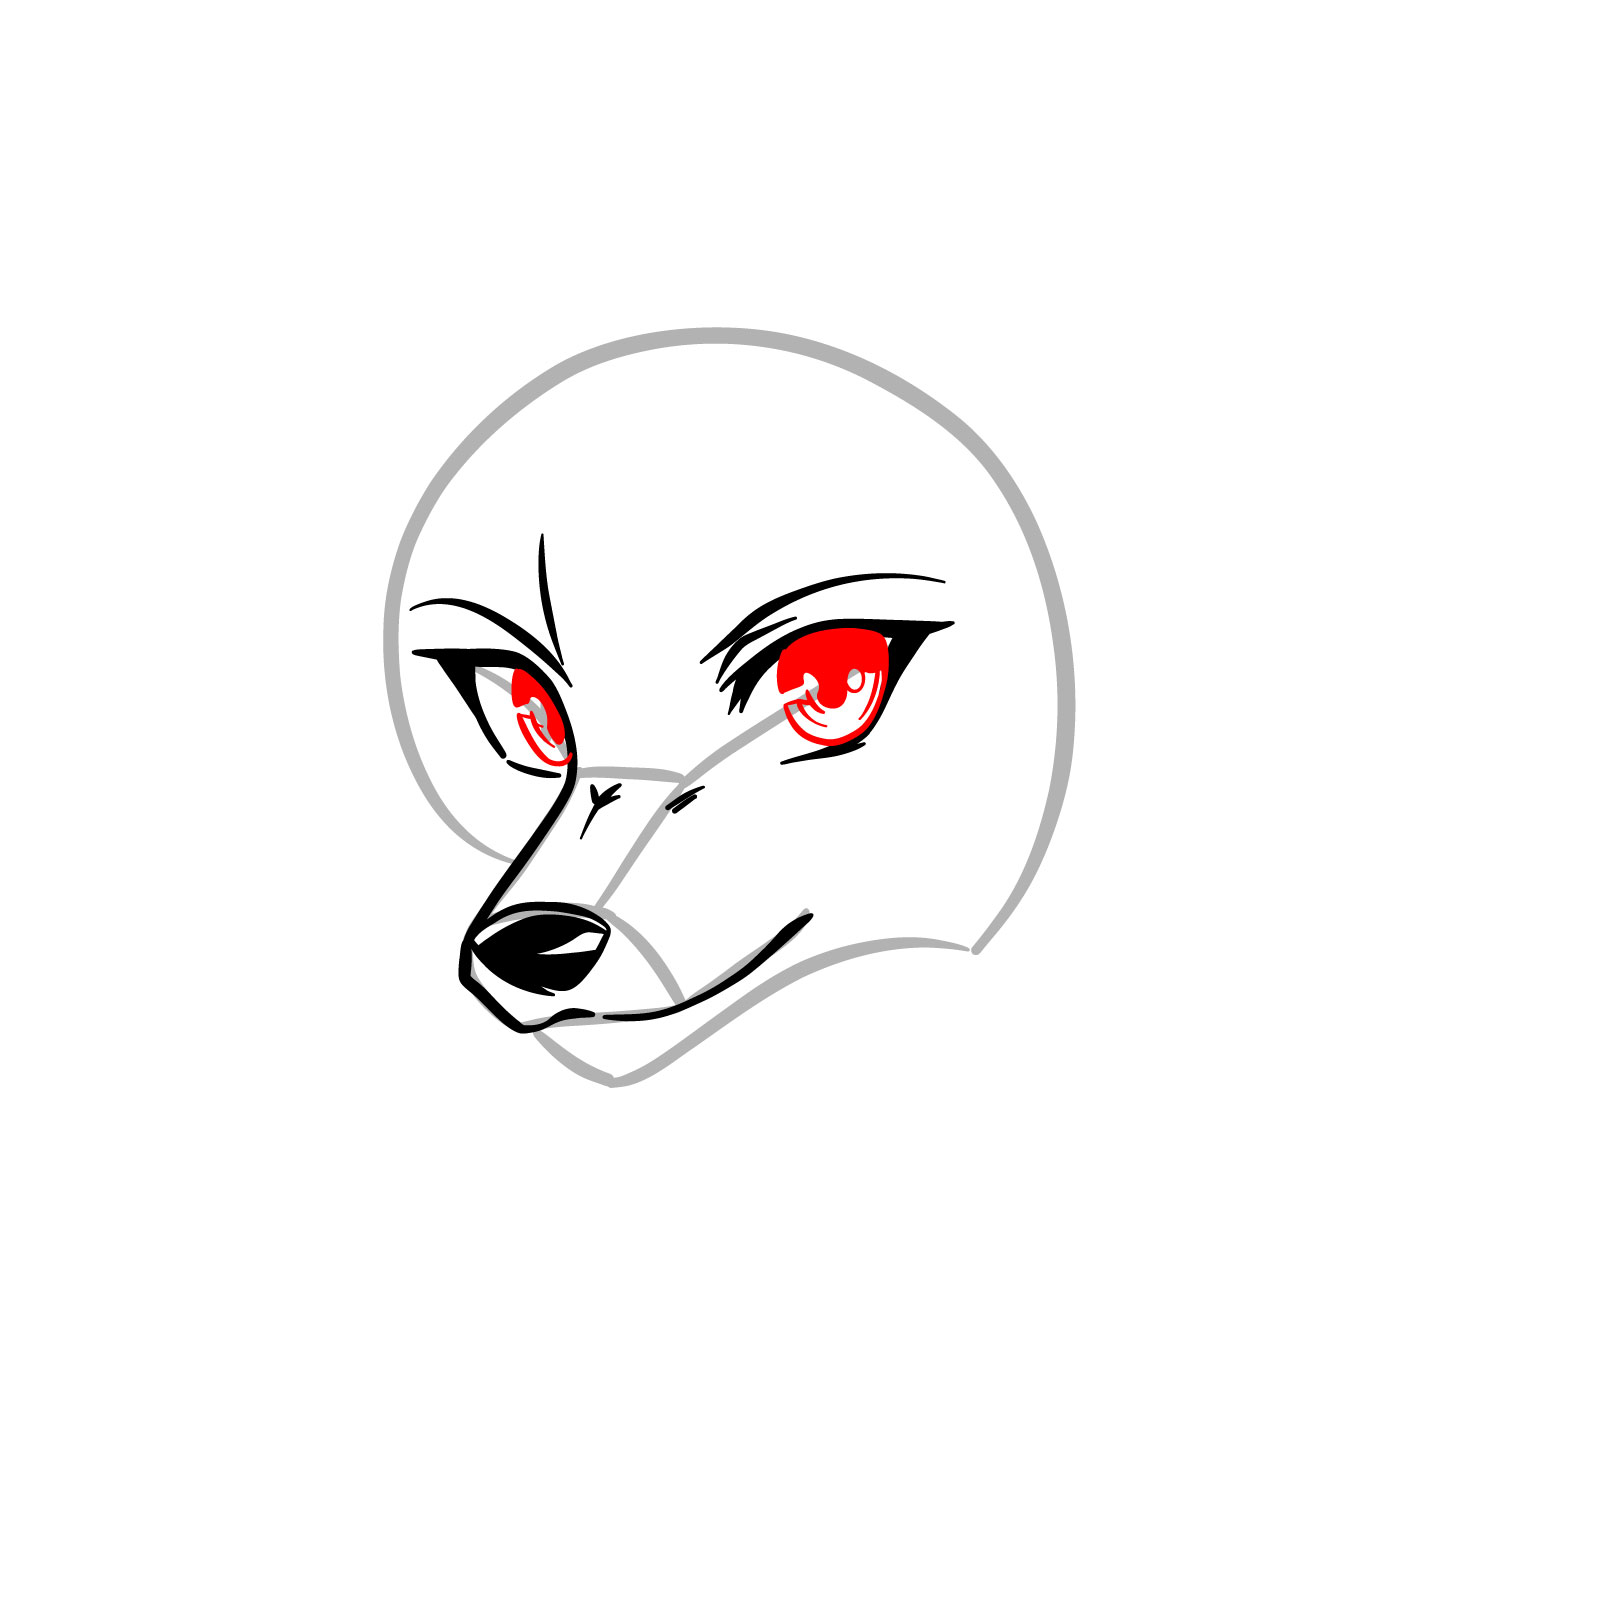
Step 05 – It’s time to give your wolf personality by drawing the detailed anime eyes. Sketch the iris and pupils, and add the reflections to create depth and emotion. The eyes are a focal point in anime characters, so take your time with this step
PinSketch the detailed anime eyes to bring life to your wolf drawing
Step 06 – Now, add the furry outline around the head. These lines should be jagged and varied in length to mimic the natural fur pattern
PinComplete the anime wolf face with a furry texture around the head
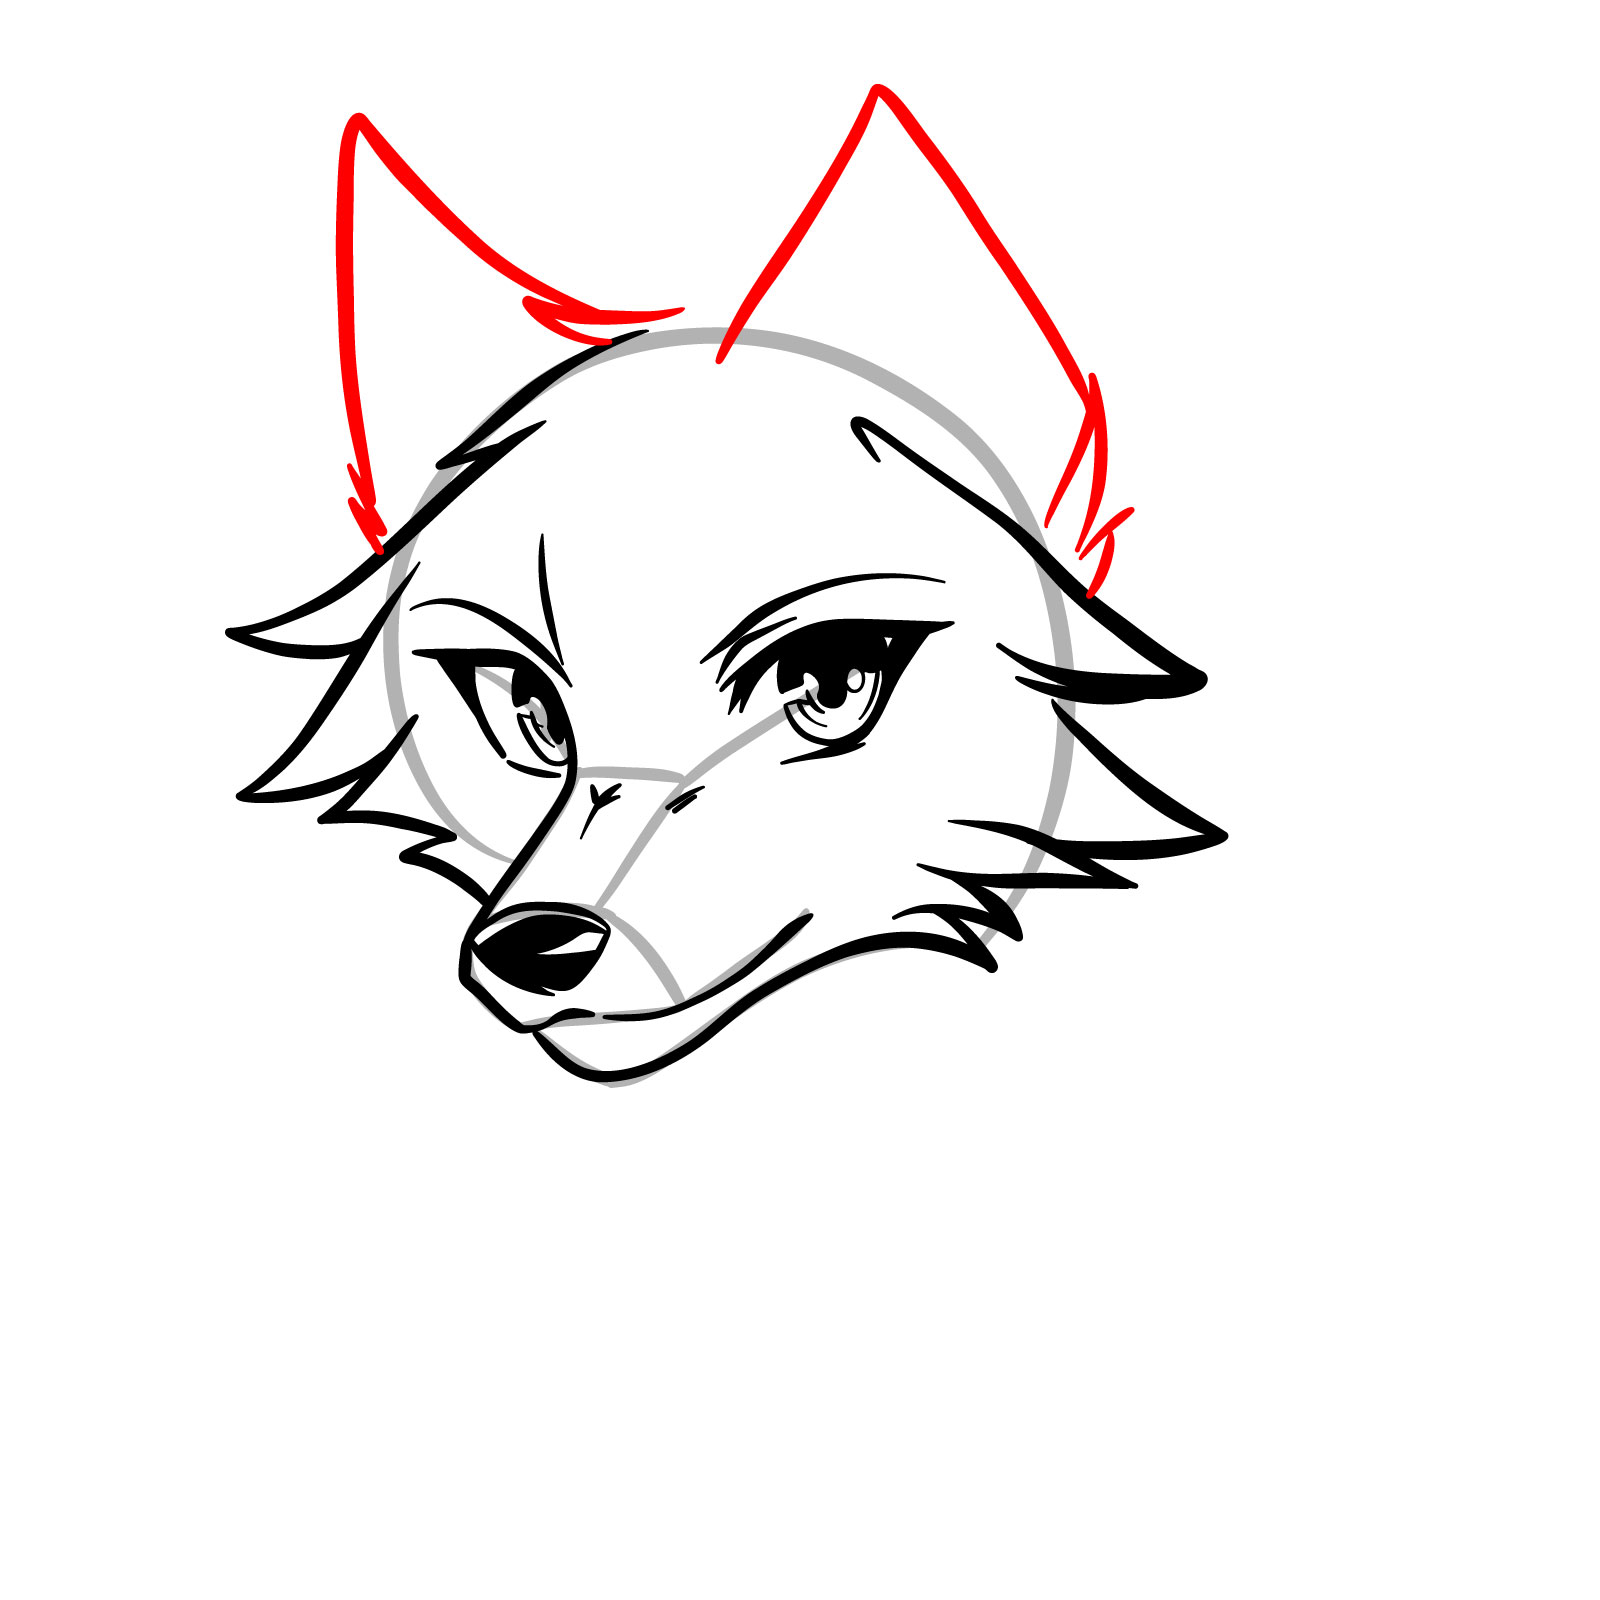
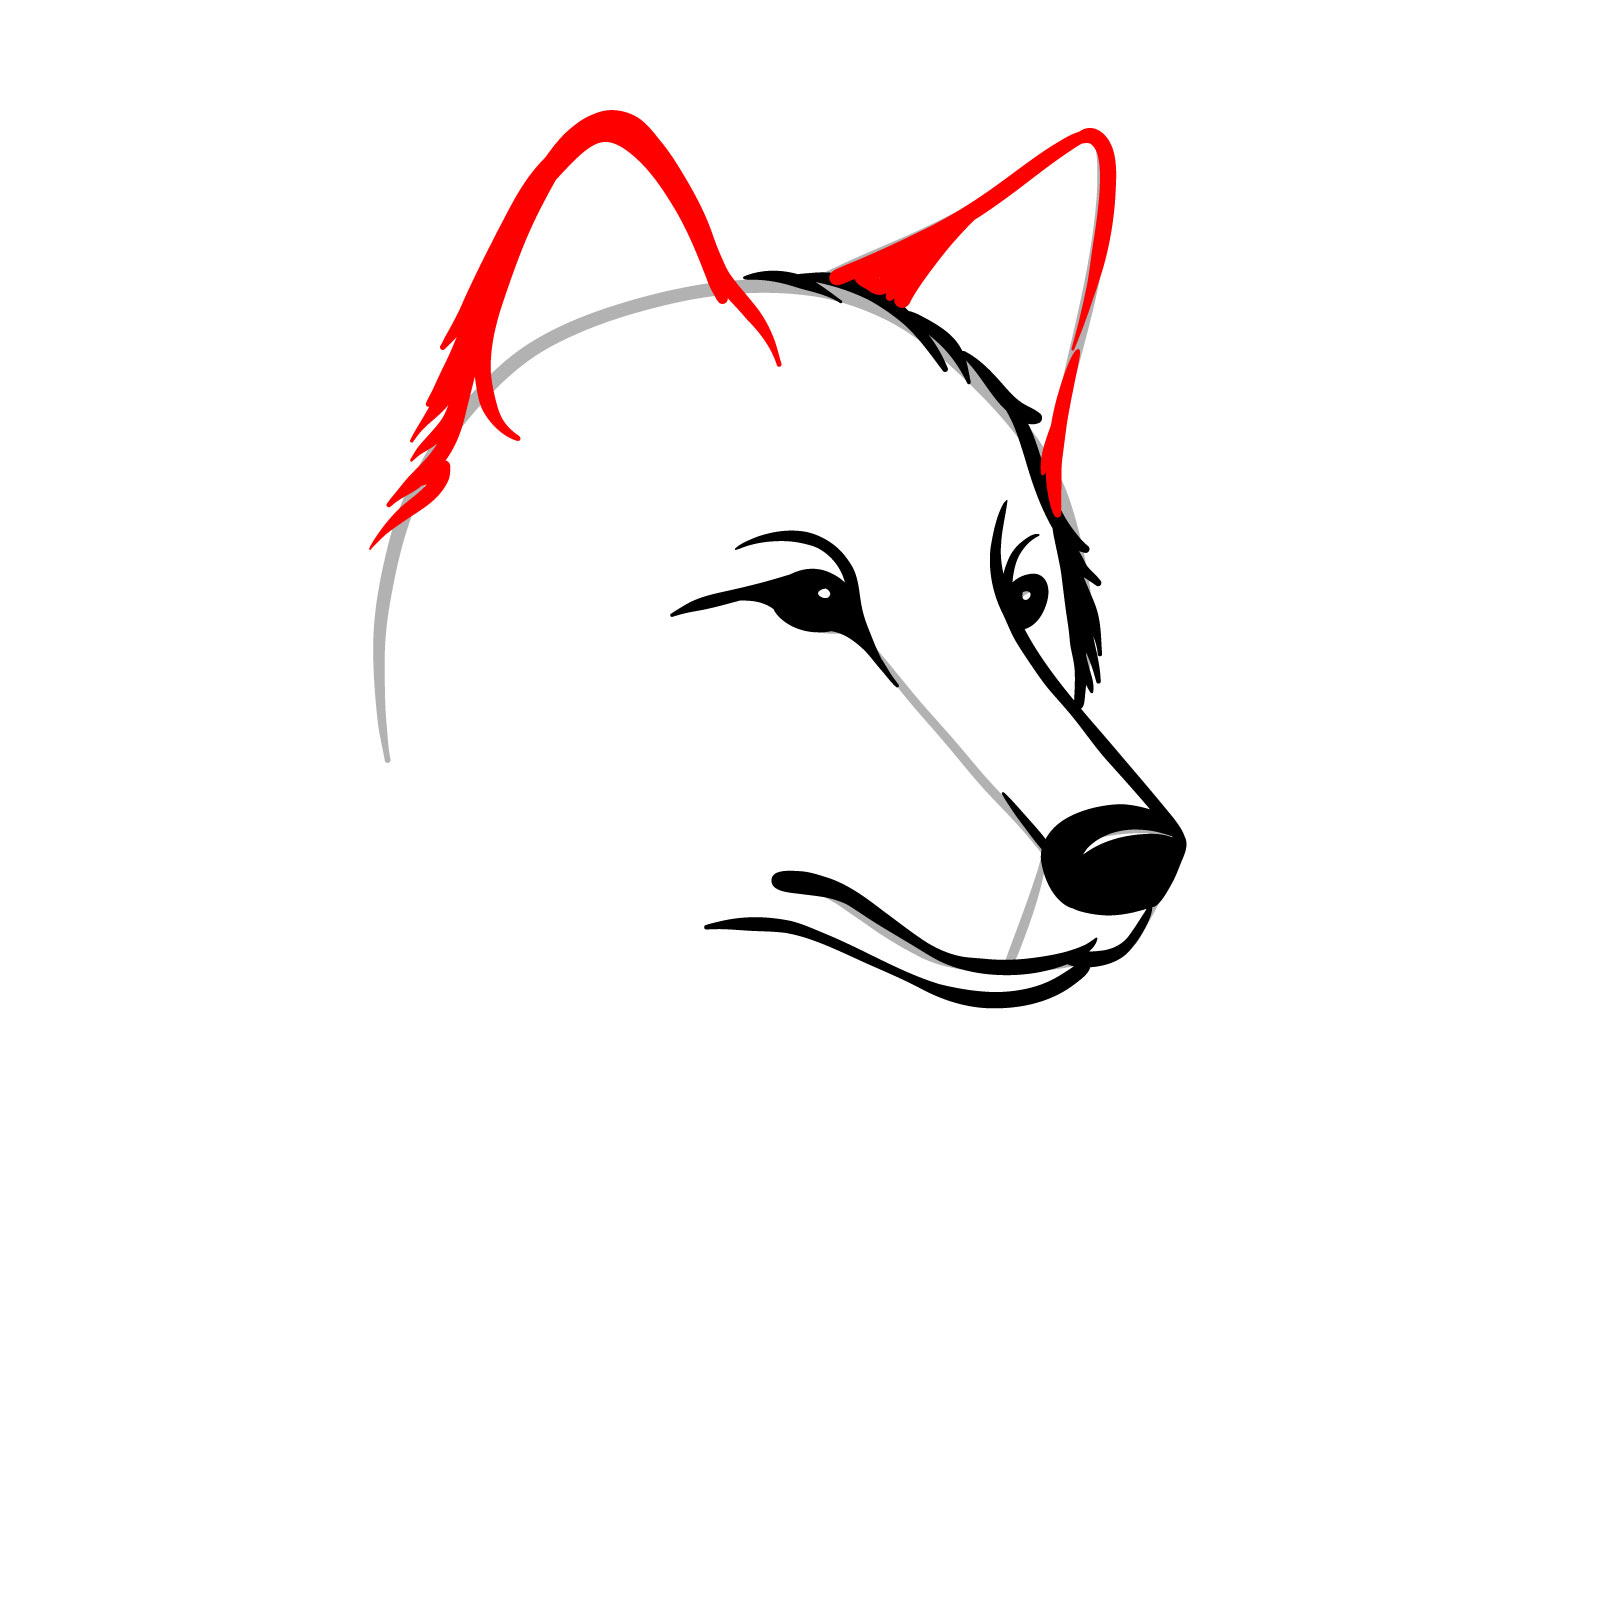
Step 07 – To bring more character to your anime wolf face drawing, add two pointed ears at the top of the head. Ensure the ears are sharp, symbolizing the wolf’s alertness and wild nature
PinSketch the pointed ears to give your anime wolf face a keen expression
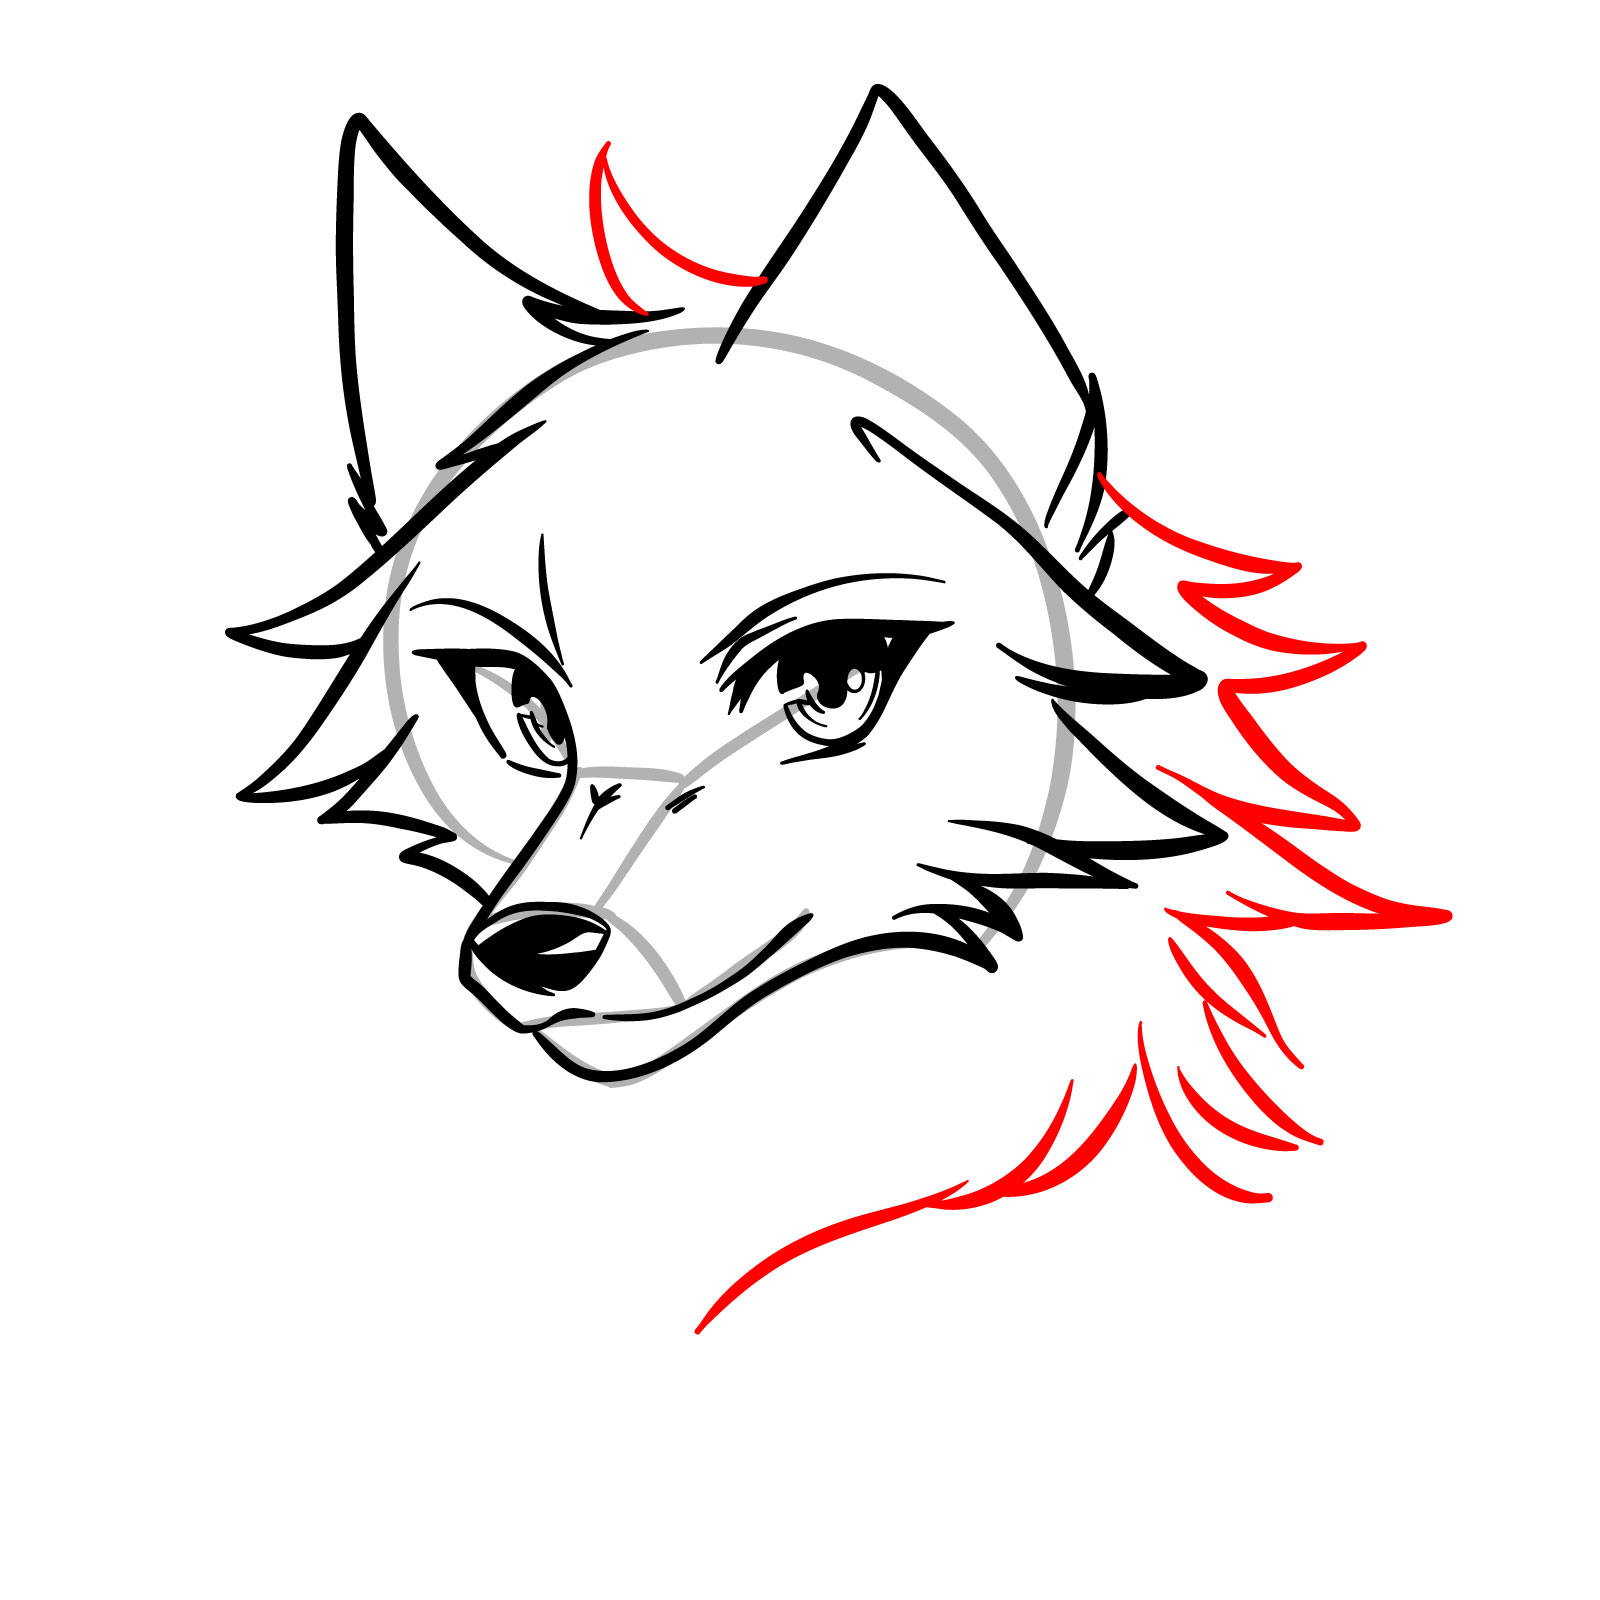
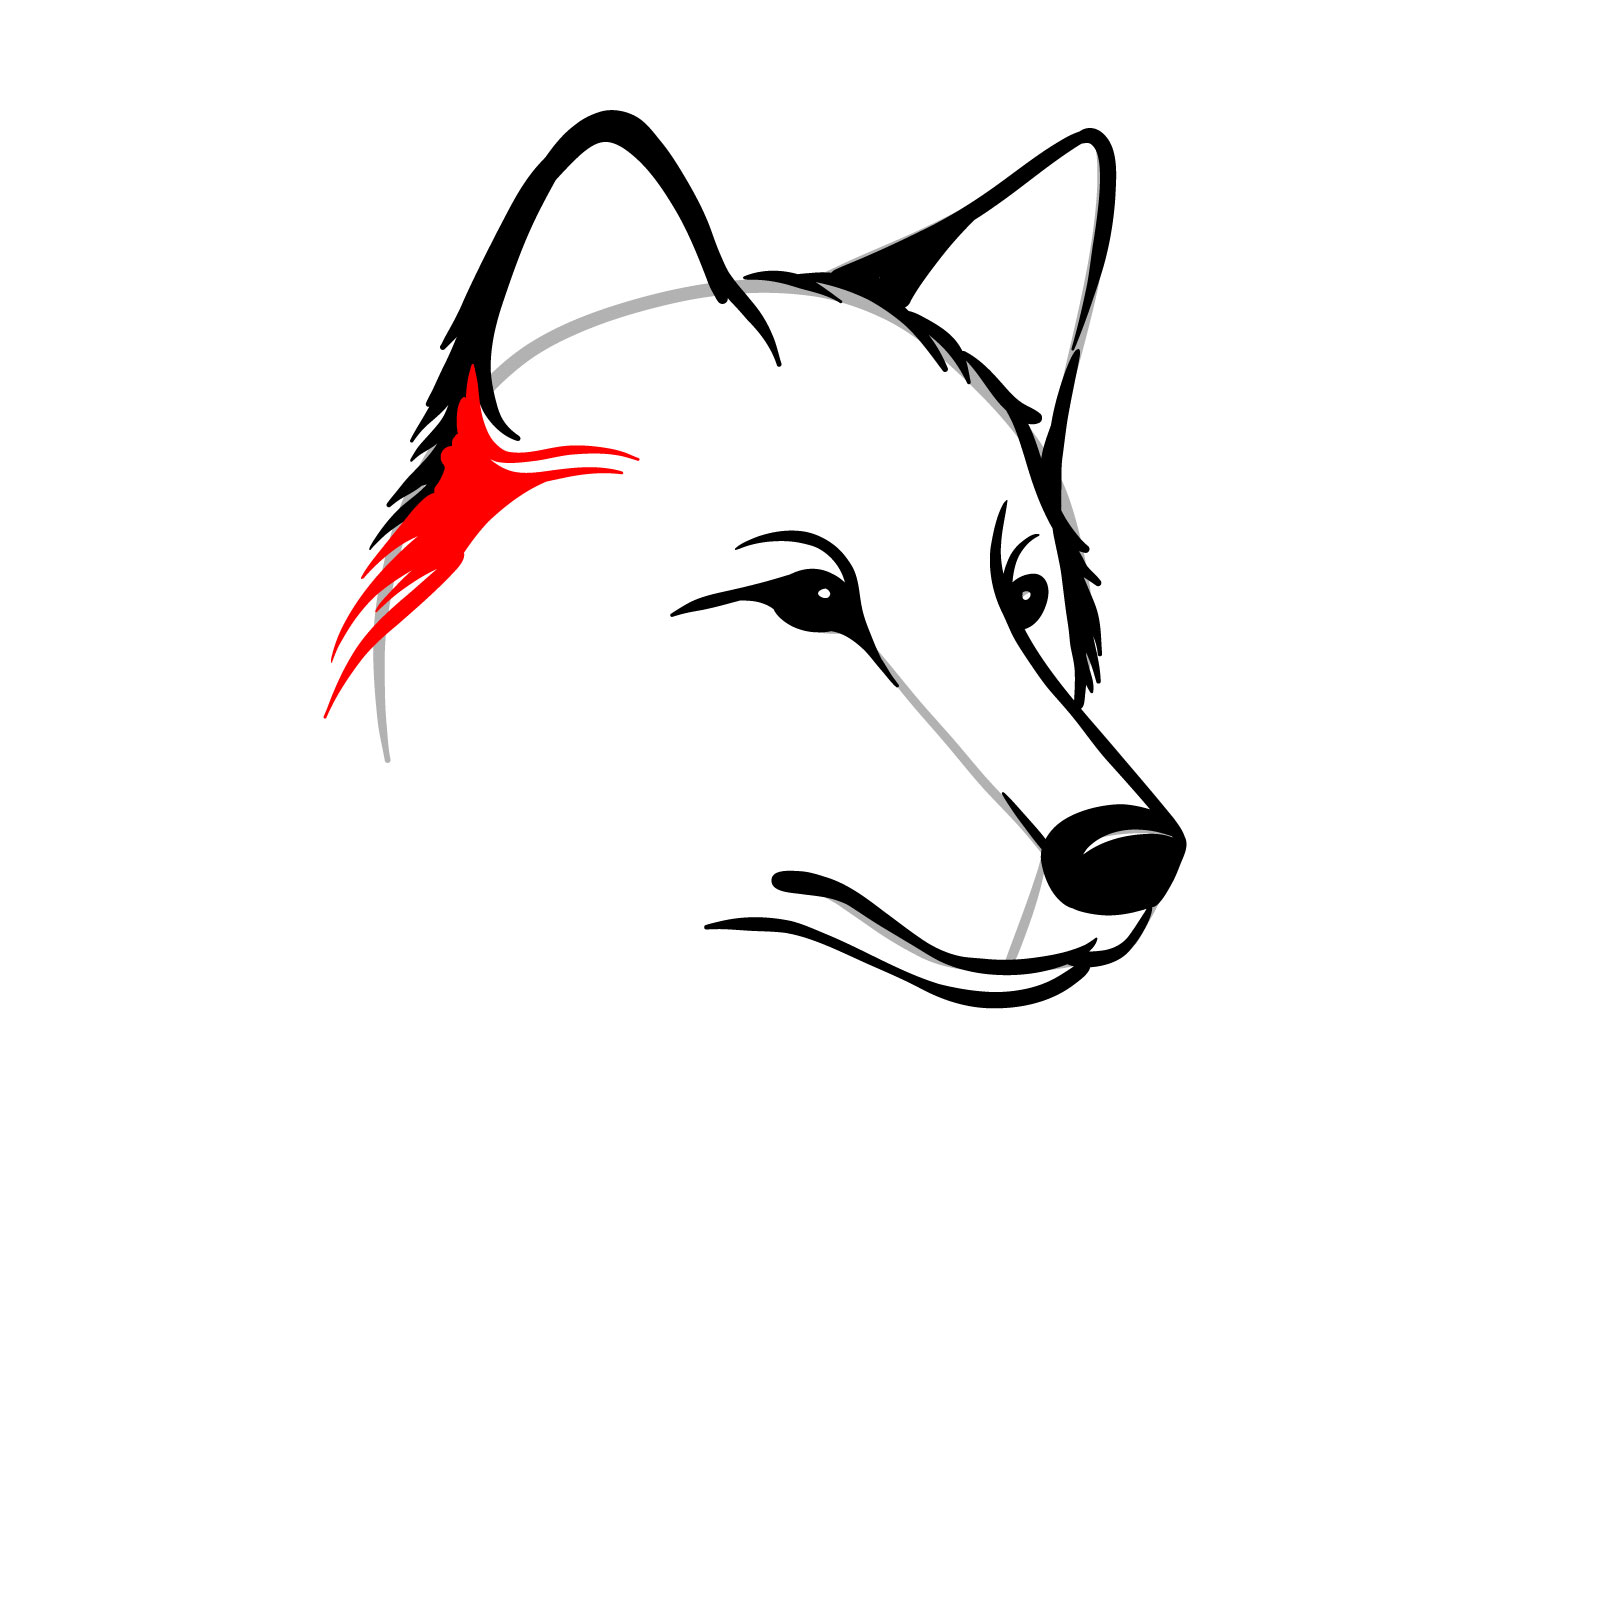
Step 08 – Create a sense of fullness and texture by sketching tufts of fur at the top of the head and extending down to the back of the neck. These lines should be flowing and slightly jagged to simulate the wolf’s thick coat
PinAdd the texture of fur on the head and neck
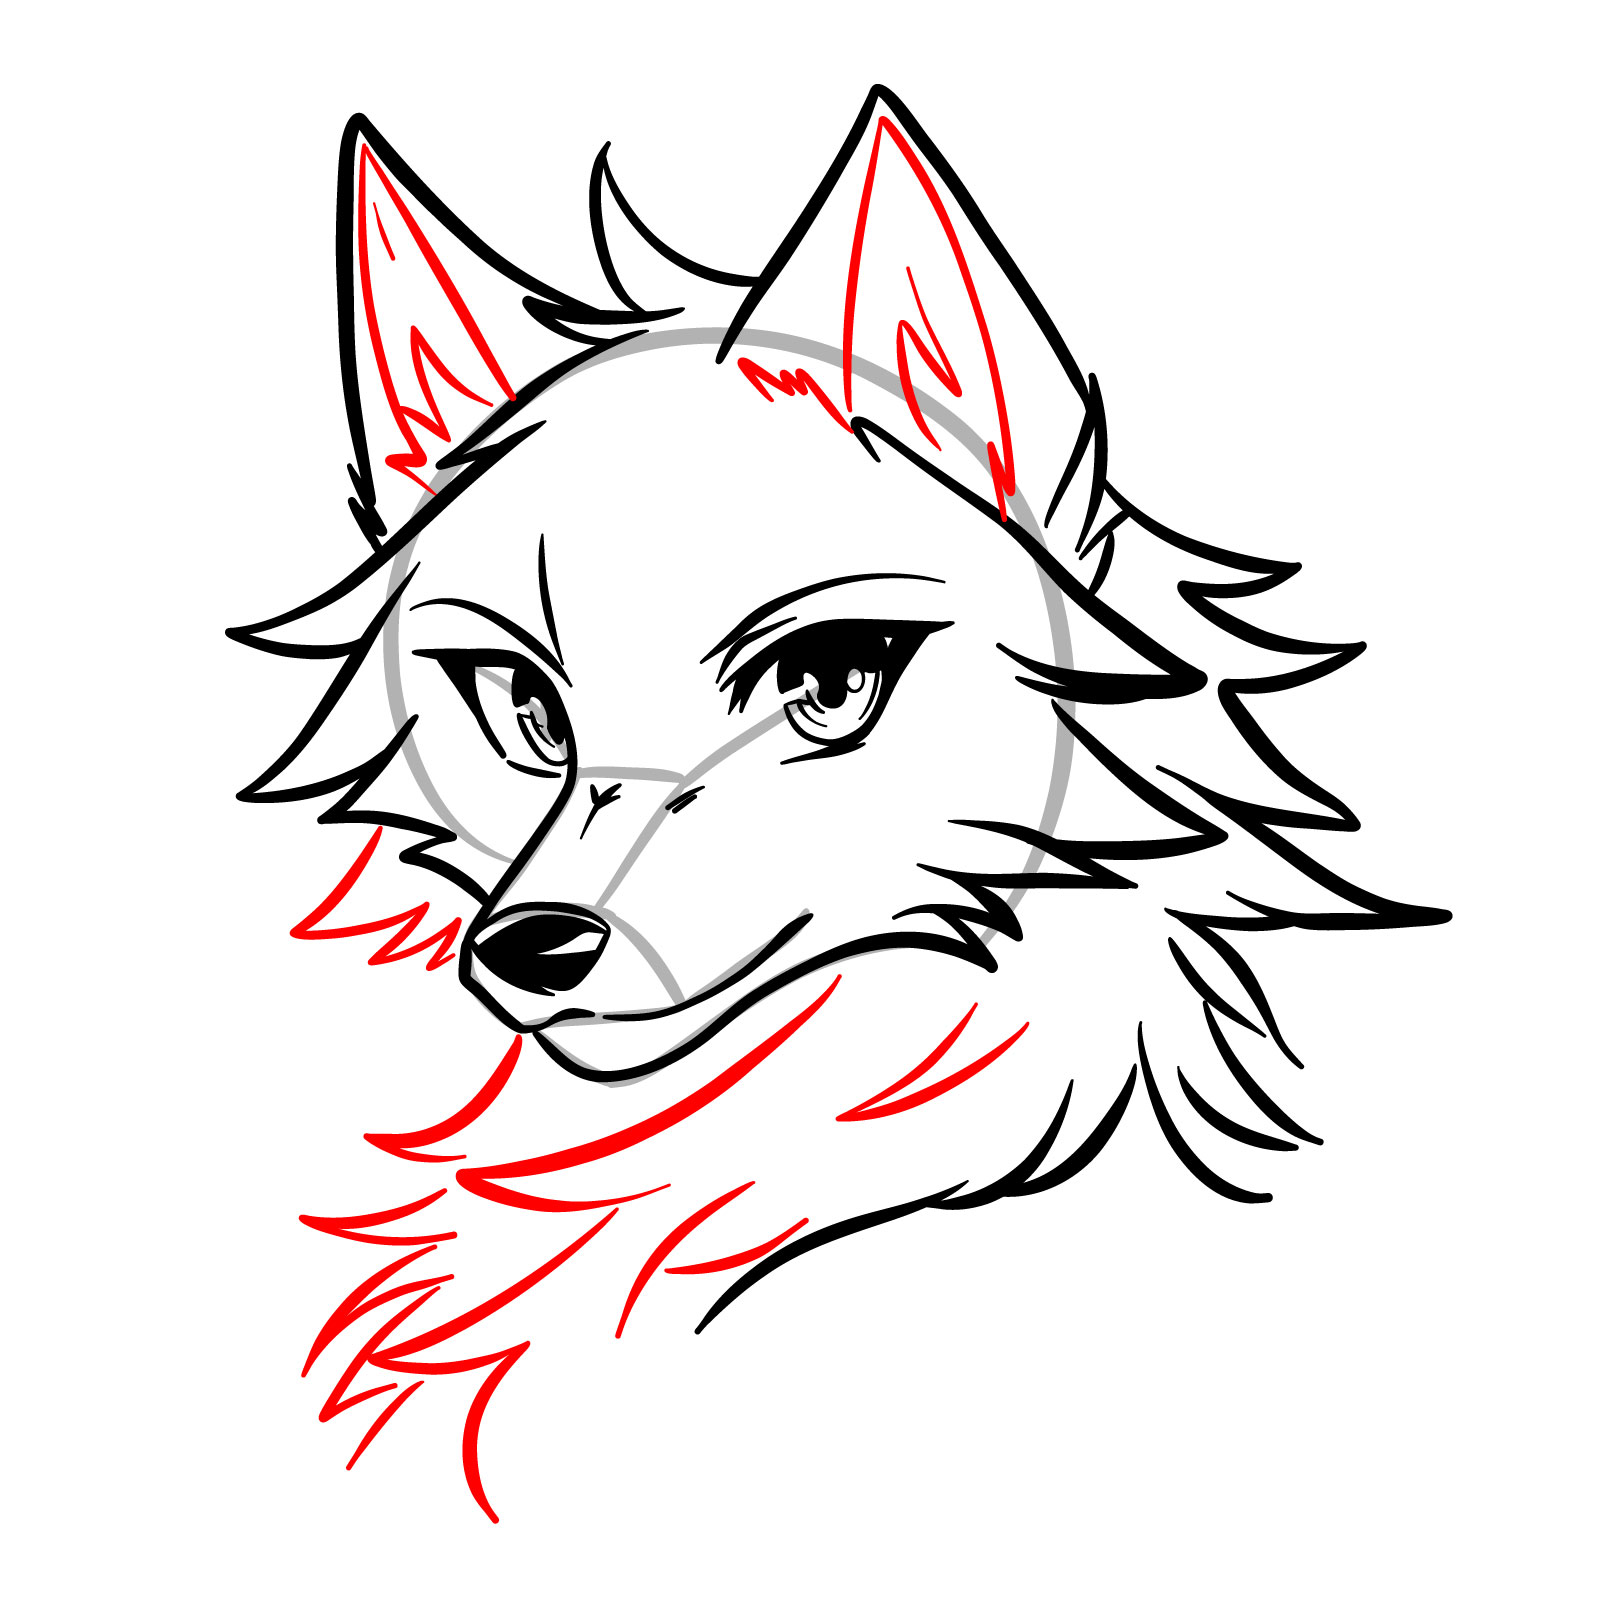
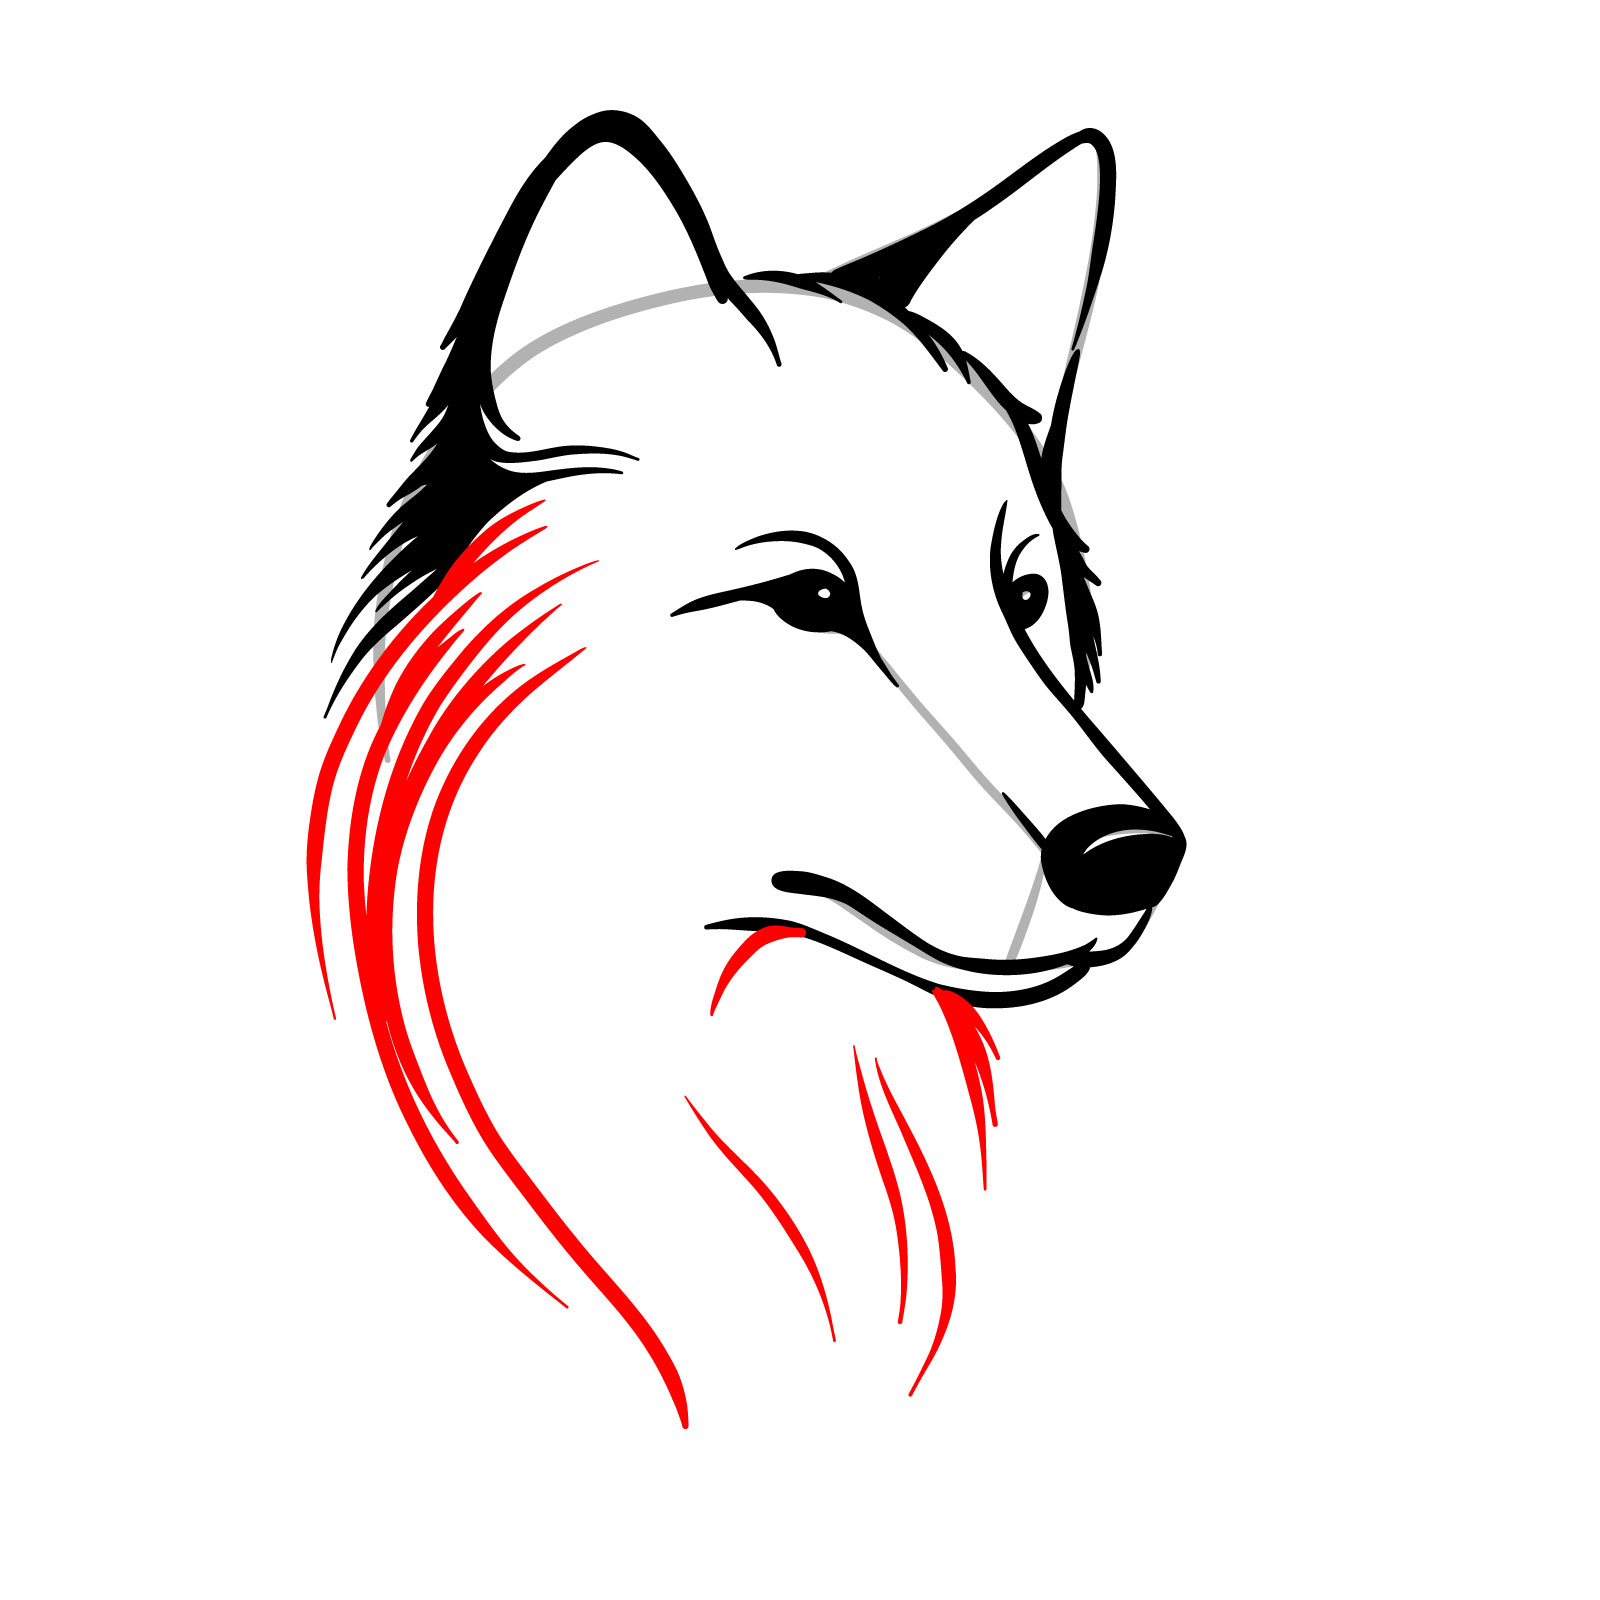
Step 09 – Now, refine the fur on the ears and neck by adding more detailed lines. These should also be varied in length and direction
PinDefine the fur details on the ears and neck of your anime wolf face
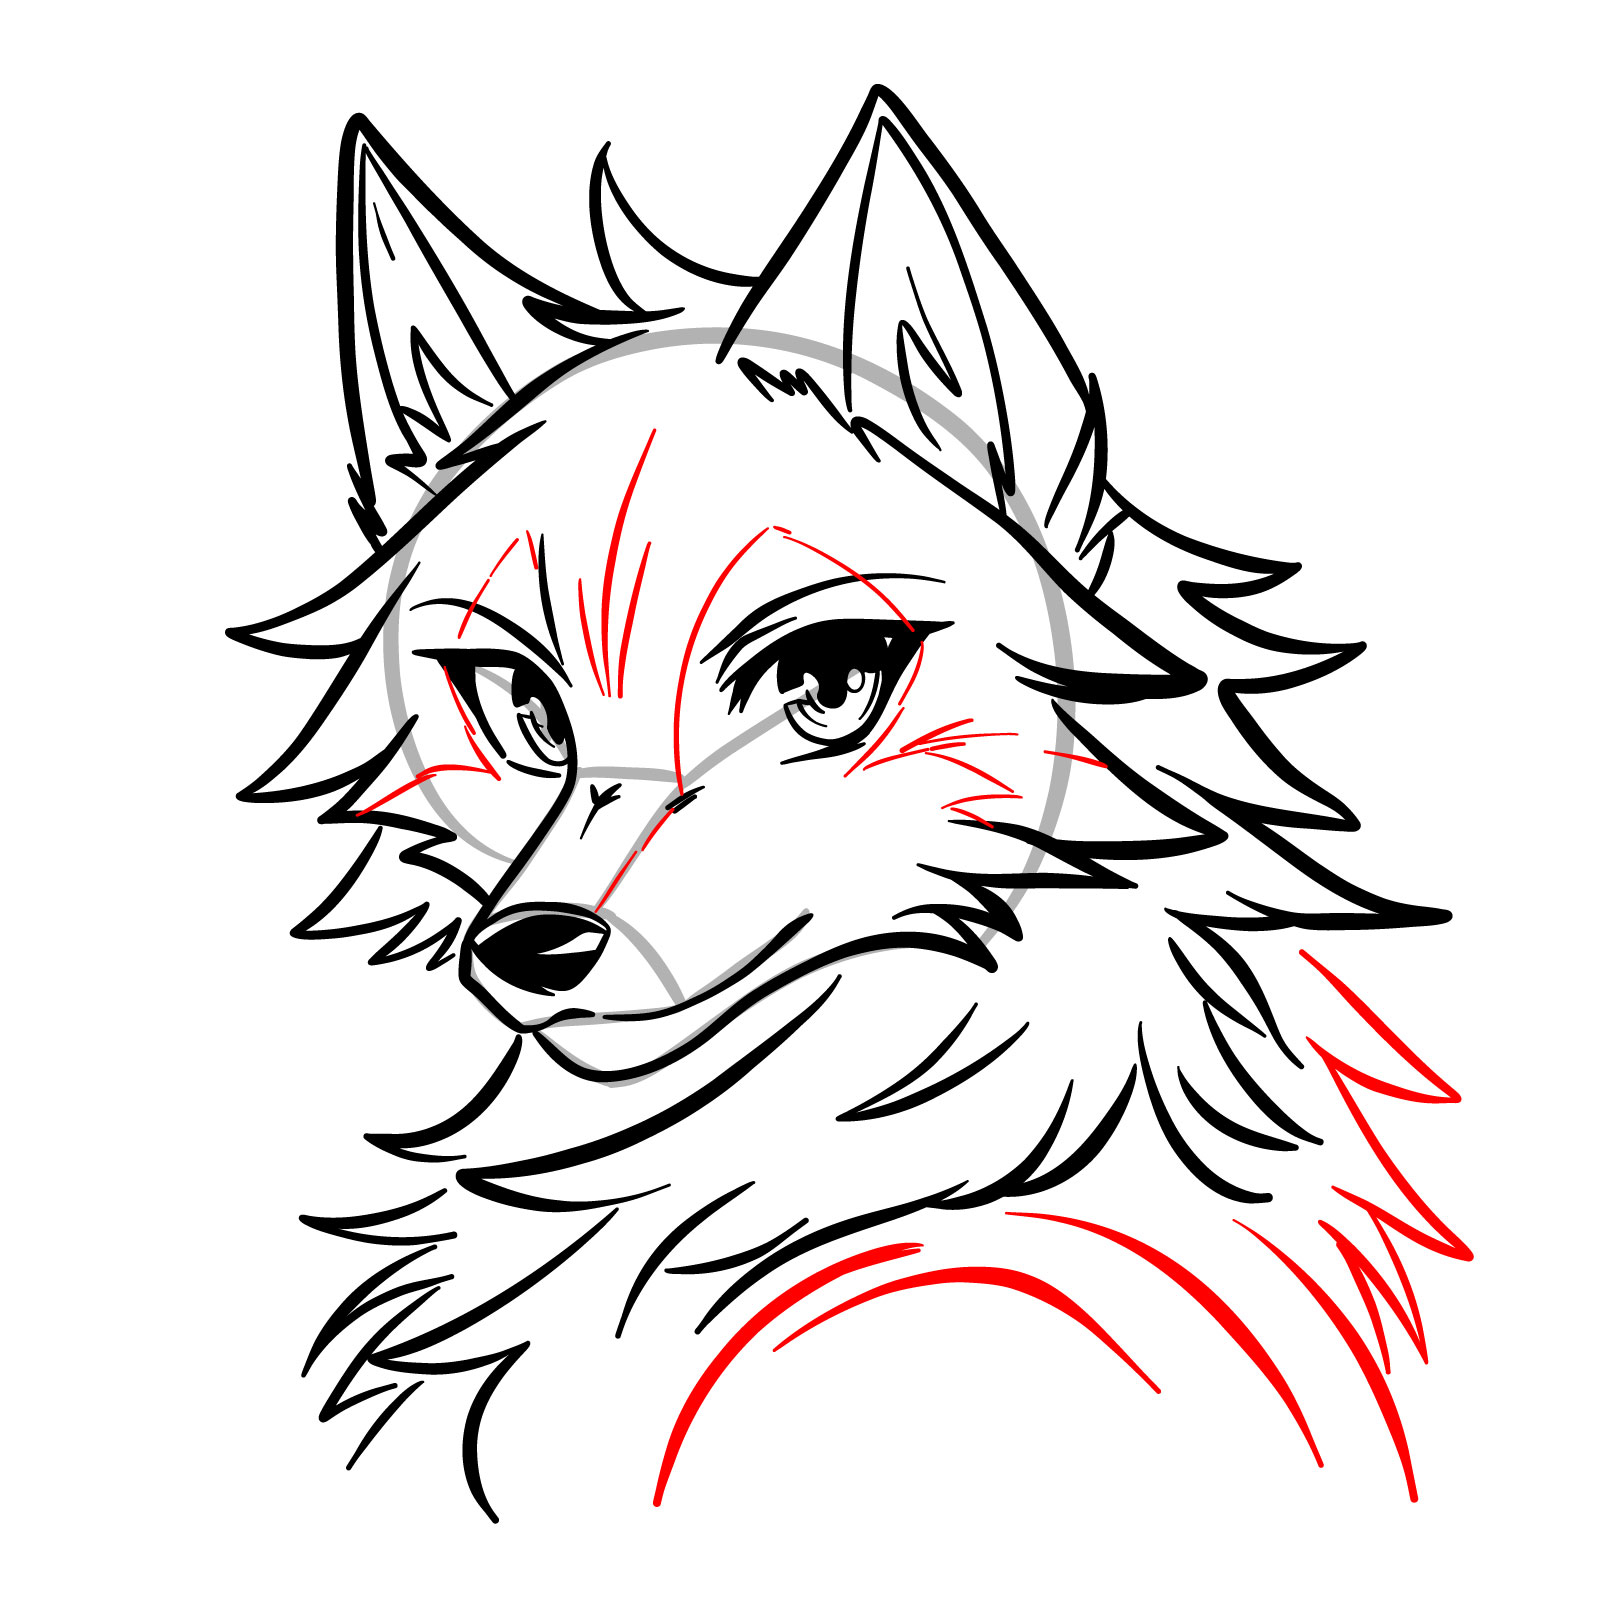
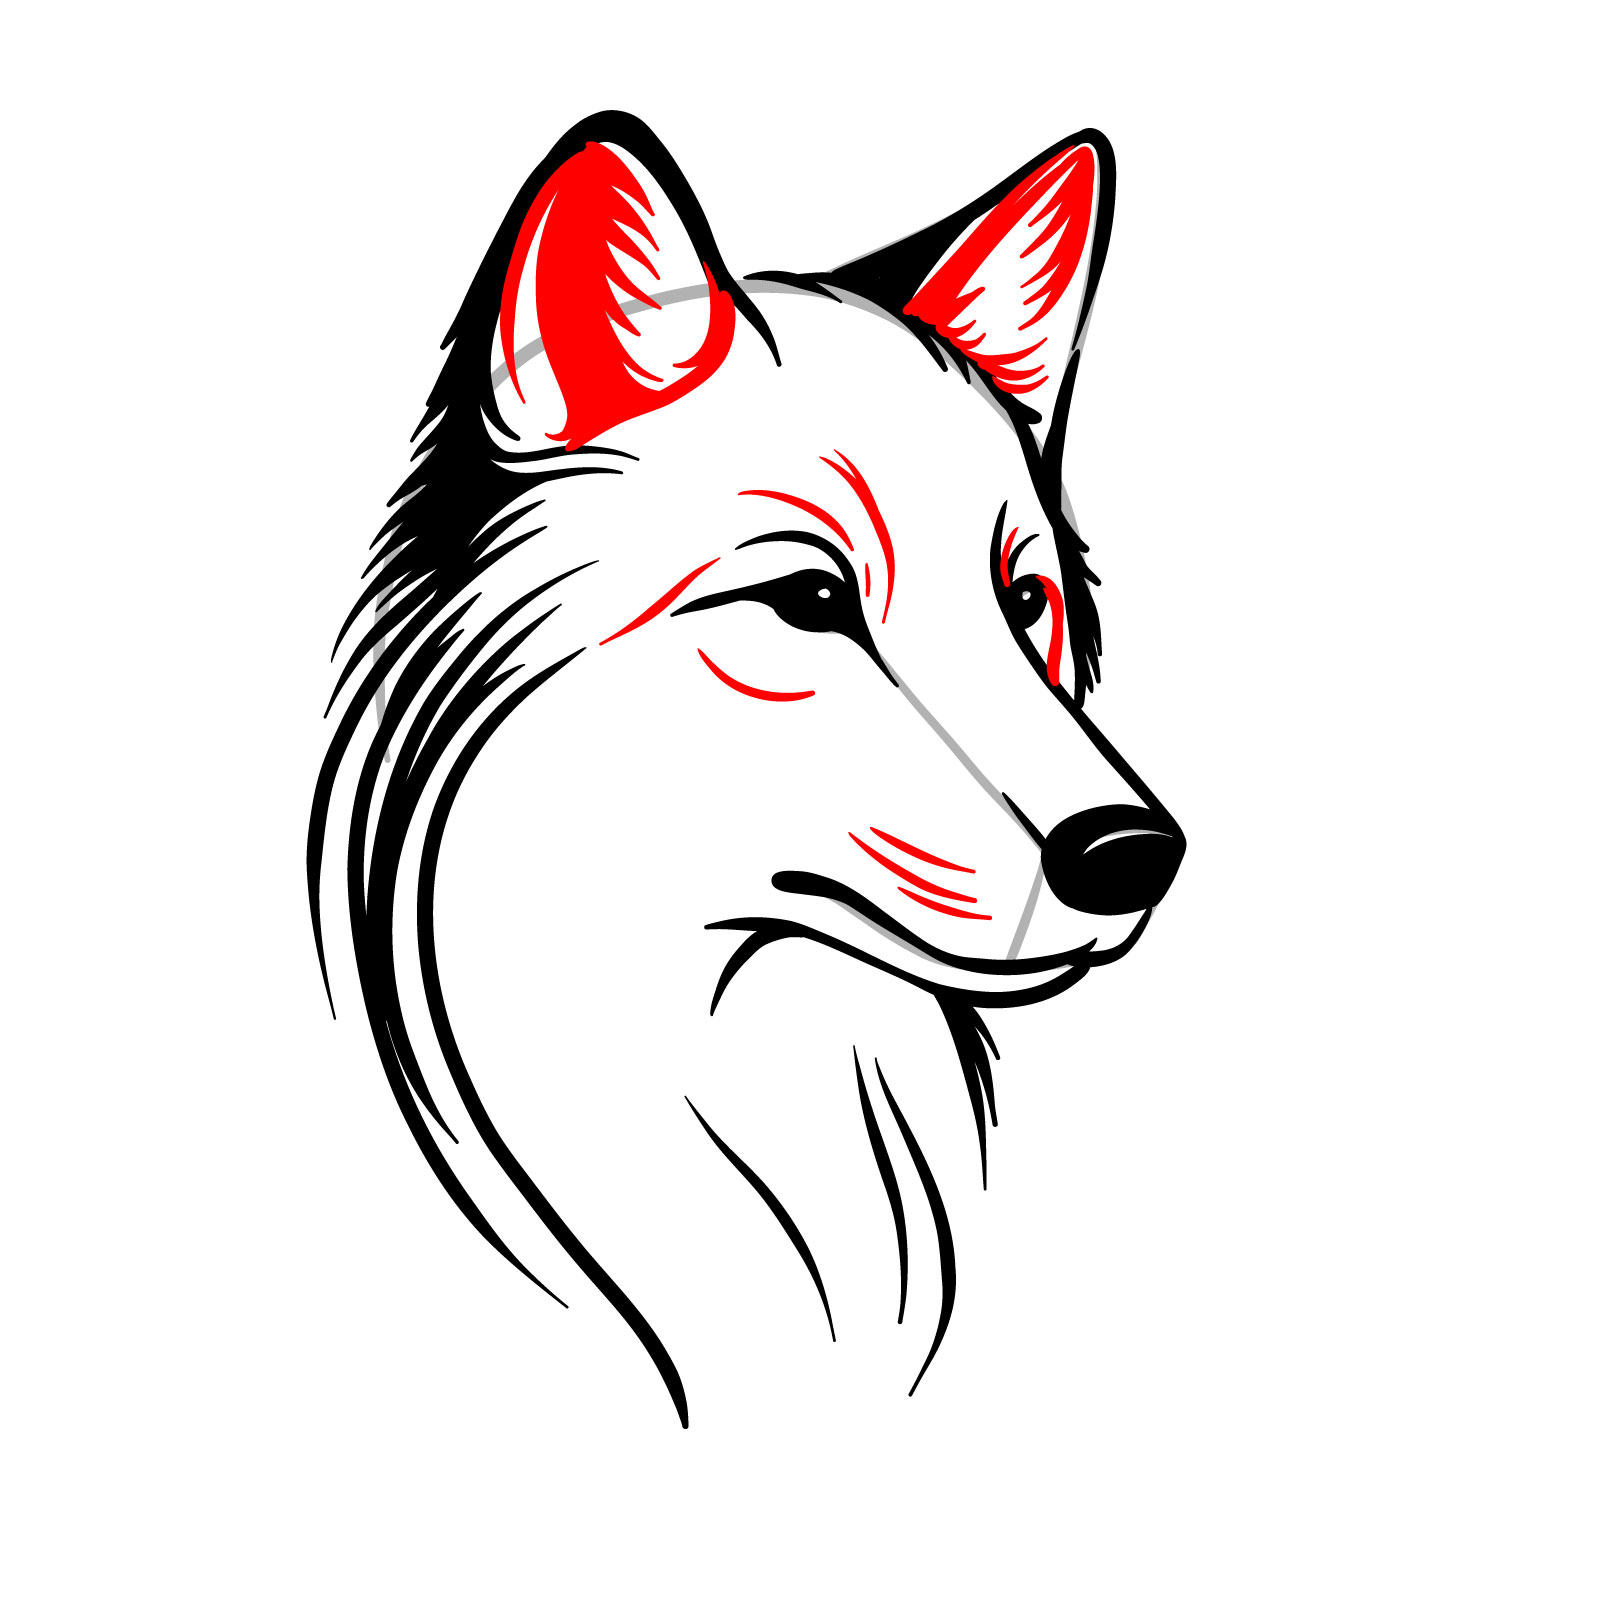
Step 10 – Continue to add depth to the fur by extending the details down to the chest and around the back. Draw thin lines to suggest the unique patterns of the wolf’s face, giving attention to the areas around the eyes and nose
PinAdd the finishing touches to the fur and introduce subtle facial patterns
Step 11 – Conclude your guide on how to draw an anime wolf face by reviewing your work, ensuring that every line contributes to the overall appearance. The finished drawing should display a balanced mix of anime stylization and the wild essence of a wolf, with expressive eyes and a lush, textured coat
PinYour anime wolf face drawing is now complete with full details and character
Creating a Realistic Wolf Face (Front View) in 12 Steps
PinHow to draw a wolf’s face front view
For the sixth guide, we turn our attention to the realism that nature has bestowed upon these majestic creatures. This tutorial is dedicated to teaching you how to draw a realistic wolf face, looking straight at you. The process is broken down into 12 thoughtful steps, with the first two dedicated to constructing a basic sketch to get the proportions and placements right. The final artwork you will create captures the wolf’s intense gaze, its textured fur, and the subtle details that give its face a lifelike appearance.
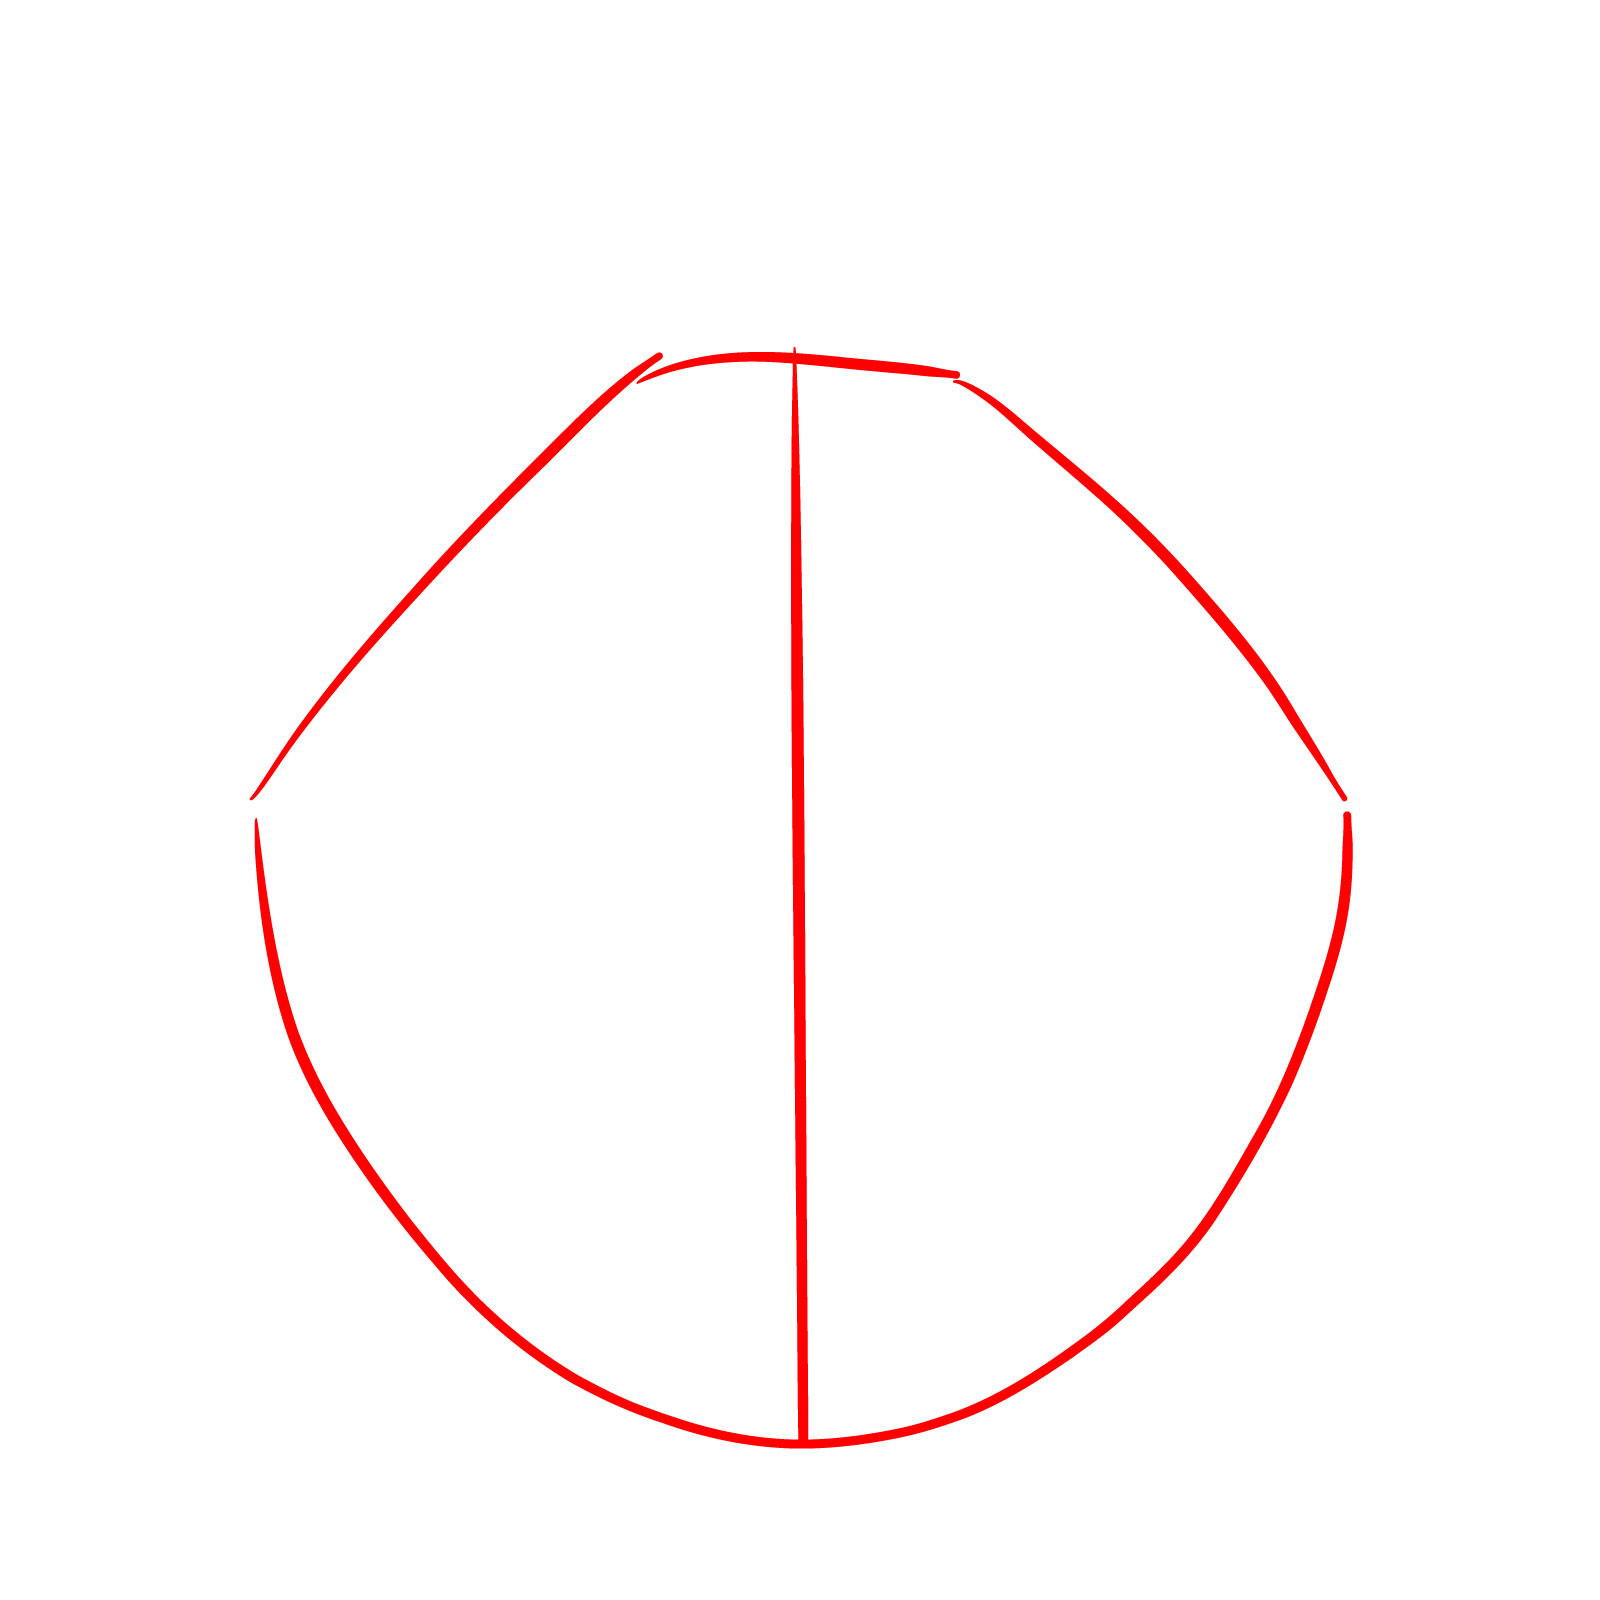
Step 01 – Start by drawing a half-circle for the bottom of the wolf’s head, extending diagonal lines upward and connecting them with a horizontal line at the top. This creates a basic outline for the head. Then divide this shape in half with a vertical line to establish symmetry in the face
PinBegin your realistic wolf face with a foundational head shape
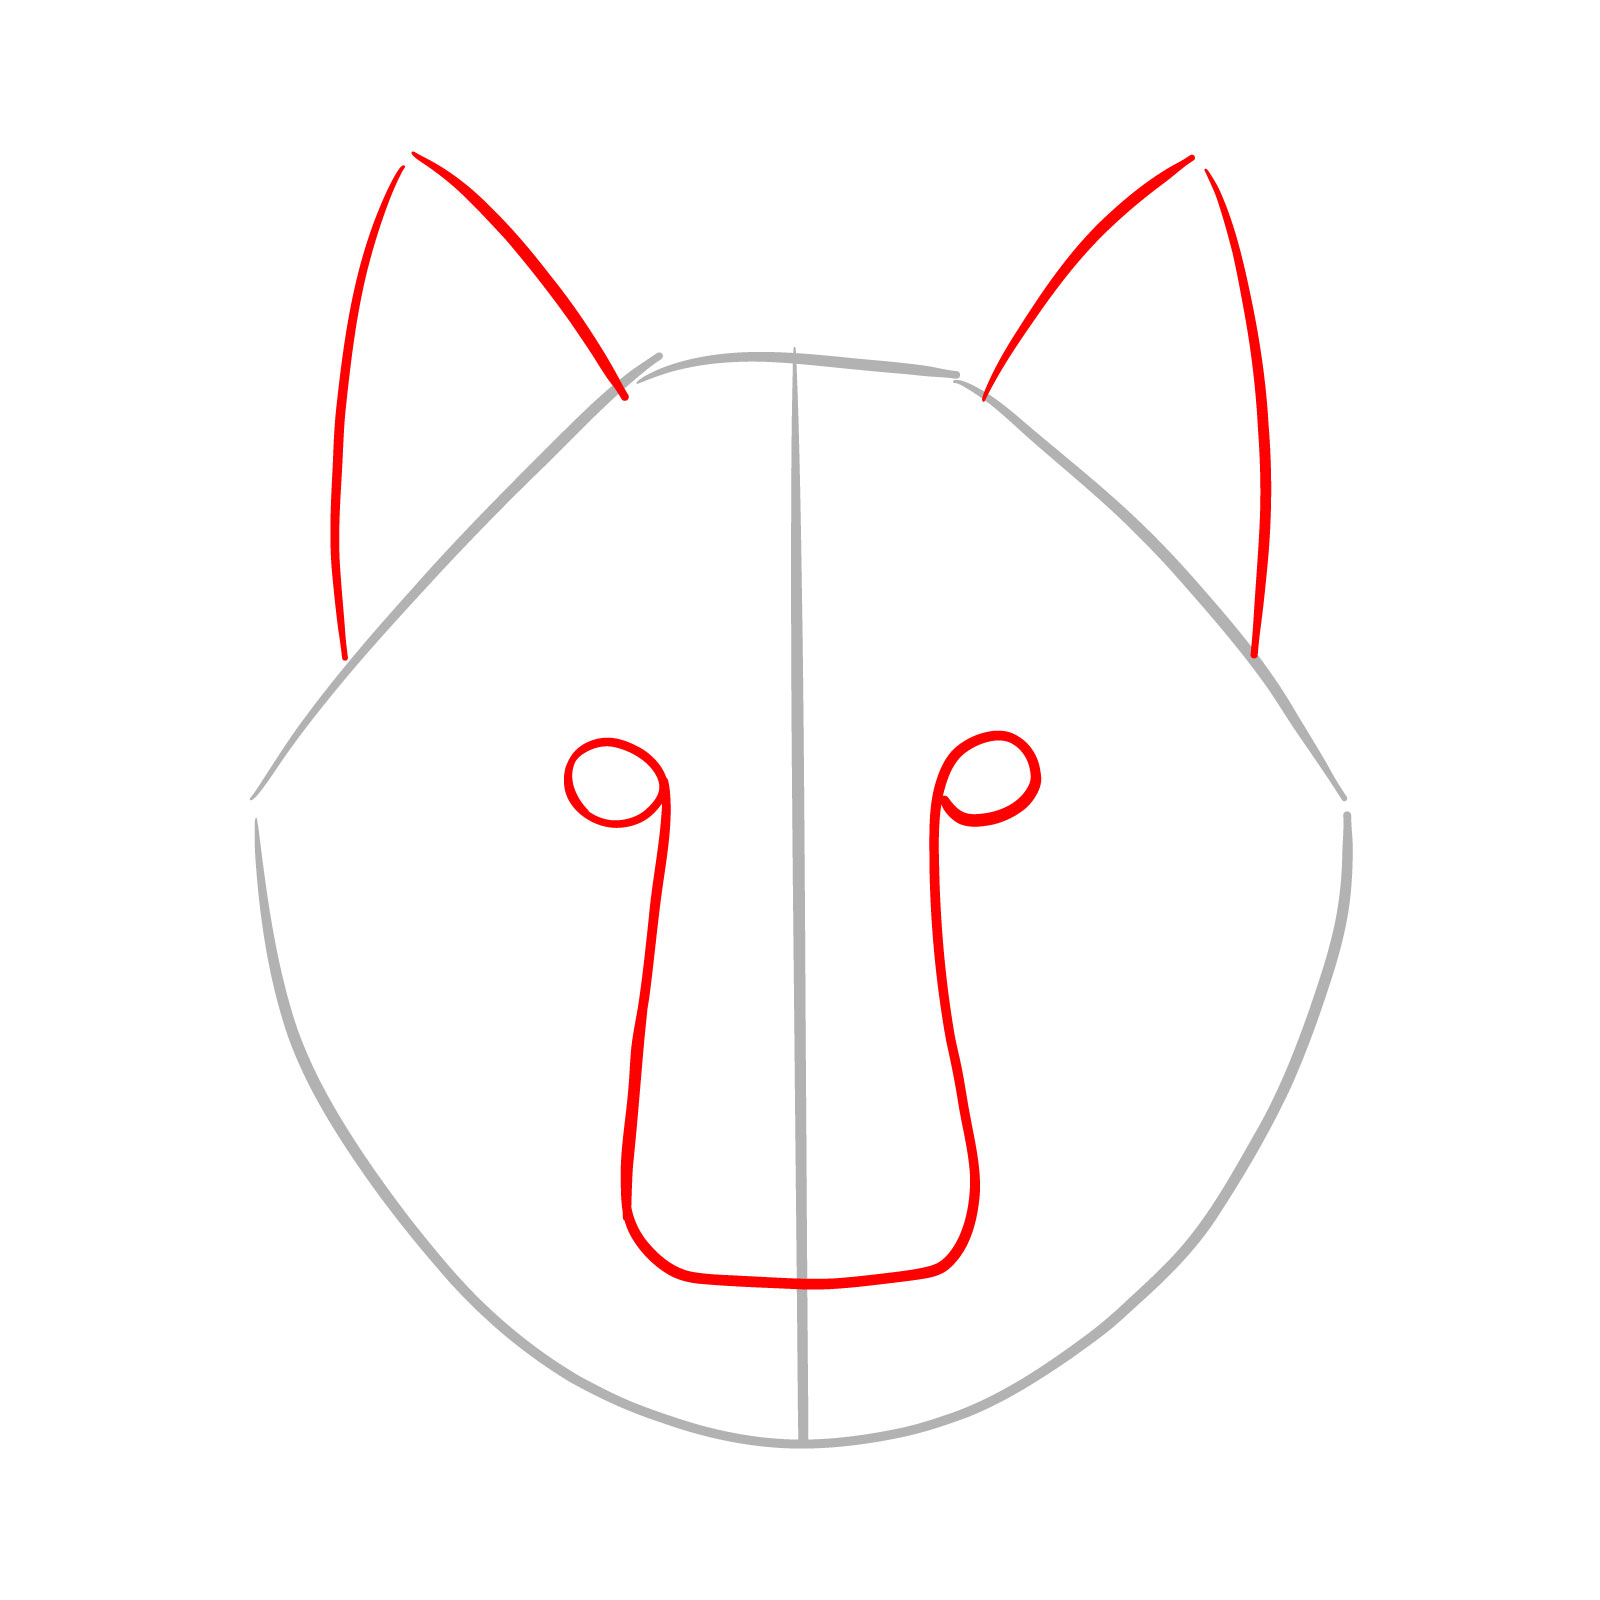
Step 02 – For the second step, add a ‘U’ shape starting slightly above the center of the head for the snout, placing small circles at the ends of the ‘U’ to mark the position and proportion of the eyes. This step is crucial for getting the facial features of the wolf aligned correctly. Also, add two triangles at the top for the ears
PinSketch the snout and eyes placement
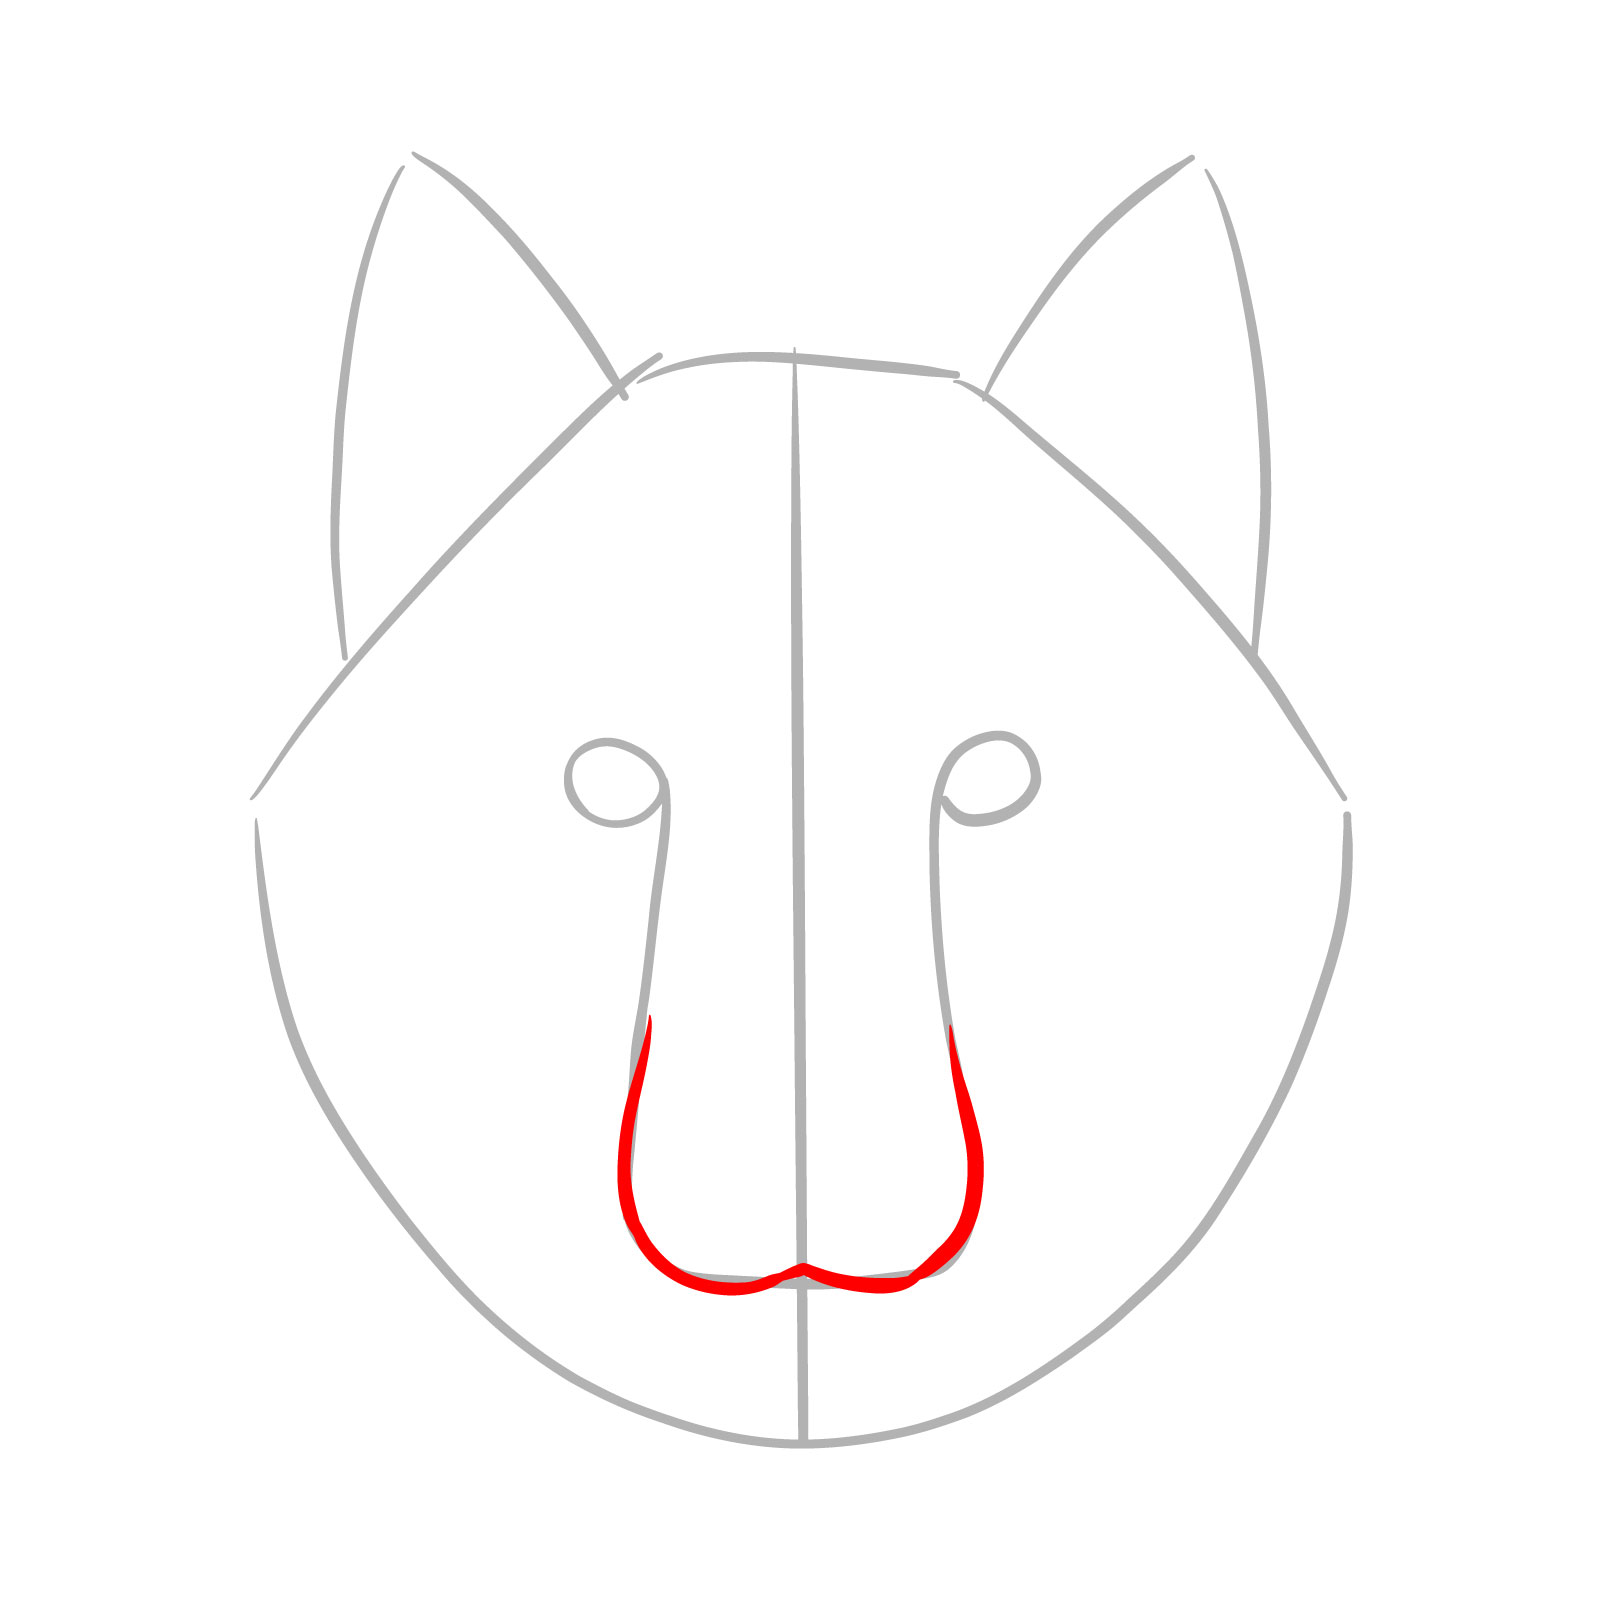
Step 03 – Begin detailing the wolf’s snout by focusing on the bottom part of the ‘U’ shape from step 2. This outlines the lower area of the snout, which will later help in shaping the mouth and nose
PinDetail the bottom part of the wolf’s snout
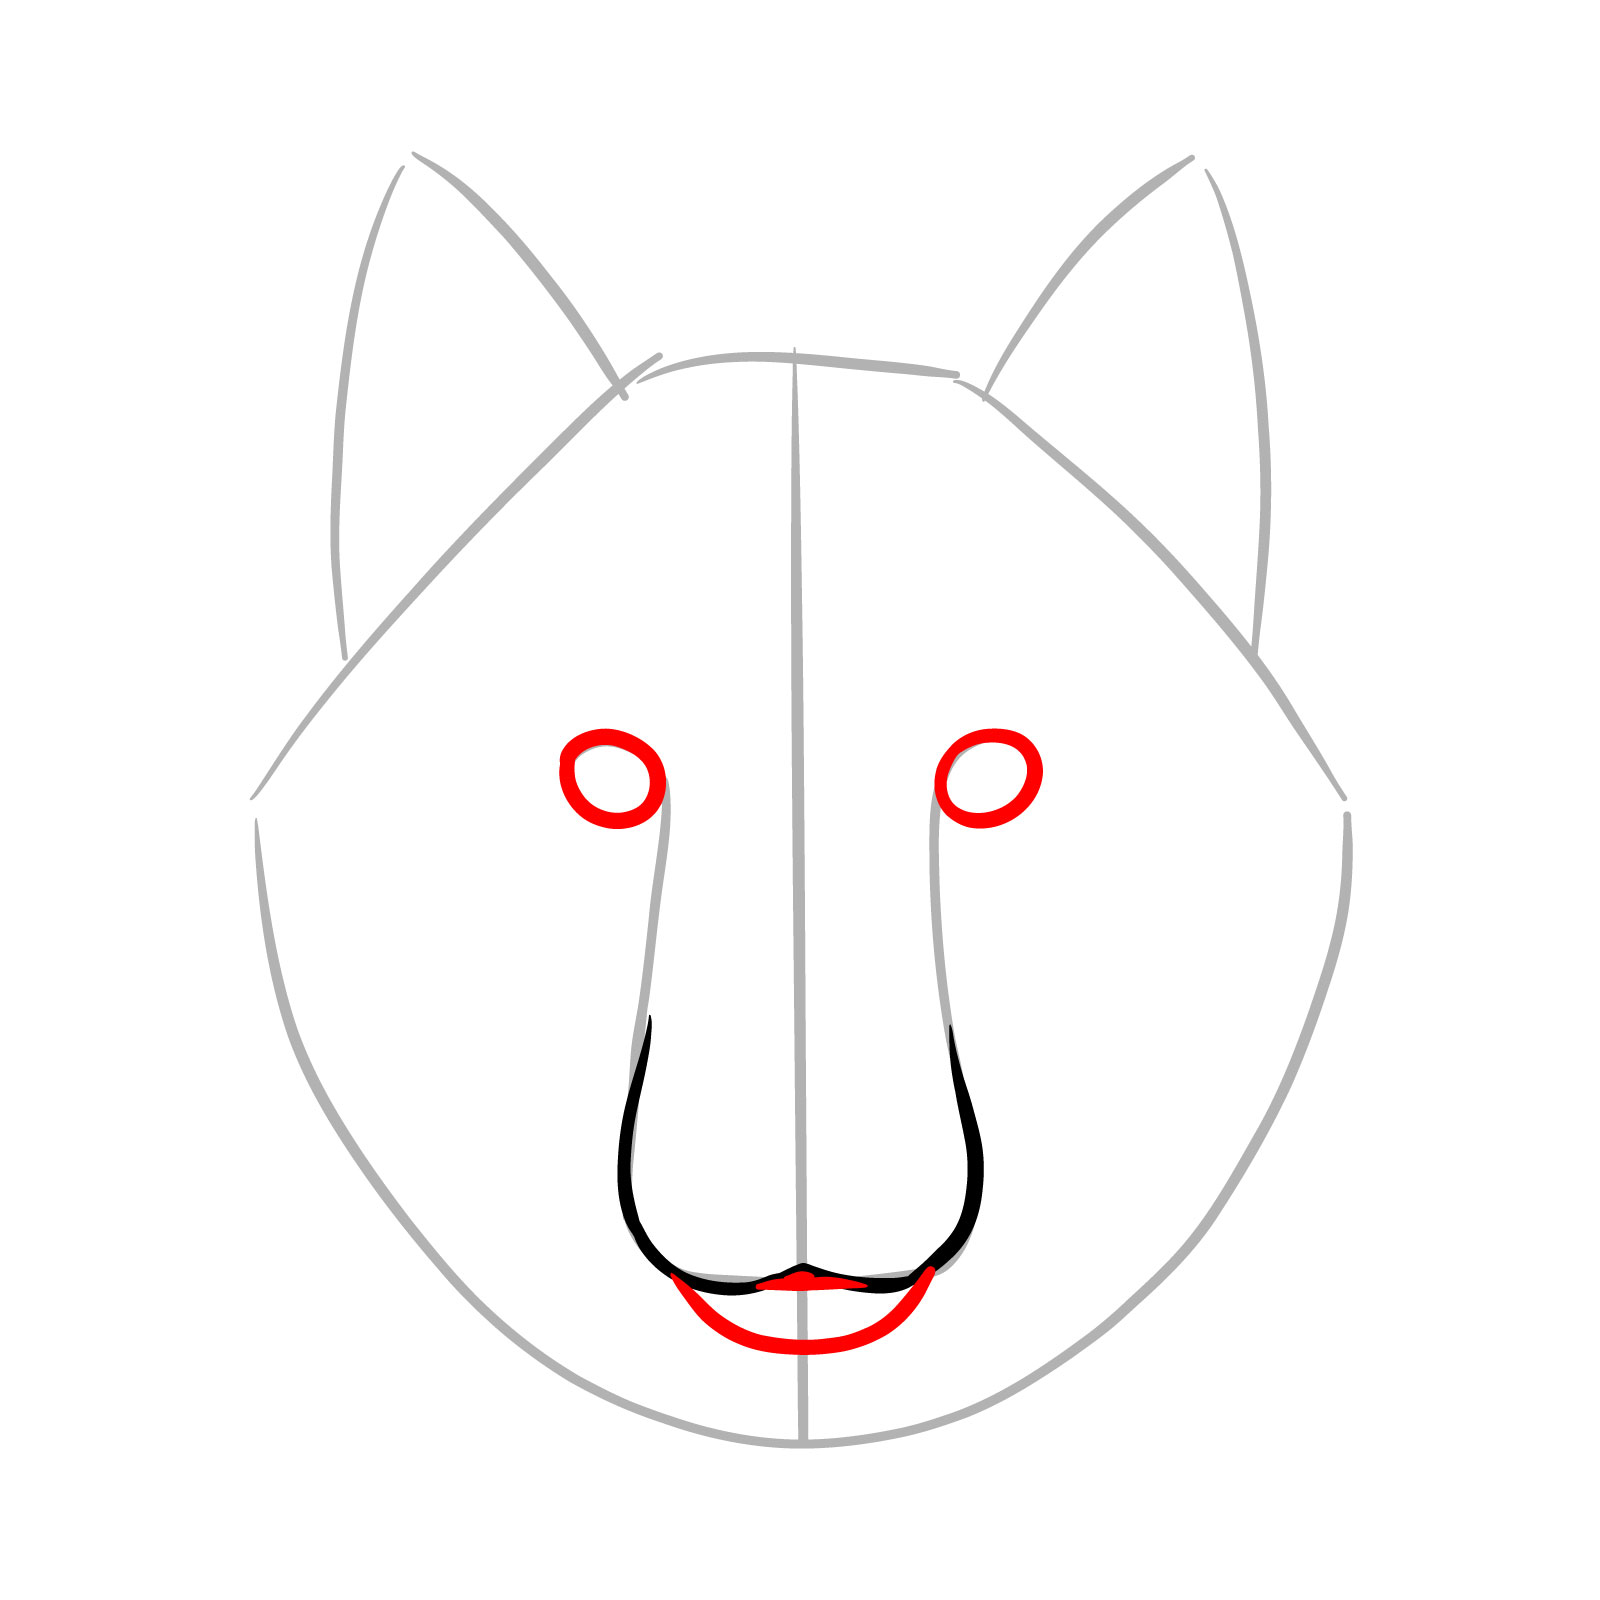
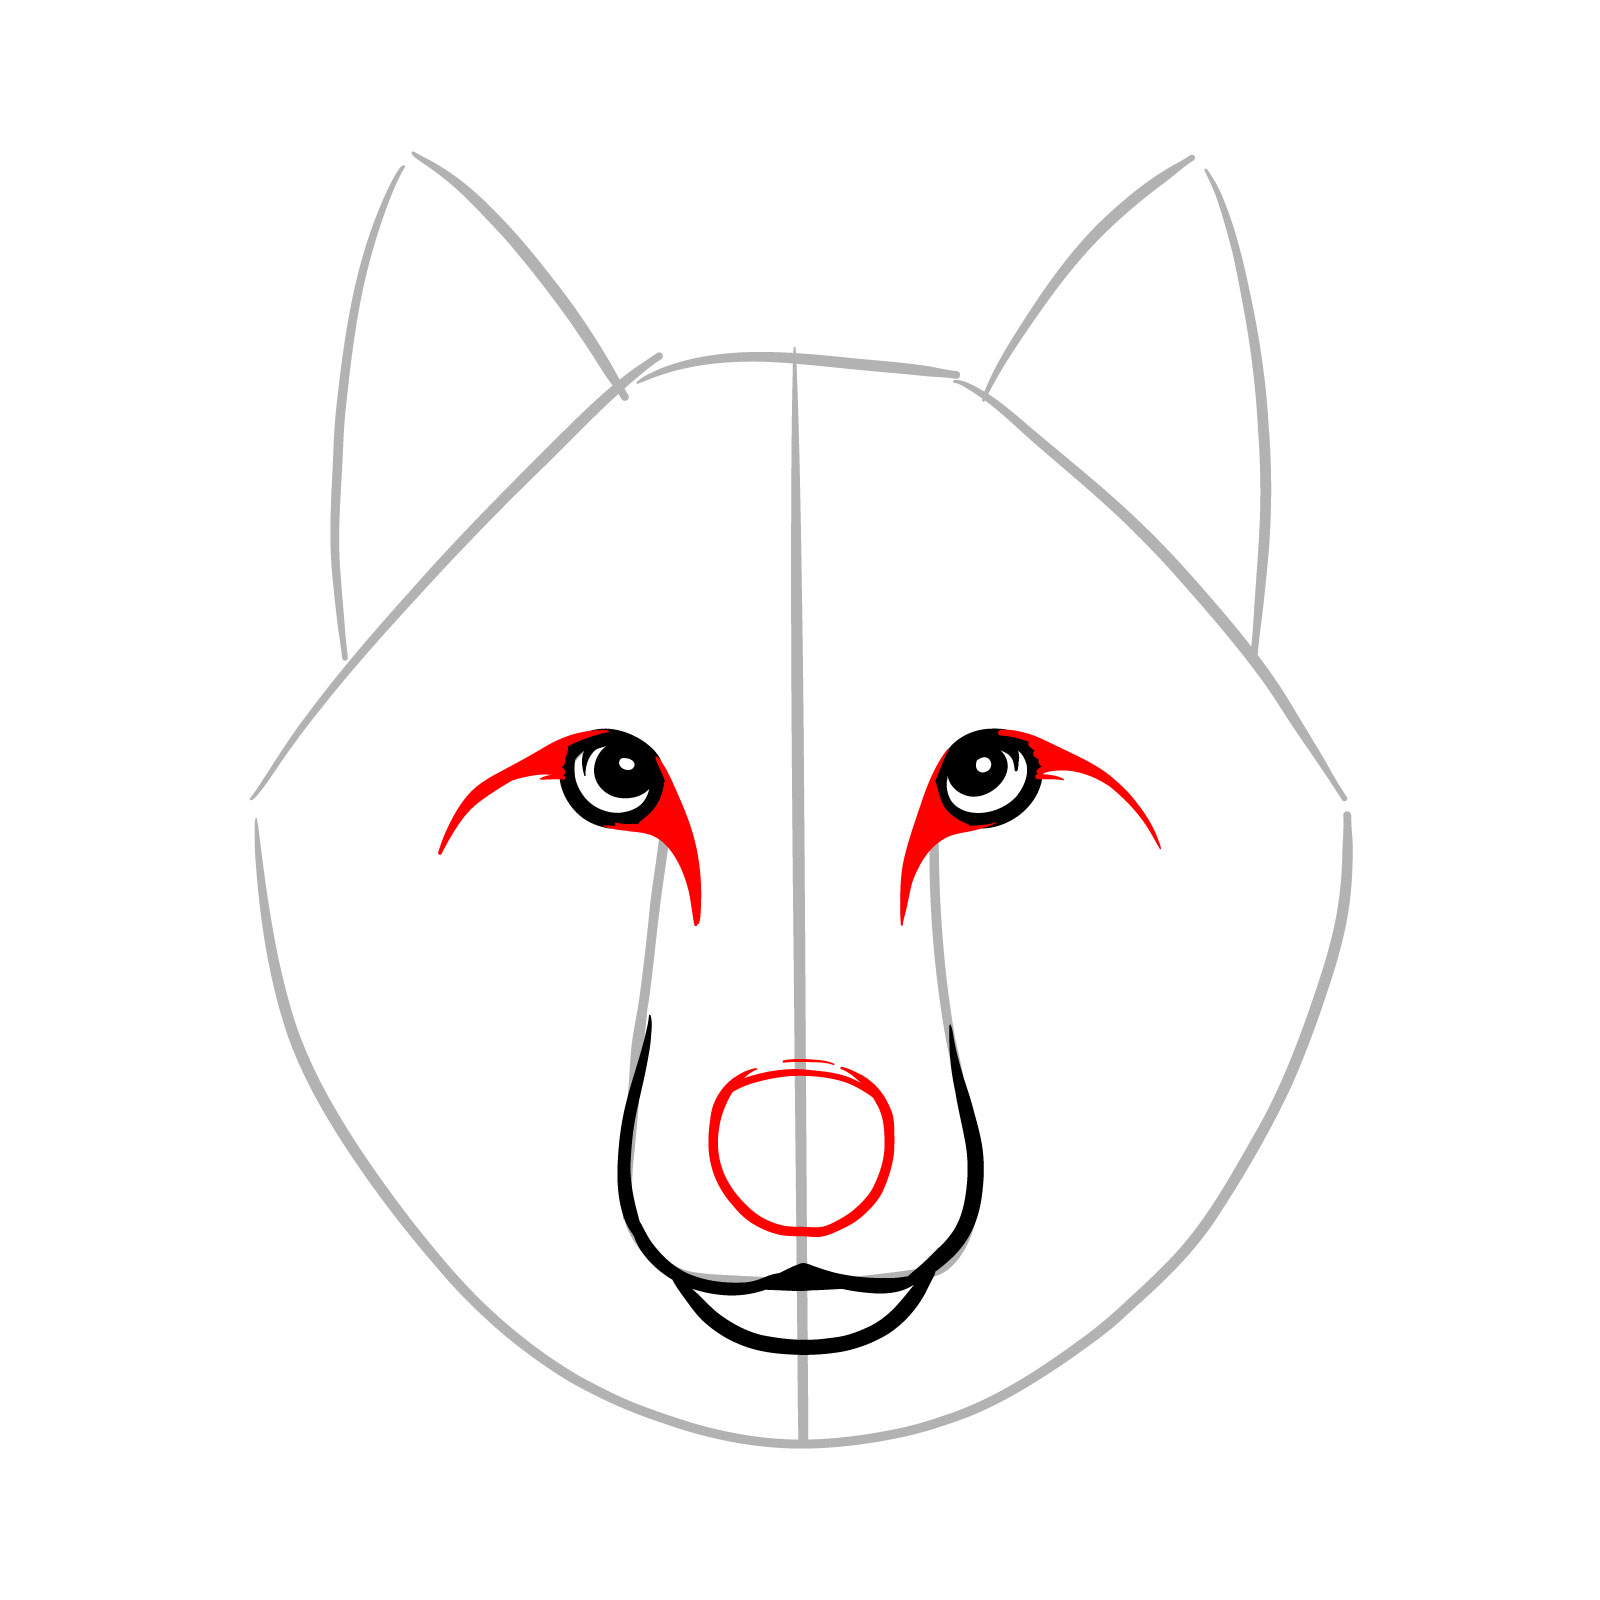
Step 04 – Add two oval shapes for the eyes, making sure they are even and symmetrical on either side of the vertical line. These ovals will be the basis for the wolf’s eyes
PinOutline the eyes of the wolf
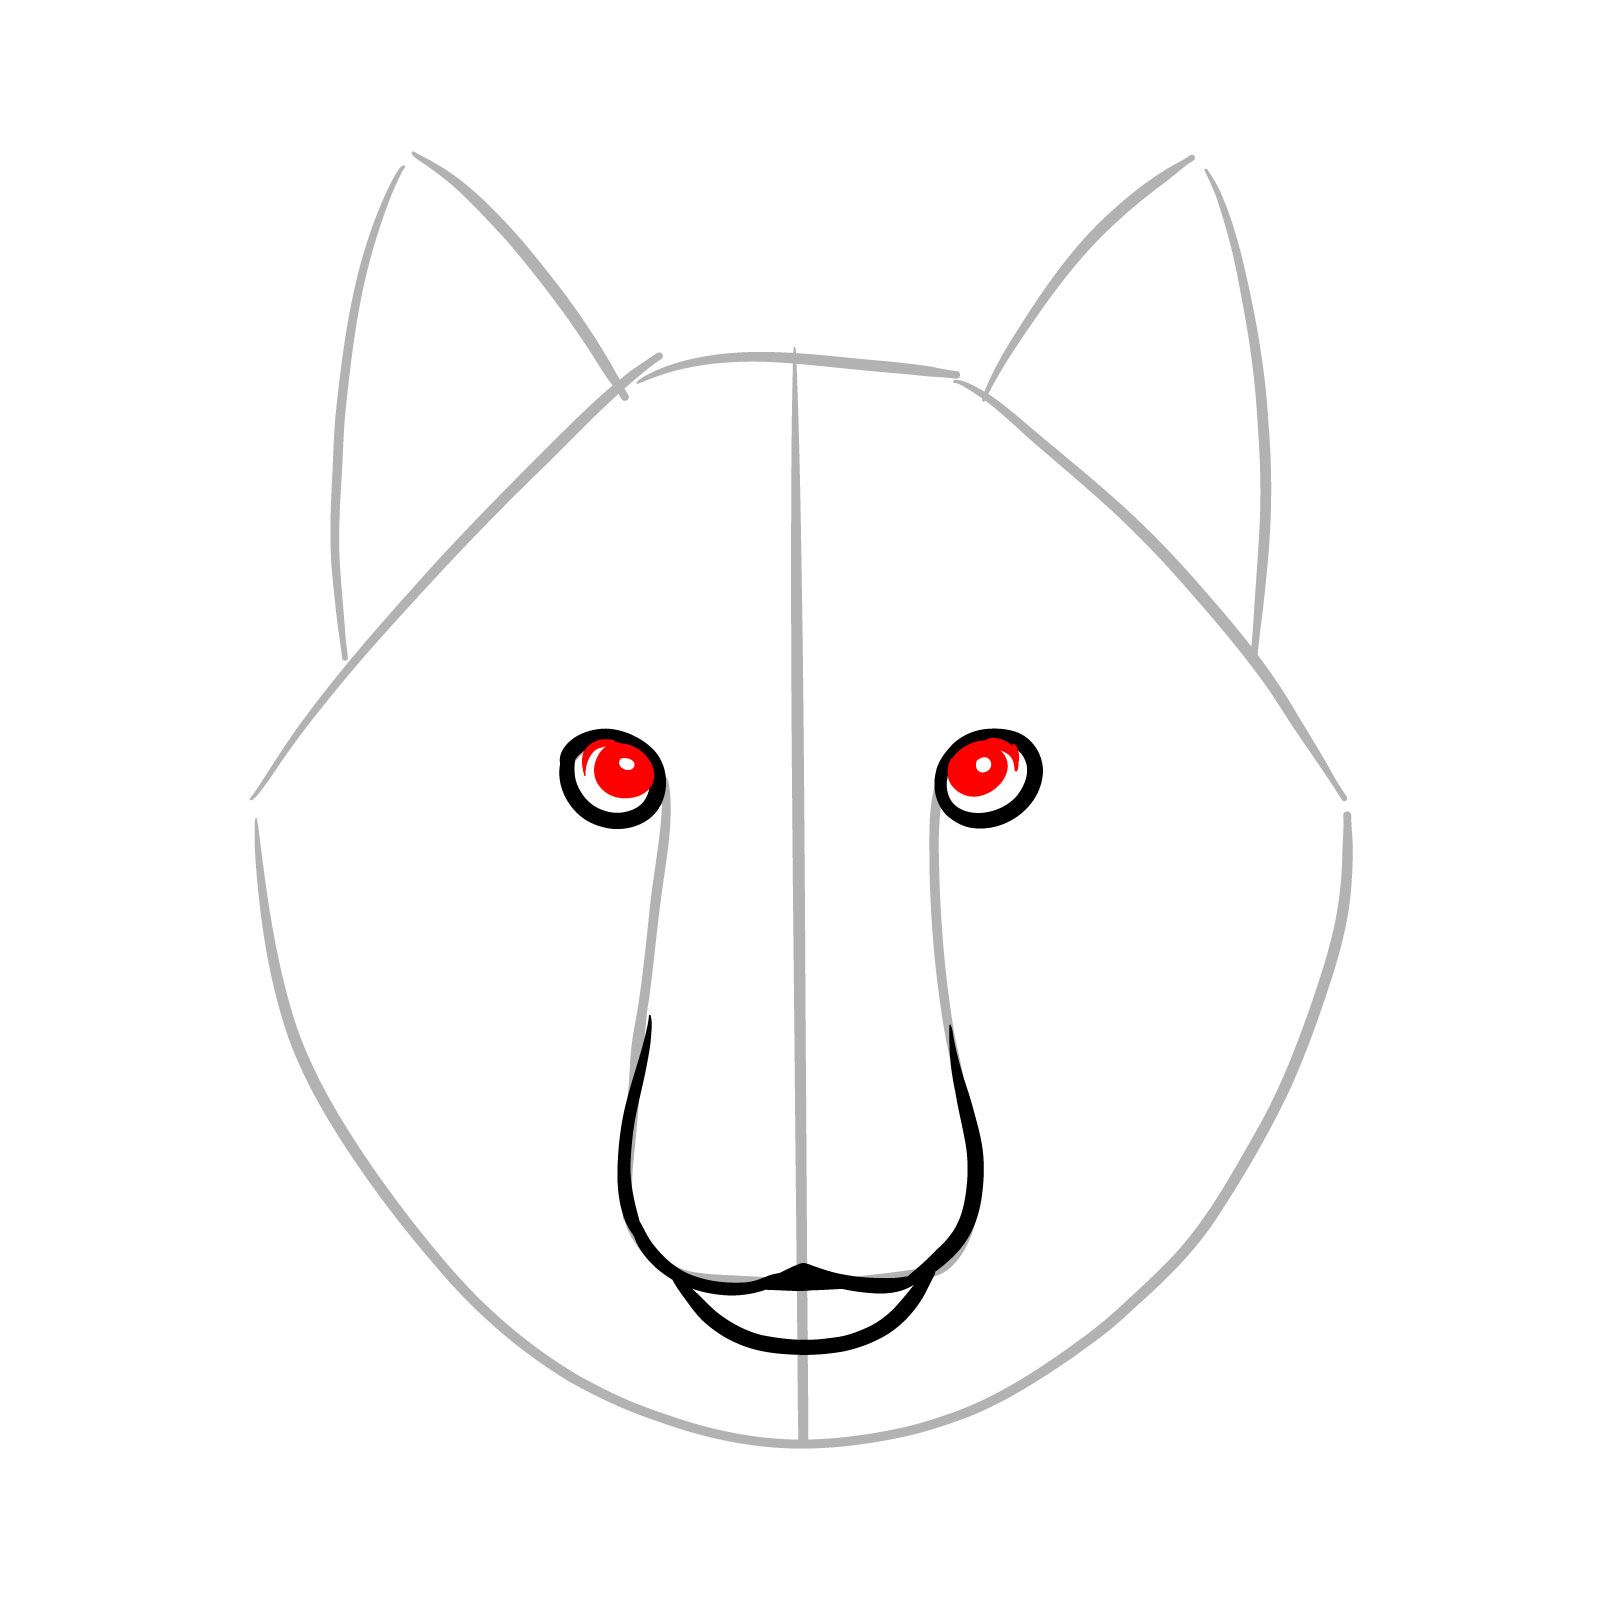
Step 05 – Inside the oval outlines, draw the eyeballs and pupils, adding small blank dots within the pupils to represent highlights
PinDraw the eyeballs and pupils with highlights
Step 06 – To add realism to your wolf drawing, deepen the eye areas by adding contours around the ovals and sketch the outline of the nose. This will begin to bring together the wolf’s facial features, creating a lifelike appearance
PinEnhance the depth of the eyes and define the nose outline
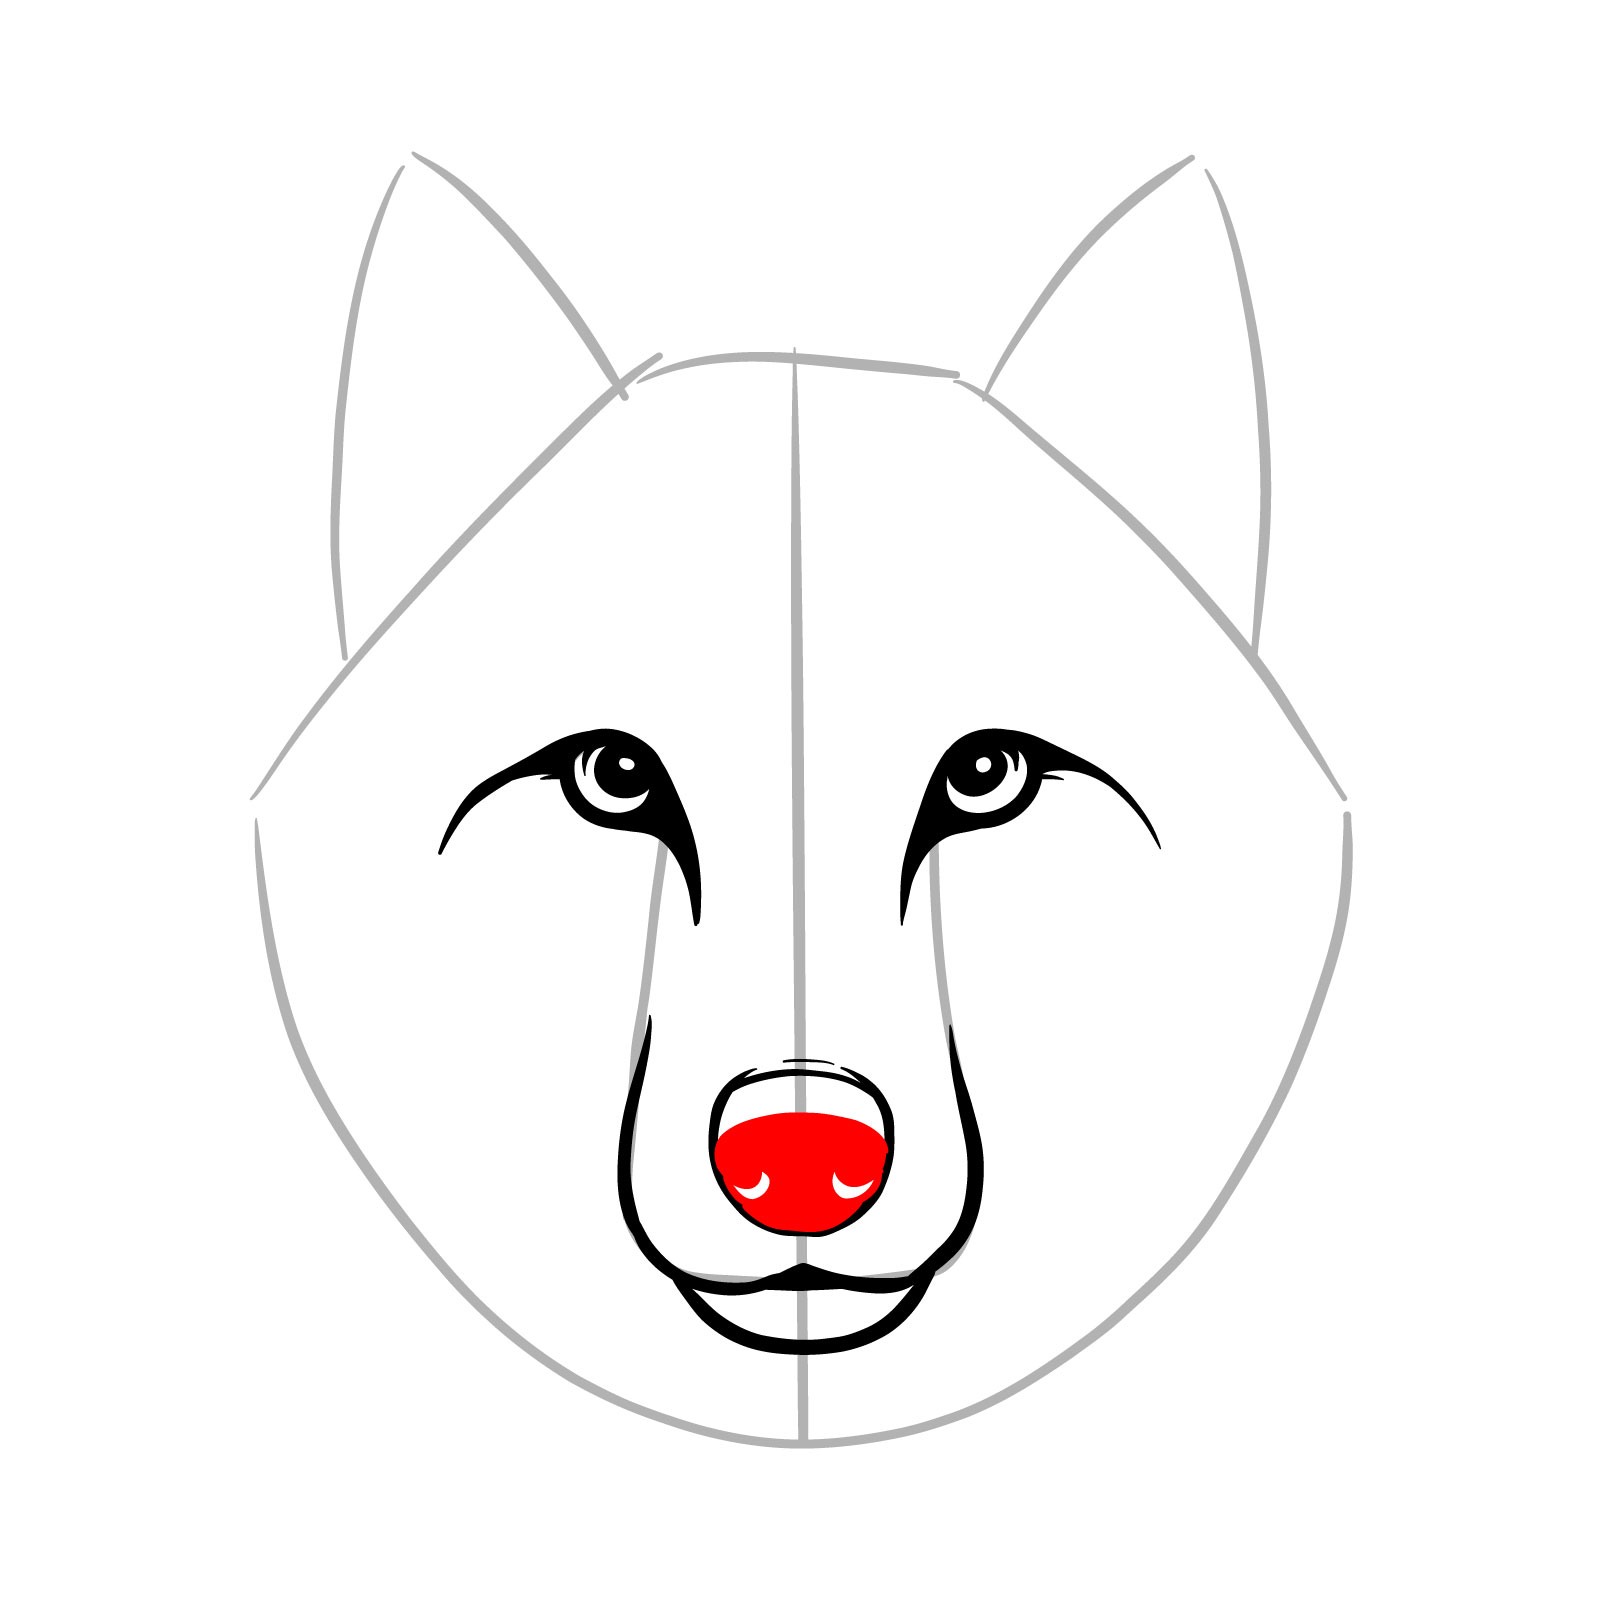
Step 07 – Shade in approximately three-quarters of the nose with color, being sure to leave small crescent-shaped areas uncolored to represent the nostrils’ highlights
PinAdd depth to the wolf’s nose with shading and highlights
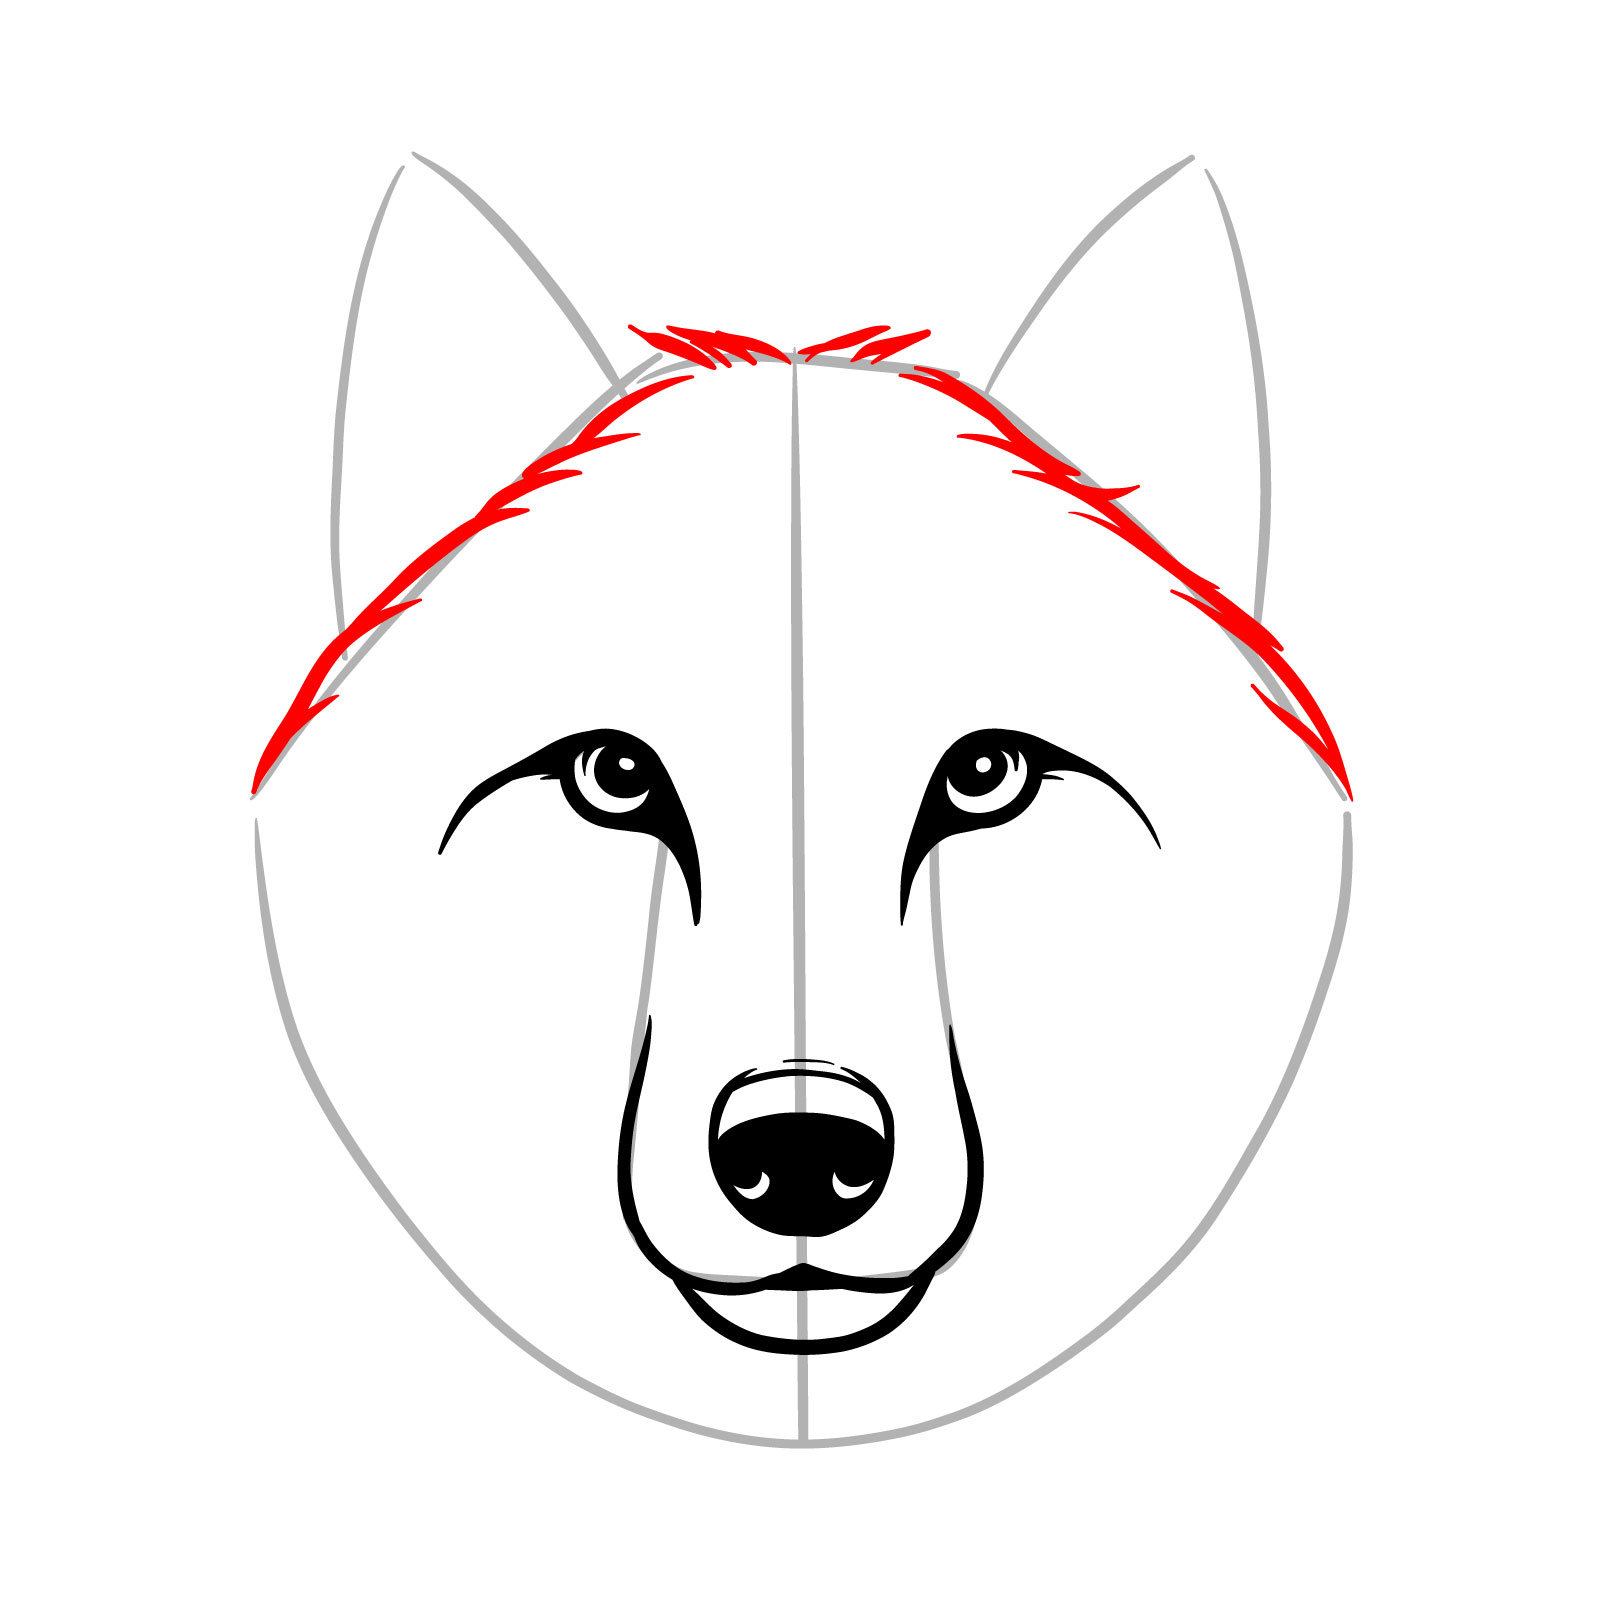
Step 08 – Instead of drawing a seamless outline, use short, wavy lines to create the furry texture at the top of the wolf’s head
PinIllustrate the furry texture on the top of the wolf’s head
Step 09 – Continue the furry texture down the sides of the head to frame the wolf’s face. The lines should be slightly longer and vary in direction to mimic the way fur naturally grows and layers
PinAdd the side fur details to frame the wolf’s face
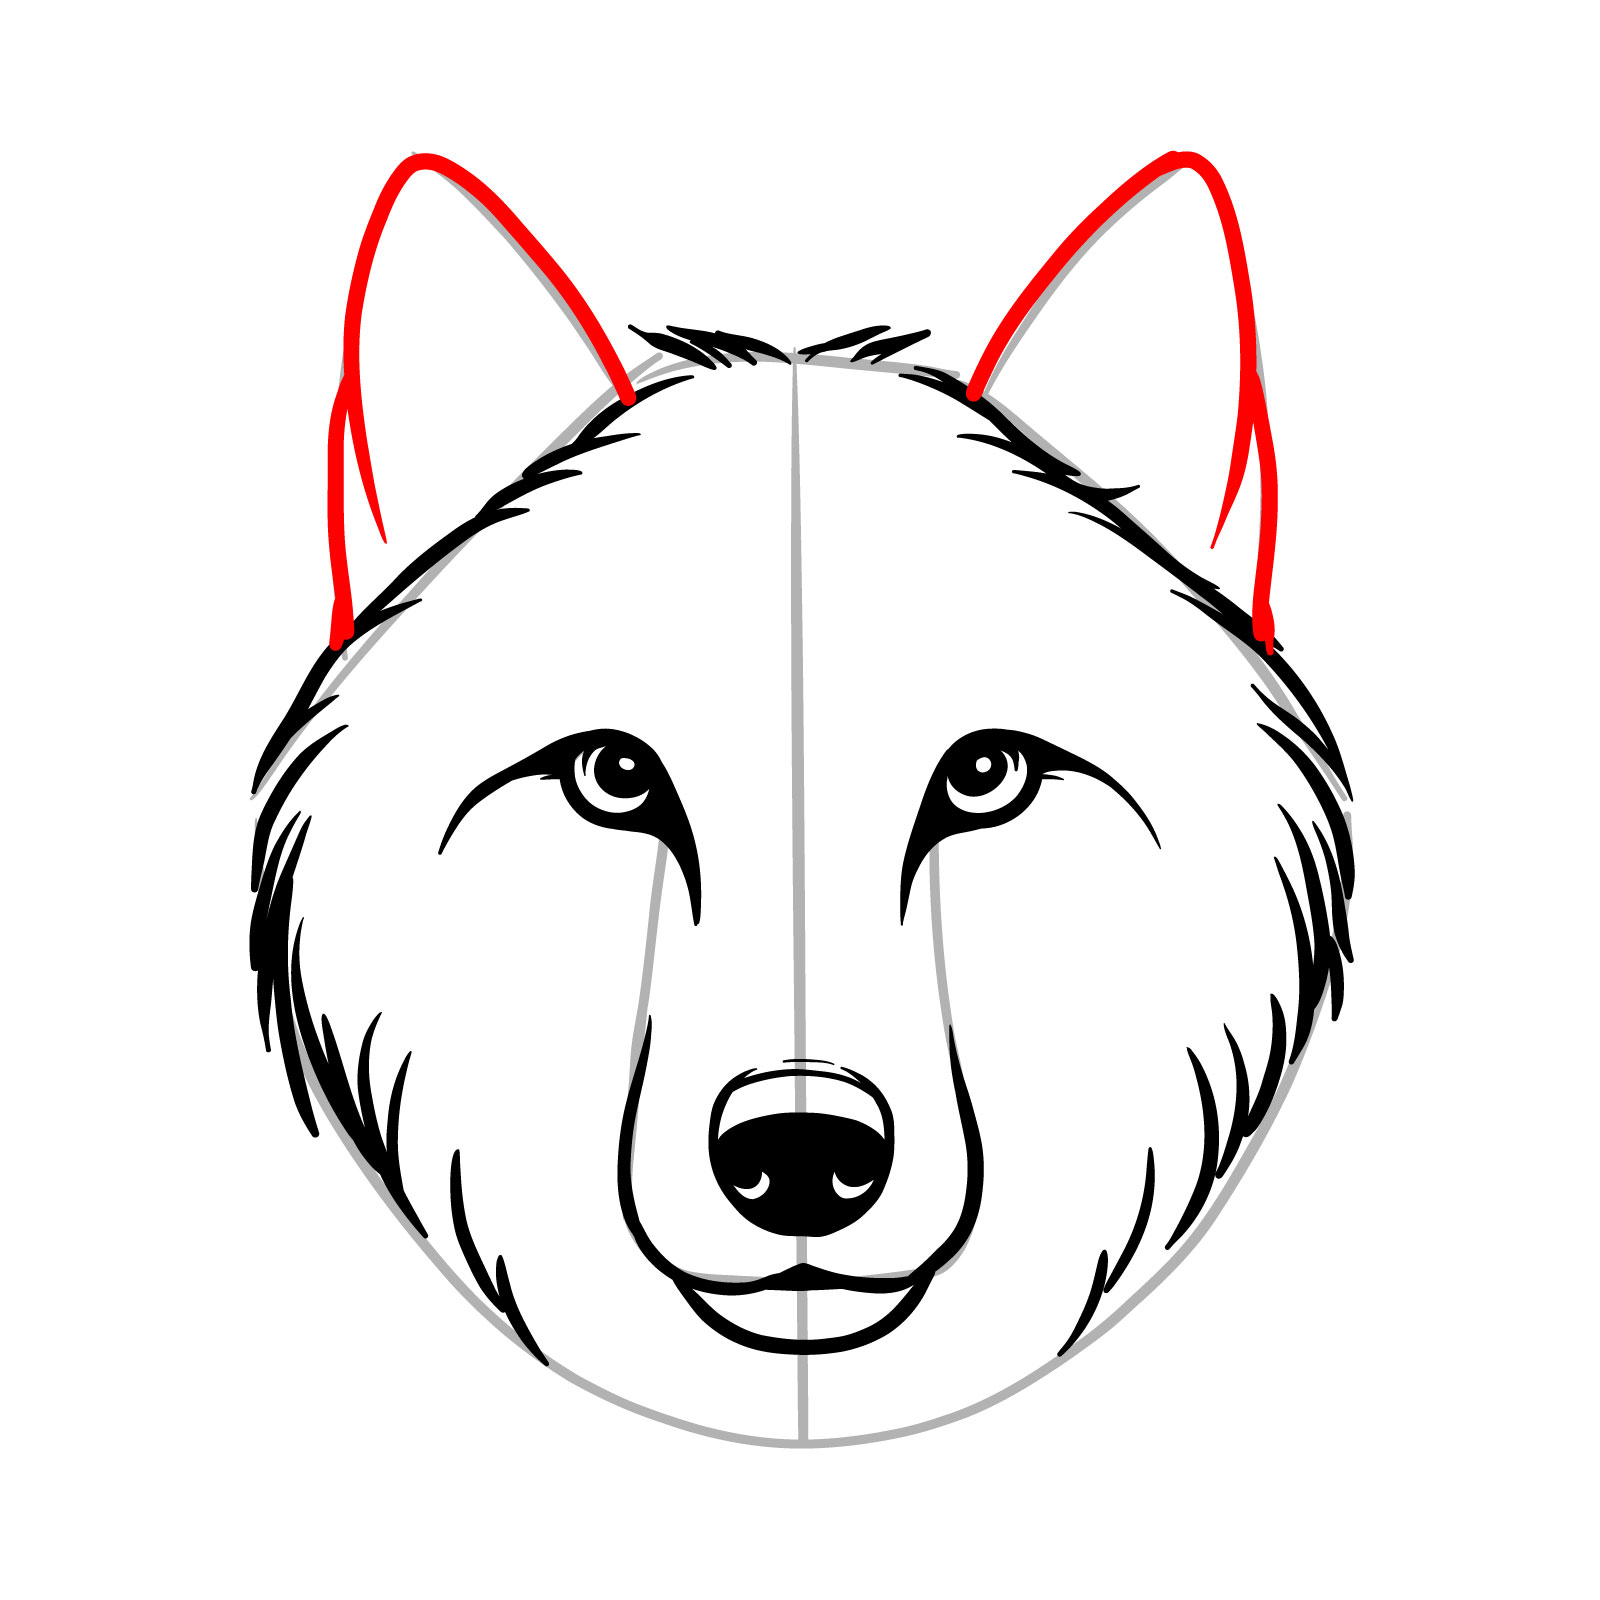
Step 10 – Create two pointed ears on top of the head to give the wolf its characteristic alert posture. The ears should be tall and triangular, with a slight inward curve at the base to show depth
PinDraw the pointed ears to complete the wolf’s head shape
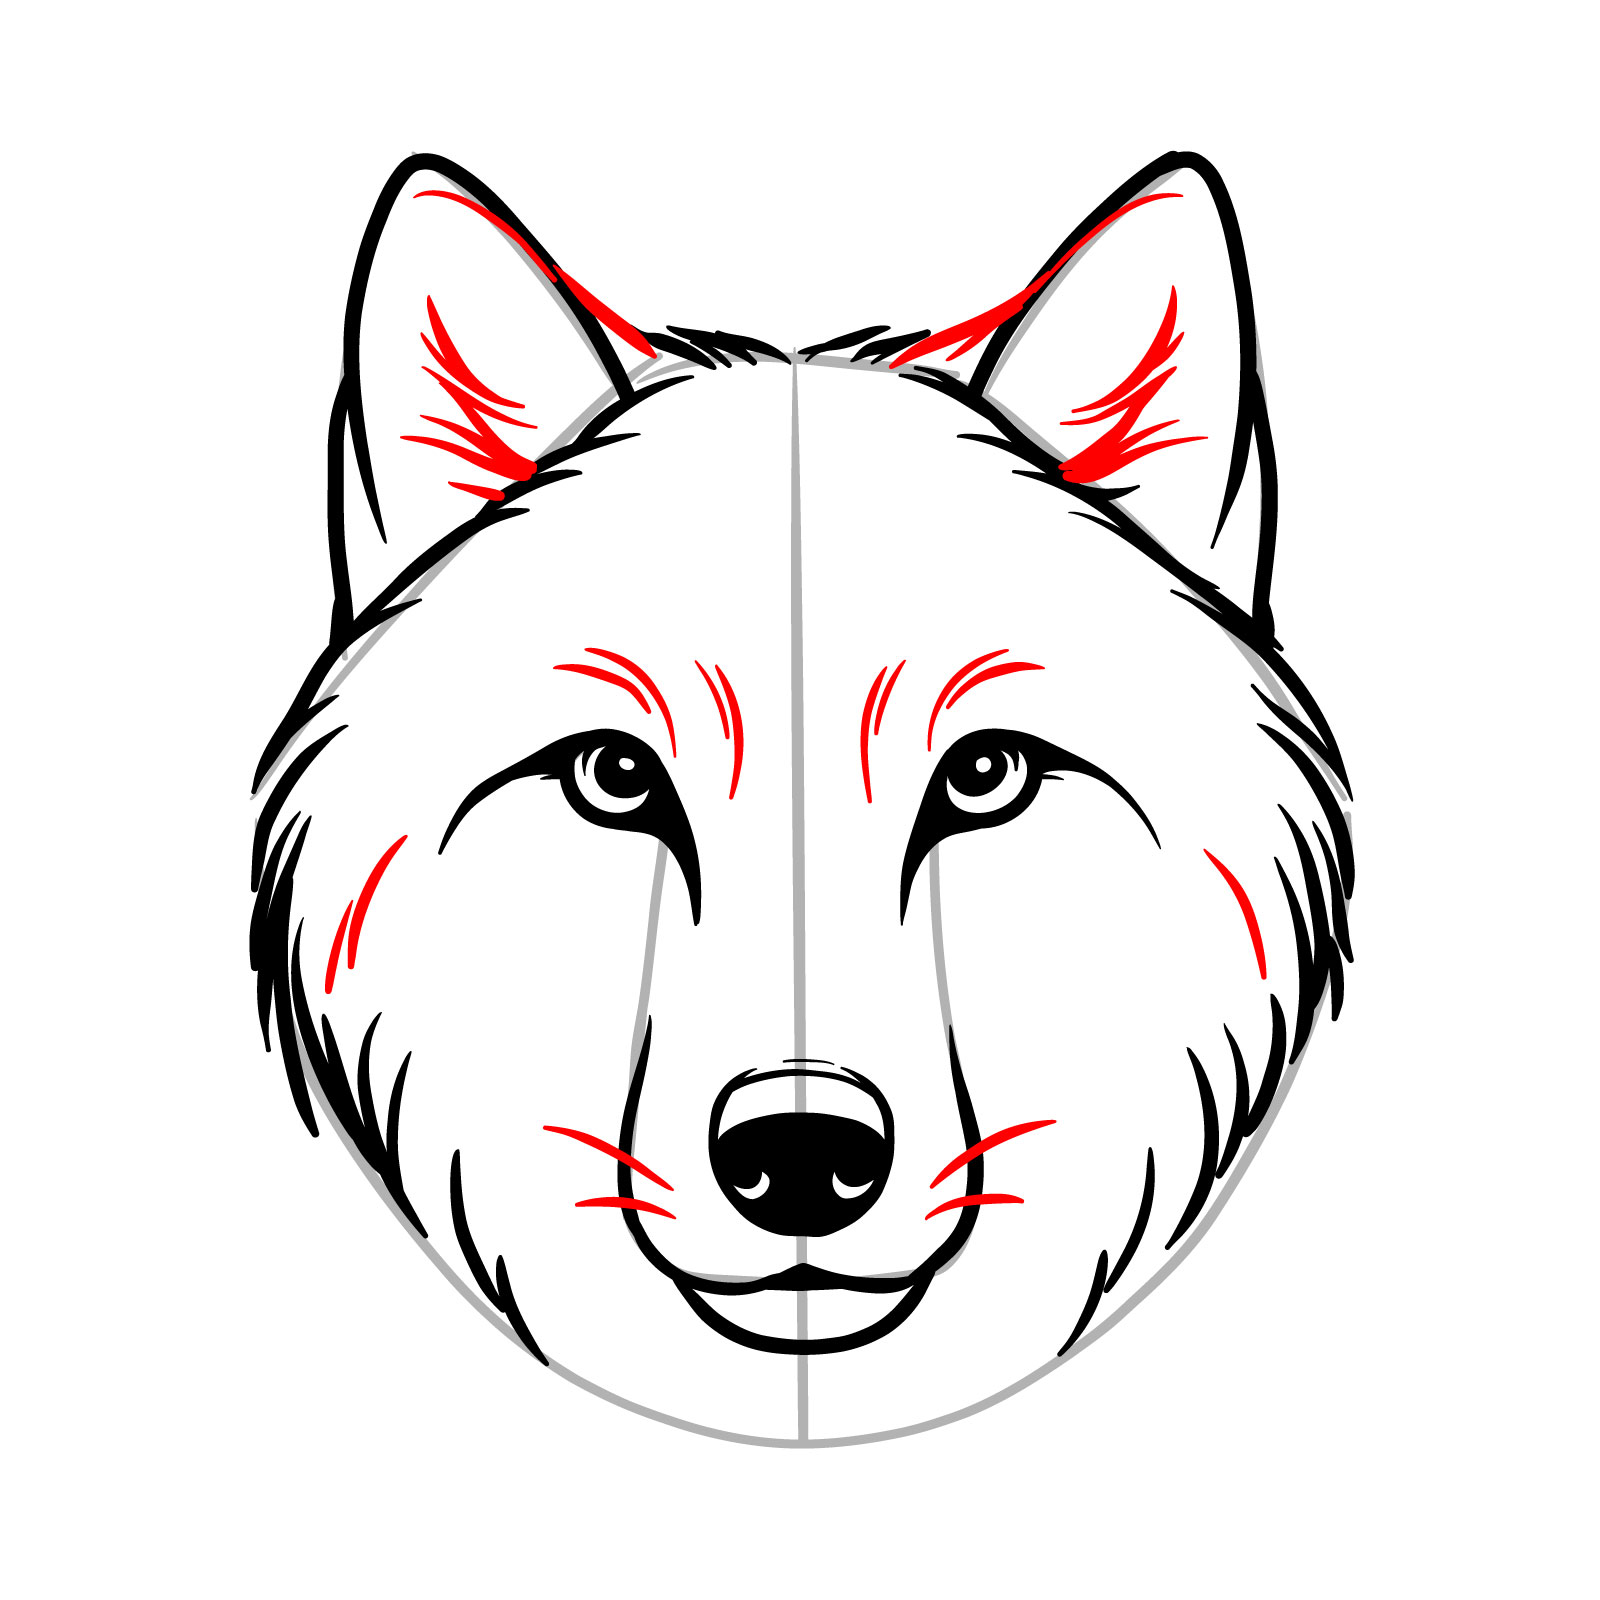
Step 11 – Add the fine details such as whiskers and additional fur lines to bring texture and realism to your wolf drawing
PinSketch the final fur and whisker details on the wolf’s face
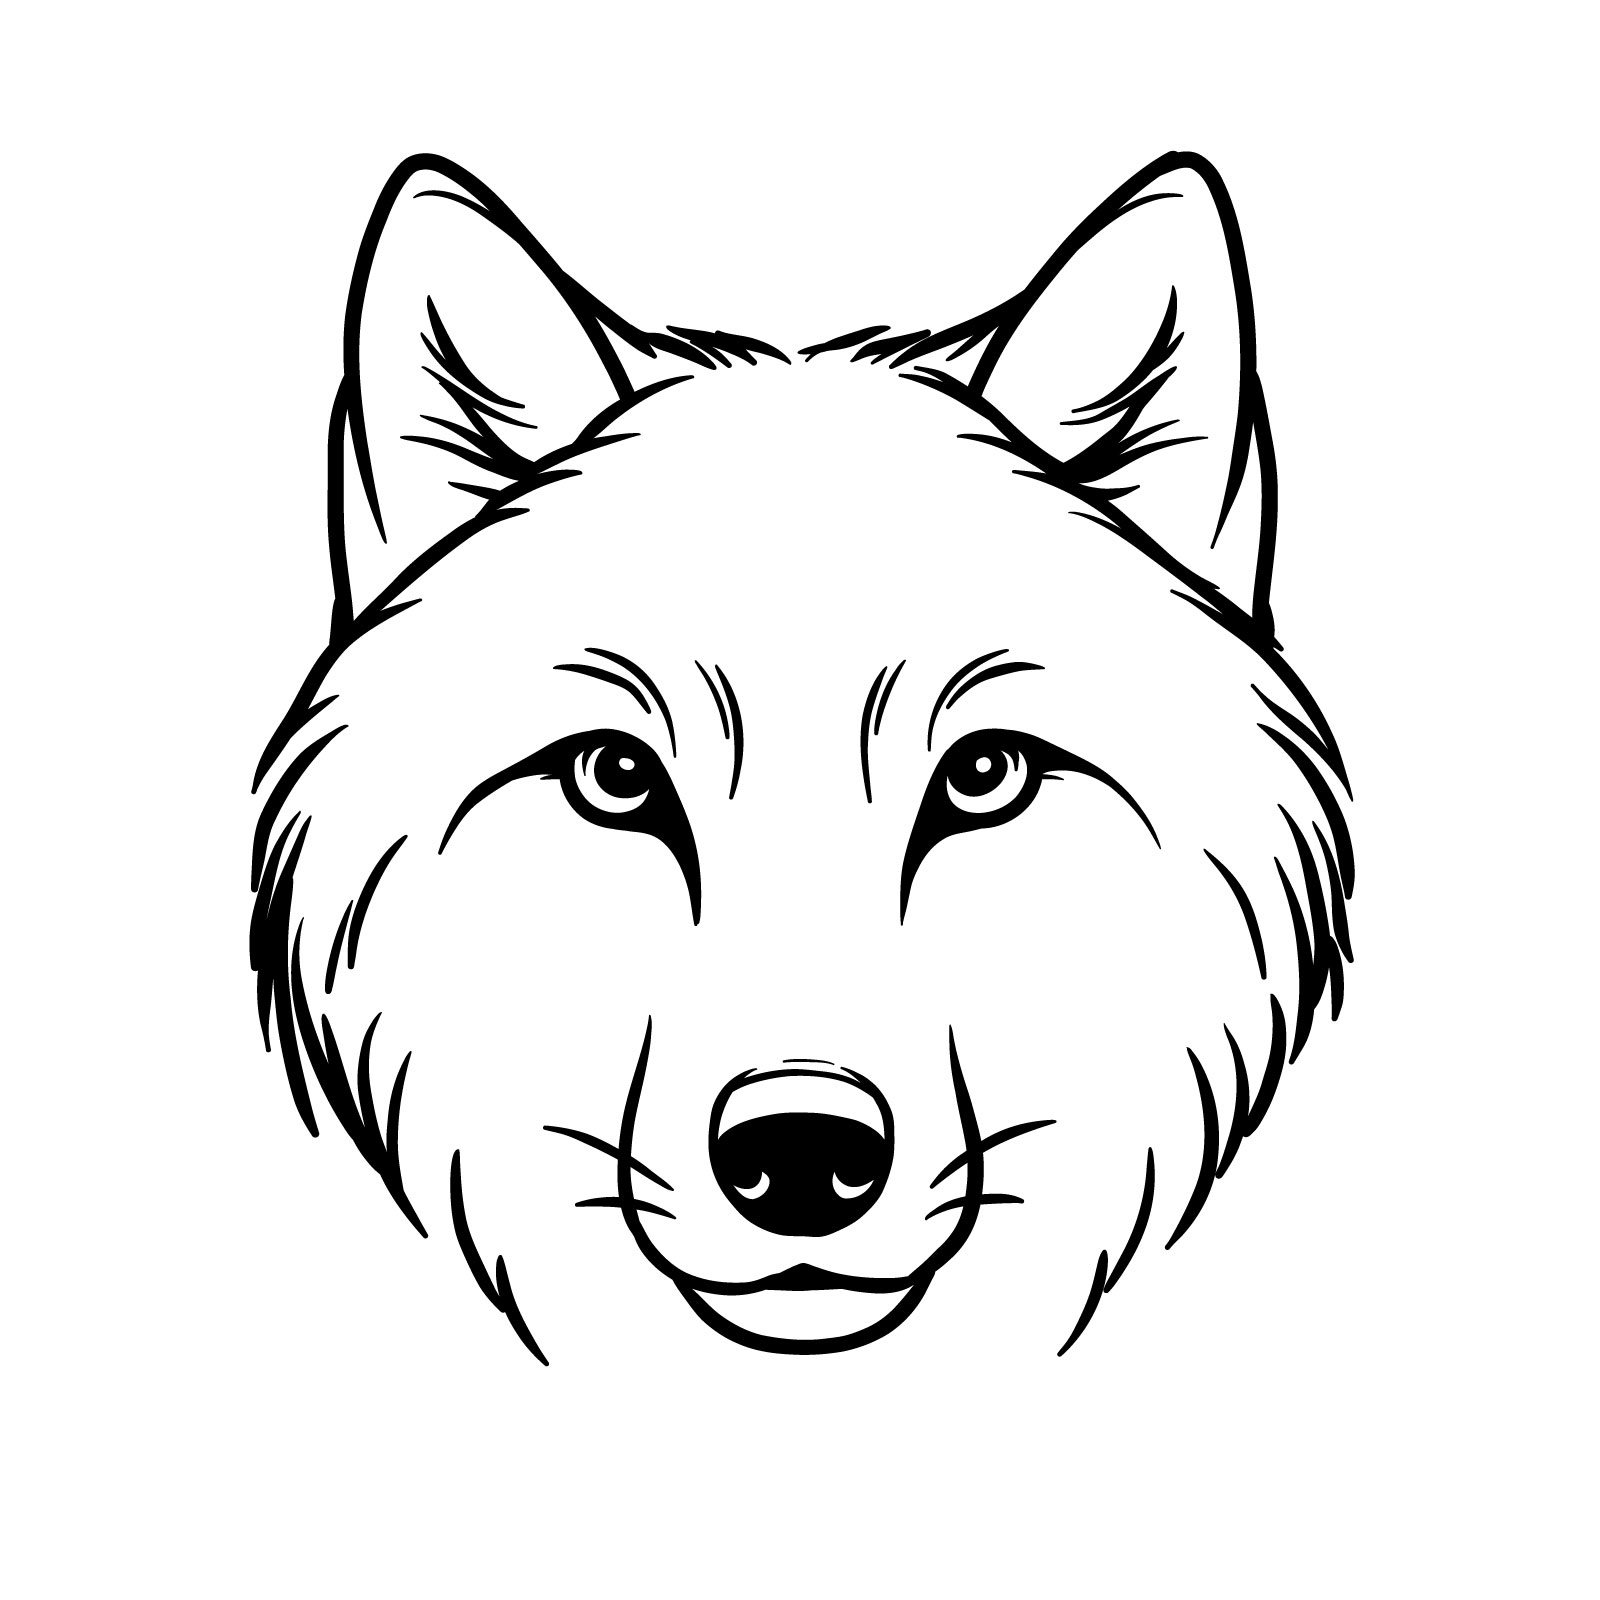
Step 12 – Review your drawing to ensure every detail contributes to the lifelike appearance of the wolf. The finished piece should display a realistic wolf face with expressive eyes, a textured nose, and a fur pattern. This step-by-step guide ensures that even beginners can learn how to draw a wolf’s face with accuracy and artistic expression
PinYour detailed guide on how to draw a wolf’s face concludes with a finished drawing
Sketching a Realistic Wolf Face (Side View) in 10 Steps
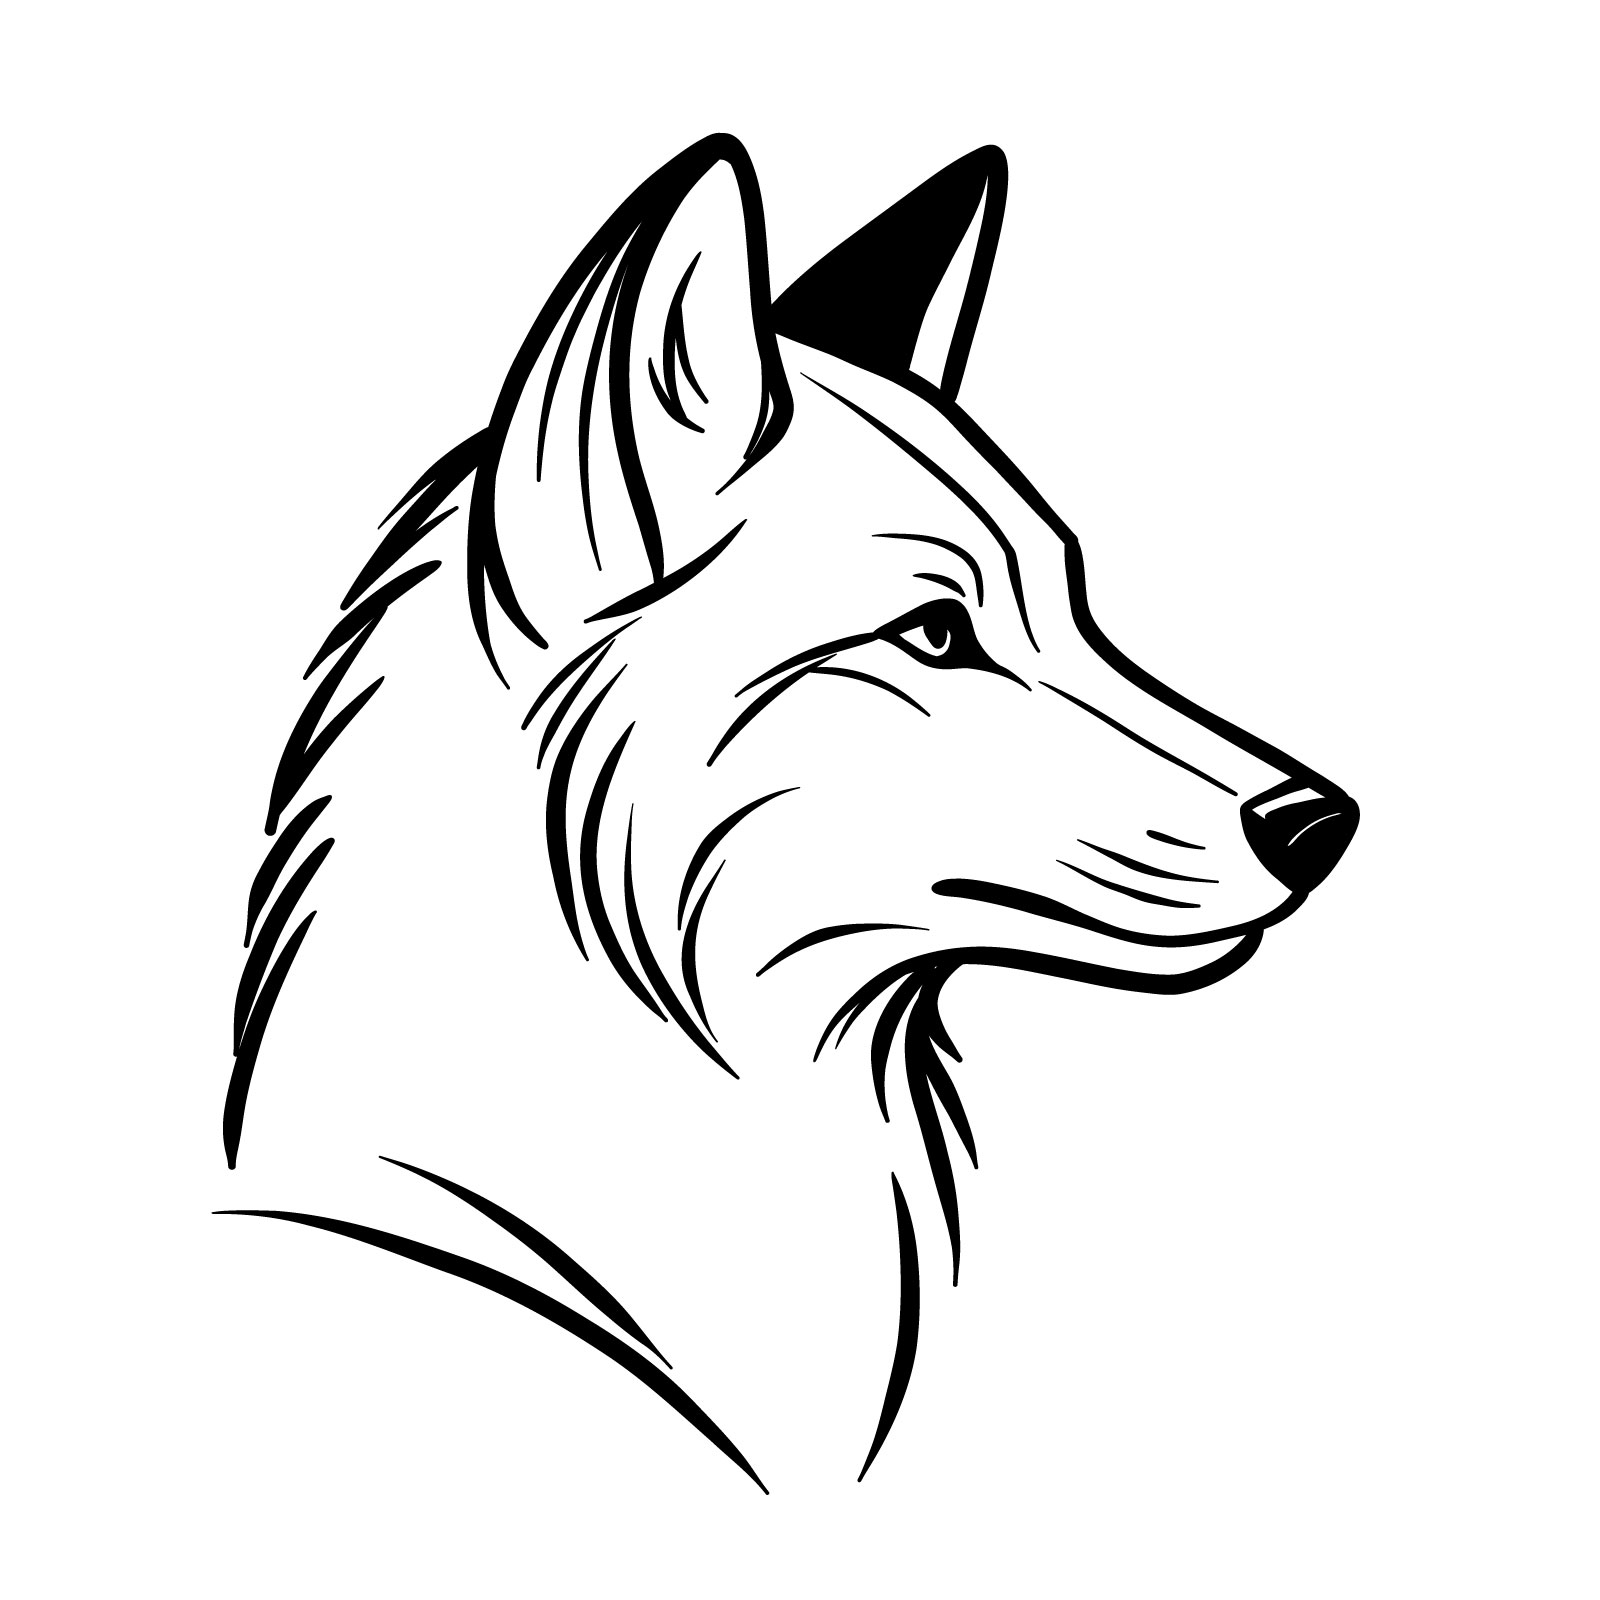
PinHow to draw a wolf’s head side view
Stepping into the seventh guide, we focus on mastering the profile of a wolf with a realistic side view depiction. This tutorial simplifies the process into 10 structured steps, with the initial two steps dedicated to drafting a basic sketch. This sketch serves as the vital framework for the wolf’s head and snout, ensuring accurate proportions. The completed drawing will reveal a wolf characterized by its sharp features, attentive ears, and the sleek contour of its fur. The side view provides a unique angle to appreciate the wolf’s regal profile.
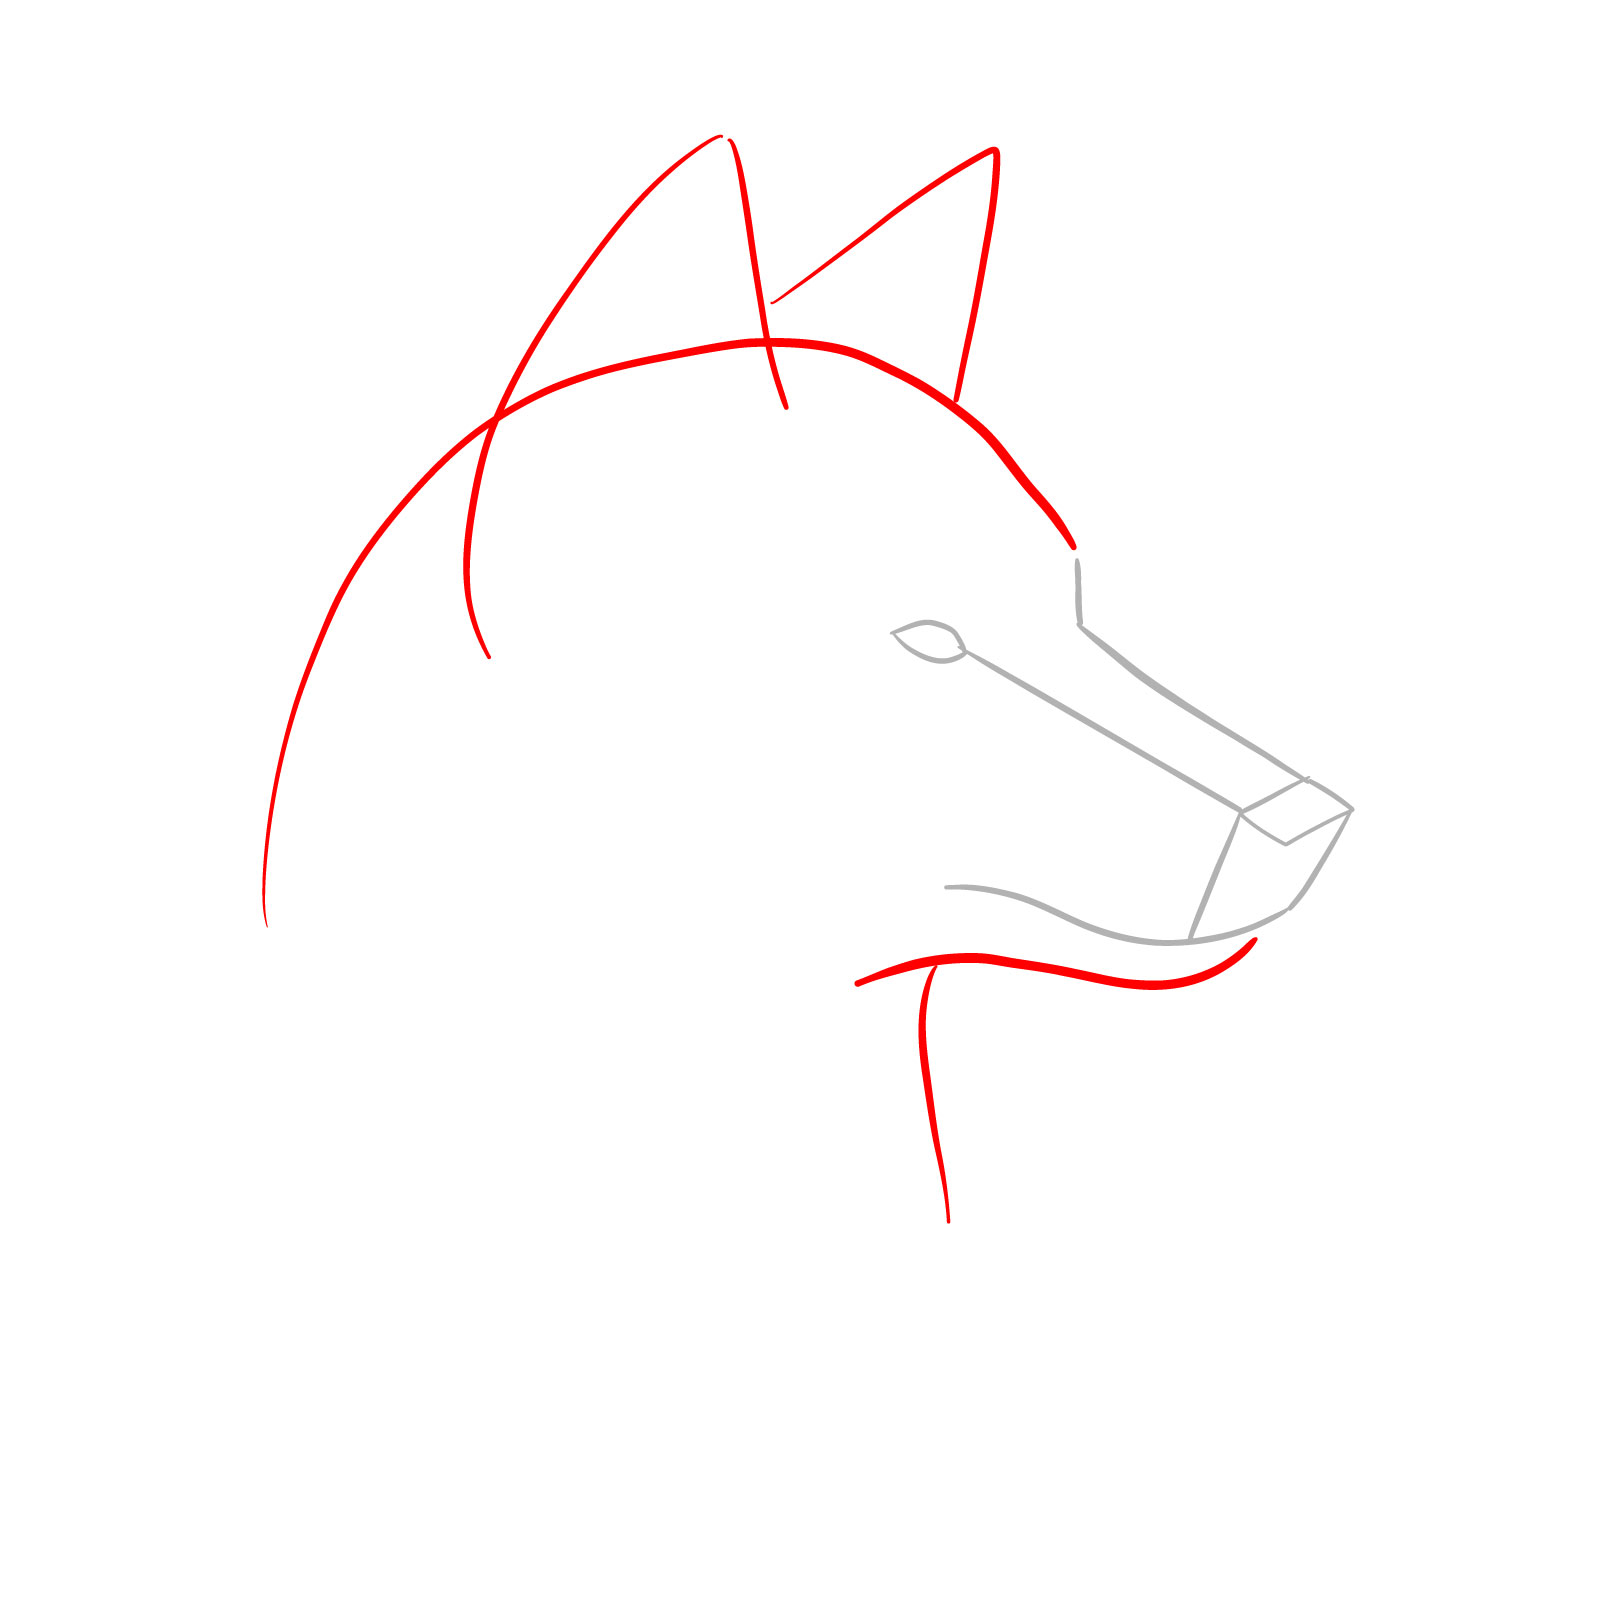
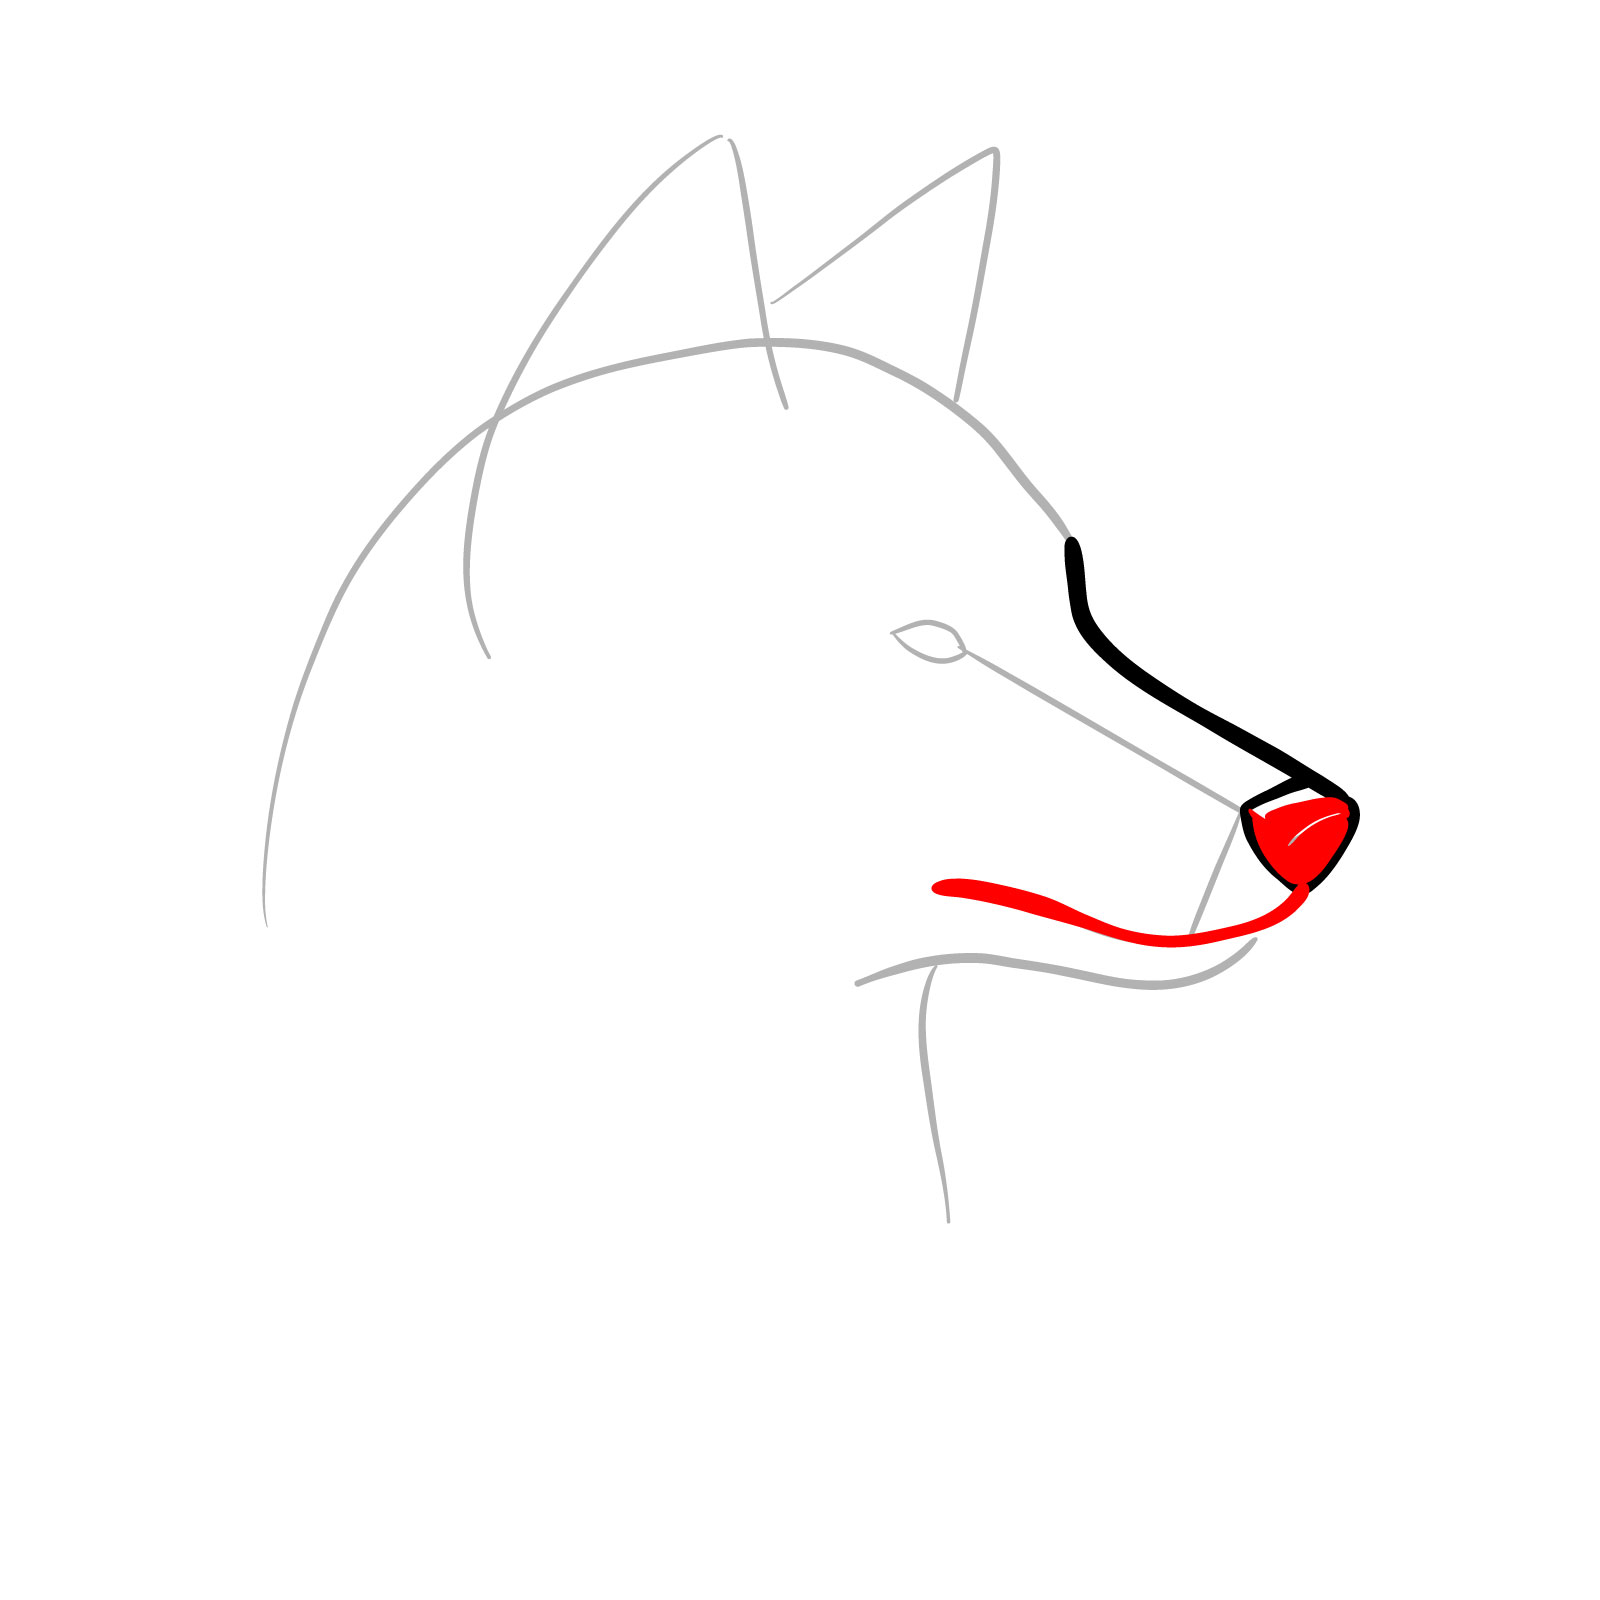
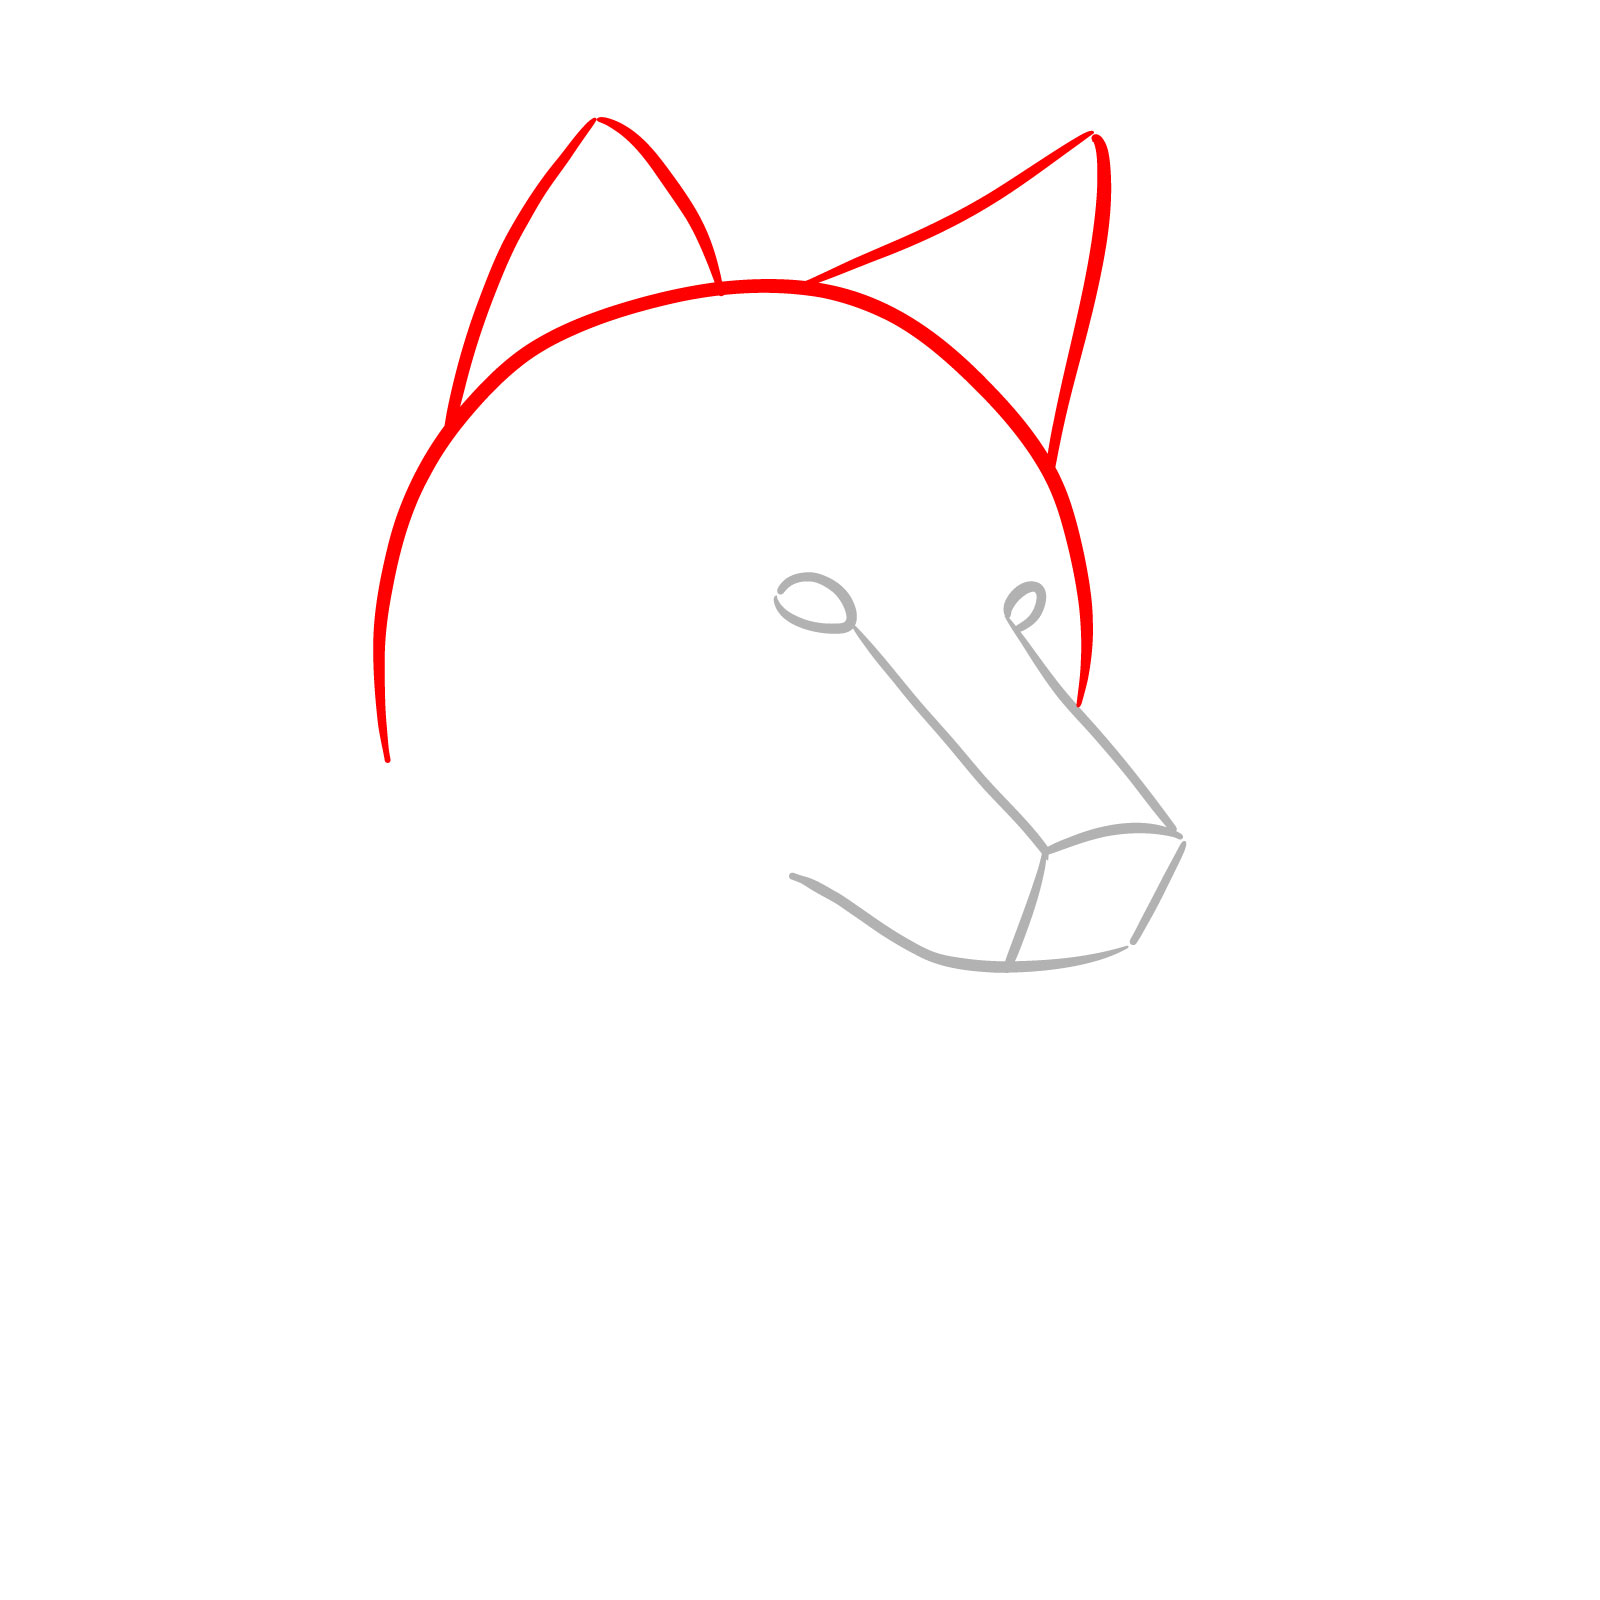
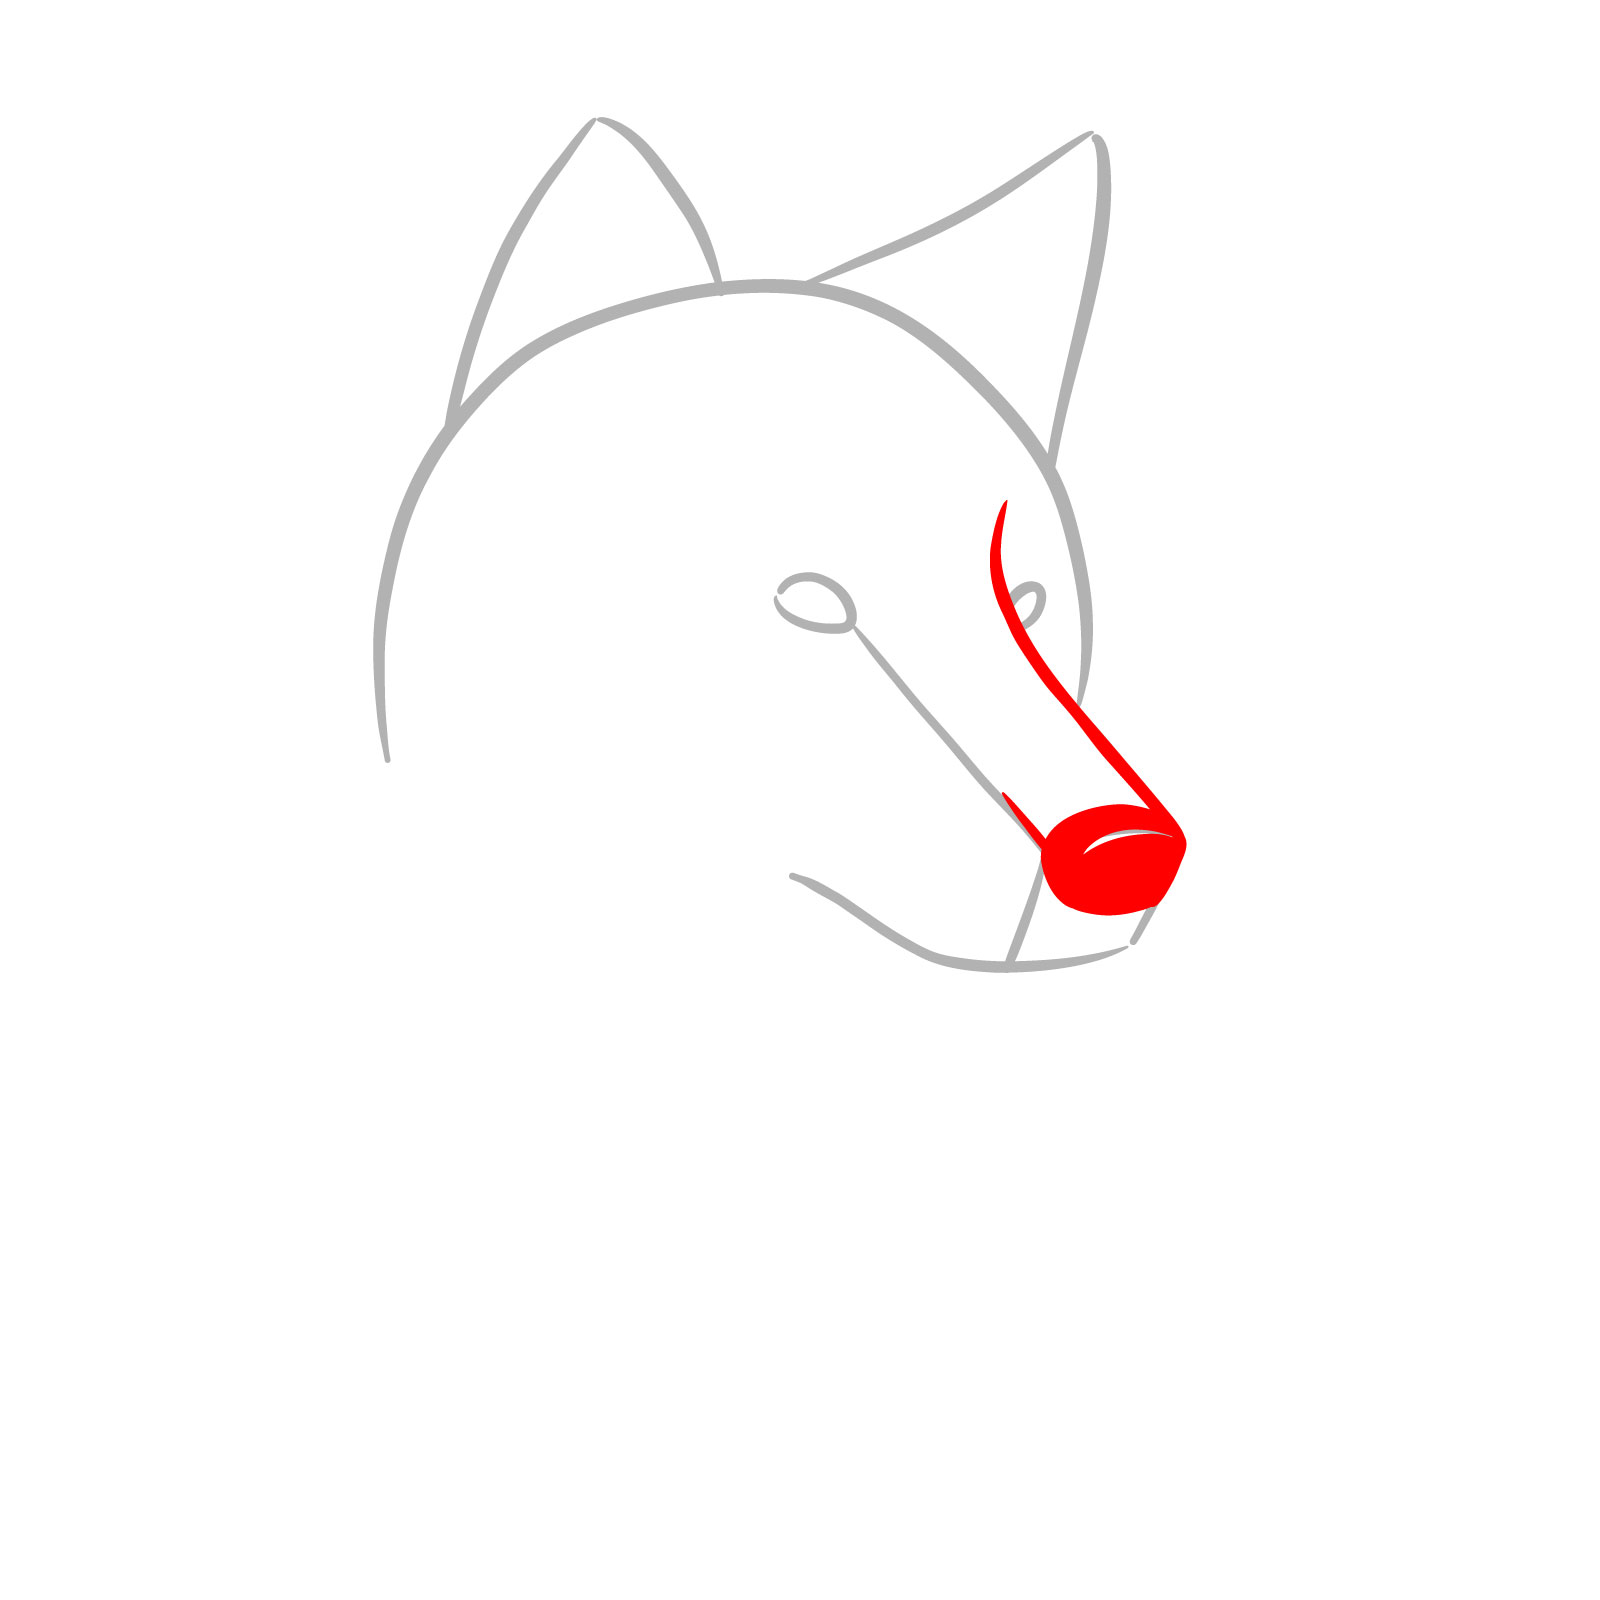
Step 01 – Begin your realistic wolf face side view by sketching the snout’s basic shape and an almond-shaped outline for the visible eye. This forms the initial framework for the wolf’s facial features
PinStarting the wolf face drawing with the snout and eye outline
Step 02 – Finish the foundational sketch by drawing the wolf’s head shape, including the placement for the ears, the curve of the bottom jaw, and the neck line. Ensure the proportions are accurate for a side view perspective
PinComplete the basic sketch with head shape and ear placements
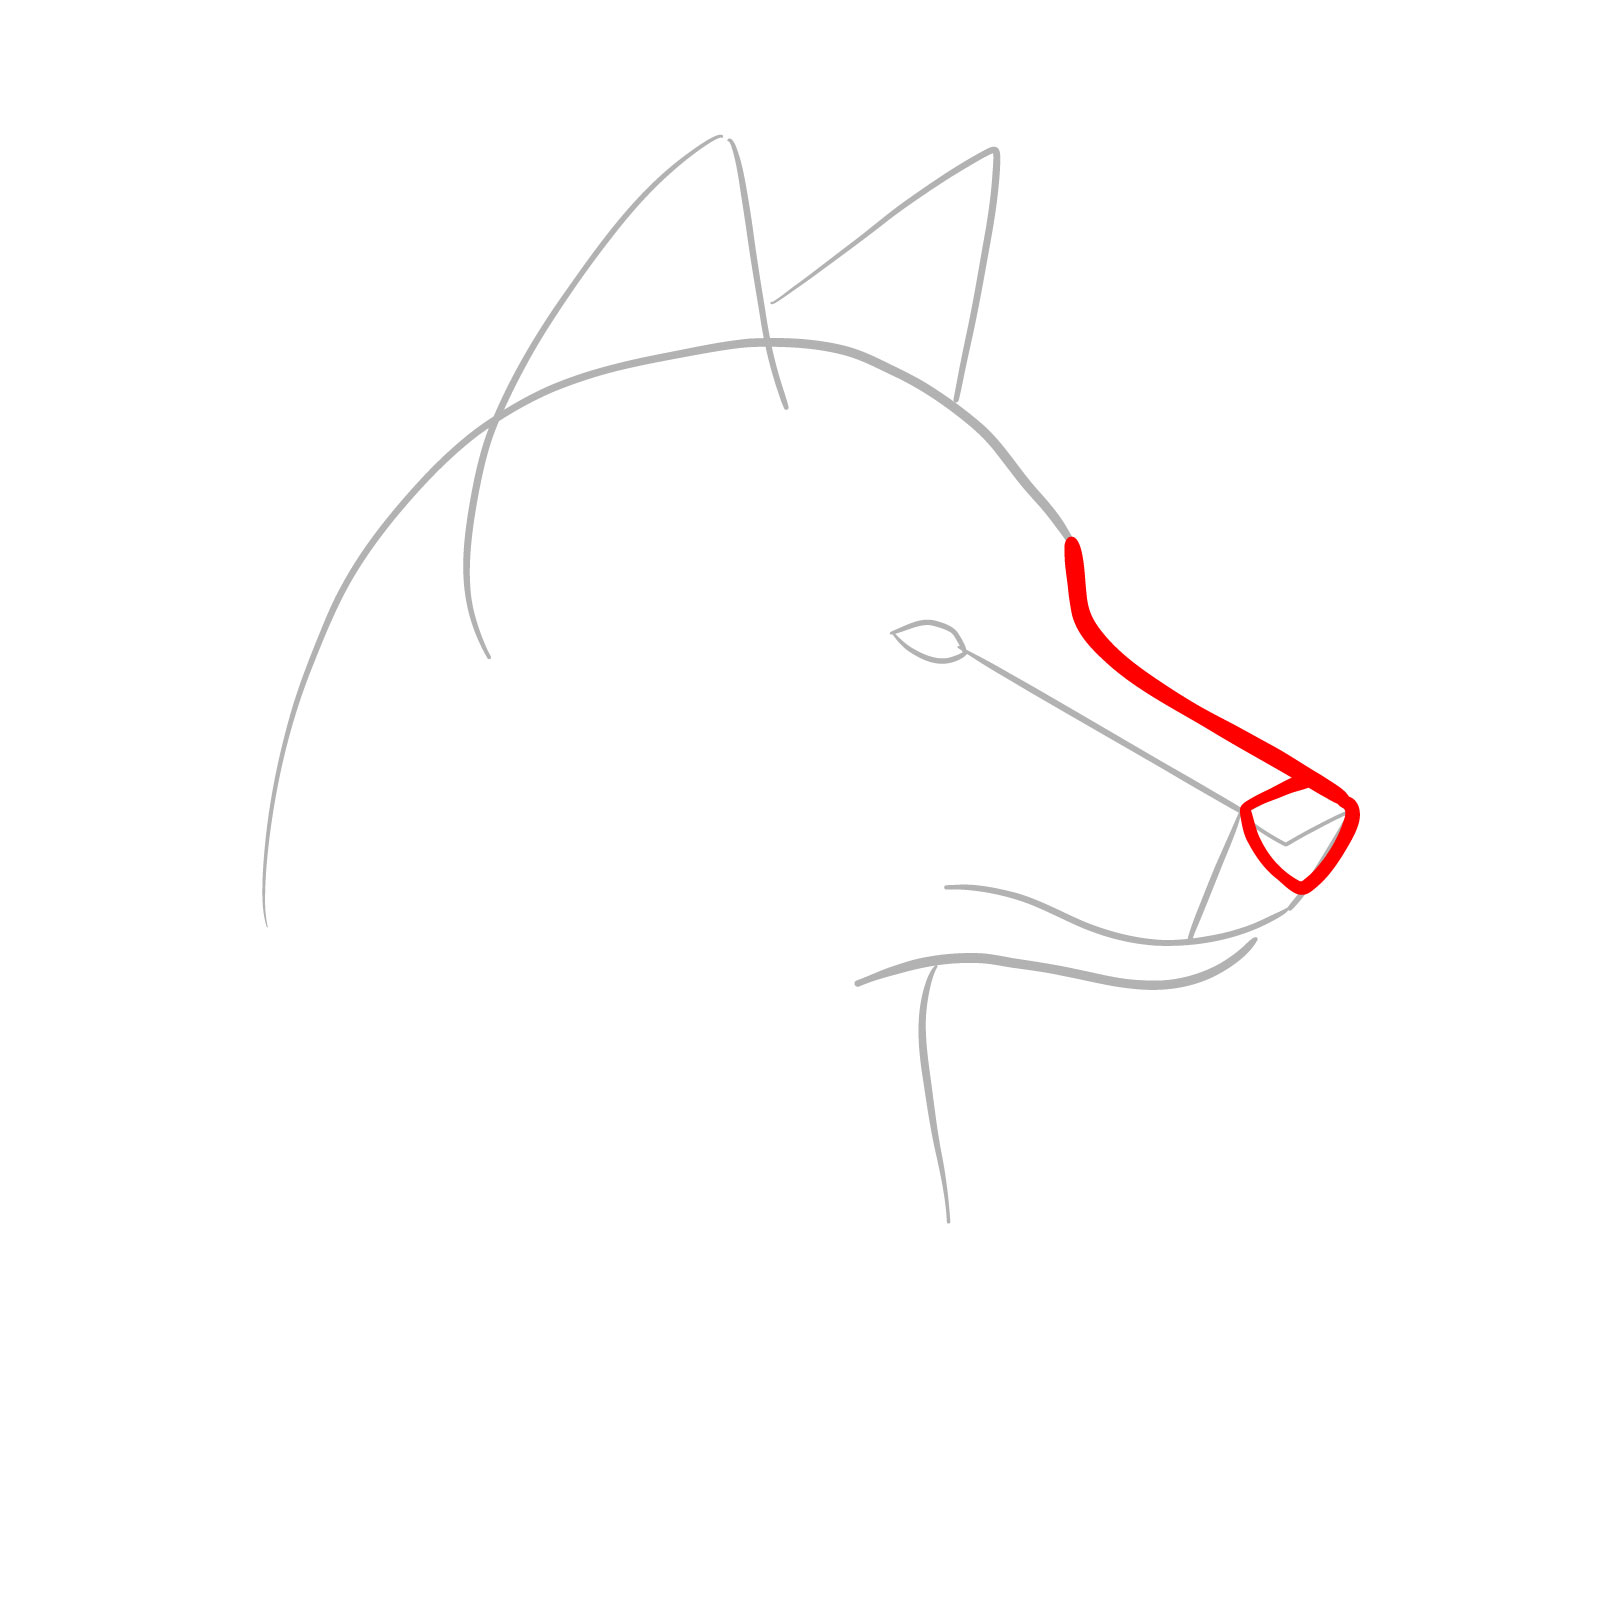
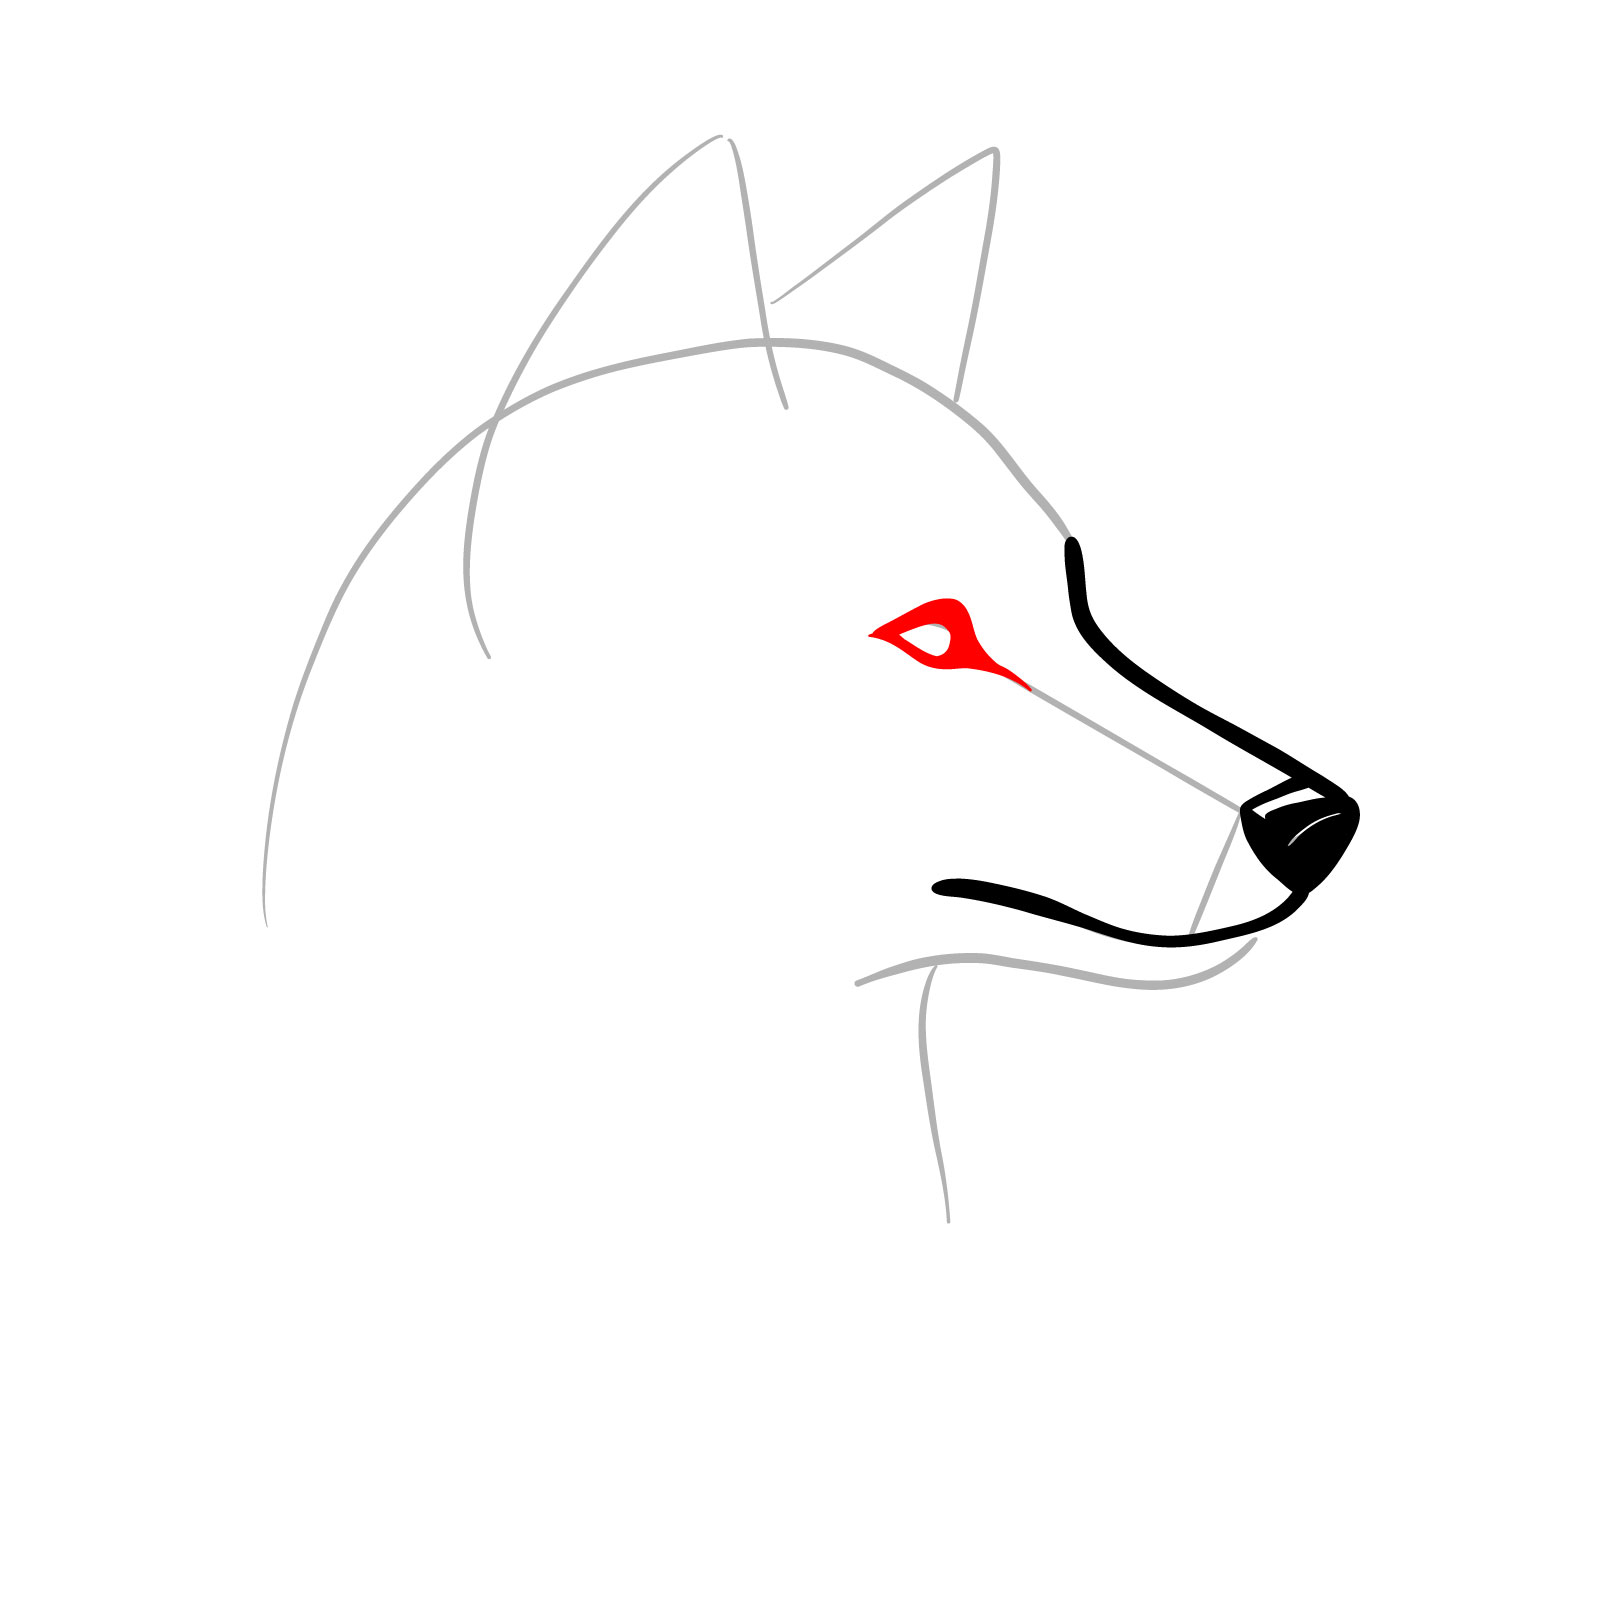
Step 03 – Add details to the upper part of the muzzle and create a precise outline for the nose. This will start to give your wolf drawing more definition and character
PinOutline the upper part of the muzzle and the nose
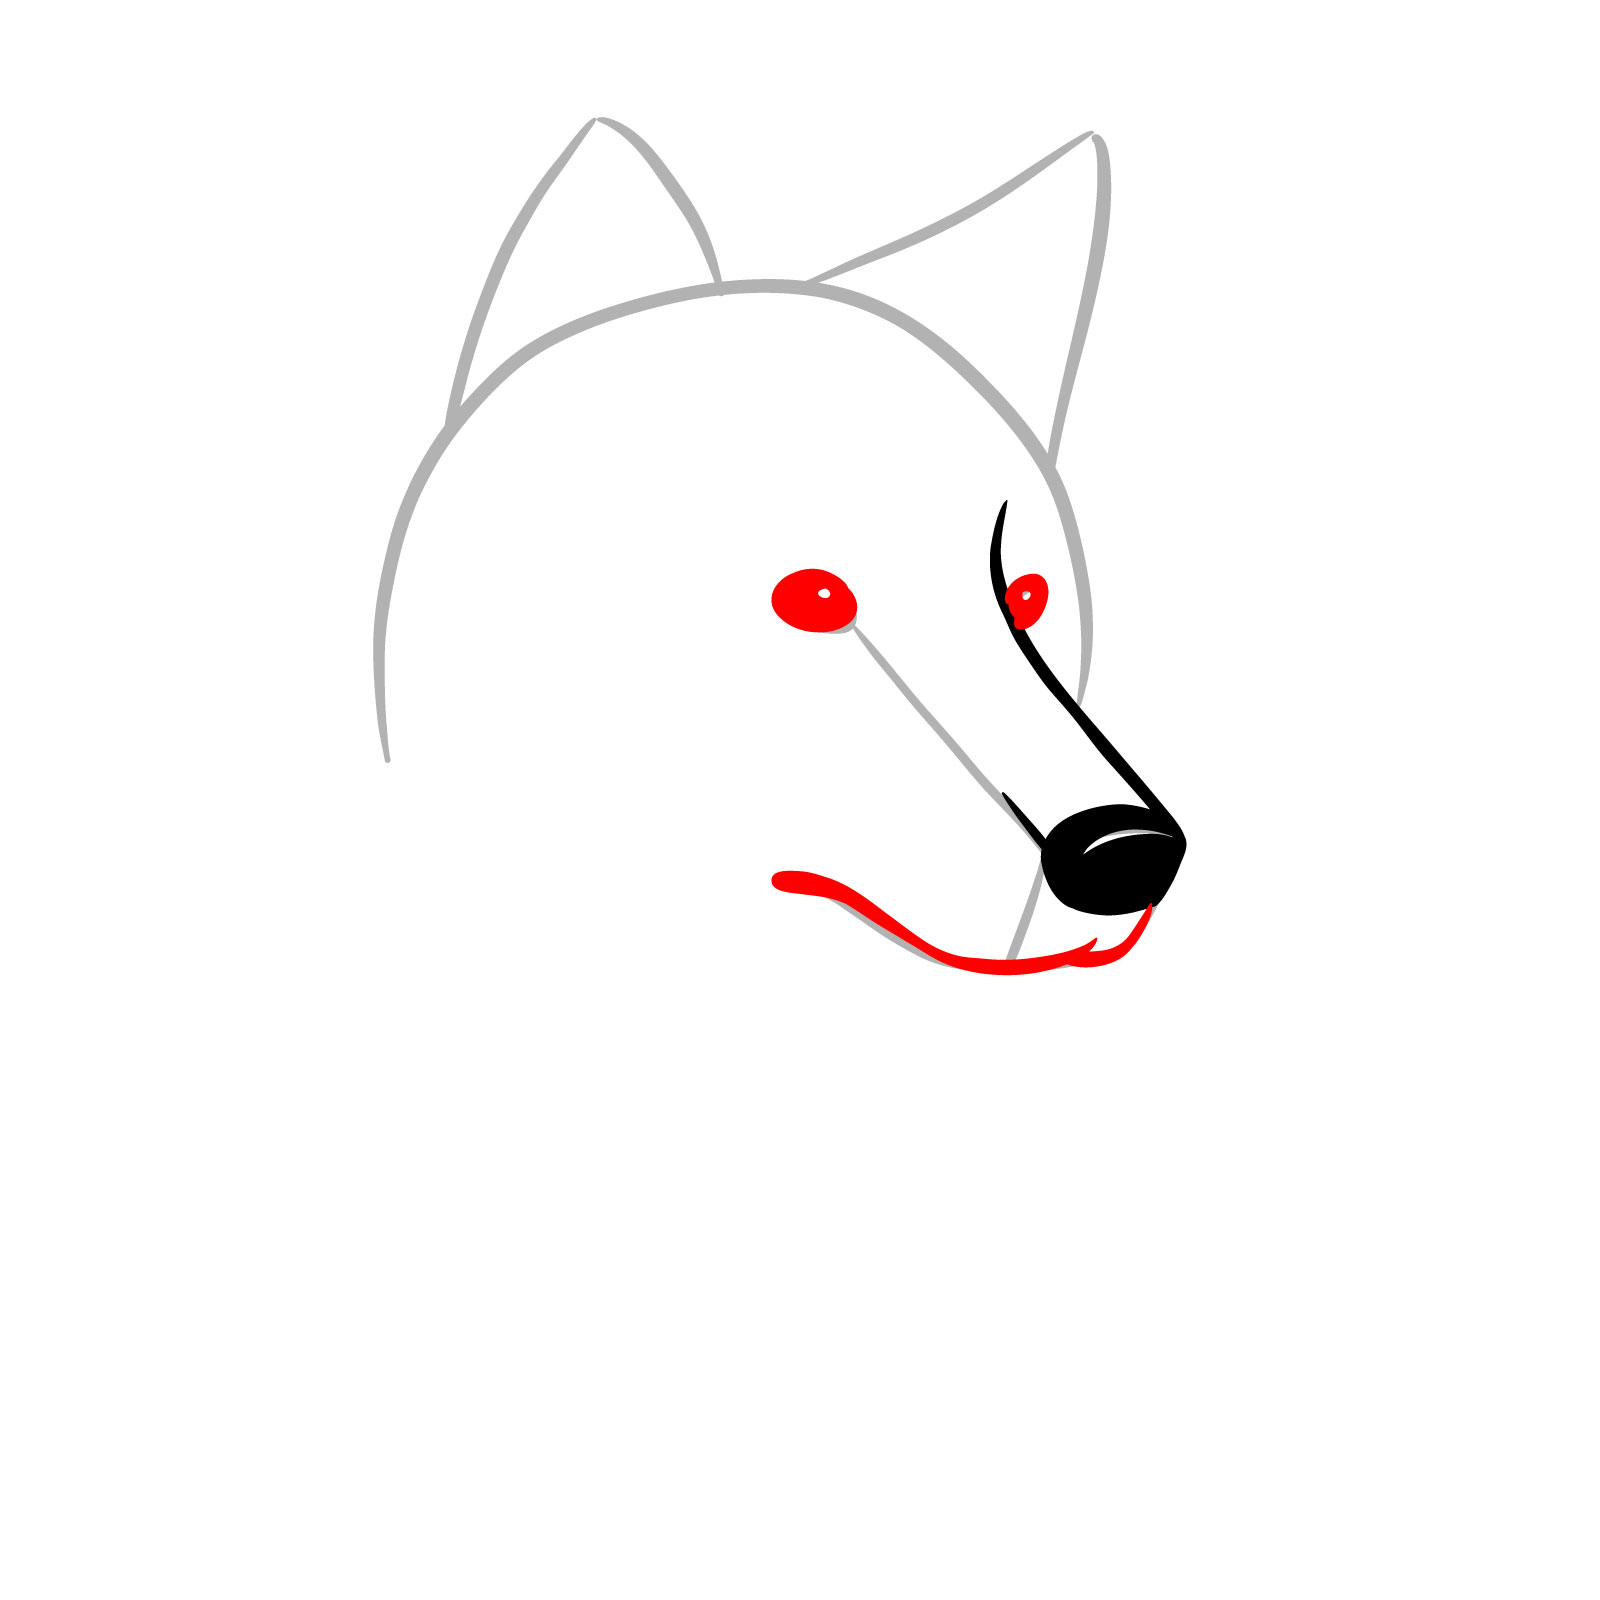
Step 04 – Shade the nose area, leaving uncolored spaces to represent the highlights which give the nose a glossy appearance. Draw the mouth line to connect the nose and the bottom jaw
PinFill in the nose with shading, leaving spaces for highlights, and add the mouth line
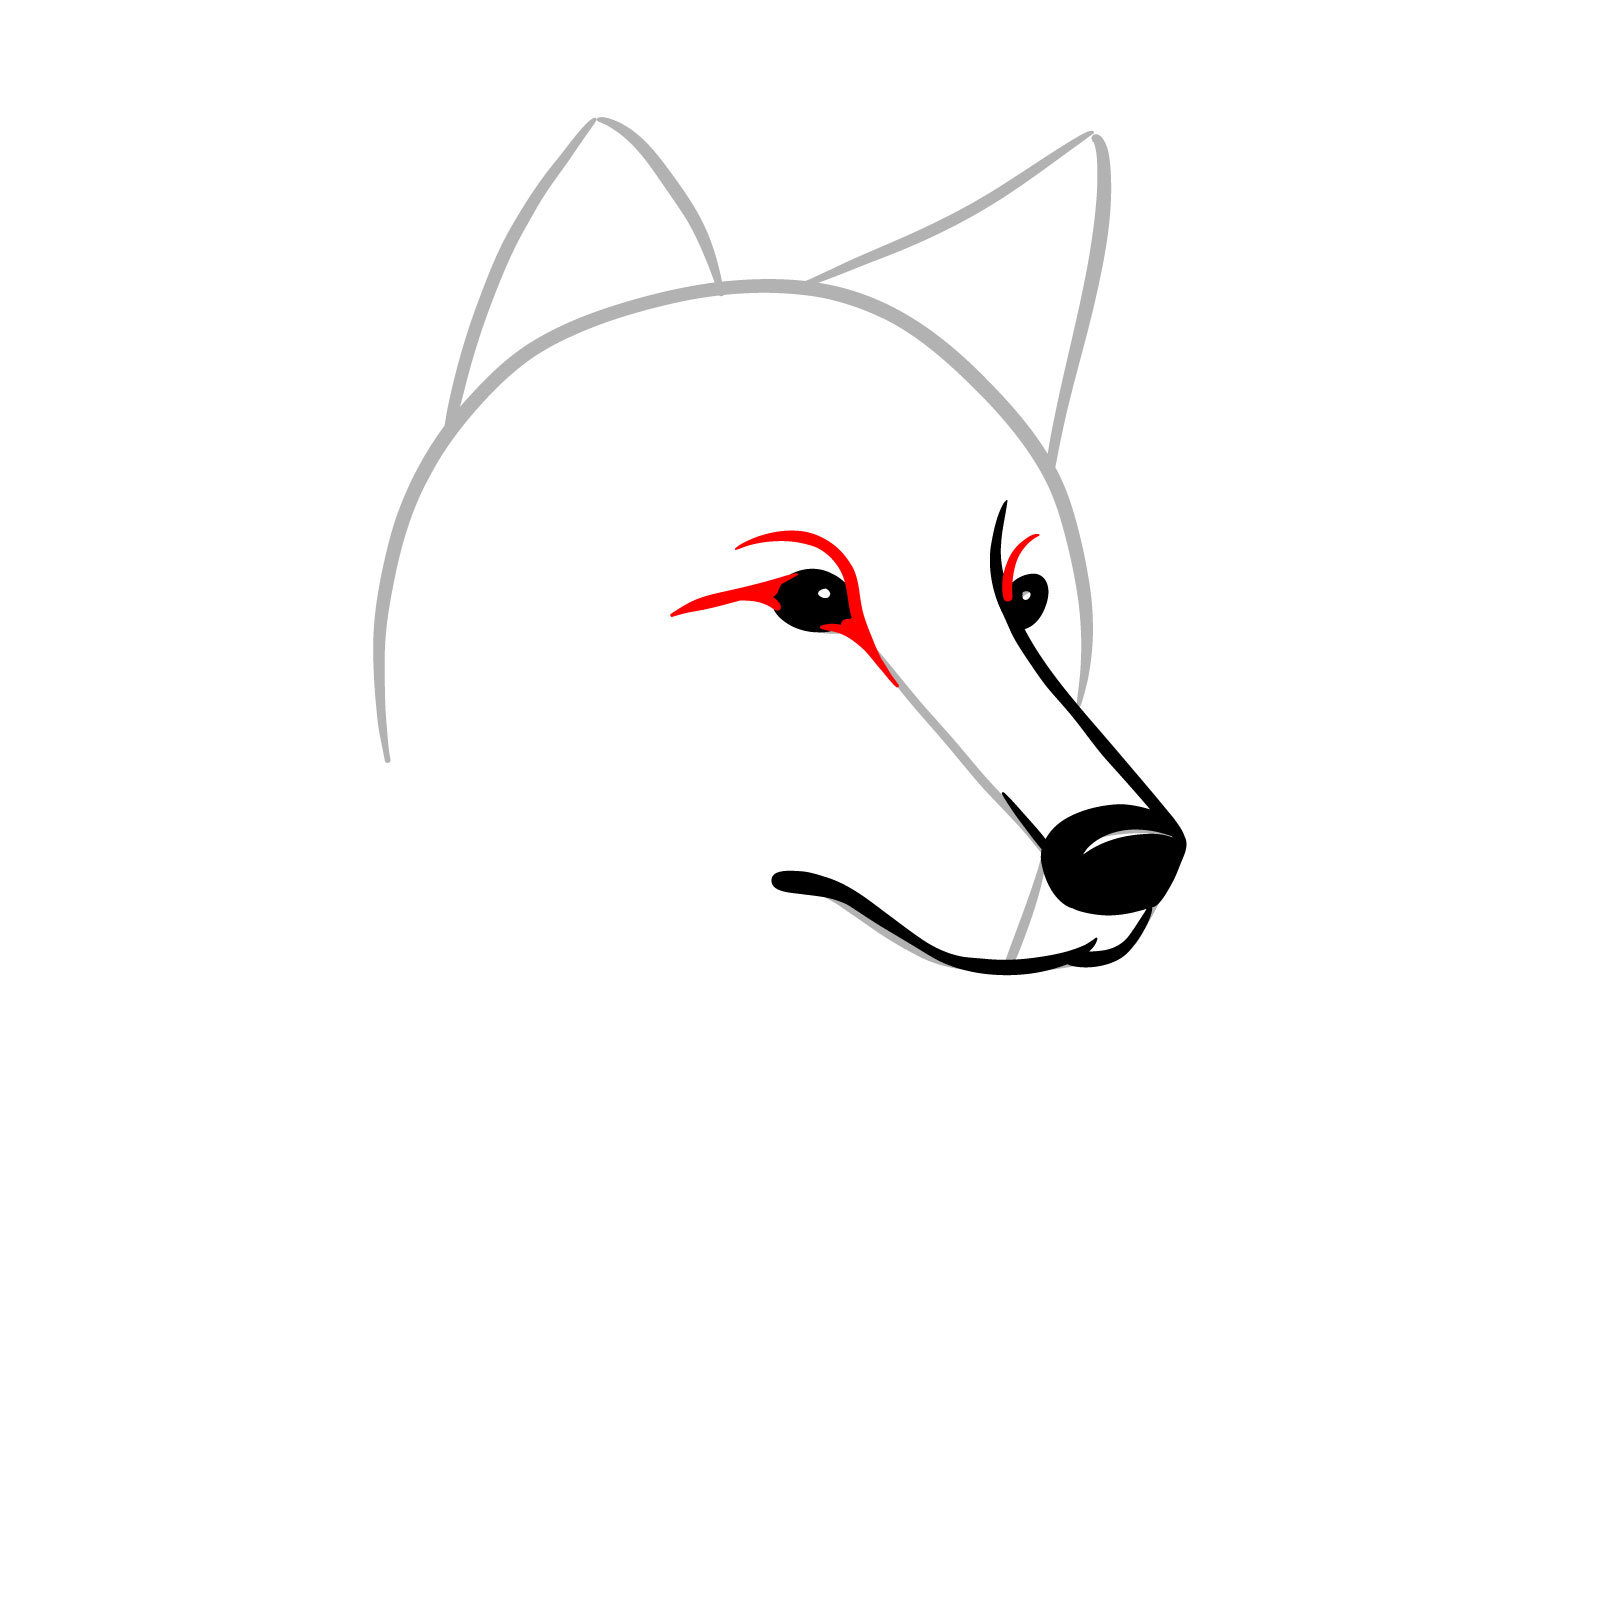
Step 05 – Enhance the eye area by adding depth around the almond-shaped outline to create the appearance of the eye socket
PinDeepen the eye area to bring life to the wolf’s expression
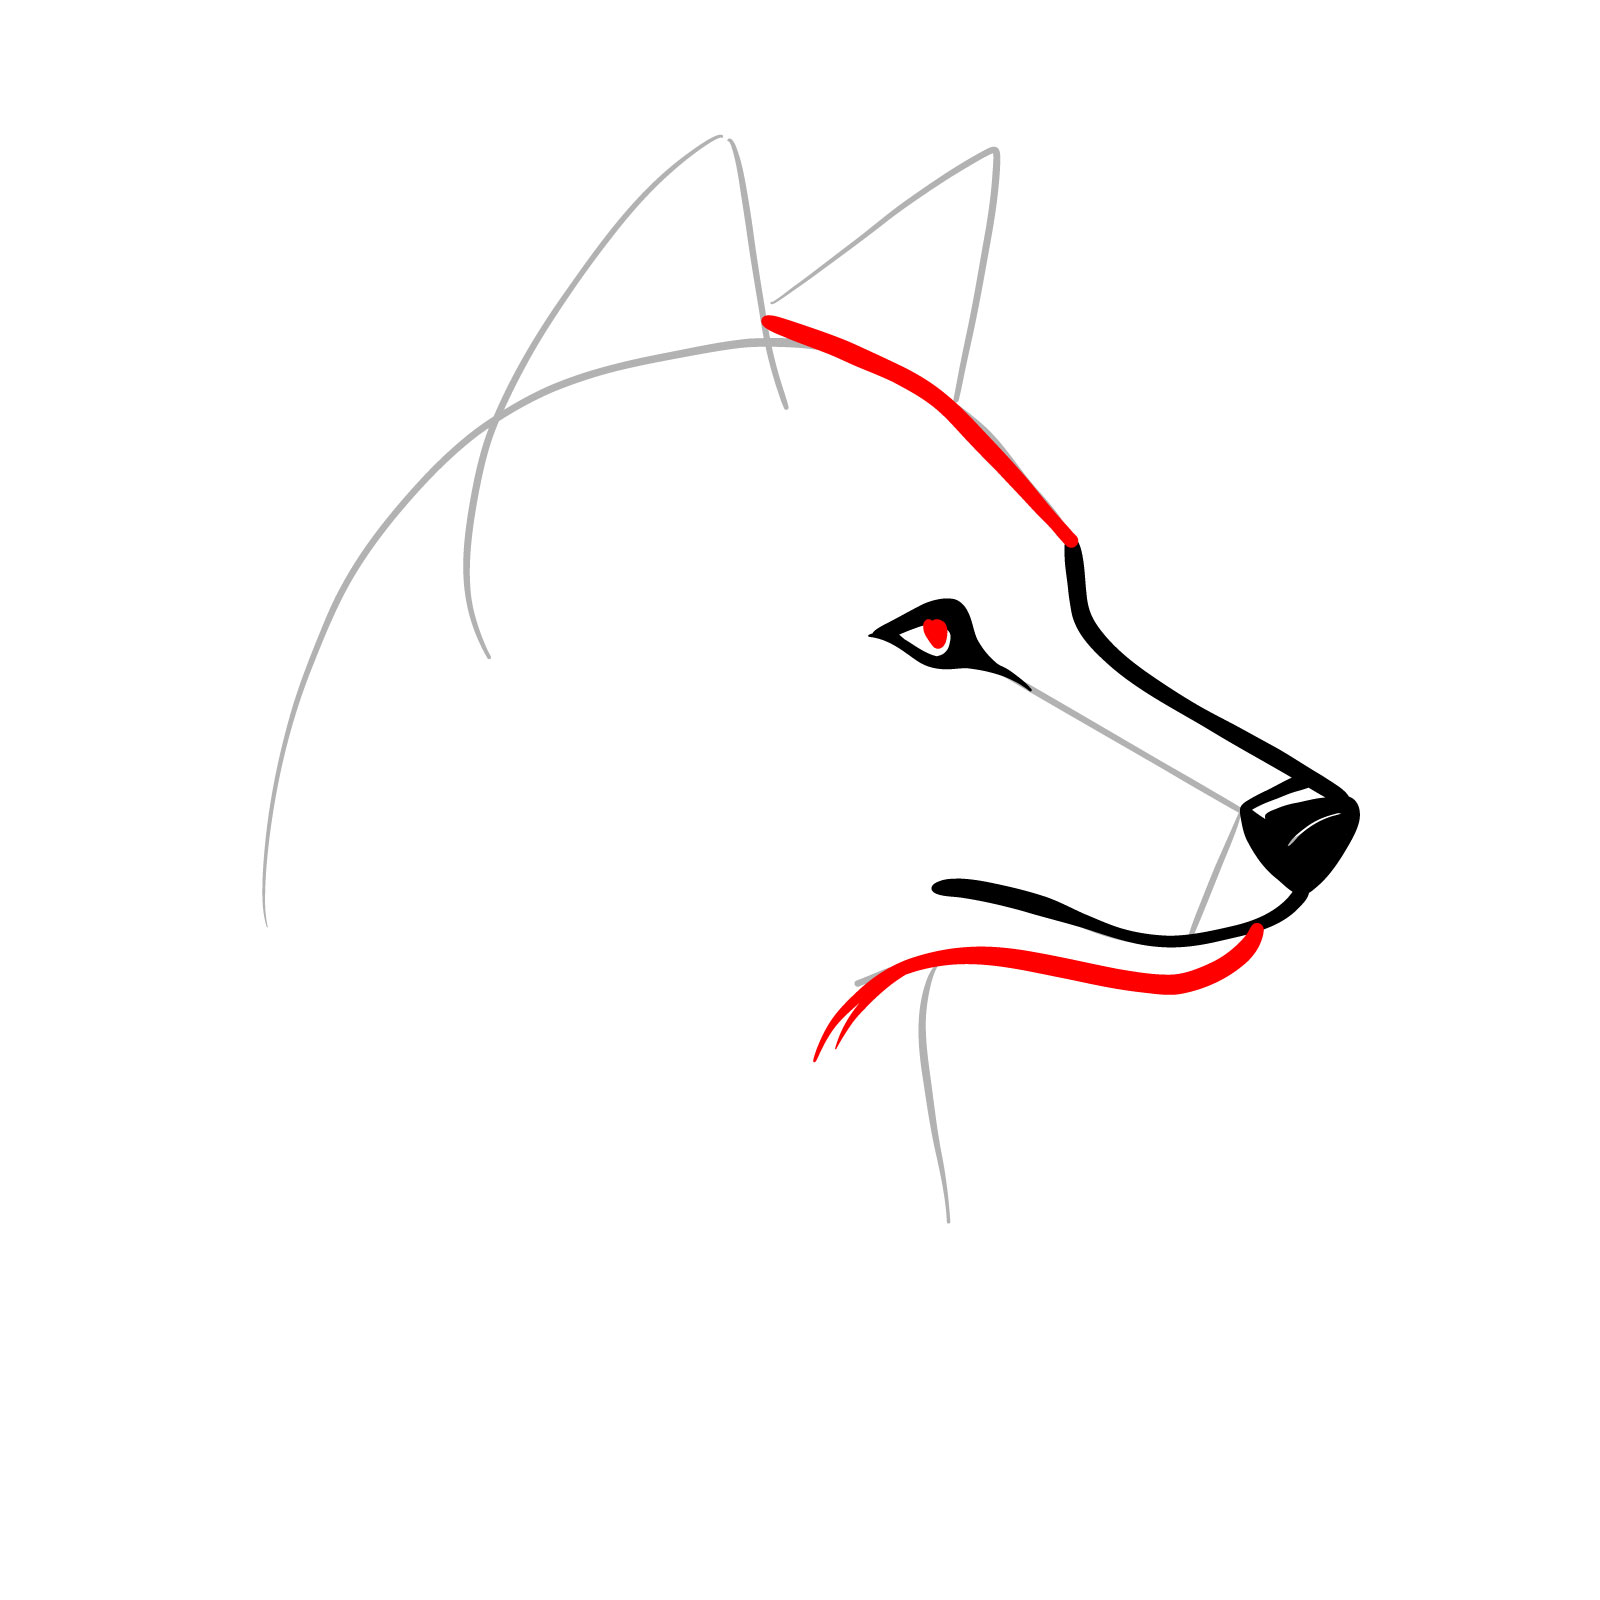
Step 06 – For the sixth step, draw the lines that form the forehead and the top of the wolf’s head, flowing into the bottom part of the jaw. This defines the main structure of the head and gives a base for further details
PinSketching the upper and lower contours of the wolf’s head
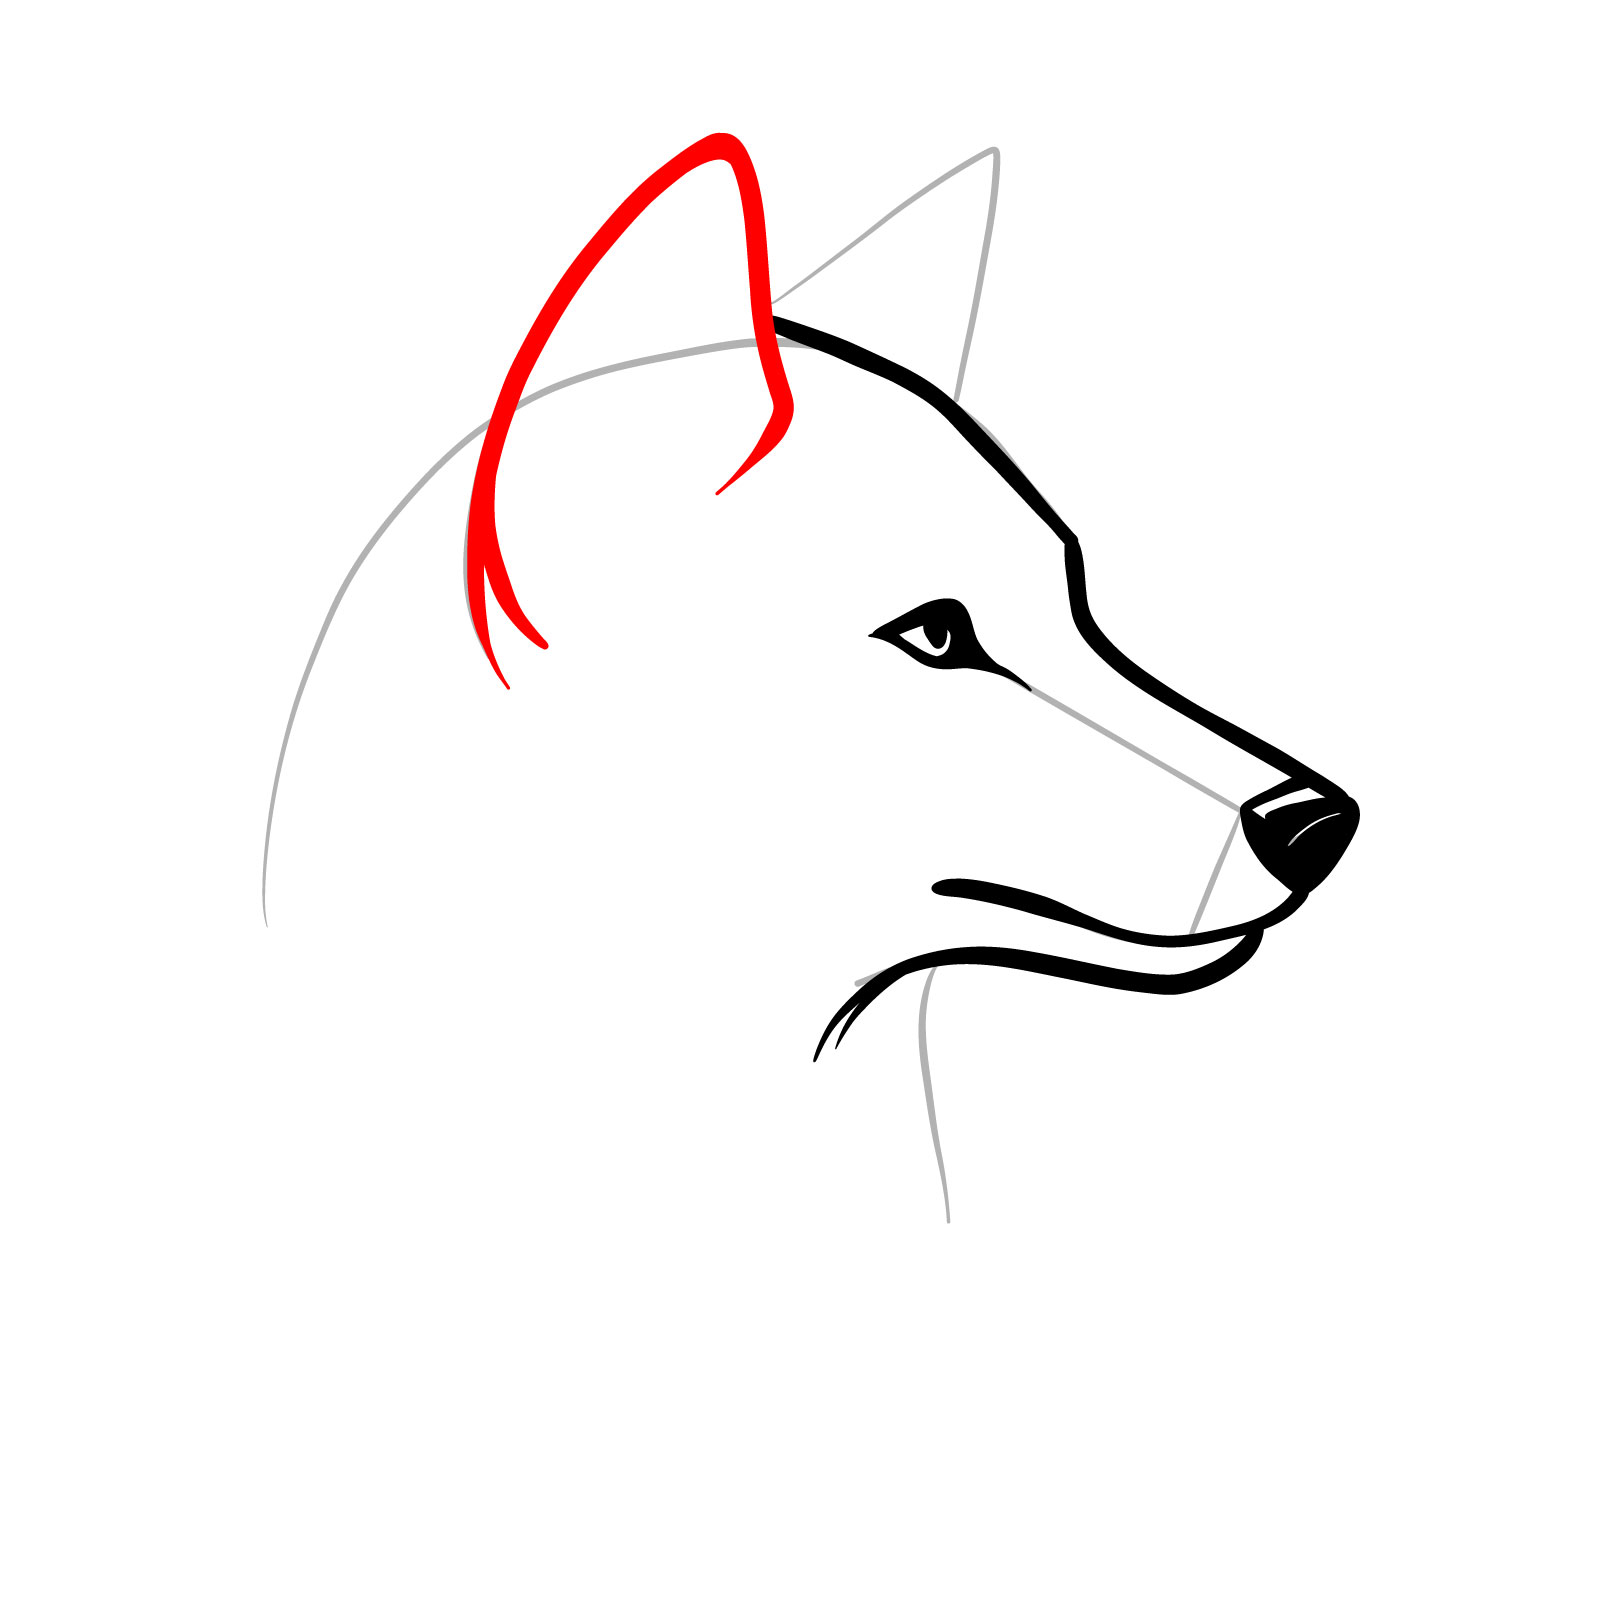
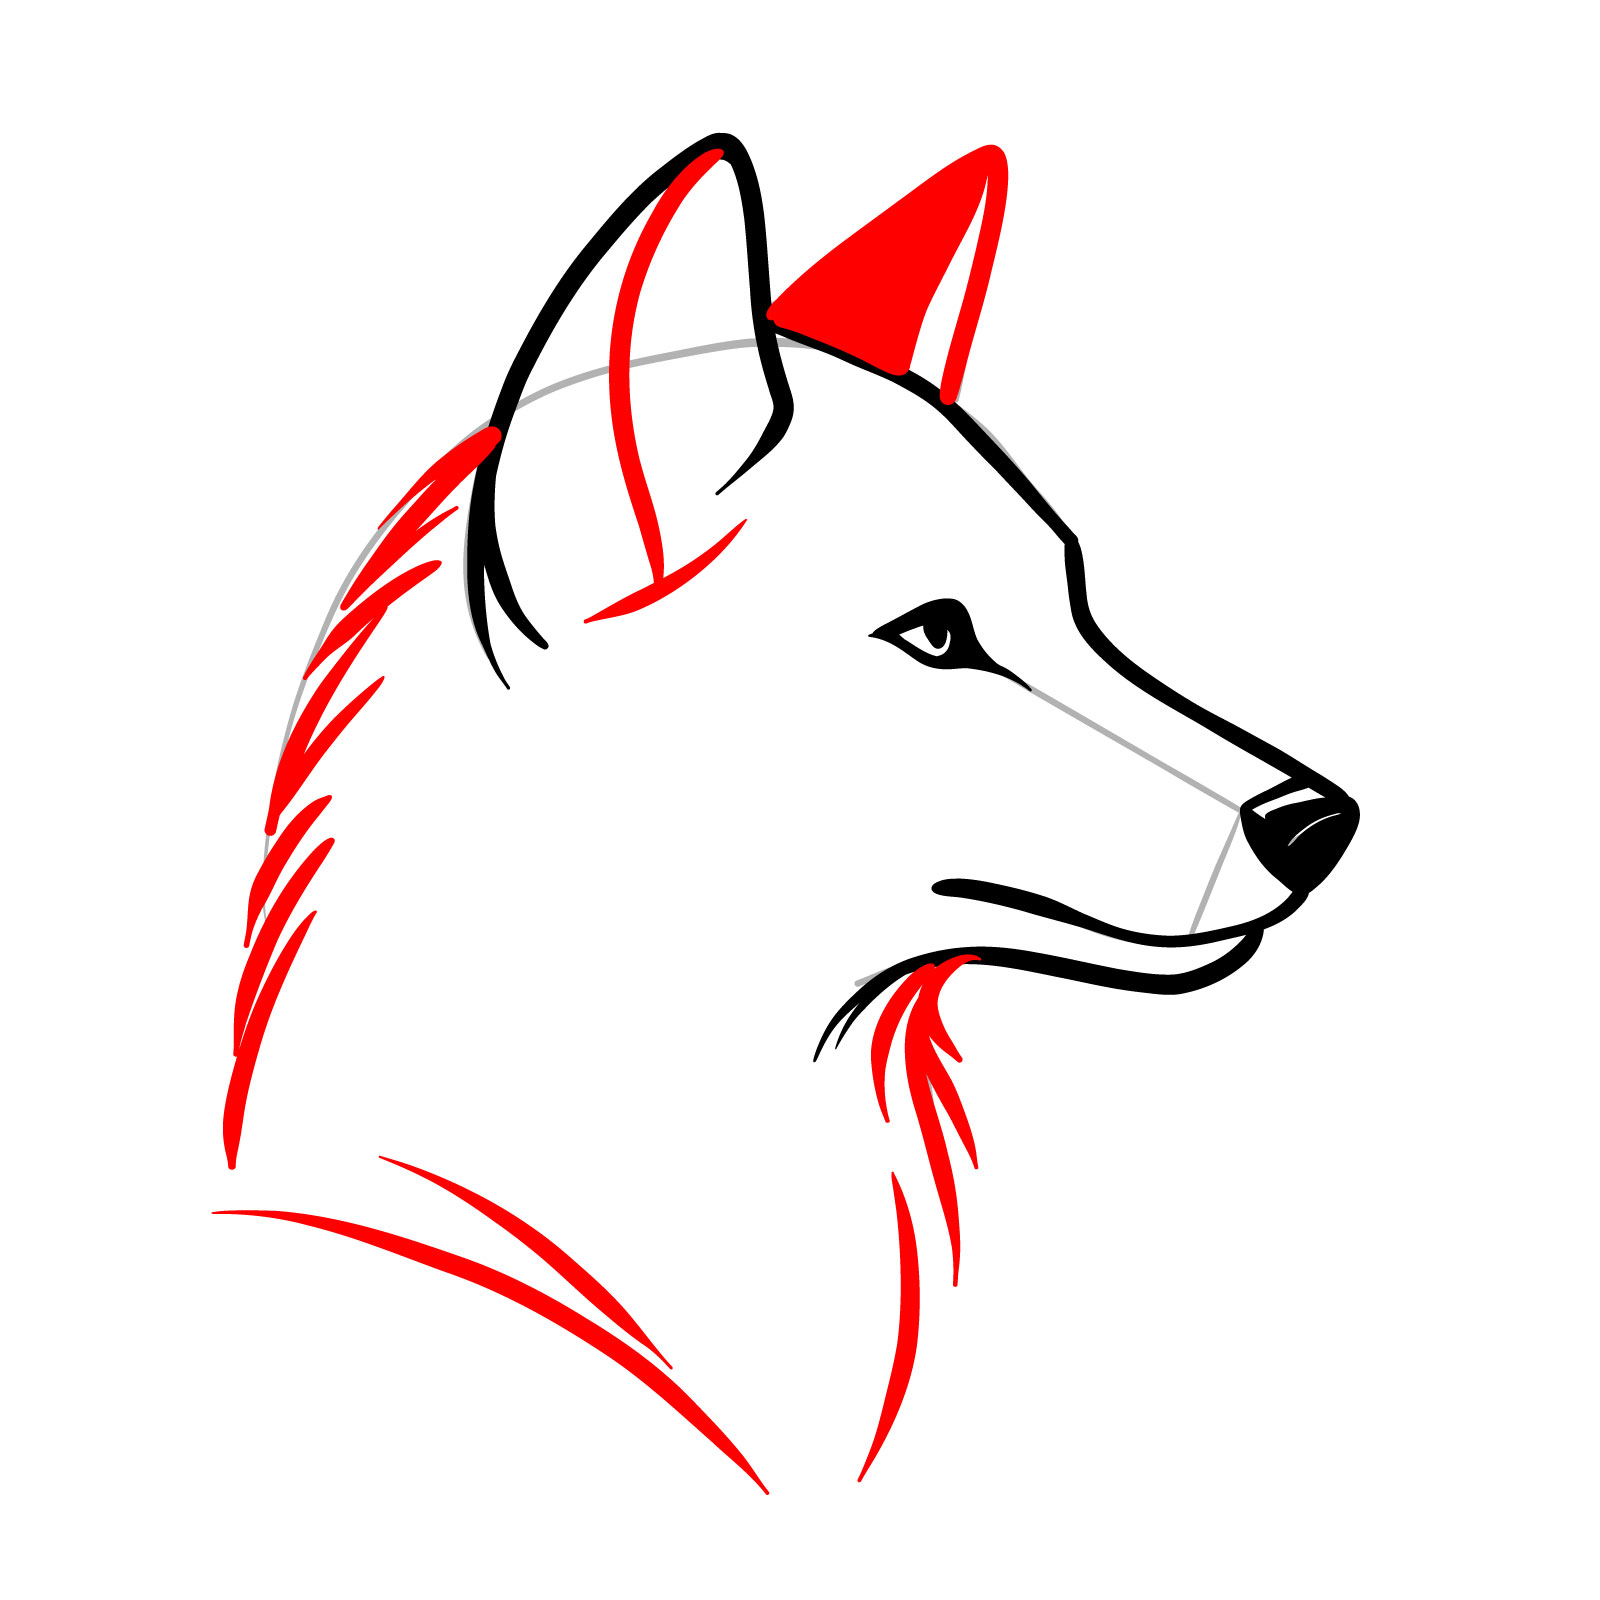
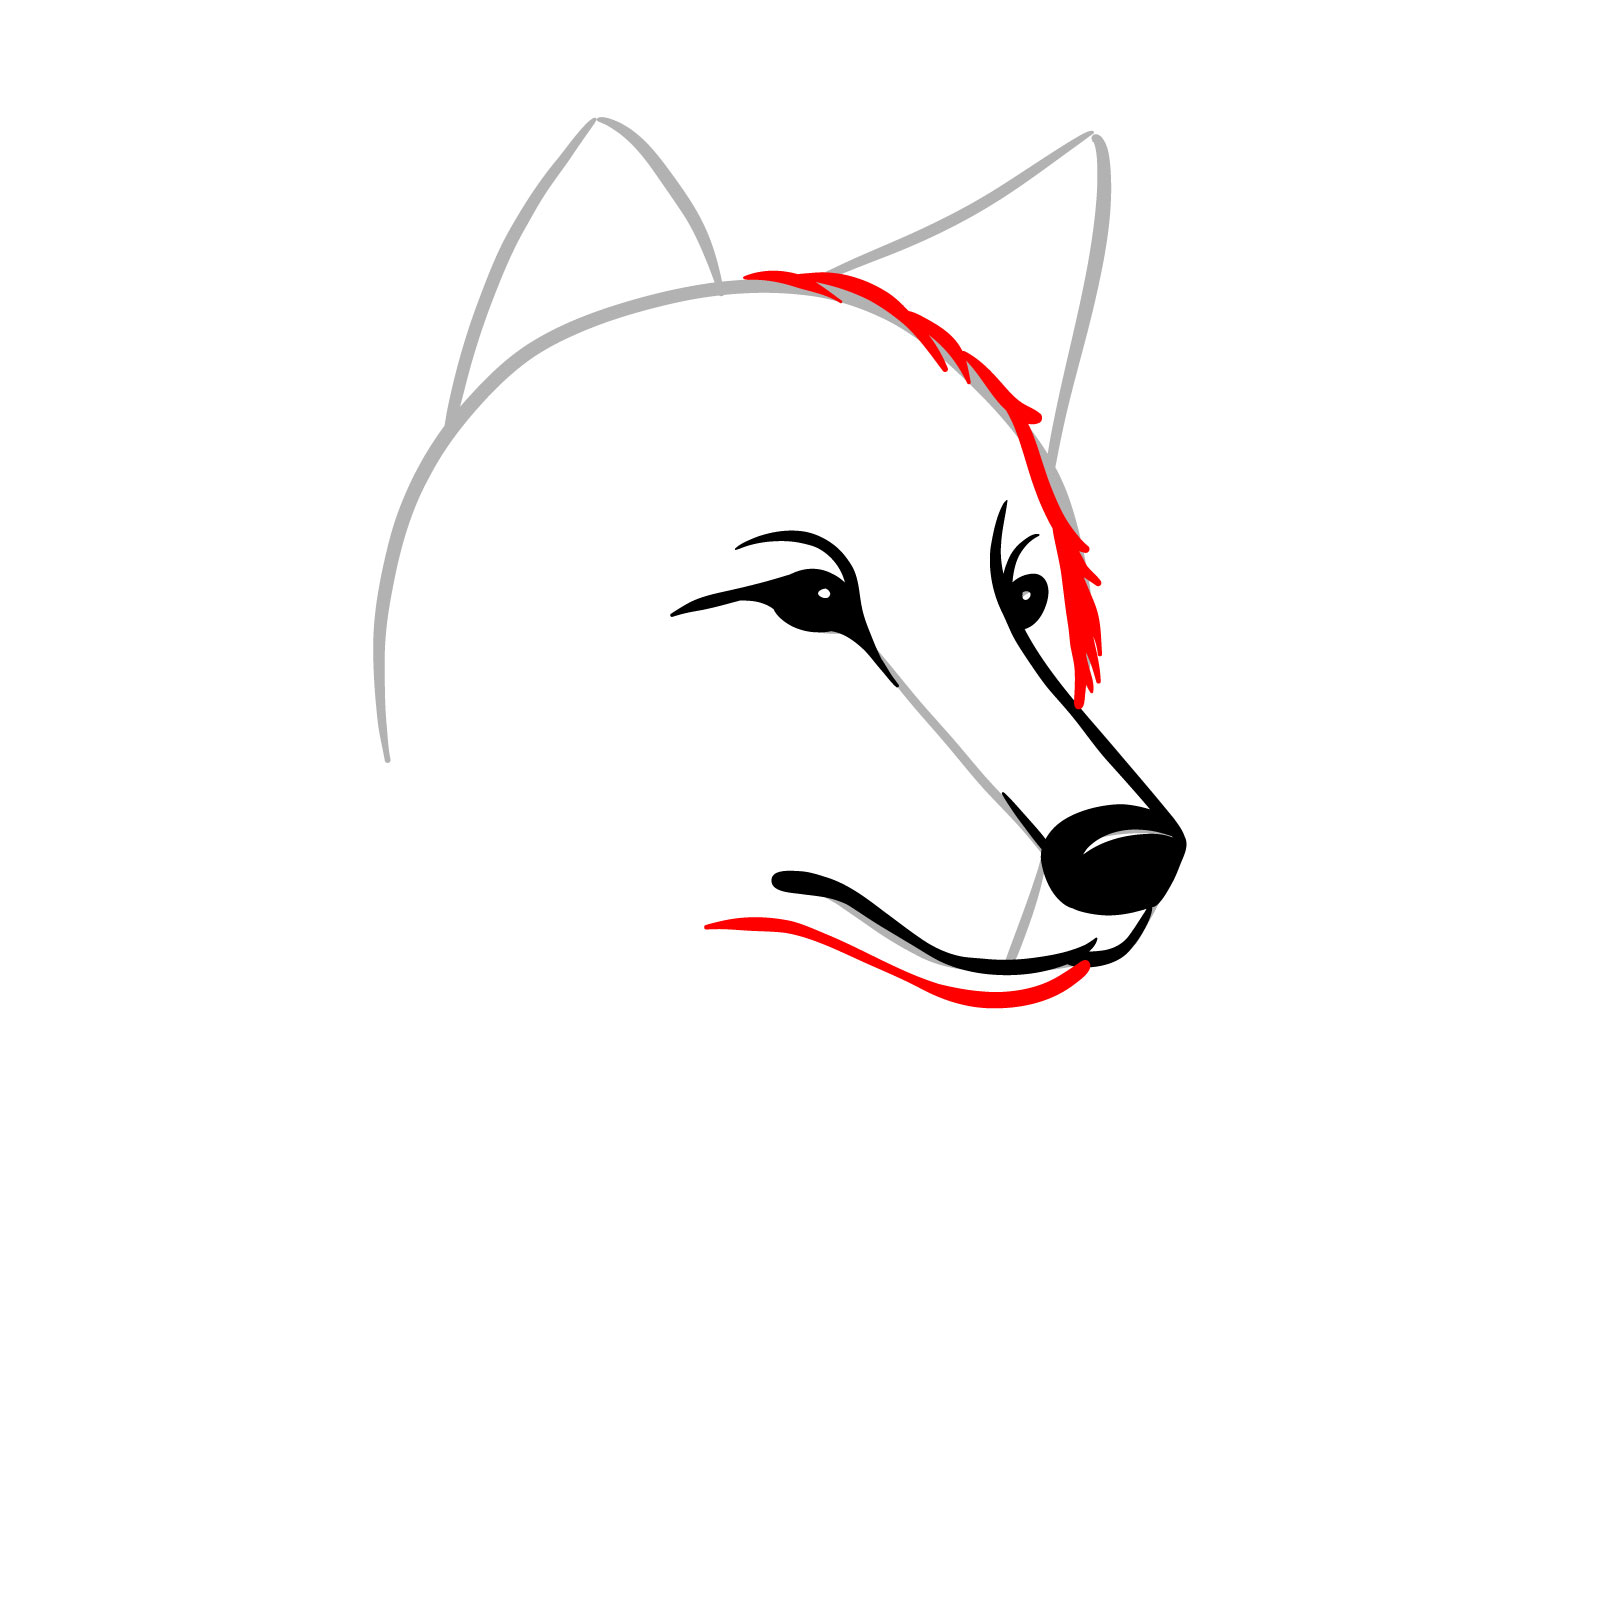
Step 07 – Sketch the ear that is closer to us, giving it a sharp, alert posture. The ear should be triangular with a slight curve at the base to indicate depth
PinIllustrate the ear closer to the viewer
Step 08 – Draw the second ear, filling in its outer side to provide contrast and depth. Refine the outline of the first ear, and continue the fur lines down the back of the head and neck to complete the wolf’s silhouette
PinRefine the second ear and the back of the head for a realistic look
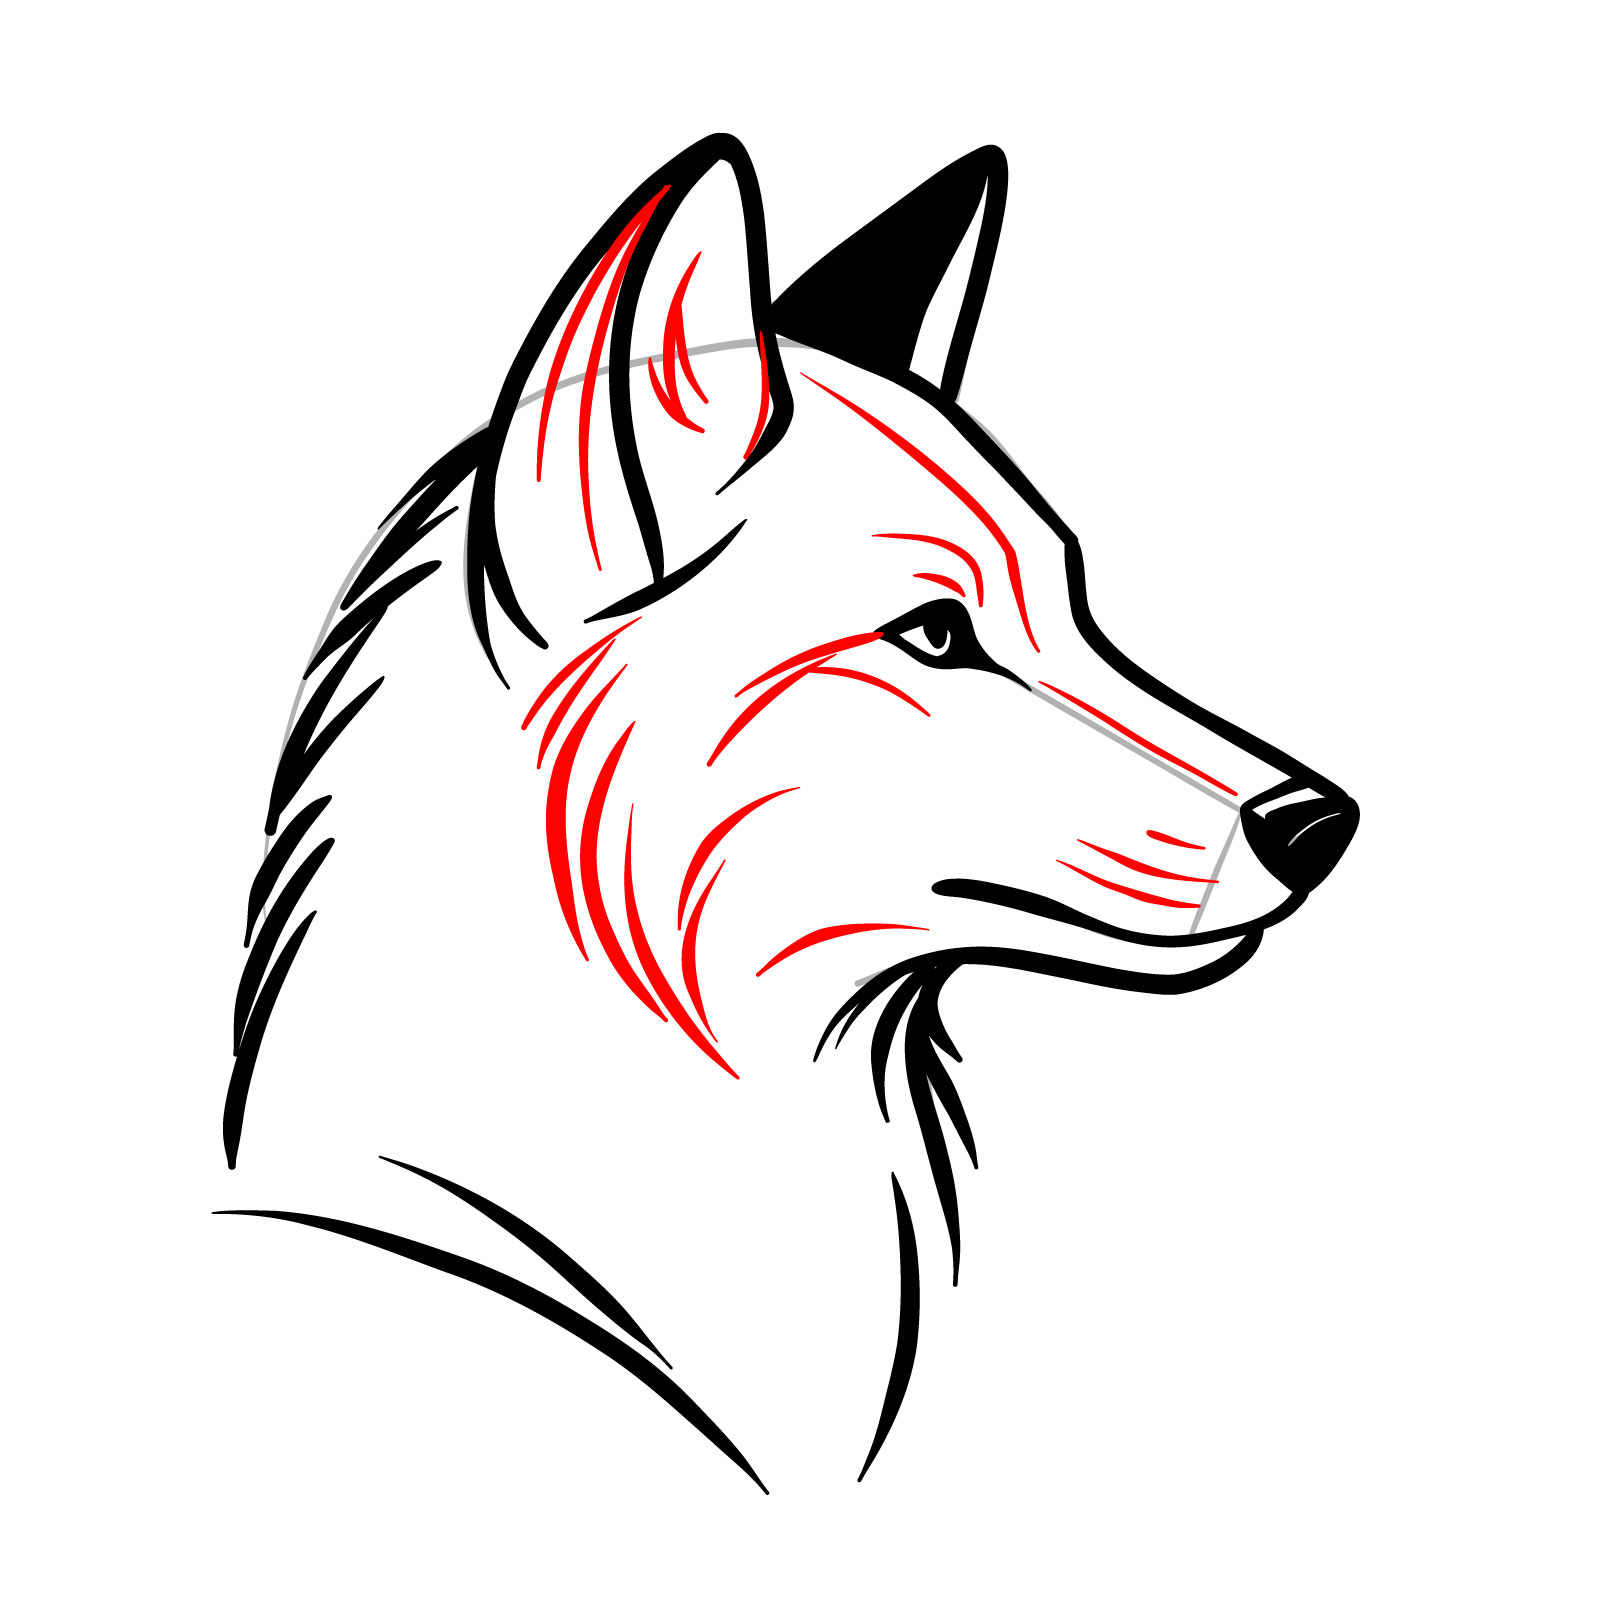
Step 09 – Add the finishing touches to the wolf’s head by sketching whisker marks, fur details within and below the ear, and around the eye and forehead
PinFinalize the head details with whisker marks and fur textures
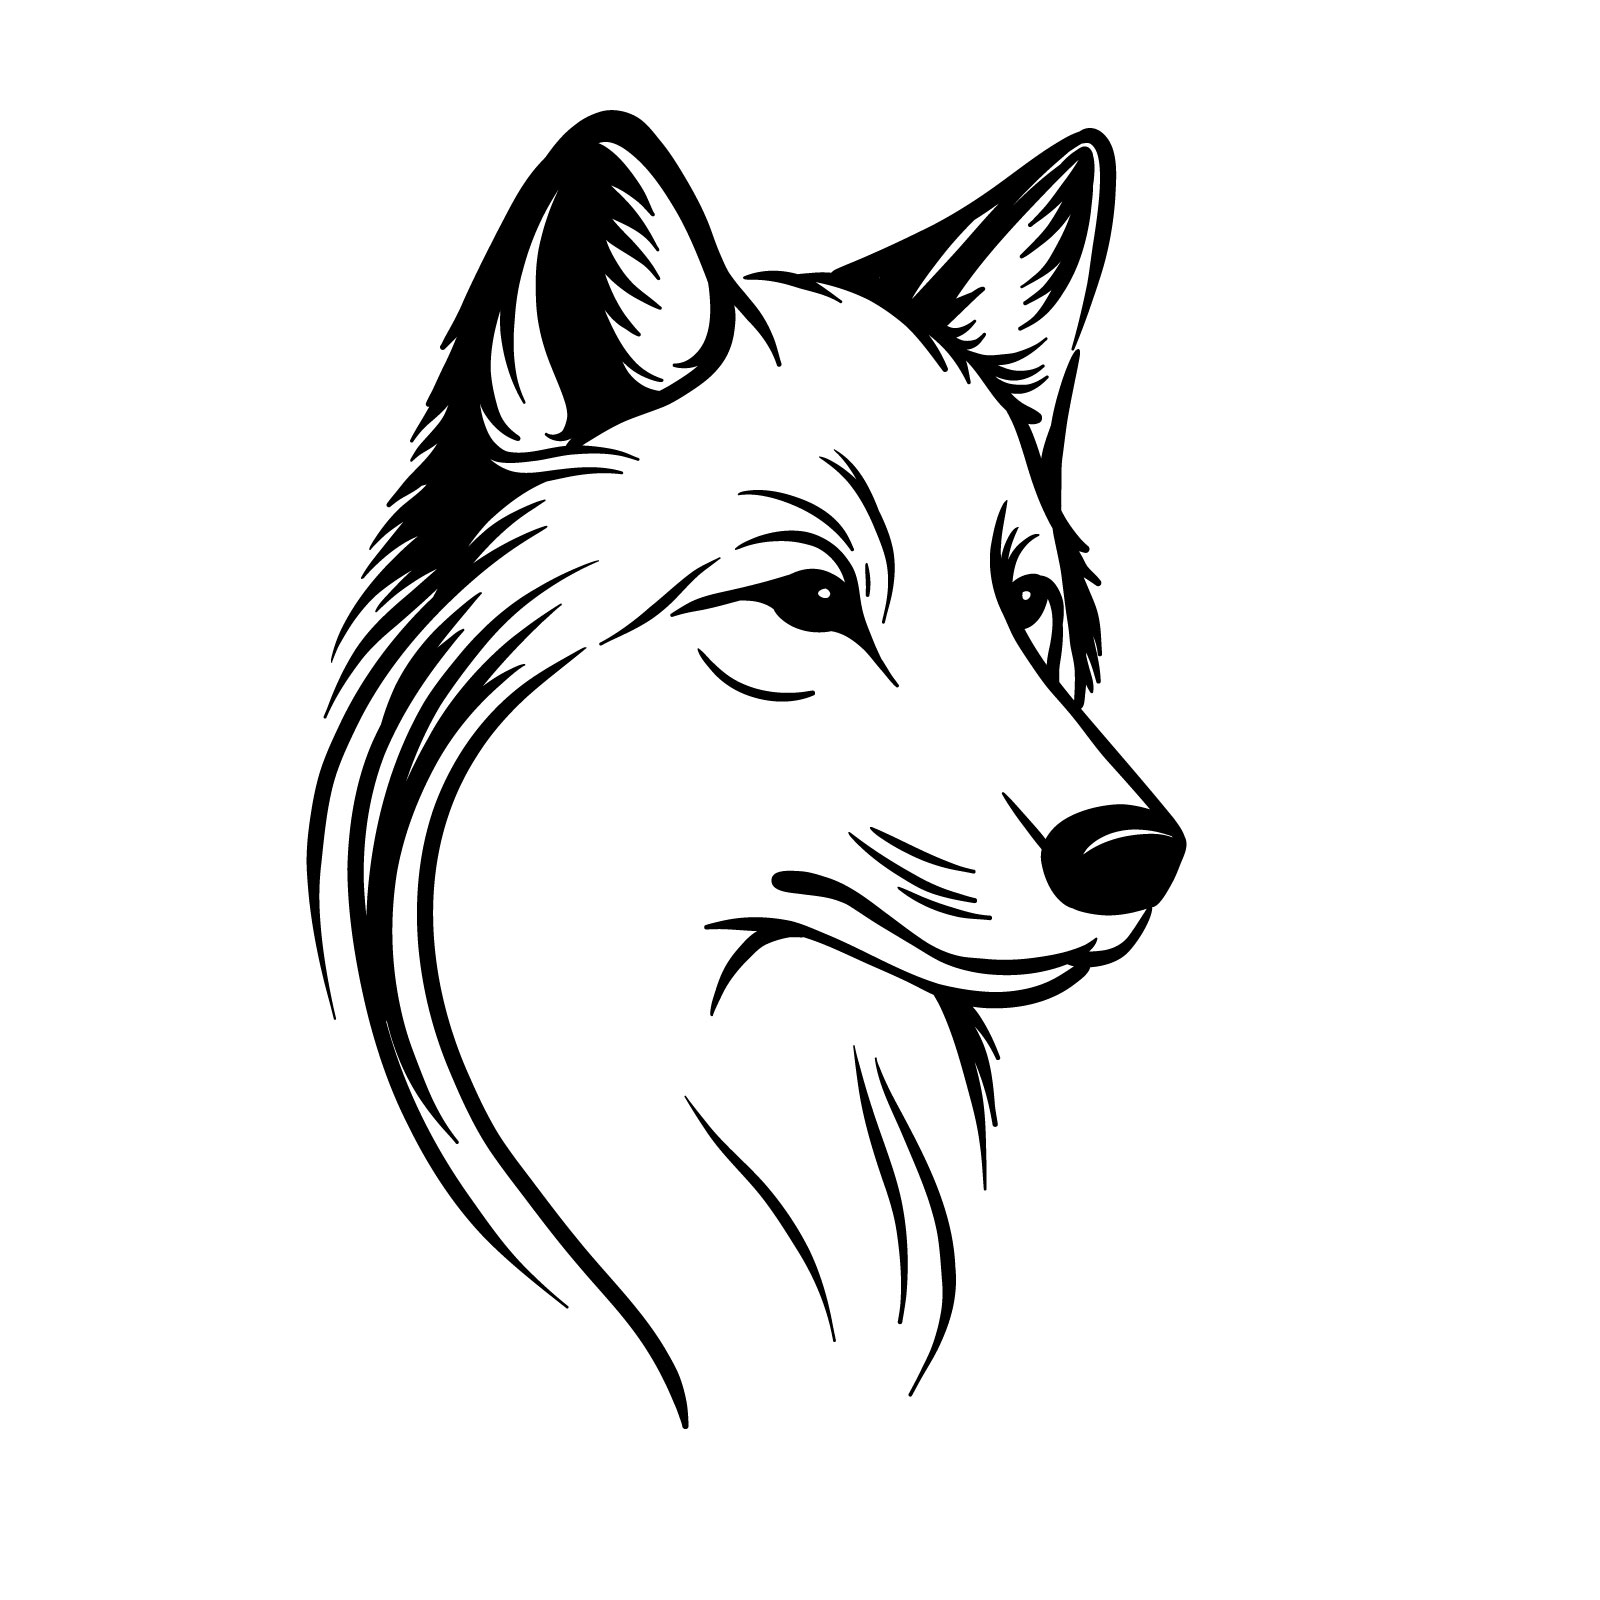
Step 10 – To complete your drawing, erase the basic sketch and any unnecessary marks to reveal a clean, detailed wolf’s head side view. The finished drawing should display a realistic portrayal of a wolf, with a keen eye, attentive ears, and a lush fur texture. This final piece should capture the intense character of a wolf, showcasing your skills in creating wildlife art
PinYour guide on how to draw a wolf’s head side view concludes with a finished sketch
A Step-by-Step Guide to Drawing a Wolf Face in 3/4 View
PinHow to draw a wolf’s face in 3/4 view
In the eighth guide, we’ll explore the dynamic angle of a wolf face in a 3/4 view. This tutorial, crafted with 11 steps, also begins with two essential steps for laying down the basic sketch, ensuring the facial structure is proportionate. I created this guide some time ago, and it has a slightly different approach with its distinct lines and features.
Step 01 – Remember we made a ‘U’ shape for the front view drawings? Start by drawing the similar ‘U’ shape for the upper part of the snout at an angle, placing ovals on its ends to mark where the eyes will be. Add a rectangular shape for the front of the snout and a subtle curve to indicate the mouth line. This will serve as the foundation for your 3/4 view wolf head
PinBegin the wolf head drawing with snout and eye placement for a 3/4 view
Step 02 – Continue your sketch by adding a half-circle for the main head shape. Sketch in the triangles for the ears, positioning them to align with the 3/4 perspective of the head
PinSketch the half-circle for the head and triangles for the ears
Step 03 – Draw the nose shape at the end of the snout and fill it in, leaving a blank line for the highlight which creates a sense of glossiness. Sketch the snout’s shape above the nose
PinDefine the nose shape and fill it in, leaving a highlight
Step 04 – Fill in the ovals for the eyes, being careful to leave small blank dots for highlights, which will bring life to the wolf’s gaze. Then, draw the mouth line extending from the bottom of the snout to further define the facial features
PinComplete the eyes with highlights and define the mouth line
Step 05 – Refine the eye area by adding details and contours that give the eyes a realistic and expressive look
PinAdd details around the eyes to enhance expression
Step 06 – Continue the sketch by drawing the bottom part of the snout / jaw, ensuring it aligns with the rest of the facial features. Add the side to the top head outline
PinDraw the lower snout and complete the head outline for a 3/4 view
Step 07 – Sketch the outline of the wolf’s ears, paying close attention to their pointed shape and positioning. The ear closer to the viewer should be more detailed, showing outer fur at the base and contour lines that suggest depth and texture
PinIllustrating the wolf’s ears to capture its alertness and wild essence
Step 08 – Refine the first ear, giving it a fuller shape and adding texture to represent fur
PinDefining the wolf’s side profile and ear structure for a realistic portrayal
Step 09 – Incorporate fur details in the neck area
PinEnhancing the wolf’s neck with fur texture
Step 10 – Carefully draw the inner details of the ears, the areas where whiskers emerge, and the subtle lines around the eyes to convey expression. This step involves adding the final touches that bring the drawing to life
PinCompleting the wolf’s head with detailed inner ear, whiskers, and eye accents
Step 11 – Finish your drawing by erasing the base sketch and any unnecessary lines. Refine any remaining details to ensure the wolf’s head looks cohesive and polished. The final illustration should capture the wild and noble spirit of the wolf, with all features clearly defined and proportionate
PinThe final illustration of the wolf’s head, showcasing the culmination of detailed steps
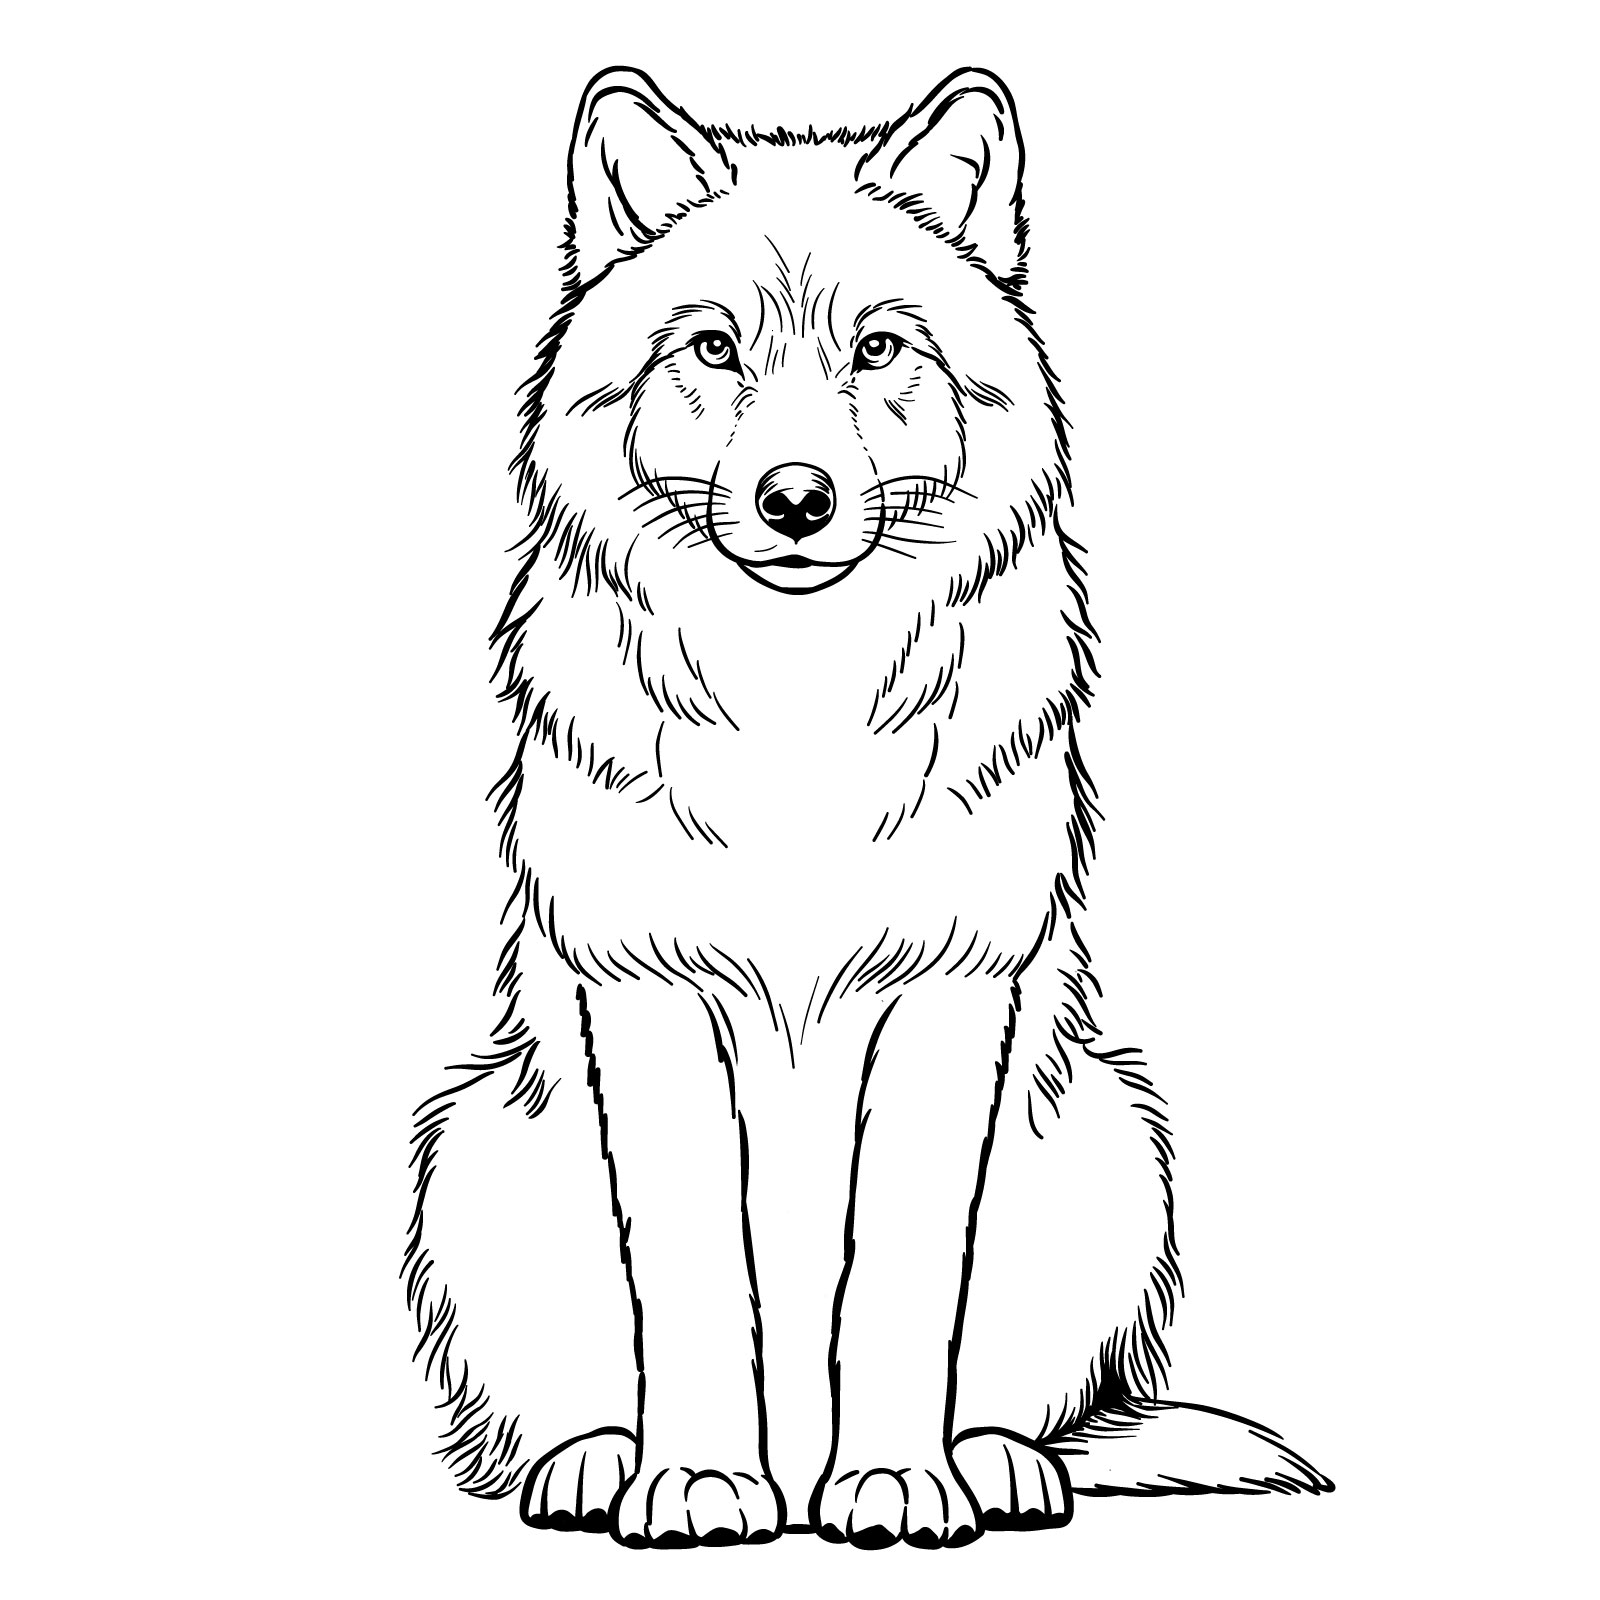
Drawing a Sitting Wolf (Front View) in 16 Steps
PinHow to draw a sitting wolf front view
The ninth guide in this series invites you to capture the calm and steady presence of a sitting wolf, viewed from the front. This tutorial is carefully broken down into 16 steps, starting with three fundamental steps to sketch out the basic shape and posture of the wolf. These initial sketches are critical in achieving the correct proportions and angles of the sitting wolf. As you progress, you’ll add layers of detail that bring the wolf to life, from the texture of its fur to the serene expression on its face.
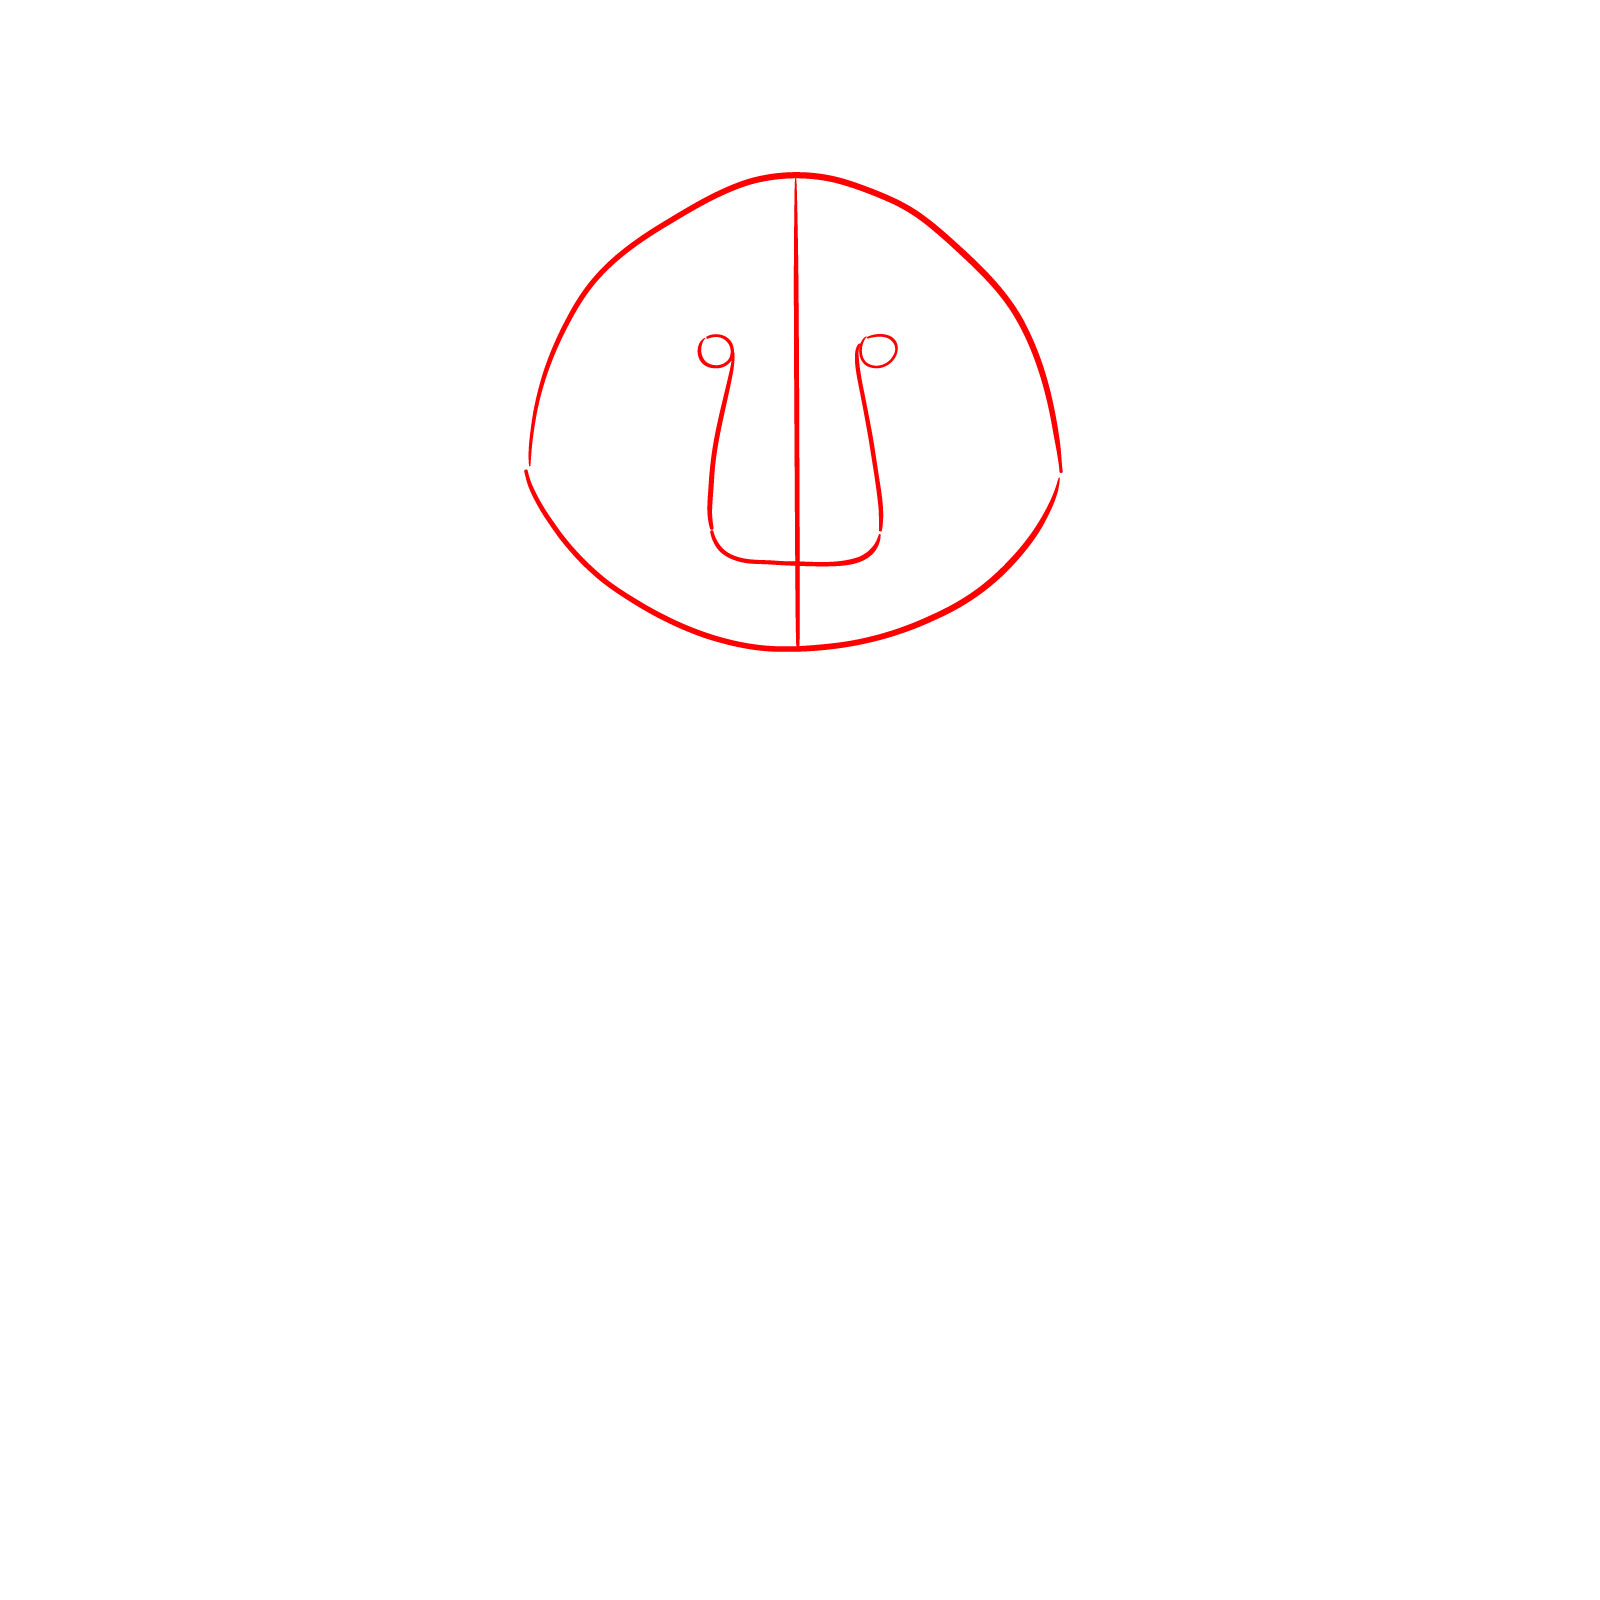
Step 01 – Begin your sitting wolf drawing by sketching the lower part of the head with a gentle curve for about one-third of the head’s height. Then, draw a semi-circular curve above it to complete the top two-thirds of the head. Divide this space in half horizontally and sketch a ‘U’ shape in the center for the snout, marking the eye placement with two small circles at the ends of the ‘U’ curve
PinInitial head shape sketch for a sitting wolf drawing
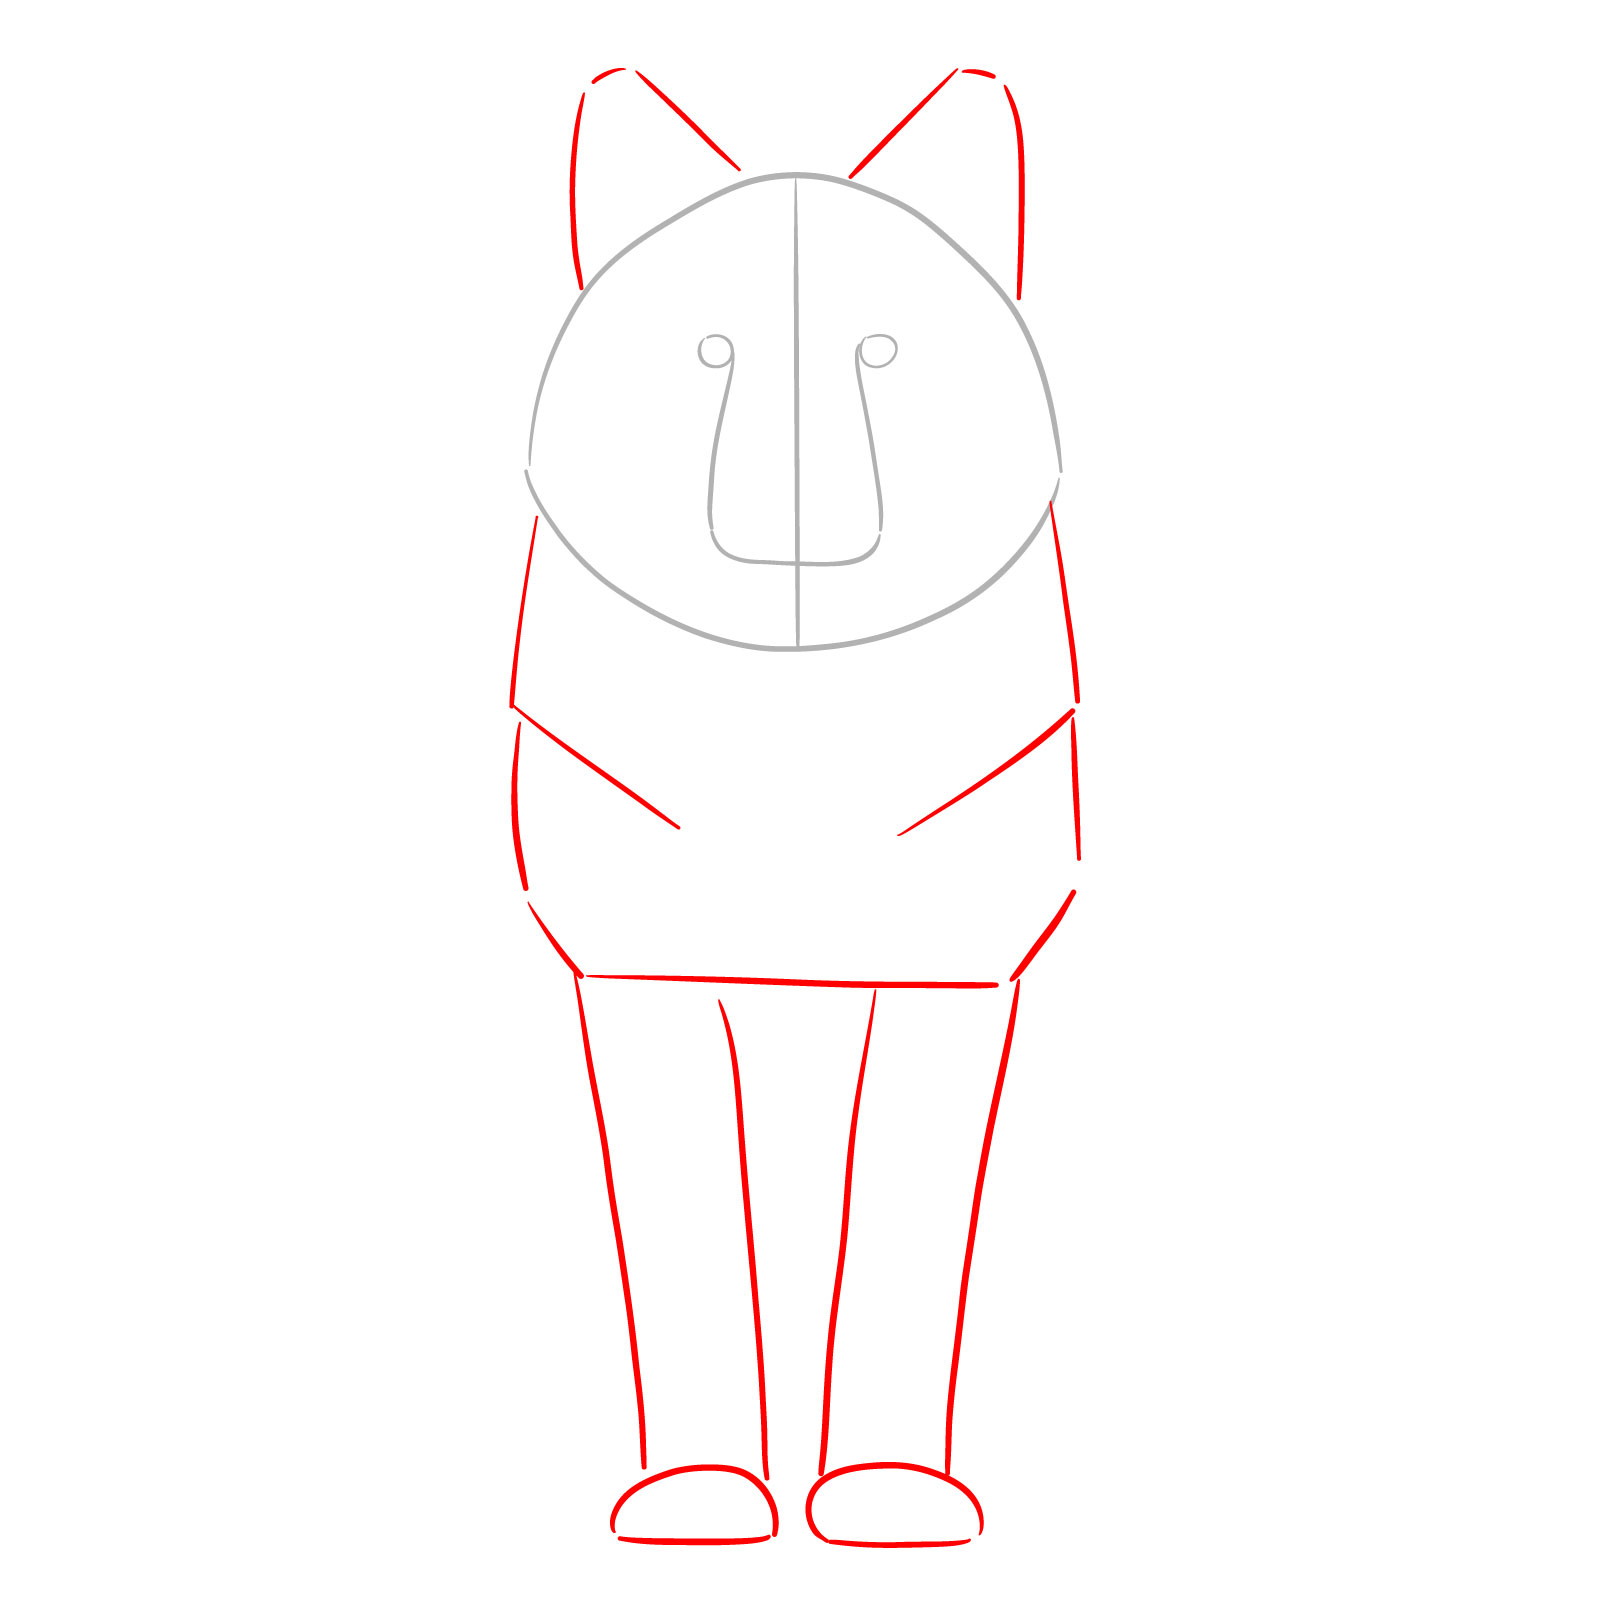
Step 02 – For the next step, extend two lines down from the head to form the neck. Draw the larger shape of the body beneath the neck, resembling a rounded rectangle. At the base of the body, sketch two elongated shapes on either side for the front legs, making sure they’re proportionate to the head and body
PinAdding the neck, body, and front legs to the sitting wolf sketch
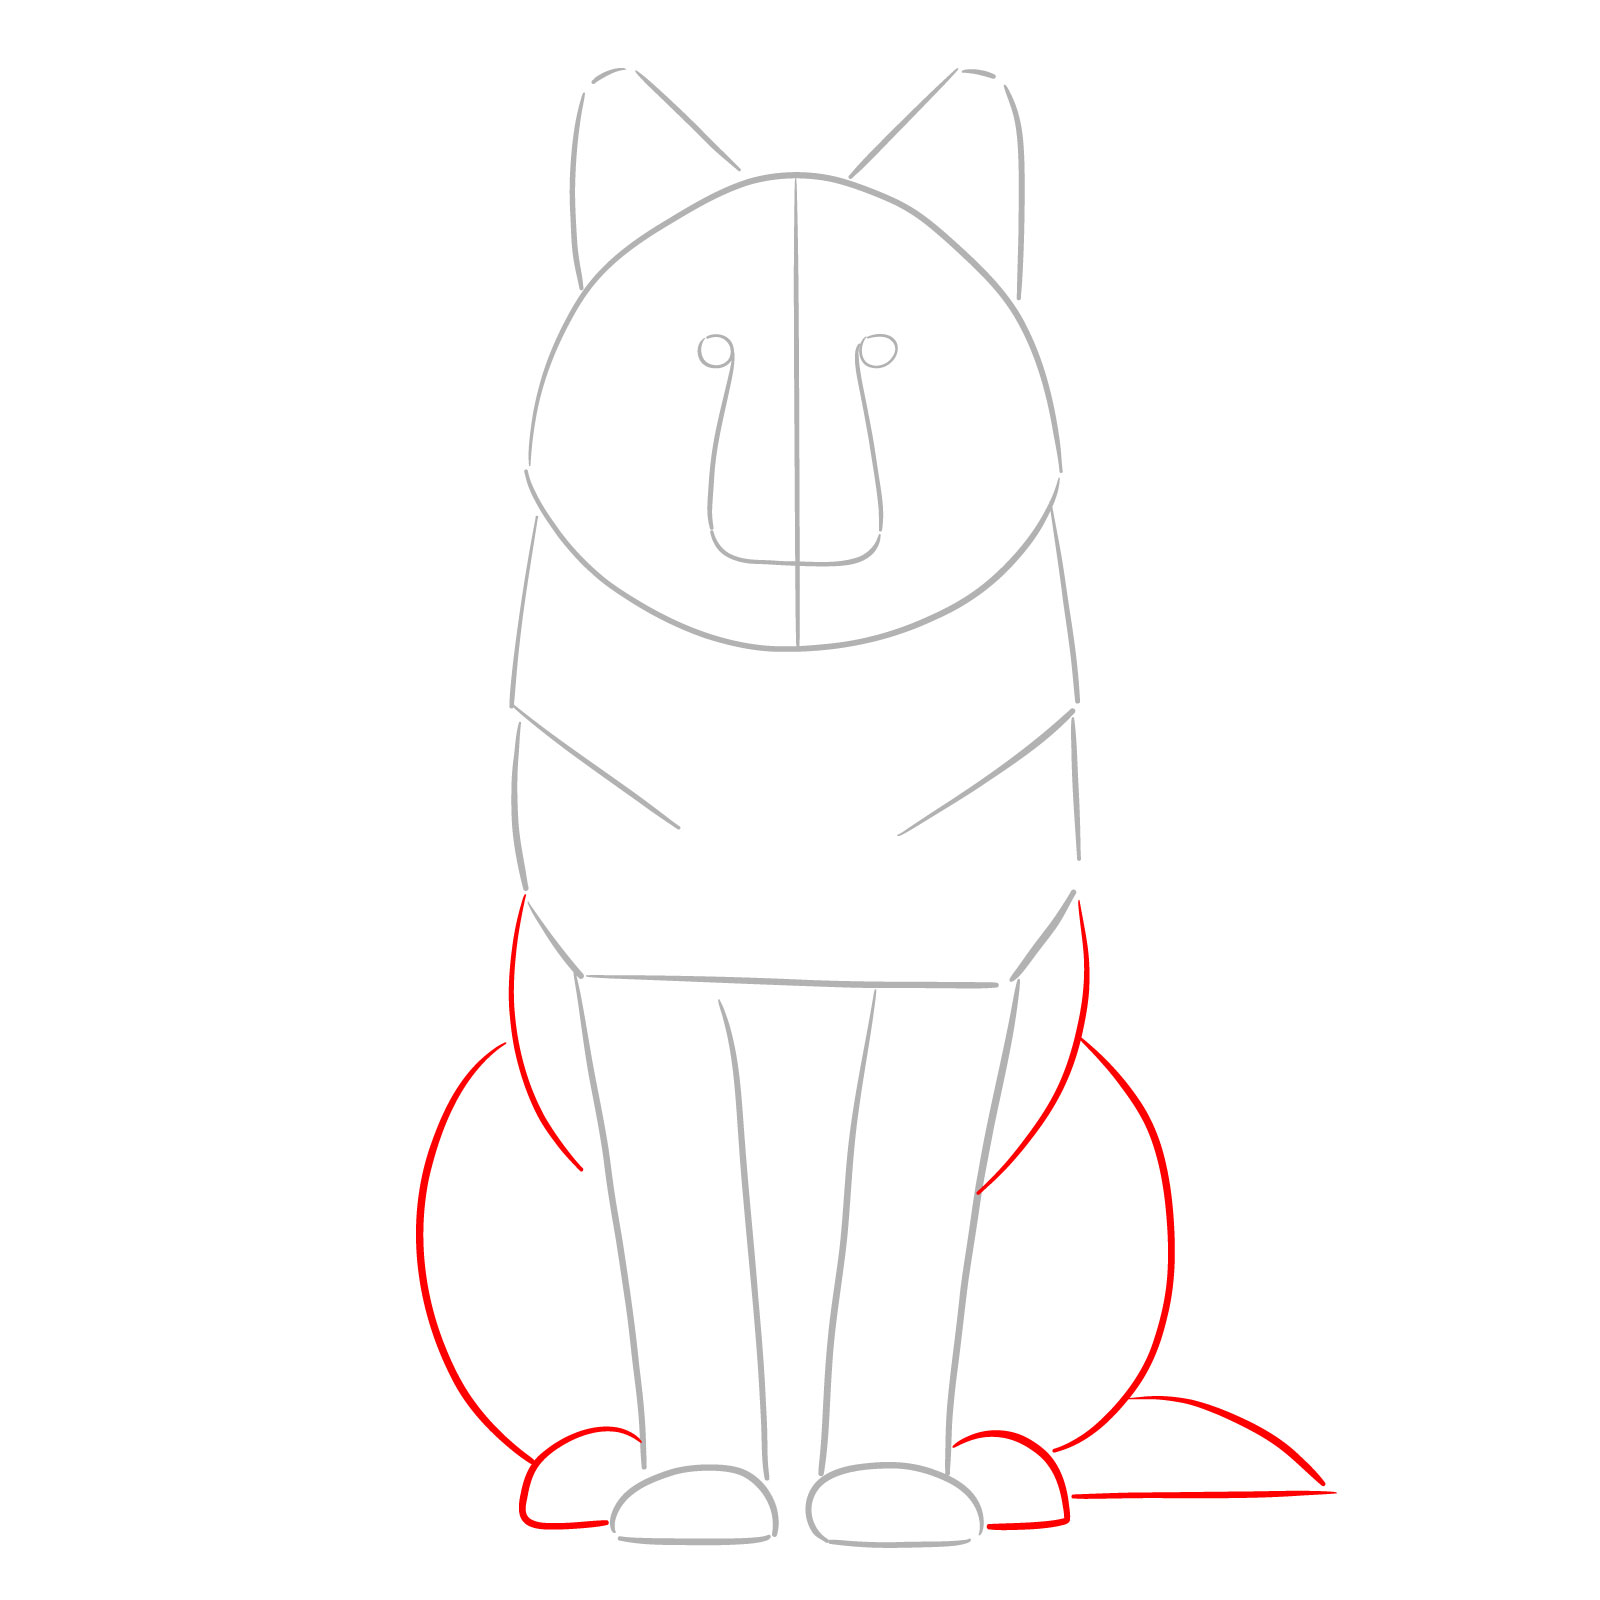
Step 03 – Now shape the rear part of the body with a large oval-like shape. Add the rear legs by drawing two extended shapes down from the body, tapering towards the paws. Sketch the tail with a long, flowing curve emanating from the back of the body, giving it a bushy appearance
PinSketching the rear part of the body, rear legs, and tail
Step 04 – In this step, refine the mouth by outlining the bottom part of the ‘U’ shape snout. Shape the eyes with more definition by turning the circular marks into the characteristic almond-shaped eyes of the wolf
PinOutlining the mouth and eyes in the sitting wolf’s head sketch
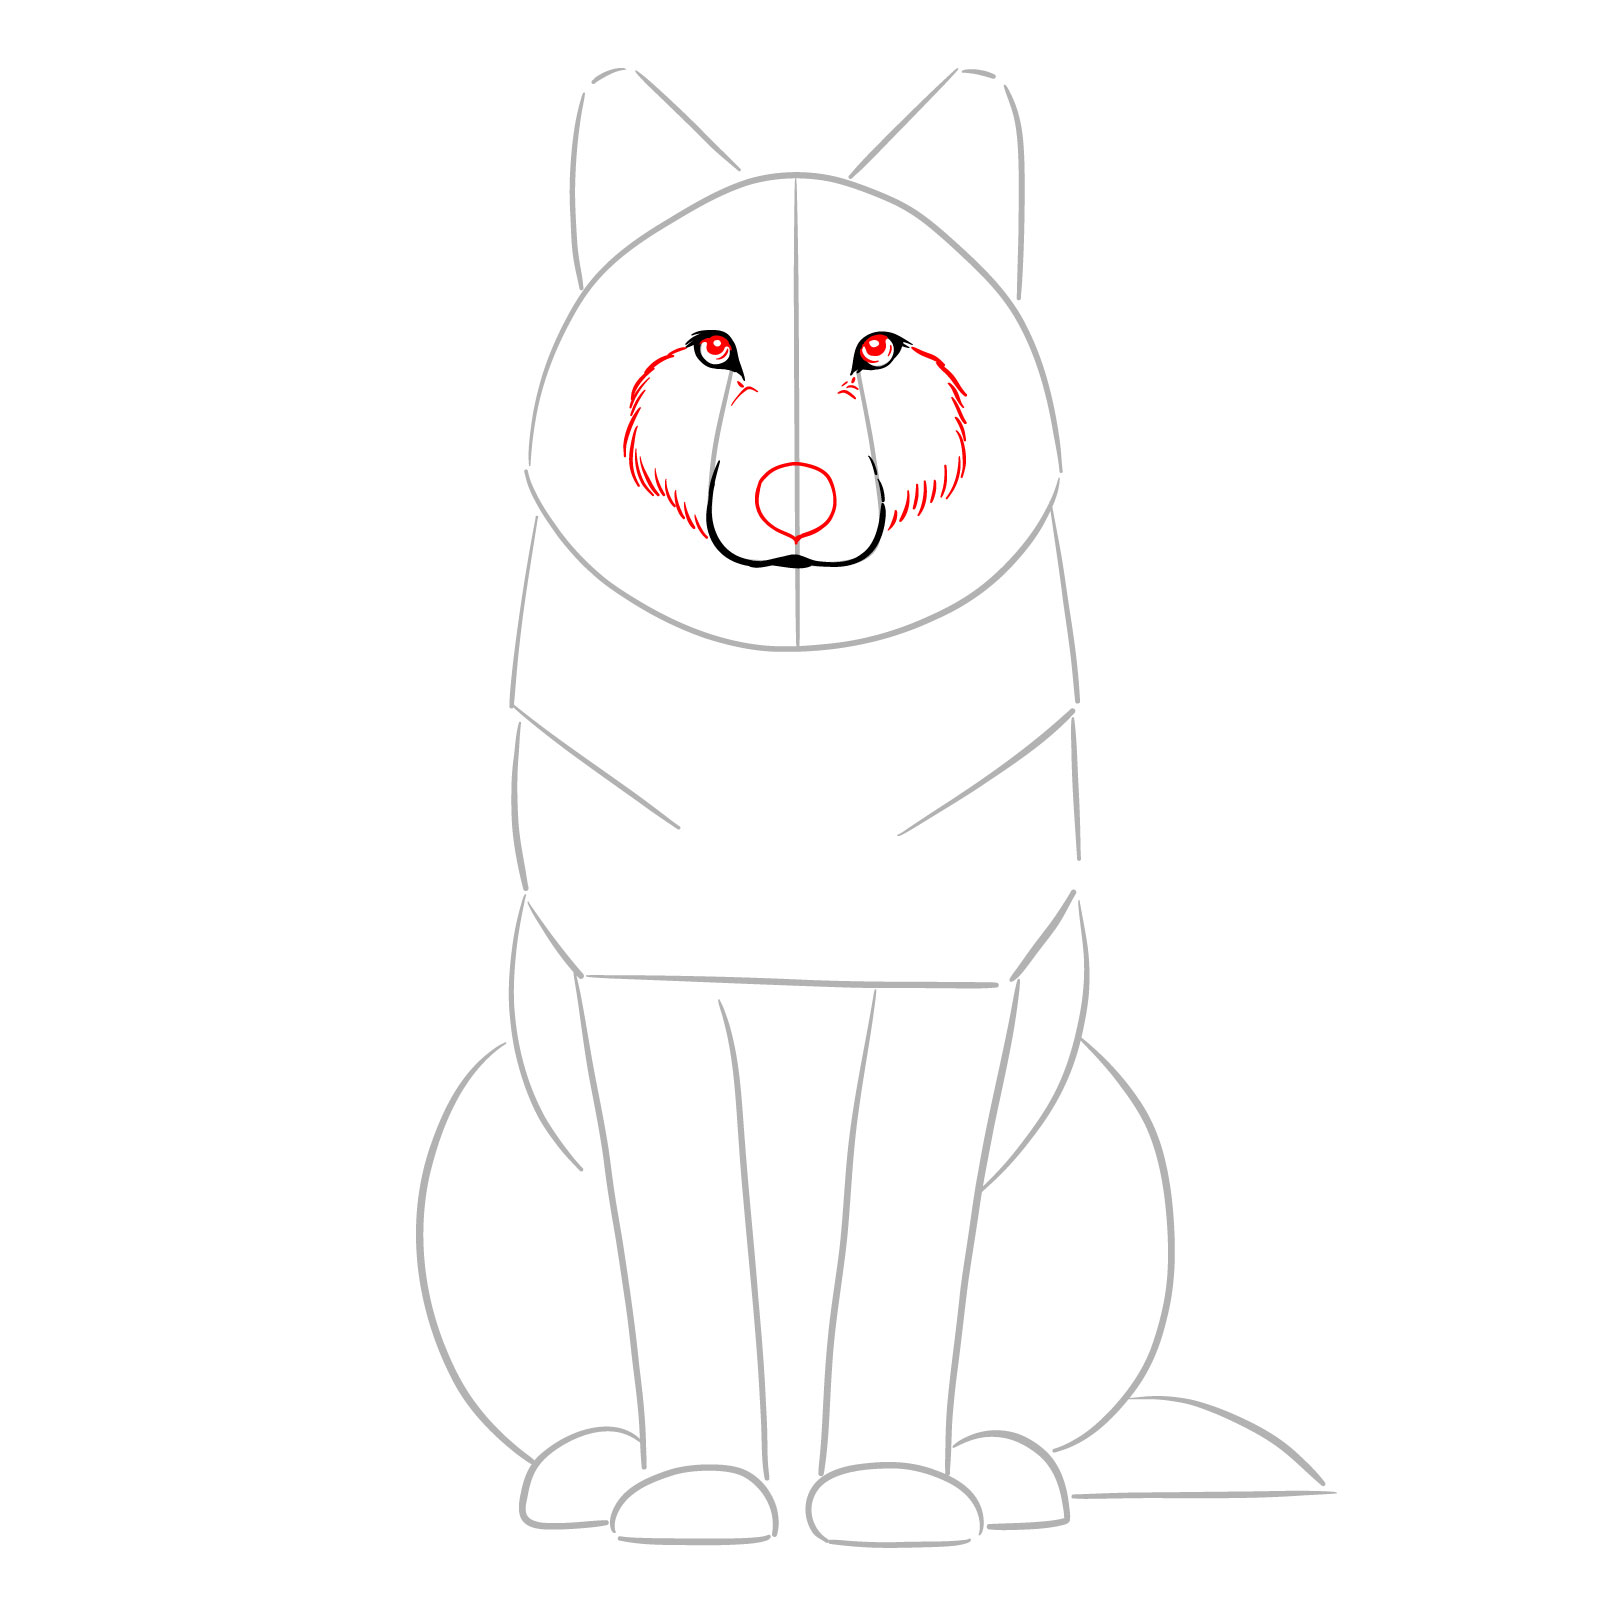
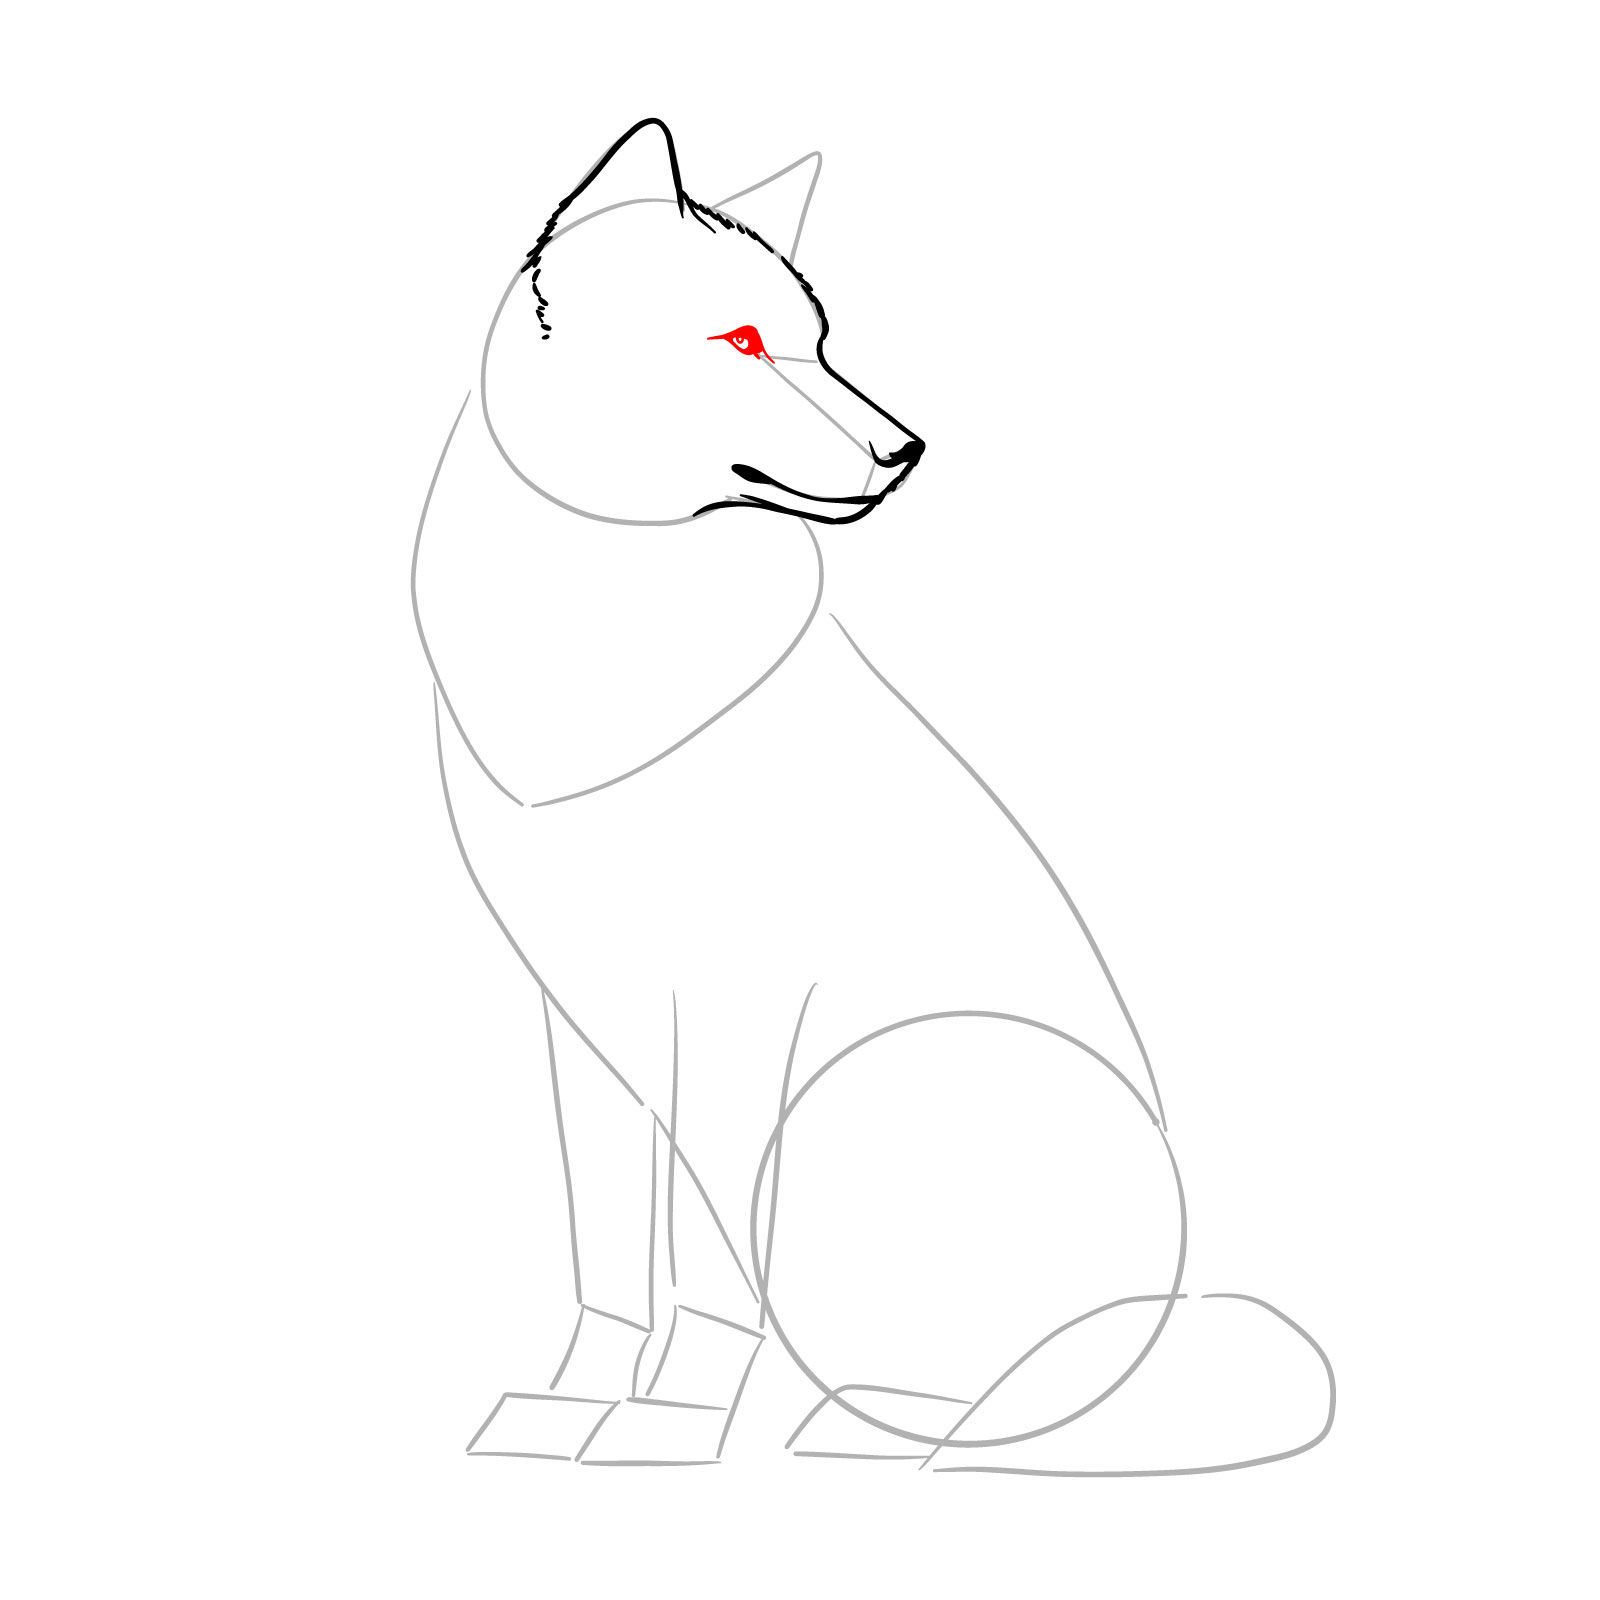
Step 05 – Enhance the eyes by adding filled-in pupils with small blank dots for highlights to bring life to your sitting wolf drawing. Outline the nose at the bottom of the snout. Create a fur texture by sketching rounded strokes from the mouth towards the eyes, framing the face
PinDrawing the pupils, nose outline, and fur texture for a sitting wolf’s face
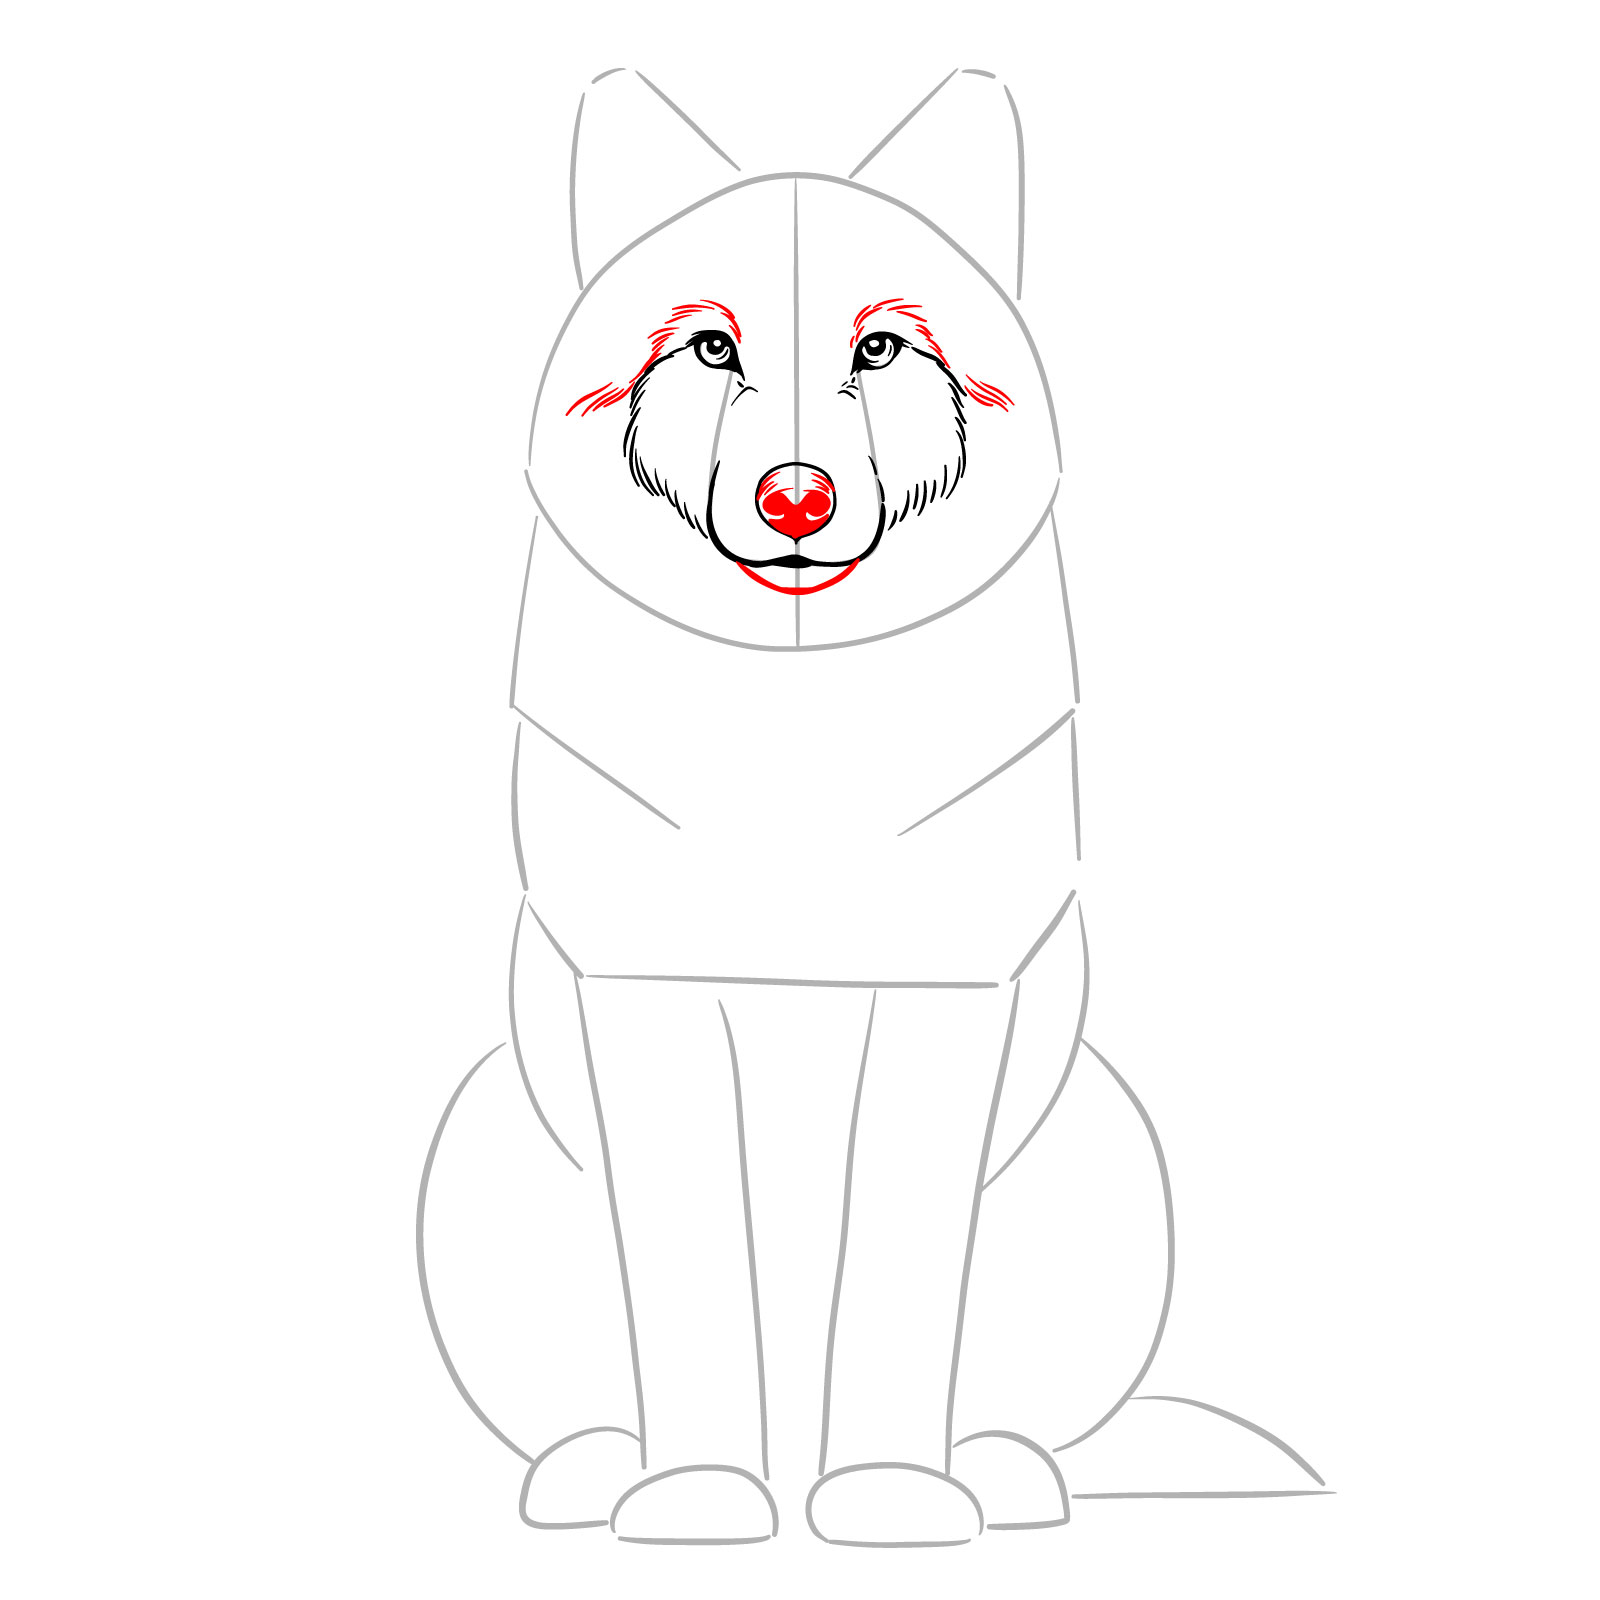
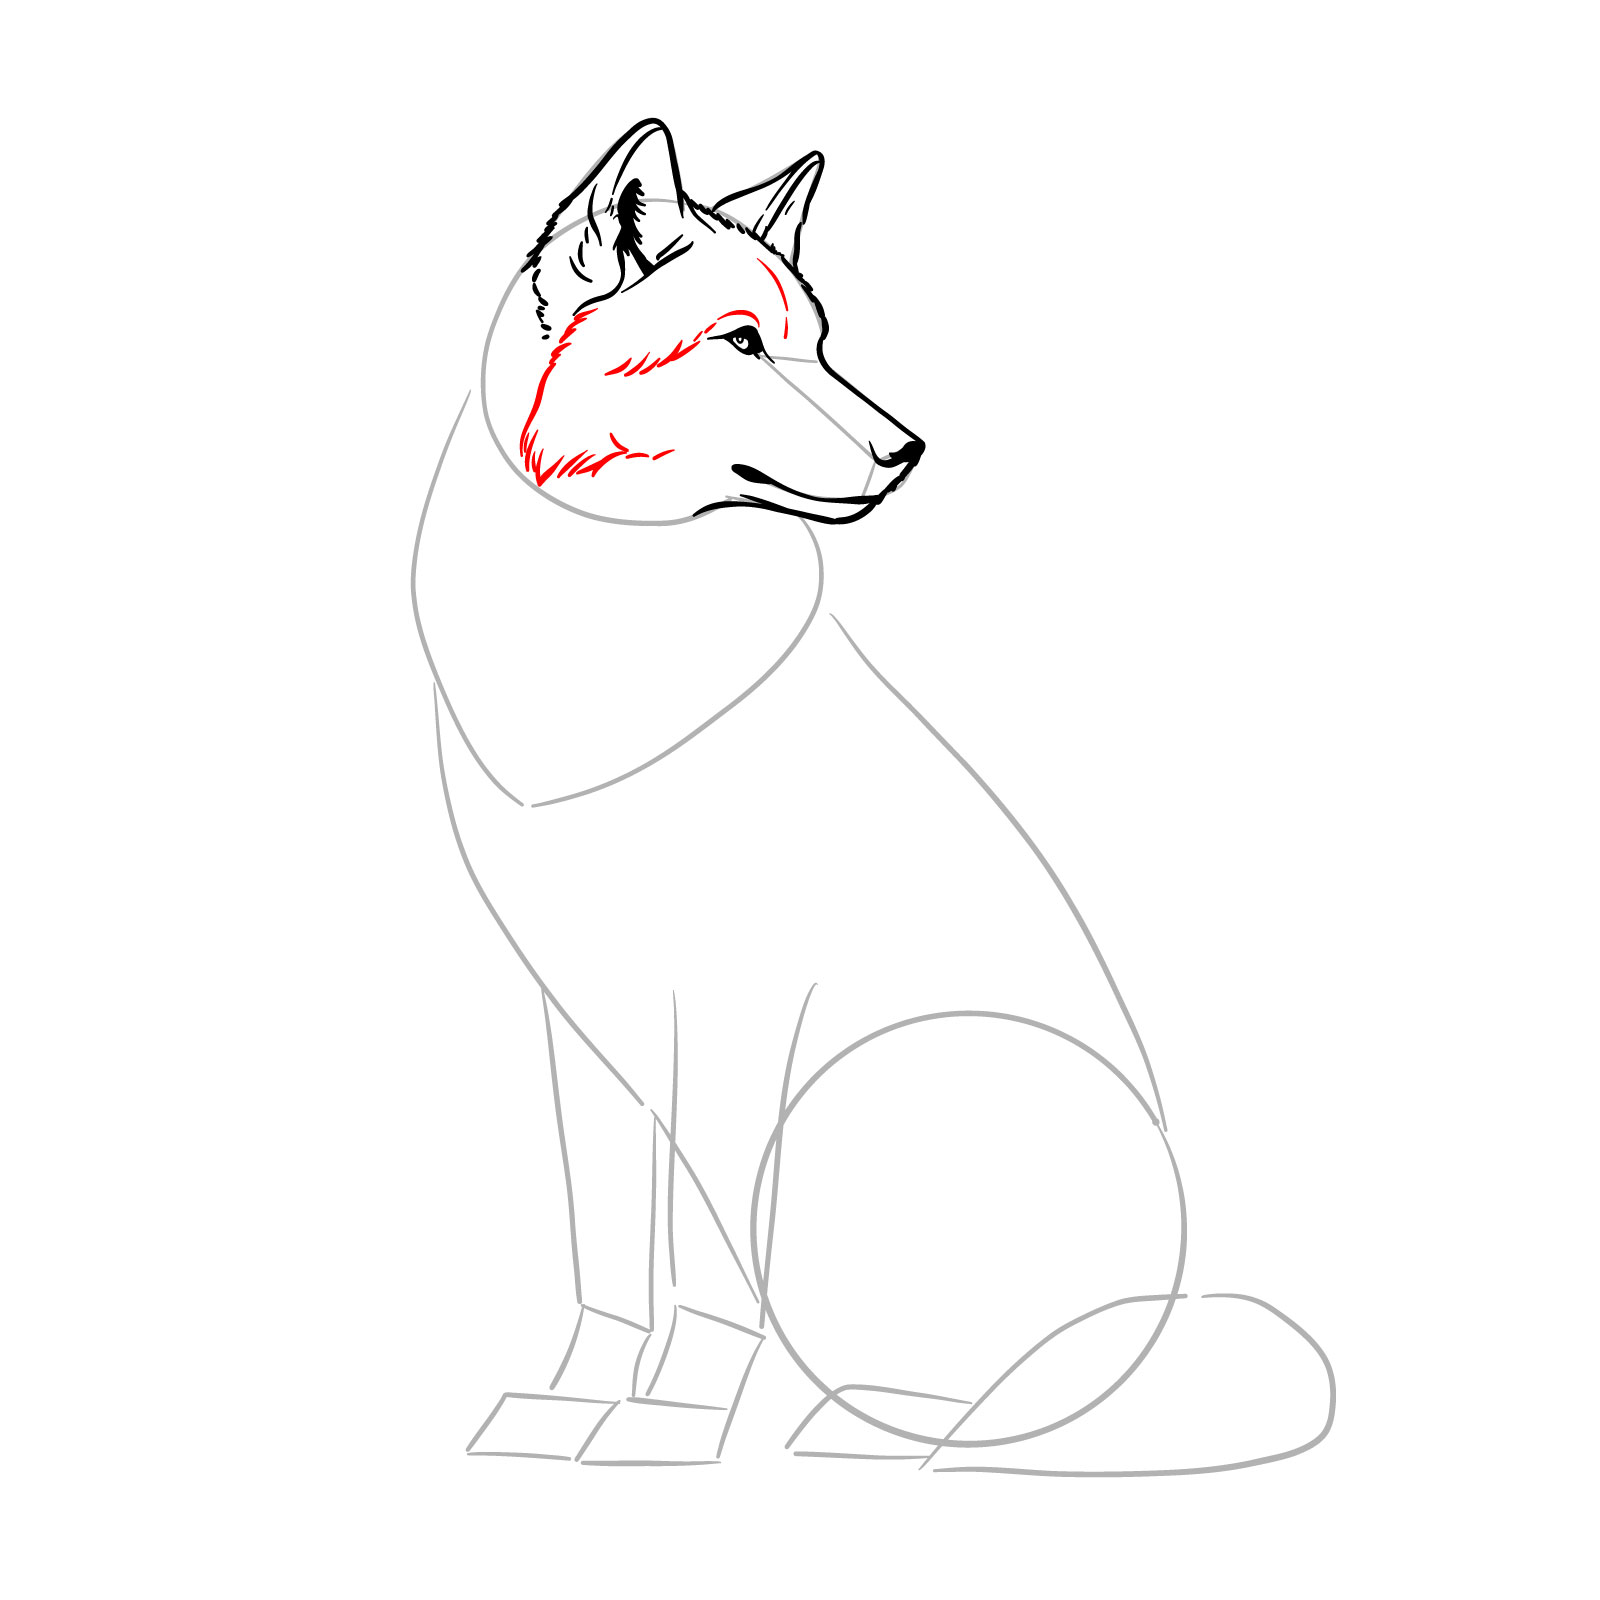
Step 06 – Draw the bottom part of the wolf’s snout, fill in the nose at the bottom, and add two small circles for nostrils. Depict fur above the eyes and on the outer sides with short strokes, giving your sitting wolf drawing a more realistic texture
PinIllustrating the lower snout and adding fur details above the eyes
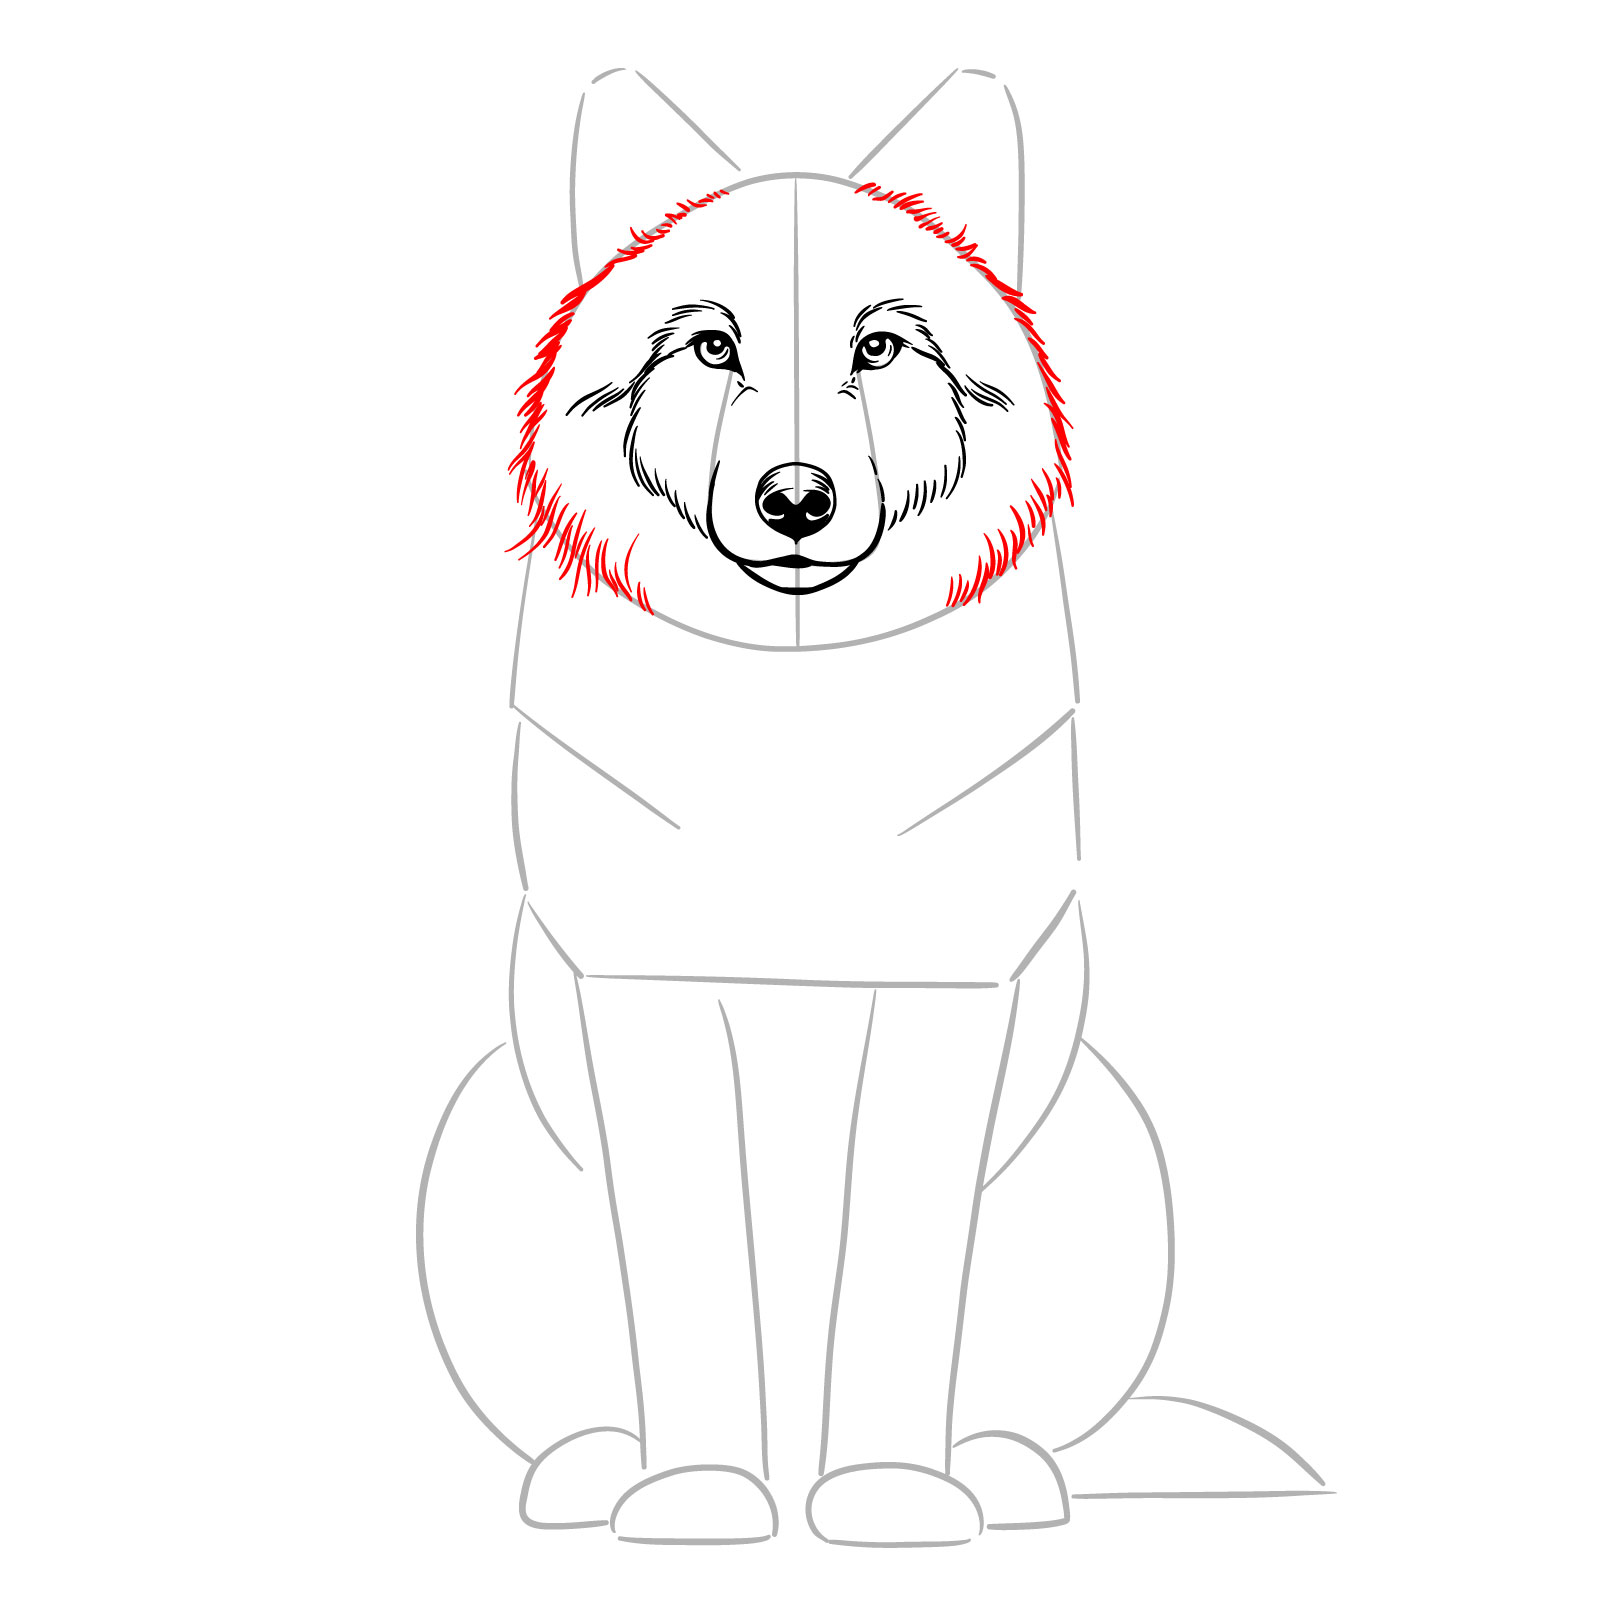
Step 07 – Mimic the fur texture around the wolf’s head by using short, sharp strokes to frame the face
PinSketching the fur outline around the sitting wolf’s head
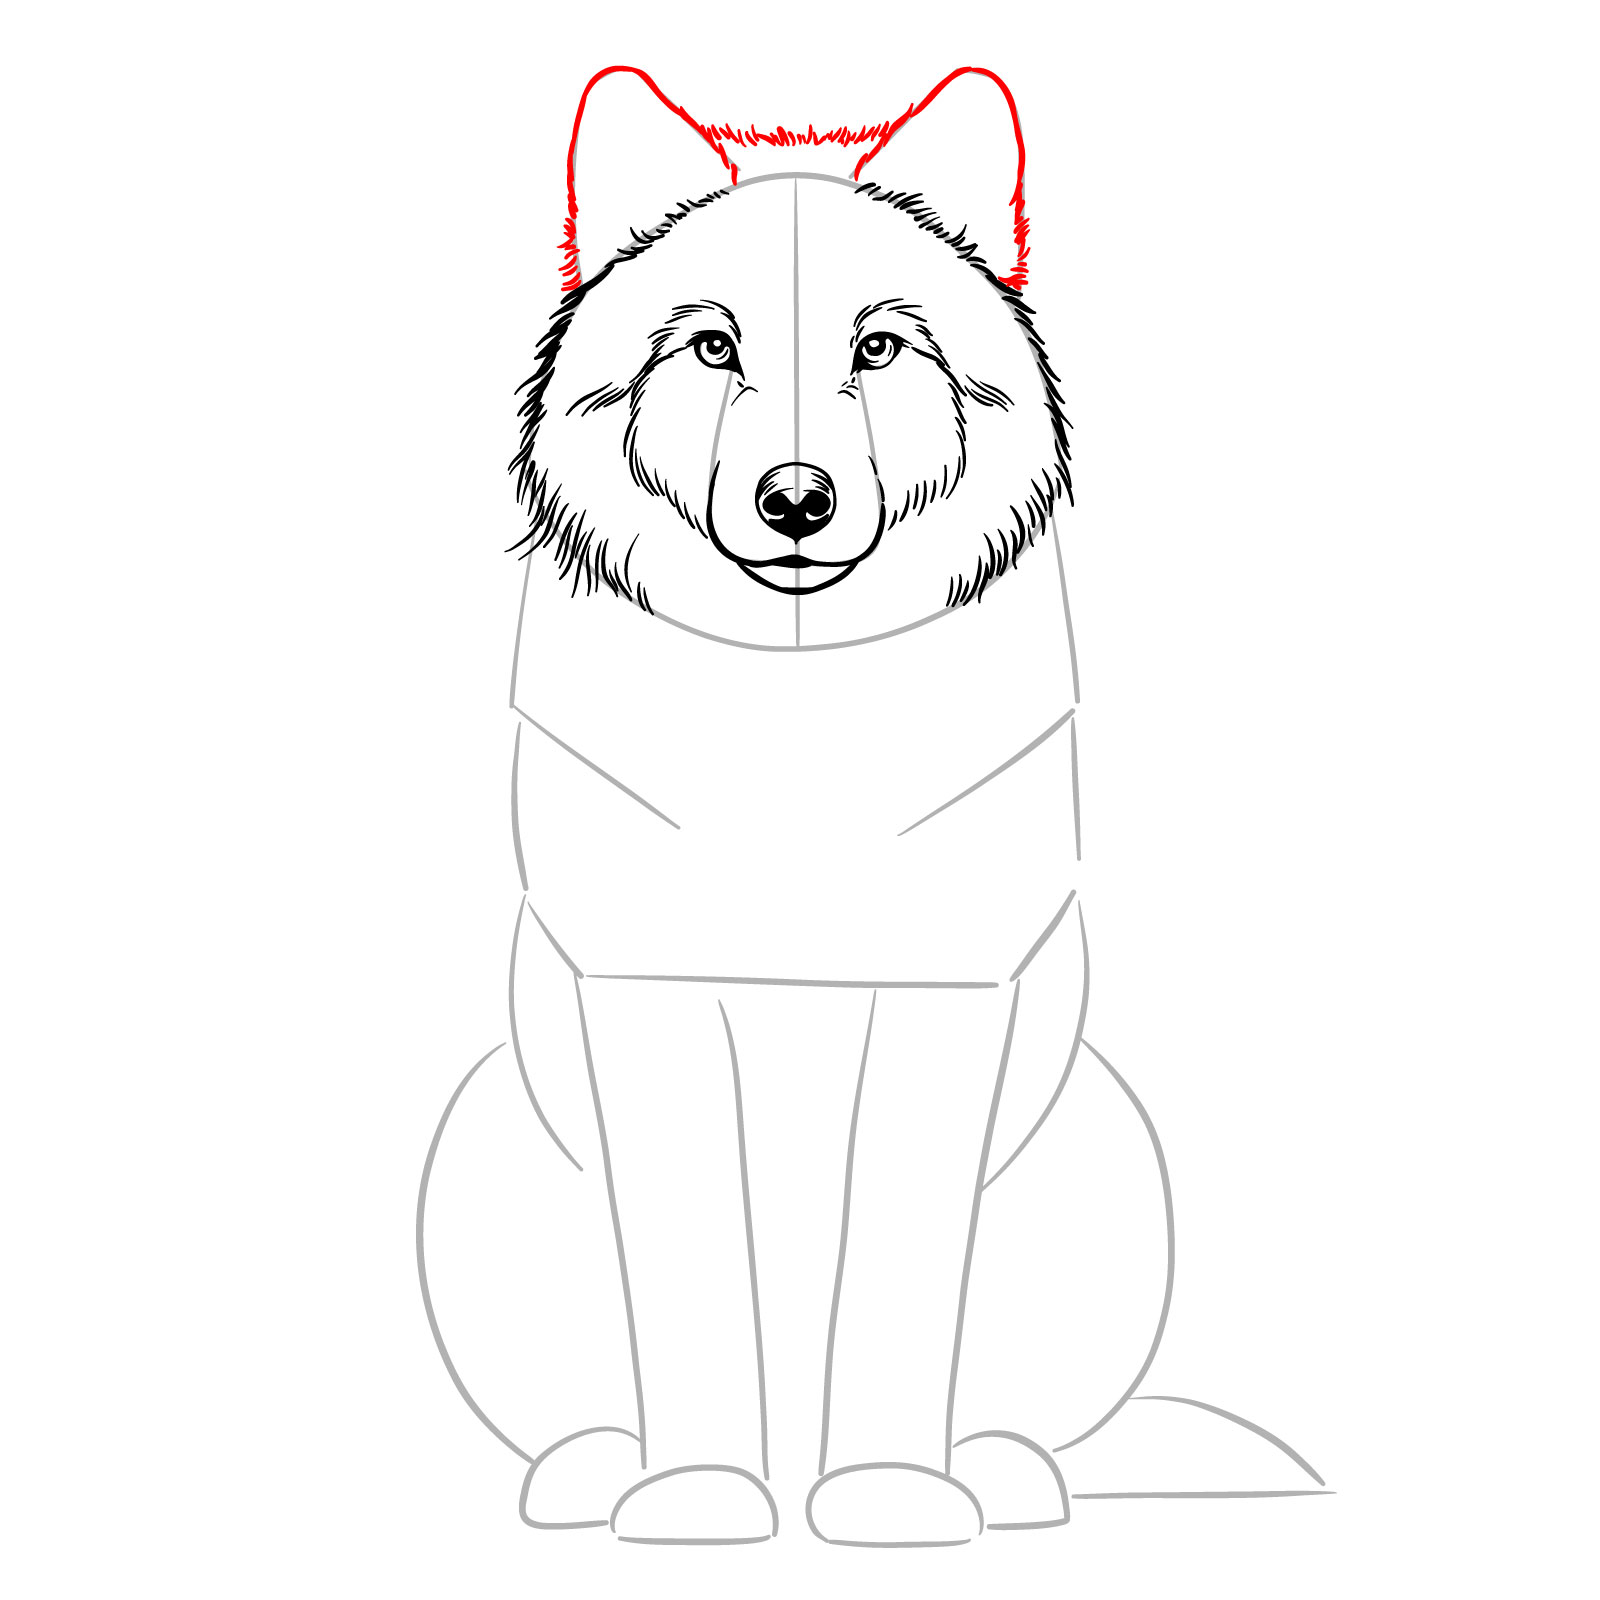
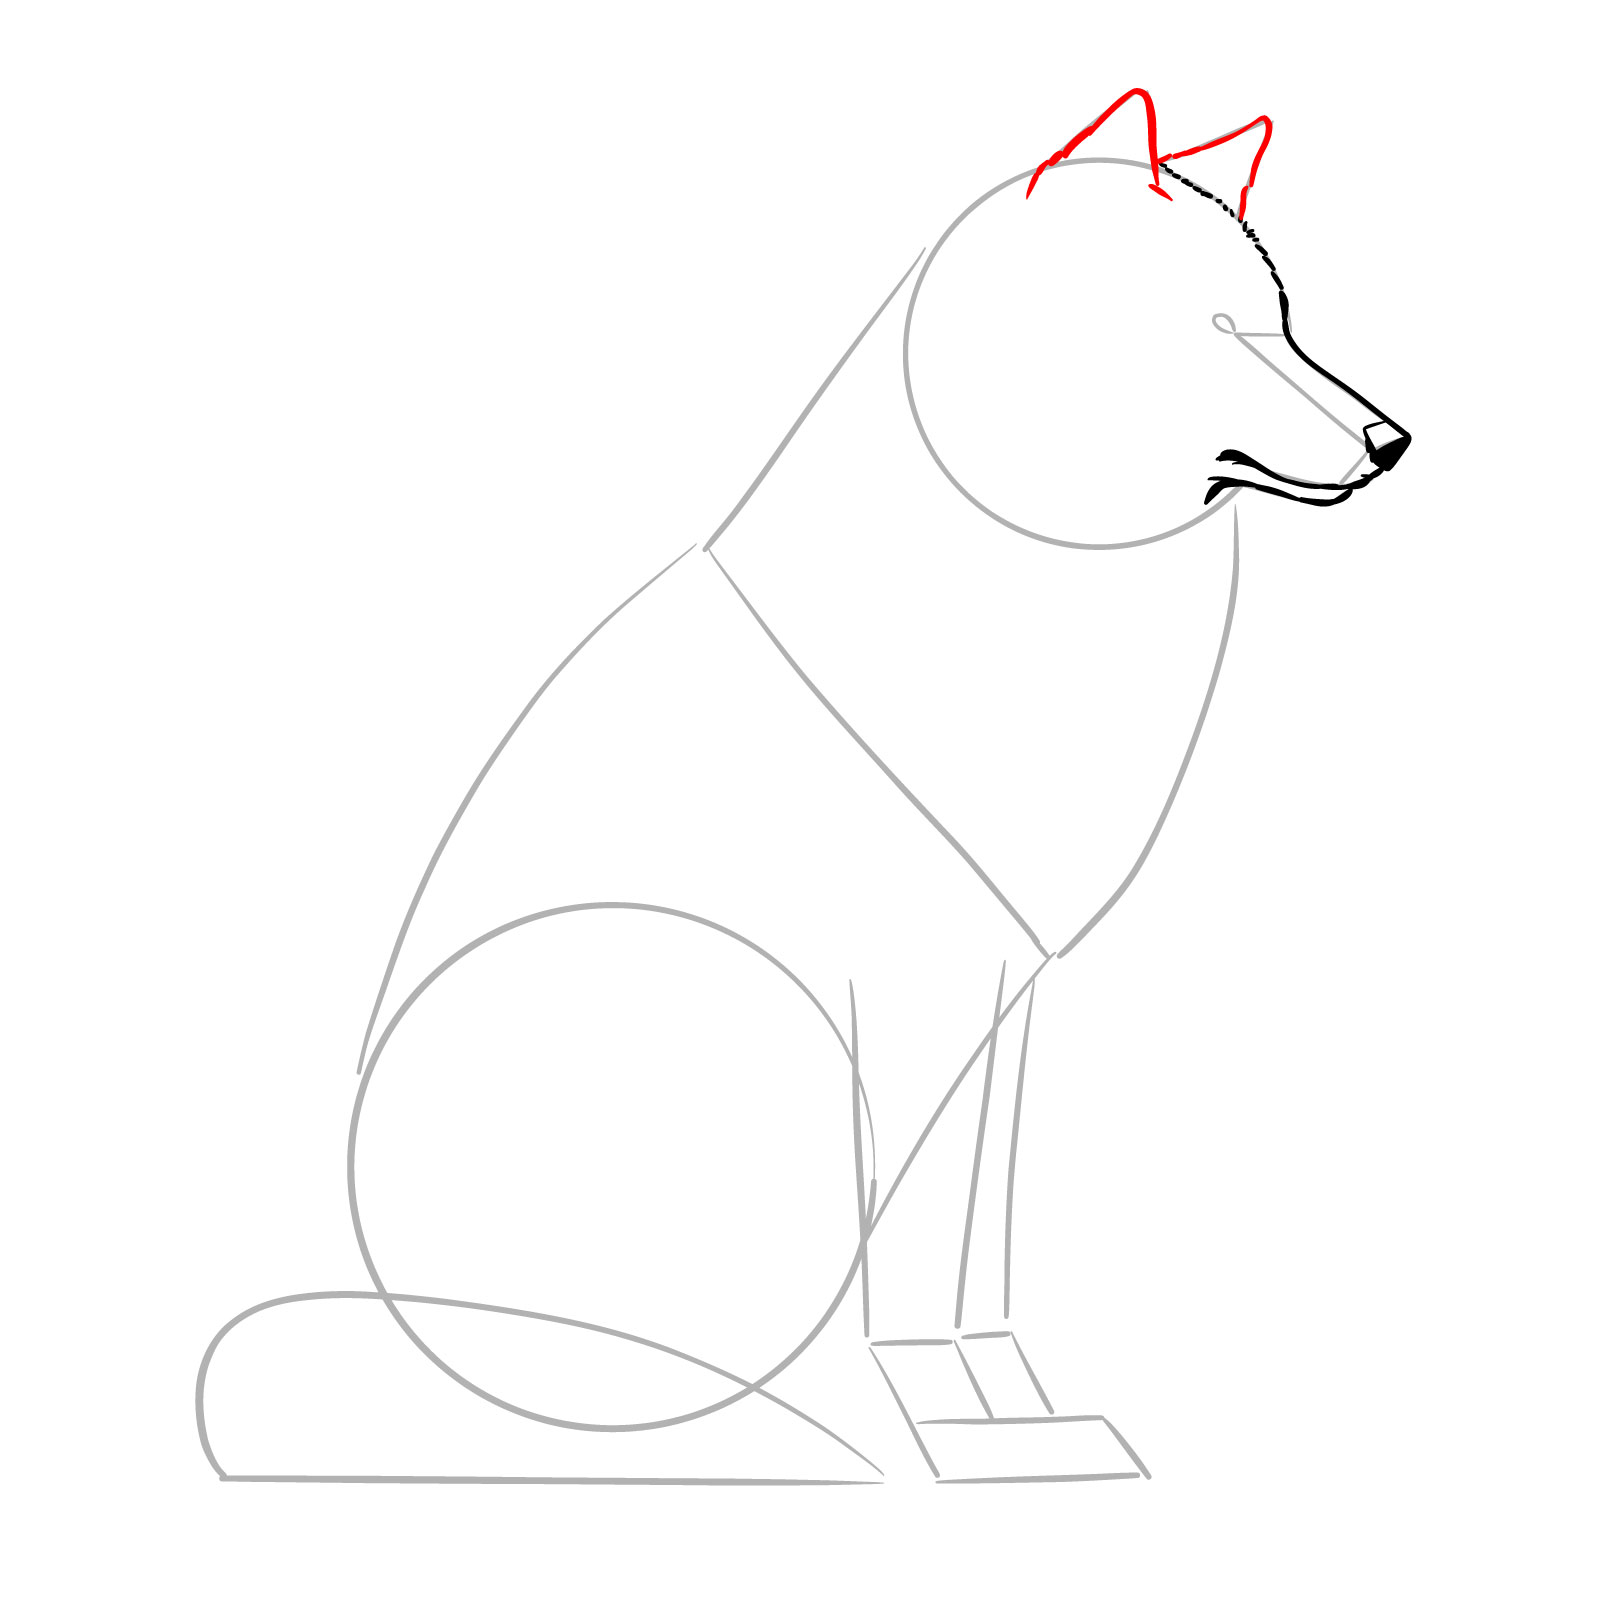
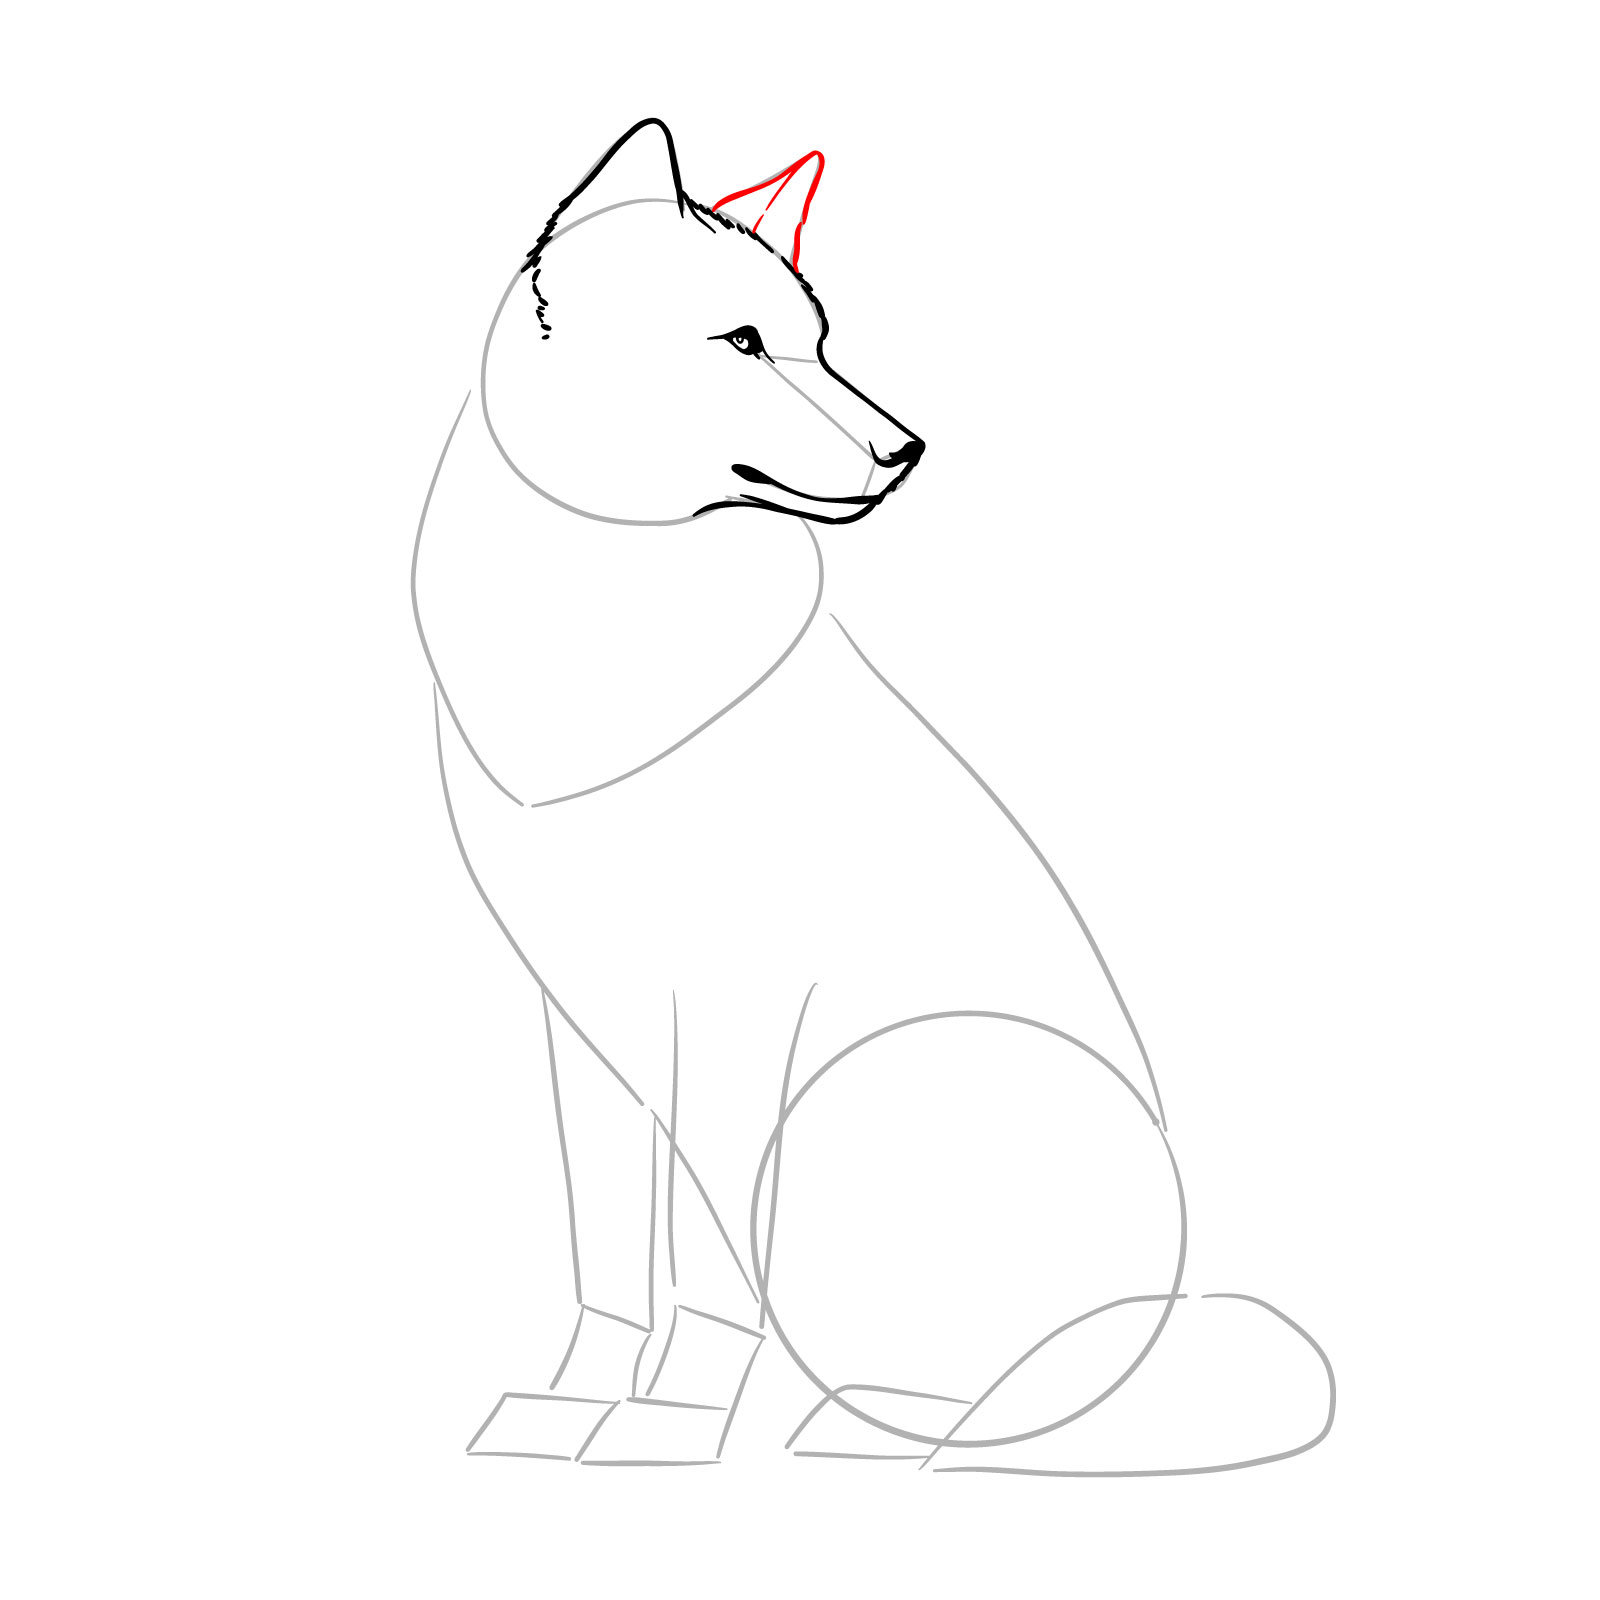
Step 08 – Sketch the ears and refine the top of the head. Draw two pointed ears atop the head using quick, short strokes to represent fur
PinAdding the ears and top of the head
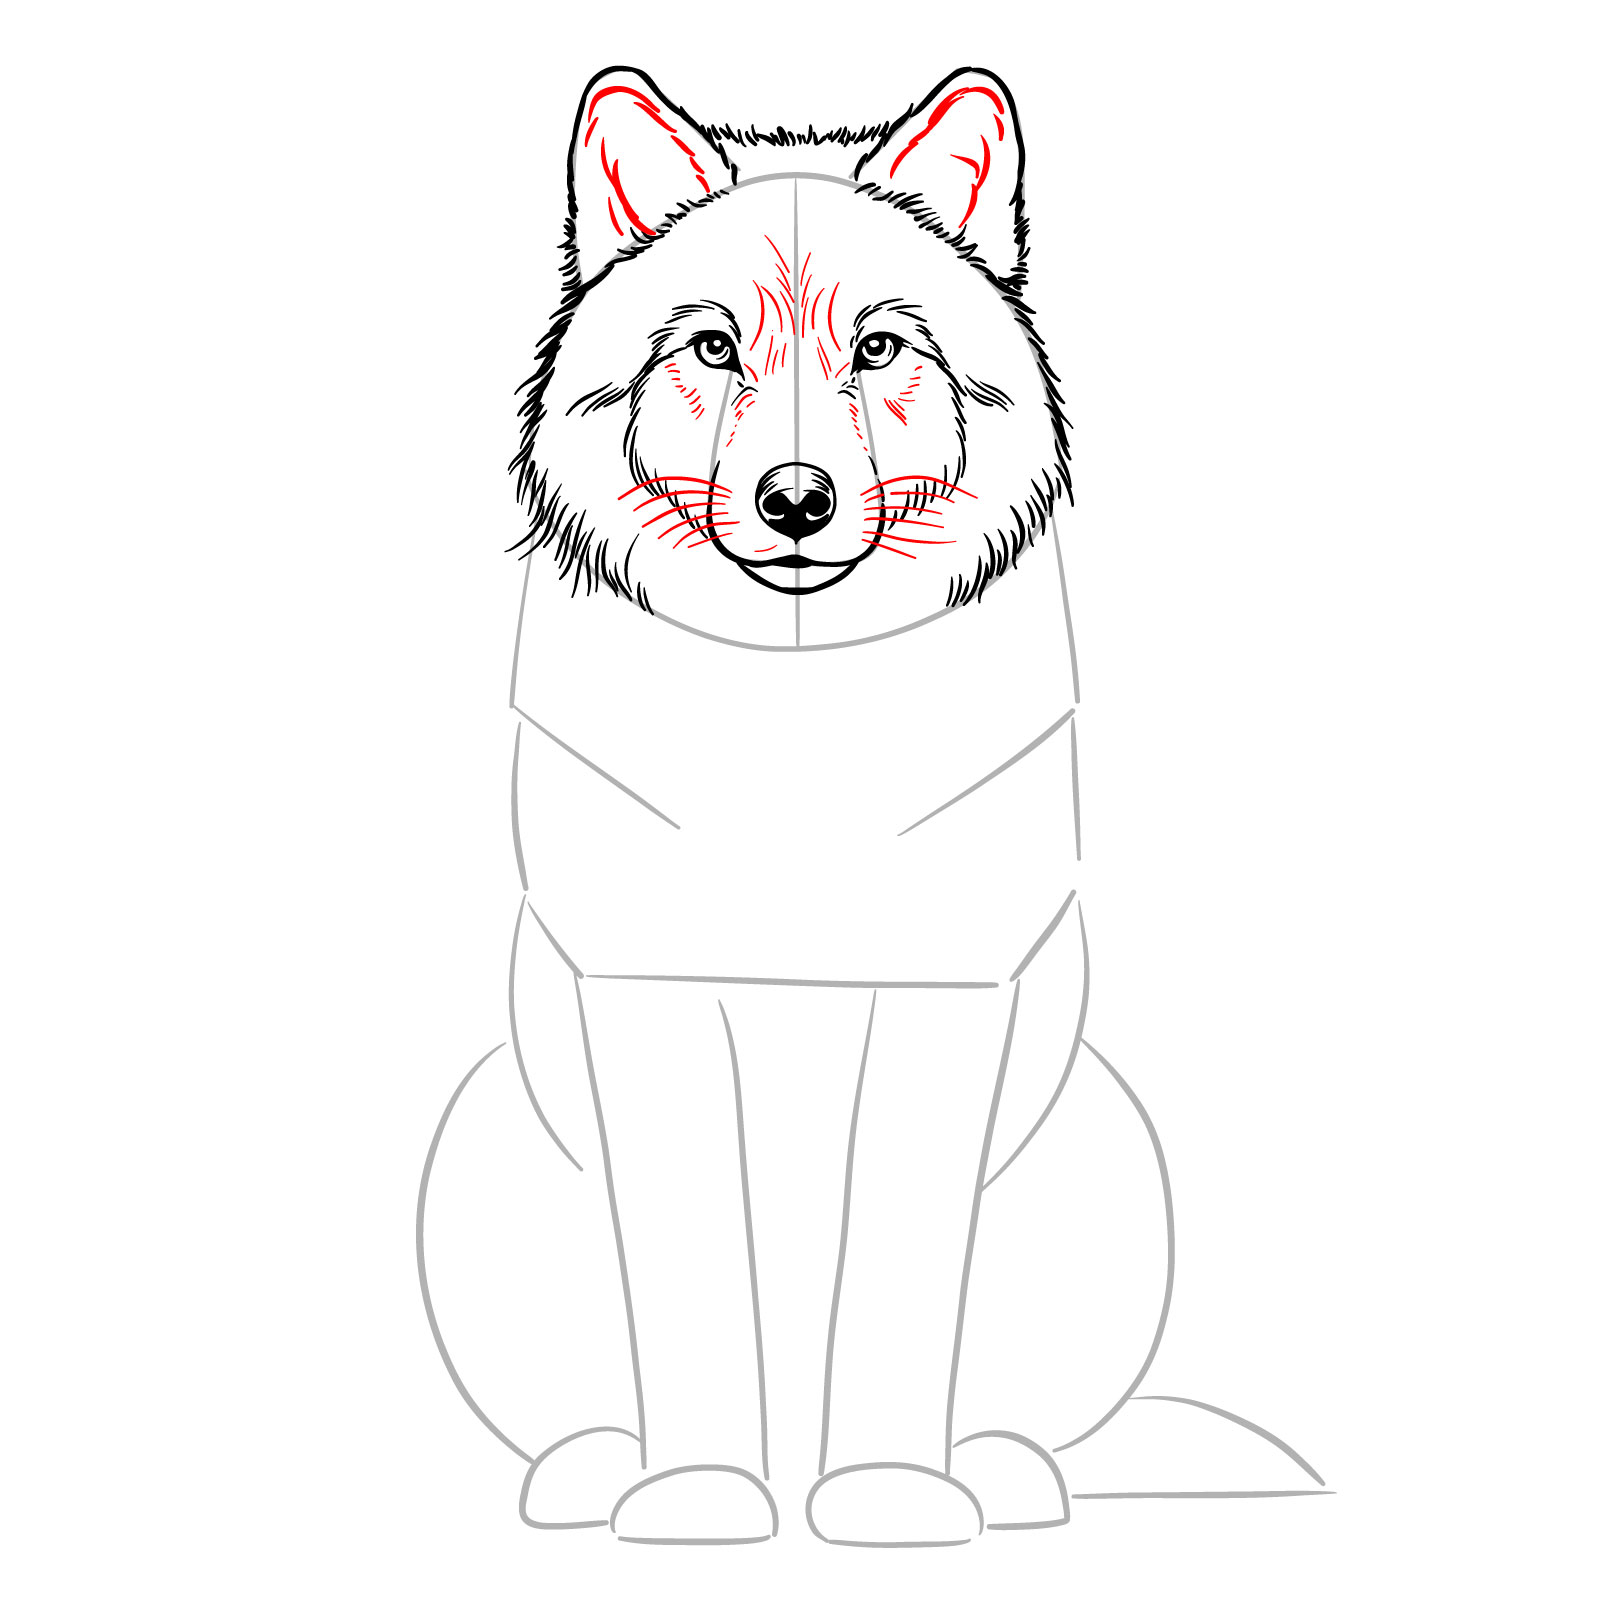
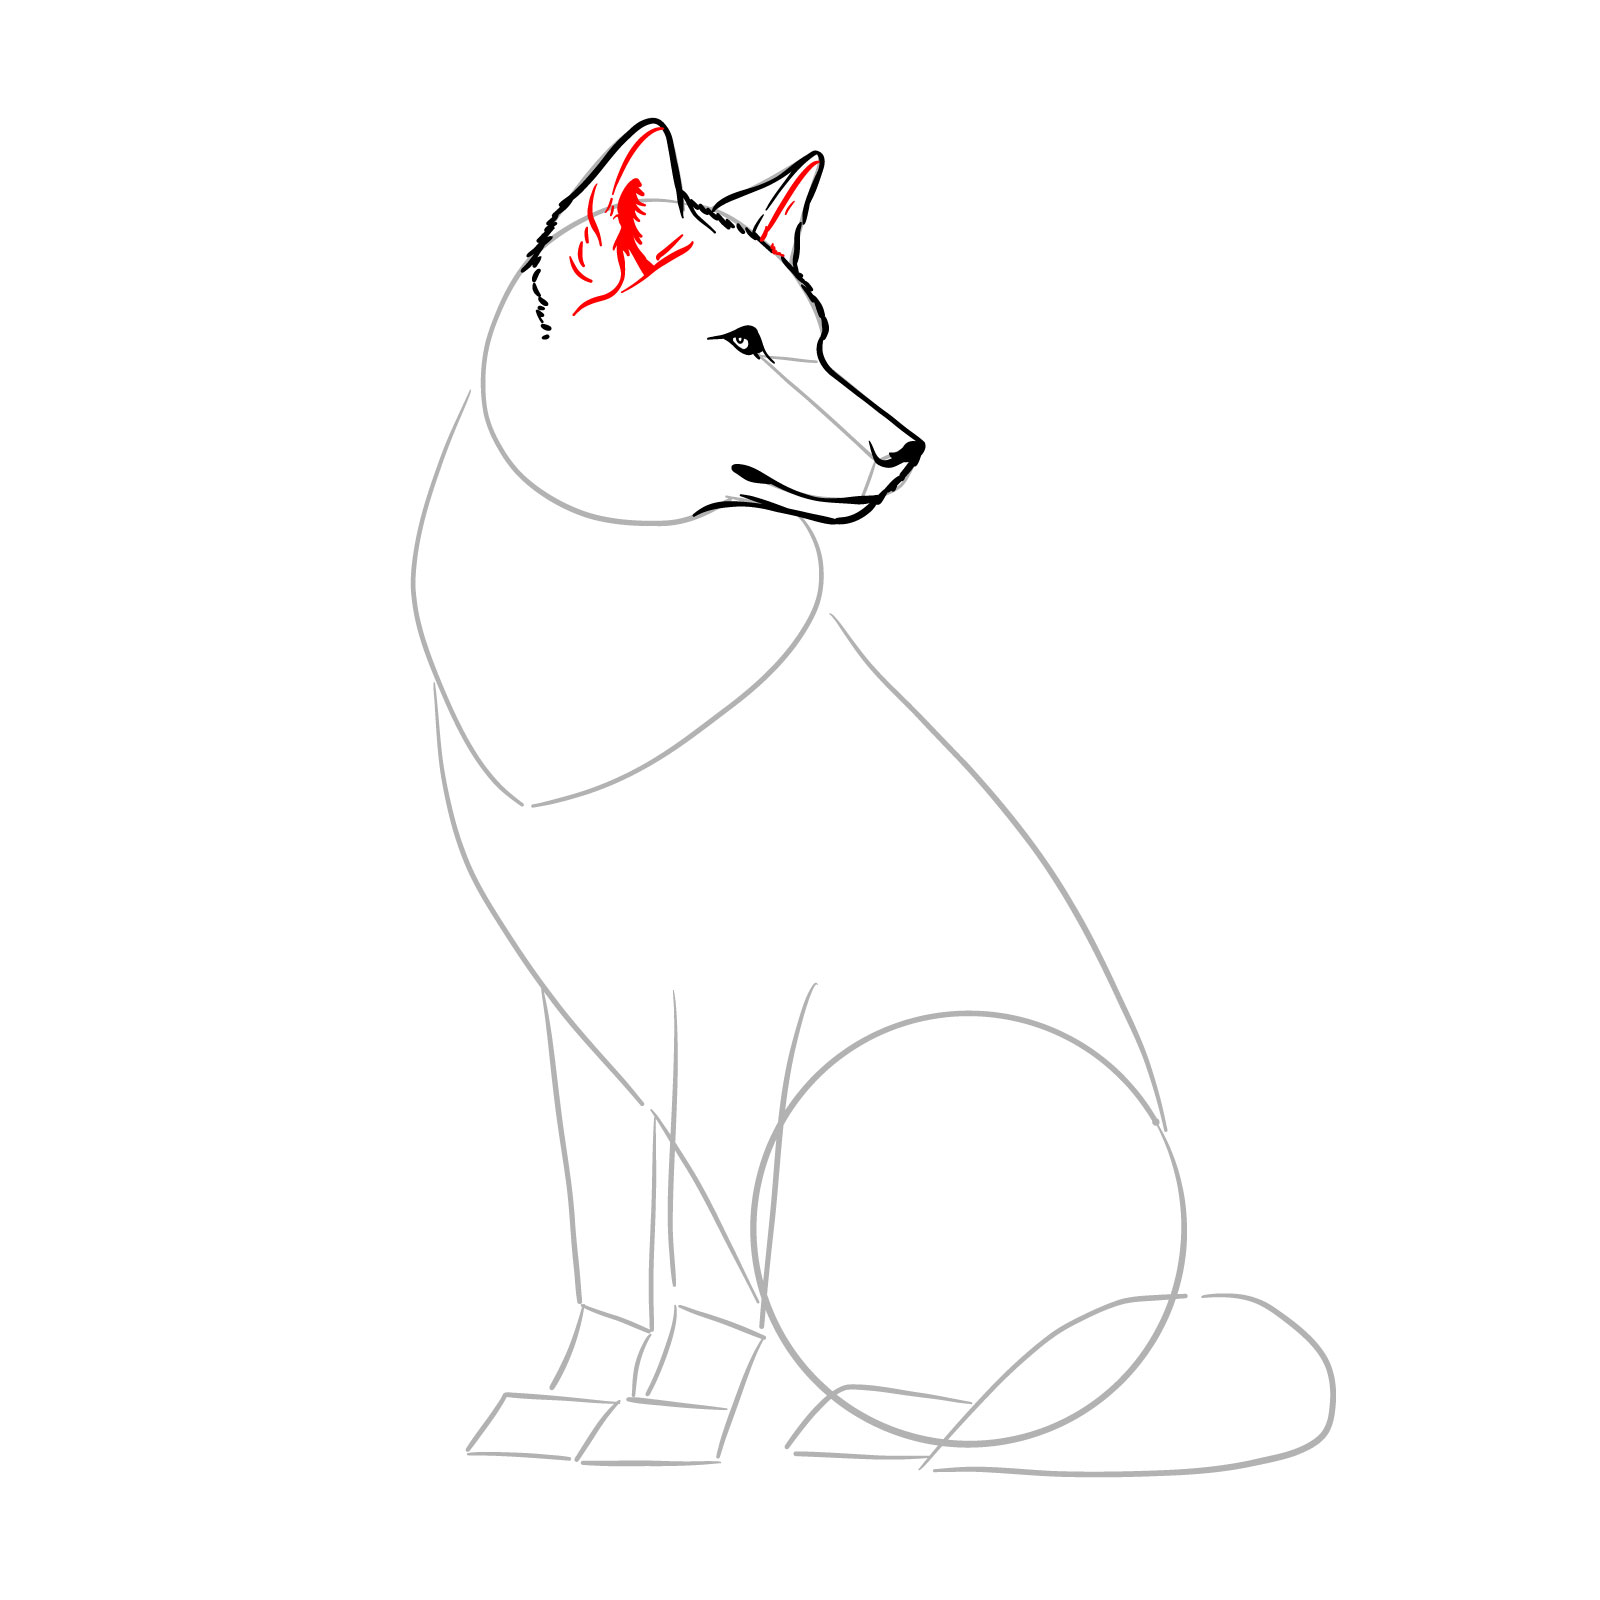
Step 09 – Start adding whiskers extending from the snout’s sides. Sketch fine lines between the eyes and above the snout to suggest fur detail. Detail the inner ears with tufts of fur to give them depth and texture
PinSketching detailed facial fur and whiskers
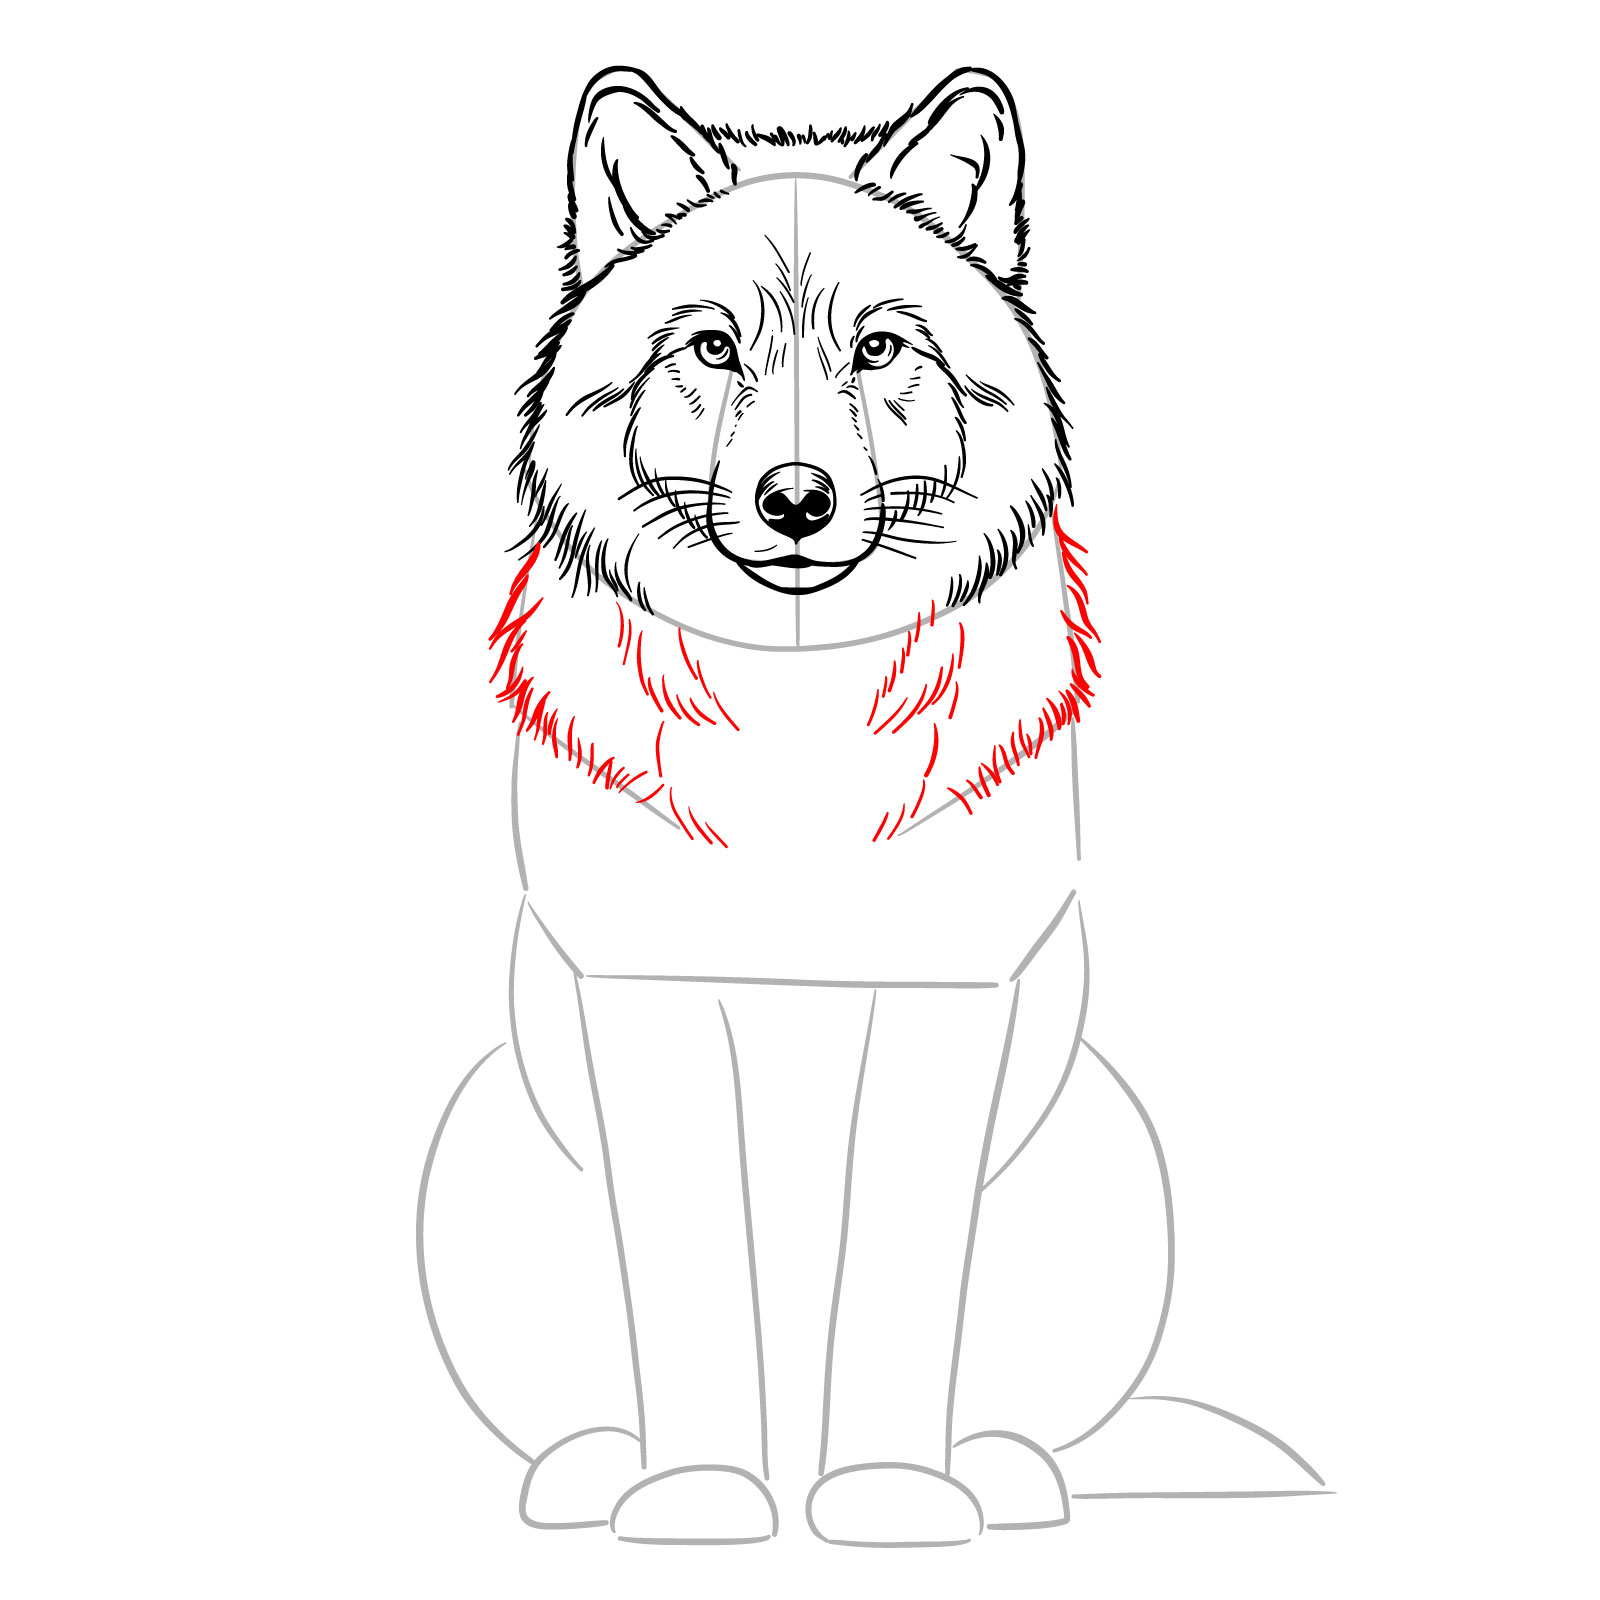
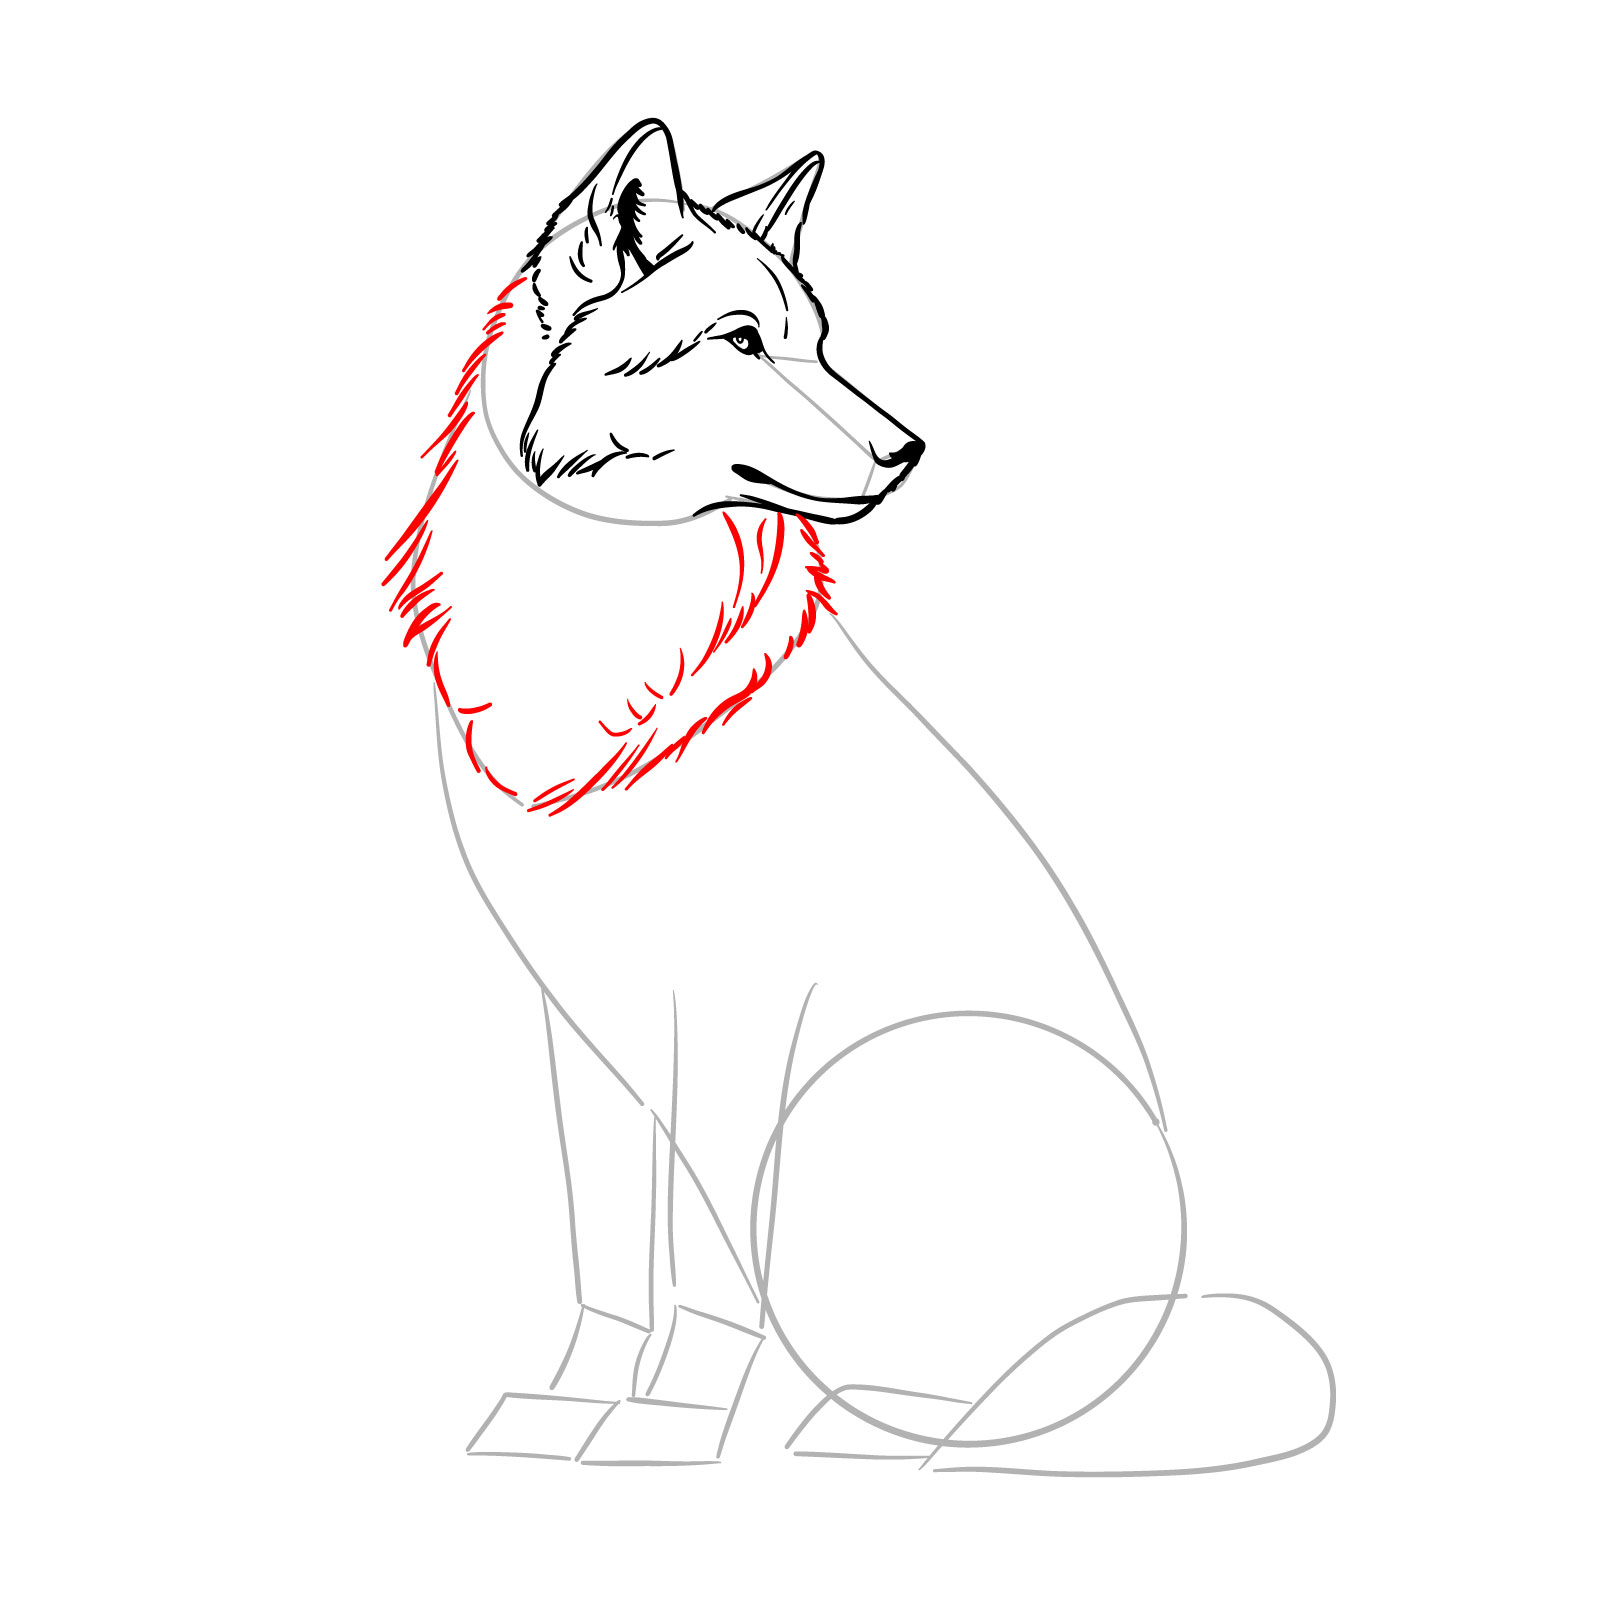
Step 10 – For this step, draw thick, shaggy fur around the wolf’s neck, using short strokes to create a layered and dense fur effect. This is an important feature in learning how to draw a sitting wolf, as it gives the animal its robust and wild appearance
PinDrawing the lush neck fur
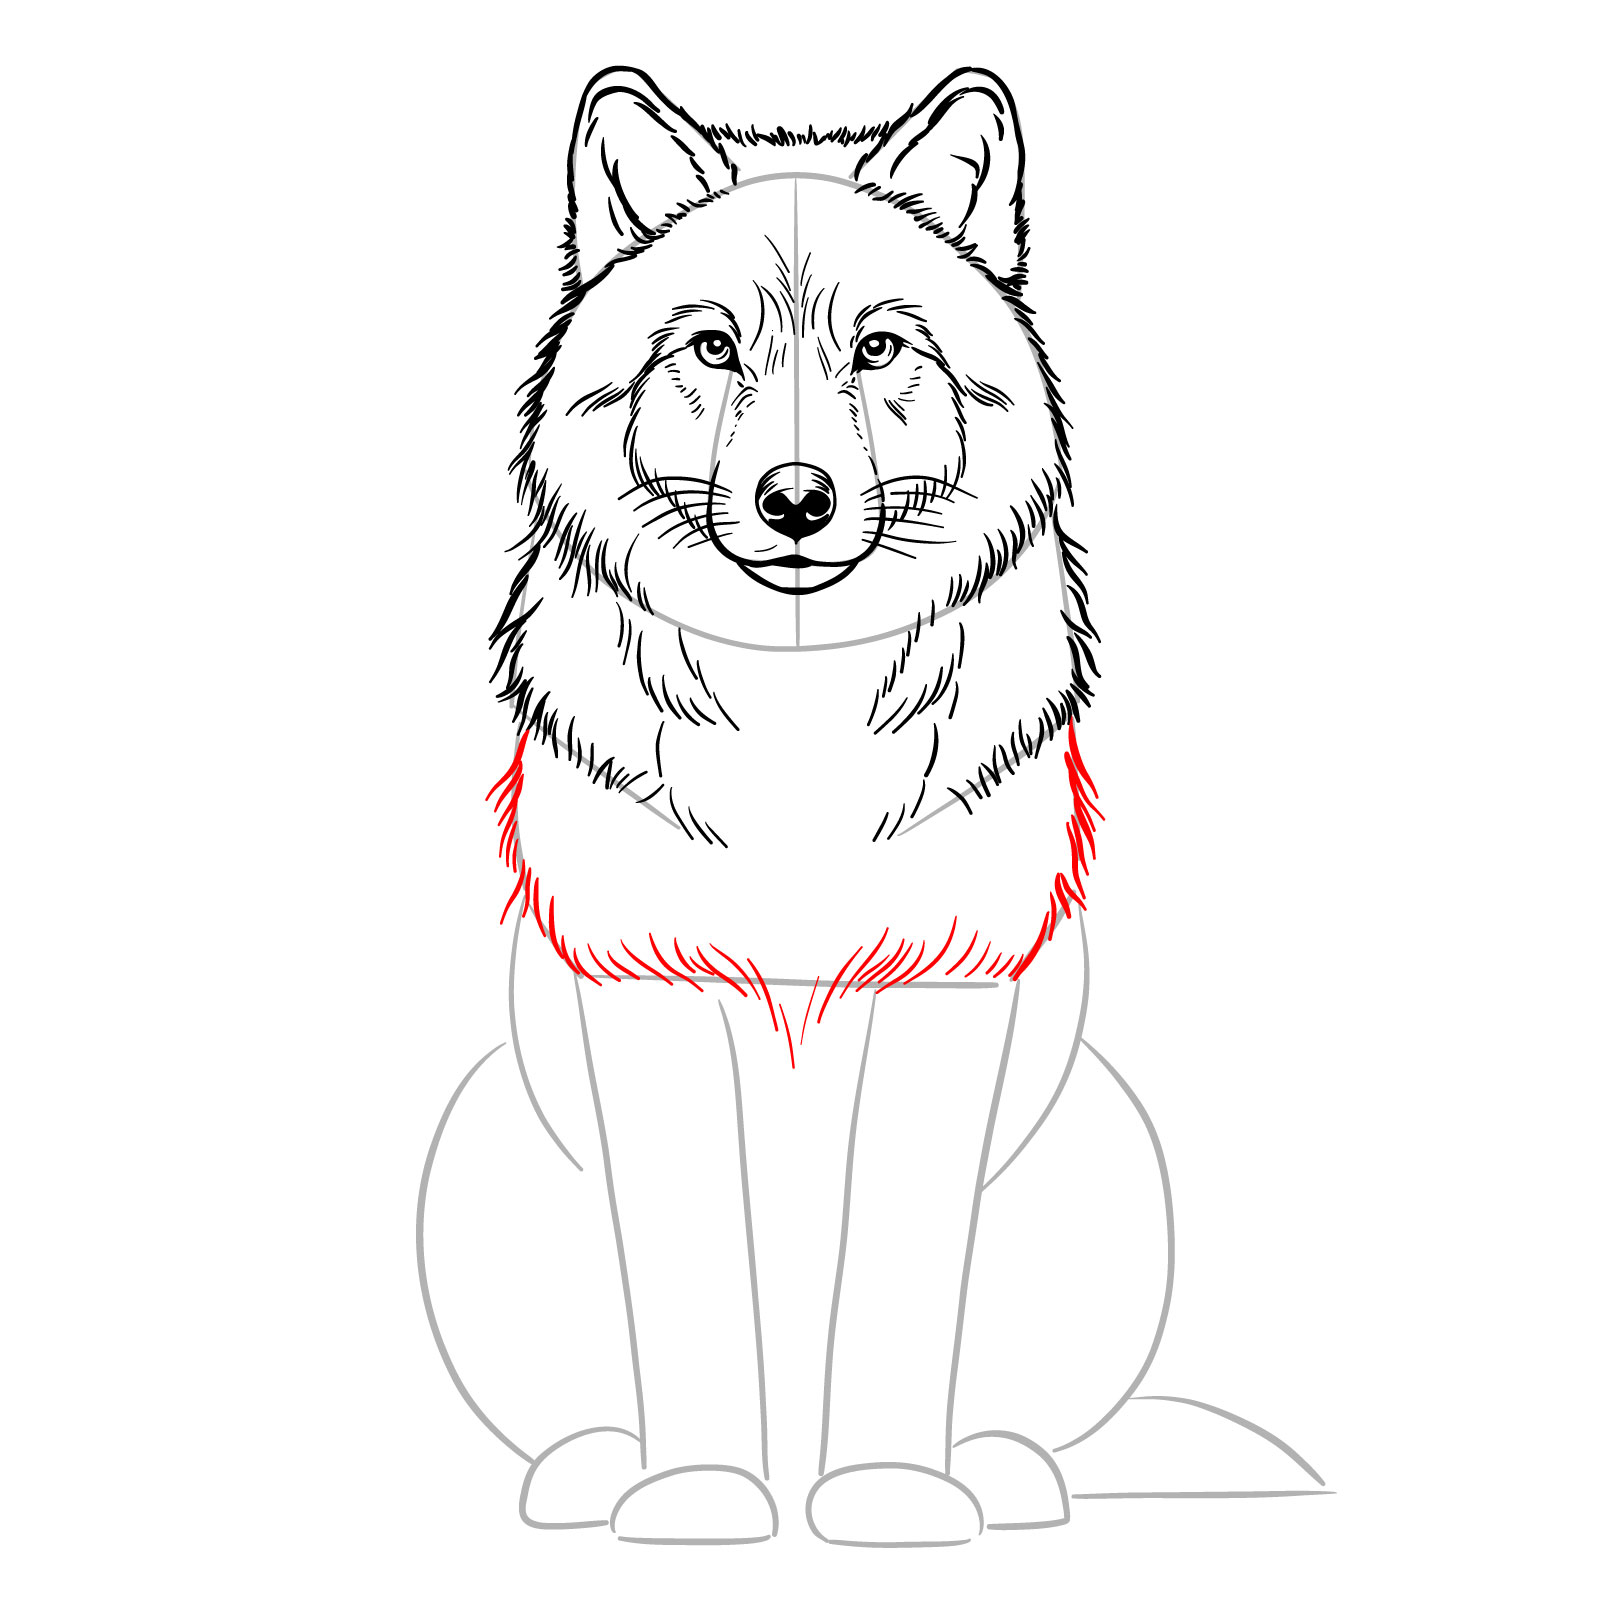
Step 11 – Continue by drawing another layer of fur below the first, using the same short stroke technique to build volume and the impression of a thick coat
PinAdding the second layer of fur
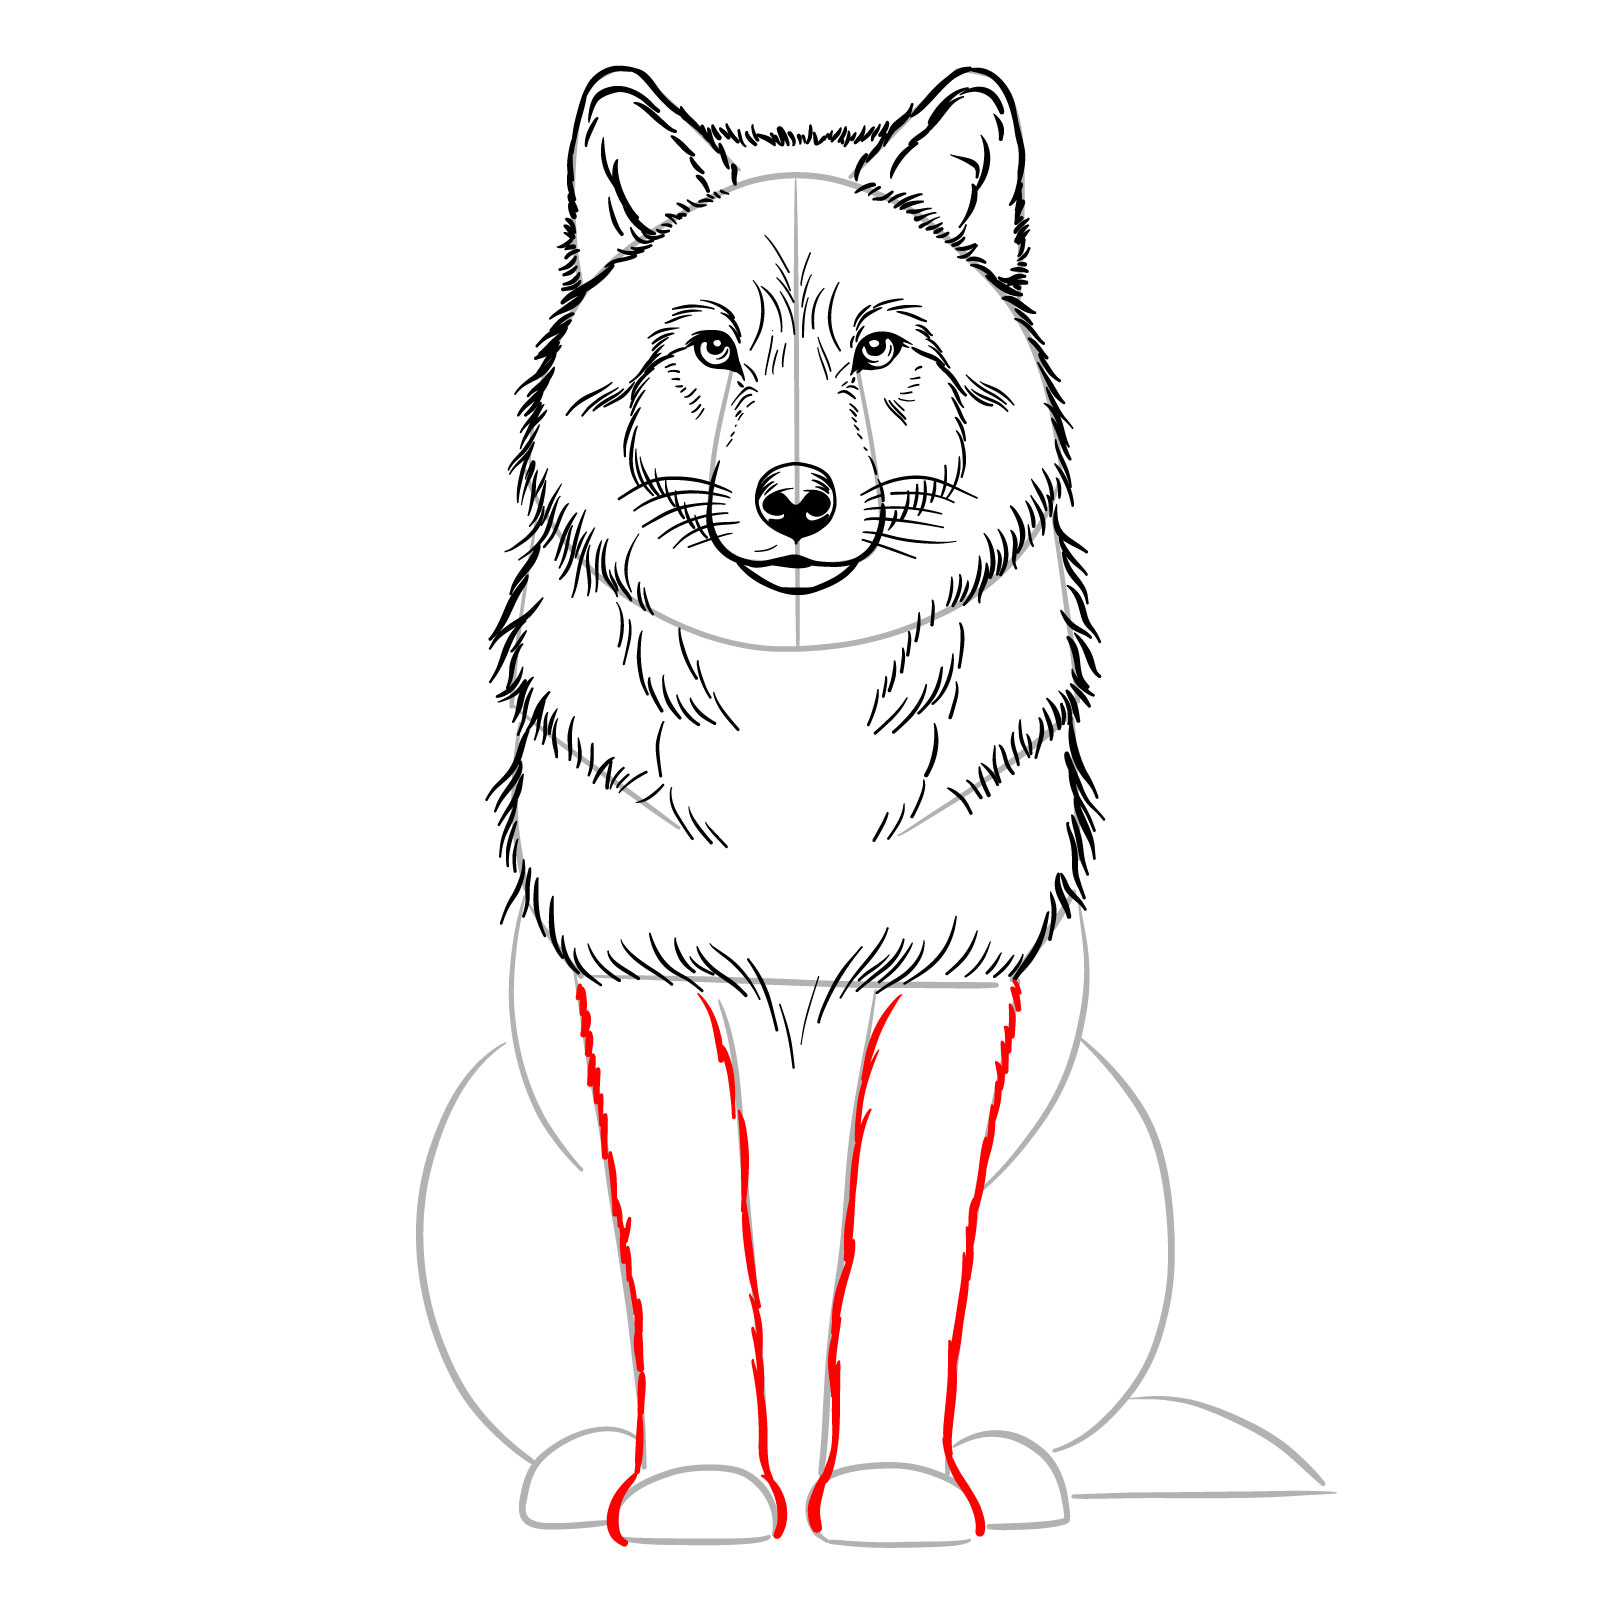
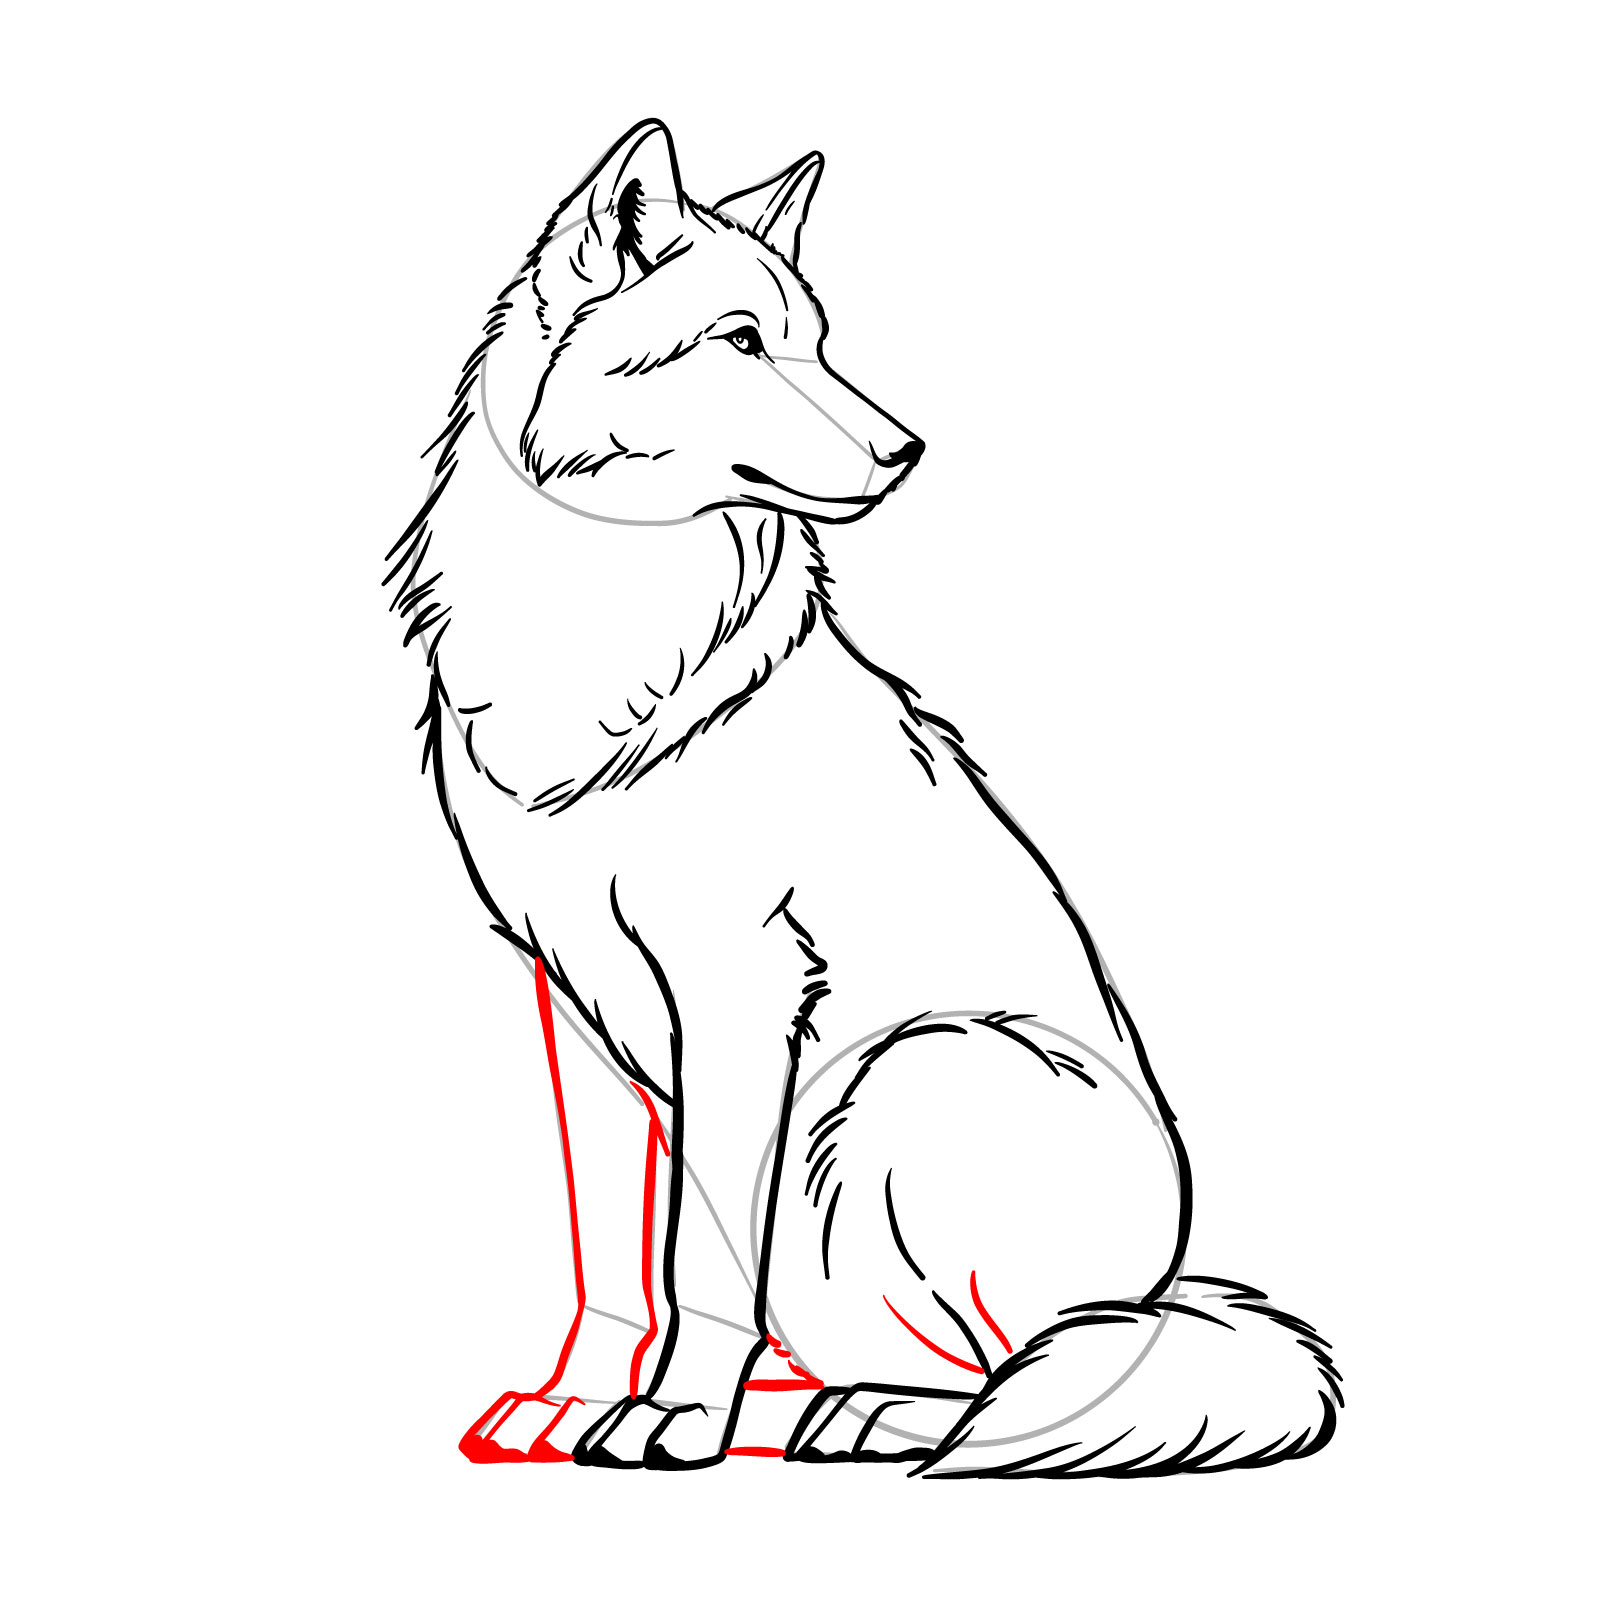
Step 12 – Define the front legs by outlining them down to the paws with short strokes, creating the illusion of fur. Pay attention to the wolf’s muscular structure while keeping the lines soft to maintain the furry texture
PinDefining the front legs and paws of a sitting wolf
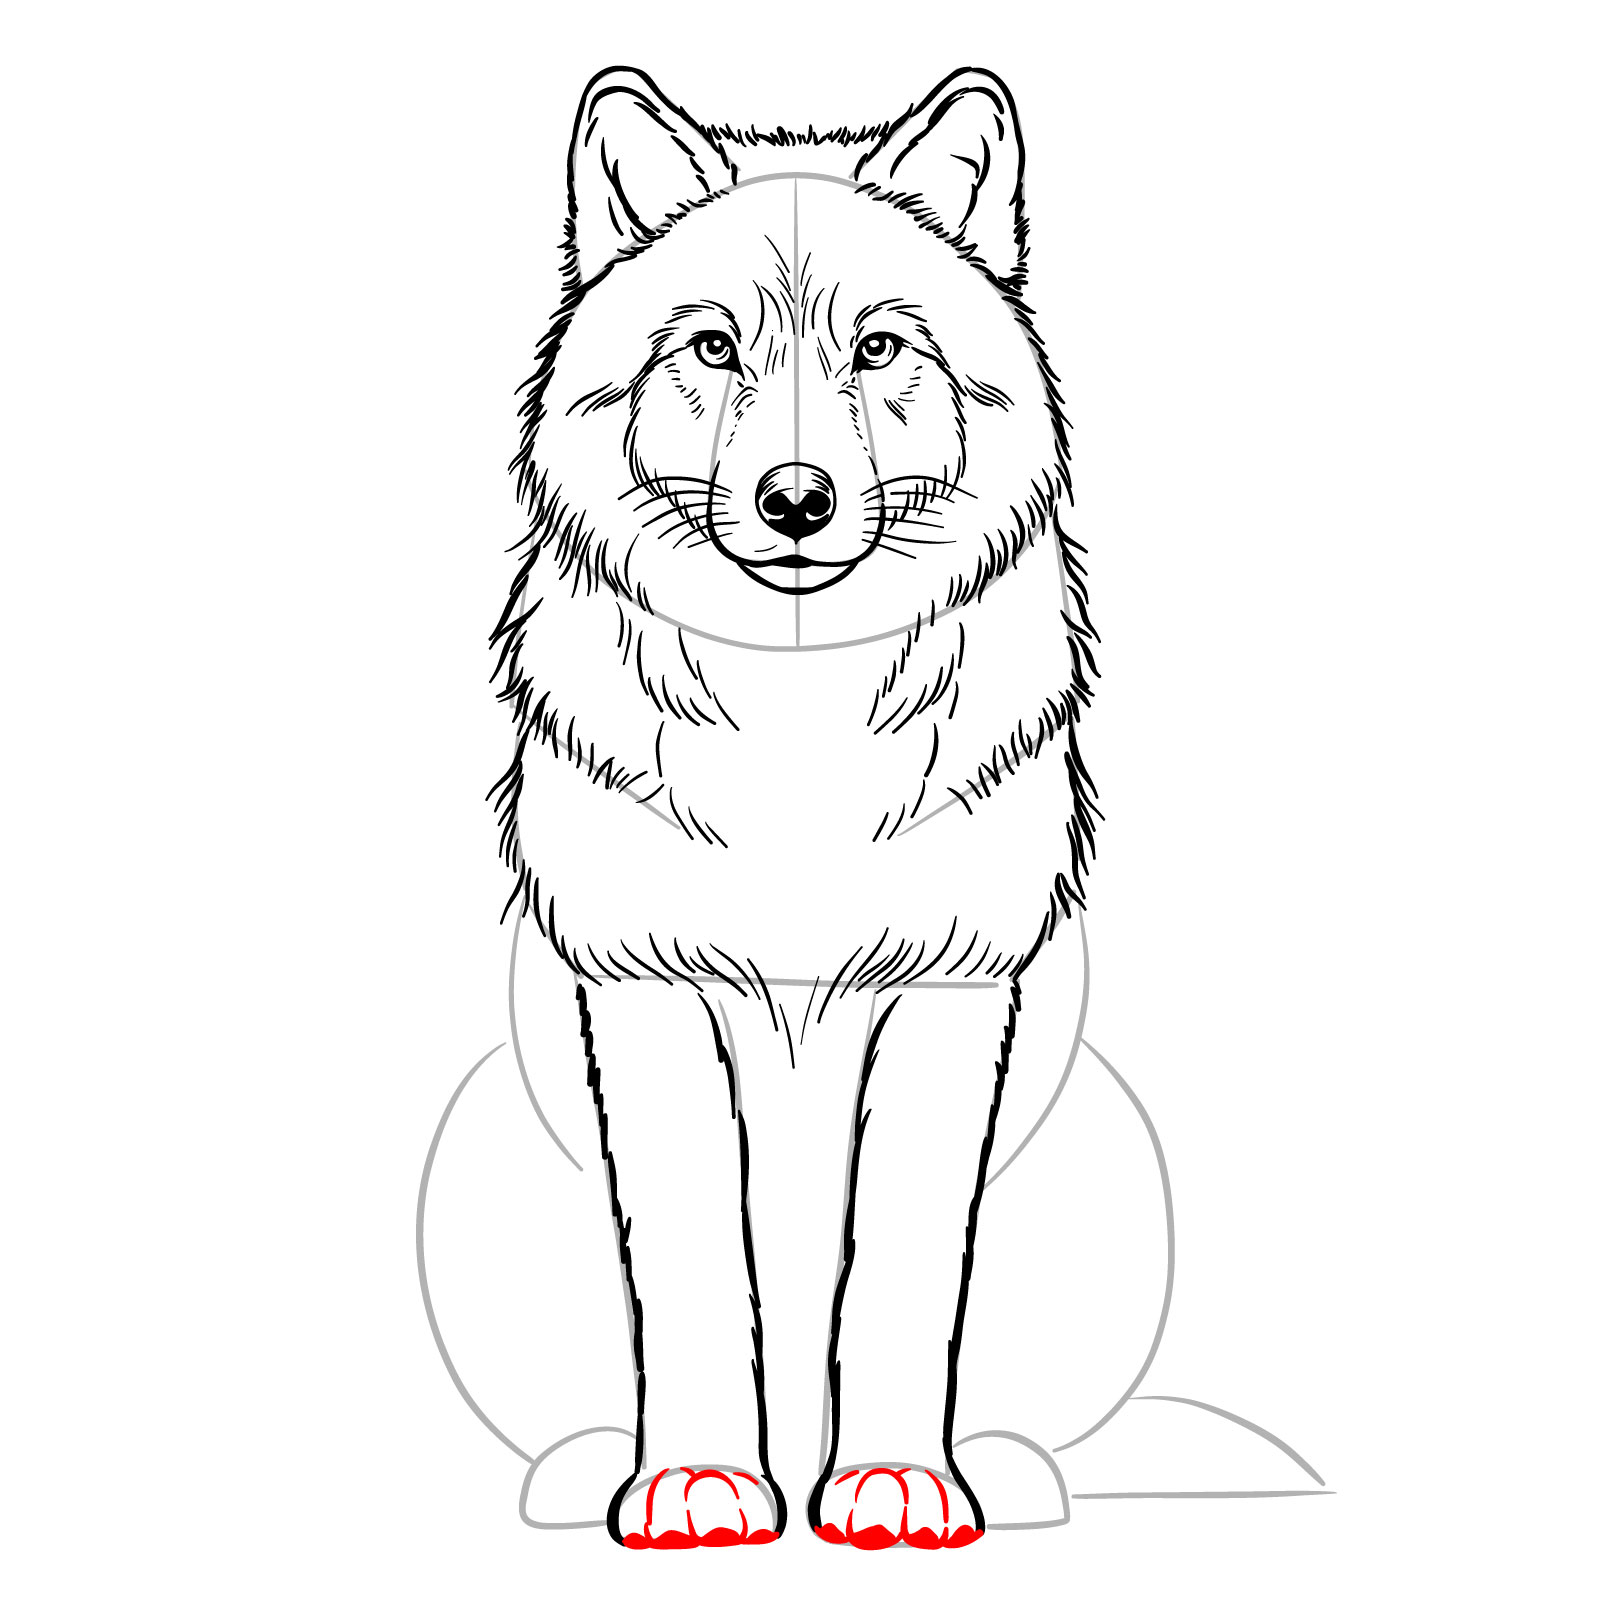
Step 13 – Draw the front paws, adding individual toes and thick pads to give them a realistic look. Ensure that the paws are proportional to the legs and body to maintain the accuracy
PinDetailing the front paws
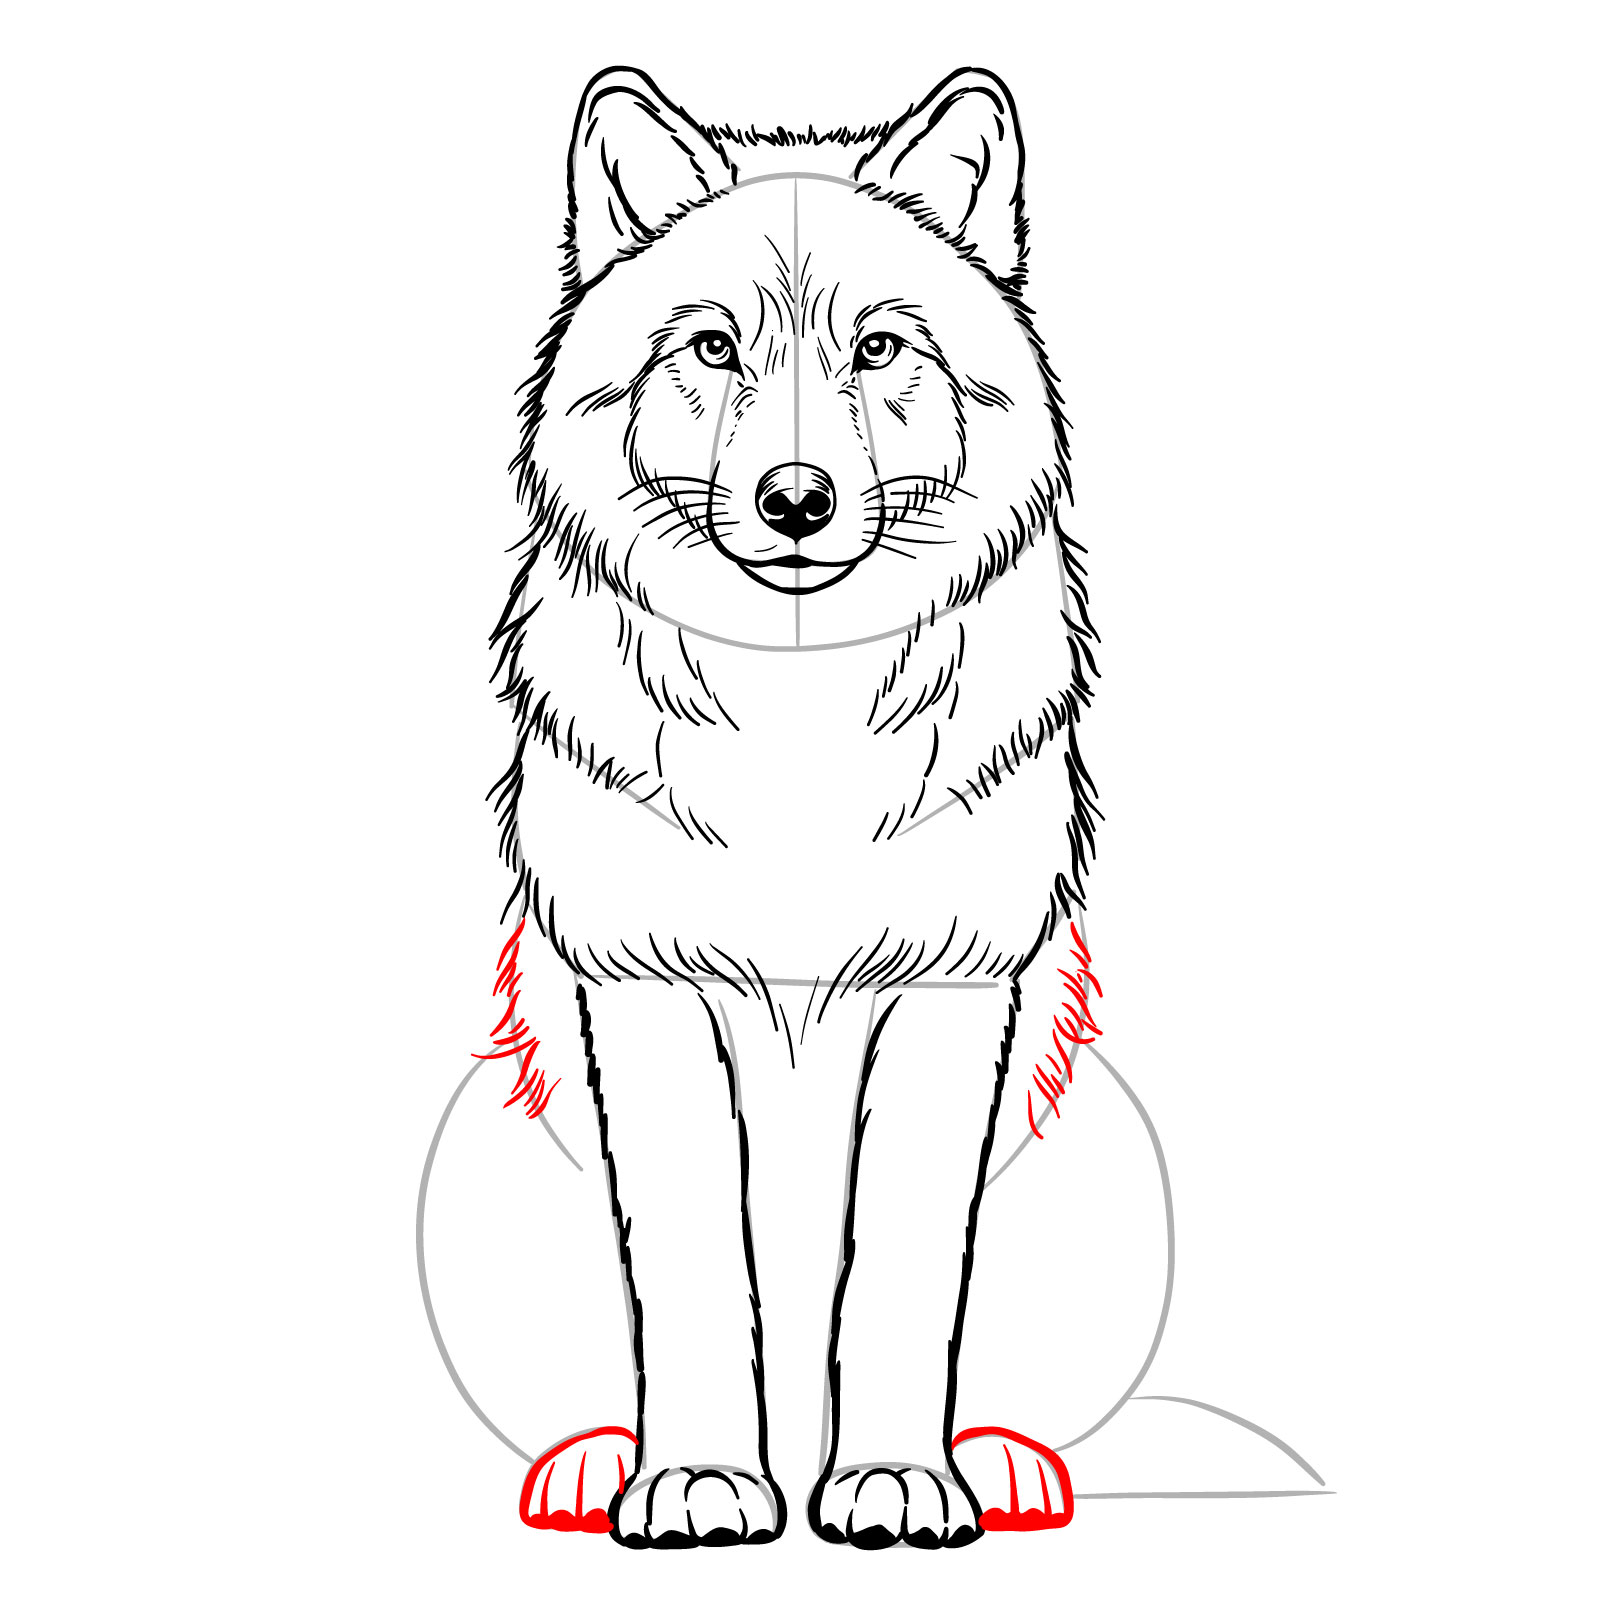
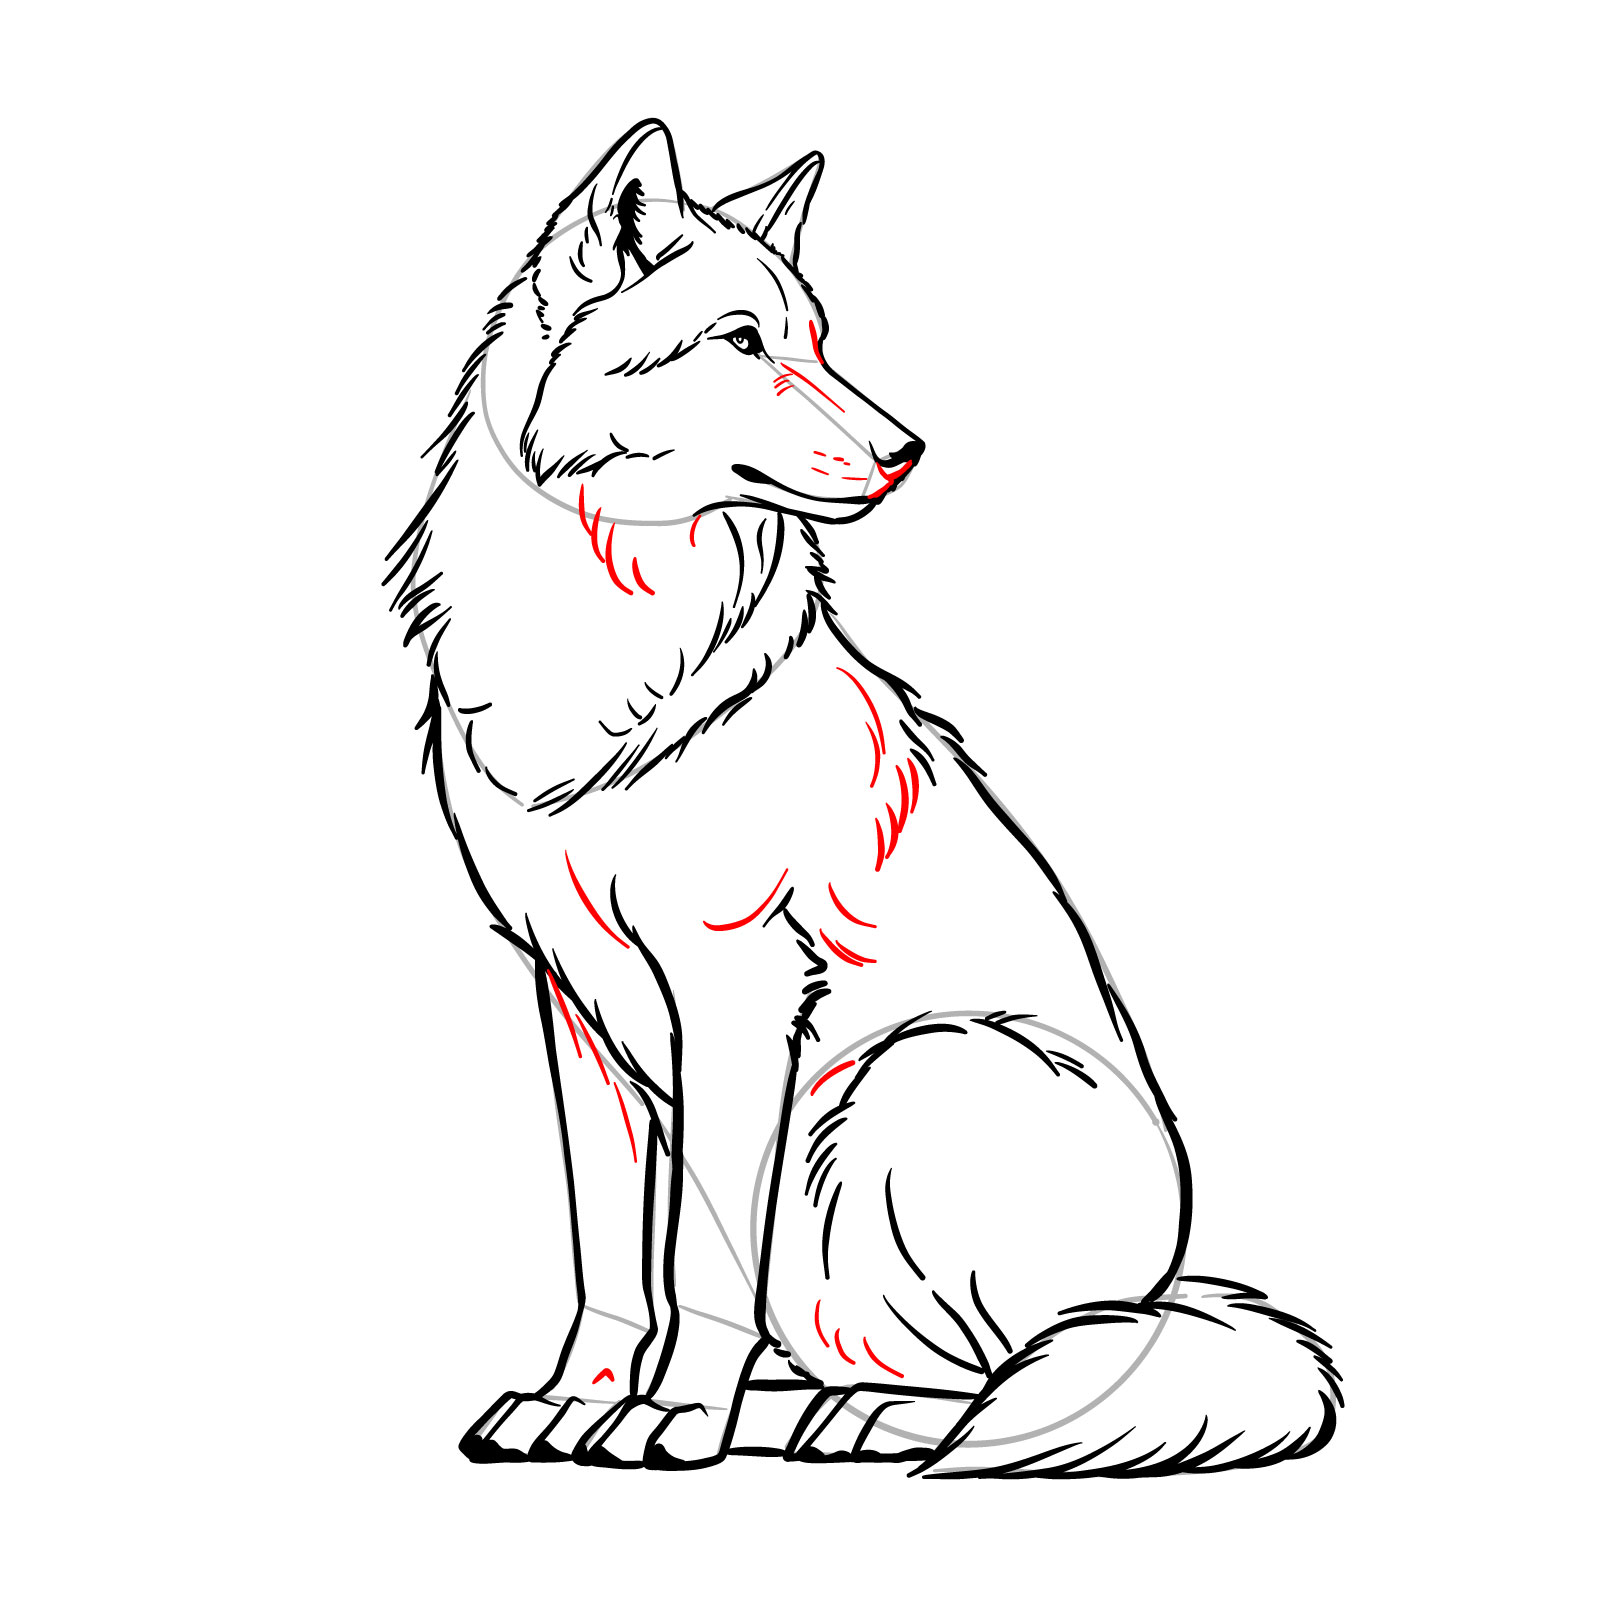
Step 14 – Illustrate the rear paws with attention to the pads. Then, add short fur strokes on the visible parts of the body
PinSketching the rear paws and adding body fur details
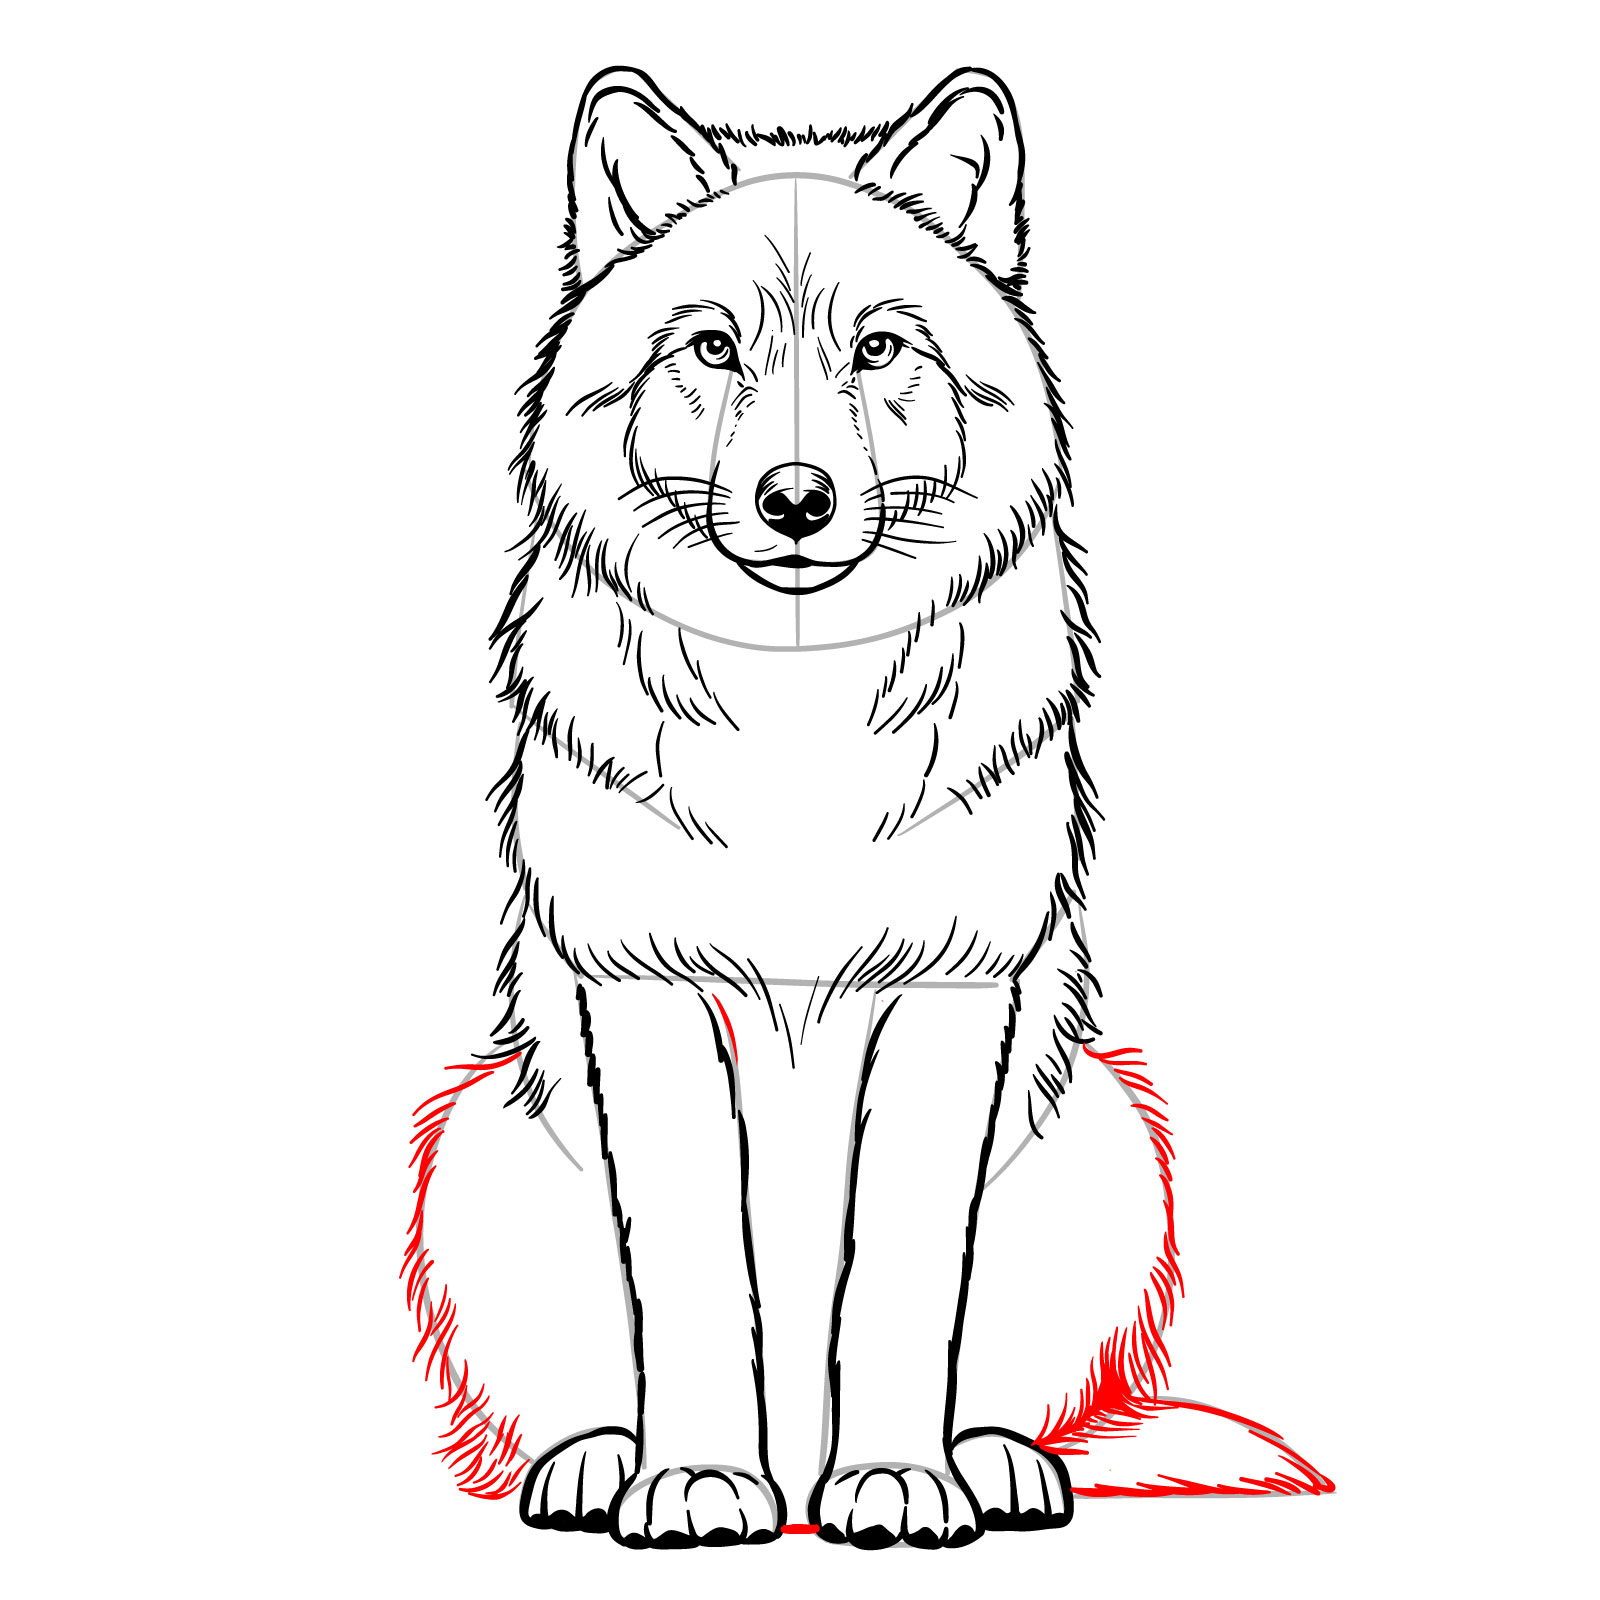
Step 15 – Create the fur outline on the rear legs to depict the sitting position, ensuring that the fur follows the contours of the legs. Extend the fur strokes onto the tail to give it a full and bushy look
PinOutlining the fur on the rear legs and tail
Step 16 – To complete this guide on how to draw a sitting wolf, carefully erase all the base sketches and any unnecessary marks. If you wish to finalize your drawing, go over it with ink or a darker tool to accentuate the lines and bring out the details, ensuring your sitting wolf illustration is clear and defined
PinThe completed sitting wolf drawing ready for inking
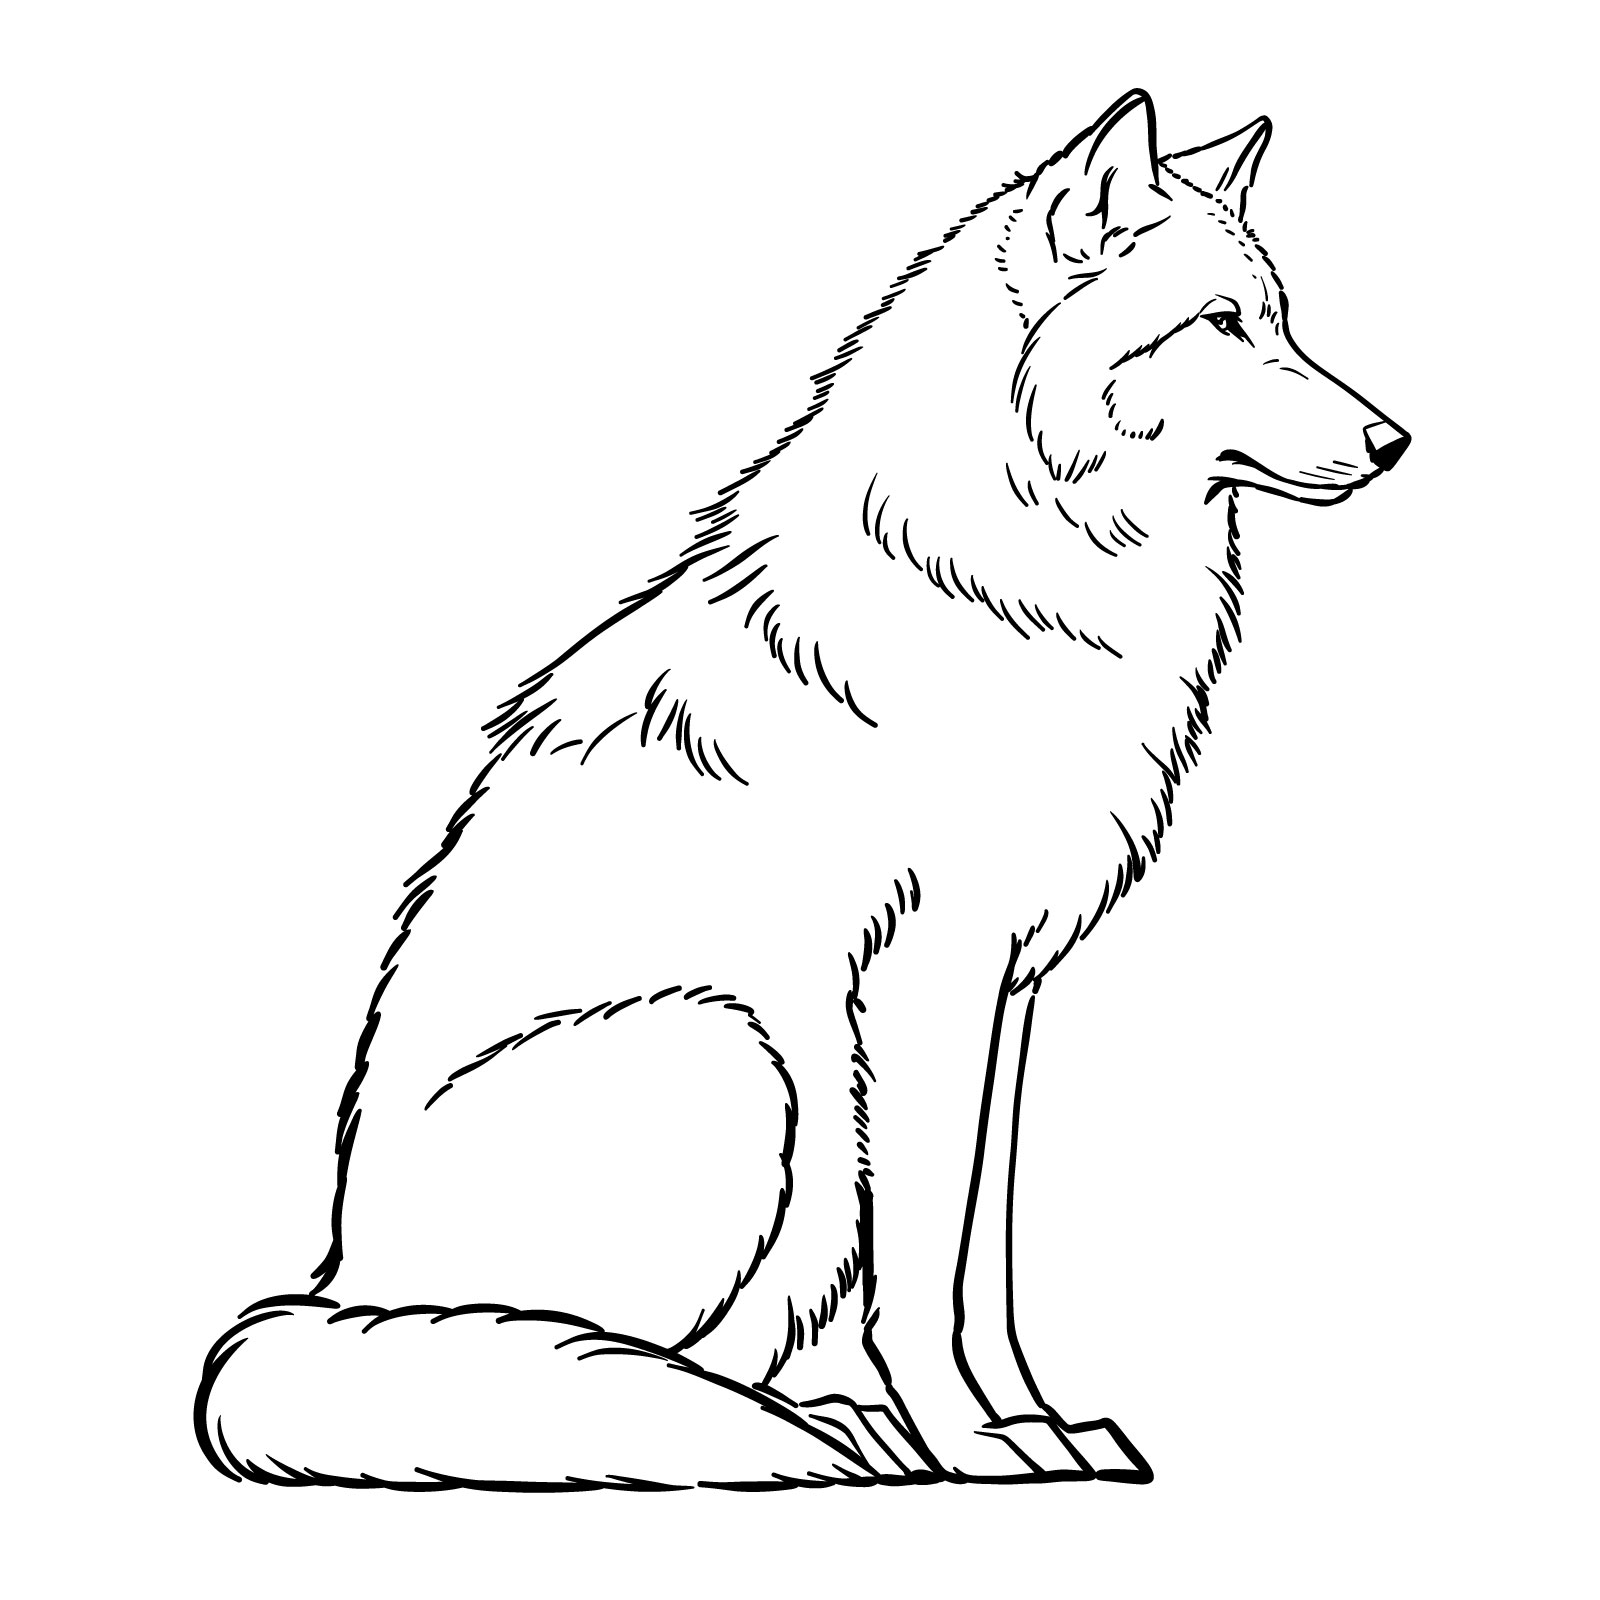
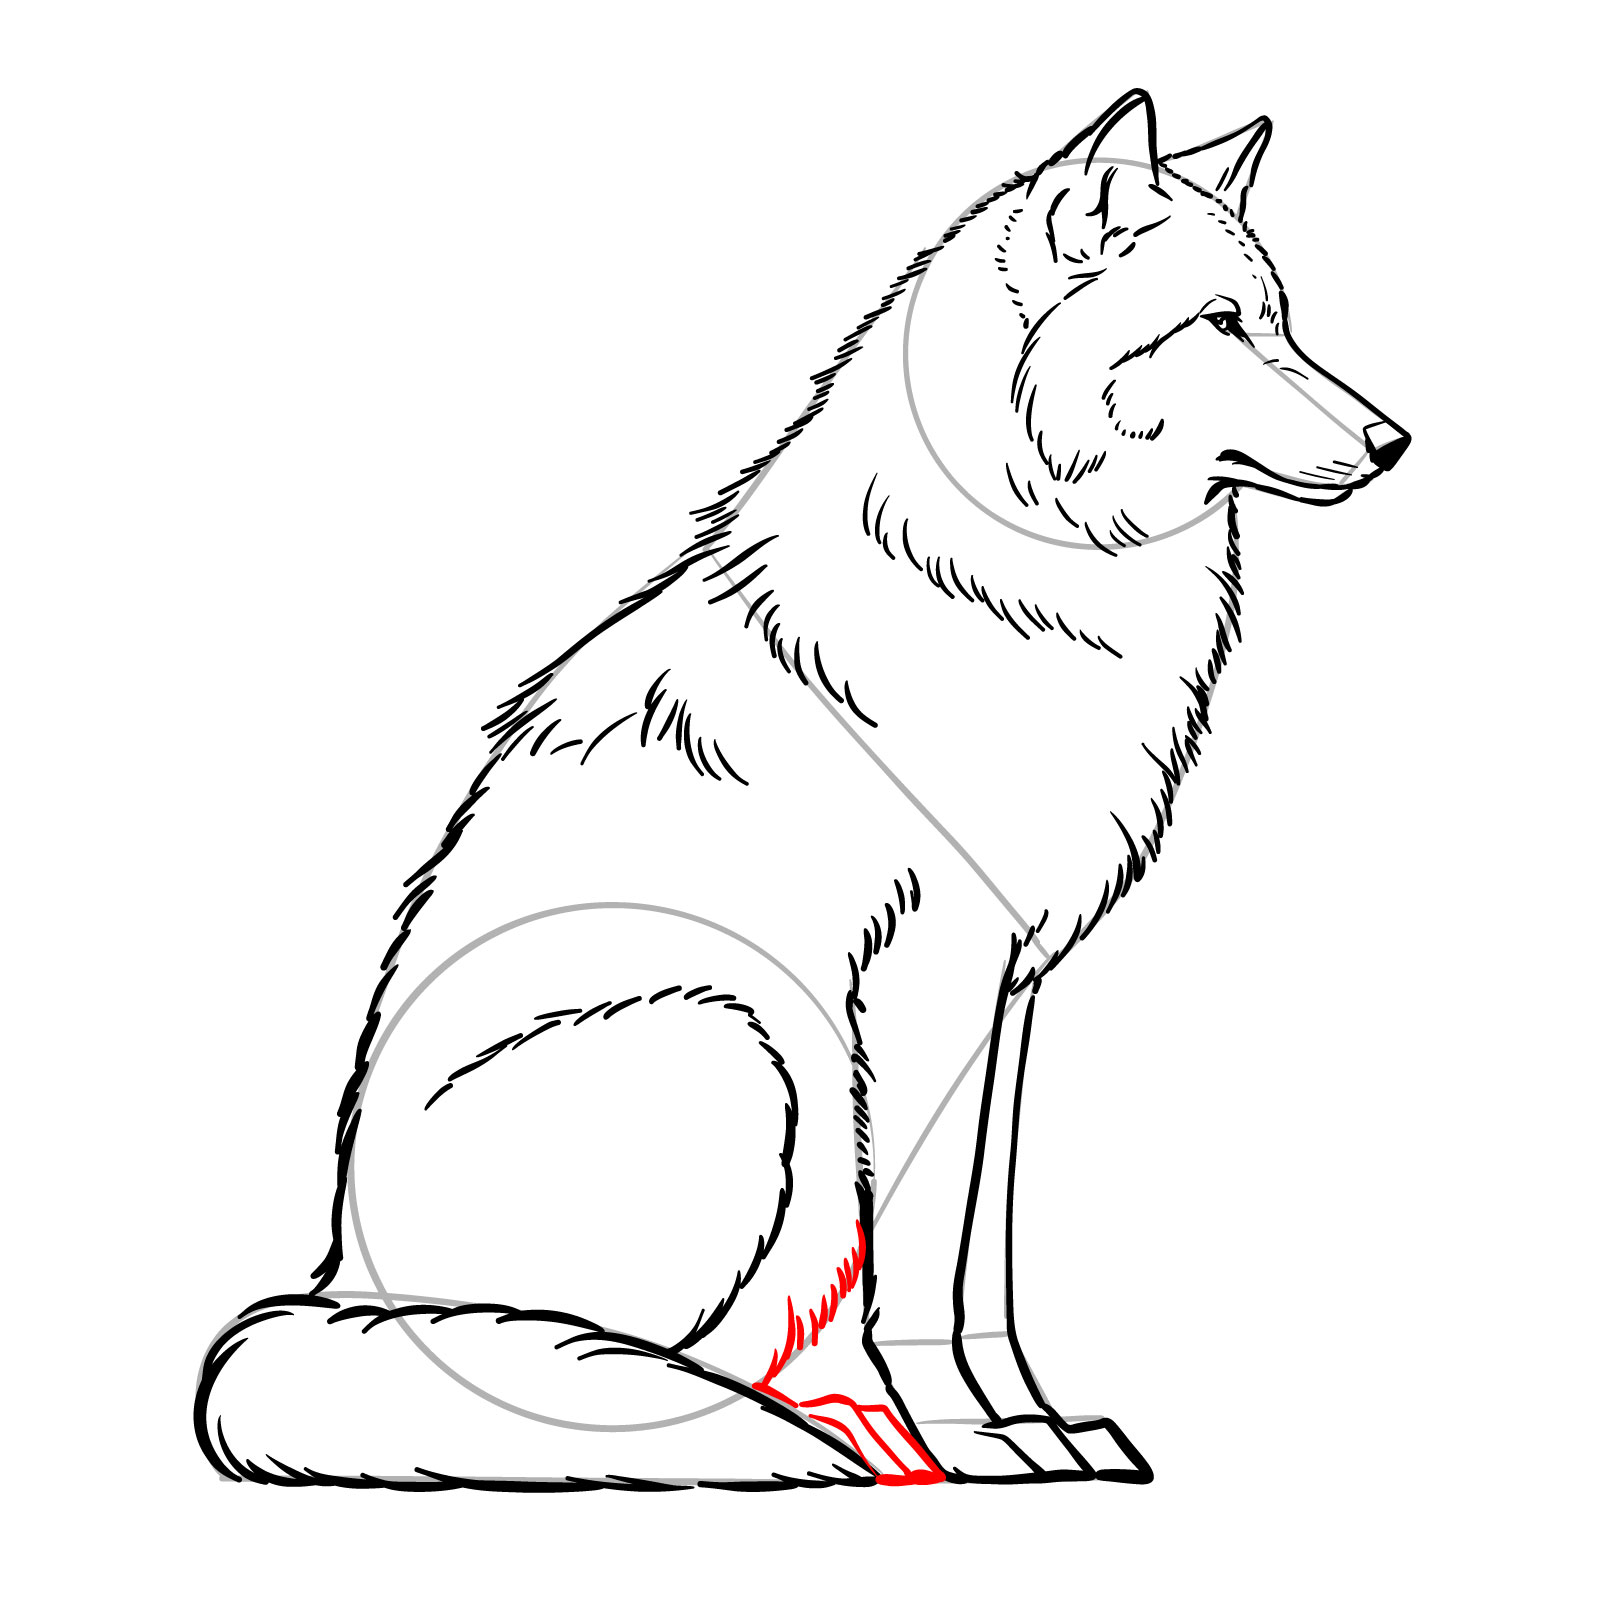
Drawing a Sitting Wolf (Side View) in 15 Steps
PinHow to draw a sitting wolf side view
Oh! We made it to the tenth guide of the series. This time we’ll focus on the side profile of a sitting wolf. This instructional pathway unfolds in 15 steps, beginning with a couple of initial sketches that form the foundational pose of our subject. The basic sketch is essential for mapping out the wolf’s relaxed posture and its distinctive silhouette. As you follow through the steps, you will layer in the intricate details of the wolf’s fur, the poise of its head, and the thoughtful gaze that reflects its quiet awareness.
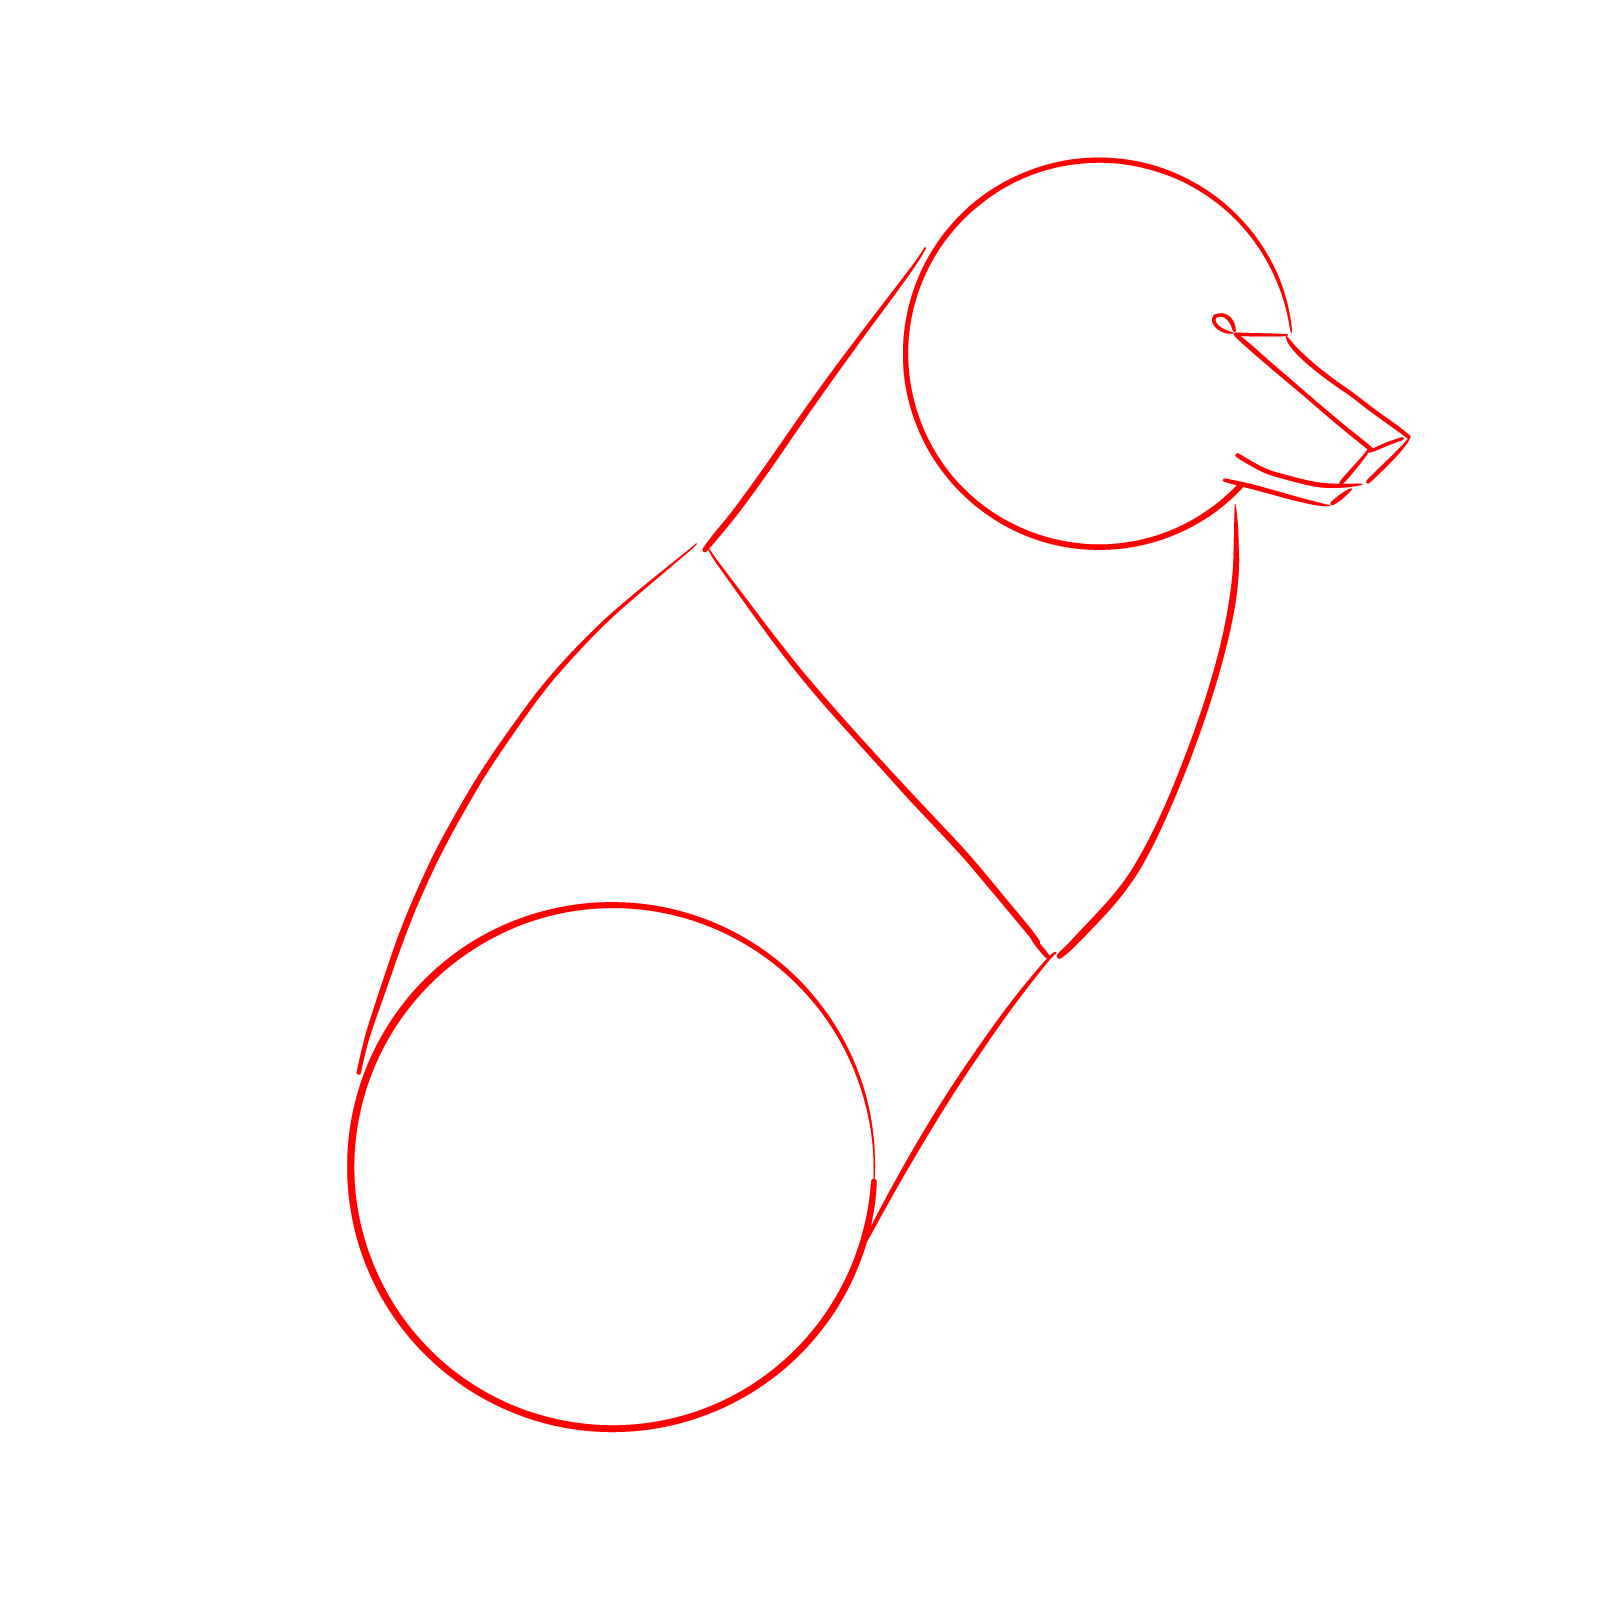
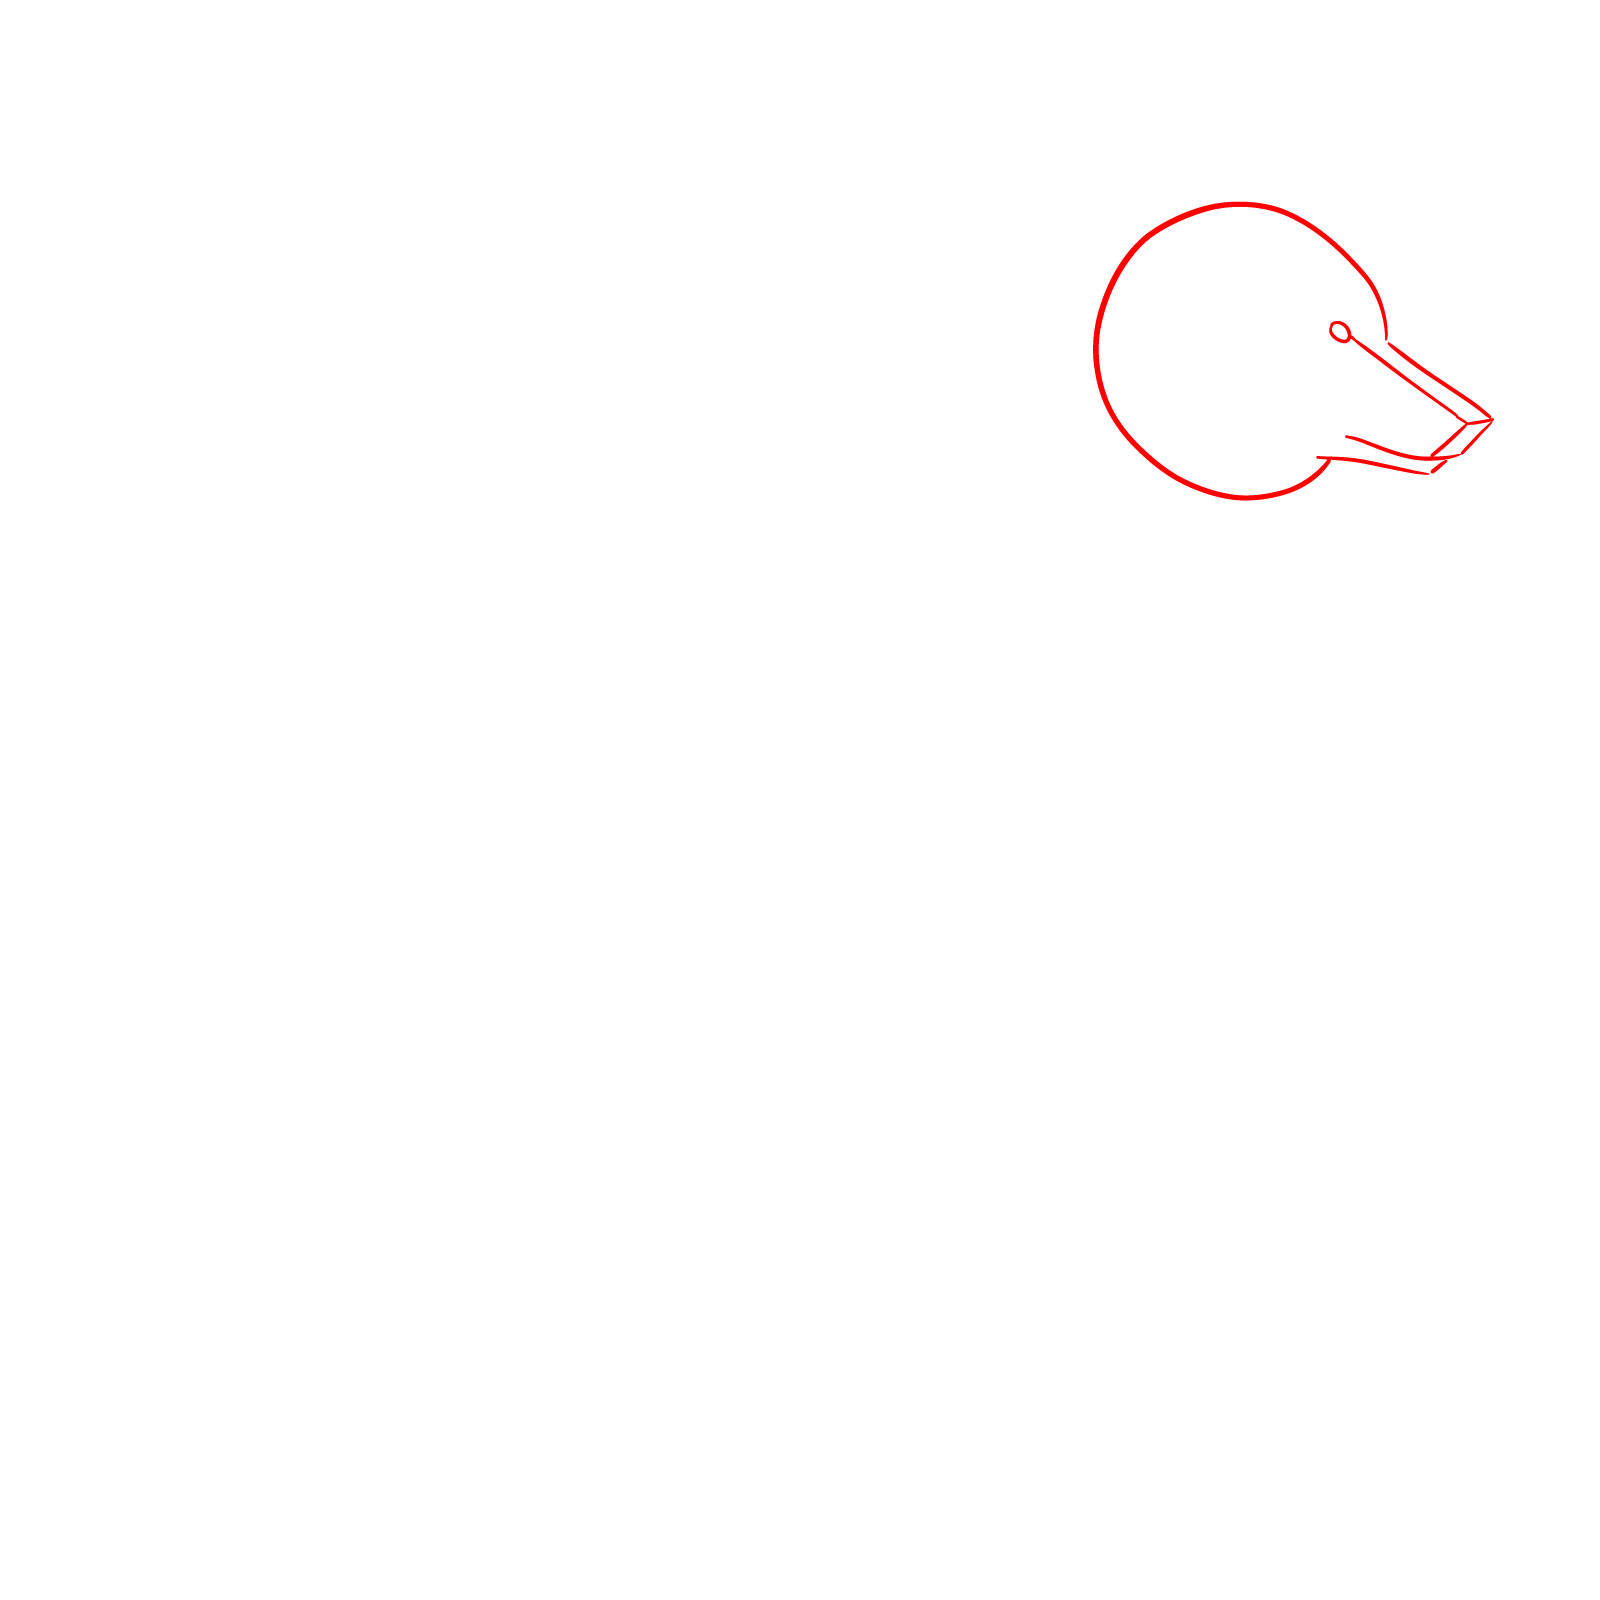
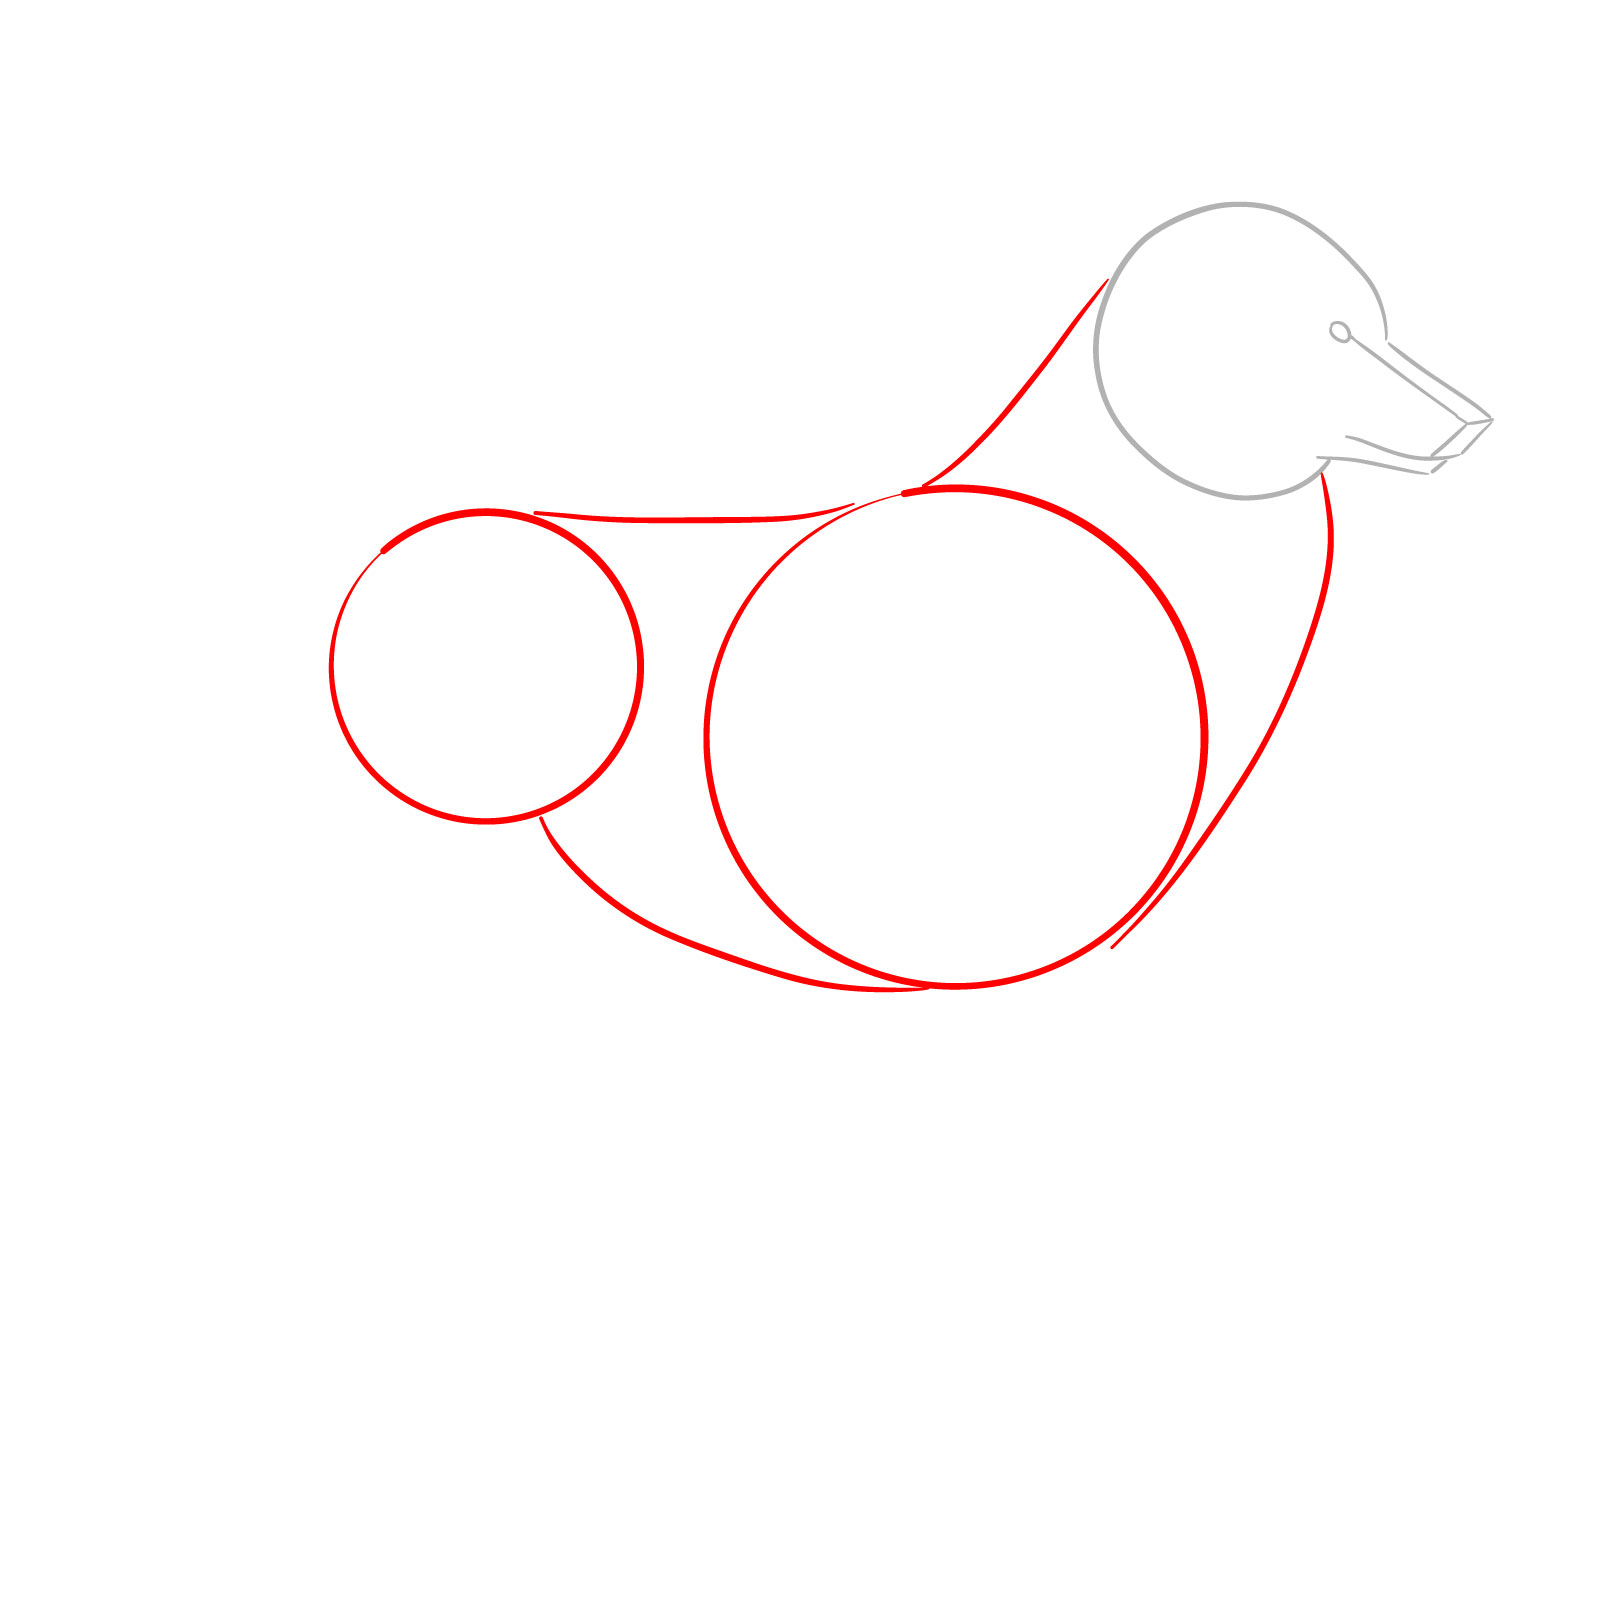
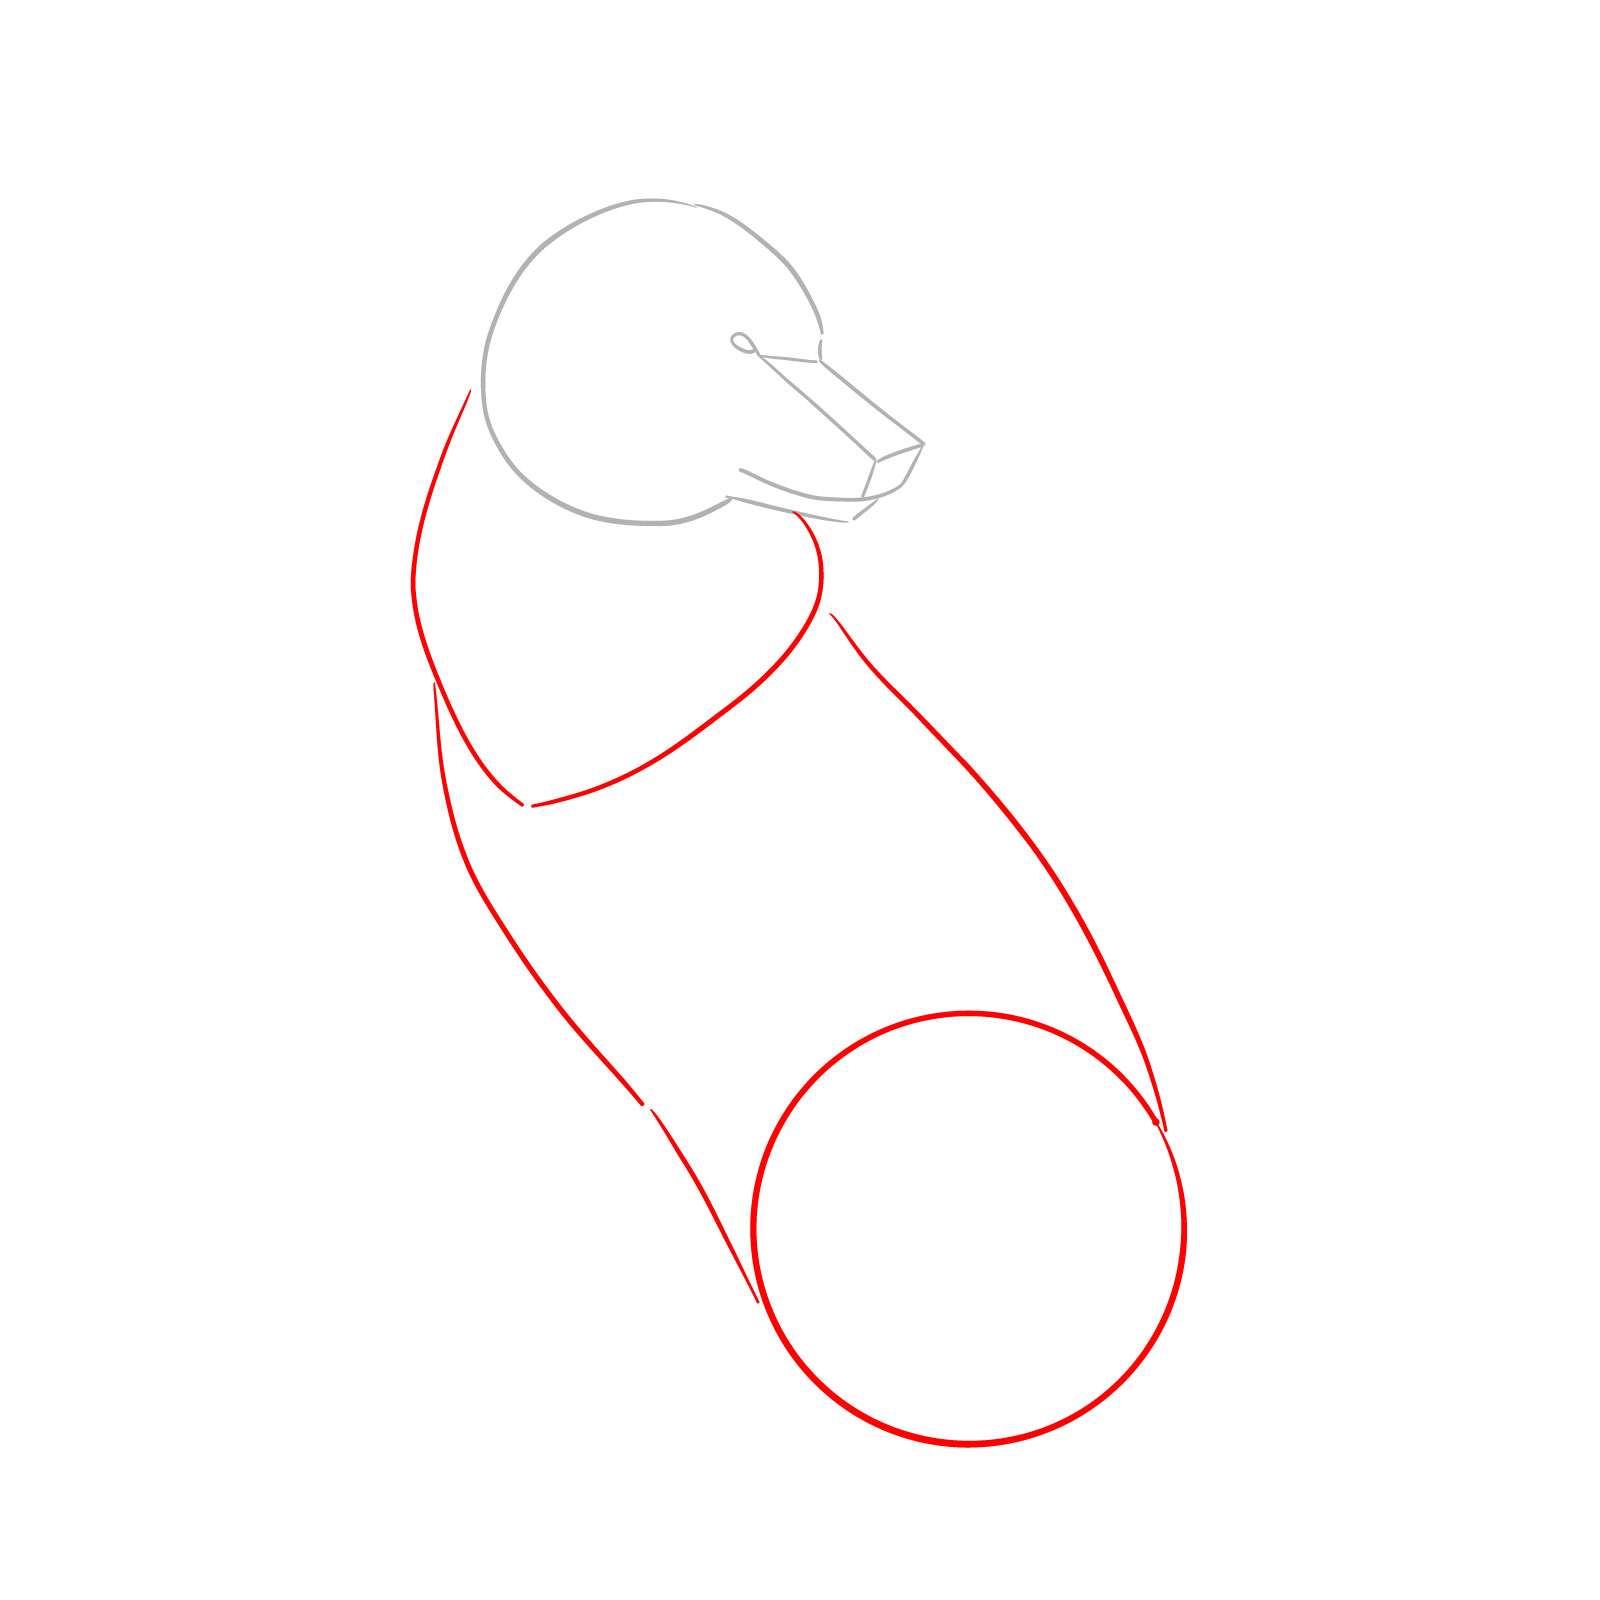
Step 01 – Start your drawing with a circle for the head and a larger circle for the bottom body, try to capture the basic shape of the body between the circles like it is shown in the image. For the snout, draw a long rectangle bent in a perspective of our view, draw a square-like shape for the front part, a curve for the mouth line, and a simple shape for the bottom part. Place an oval or an almond-like shape for the eye on the left angle of the top rectangle – almost like we did with the ‘U’ shapes above
PinStarting with basic head and body shapes
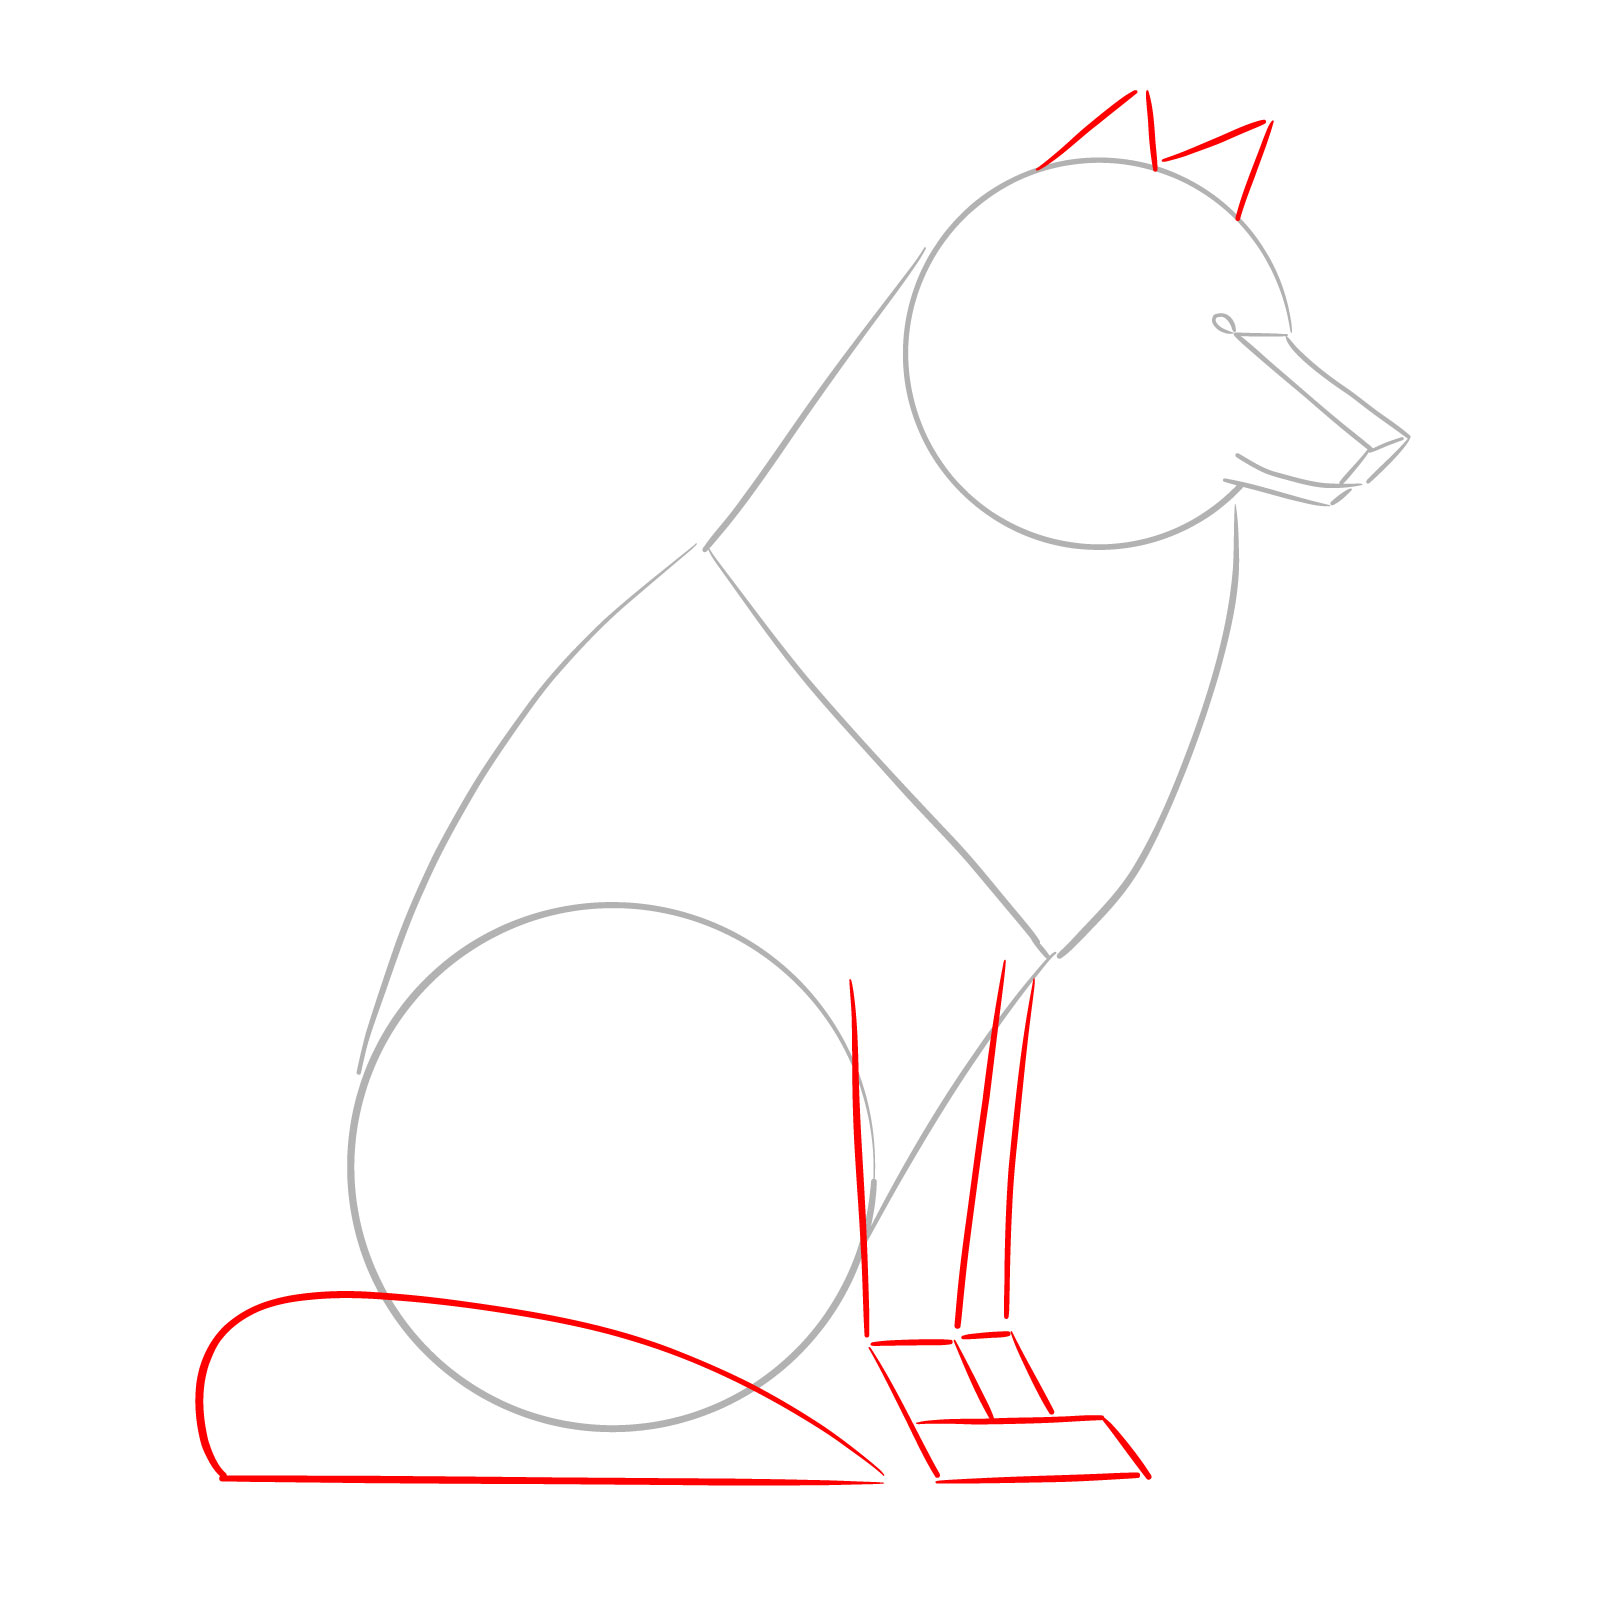
Step 02 – Sketch simple geometric shapes for the legs, ensuring they’re in the correct position for a sitting pose. Draw a triangular shape for the tail’s base, giving a rough outline of its form
PinOutlining the basic shapes for legs and tail
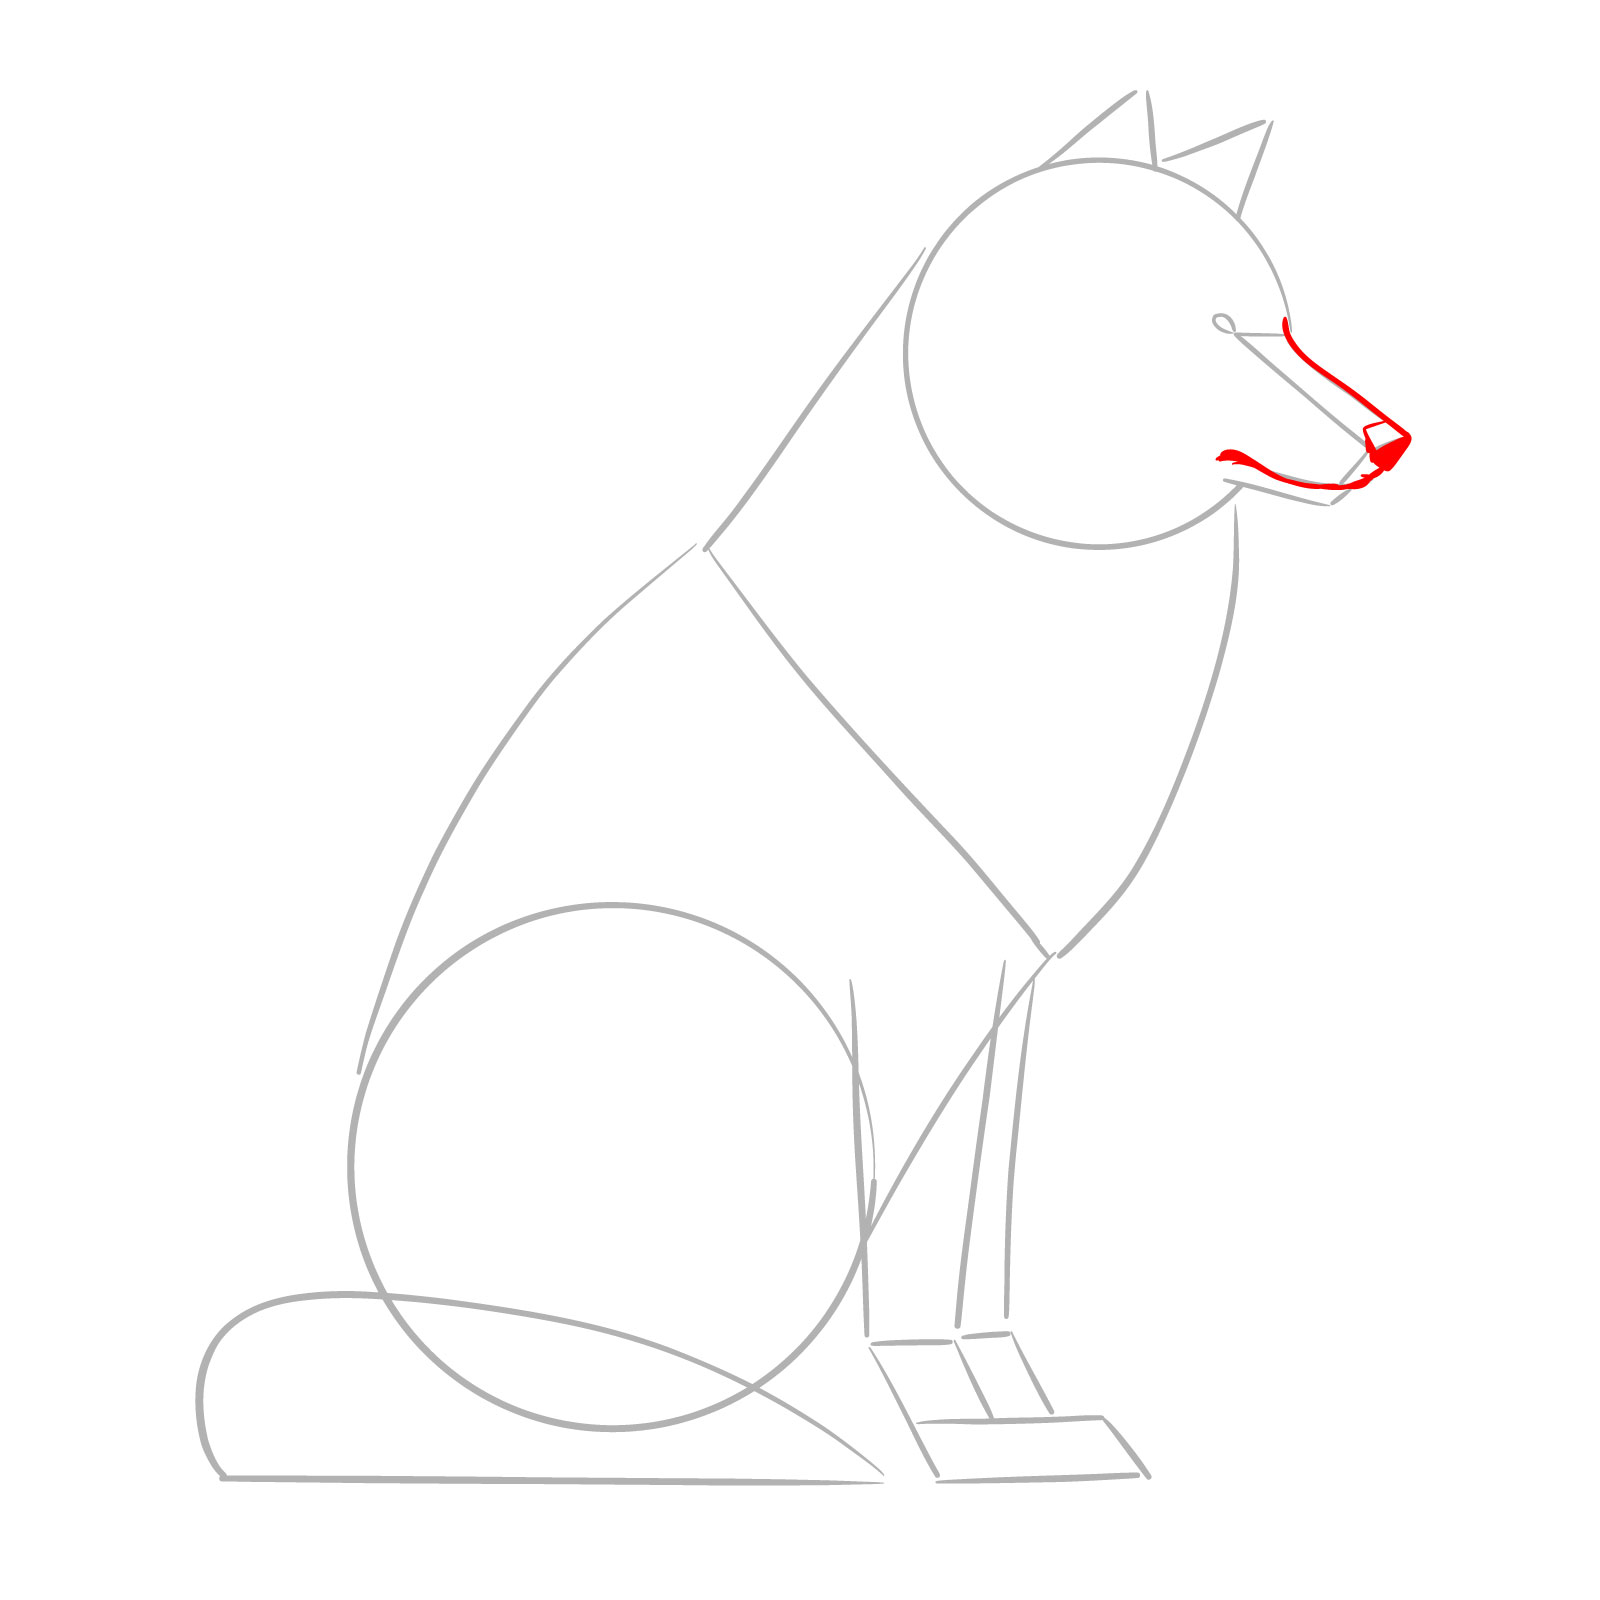
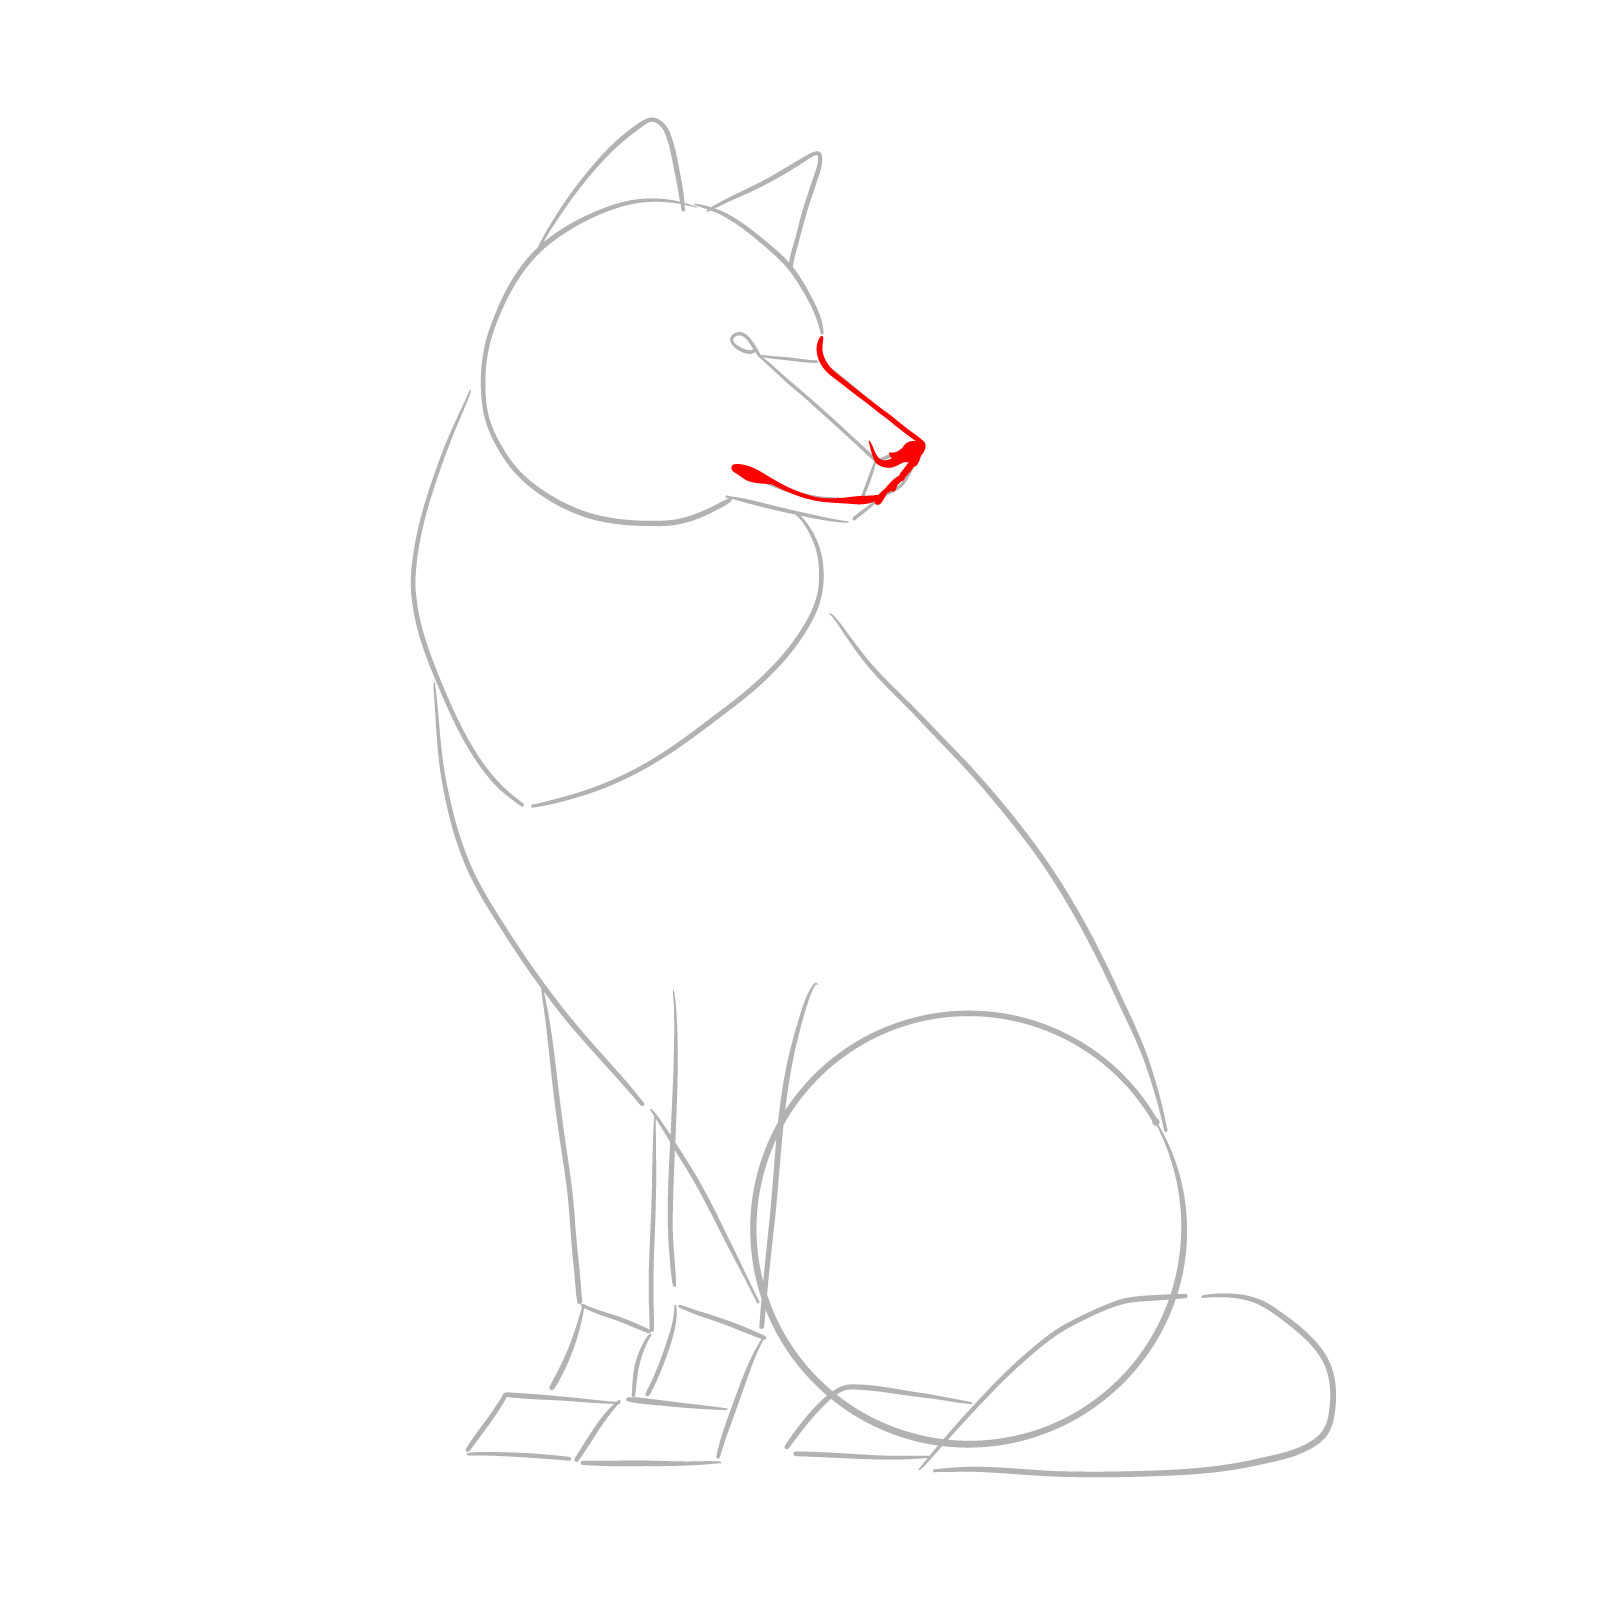
Step 03 – Define the upper part of the snout with a more detailed outline, including the nose and the line for the mouth
PinSketching the upper part of the snout, nose, and mouth of a sitting wolf
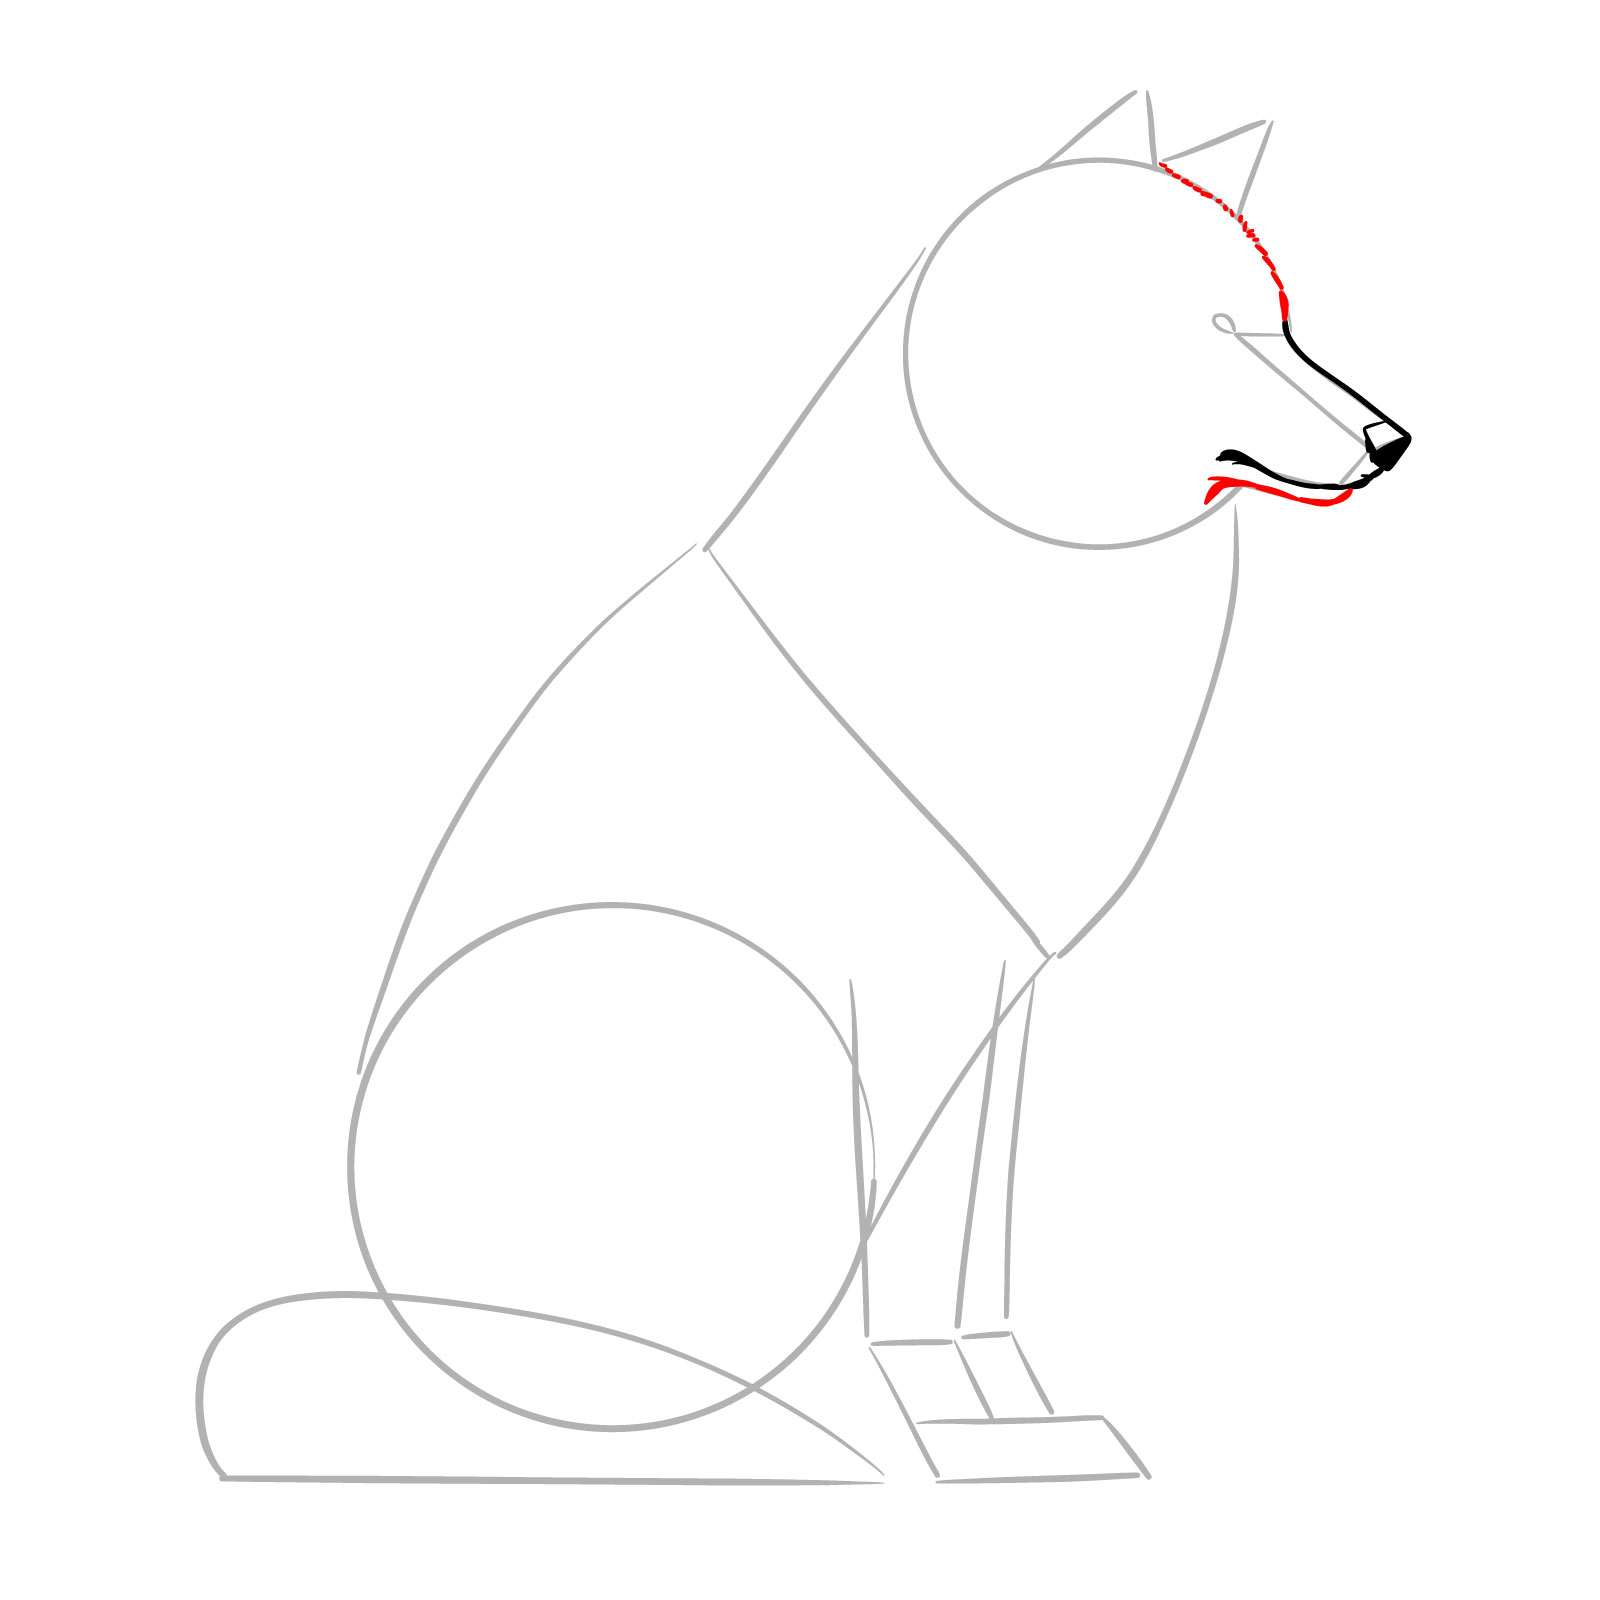
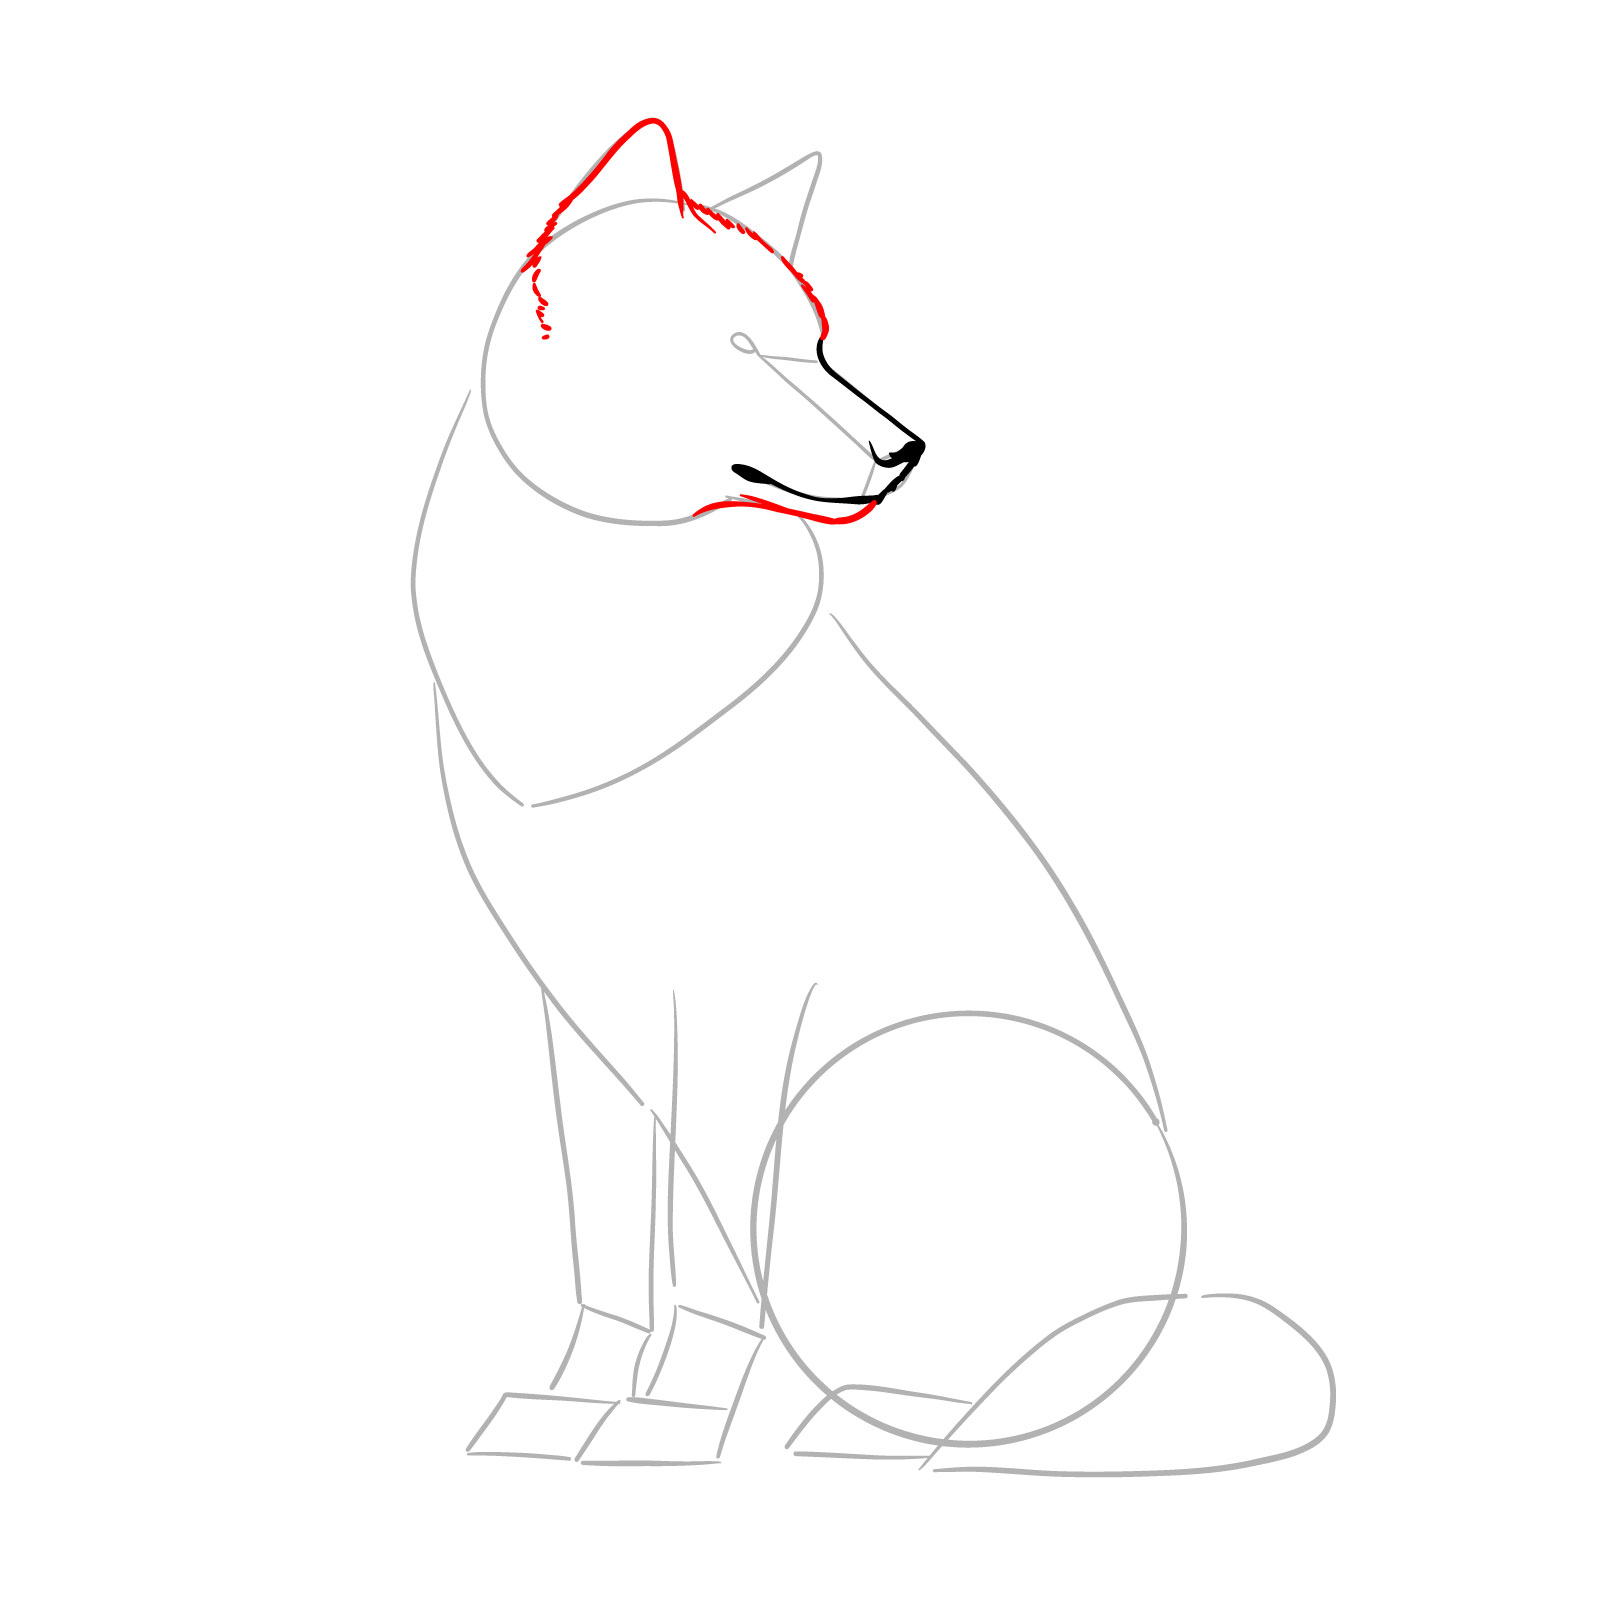
Step 04 – Use short, messy lines to replicate the fur texture on the forehead and outline the lower part of the snout. Using short messy strokes instead of smooth outlines will give your sketch a realistic touch
PinSketching the bottom snout and forehead with fur texture
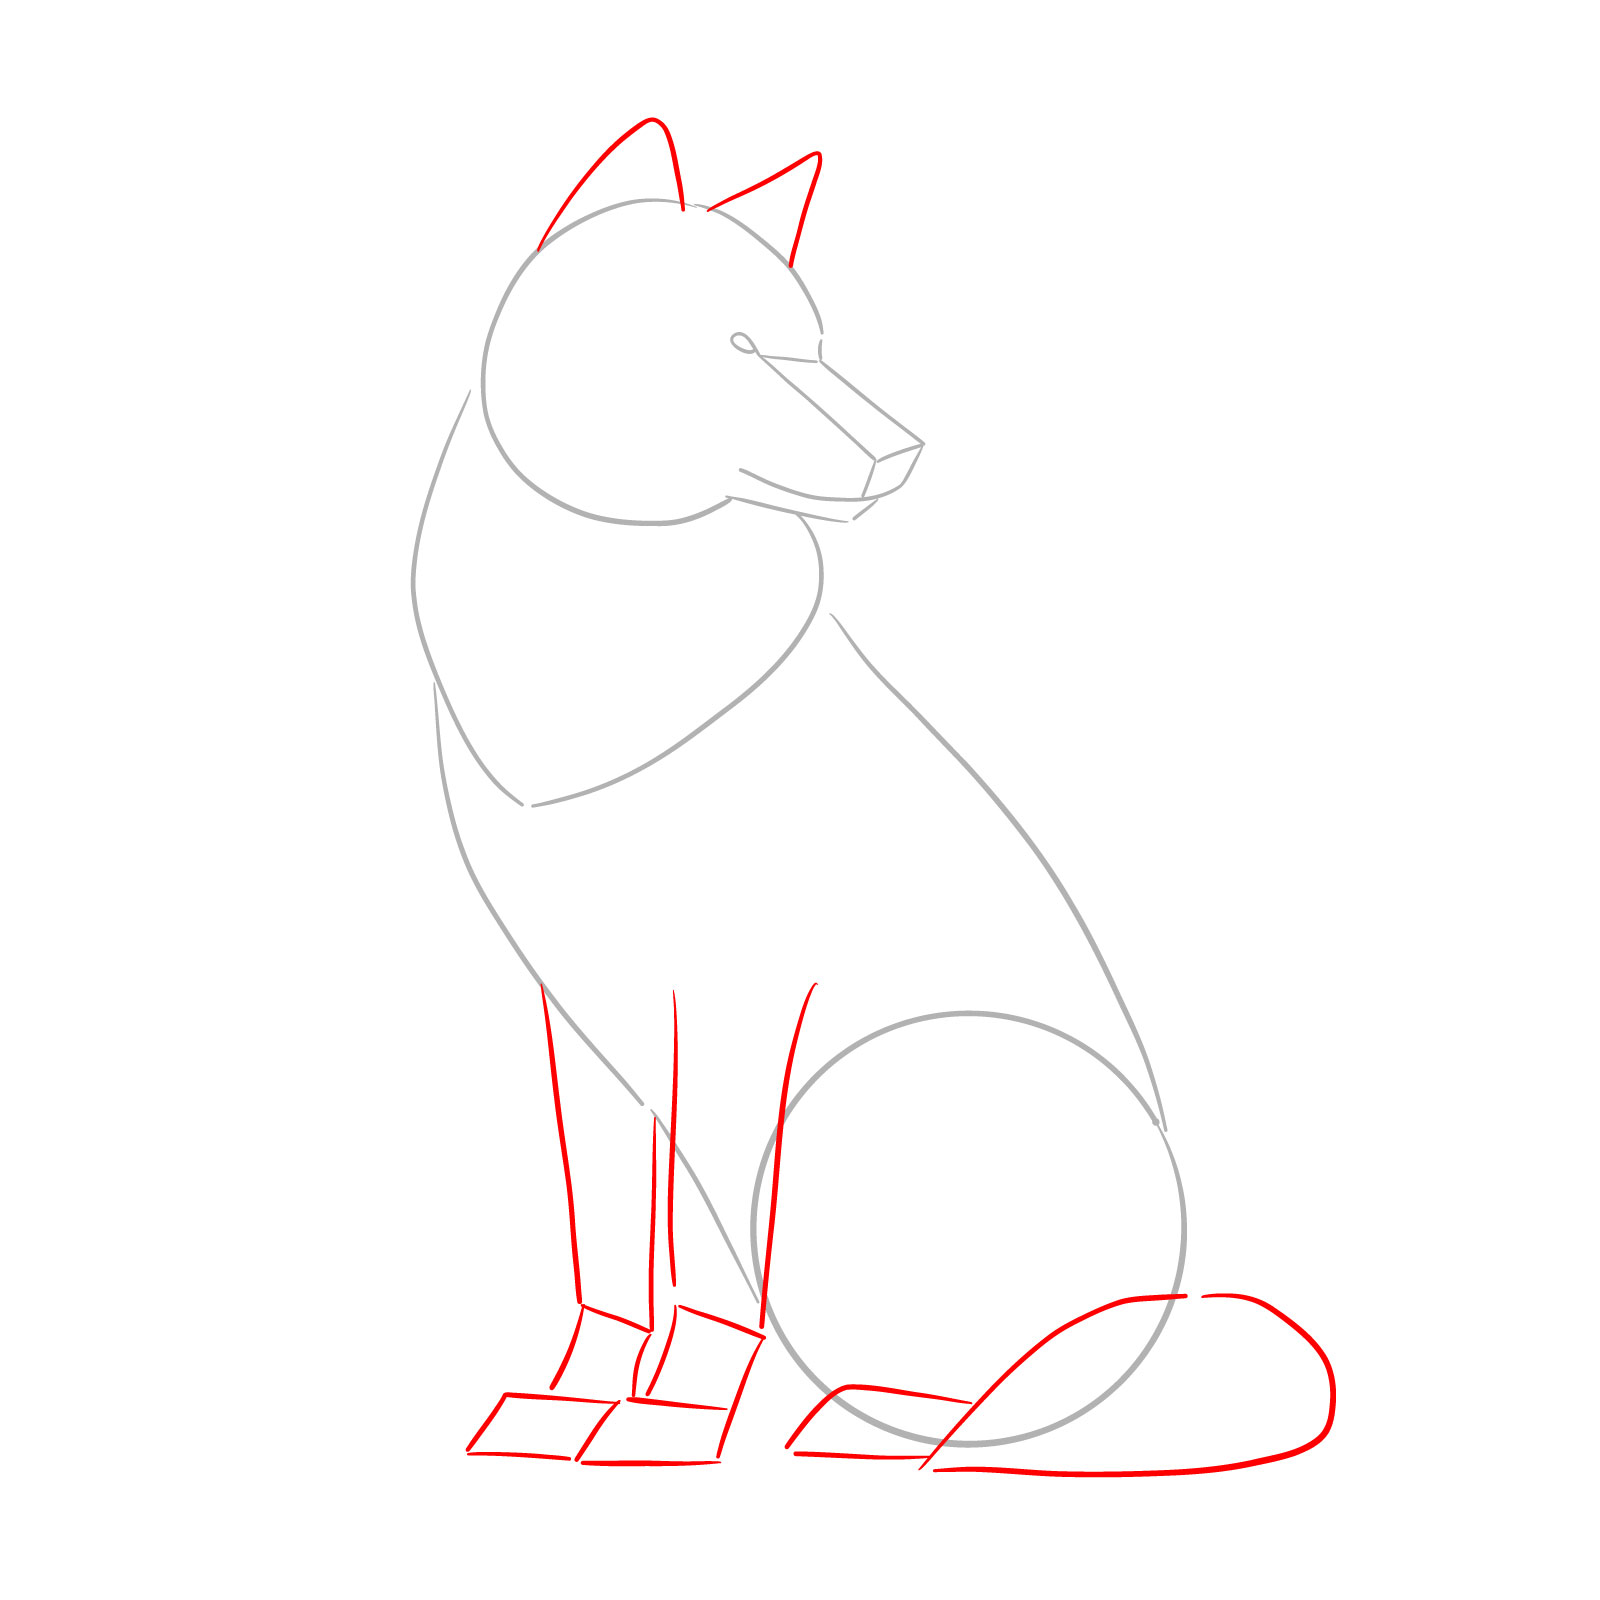
Step 05 – Sketch the ears on the top of the wolf’s head, using pointed triangular shapes to represent the alert and perky nature of the wolf’s ears
PinDrawing the ears
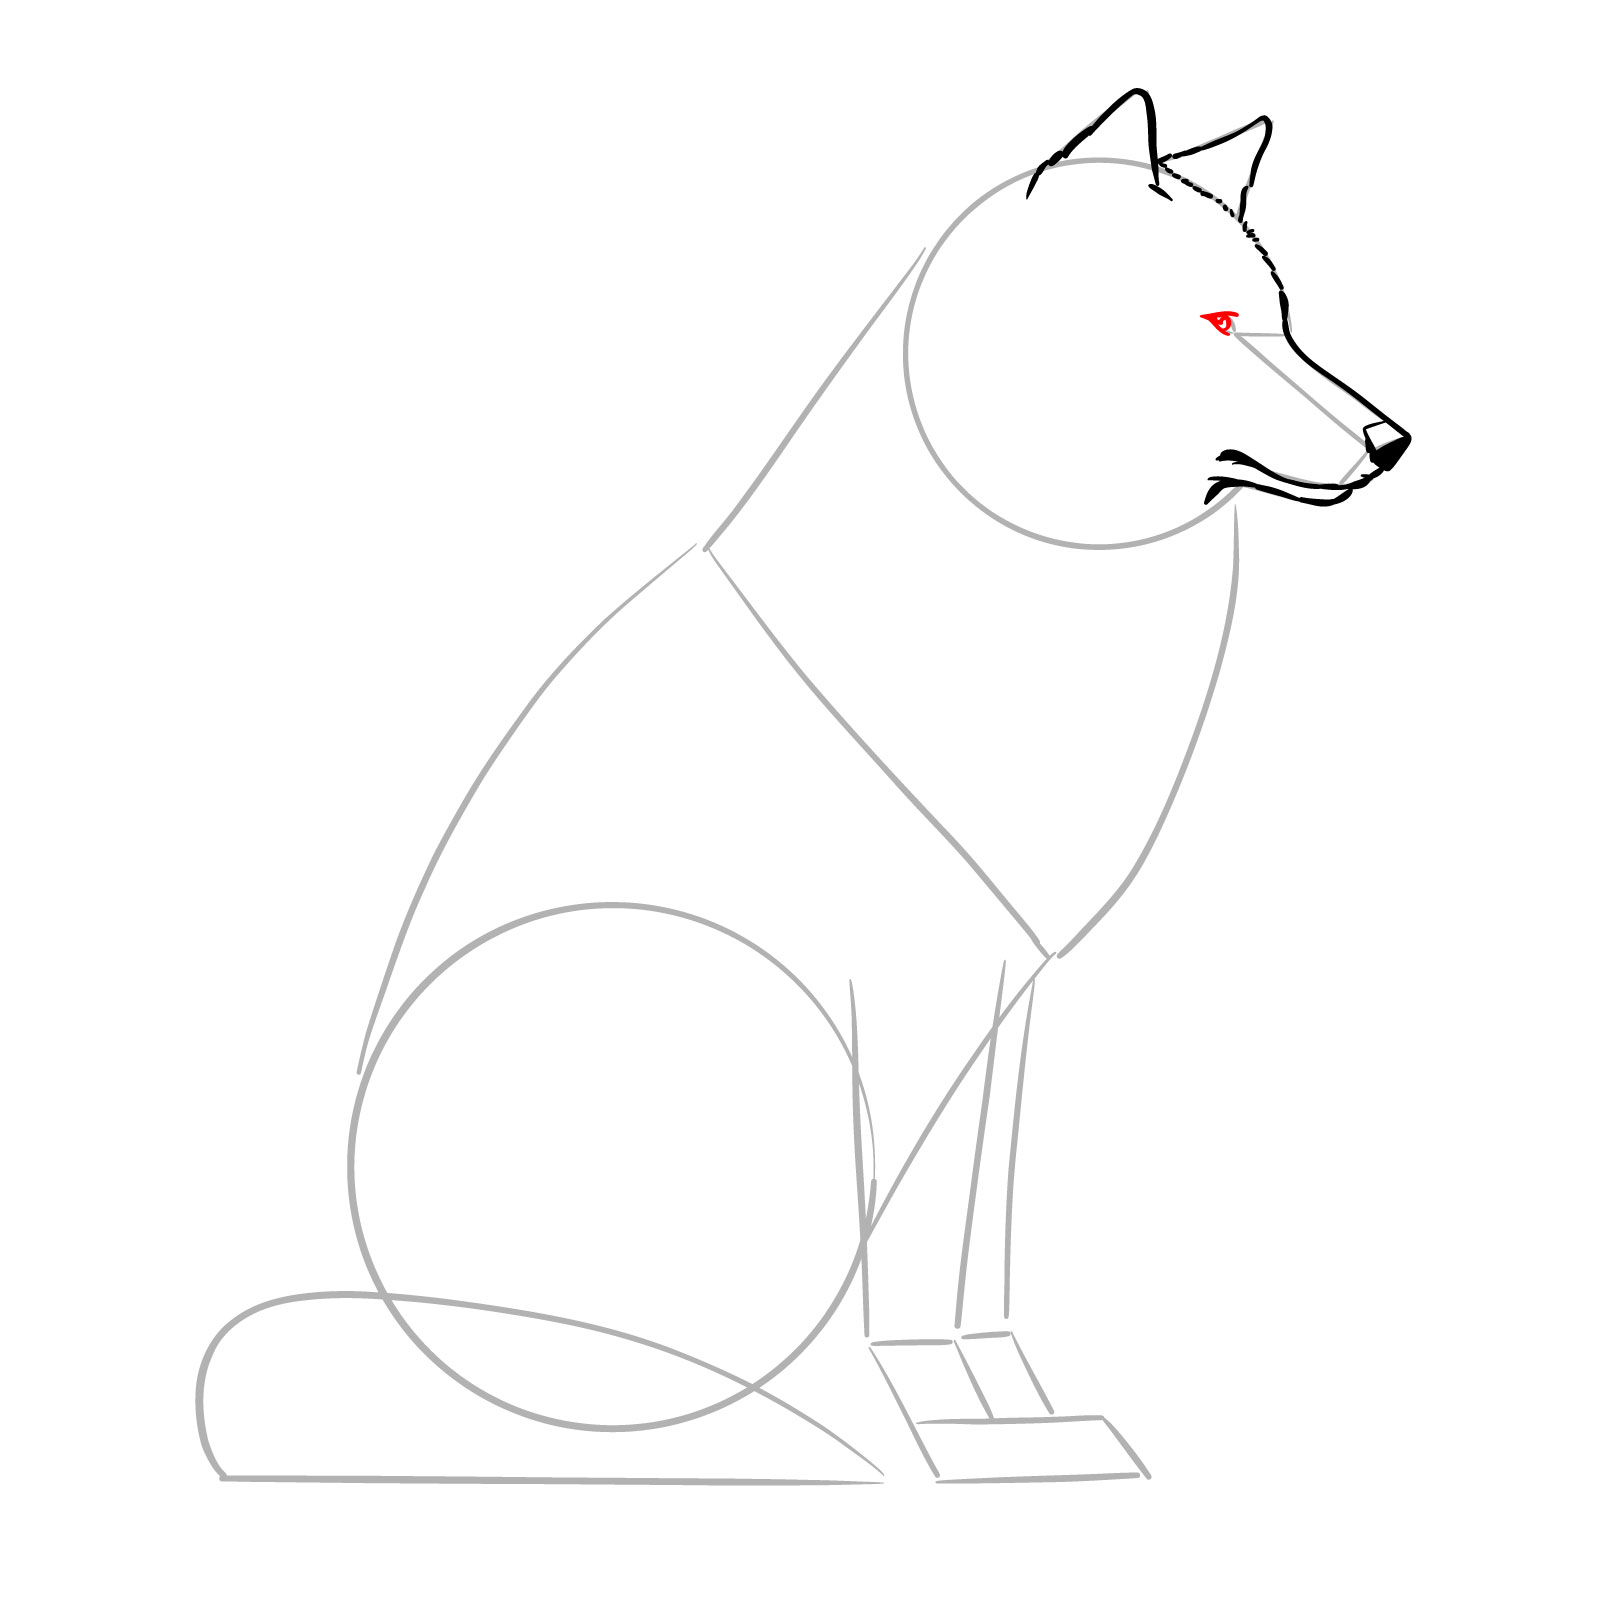
Step 06 – For this step, add the eye to your sitting wolf drawing, making sure it’s the correct shape and size for the wolf’s face. Position the eye carefully to give the right expression to the wolf, and leave some black space inside for the highlight
PinSketching the eye
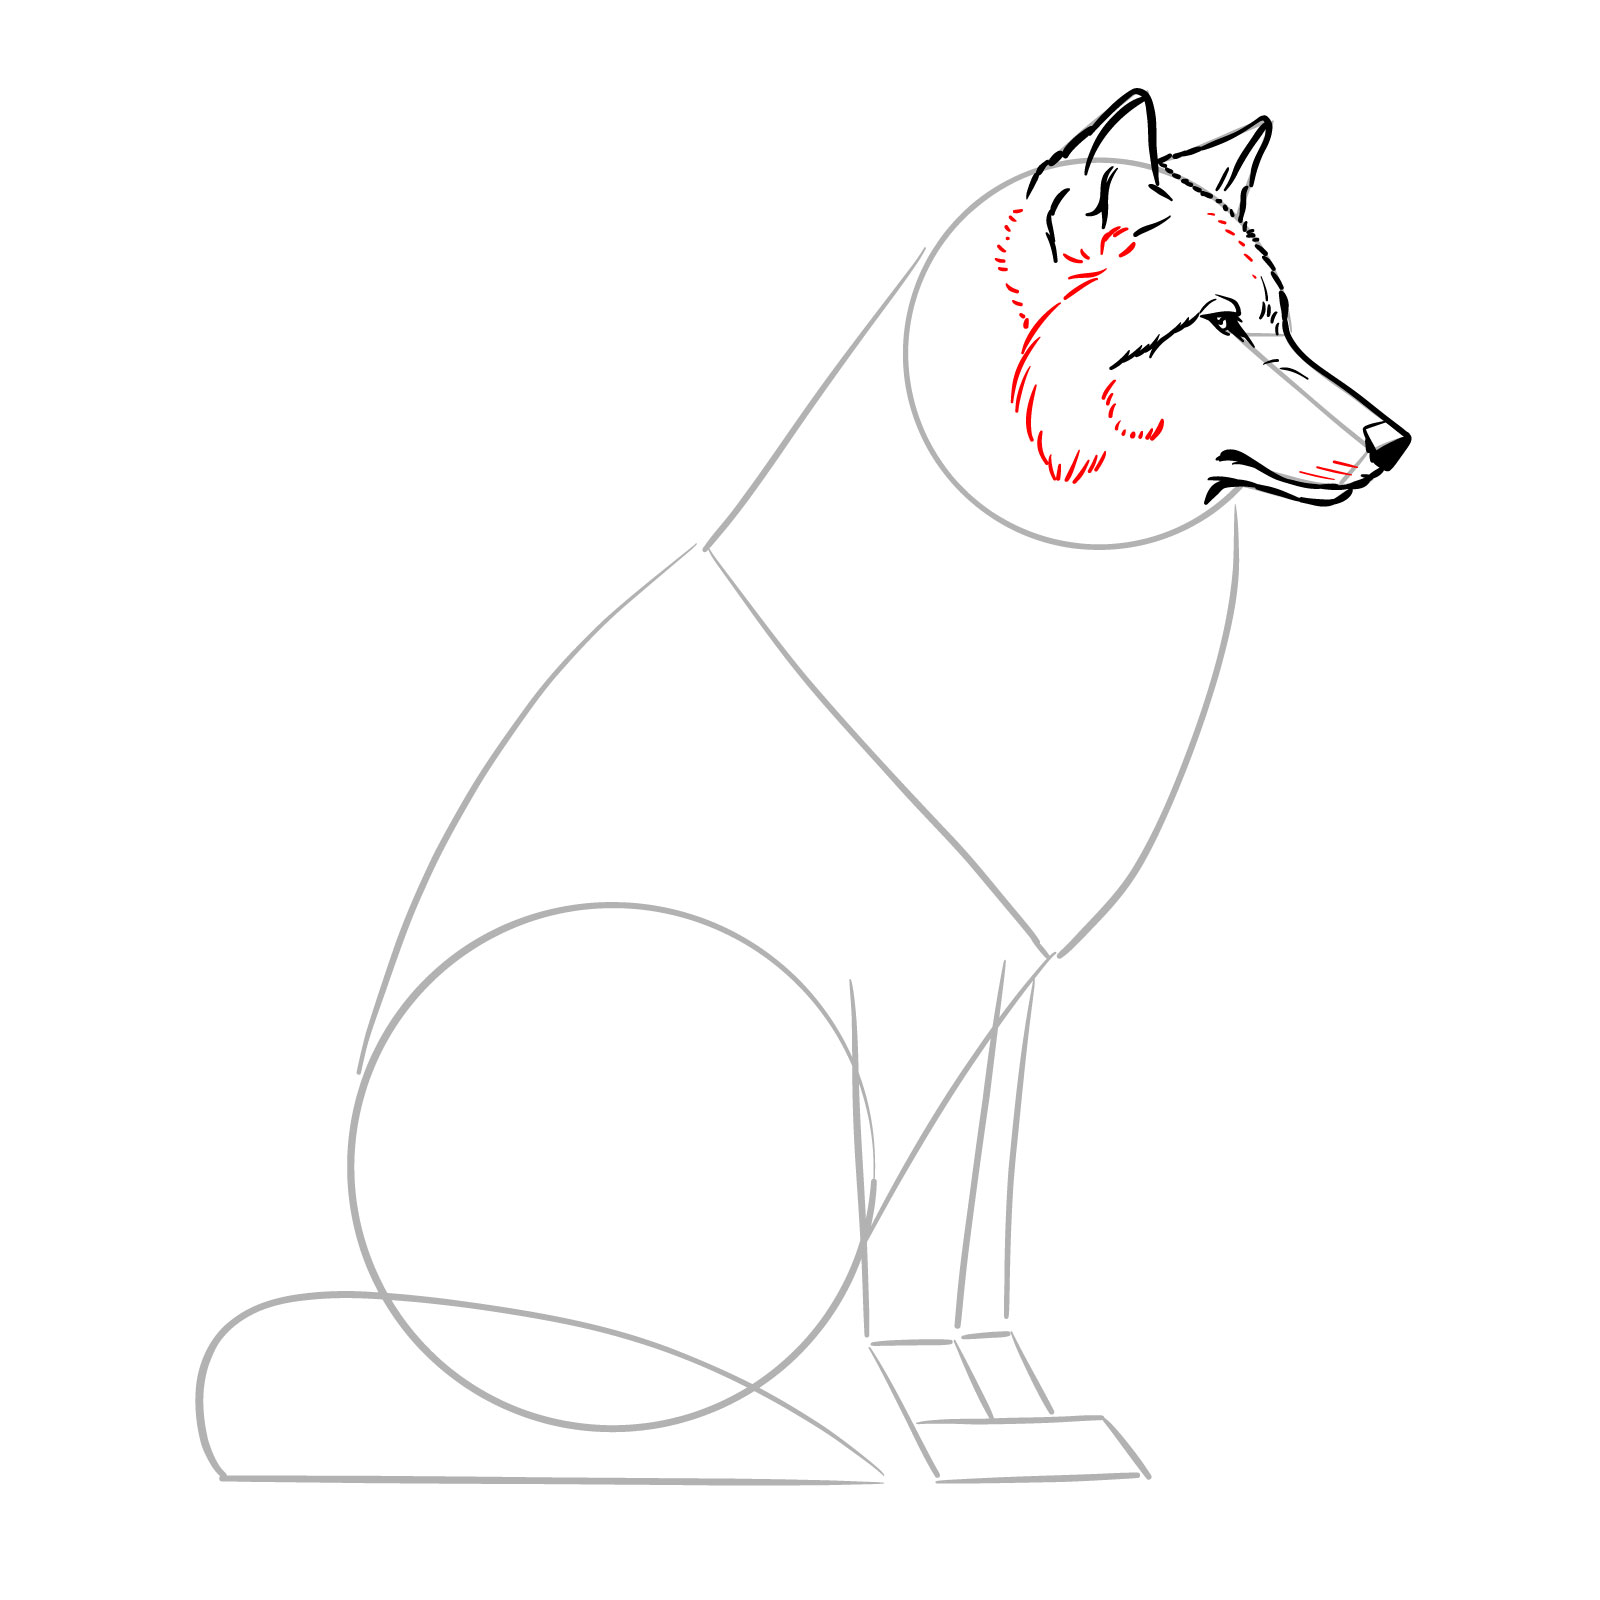
Step 07 – Now, let’s add details to the inner ear and some fur strokes around the eye
PinDetailing the inner ear and areas around the eye in a sitting wolf sketch
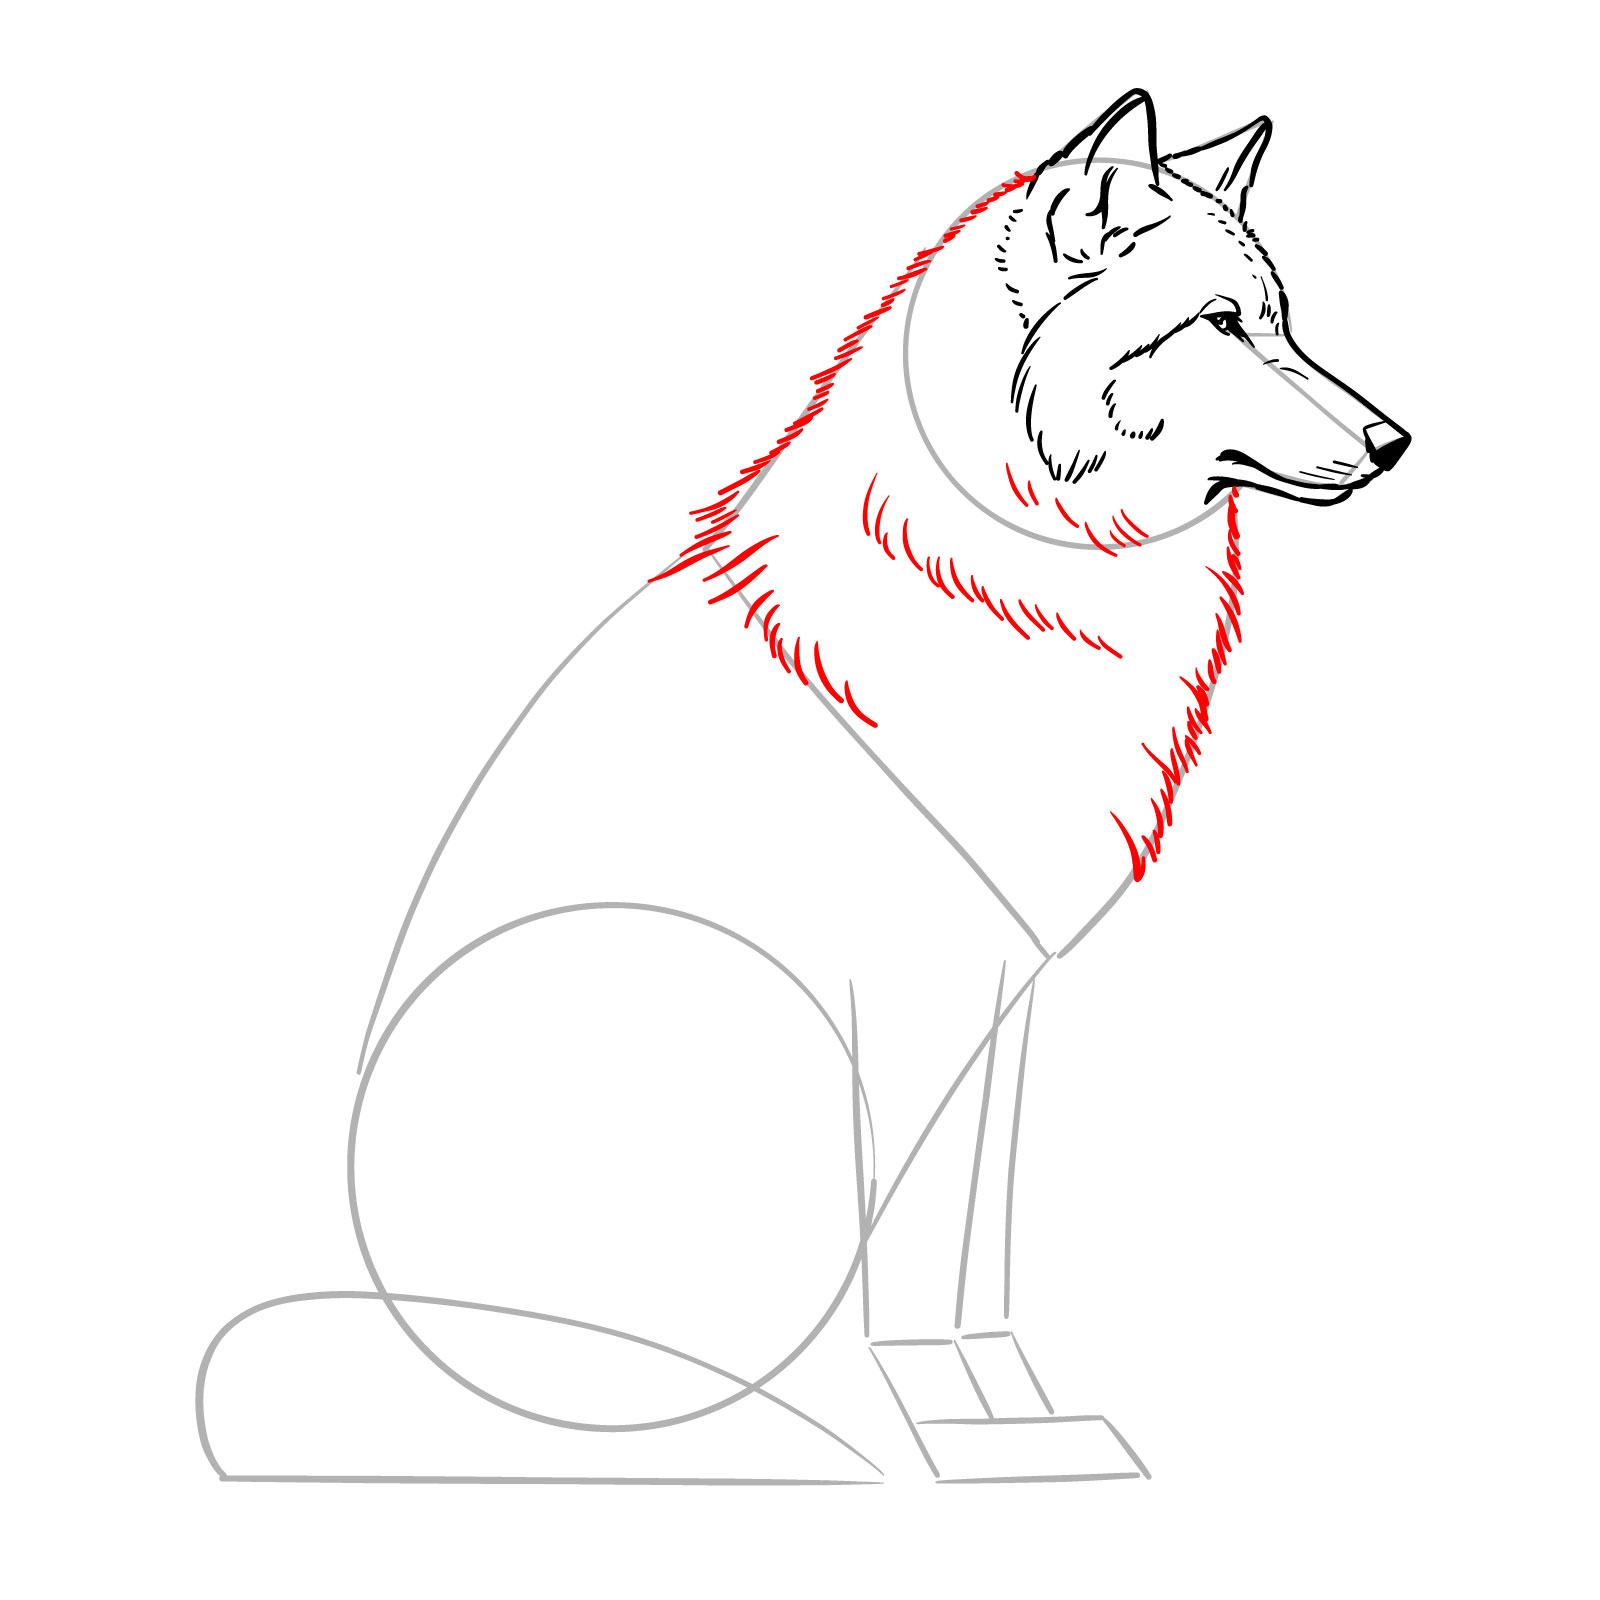
Step 08 – Start adding side-of-head details, including whisker marks and additional fur strokes on the forehead, to fully capture the wolf’s wild and natural appearance
PinCompleting the head details with whisker marks and fur
Step 09 – For this step in your sitting wolf drawing, create the outline of the neck using short lines to mimic the texture of fur
PinDrawing the neck fur
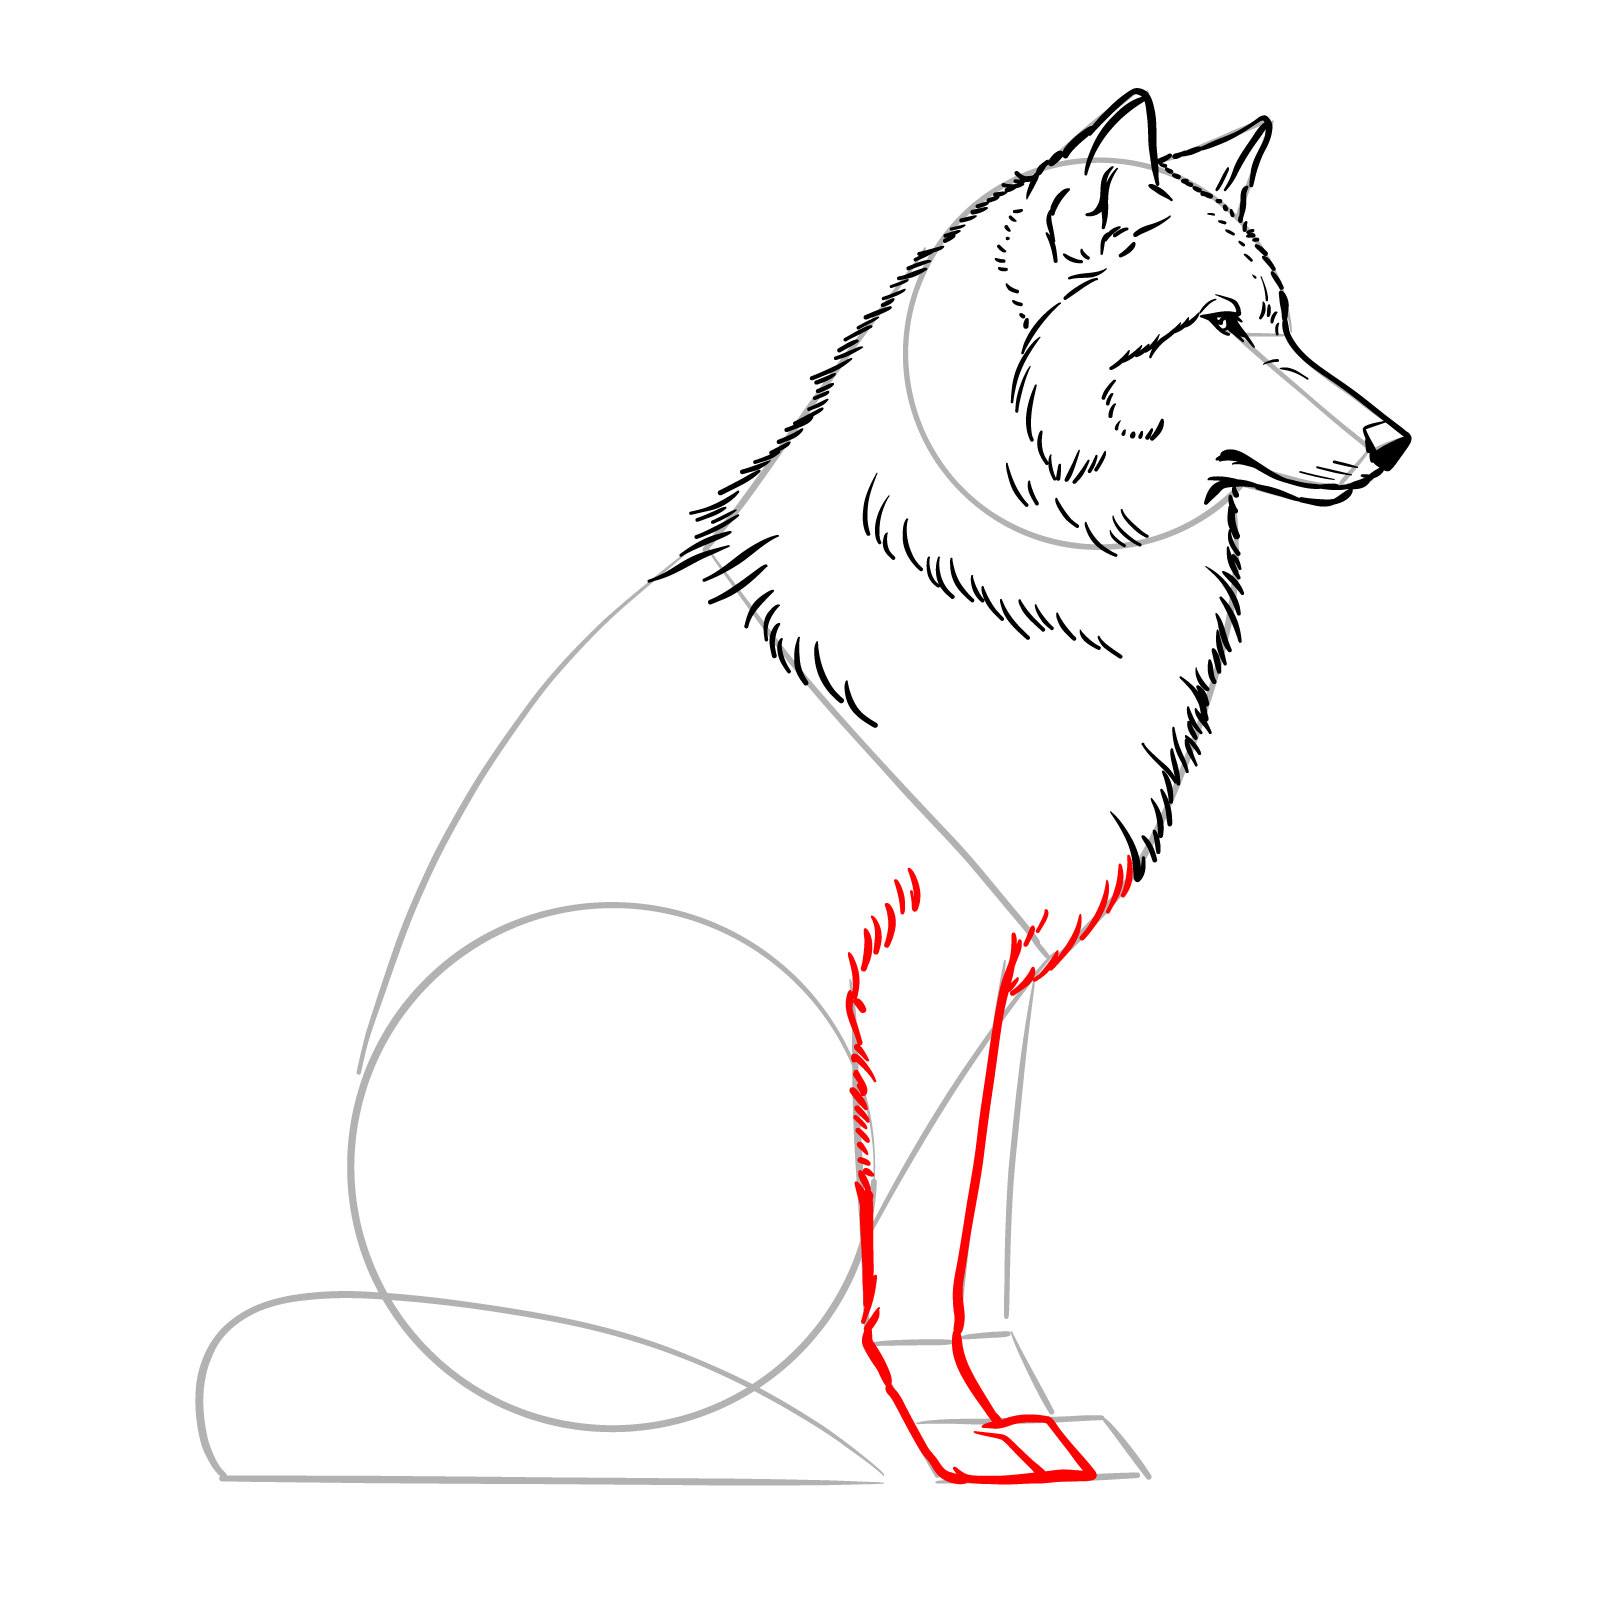
Step 10 – Draw the front leg closest to the viewer with attention to the muscular structure and joint placement. Use short strokes for the fur on the upper part, and transition to smoother lines down to the paws
PinIllustrating the first front leg in a sitting wolf side view
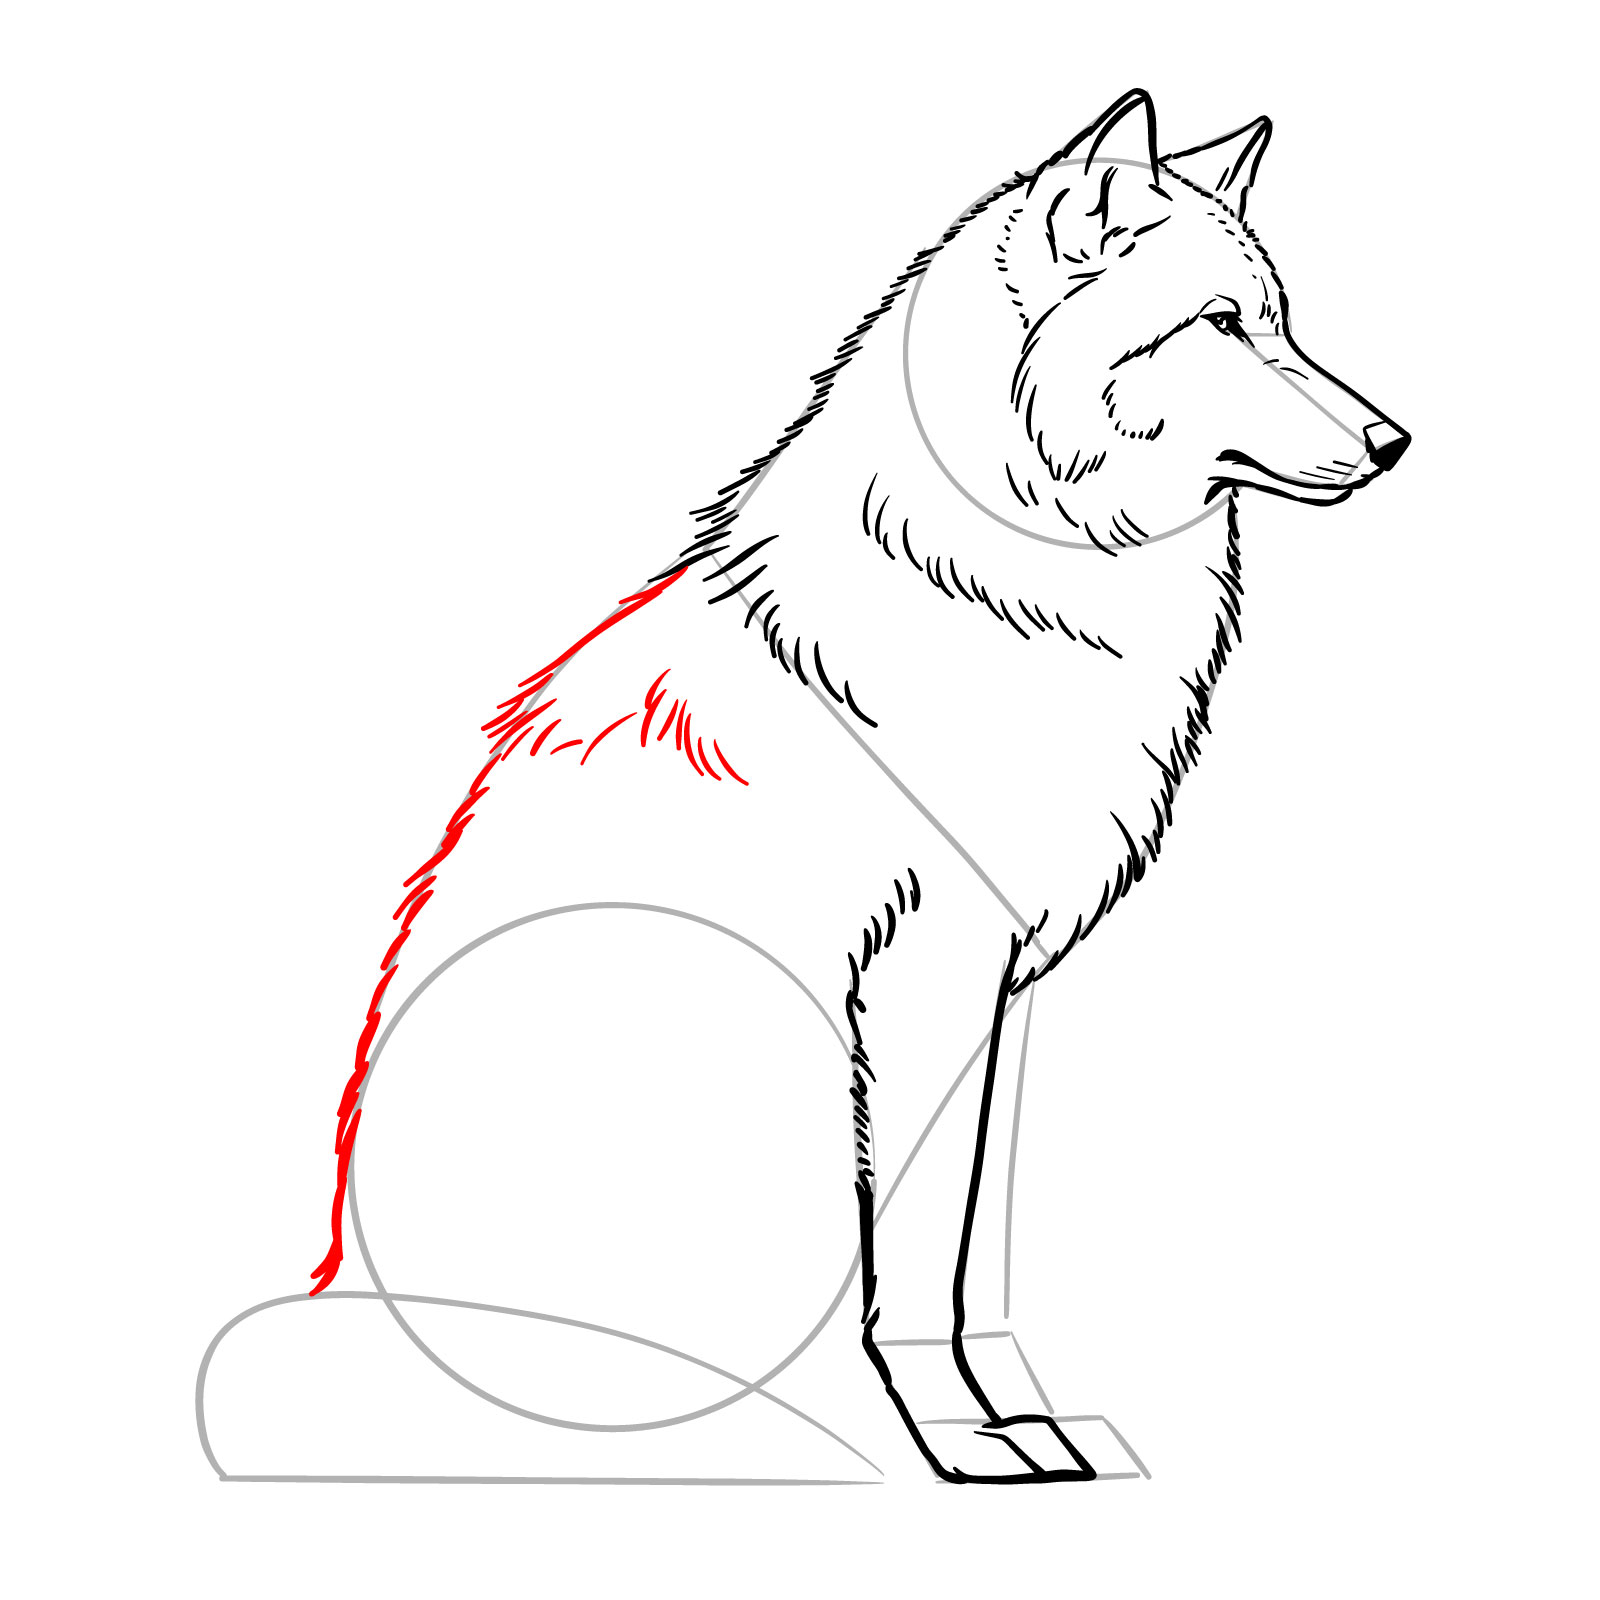
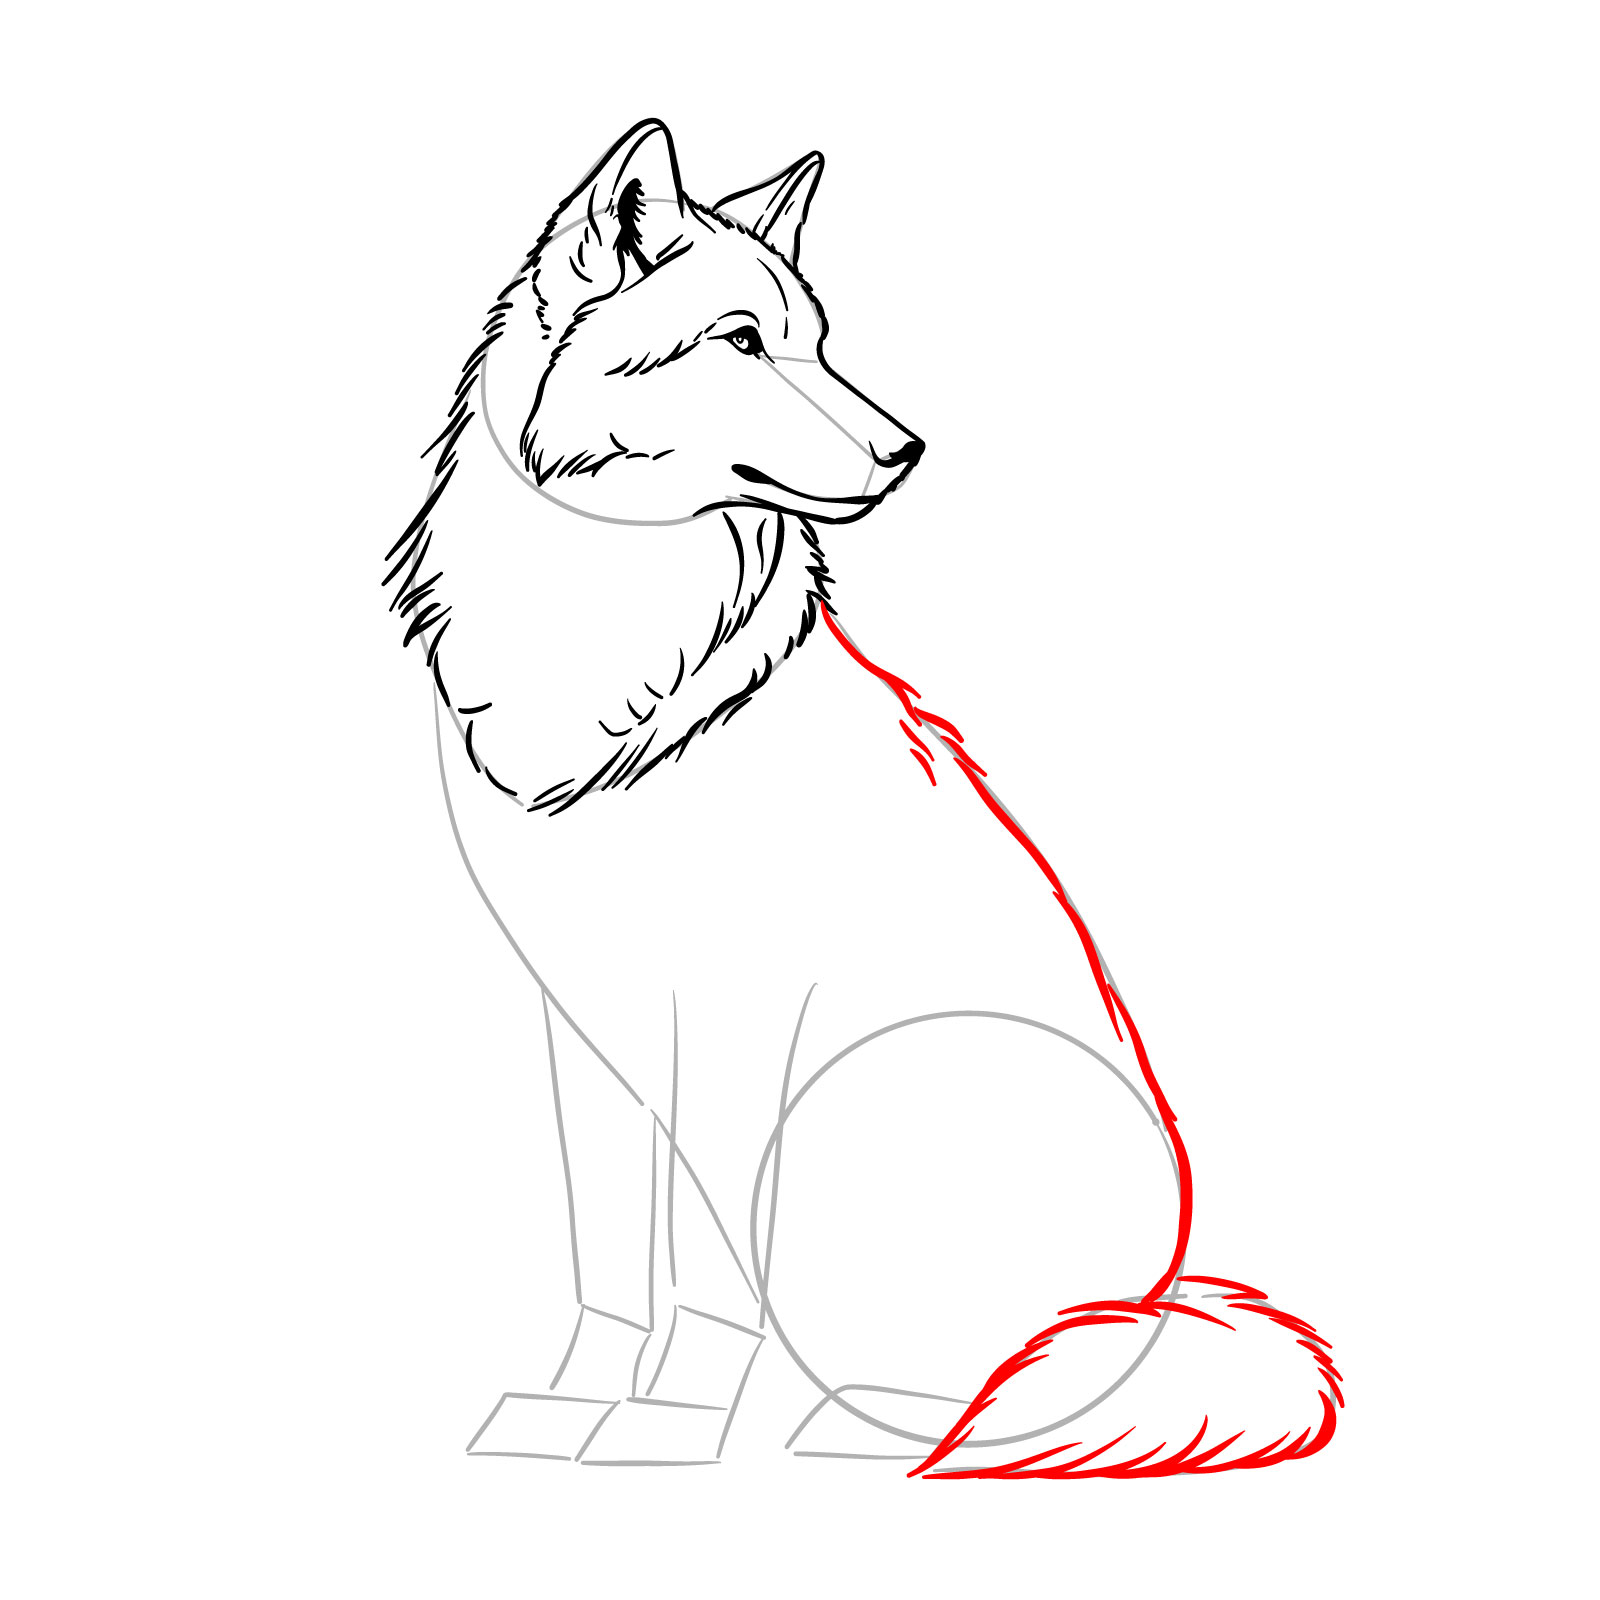
Step 11 – Carefully outline the back of your sitting wolf, adding fur texture with short, jagged lines. This will give the wolf’s coat a fluffy and realistic appearance
PinSketching the back outline
Step 12 – Illustrate the wolf’s tail with a series of flowing lines to capture its bushiness
PinDrawing the tail
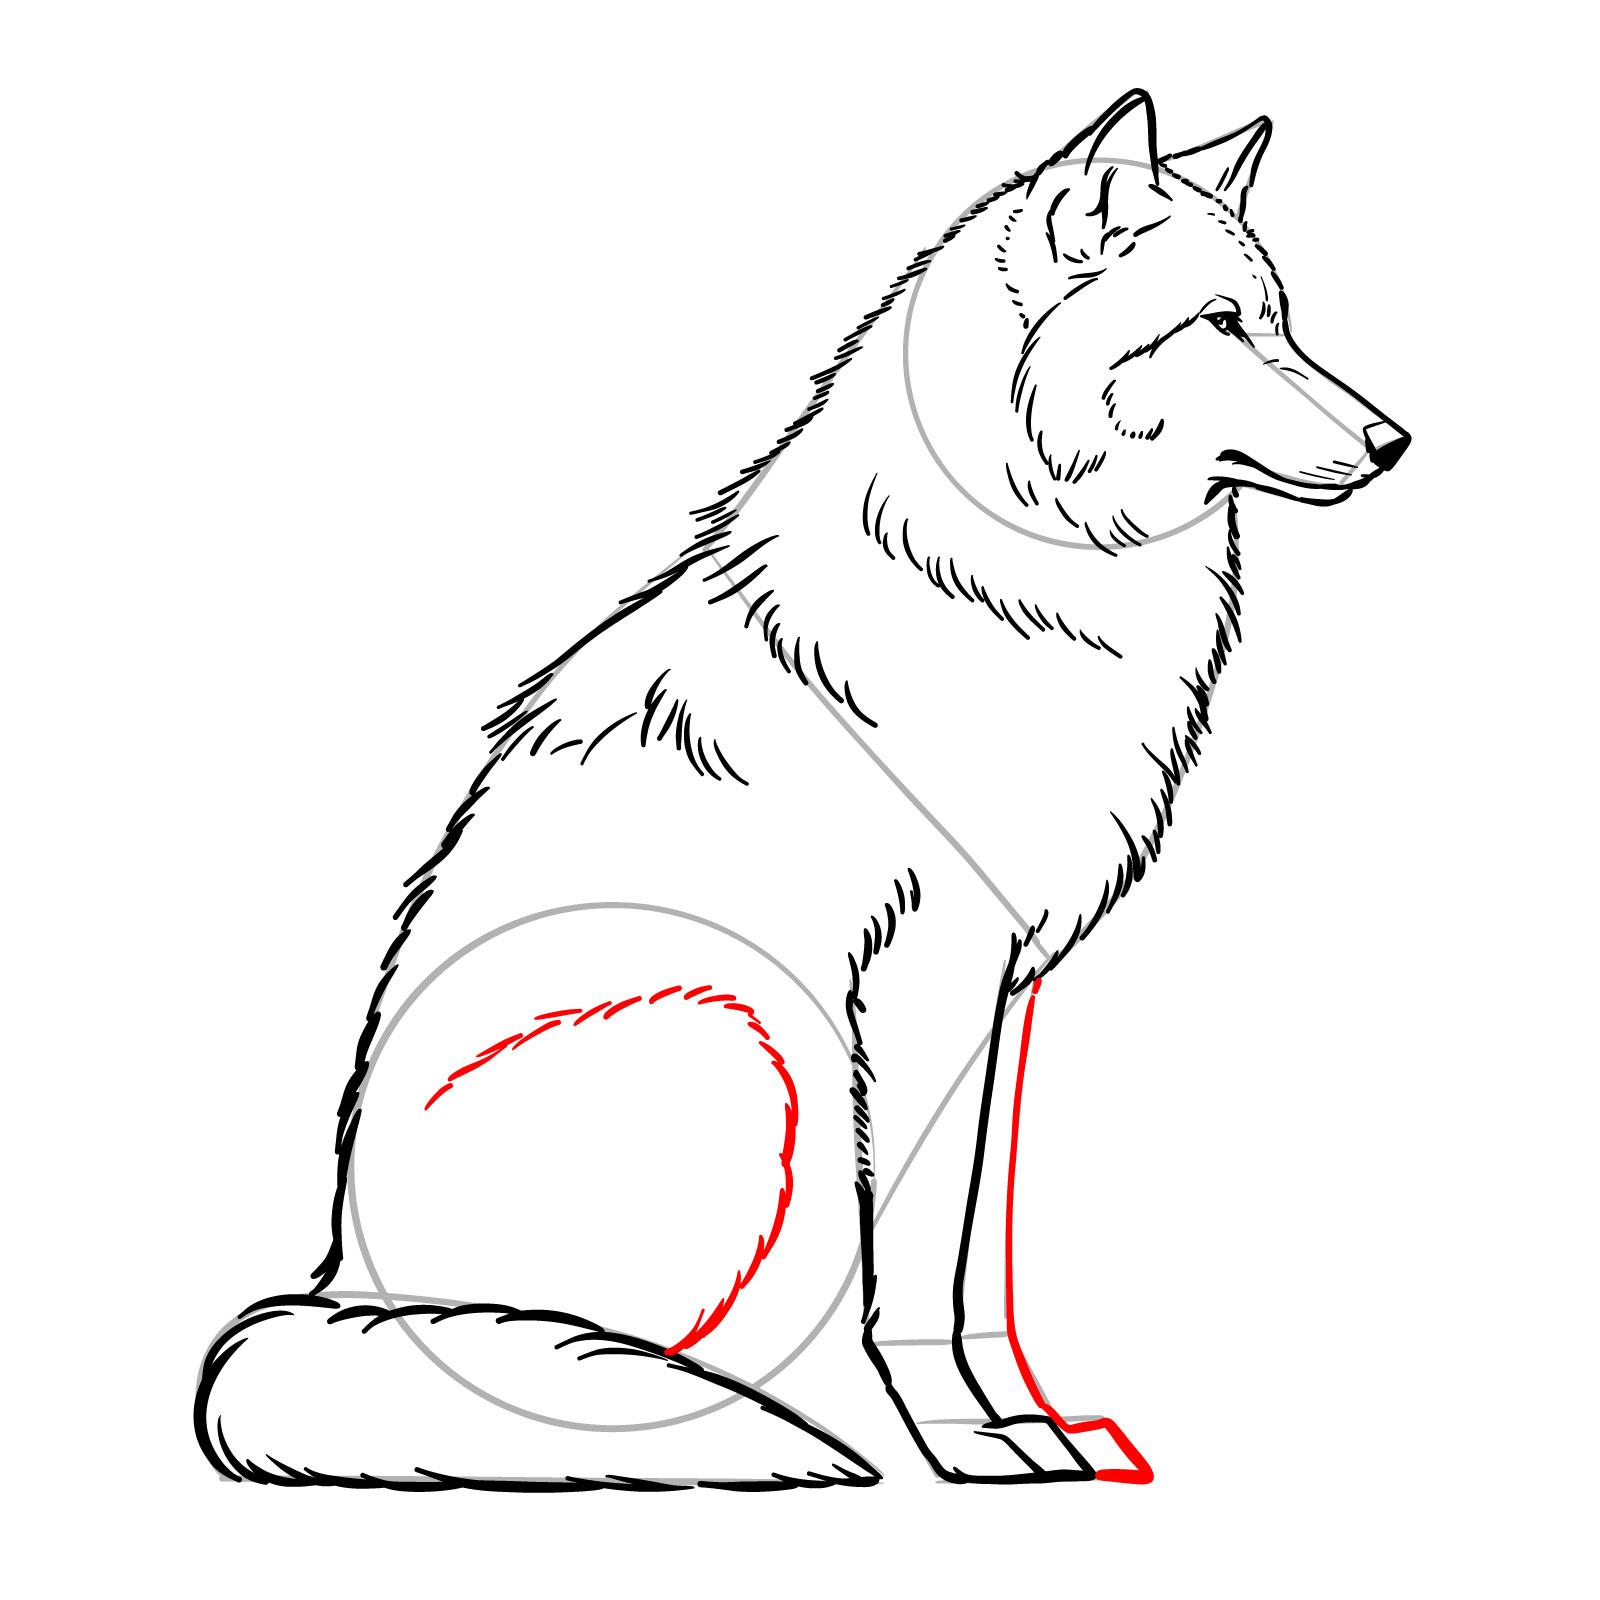
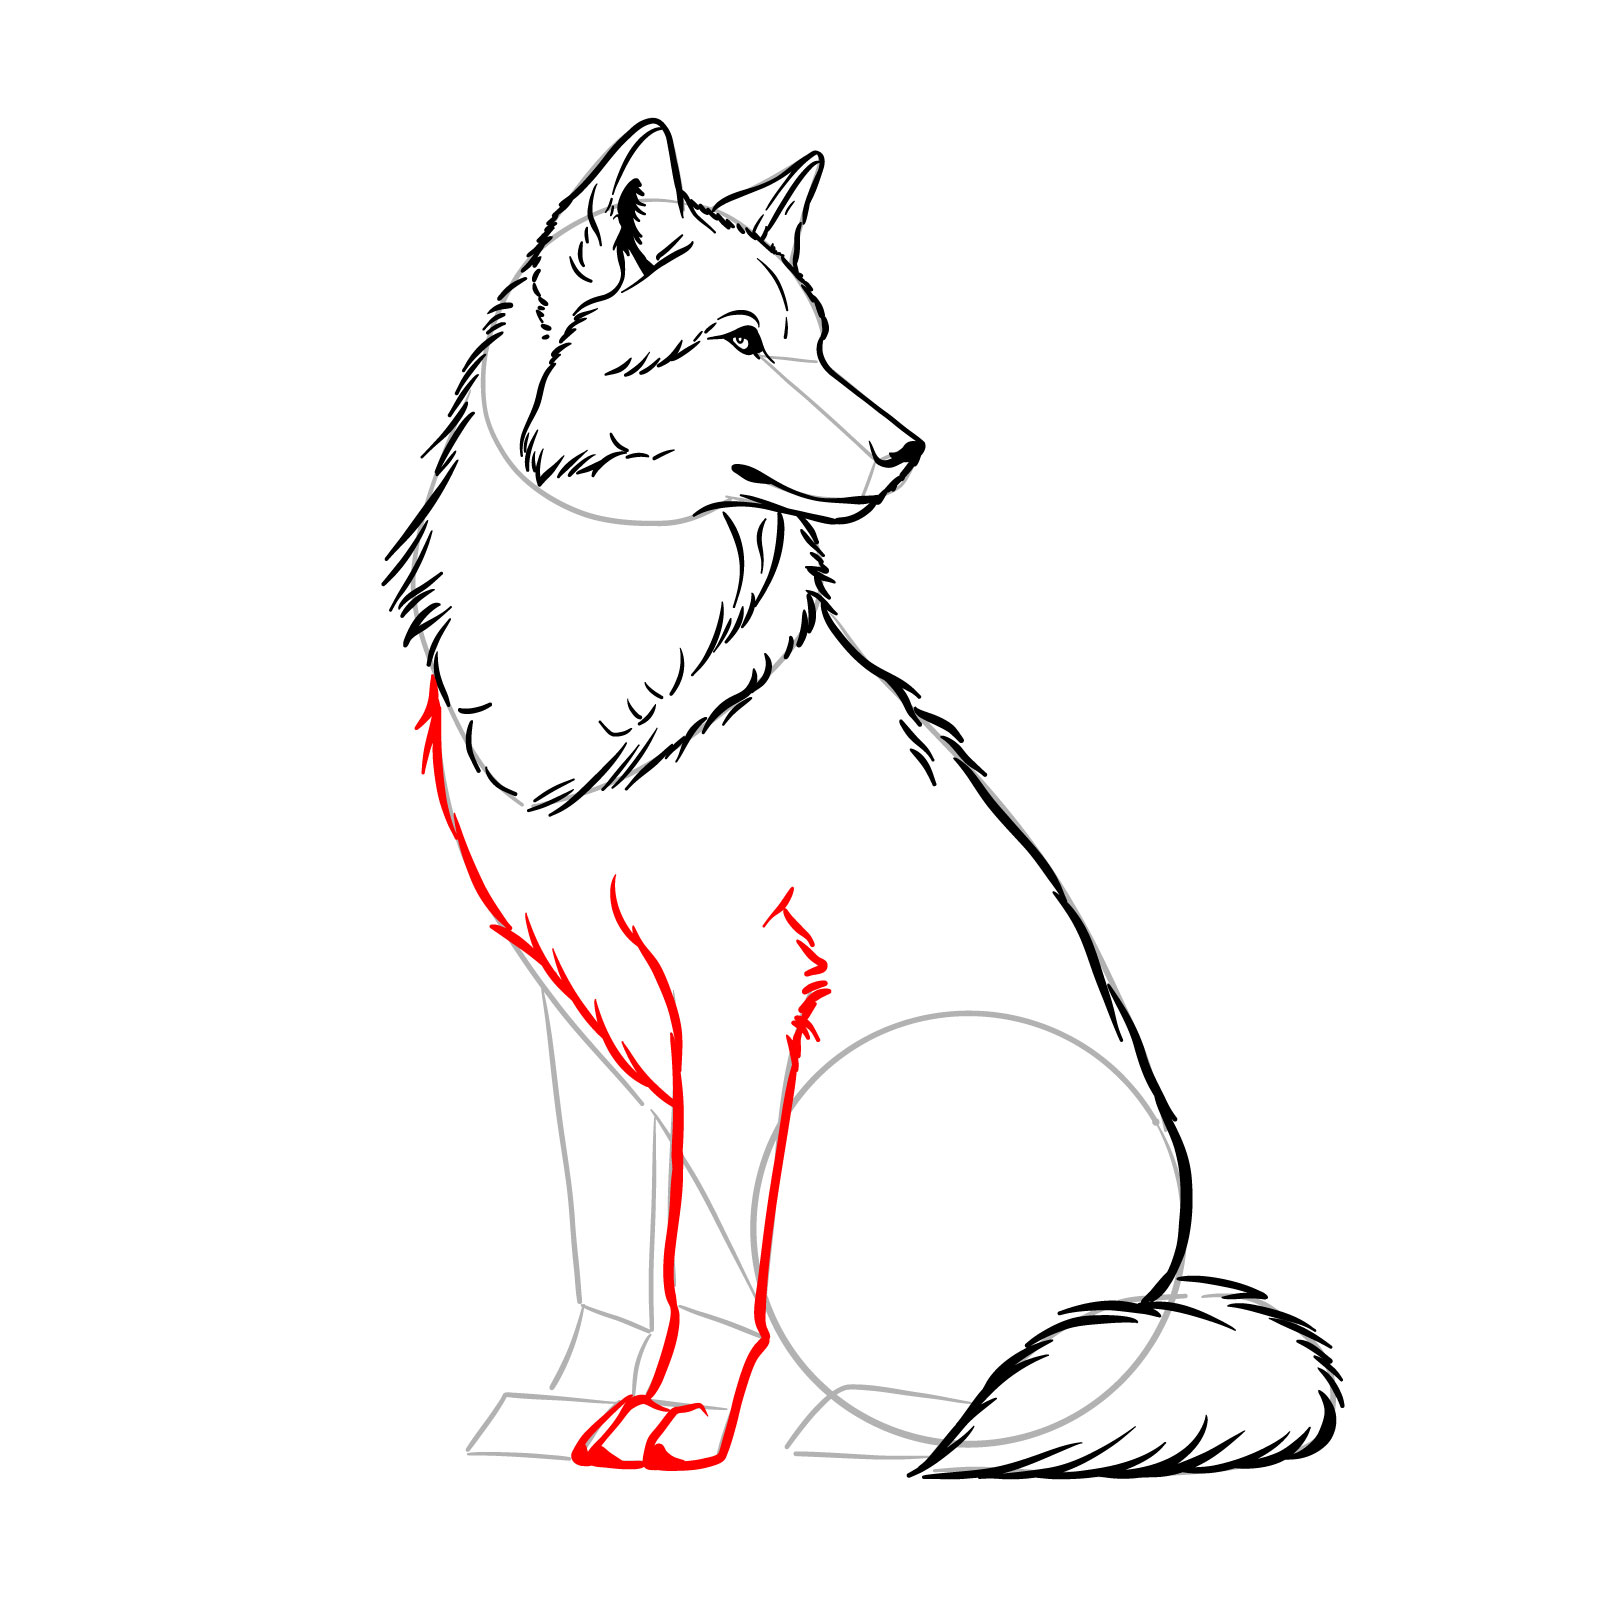
Step 13 – Add the second front leg and the rear leg that’s bent in a sitting position behind the tail. Ensure that the lines indicate the proper folding and placement of the legs in a relaxed sitting pose
PinDetailing the second front leg and the visible rear leg
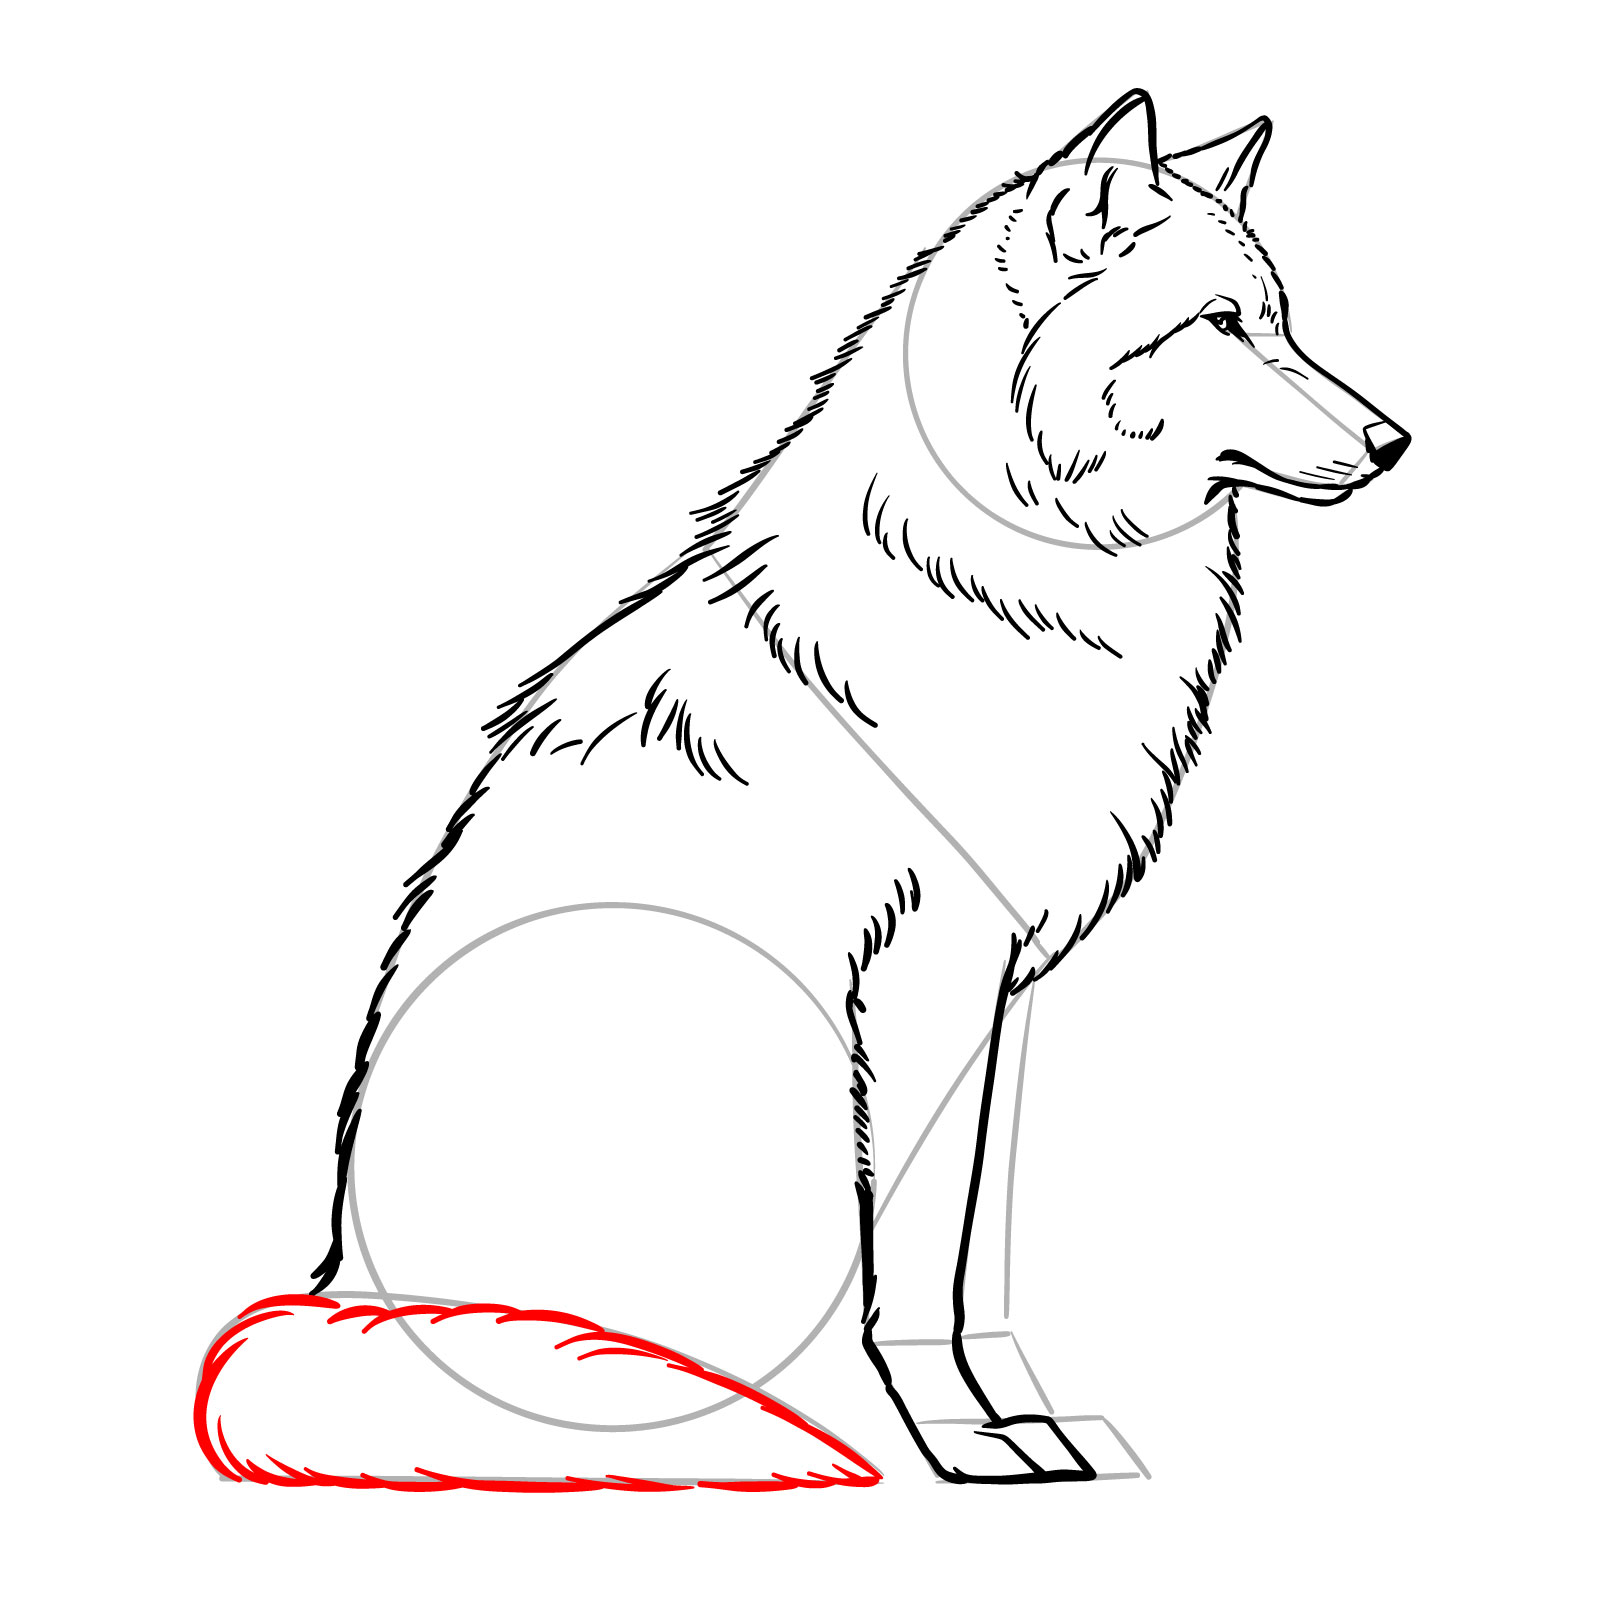
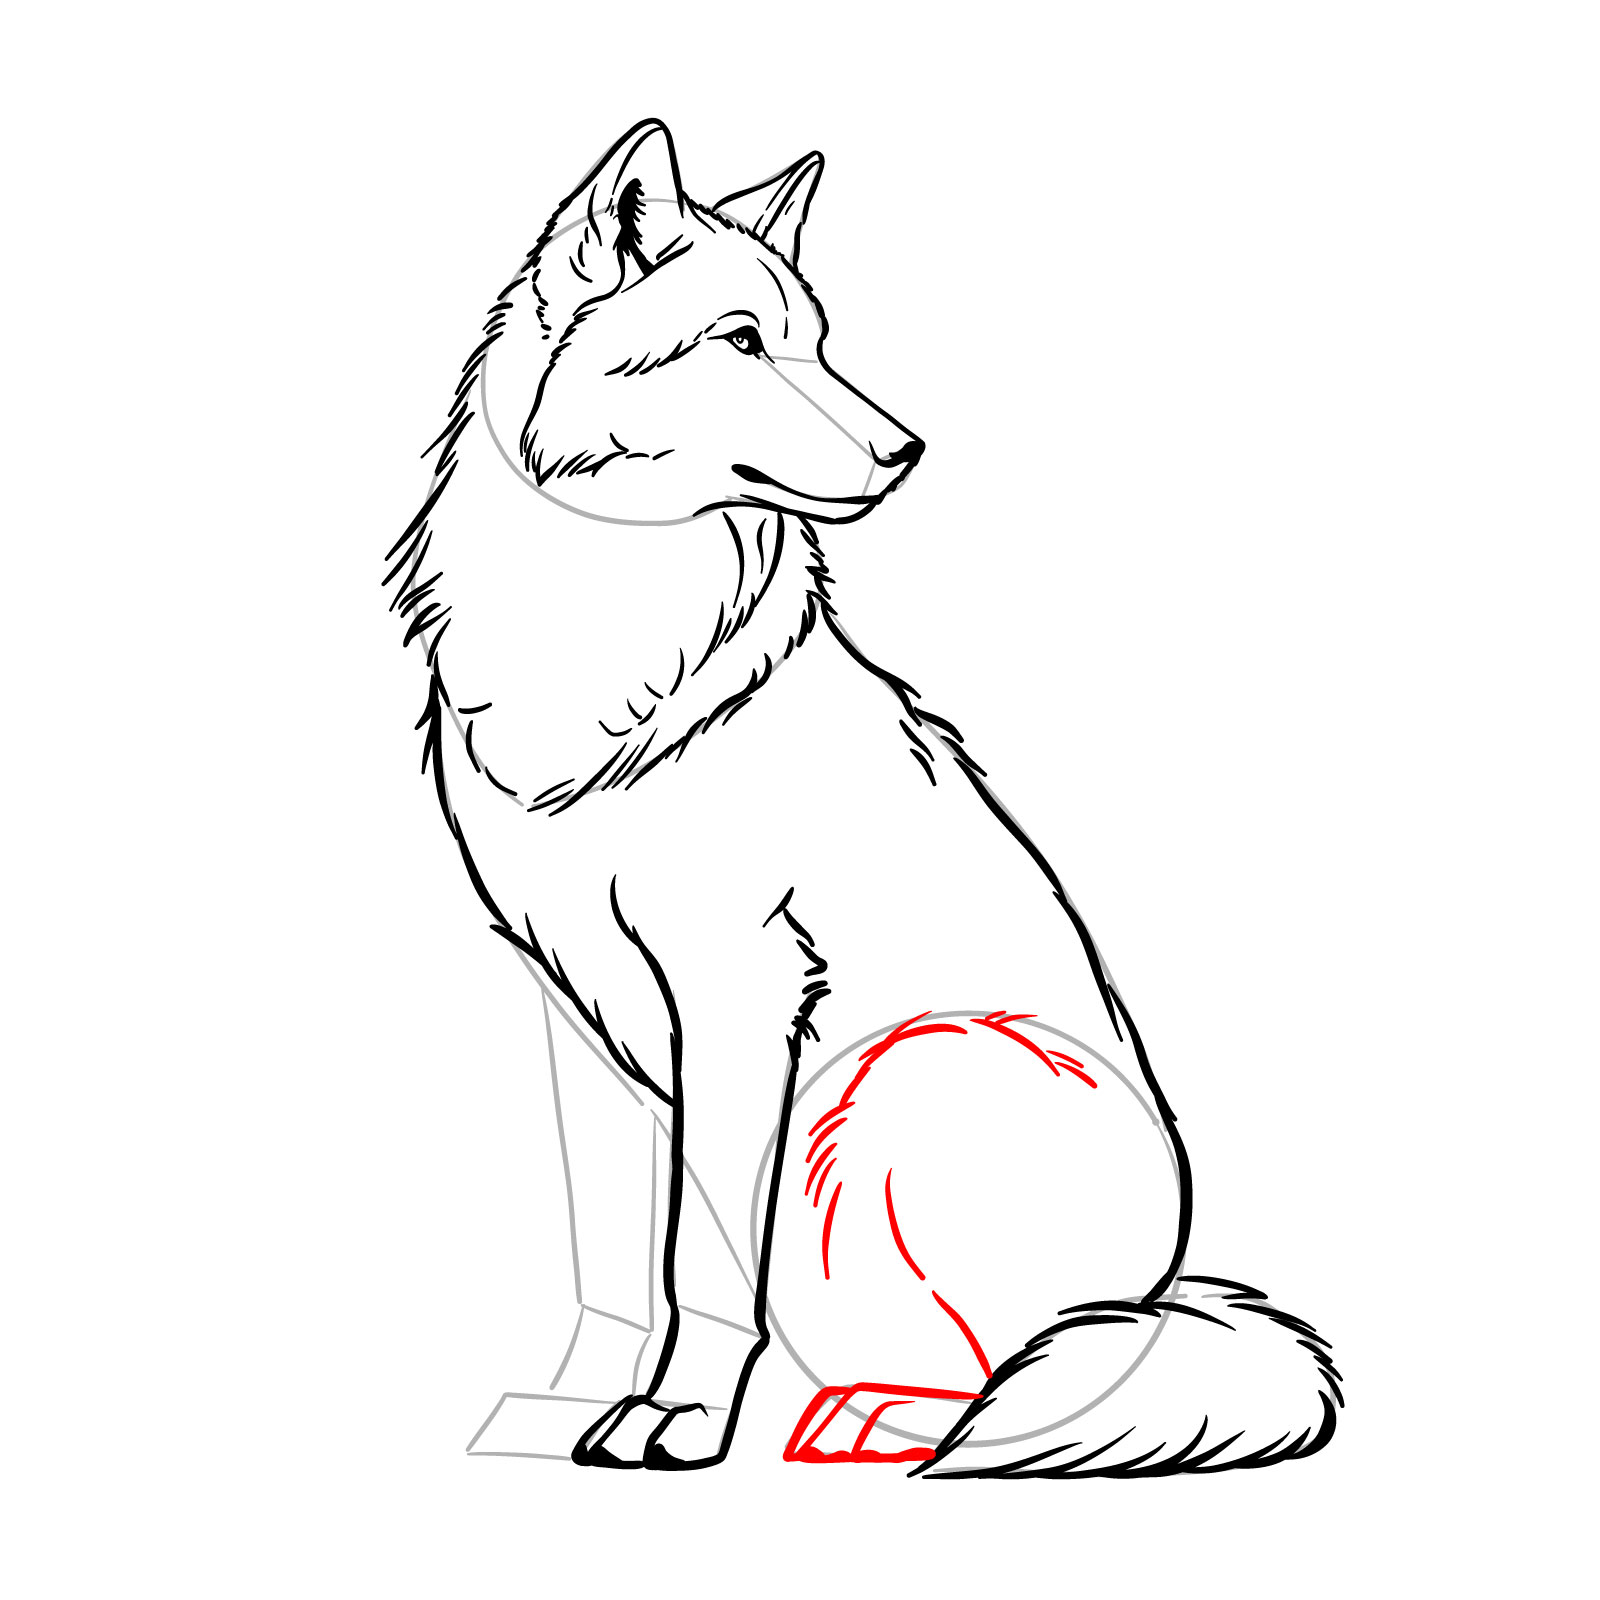
Step 14 – Complete the underbody of your sitting wolf by sketching the belly line and the rear paw
PinCompleting the belly outline and rear paw
Step 15 – To finish your how to draw a sitting wolf side view, carefully erase any remaining pencil marks and unnecessary lines. If desired, go over the sketch with ink to finalize the drawing, enhancing the clean outlines and fur details
PinFinalized drawing of a sitting wolf in side view
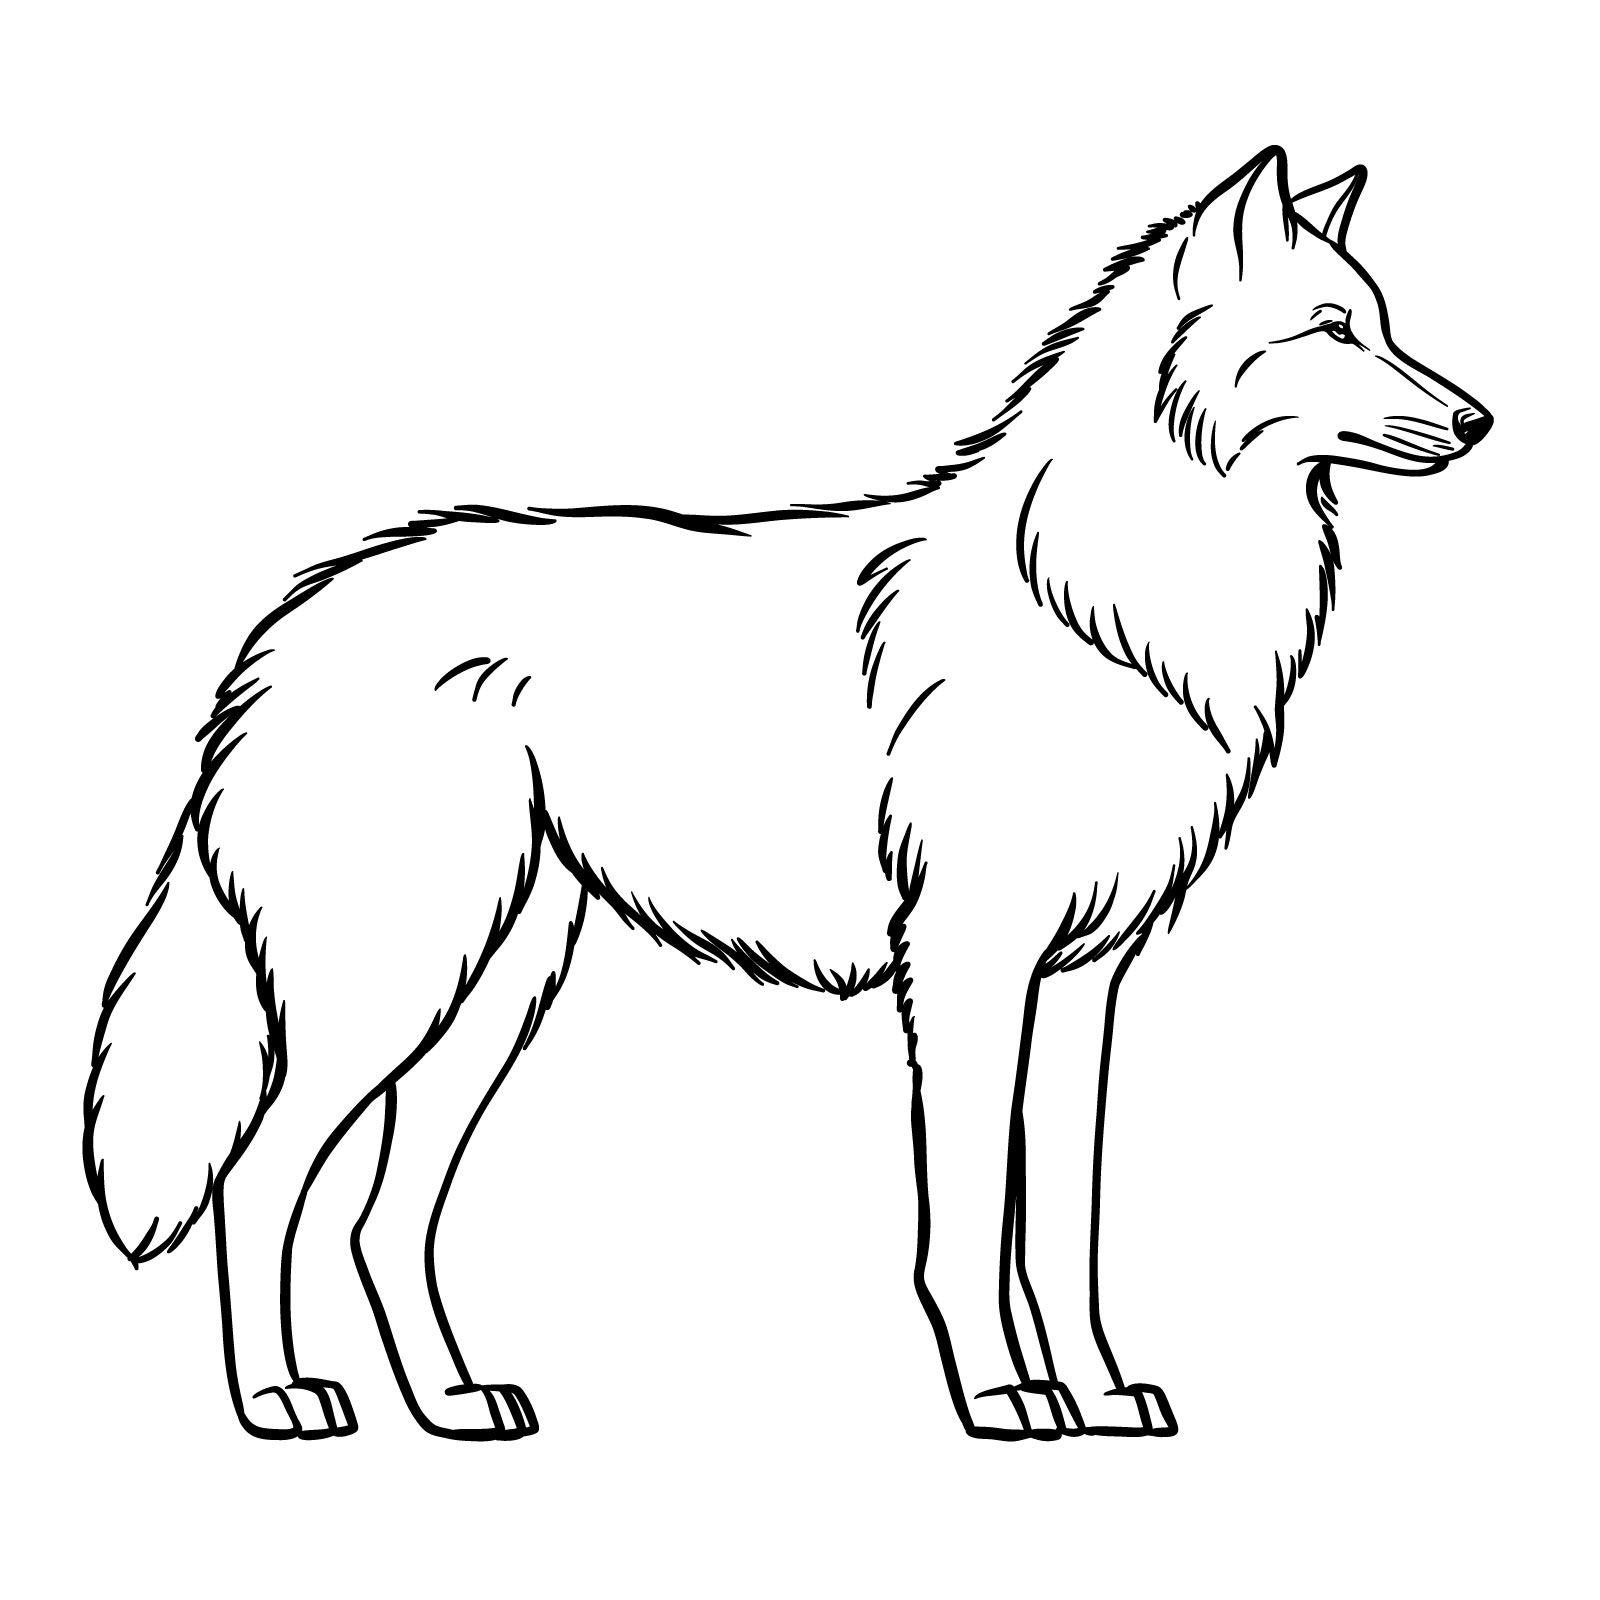
Illustrating a Standing Wolf (Side View) in 13 Steps
PinHow to draw a standing wolf side view
Continuing to the eleventh guide, we approach the challenge of drawing a standing wolf in a side view. This guide is organized into 13 steps, starting with three initial sketches that help you establish the basic structure and stance of the wolf. As you progress through the steps, you will refine the shape, adding the texture of the fur and the details that bring the wolf’s muscular form and alert posture to life. The end result is a portrayal of a wolf standing with confidence, ready to be admired for its wild appearance and poise.
Step 01 – Start by drawing the shape of the wolf’s head. It’s almost the same as we did in the previous guide
PinBeginning the side view wolf drawing with the head outline
Step 02 – Draw two additional shapes for the body: a larger circle for the midsection, about twice the size of the head, and another circle of the same size as the head for the lower body. Position these circles to form the basic shape of the wolf’s body and connect them with smooth lines to establish the wolf’s neck, back and underbelly
PinAdding the body circles
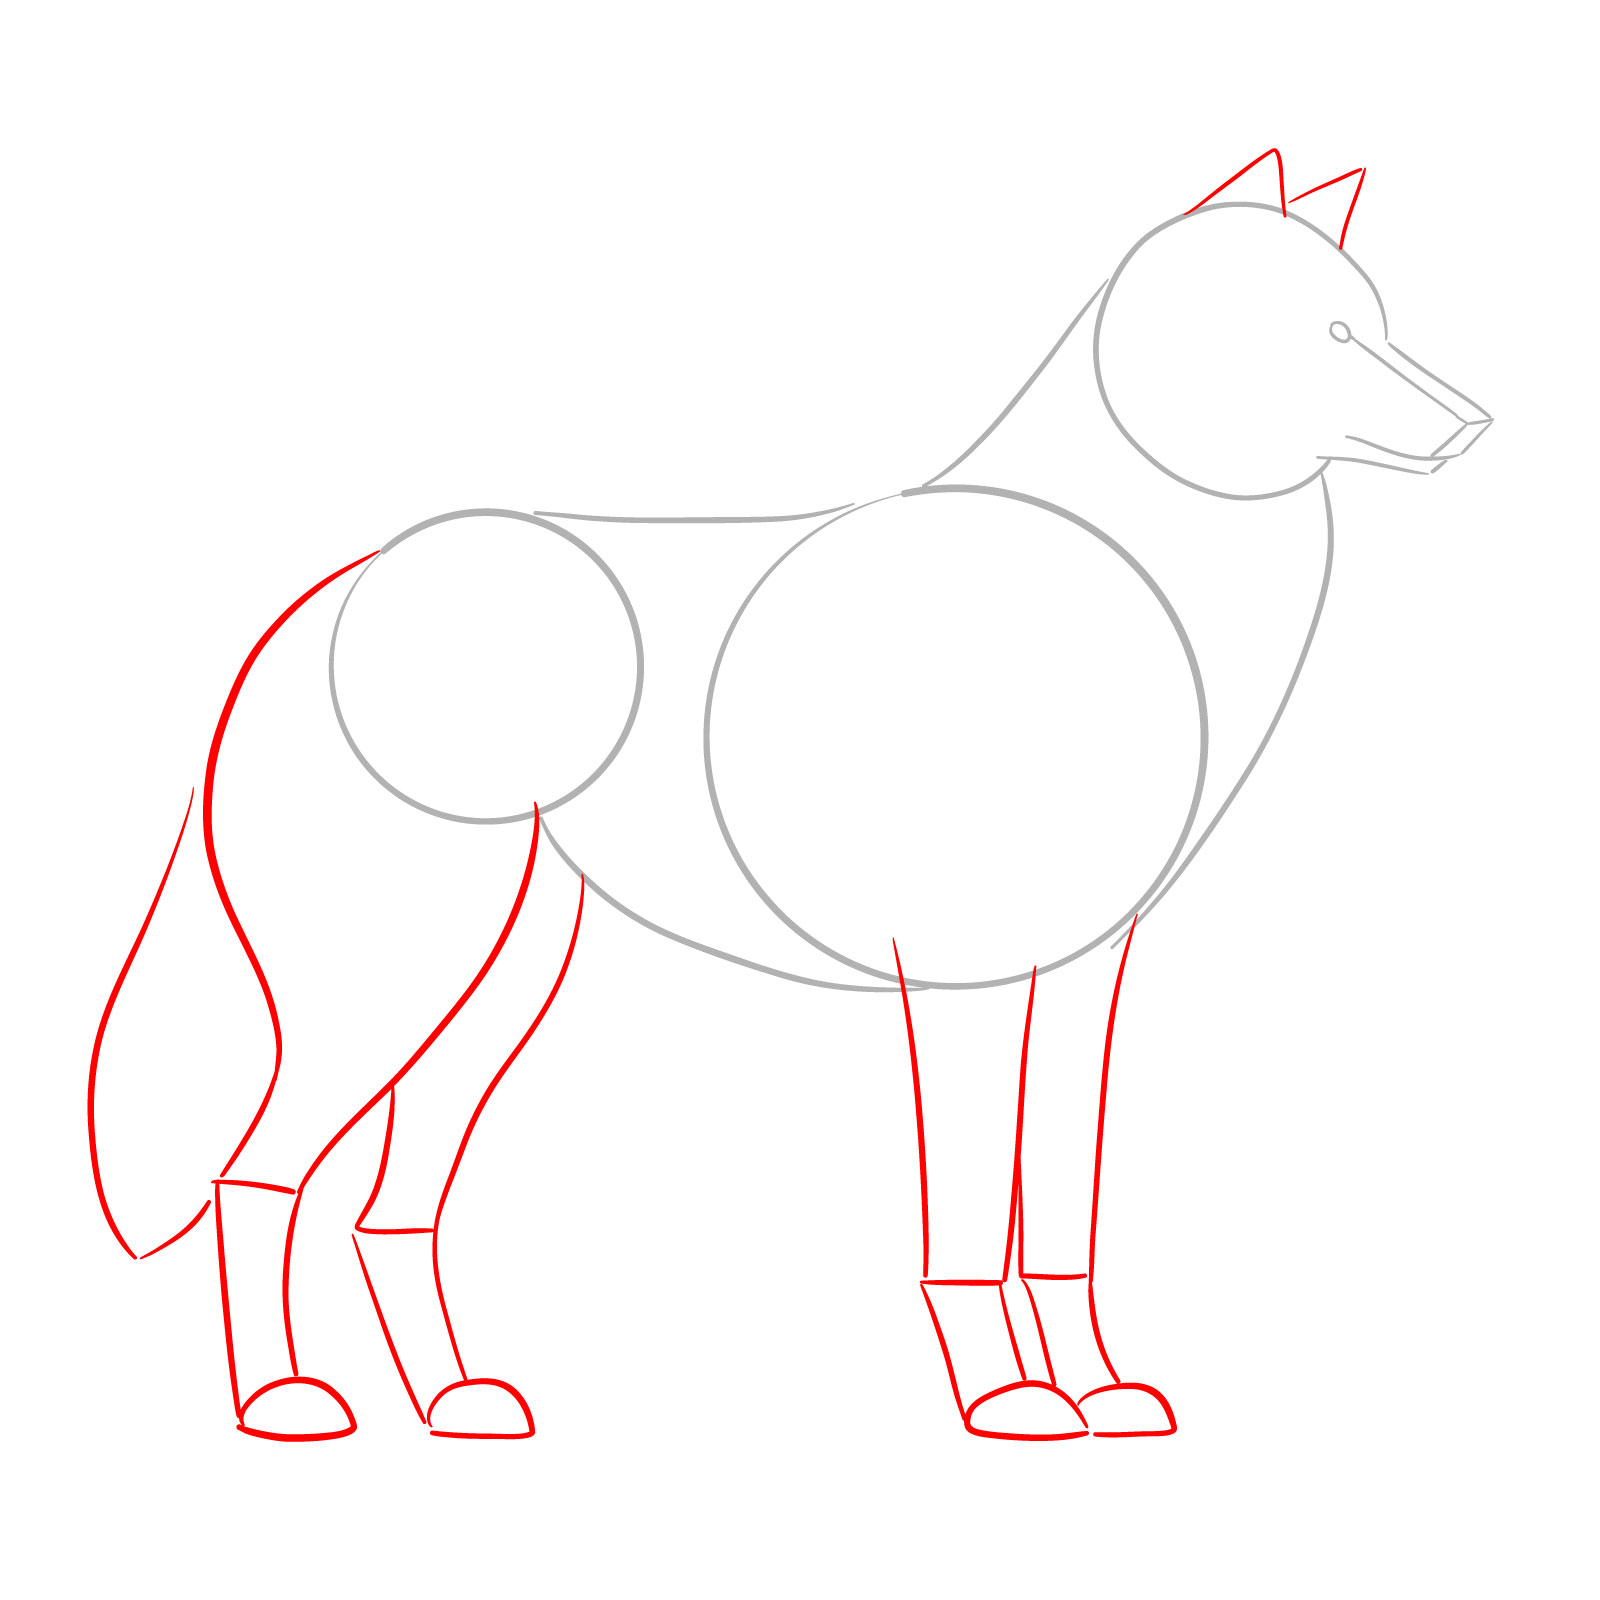
Step 03 – Add simple outlines for the legs and tail. The front legs should extend downward from the body, with the paws touching what will be the ground line. The hind legs are drawn with a bit more shape to show the muscle structure. The tail should extend from the back with a slight curve
PinSketching the legs and tail
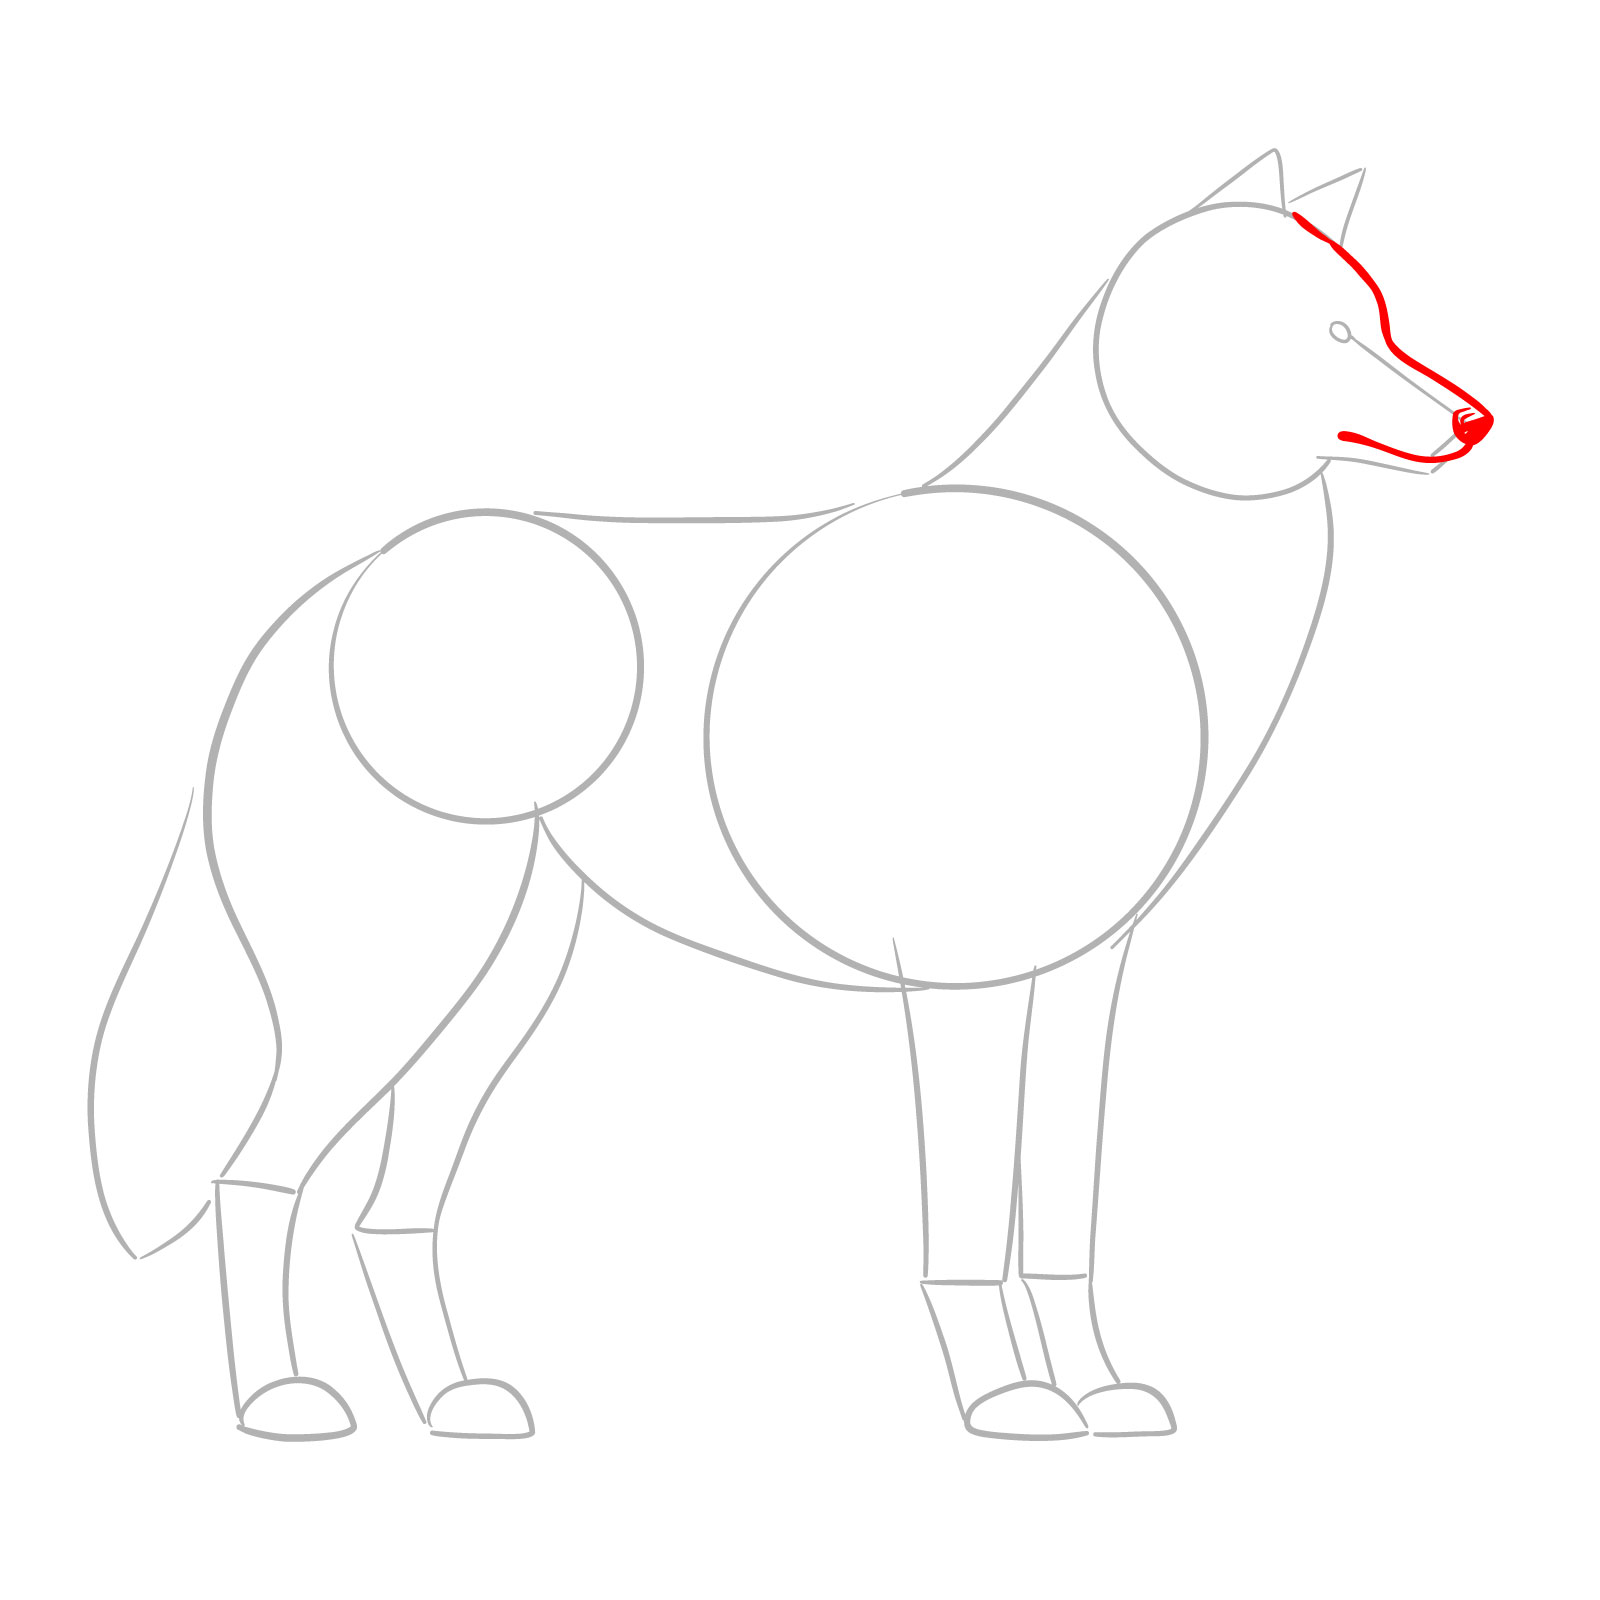
Step 04 – Refine the wolf’s head by drawing the upper part of the snout and the forehead. Add the outline for the nose at the tip of the snout and fill it in, and draw a line for the mouth
PinOutlining the upper part of the snout and forehead
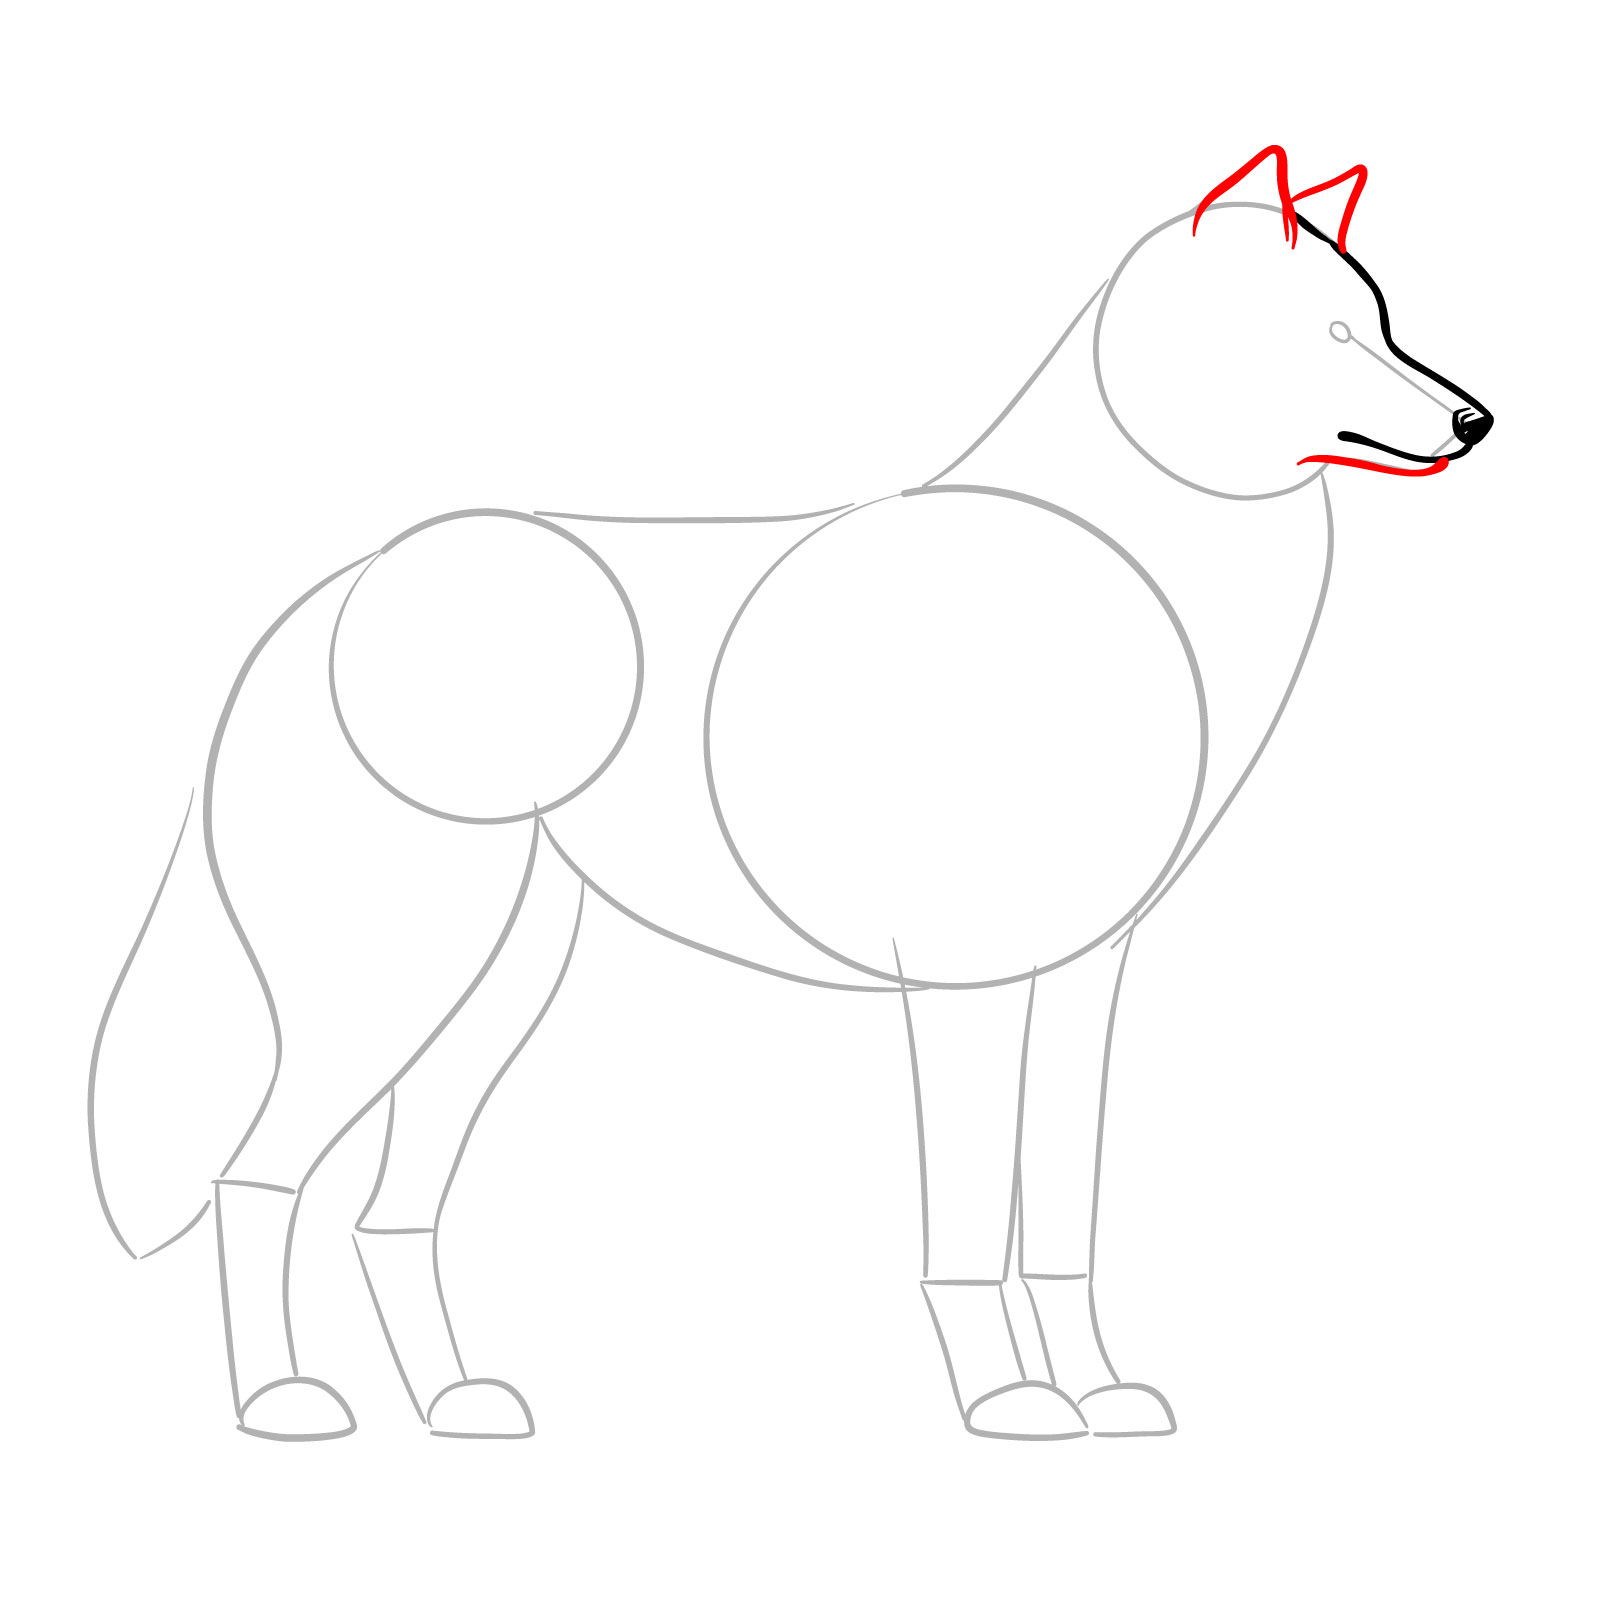
Step 05 – Draw the lower part of the snout and add the ears. The snout should connect to the upper outline created in the previous step, and the ears should be pointed and positioned atop the head
PinDrawing the bottom part of the snout and ears
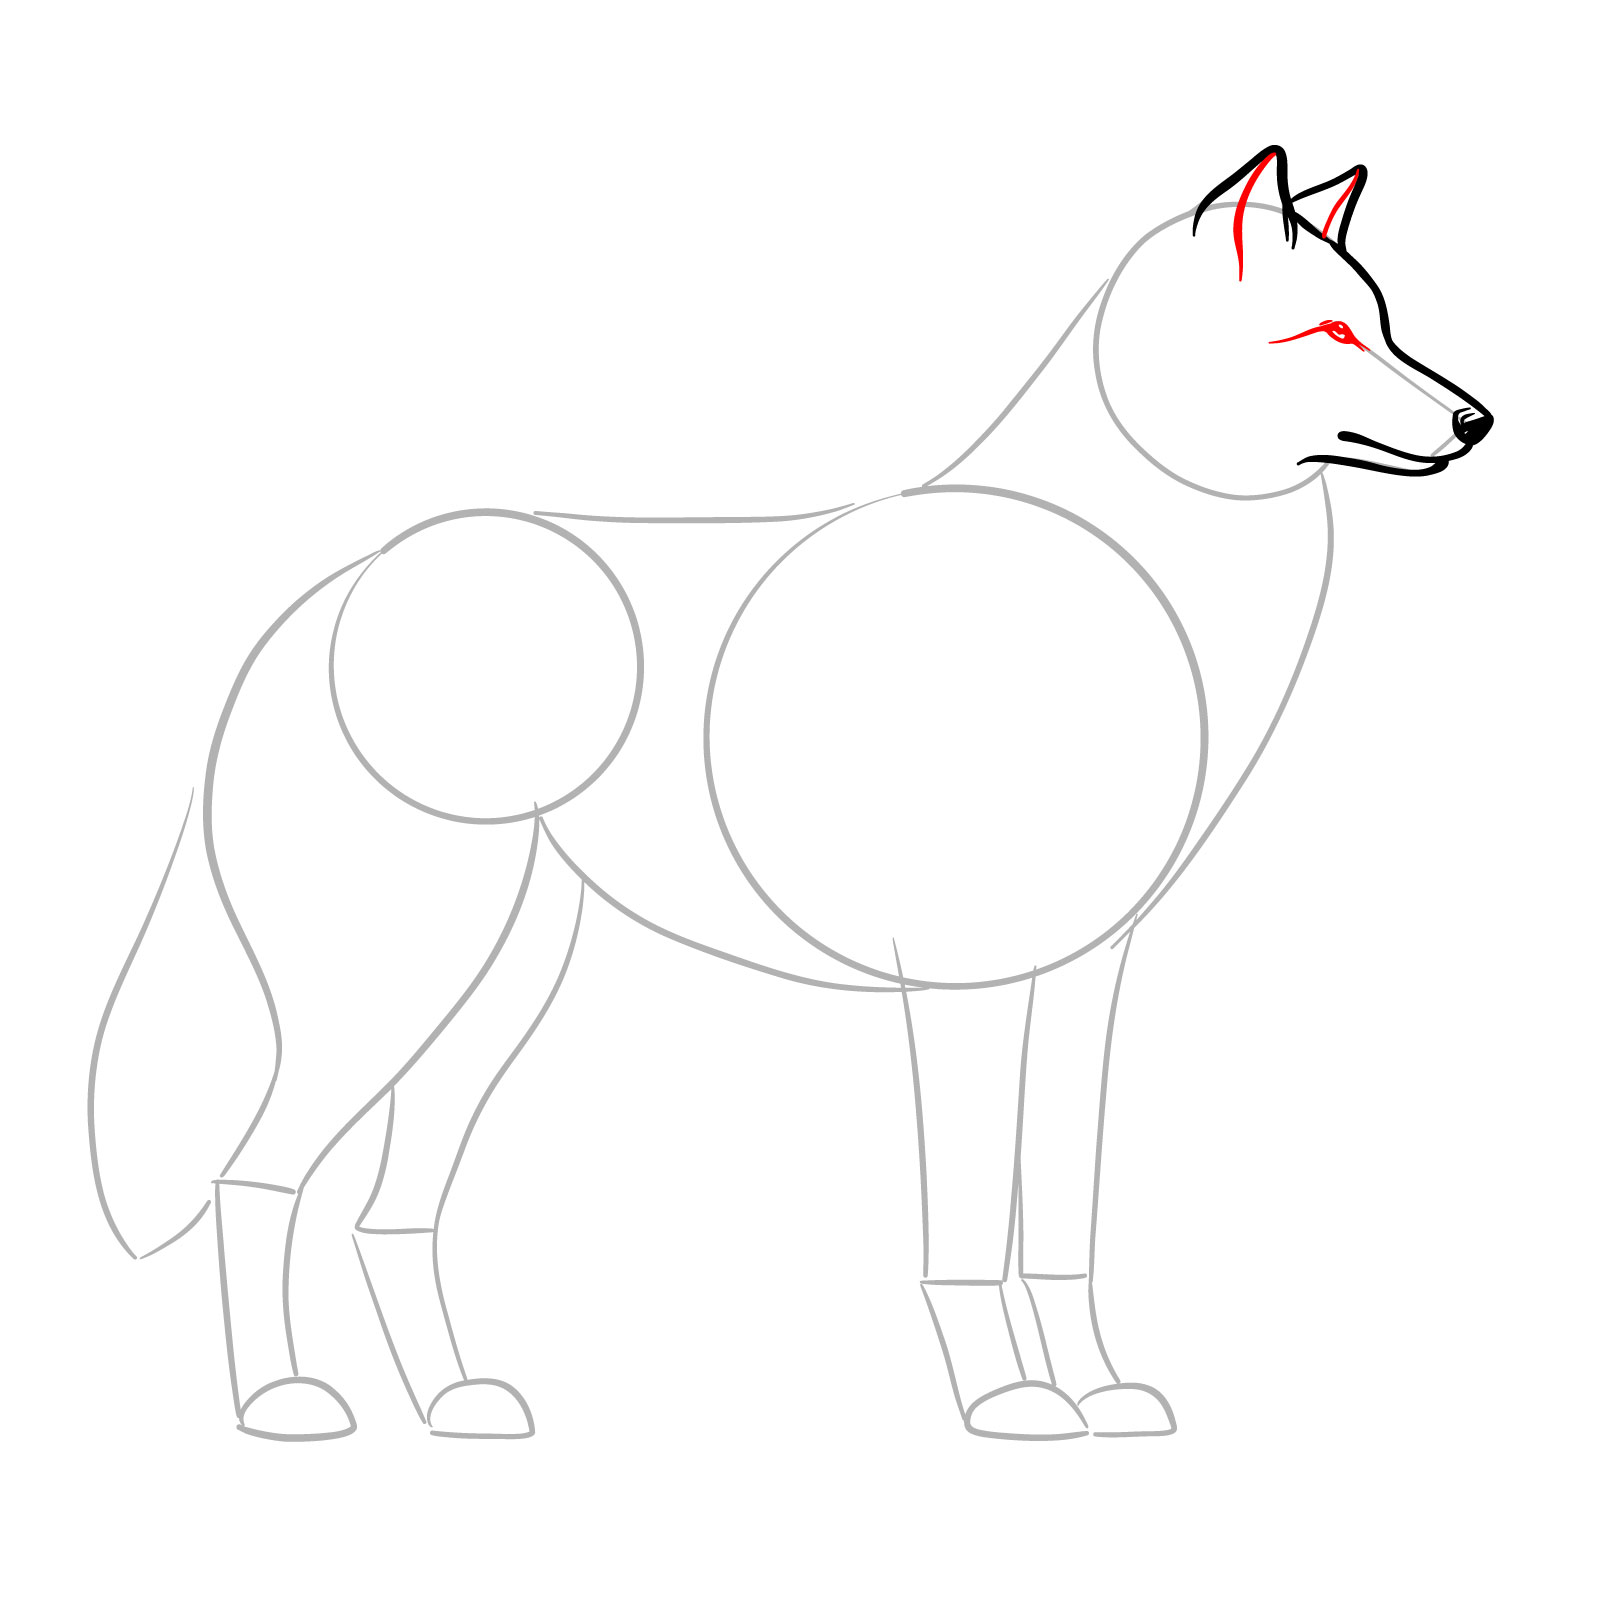
Step 06 – Sketch the eye, ensuring it’s the correct size and shape. Detail the inside of the ears to give them depth
PinSketching the eye and detailing the ears in the wolf side view drawing
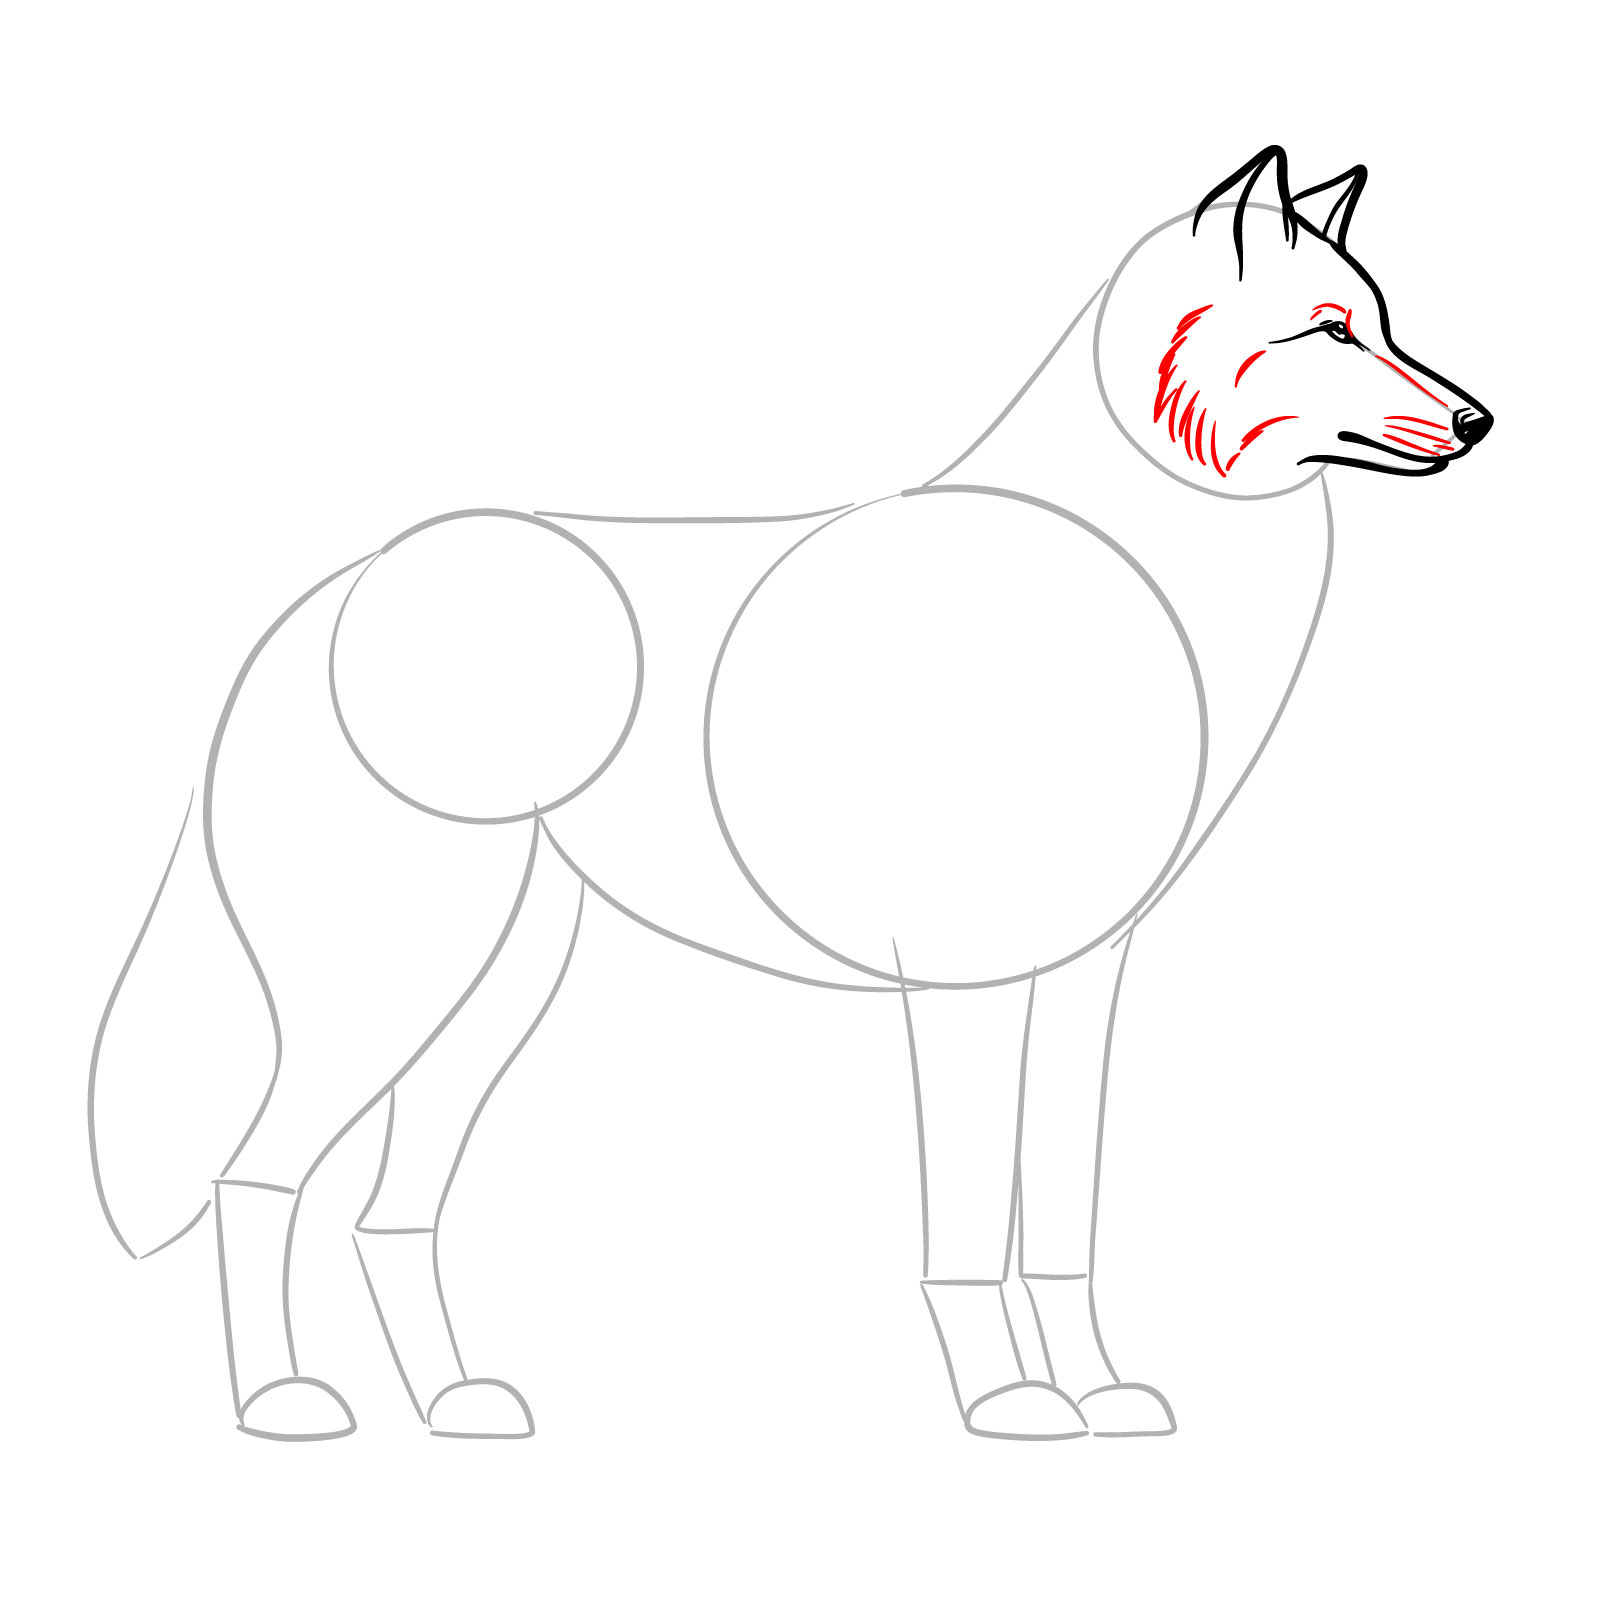
Step 07 – Finish the drawing by adding whisker marks, fur textures along the side of the head, and above the eye
PinAdding whisker marks and fur texture
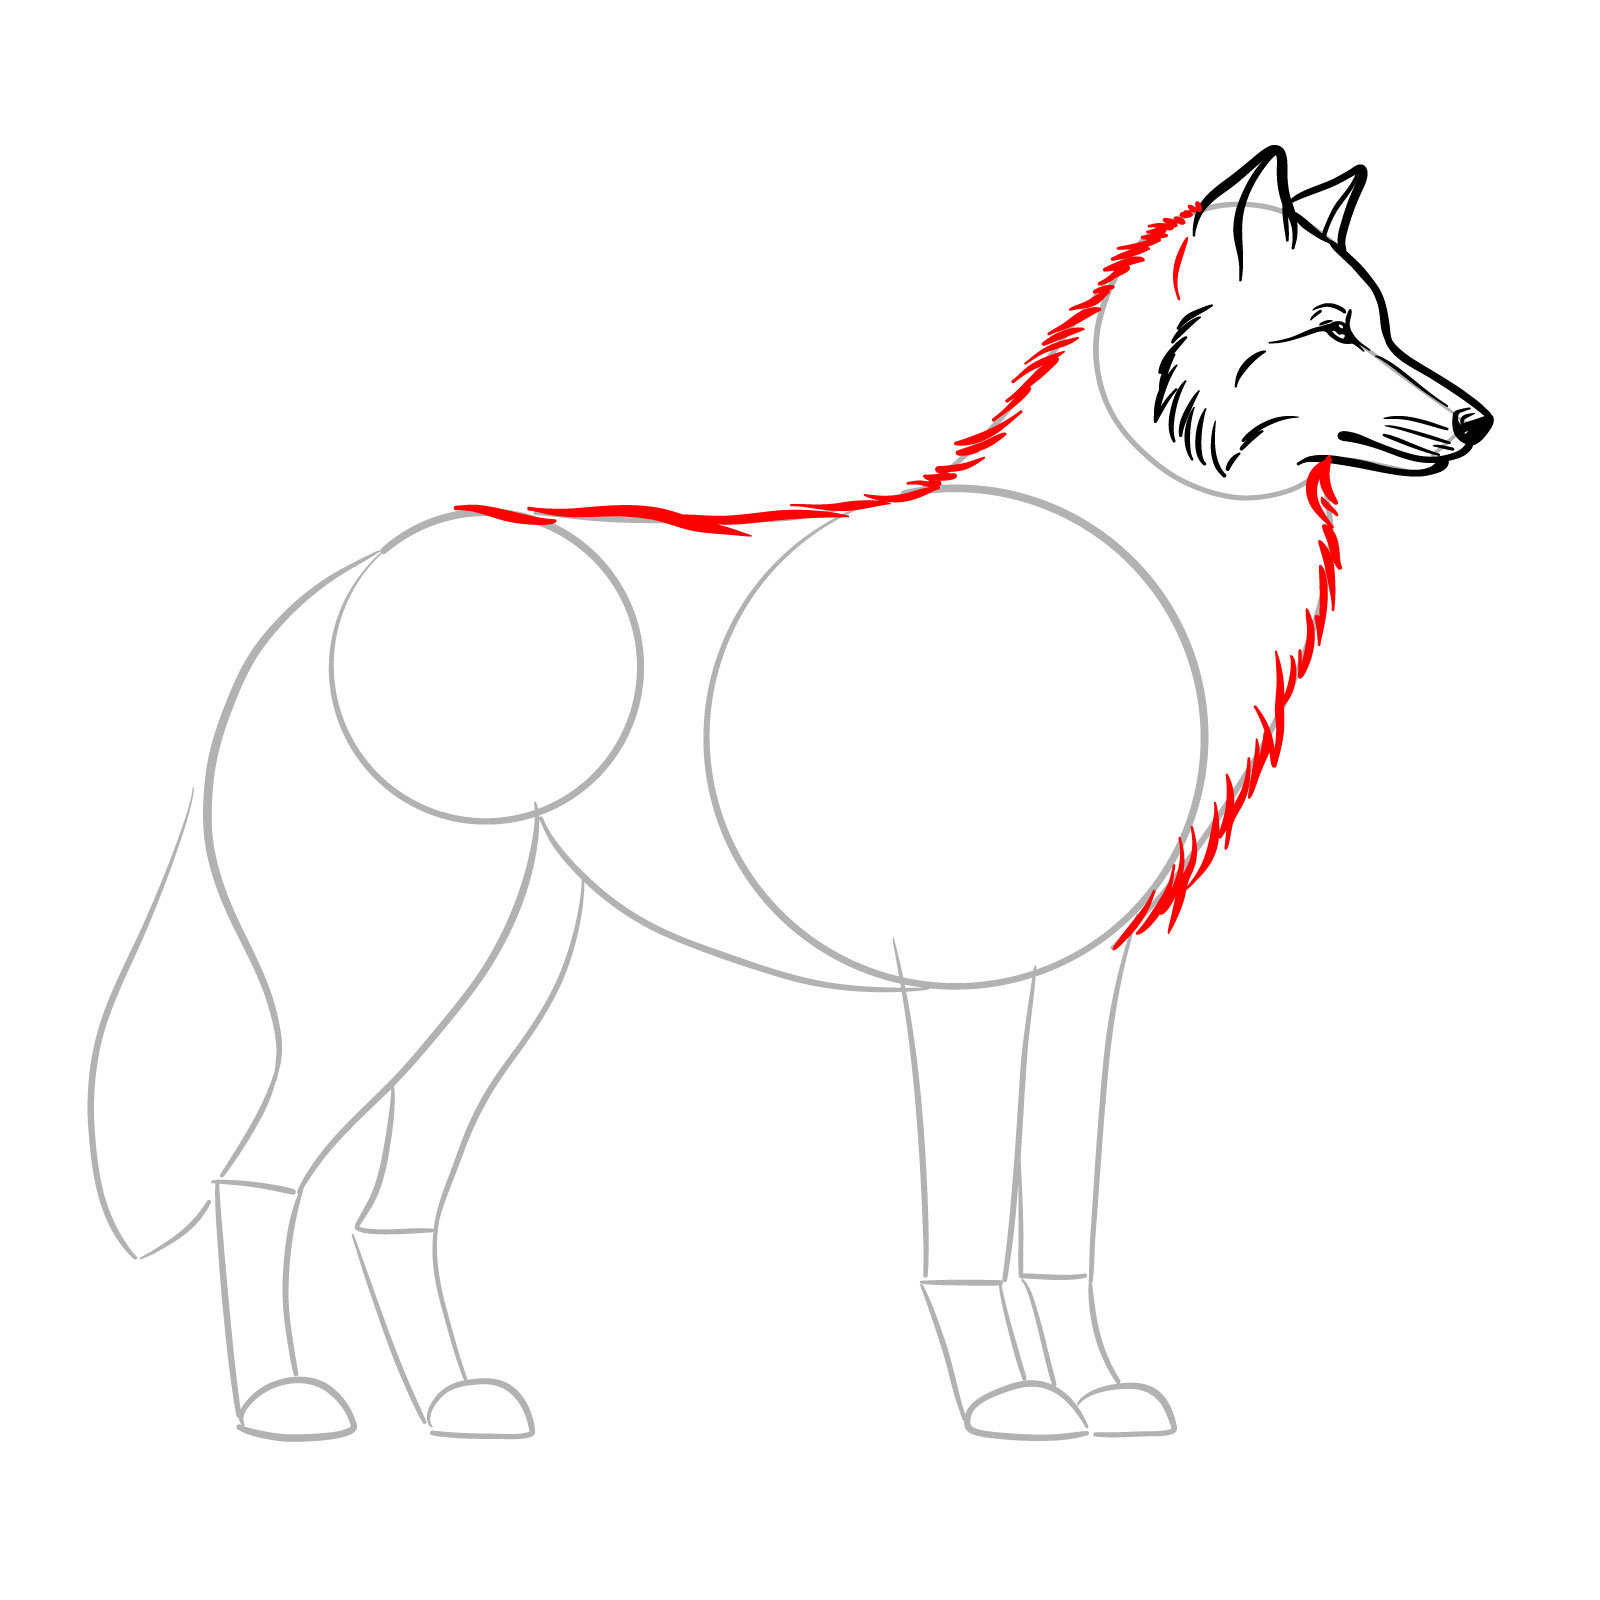
Step 08 – Outline the wolf’s neck and back using short strokes to simulate the texture of fur. Ensure these lines flow naturally with the body’s form, giving the wolf a full and realistic coat
PinCreating fur detail along the wolf’s neck and back
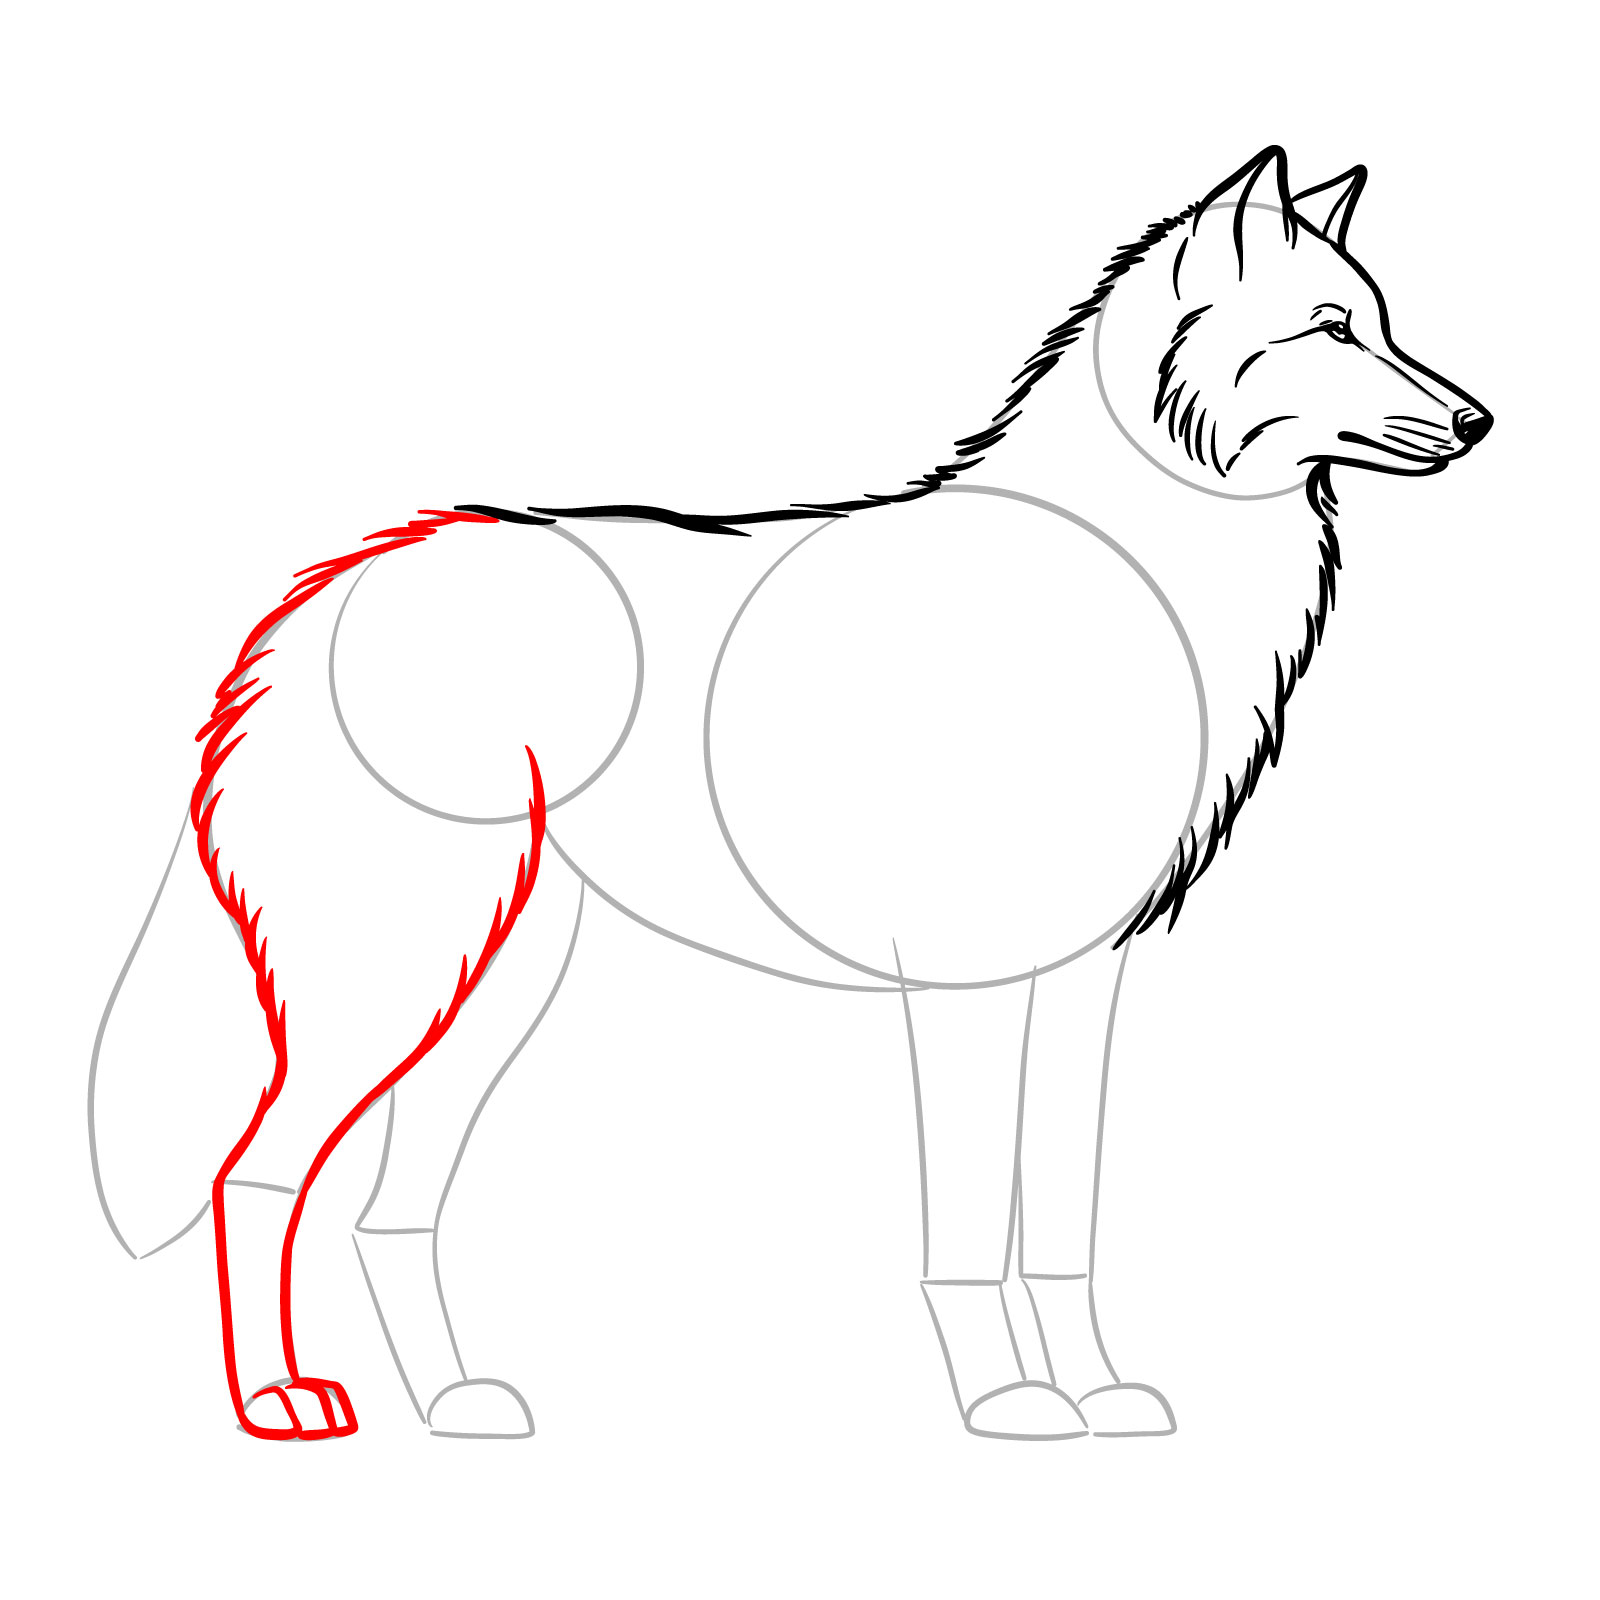
Step 09 – Sketch the rear leg that is closer to us. Begin with the thigh, tapering down to the knee, and finish with the lower leg and paw, making sure to capture the muscular appearance and correct proportions of the wolf’s limb
PinDrawing the first rear leg of the wolf
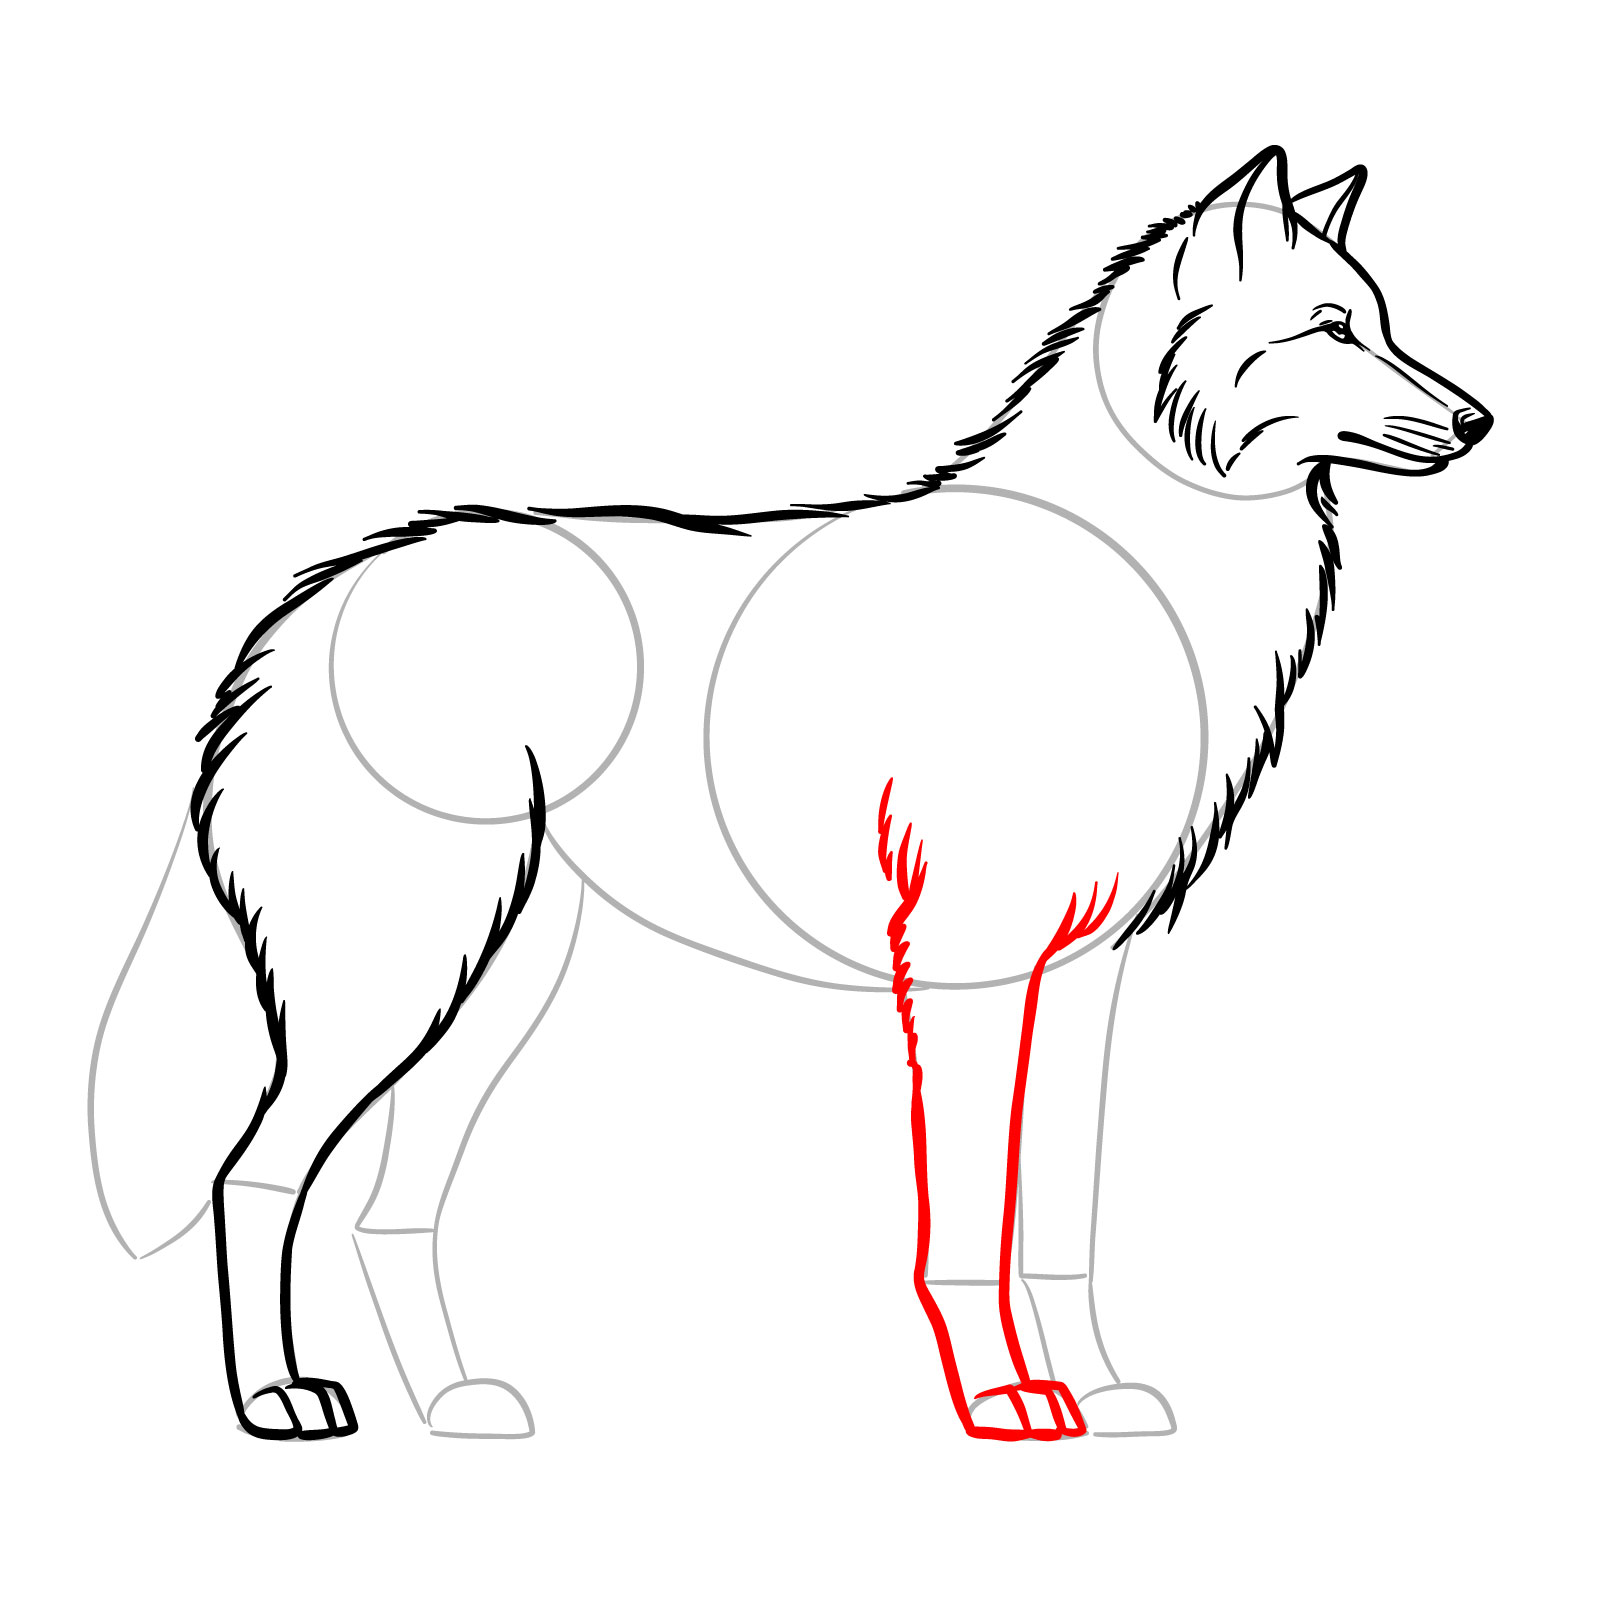
Step 10 – Now, draw the front leg, starting from the lower part of the middle circle and working your way down to the paw. Pay attention to the angles of the joints and the placement of the leg to ensure it looks natural and supports the wolf’s stance
PinSketching the front leg
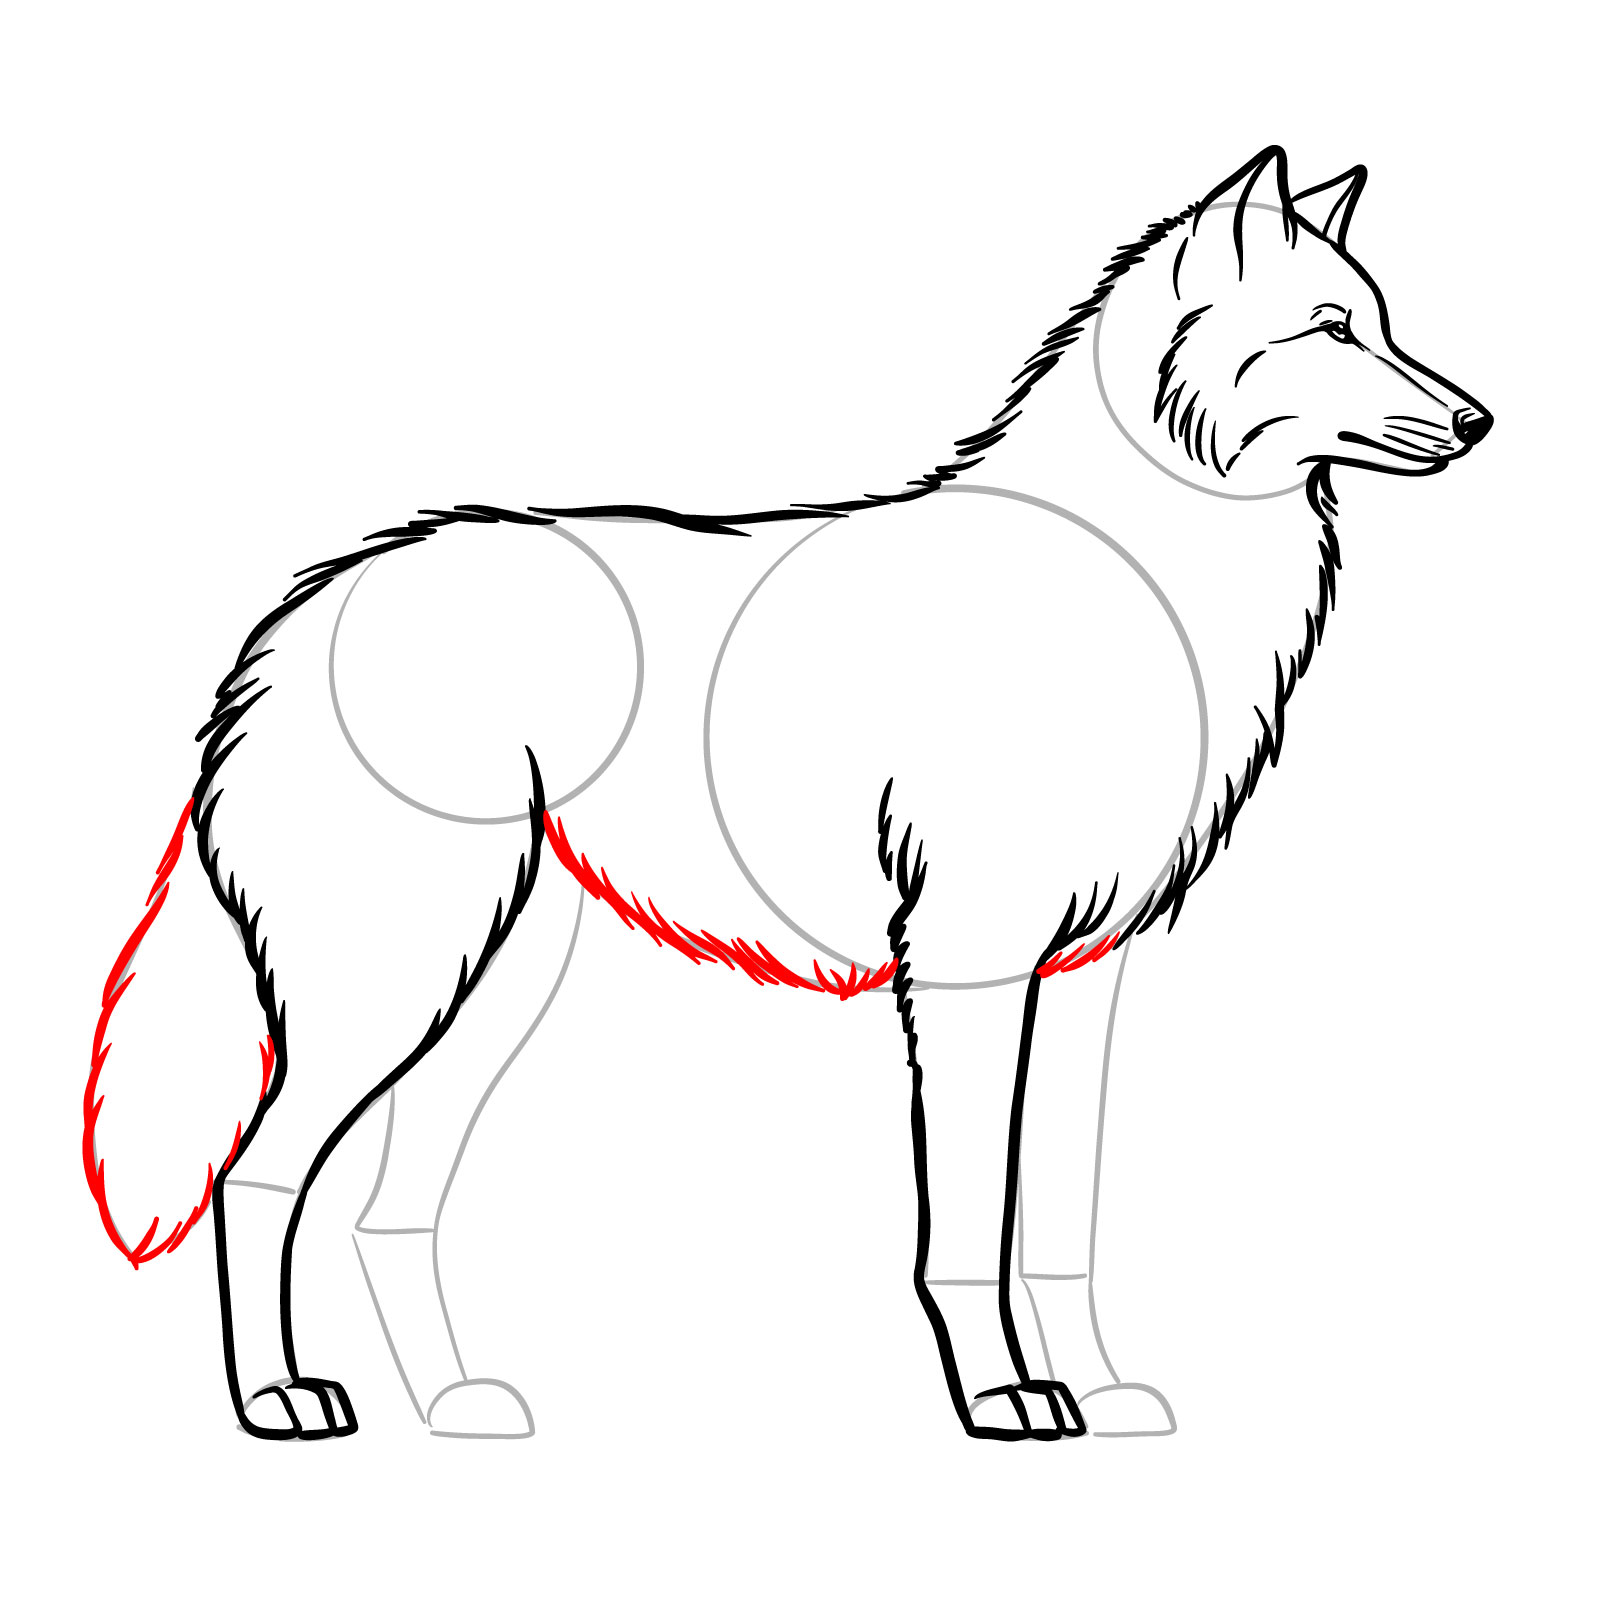
Step 11 – Add details to the underbelly and the tail of the wolf. The belly should be drawn with a series of short strokes (for fur), those should form a slight curve upwards towards the hind legs, and the tail should have a bushy appearance, with lines to suggest fur texture
PinDetailing the underbelly and tail
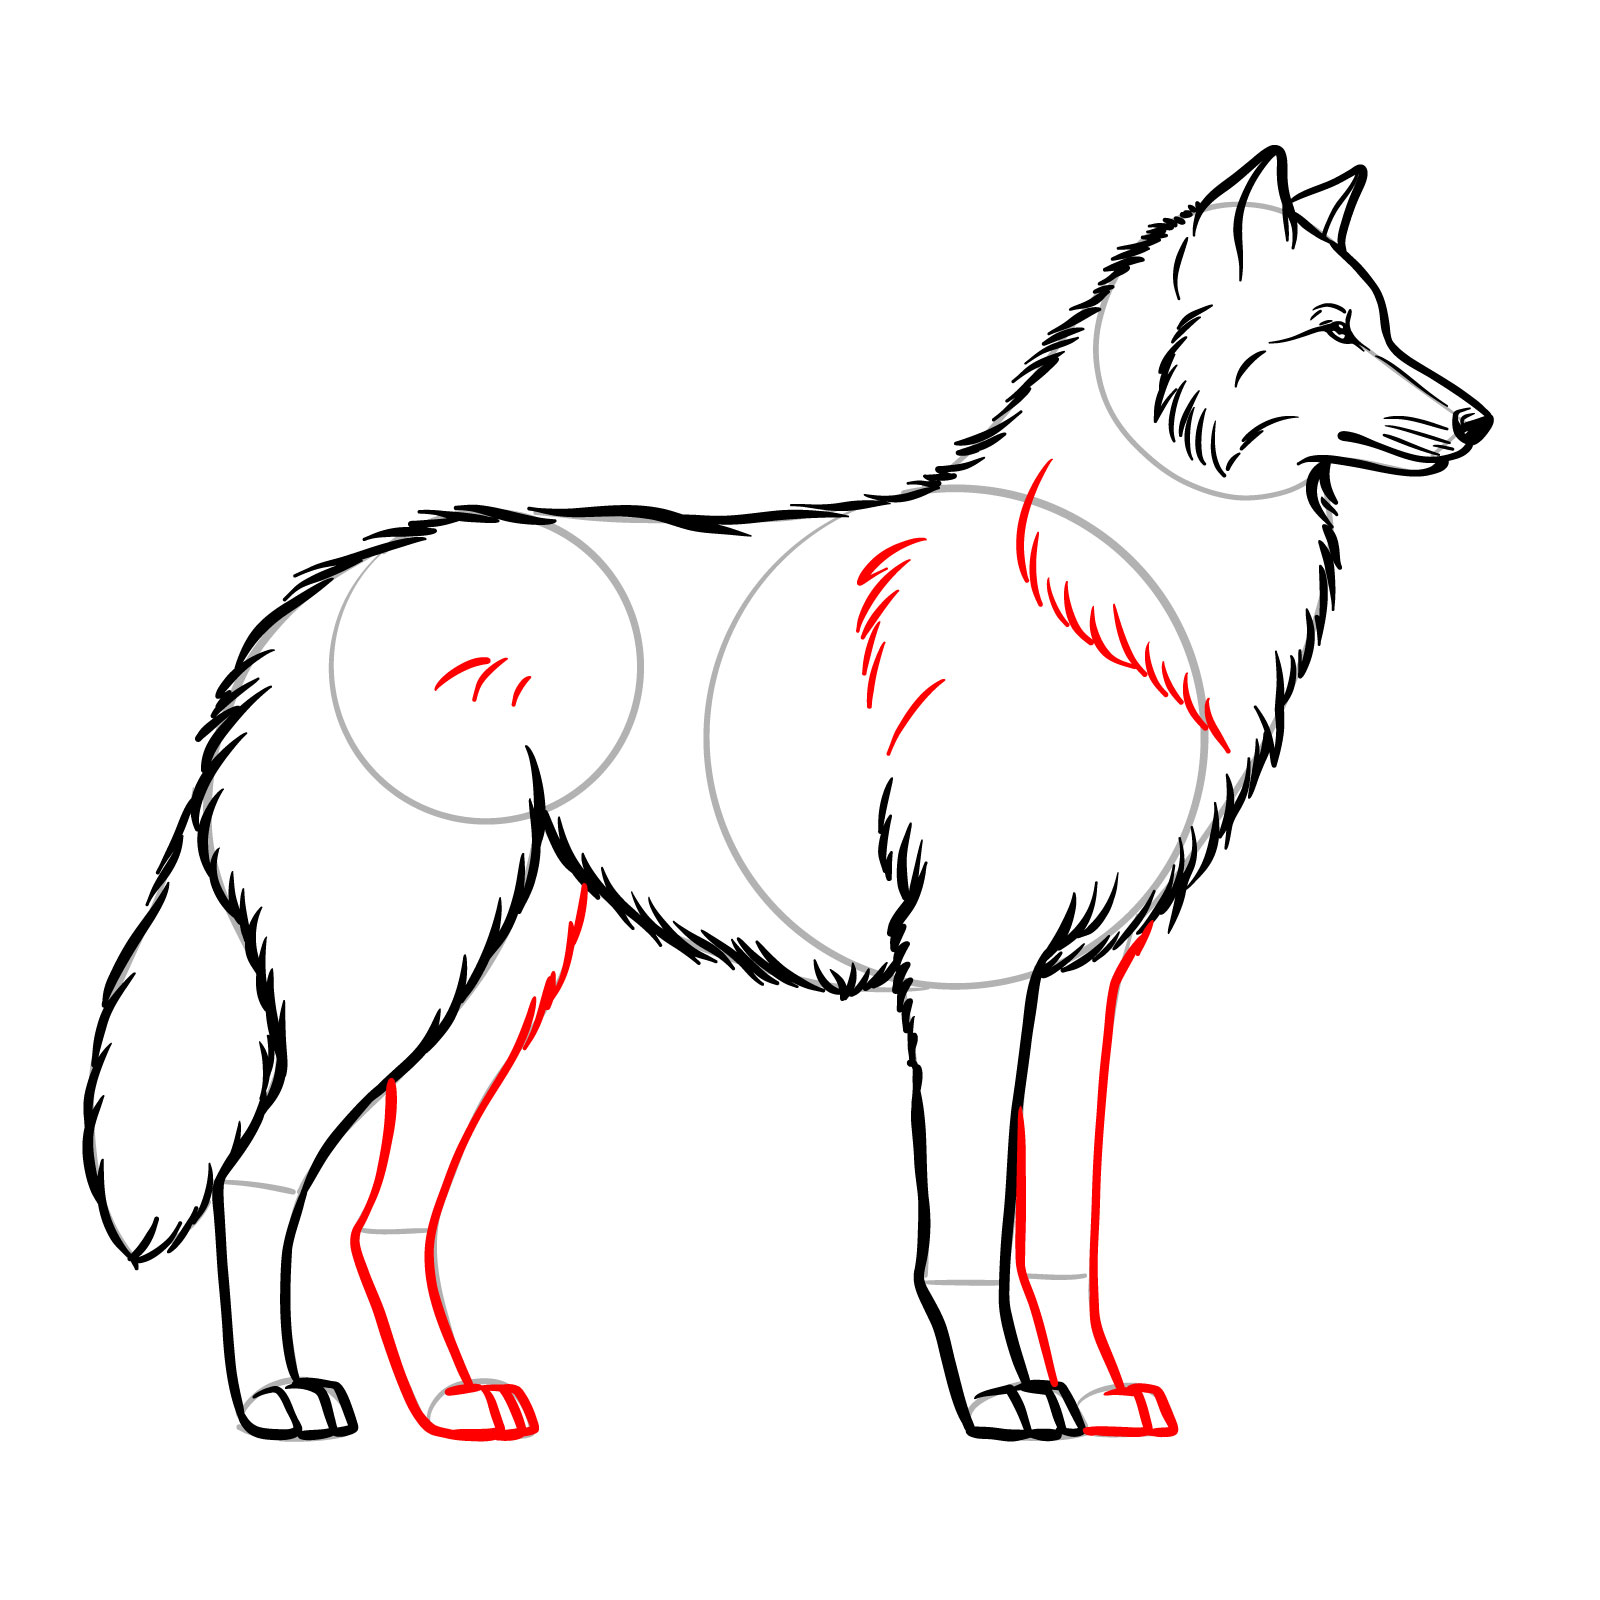
Step 12 – Complete the drawing by sketching the remaining two legs and adding small fur texture details across the body
PinFinalizing the legs and adding fur details to the wolf drawing
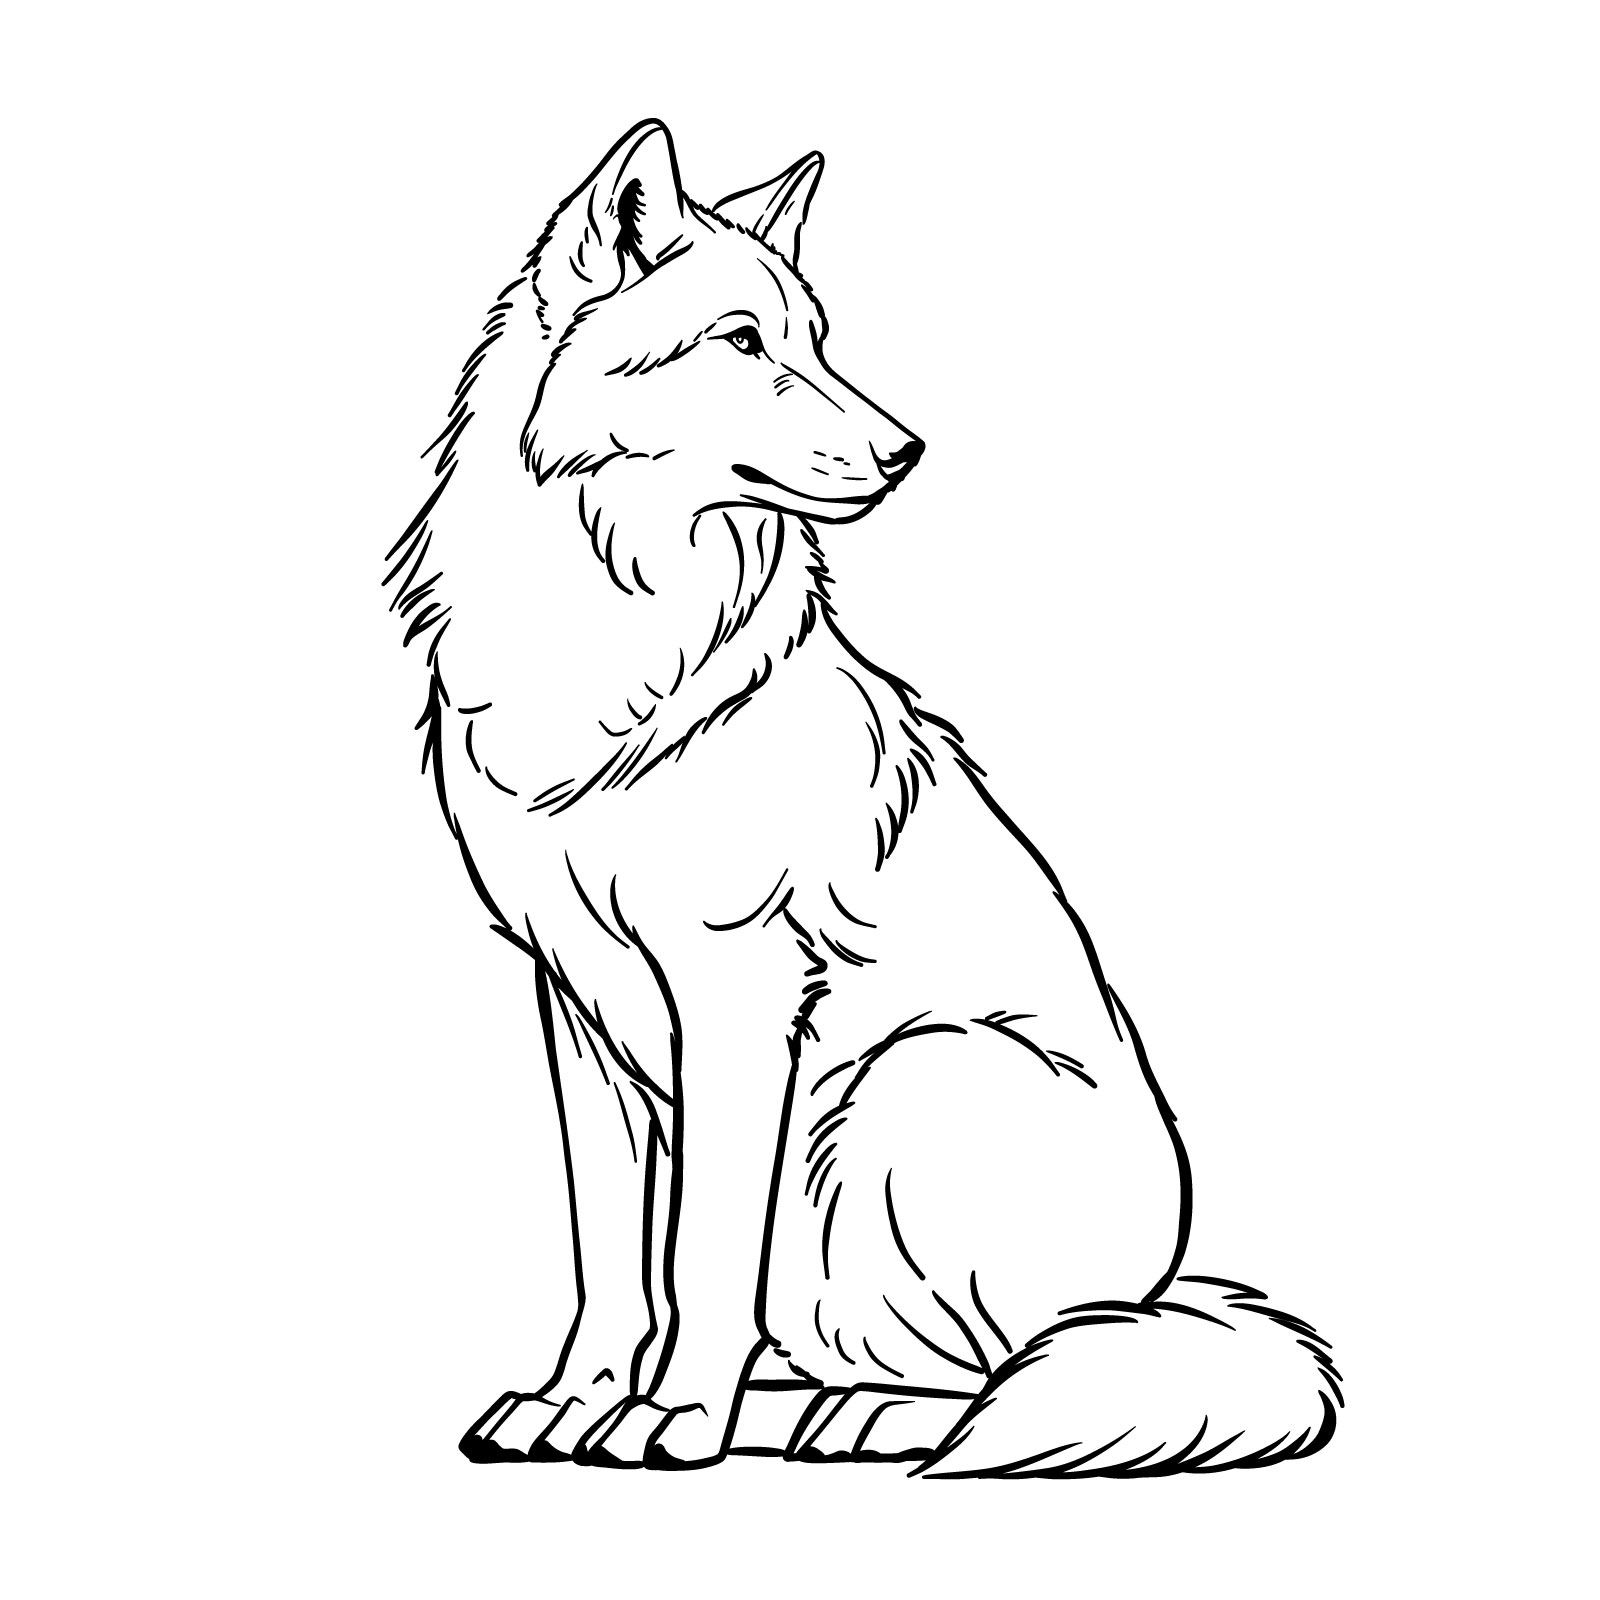
Step 13 – The final optional step is to ink your drawing for a clean, finished look, and erase any remaining pencil marks and the basic sketch. This step will highlight the detailed work you’ve put into learning how to draw a wolf side view and give your wolf drawing a professional appearance. Remember to let the ink dry before erasing to avoid smudging, and use a fine-tip pen to capture all the delicate textures you’ve created. This final step truly brings your wolf to life, making it ready to leap off the page
PinThe completed side view wolf drawing after inking and cleaning
Draw a Sitting Wolf with Head Turned Back in 16 Steps
PinHow to draw a sitting wolf with head turned back
The twelfth guide brings a twist, quite literally, as we learn to draw a sitting wolf with its head turned back. The guide spans 16 steps, with the initial three steps dedicated to creating a basic sketch that outlines the wolf’s seated body and the unique turn of its head. This pose captures a moment of reflection or alertness, adding a narrative element to your drawing. The final depiction will have the wolf’s fur rendered in detailed strokes, and its eyes casting a backward glance, combining to create a sense of movement and character.
When drawing animals in such dynamic poses, it’s helpful to understand the basic anatomy of the subject. For this illustration, pay special attention to the twist in the neck and the way the shoulders and hips align. This knowledge helps in rendering the turn of the head with a natural and believable posture. I tried to make the steps as easy as possible, and hope you’ll enjoy the process.
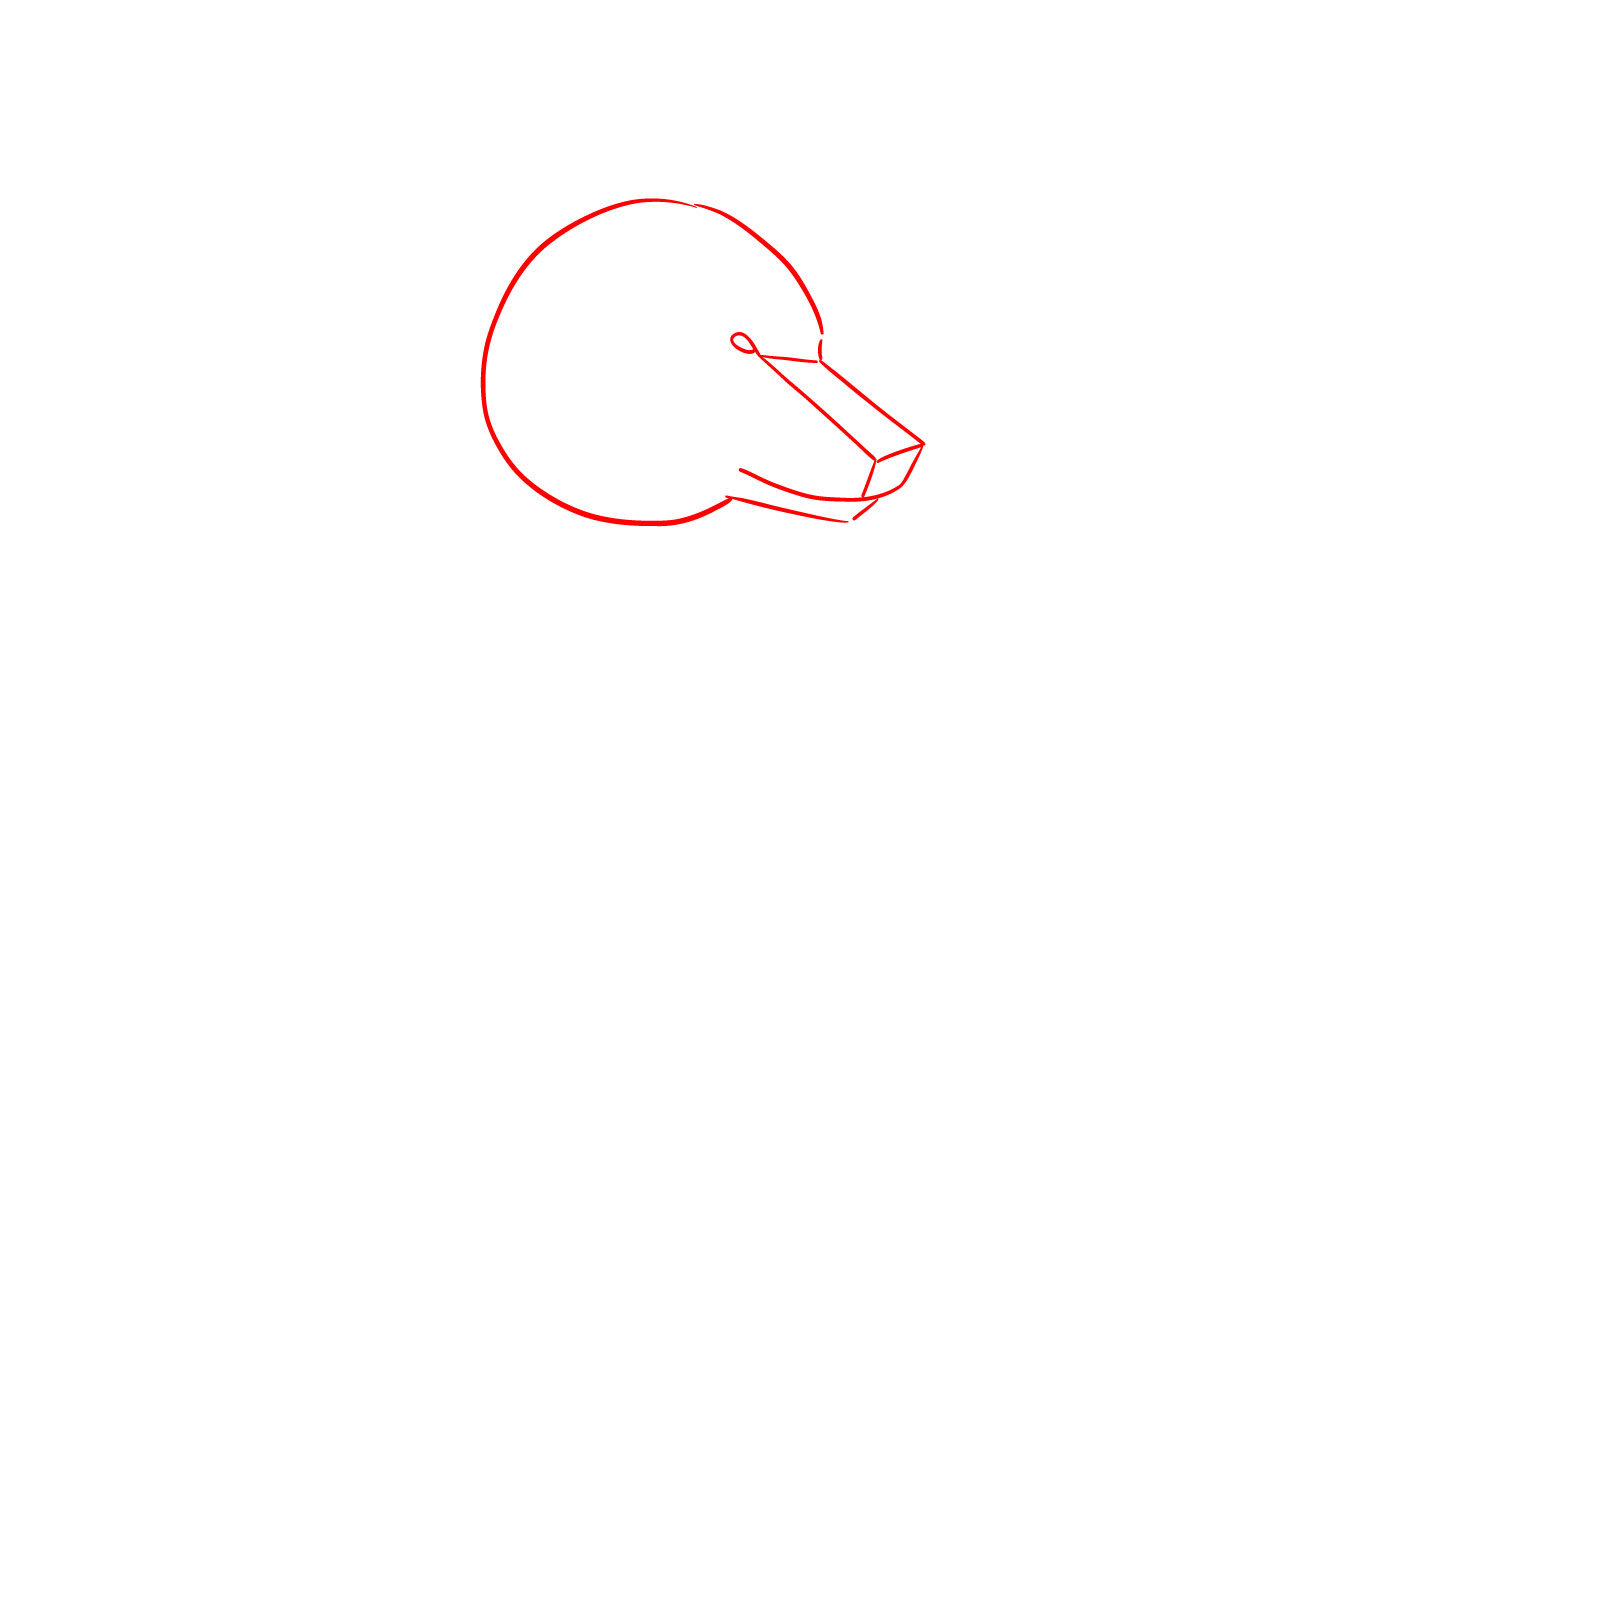
Step 01 – Begin with the familiar head shape as outlined in previous guides. This forms the basis of the wolf’s head, with attention to the snout and the area where the eyes will be placed
PinStarting the sitting wolf drawing with the head shape
Step 02 – Draw the neck coat shape extending downwards and then add a circle for the bottom body. Connect these two with lines that will define the contour of the wolf’s body, taking care to make the body appear seated
PinDefining the wolf’s neck and body with simple shapes
Step 03 – Create simple outlines for the wolf’s legs and tail. The legs should be drawn to convey the wolf’s seated posture, with the tail resting on one side
PinSketching the initial shapes for the legs and tail
Step 04 – Sketch the upper part of the snout, fill in the nose shape at the tip, and draw a line for the mouth, giving careful attention to the wolf’s profile
PinDrawing the upper part of the snout and facial features
Step 05 – Draw the bottom part of the snout and continue the outline to the top of the head. Add the first ear, ensuring it’s in the correct position relative to the head
PinFinishing the snout and adding the top of the head and first ear
Step 06 – Place the eye on the face with a calm and attentive expression, considering the turn of the head and the direction of the wolf’s gaze
PinSketching the eye
Step 07 – Add the second ear to the head, matching the first ear’s position and size, completing the symmetry of the head
PinDrawing the second ear
Step 08 – Finish the ears by adding inner lines to suggest depth and fur texture, which gives the wolf’s ears a realistic and attentive look
PinAdding details to the ears of the sitting wolf
Step 09 – Enhance the head with fur details, especially on the side and around the eye. Use short strokes to suggest the texture and direction of the fur
PinDetailing the head fur
Step 10 – Depict the thick fur around the wolf’s neck. The strokes should be longer than those on the head to show the difference in fur length and to give a fuller appearance
PinDrawing the neck fur
Step 11 – Draw the back line continuing into the tail. Add fur texture to the tail, making it appear bushy and full, which is characteristic of wolves
PinOutlining the wolf’s back and tail with fur details
Step 12 – Define the chest area and sketch the nearest front leg. Ensure the leg is correctly proportioned and the paw is firmly placed on the ground
PinSketching the chest and the foremost front leg
Step 13 – Create the shape of the rear leg, showing the bent posture as the wolf sits. The leg should tuck under the body with the paw just visible
PinDetailing the rear leg on the sitting wolf
Step 14 – Complete the leg outlines, ensuring they support the wolf’s seated posture. The far legs should be less detailed due to perspective
PinDrawing the remaining legs of the seated wolf
Step 15 – Refine the drawing with fur details on the body, legs, and neck. Add whisker marks and facial features to bring realism to the sketch
PinEnhancing the drawing with fur, whisker marks, and facial details
Step 16 – Finish the drawing by erasing any remaining construction lines and optionally inking over the sketch for a polished look. This step emphasizes the depth and detail of your work, highlighting the majestic posture and keen expression typical of wolves
PinFinal inking of the sitting wolf drawing
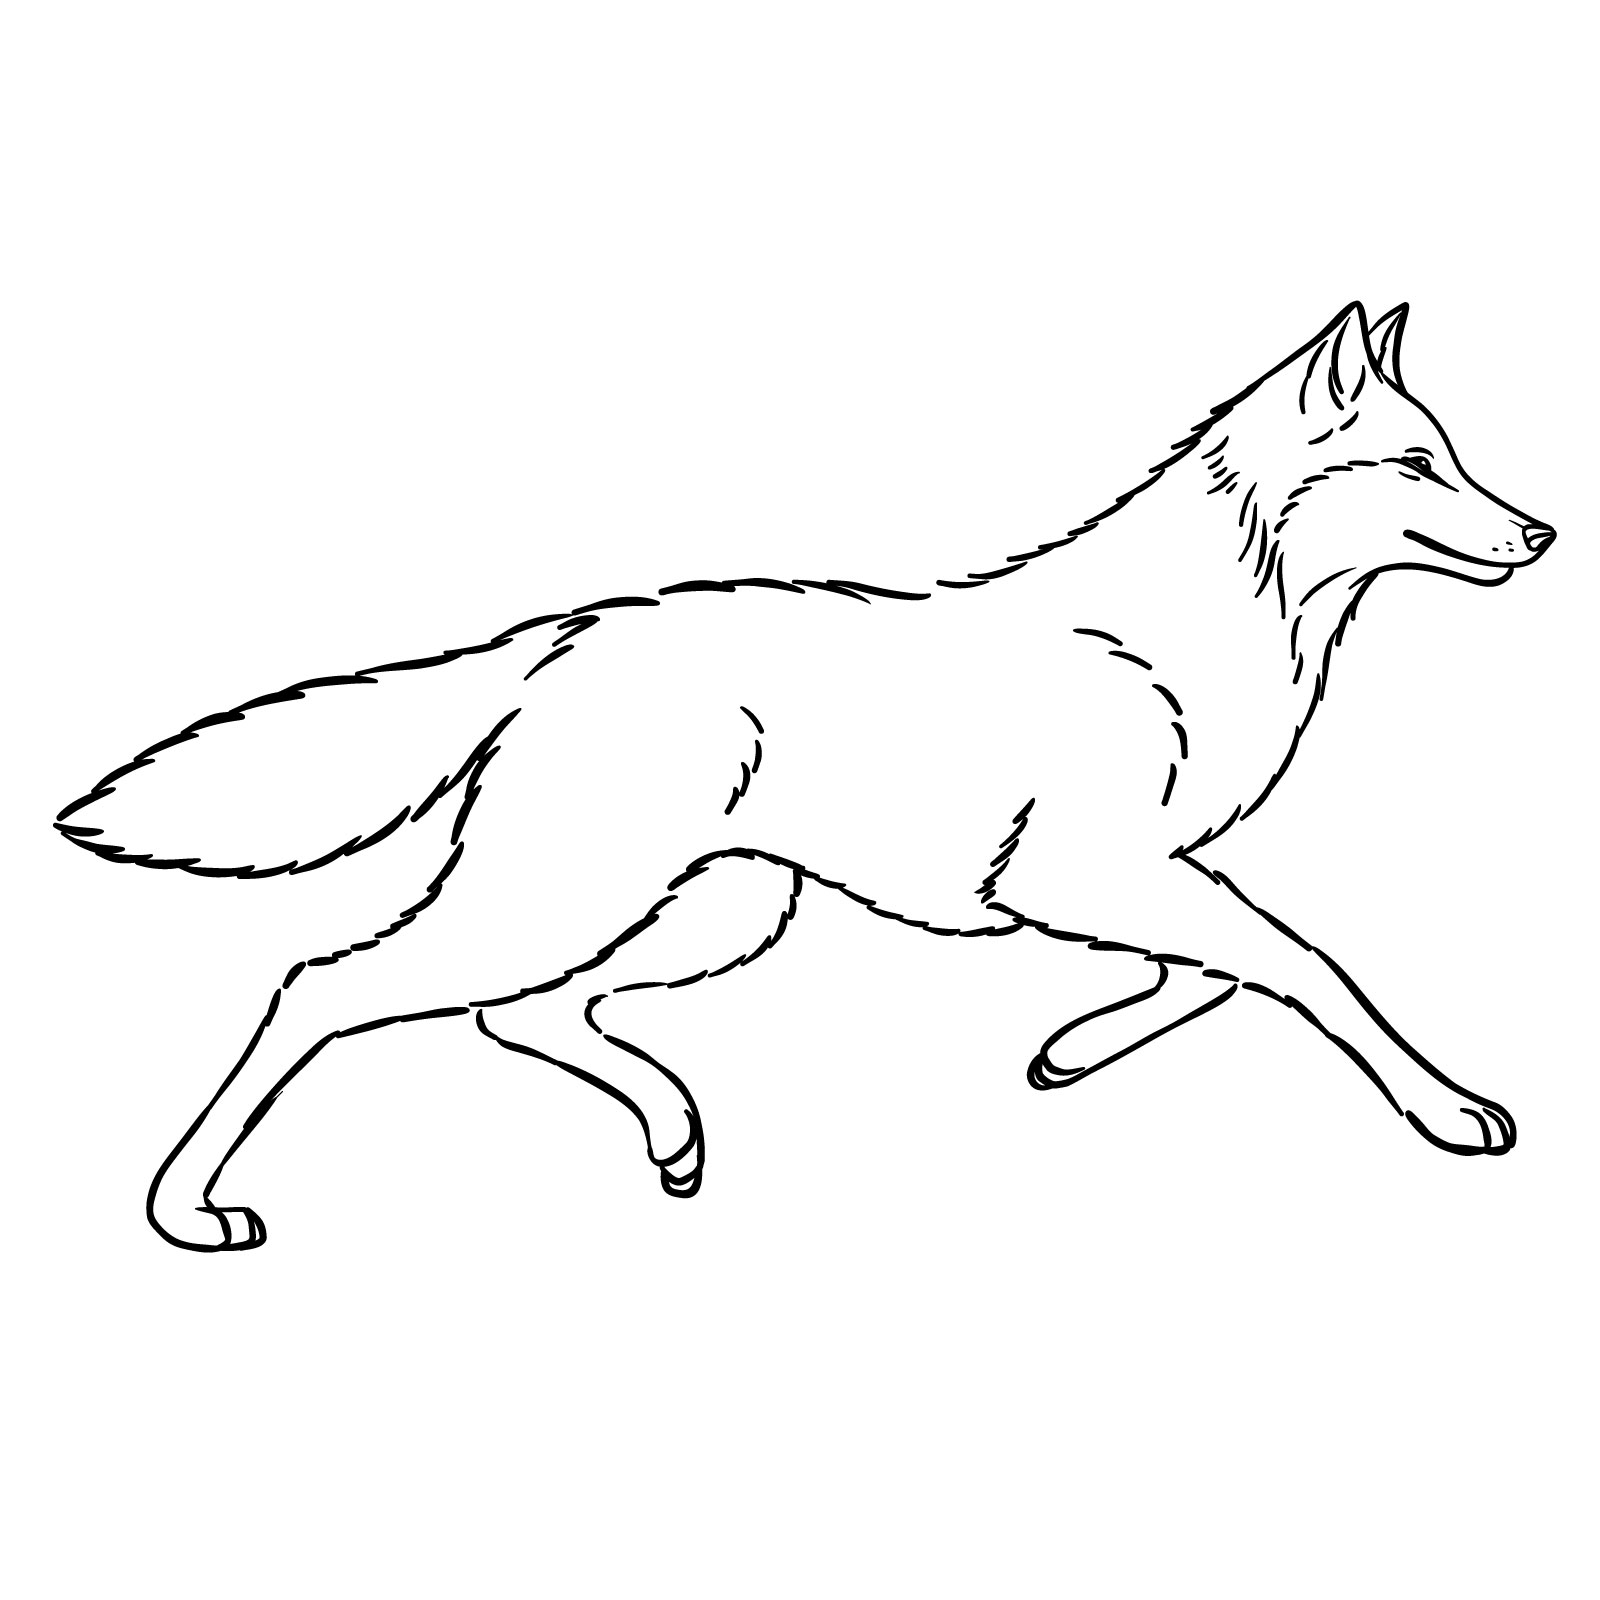
How to Draw a Running Wolf (Side View) in 12 Steps
PinHow to draw a running wolf
The thirteenth guide in the series captures the swift motion of a running wolf from a side view. This guide is divided into 12 steps, starting with two for the basic sketch that lays the foundation for the wolf’s body in motion. Focusing on the stride and the flow of the fur, you will depict the wolf’s powerful legs and streamlined body designed for speed. The final drawing will convey the wolf’s agile movement and the graceful, yet potent energy that these animals are known for.
When illustrating motion, it’s important to consider the position of the legs and the angle of the body. Observe how the wolf’s legs are extended and the body is angled to suggest forward momentum. Capturing the essence of movement in a still image relies on these subtleties. Also, note how the fur contours to the body, highlighting the direction of movement. Keep your lines fluid to reflect the wolf’s swift pace and allow the drawing to express the elegance of its run.
Step 01 – Start your drawing with a head shape similar to previous side view wolf drawings. Create a larger circle for the widest part of the body and a circle slightly larger than the head shape for the lower body. Draw lines connecting the two body circles and the head shape to establish the wolf’s body
PinBegin your running wolf drawing with the foundational shapes for the head and body
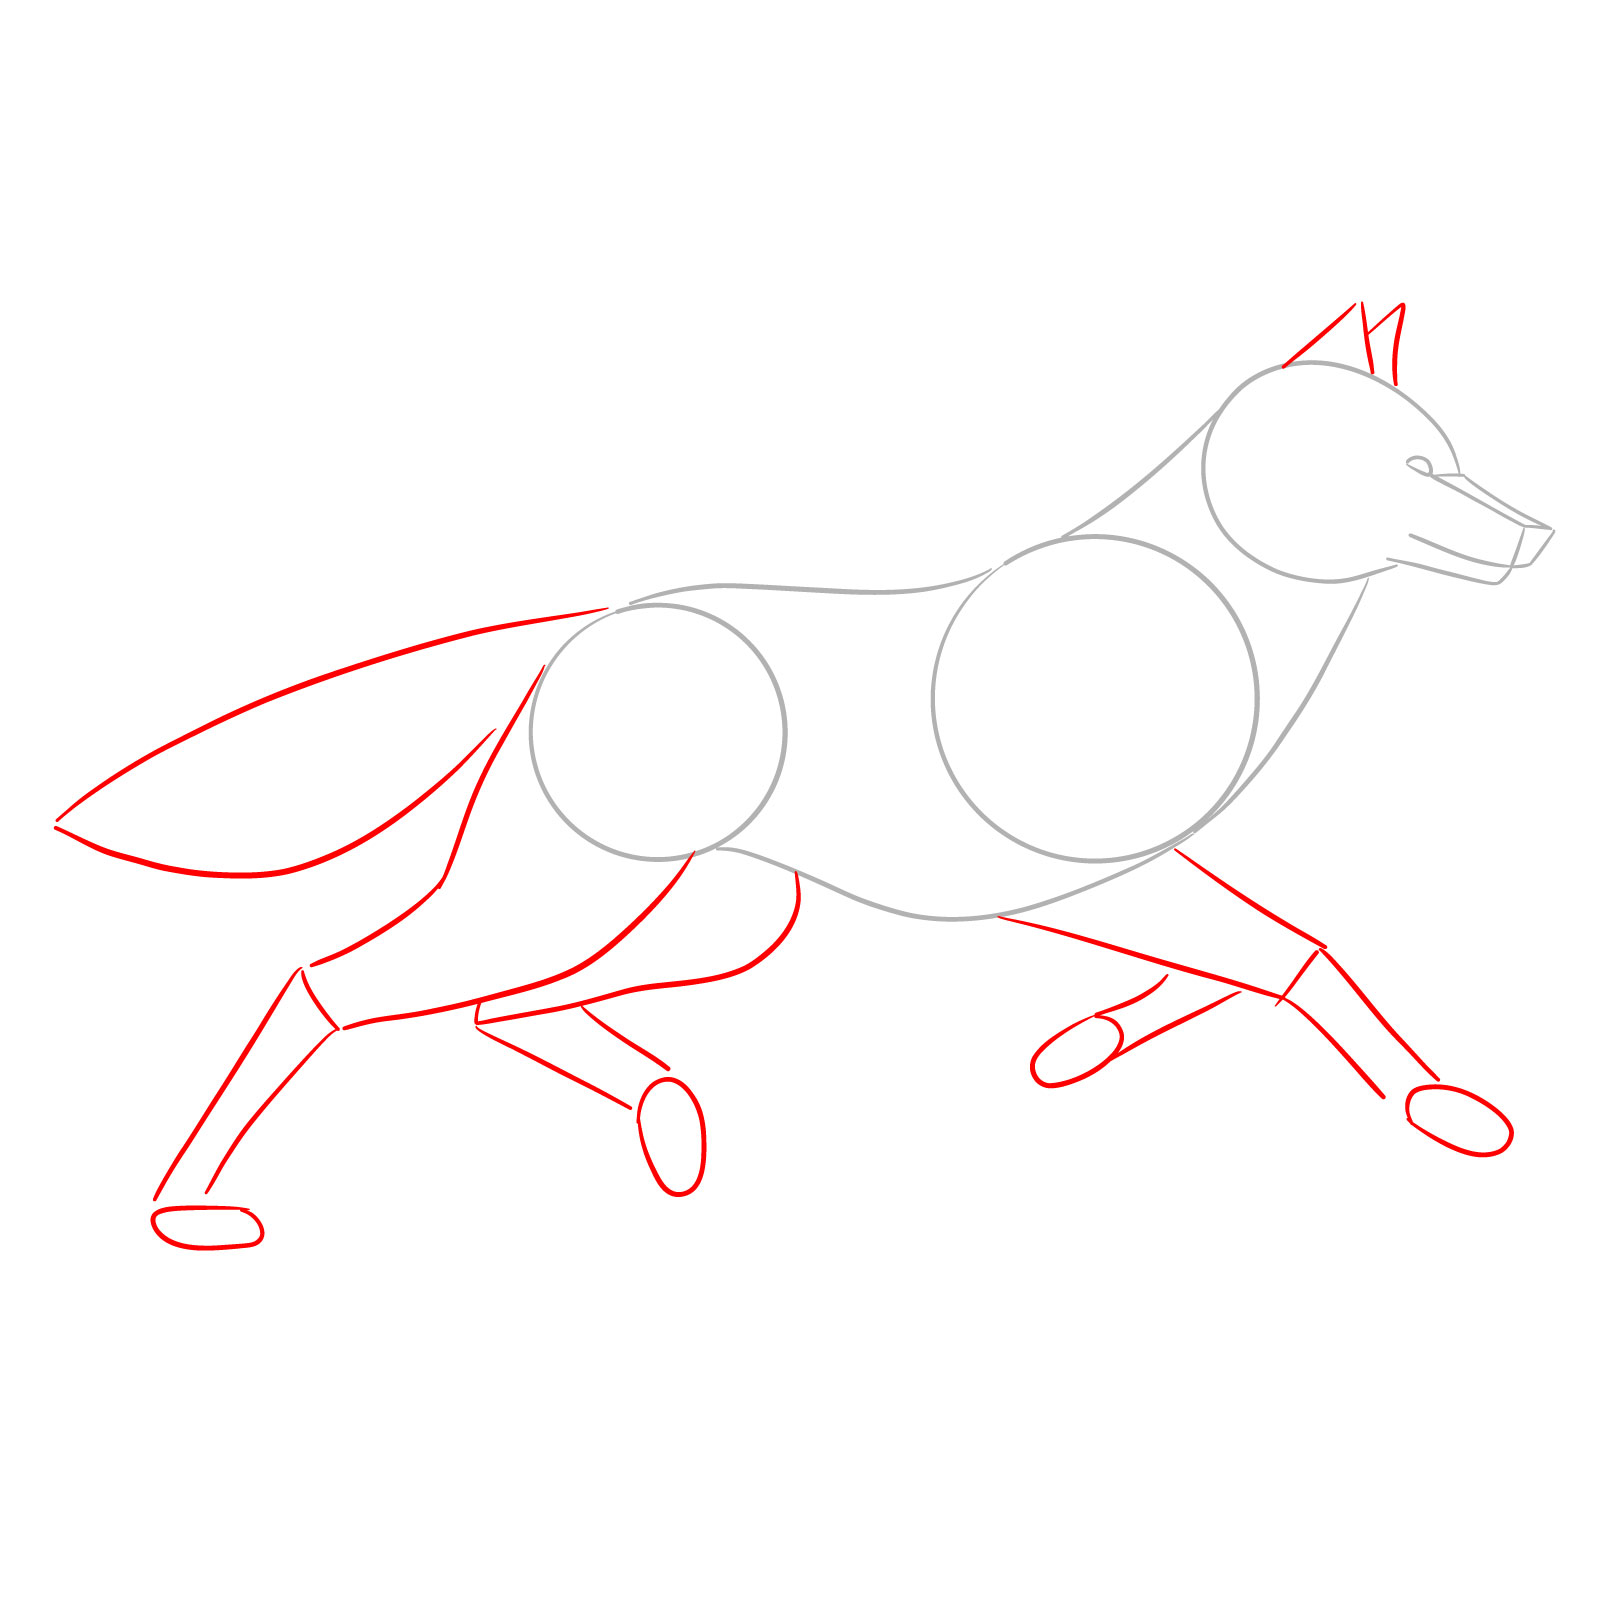
Step 02 – For the second step, sketch the outlines for the wolf’s legs and tail. Position the leg shapes to capture the motion of running, with the rear legs extended backward and the front legs reaching forward. The tail shape should flow with the movement
PinThe second step introduces the leg and tail shapes
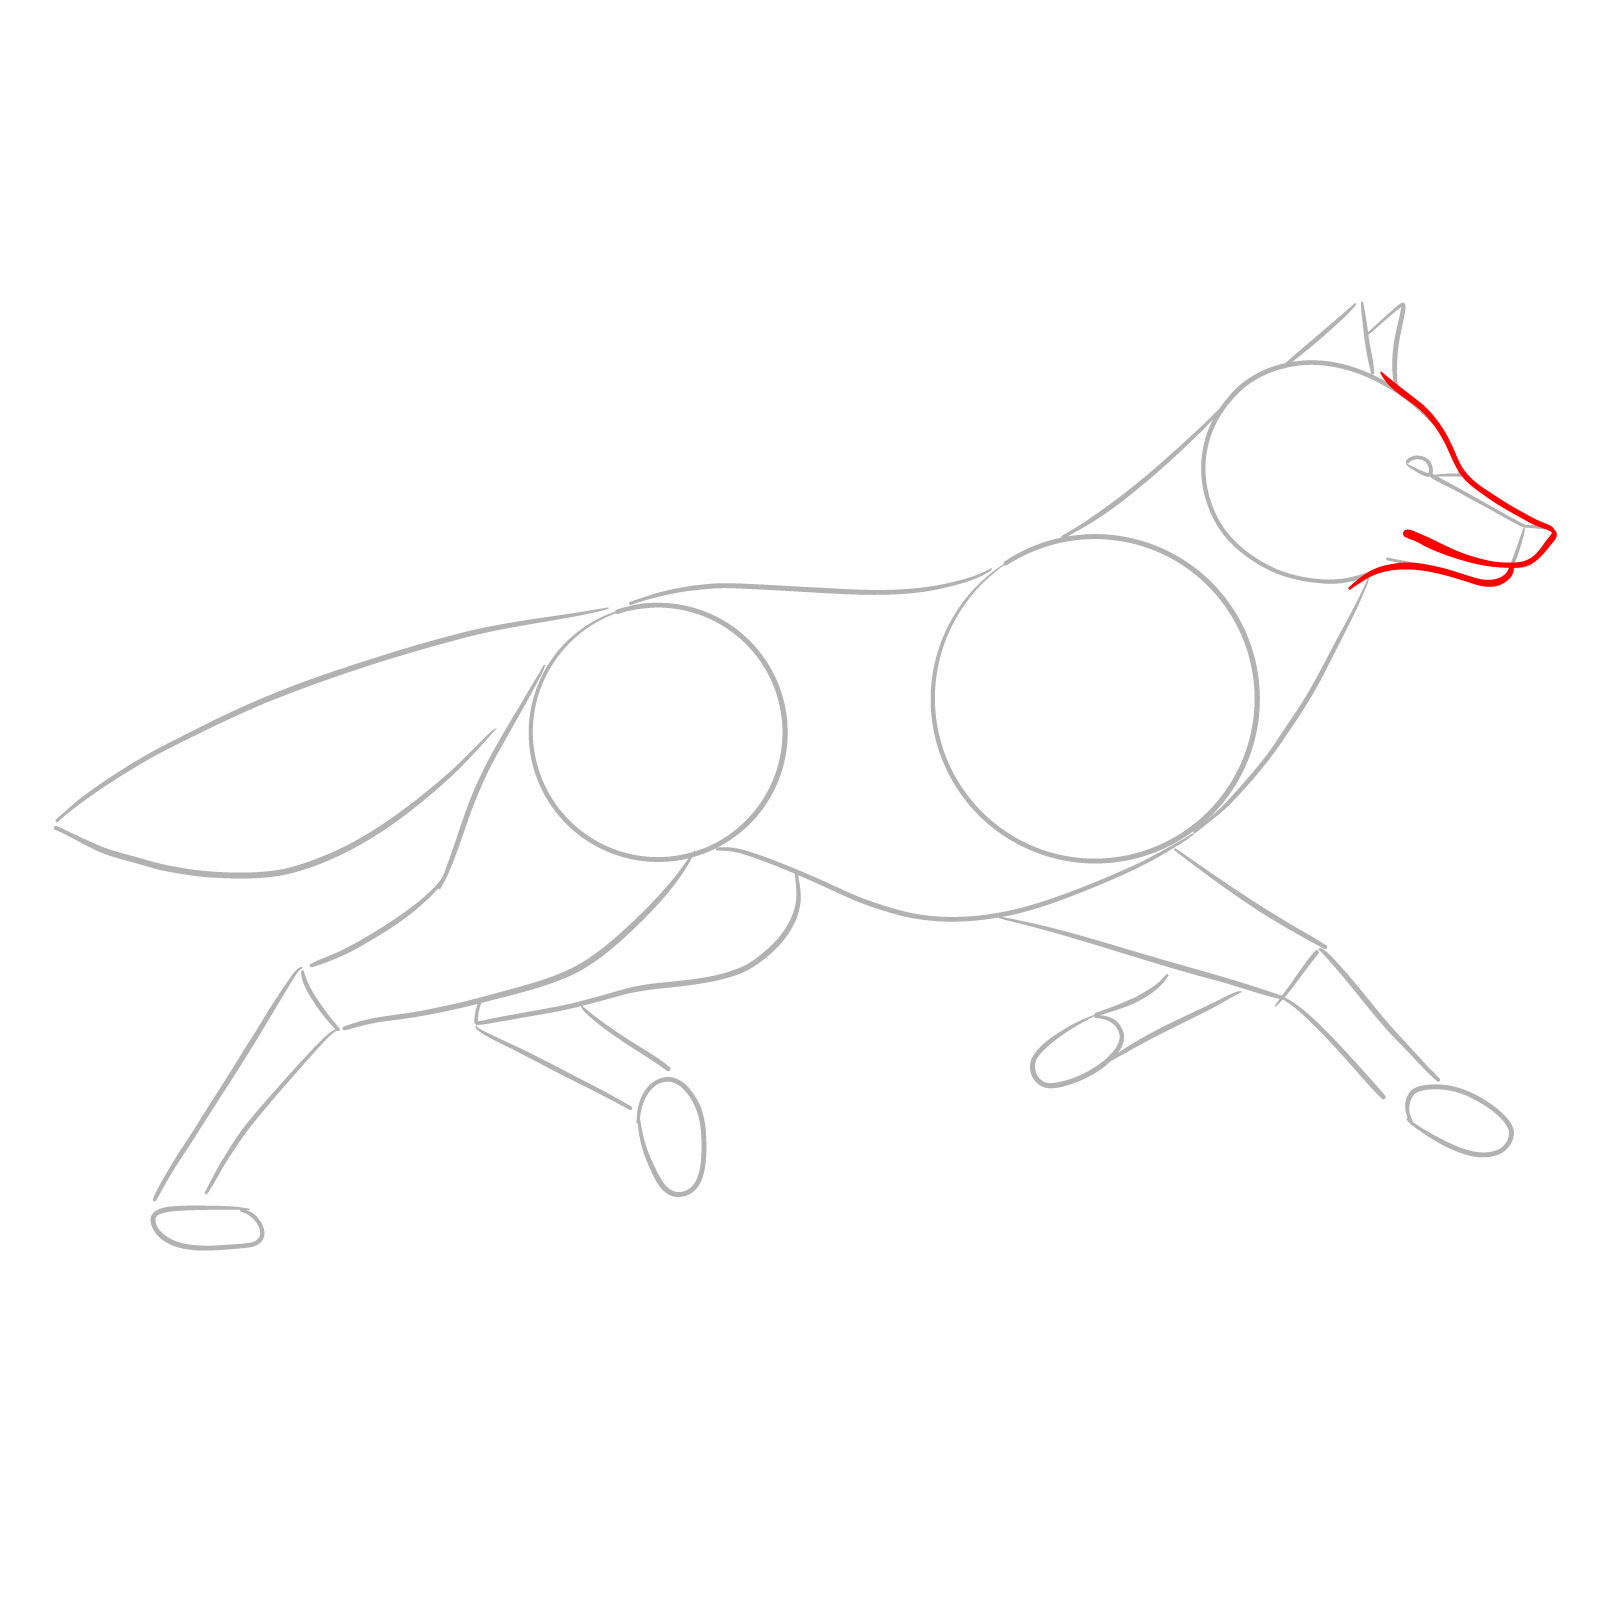
Step 03 – Now refine the wolf’s head by adding the snout, chin, and forehead. The snout should protrude forward, with the chin underneath it, and the forehead rising above, all aligning to suggest a forward motion
PinDefining the wolf’s head features
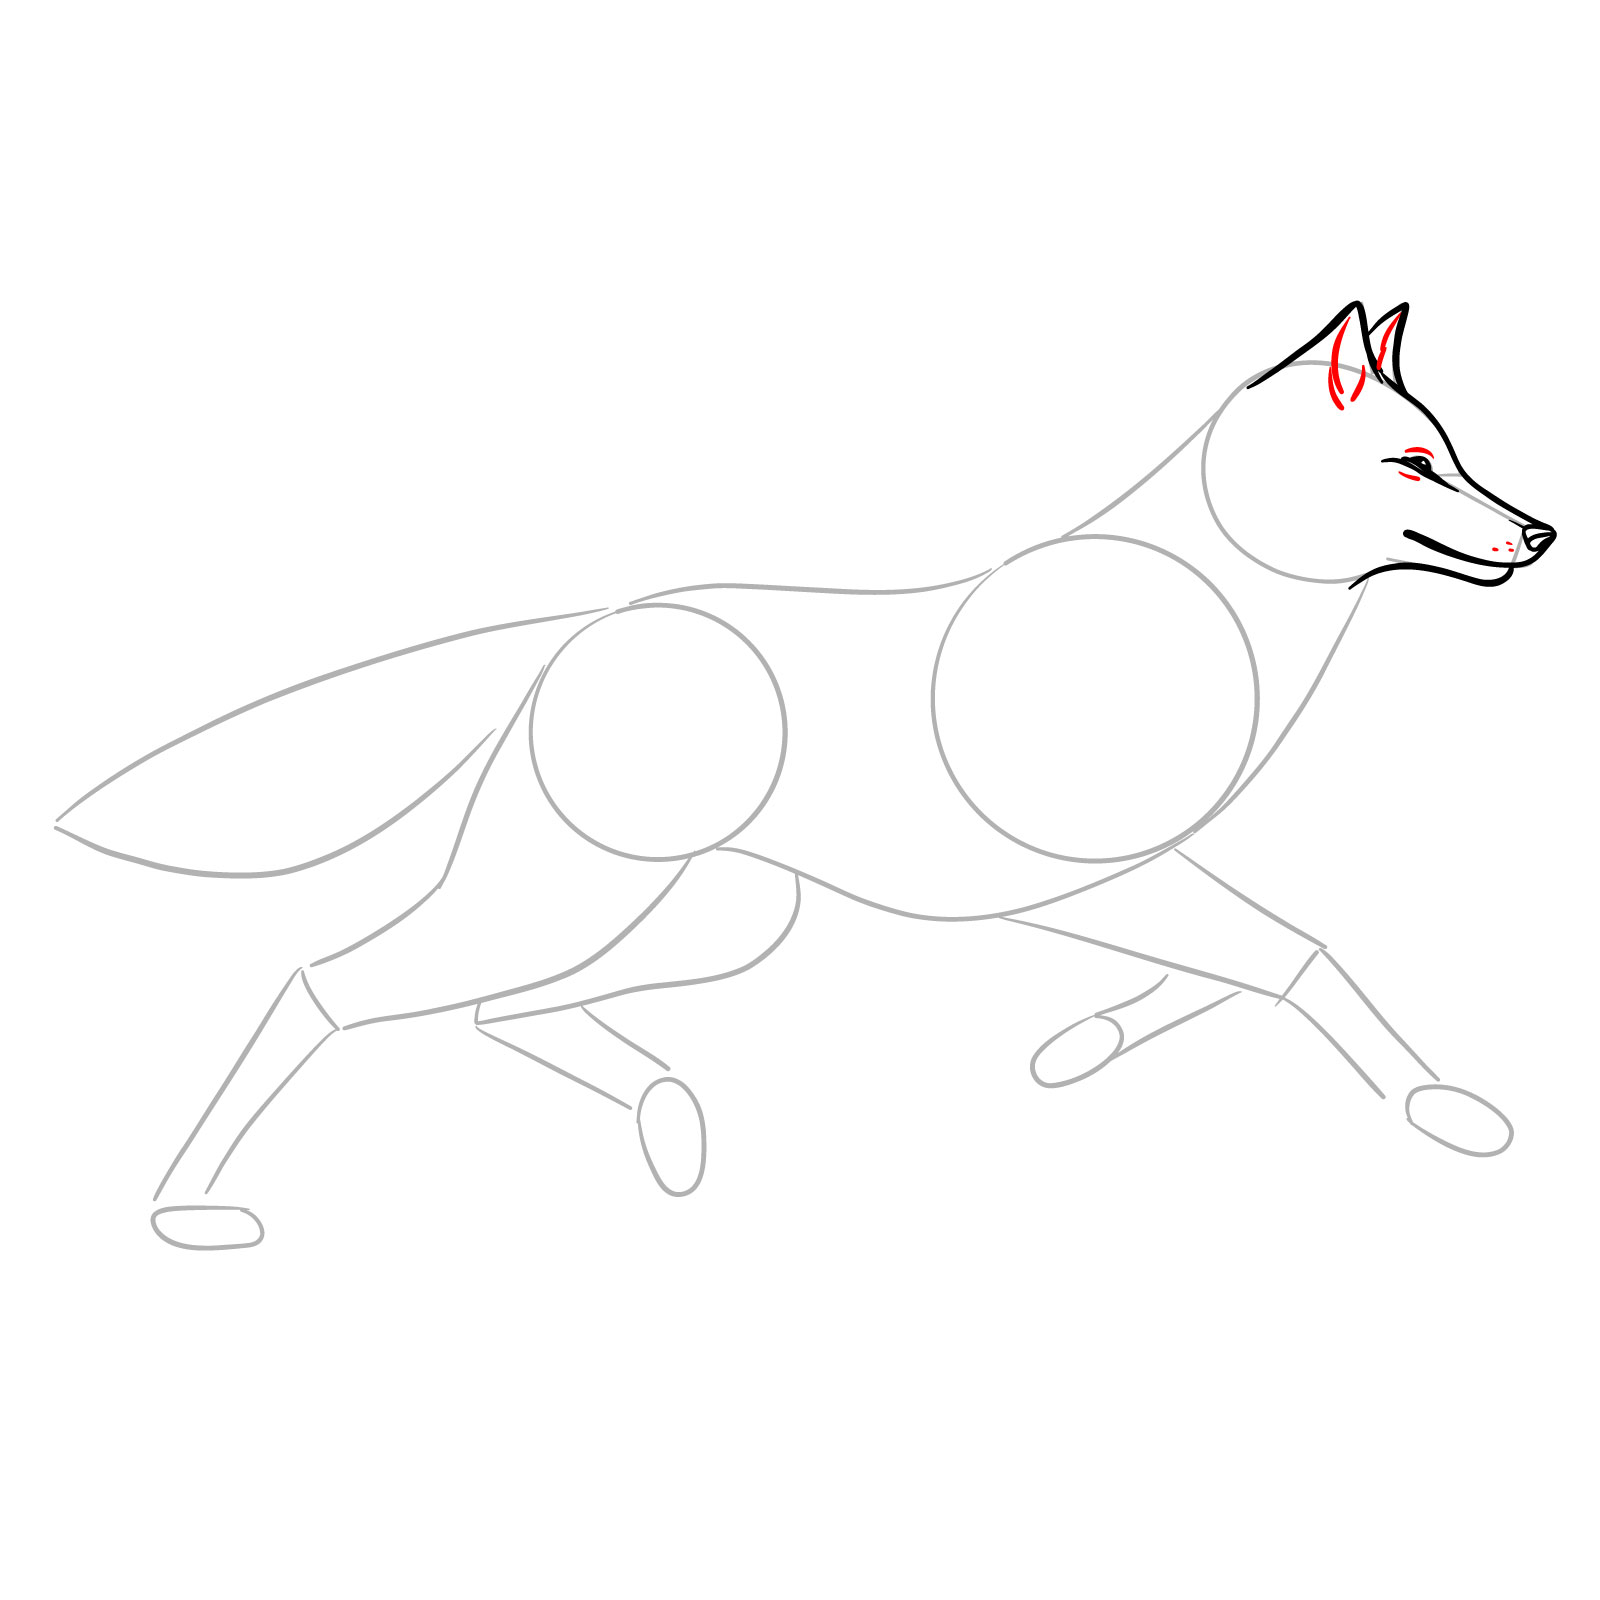
Step 04 – In this step, focus on the facial details by drawing the eye, nose, and ears. Place the eye keenly gazing forward, the nose at the tip of the snout, and the ears perked up to capture the wolf’s alertness as it runs
PinAdding facial details
Step 05 – Enhance the head with whisker marks and add small details around the eye to give expression. Sketch the inner details of the ears to give them depth and texture, completing the wolf’s head
PinEnhancing the running wolf’s head with whisker marks and ear details
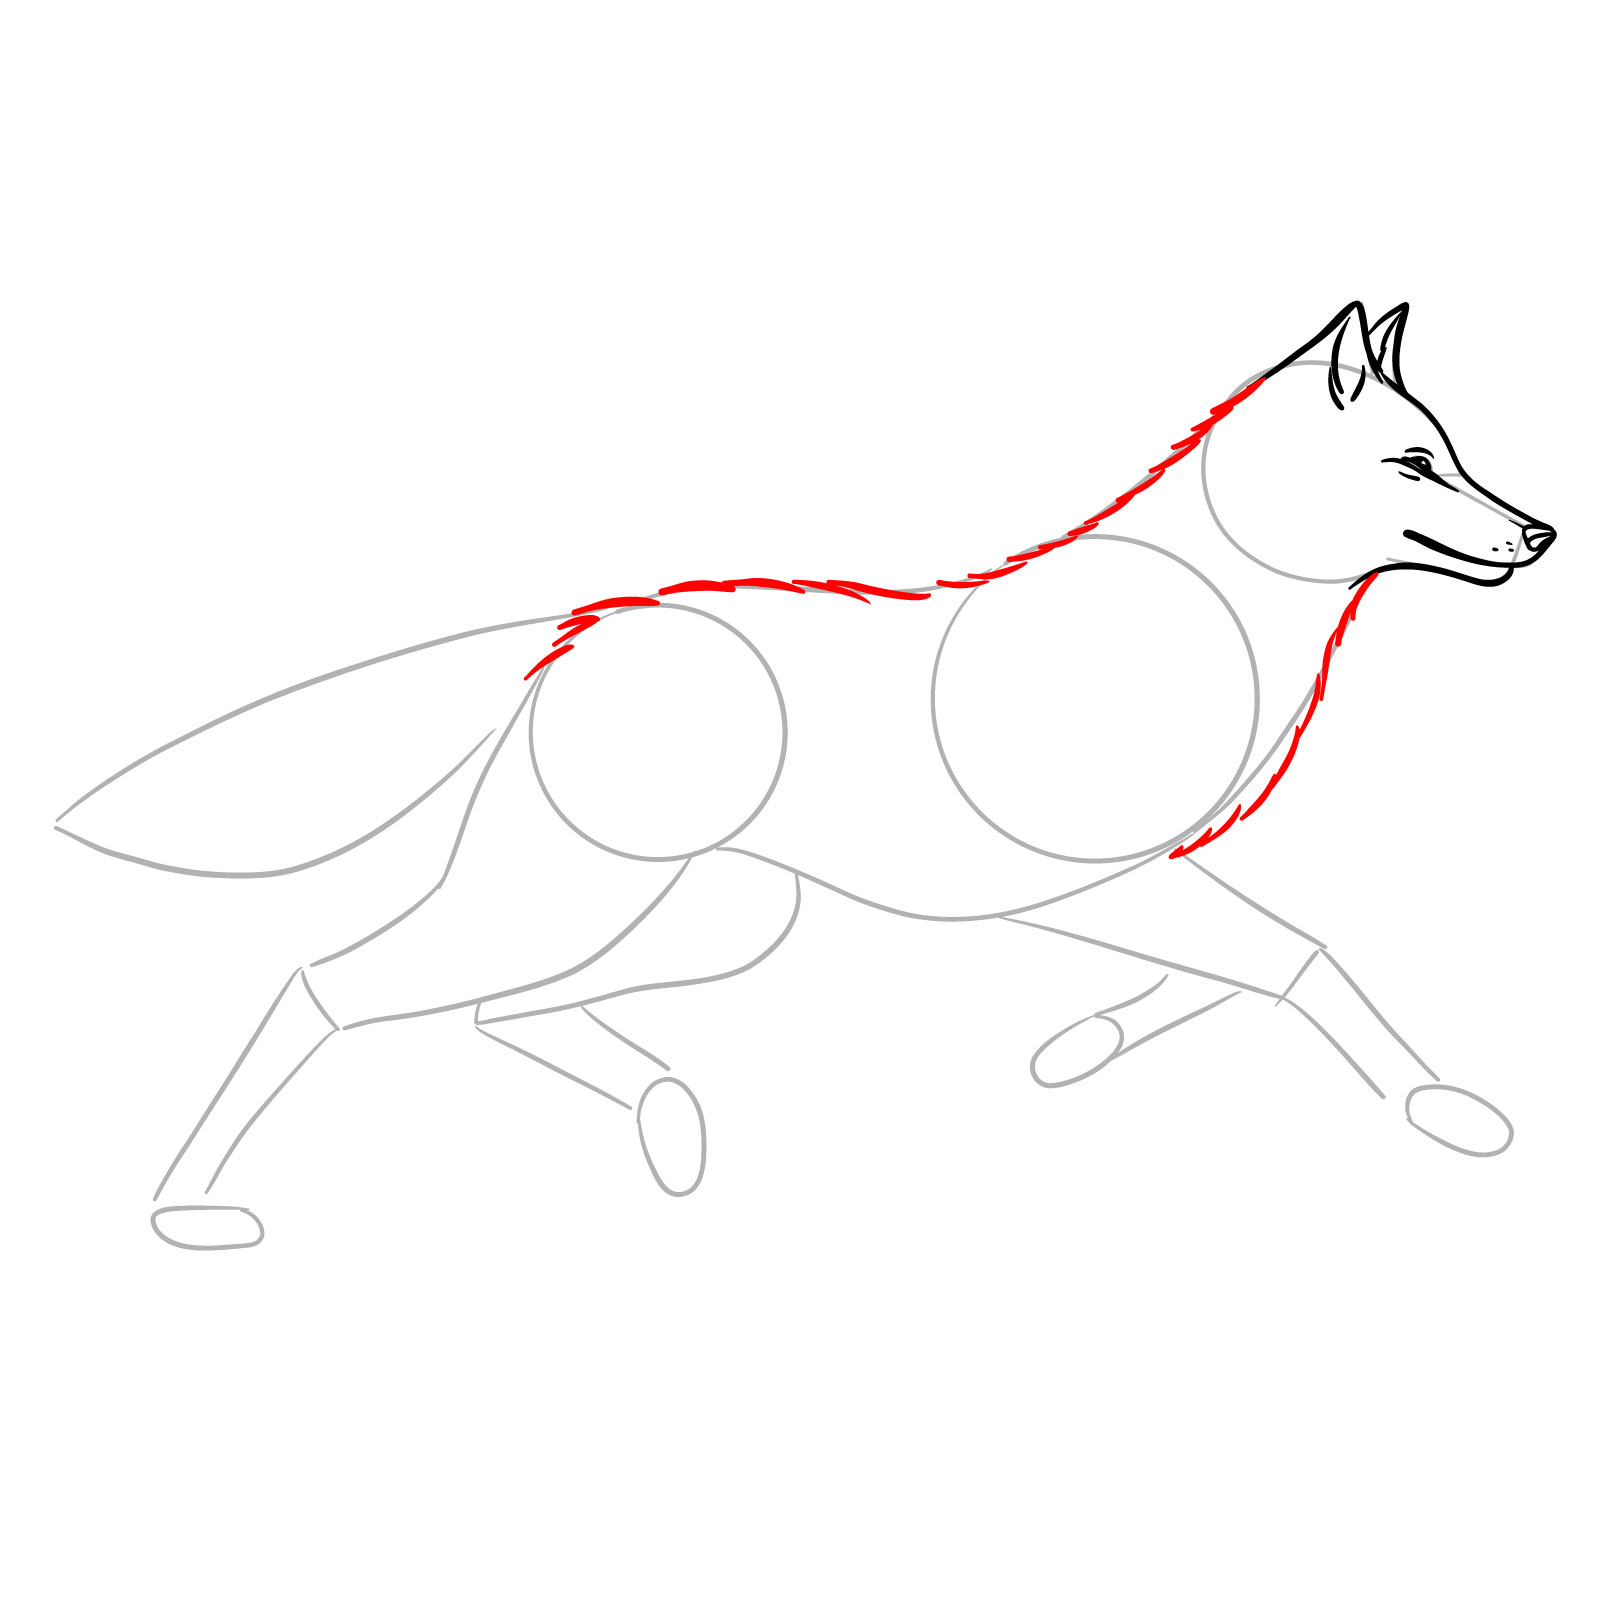
Step 06 – Outline the wolf’s neck, back, and chest fur using short strokes to represent the fur’s texture. These outlines should suggest the flow and direction of the fur as it’s swept back by the wolf’s swift movement
PinCreating the fur outline for the neck, back, and chest
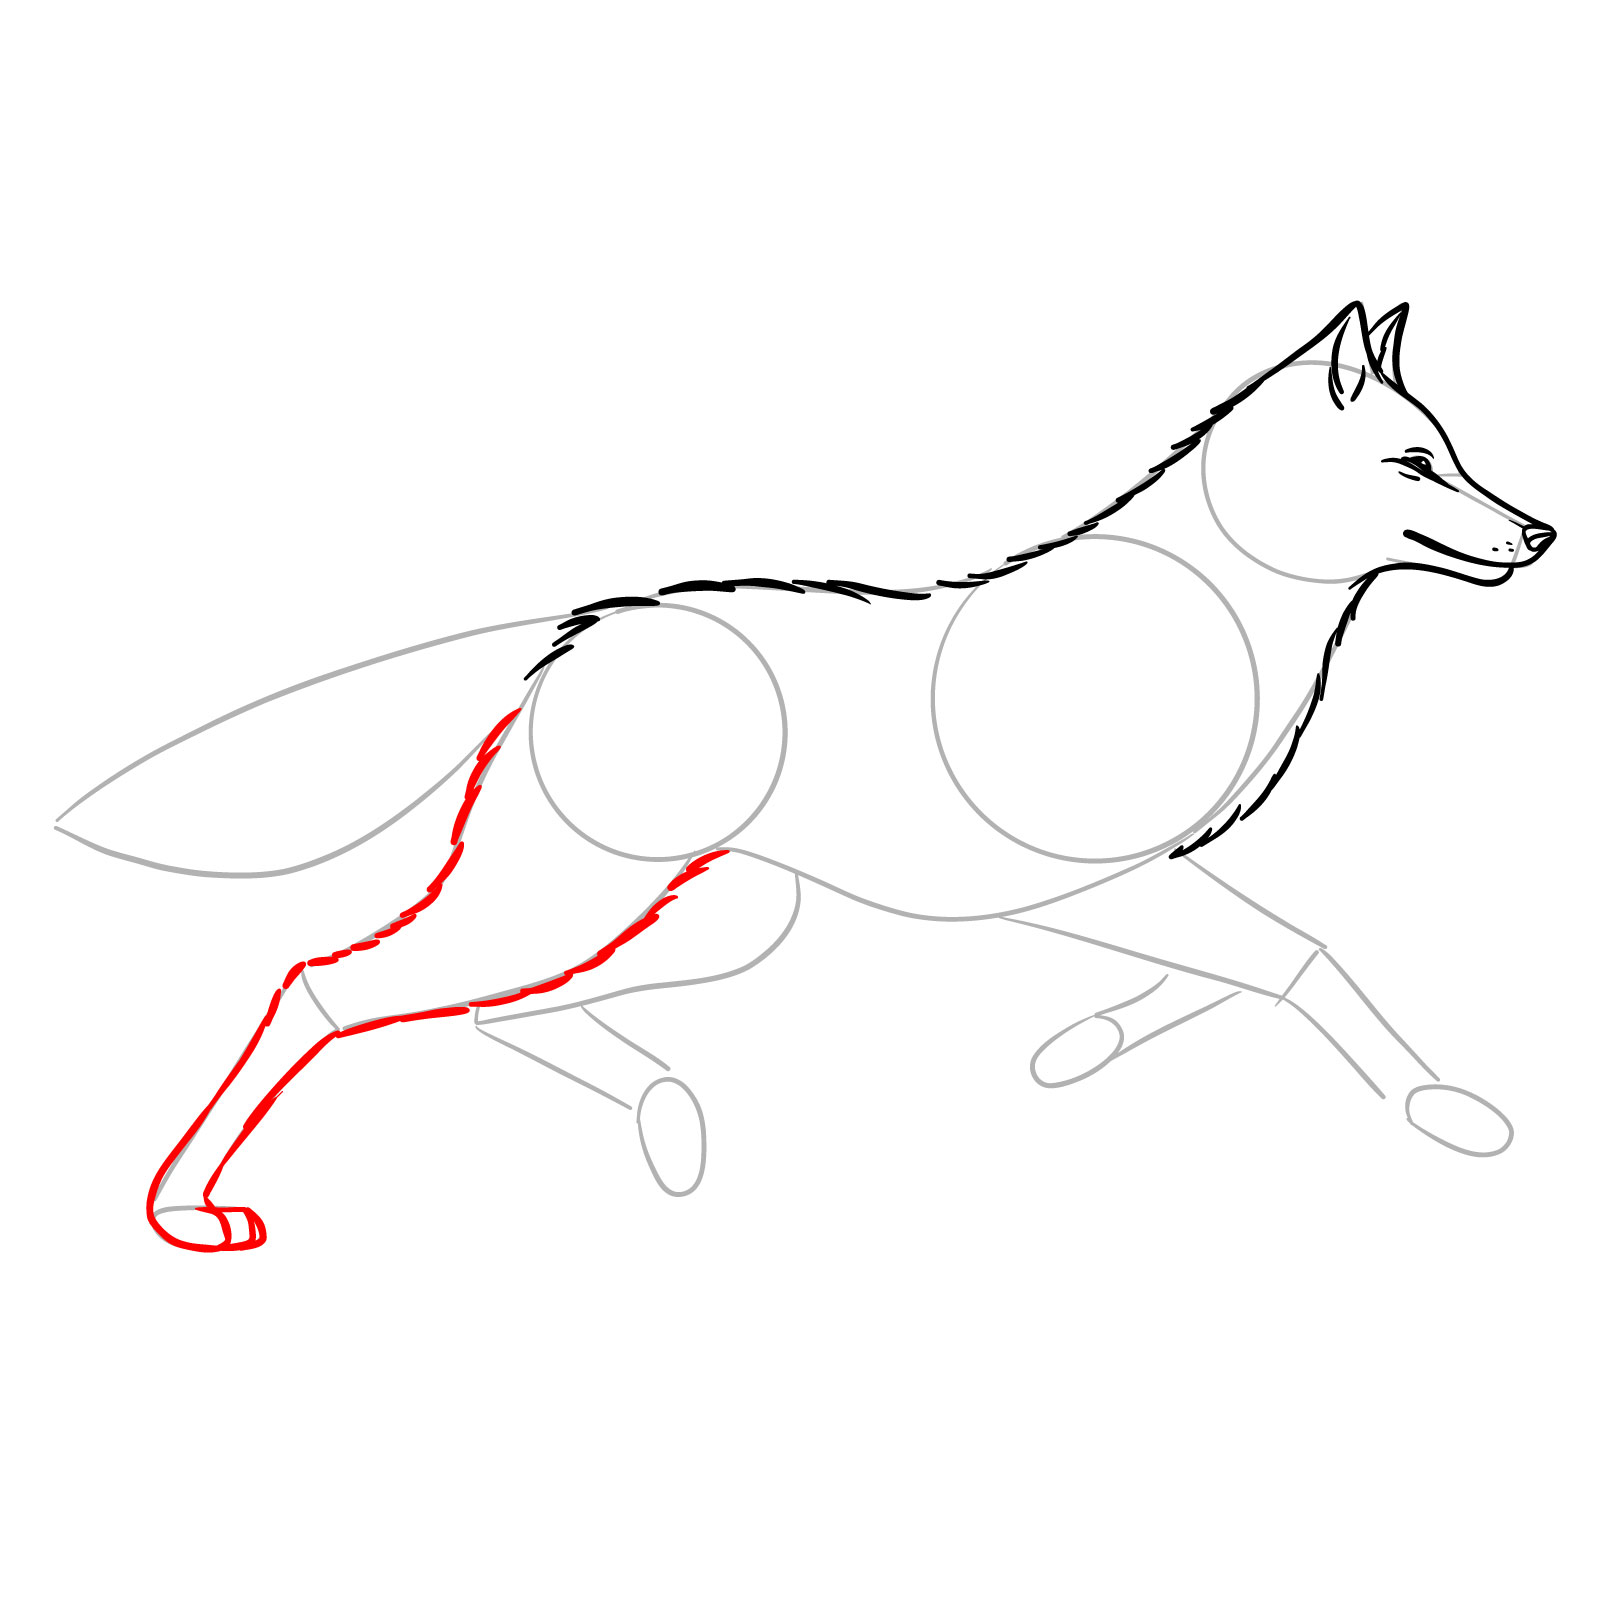
Step 07 – Illustrate the hind leg nearest to us, paying attention to the joint and muscle structure to convey power and movement. The leg should be bent, showing the force of the push-off as the wolf runs
PinDrawing the closer hind leg to showcase the wolf’s running stance
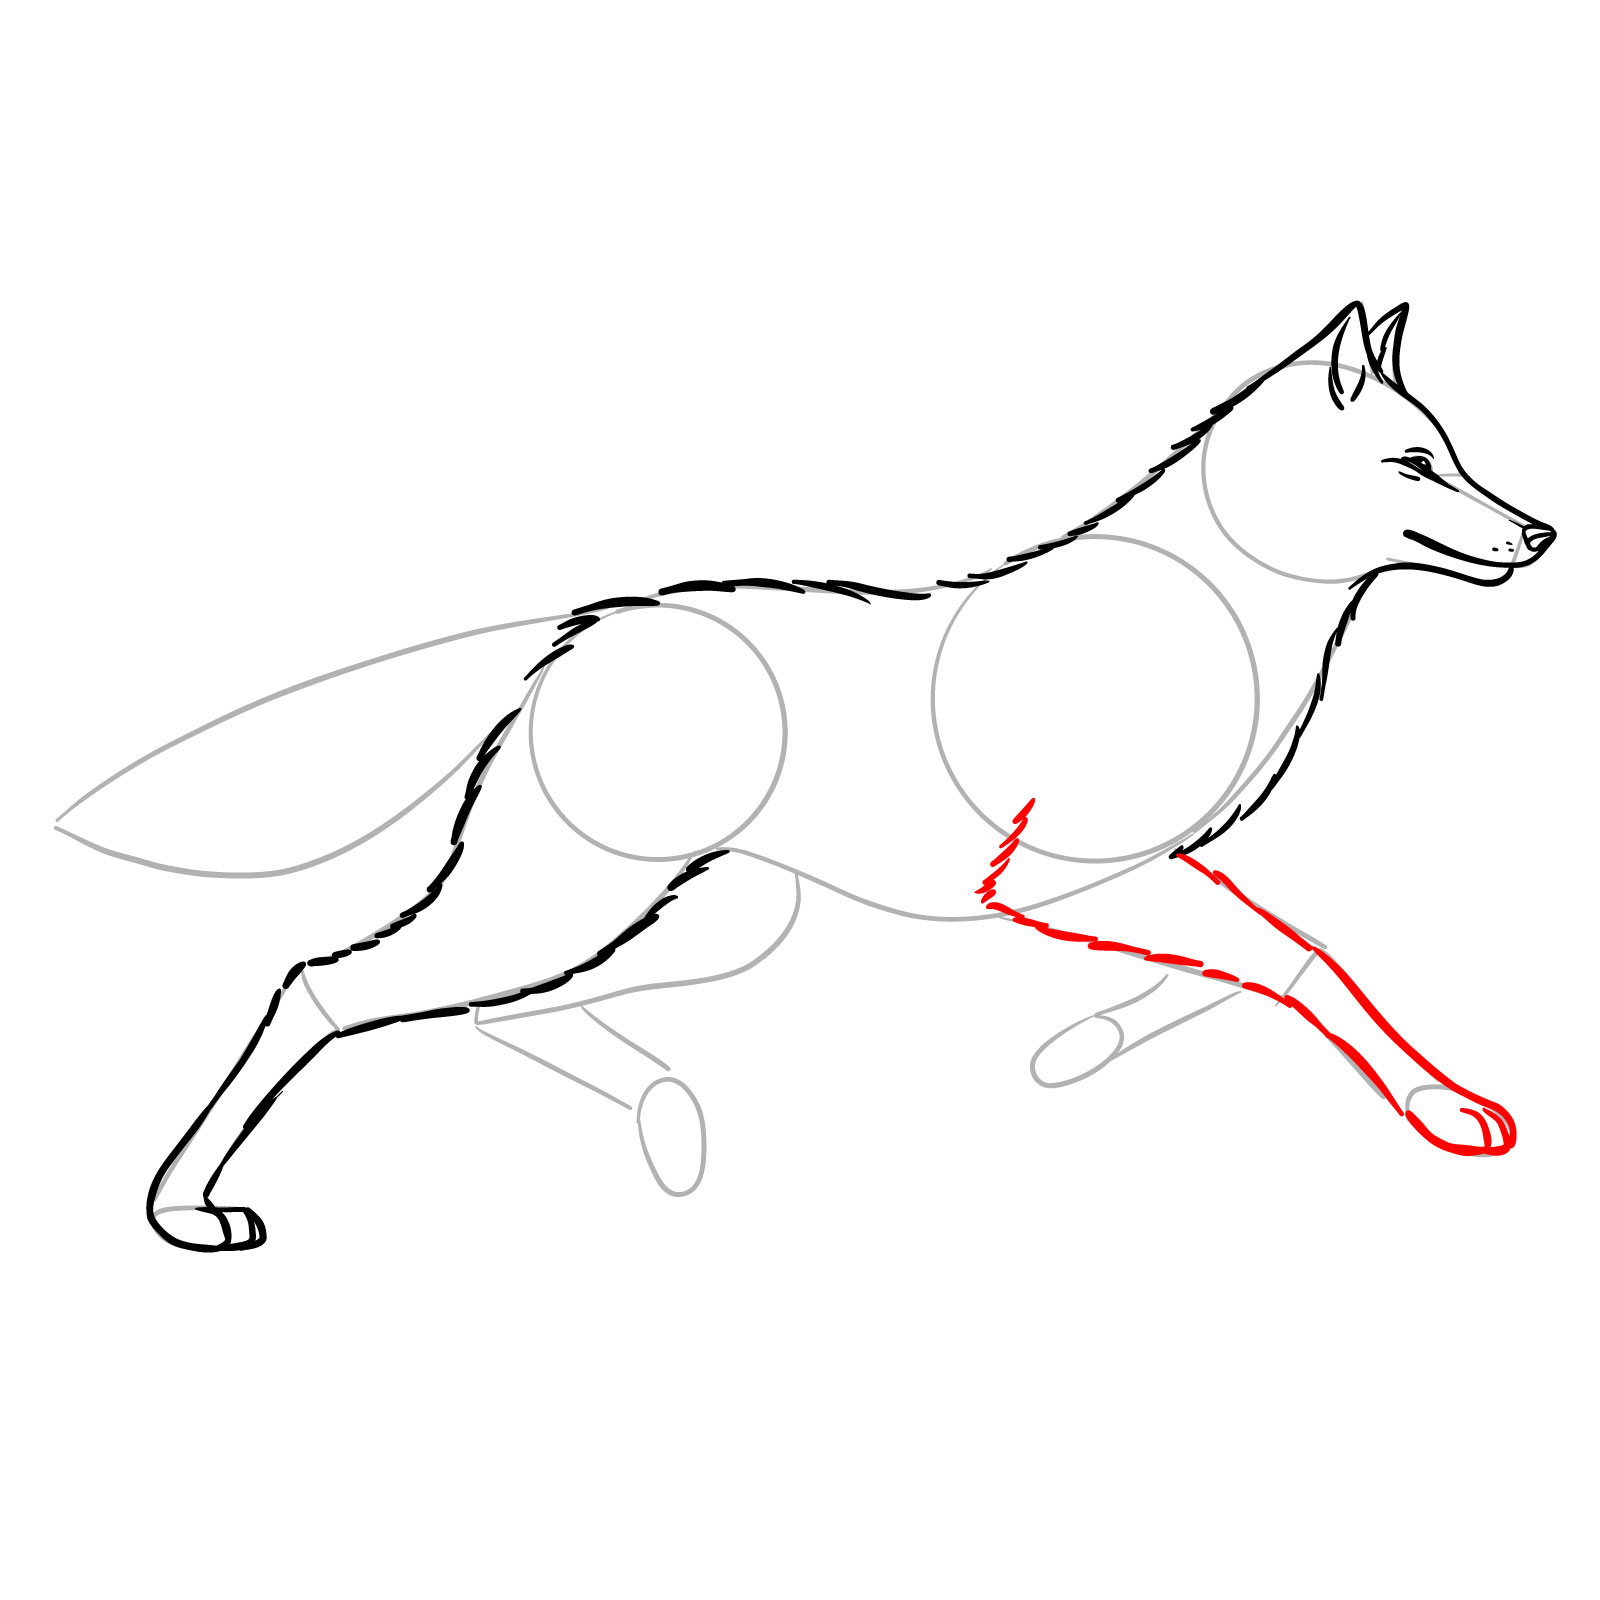
Step 08 – Now, draw the front leg that is reaching forward. This leg should convey the pulling action in the wolf’s run, with attention to the bends in the joints that indicate forward motion
PinAdding the forward-reaching front leg
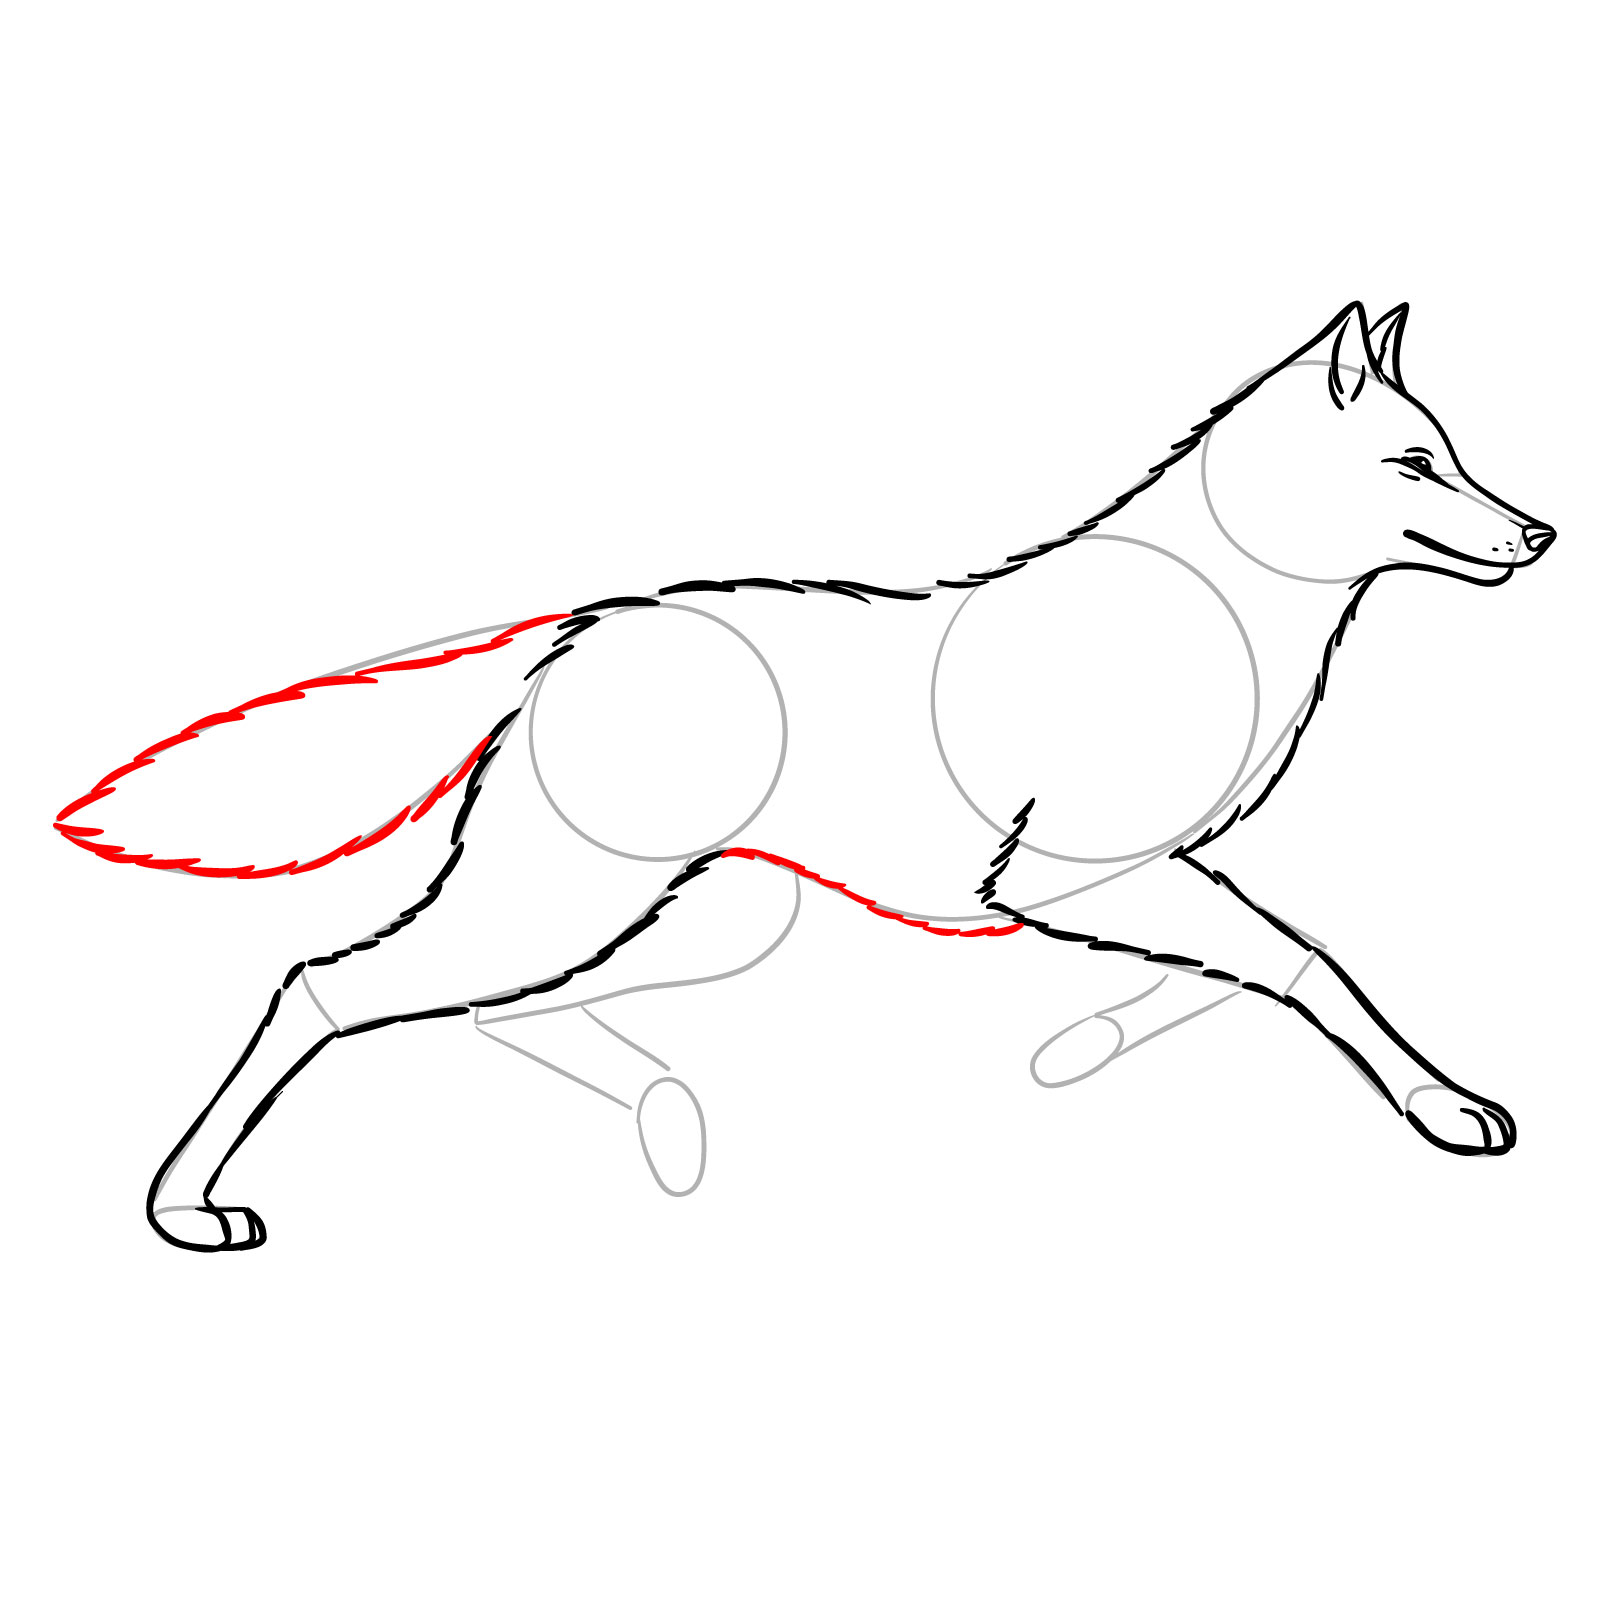
Step 09 – Sketch the belly line (again with short strokes) to connect the chest and hindquarters, curving it slightly to reflect the wolf’s anatomy in motion. Then, add the tail, ensuring it complements the direction of movement for balance and action
PinSketching the underbelly and the tail
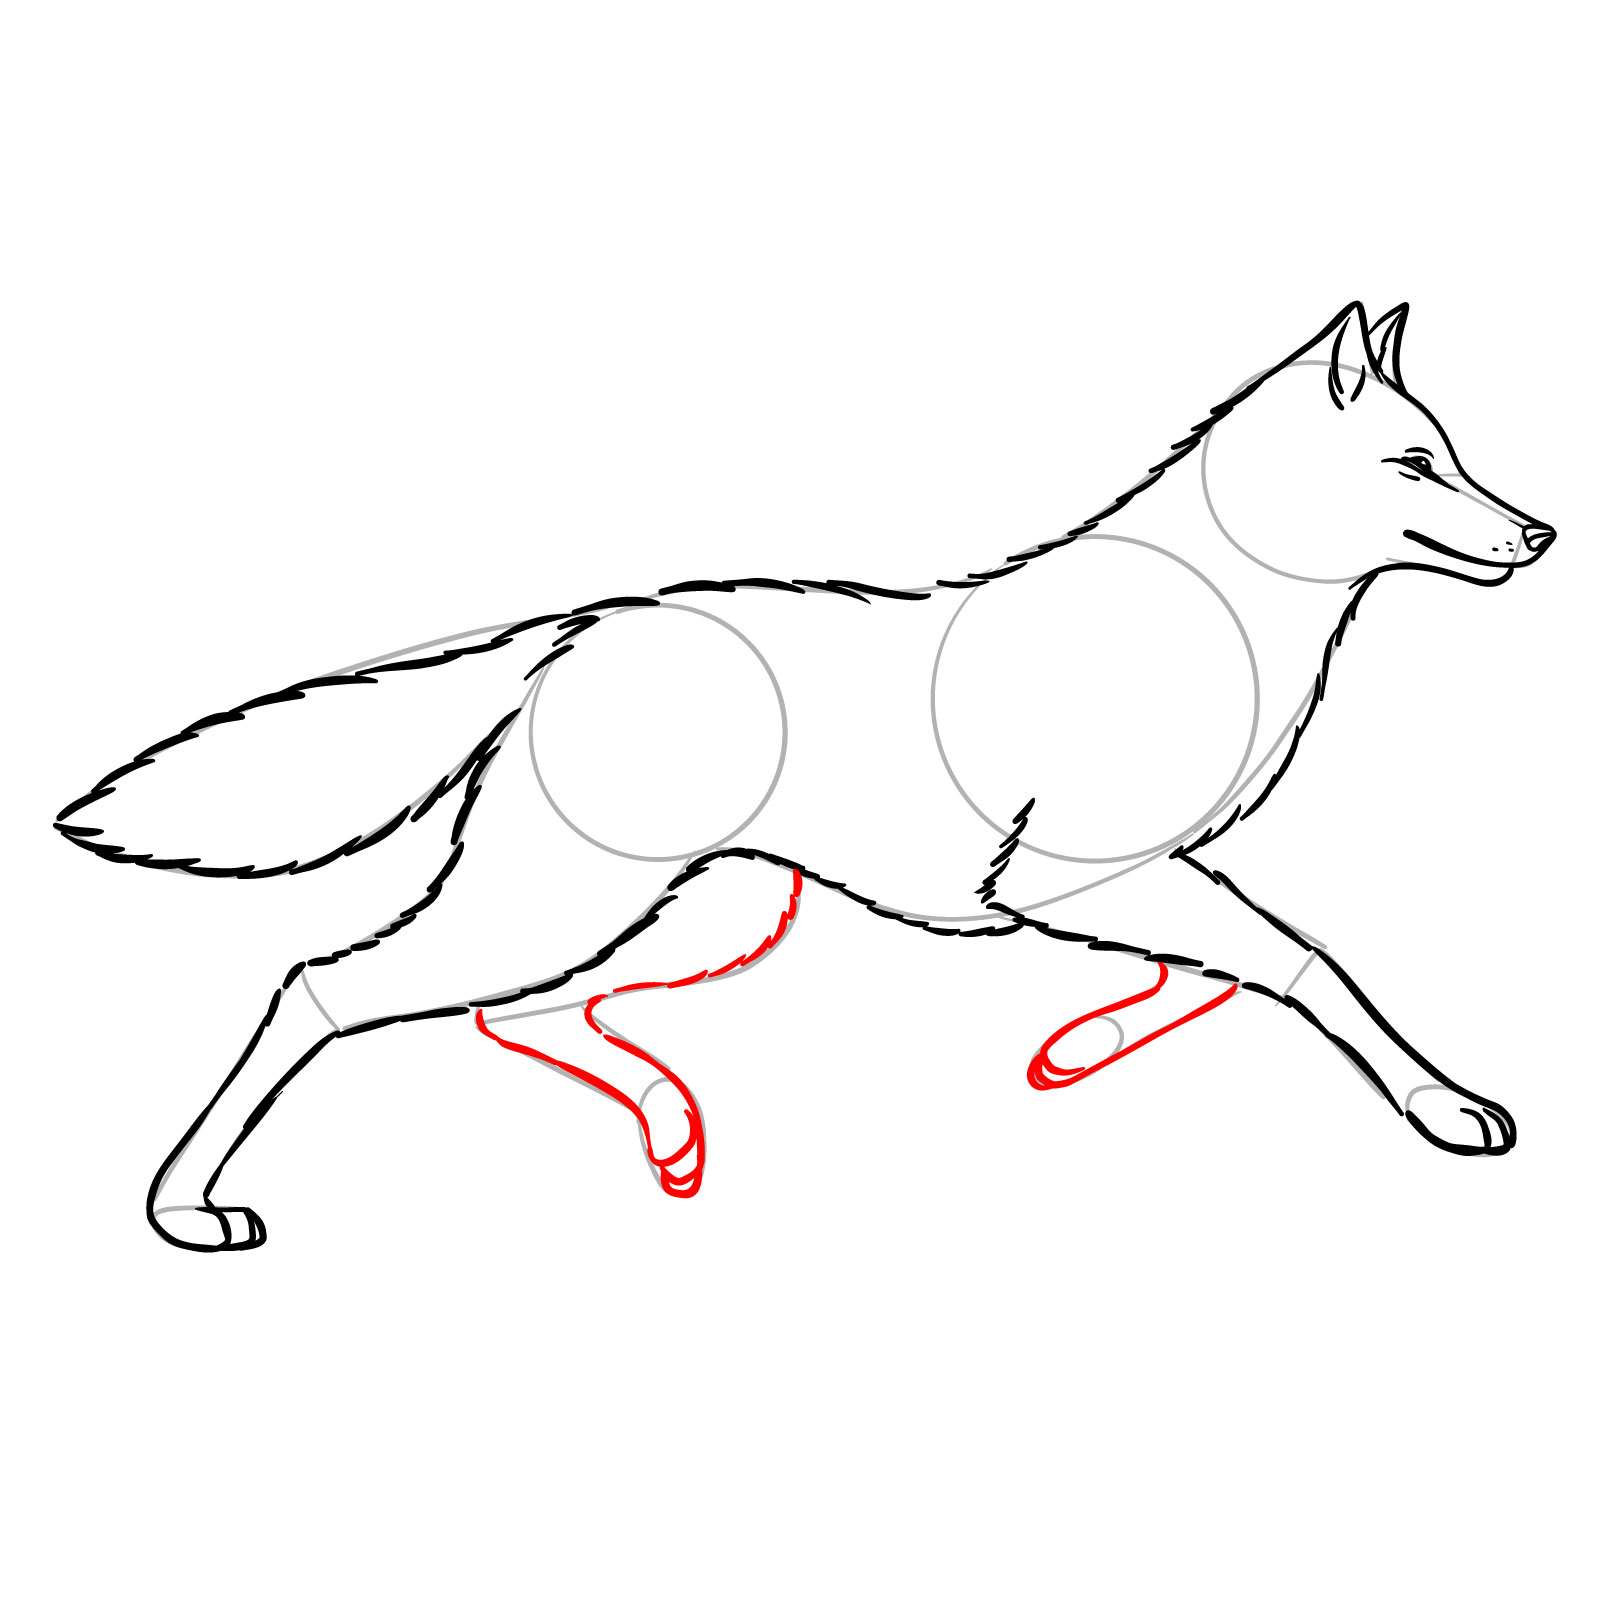
Step 10 – Add the remaining legs, considering their position and form in relation to the wolf’s running motion. Ensure that the far limbs are proportionate and aligned with the wolf’s body dynamics
PinFinalizing the wolf’s limbs to complete the running motion
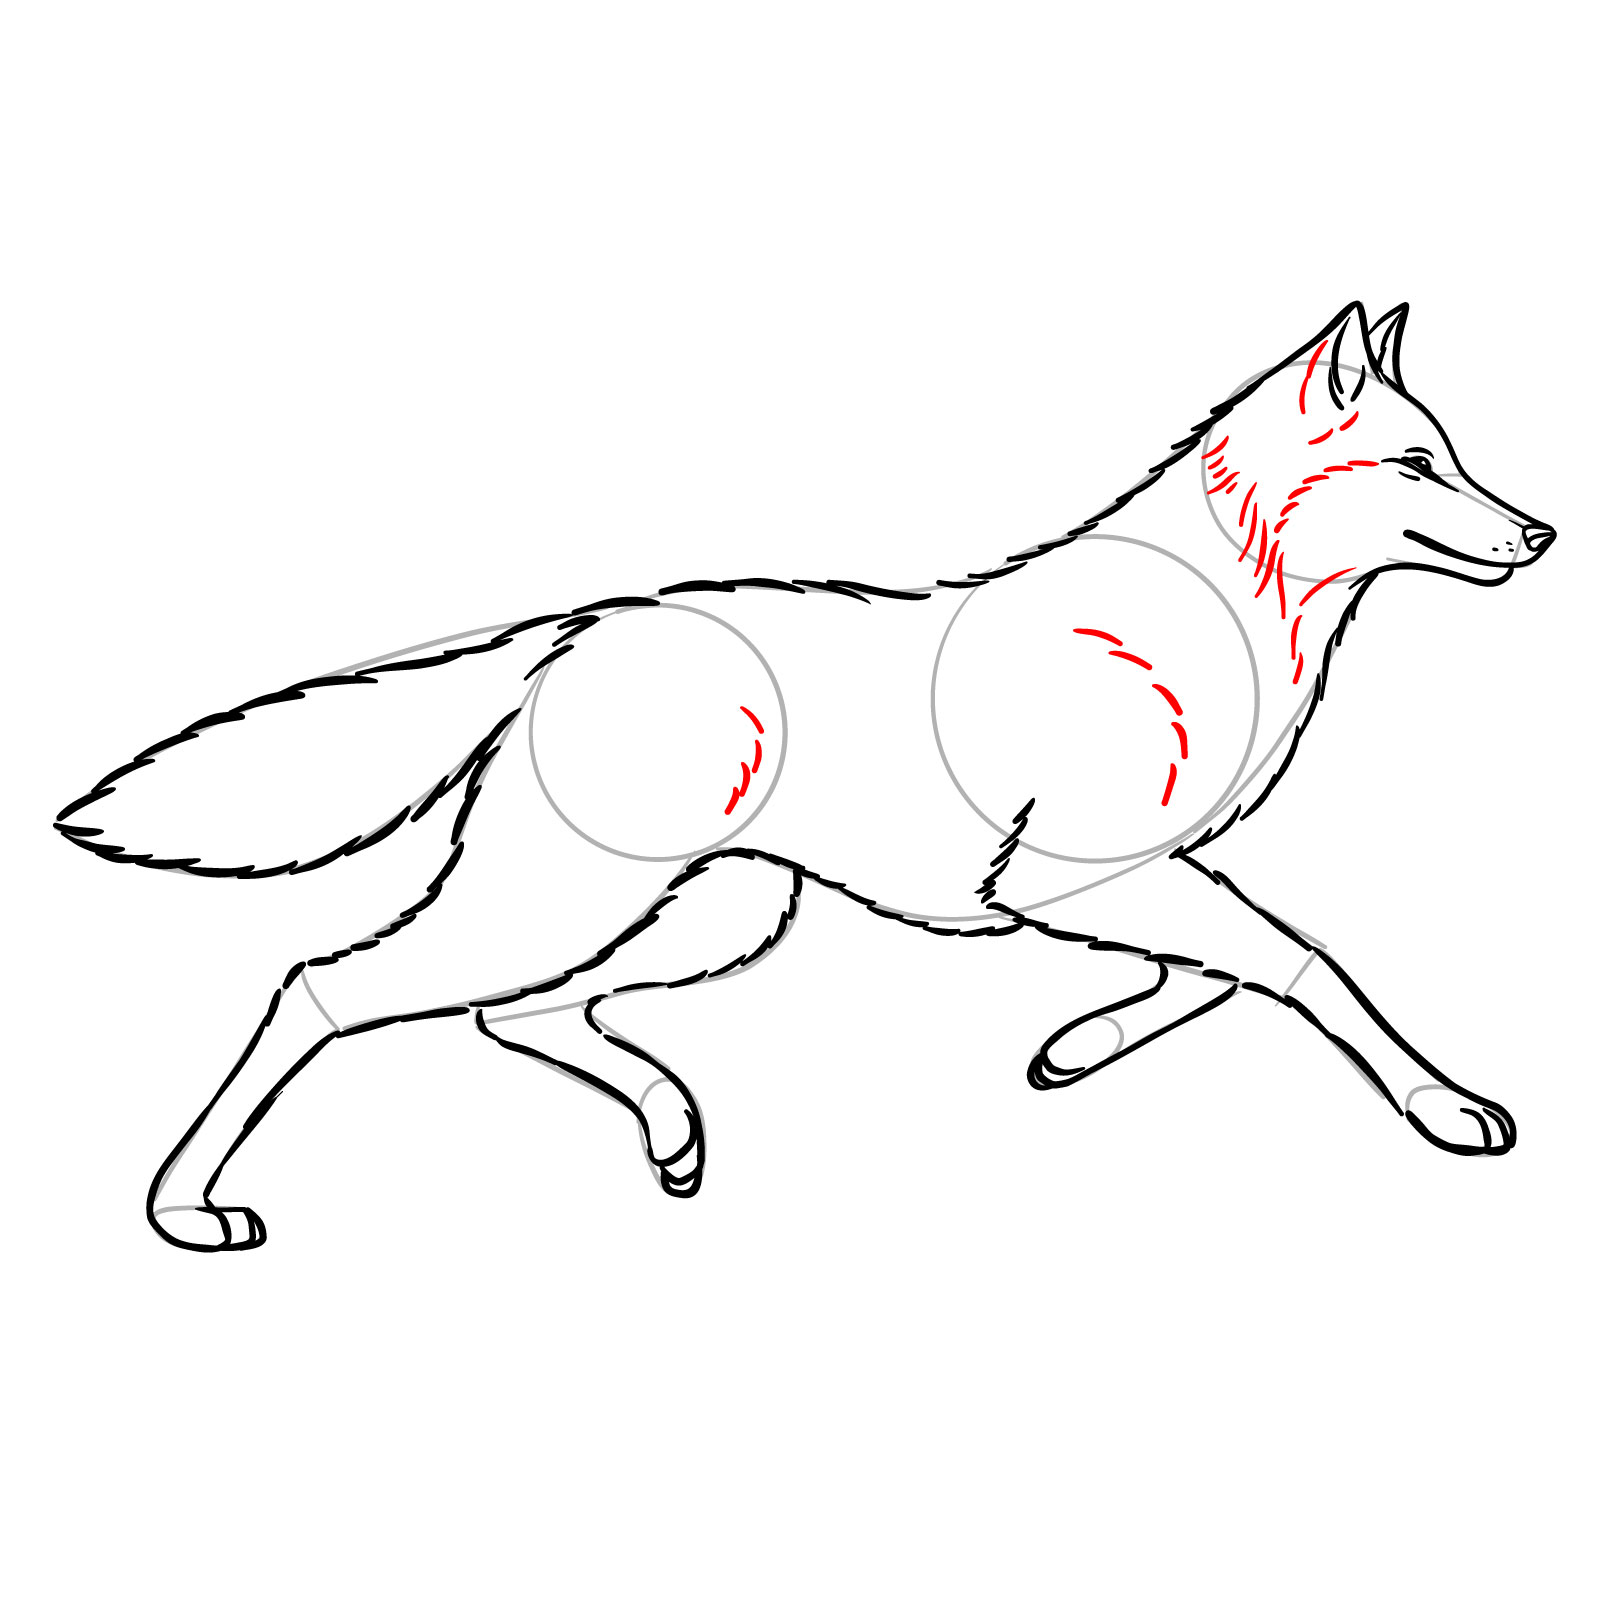
Step 11 – Draw fur details on the side of the head and one the muscle structure on the limbs to give your wolf depth and texture. Use short strokes to suggest fur
PinRefining the wolf’s fur and muscle details
Step 12 – This is the last optional step in the how to draw a running wolf guide. Finish your drawing by erasing the base sketch and any unnecessary lines. You can choose to ink the sketch for a more defined illustration.
PinCompleting the running wolf drawing by cleaning up the sketch
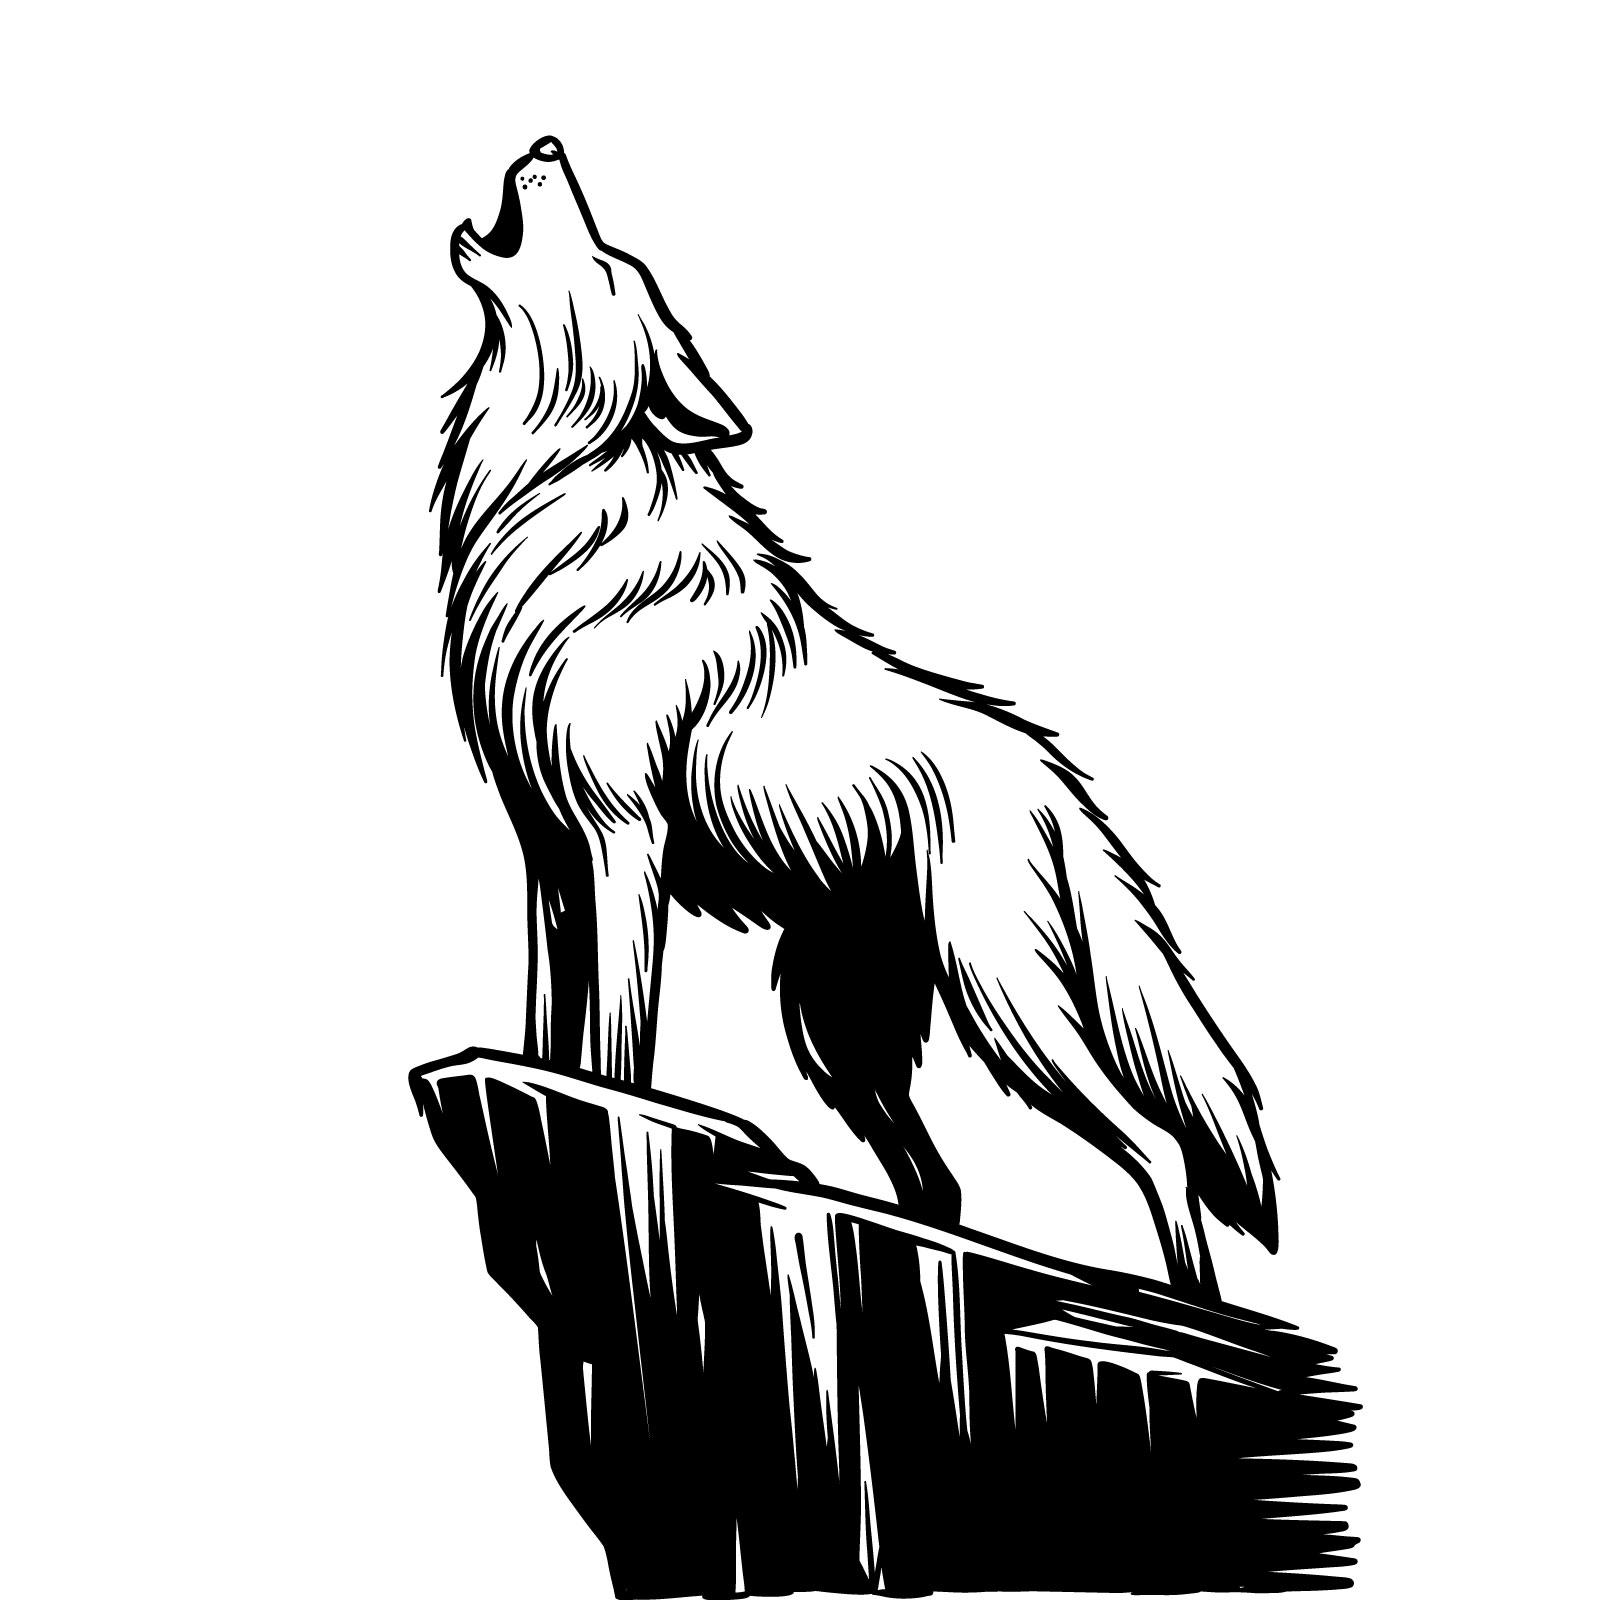
Draw a Howling Wolf on a Cliff in 14 Steps
PinHow to draw a howling wolf
Congratulations! You have reached the fourteenth and final guide. It will show you how to draw a howling wolf perched atop a cliff. With a slight upward perspective, the viewer is invited to look up to this majestic creature. This guide unfolds in 14 steps, with the first two laying down the basic sketch that frames the wolf’s open mouth and raised head in a primal howl. As the tutorial was the first created for this series, it showcases a different style with smoother lines and more pronounced shading, which brings out the wolf’s fur texture and the ruggedness of the cliff it stands on.
The varied styles across the guides in this tutorial reflect the time elapsed between their creations. This howling wolf, with its contrast shades and contours, was the first drawing for this tutorial series. If you are interested in a more simplified or stylized version, such as a silhouette, I also have a separate drawing guide for a howling wolf silhouette that might be just what you’re looking for.
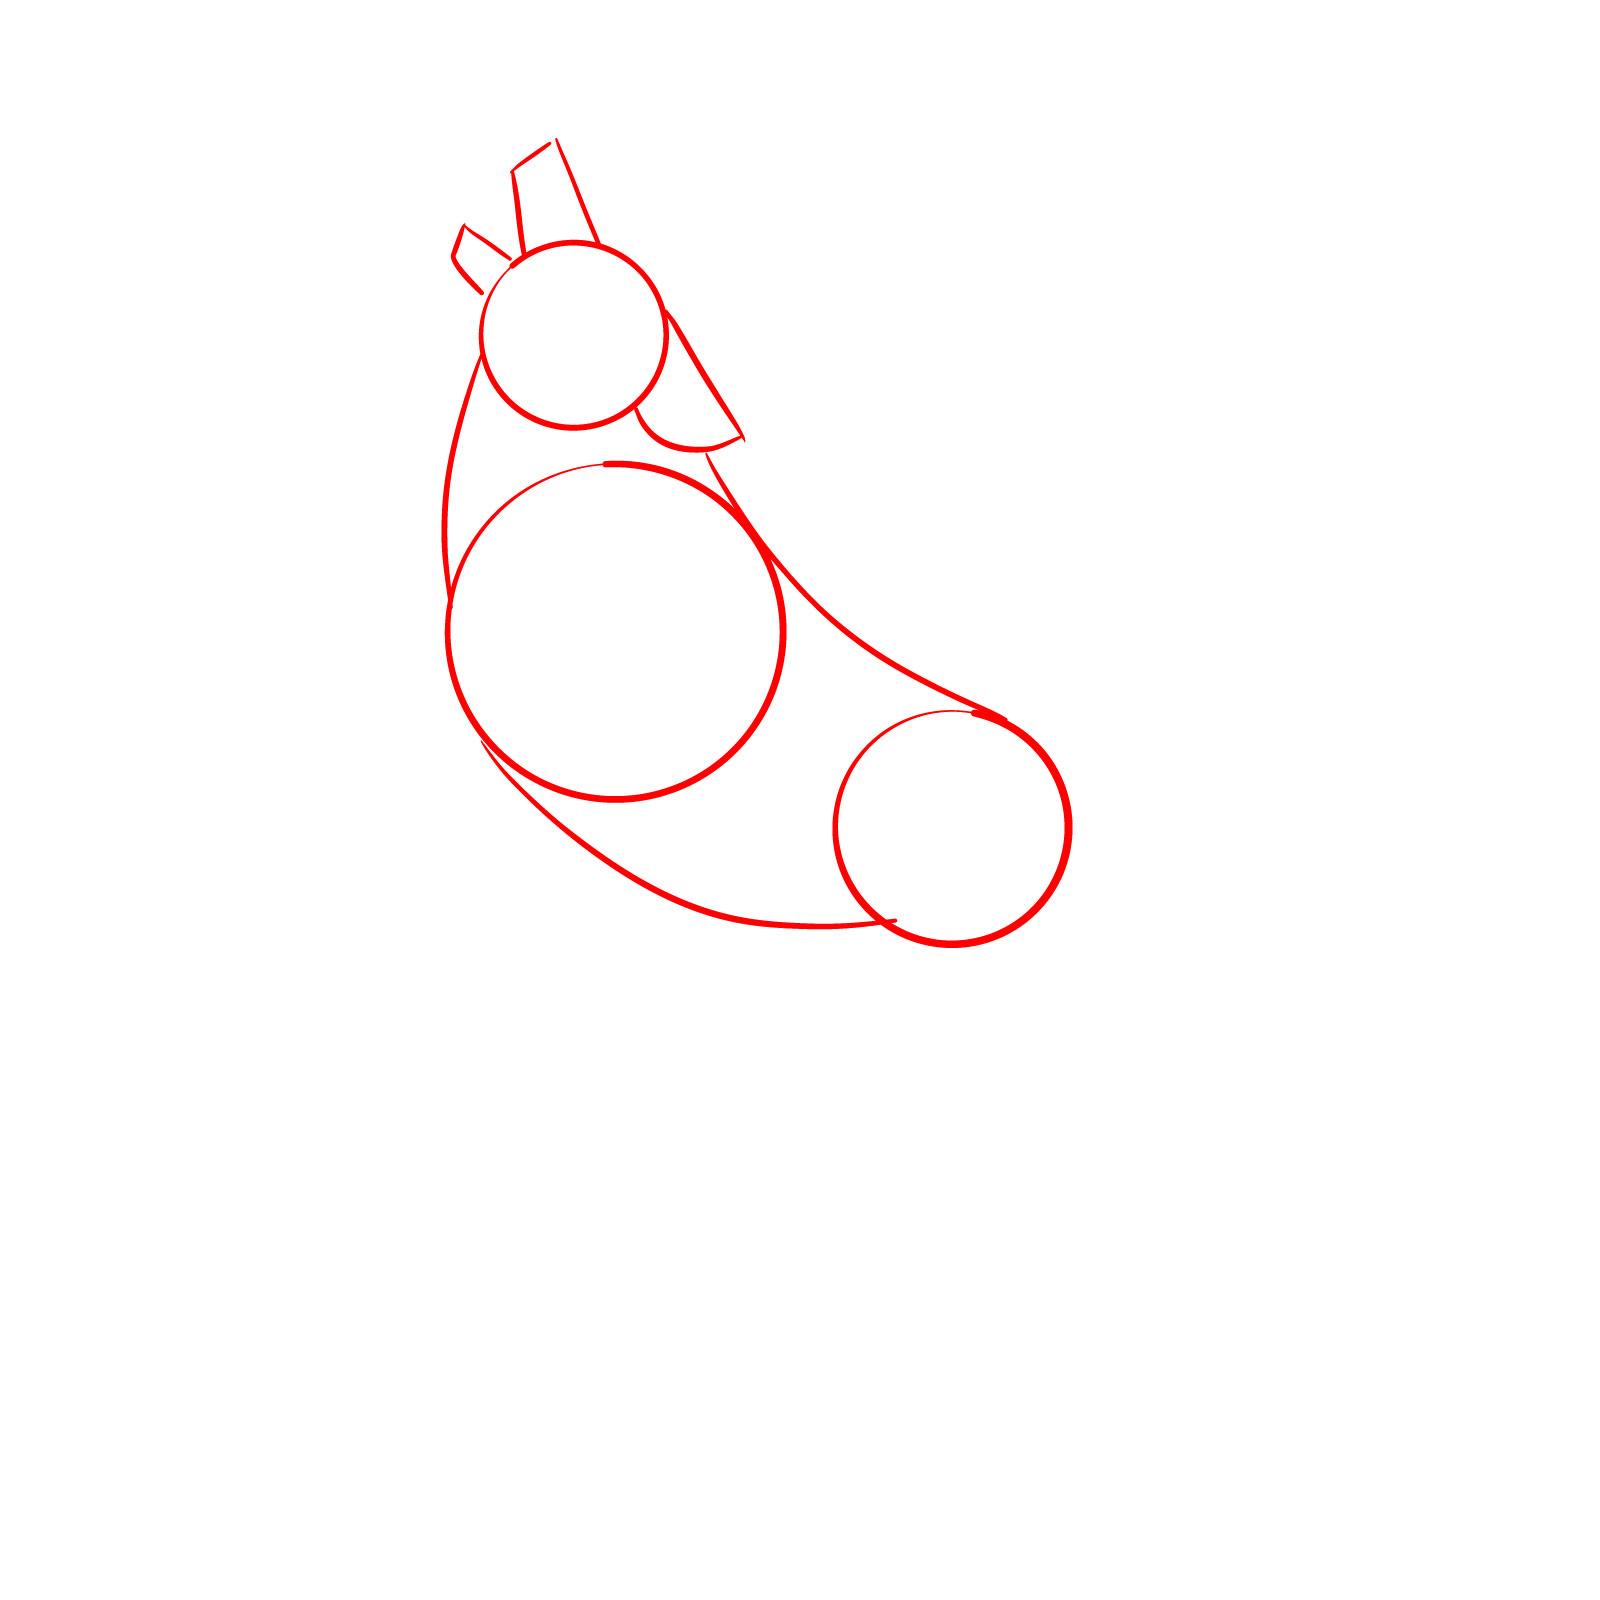
Step 01 – Begin by drawing a circle for the wolf’s head and a circle twice that size for the middle body, representing the widest part. Add a middle-sized circle (between the head and body) for the lower body. For the snout, draw two rectangular shapes to indicate the open mouth. Include one ear shape and use smooth lines to connect the circles, forming the basic body shape of the howling wolf
PinStarting the howling wolf drawing with fundamental shapes
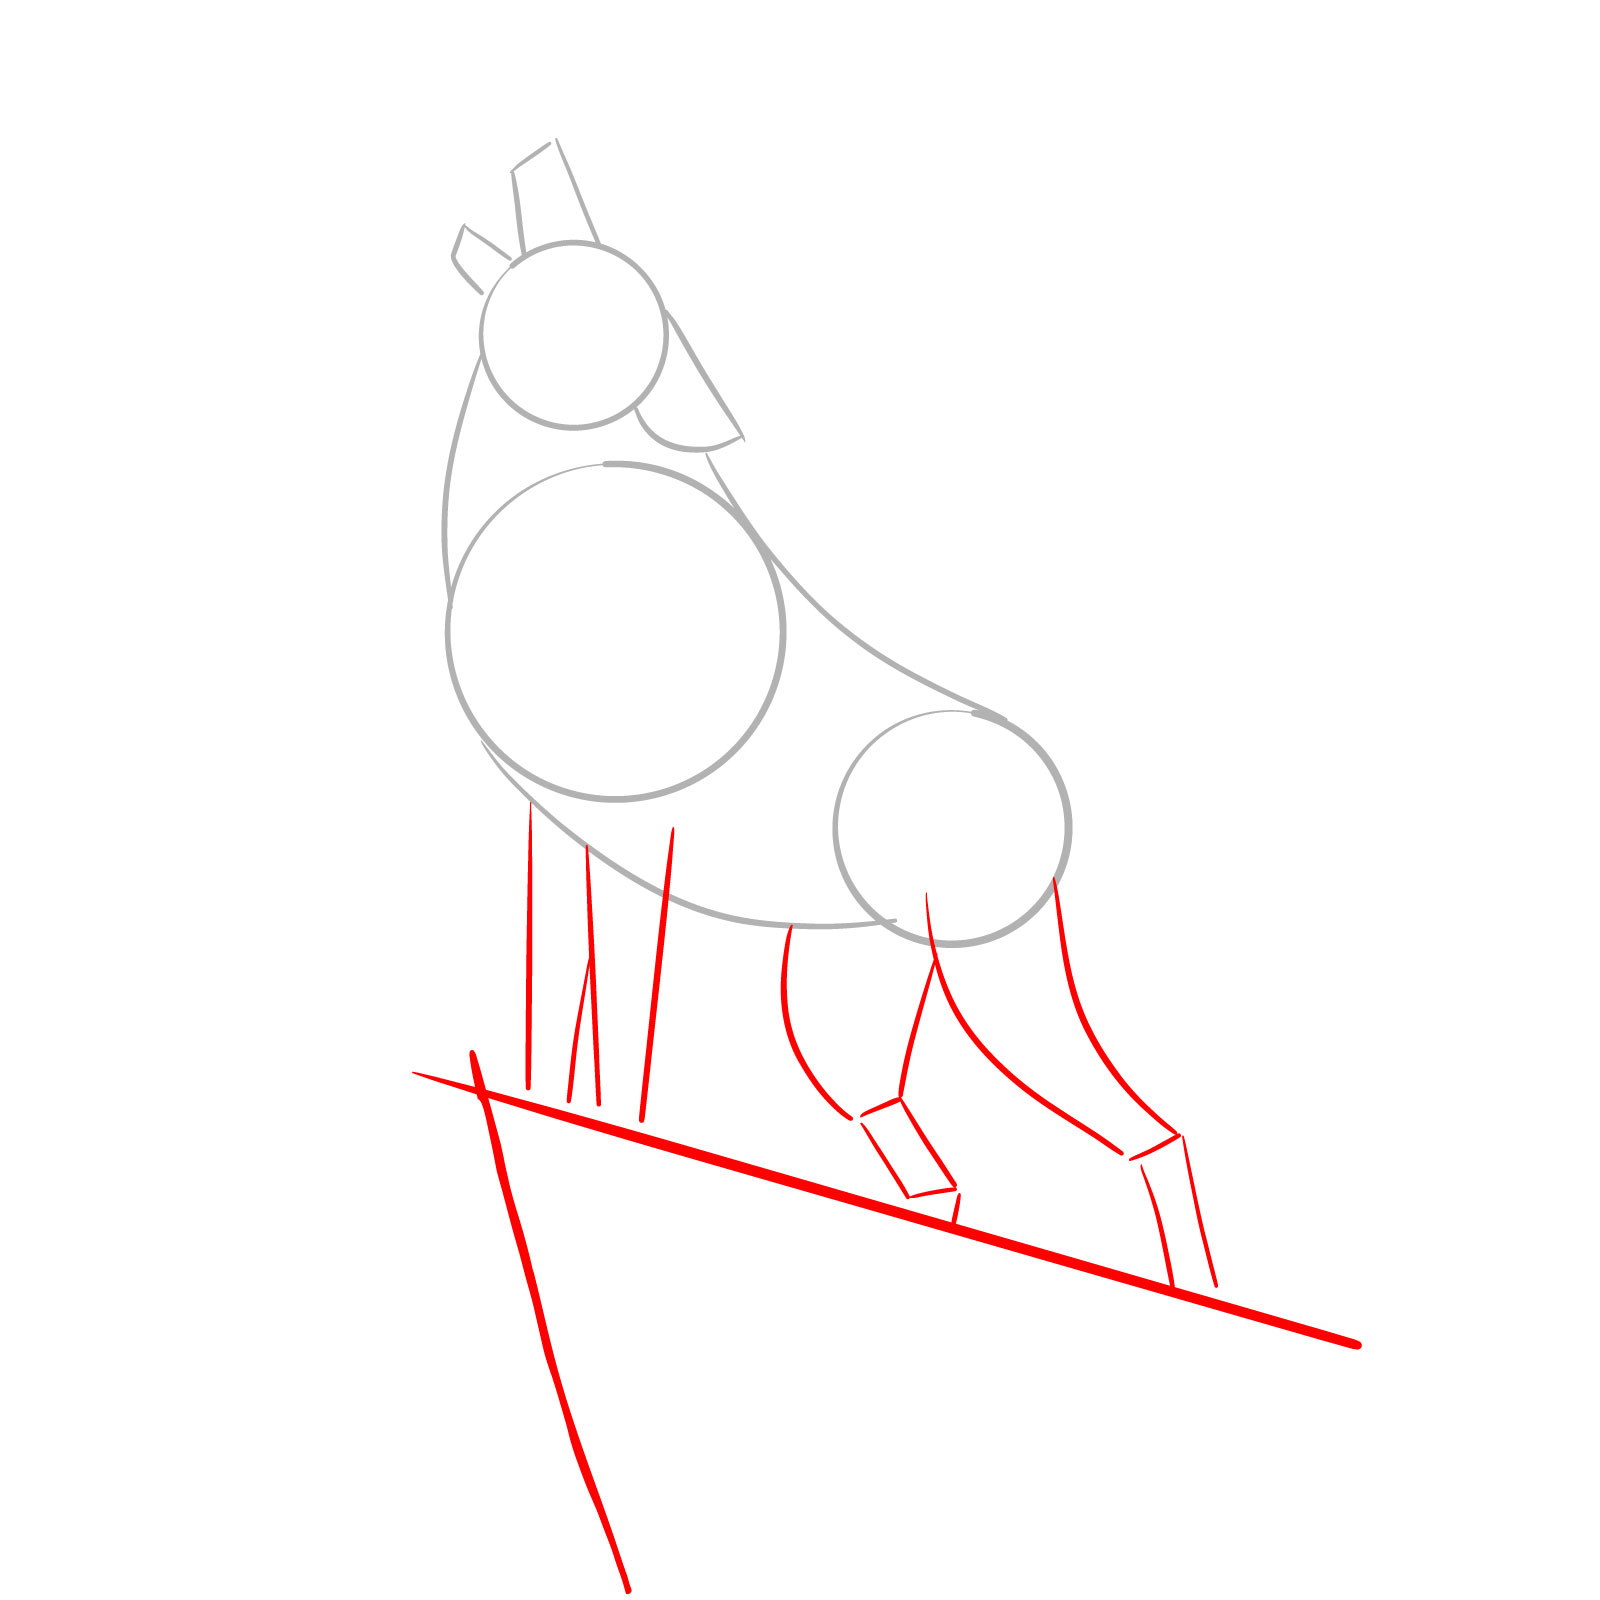
Step 02 – Map out the cliff with simple lines to establish where the wolf is howling from. Add basic shapes for the legs to show the wolf’s posture, with the legs supporting its body as it tilts its head upward in a howl
PinOutlining the wolf’s stance on a cliff in the howling position
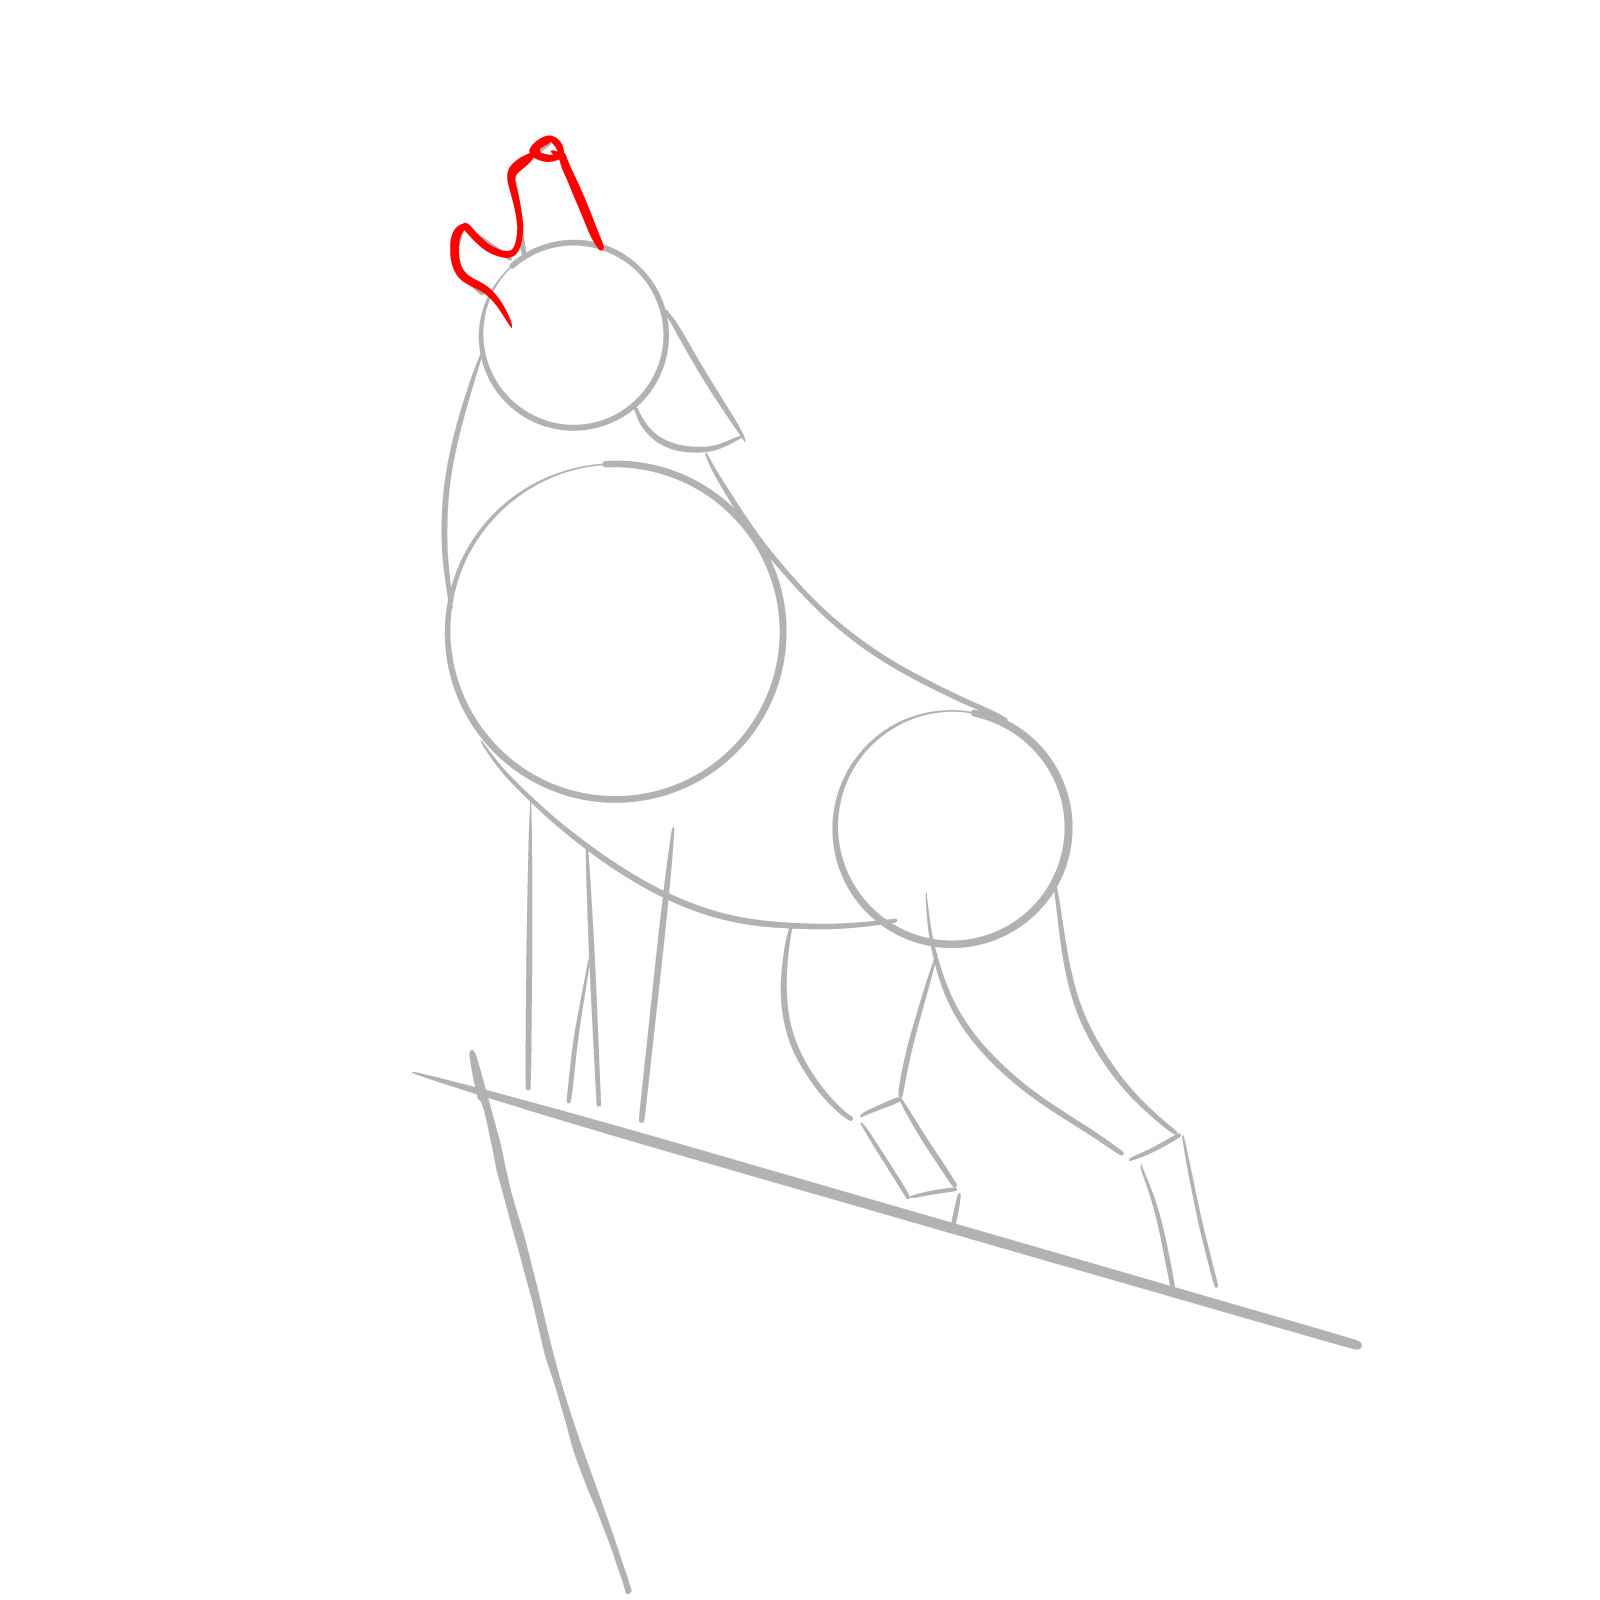
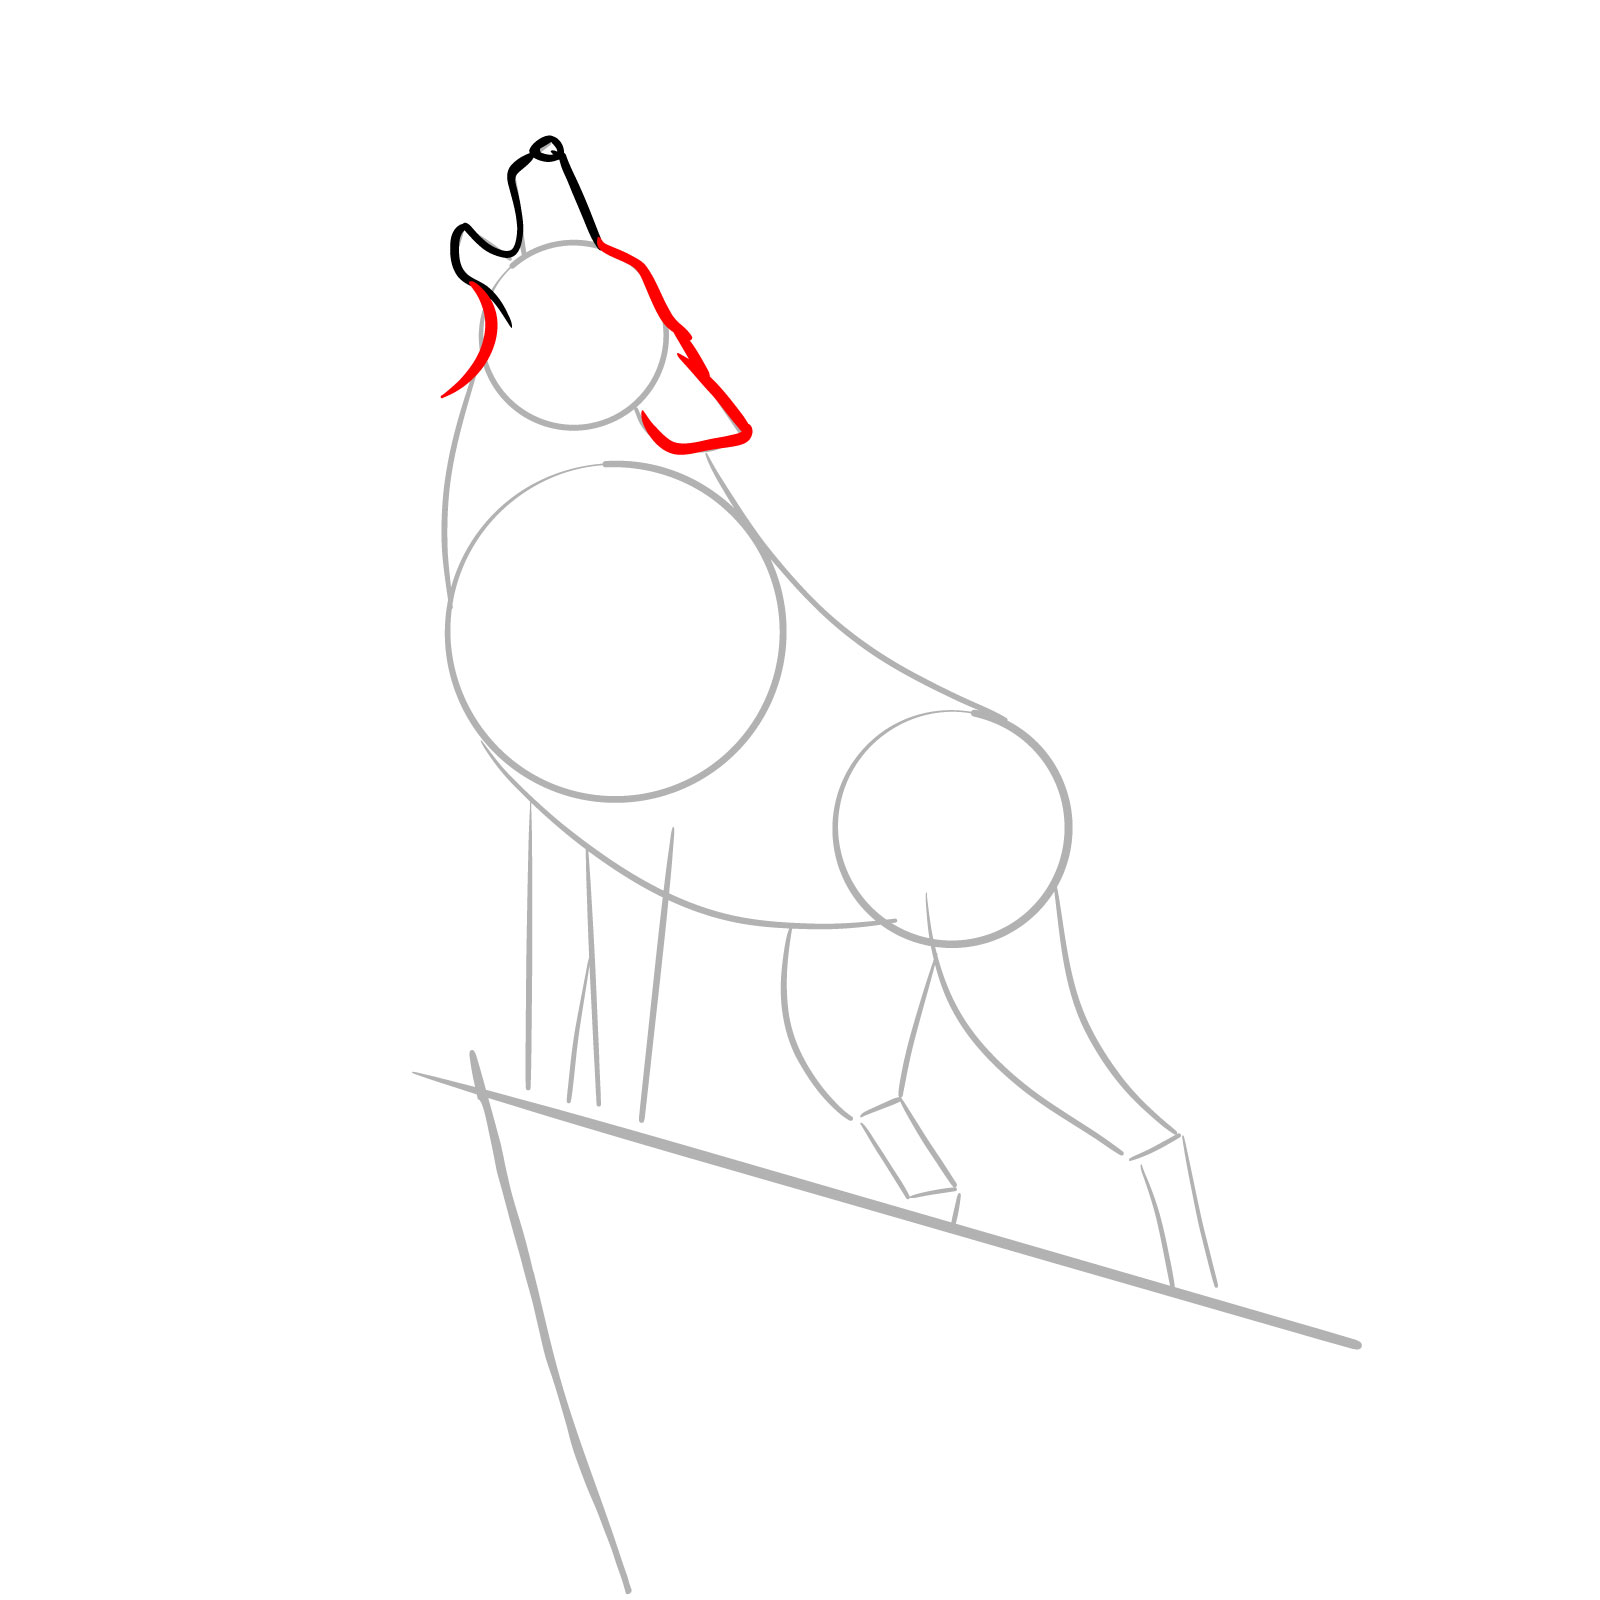
Step 03 – Outline the mouth and nose of the wolf. The mouth should be wide open in a howling position, with the nose placed at the top of the muzzle, capturing the essence of the howl
PinDefining the howling wolf’s mouth and nose
Step 04 – Draw the transition from the snout to the neck, and outline the top of the head and ear, refining the wolf’s profile as it throws its head back to howl
PinRefining the wolf’s snout, neck, and head
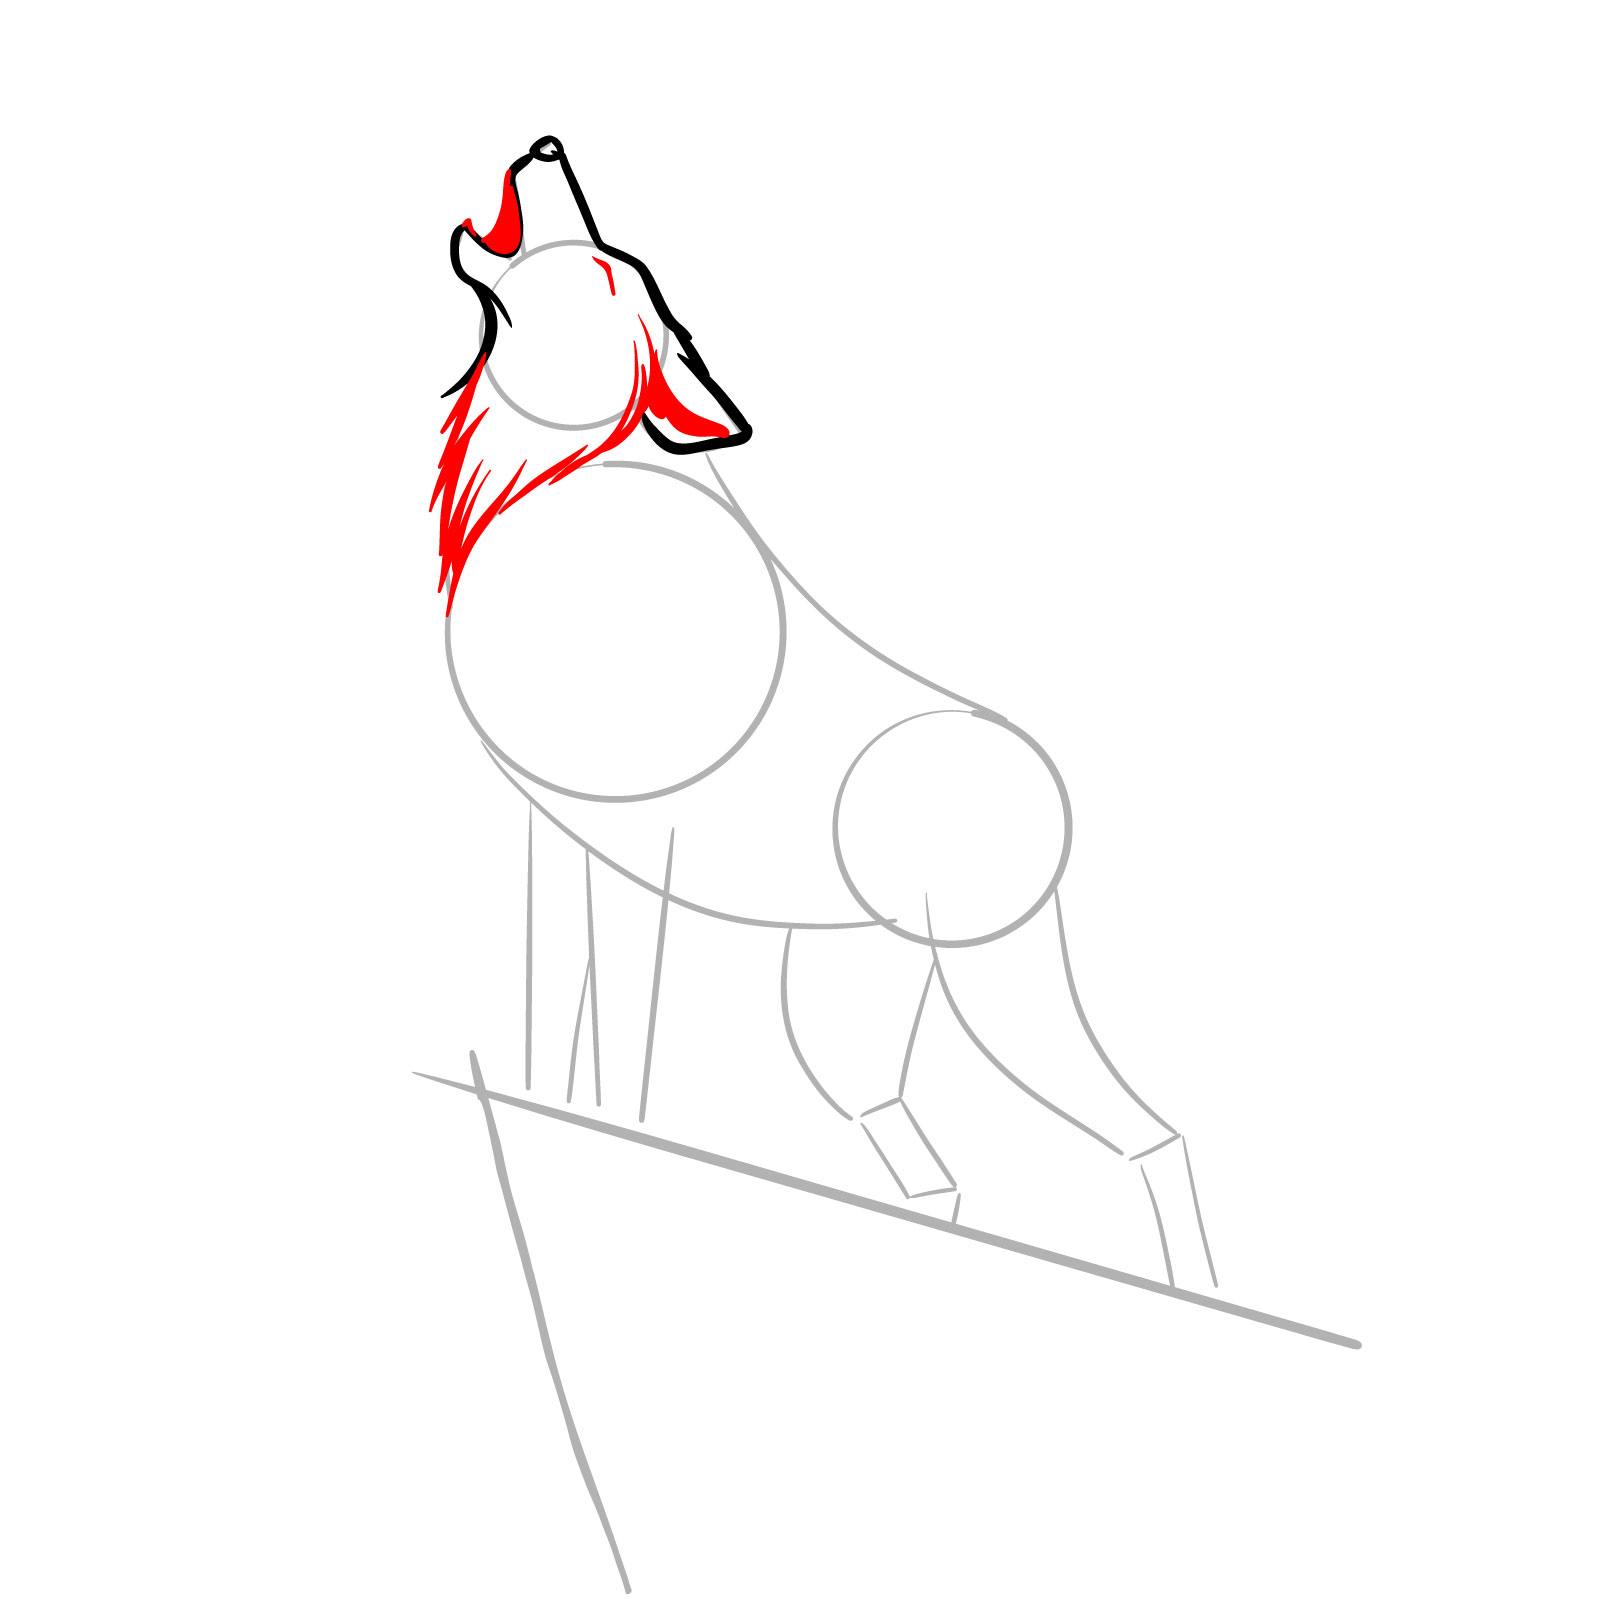
Step 05 – Sketch the neck fur coat with fluid lines to give it volume and texture. Fill in the inner ear area and detail the bottom fangs and mouth area to define the howl. Add a closed eye shape to convey the wolf’s emotional howling expression
PinIllustrating detailed features of the howling wolf’s expression
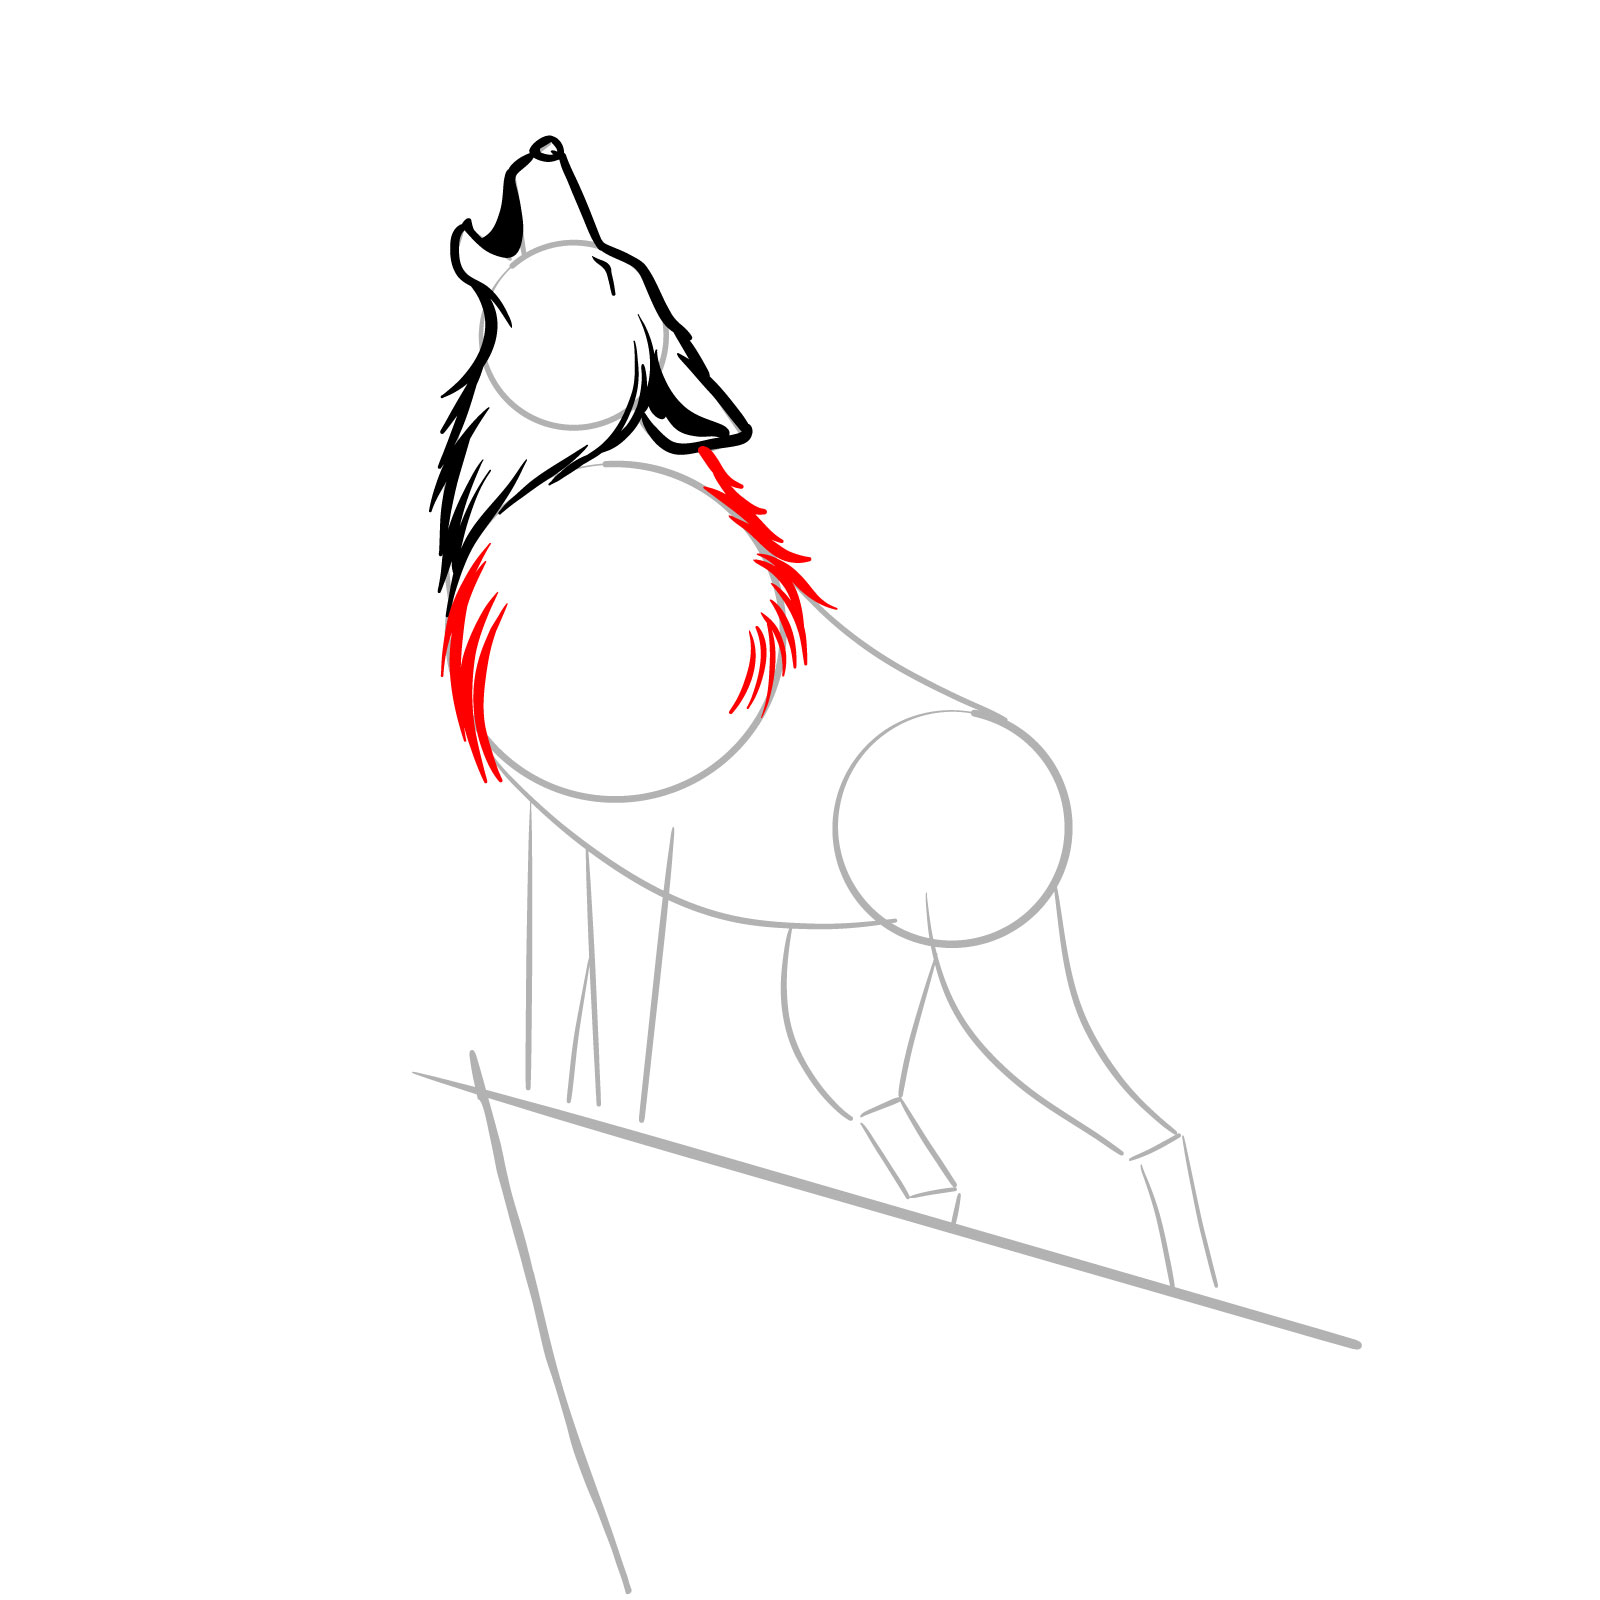
Step 06 – Frame the middle part of the body with short, smooth strokes to mimic the fur’s texture, giving the impression of the wolf’s thick coat
PinDrawing the fur texture
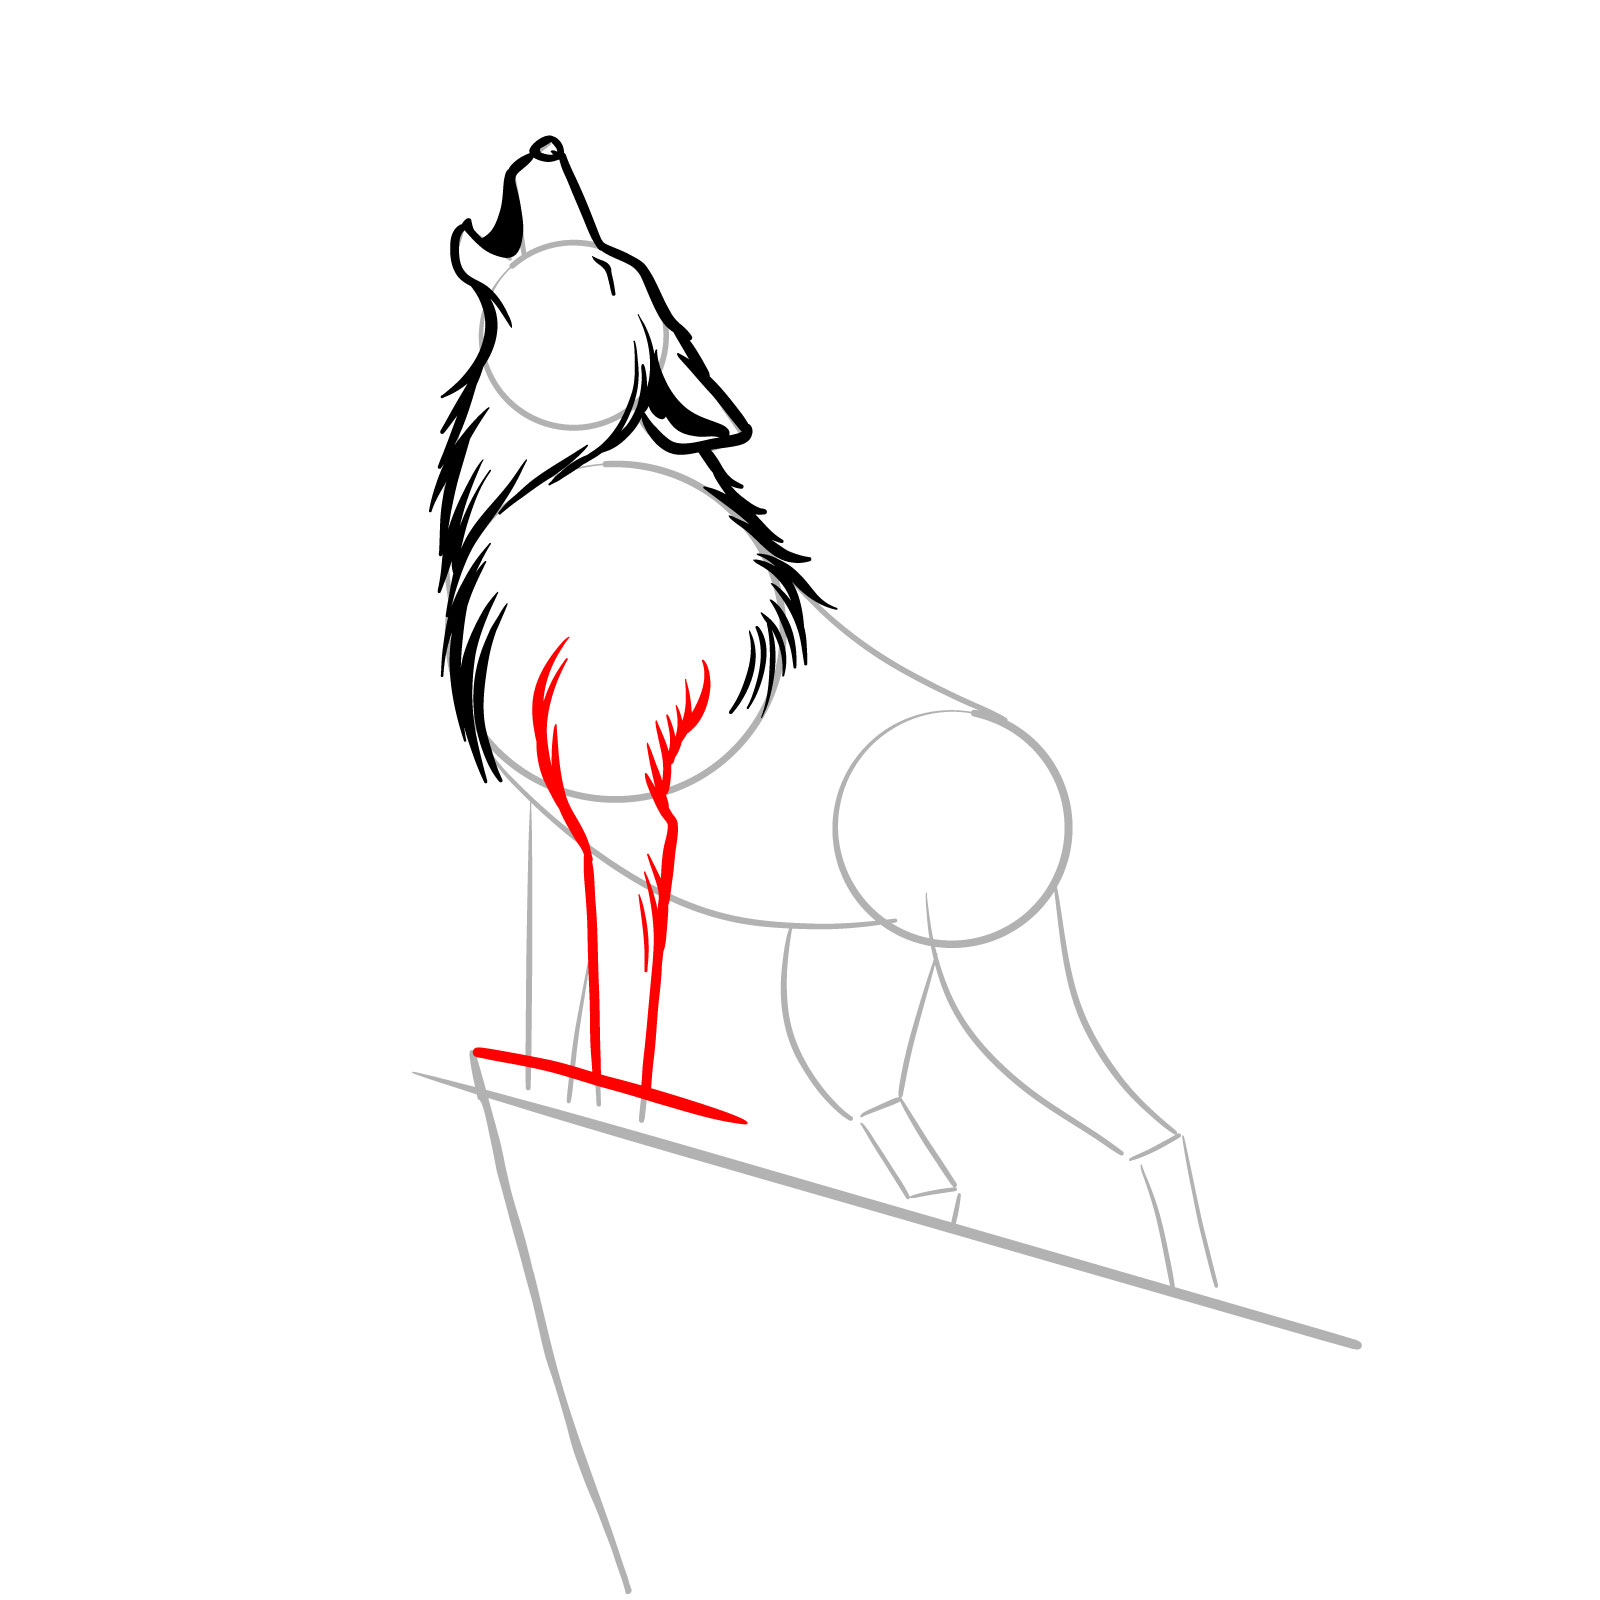
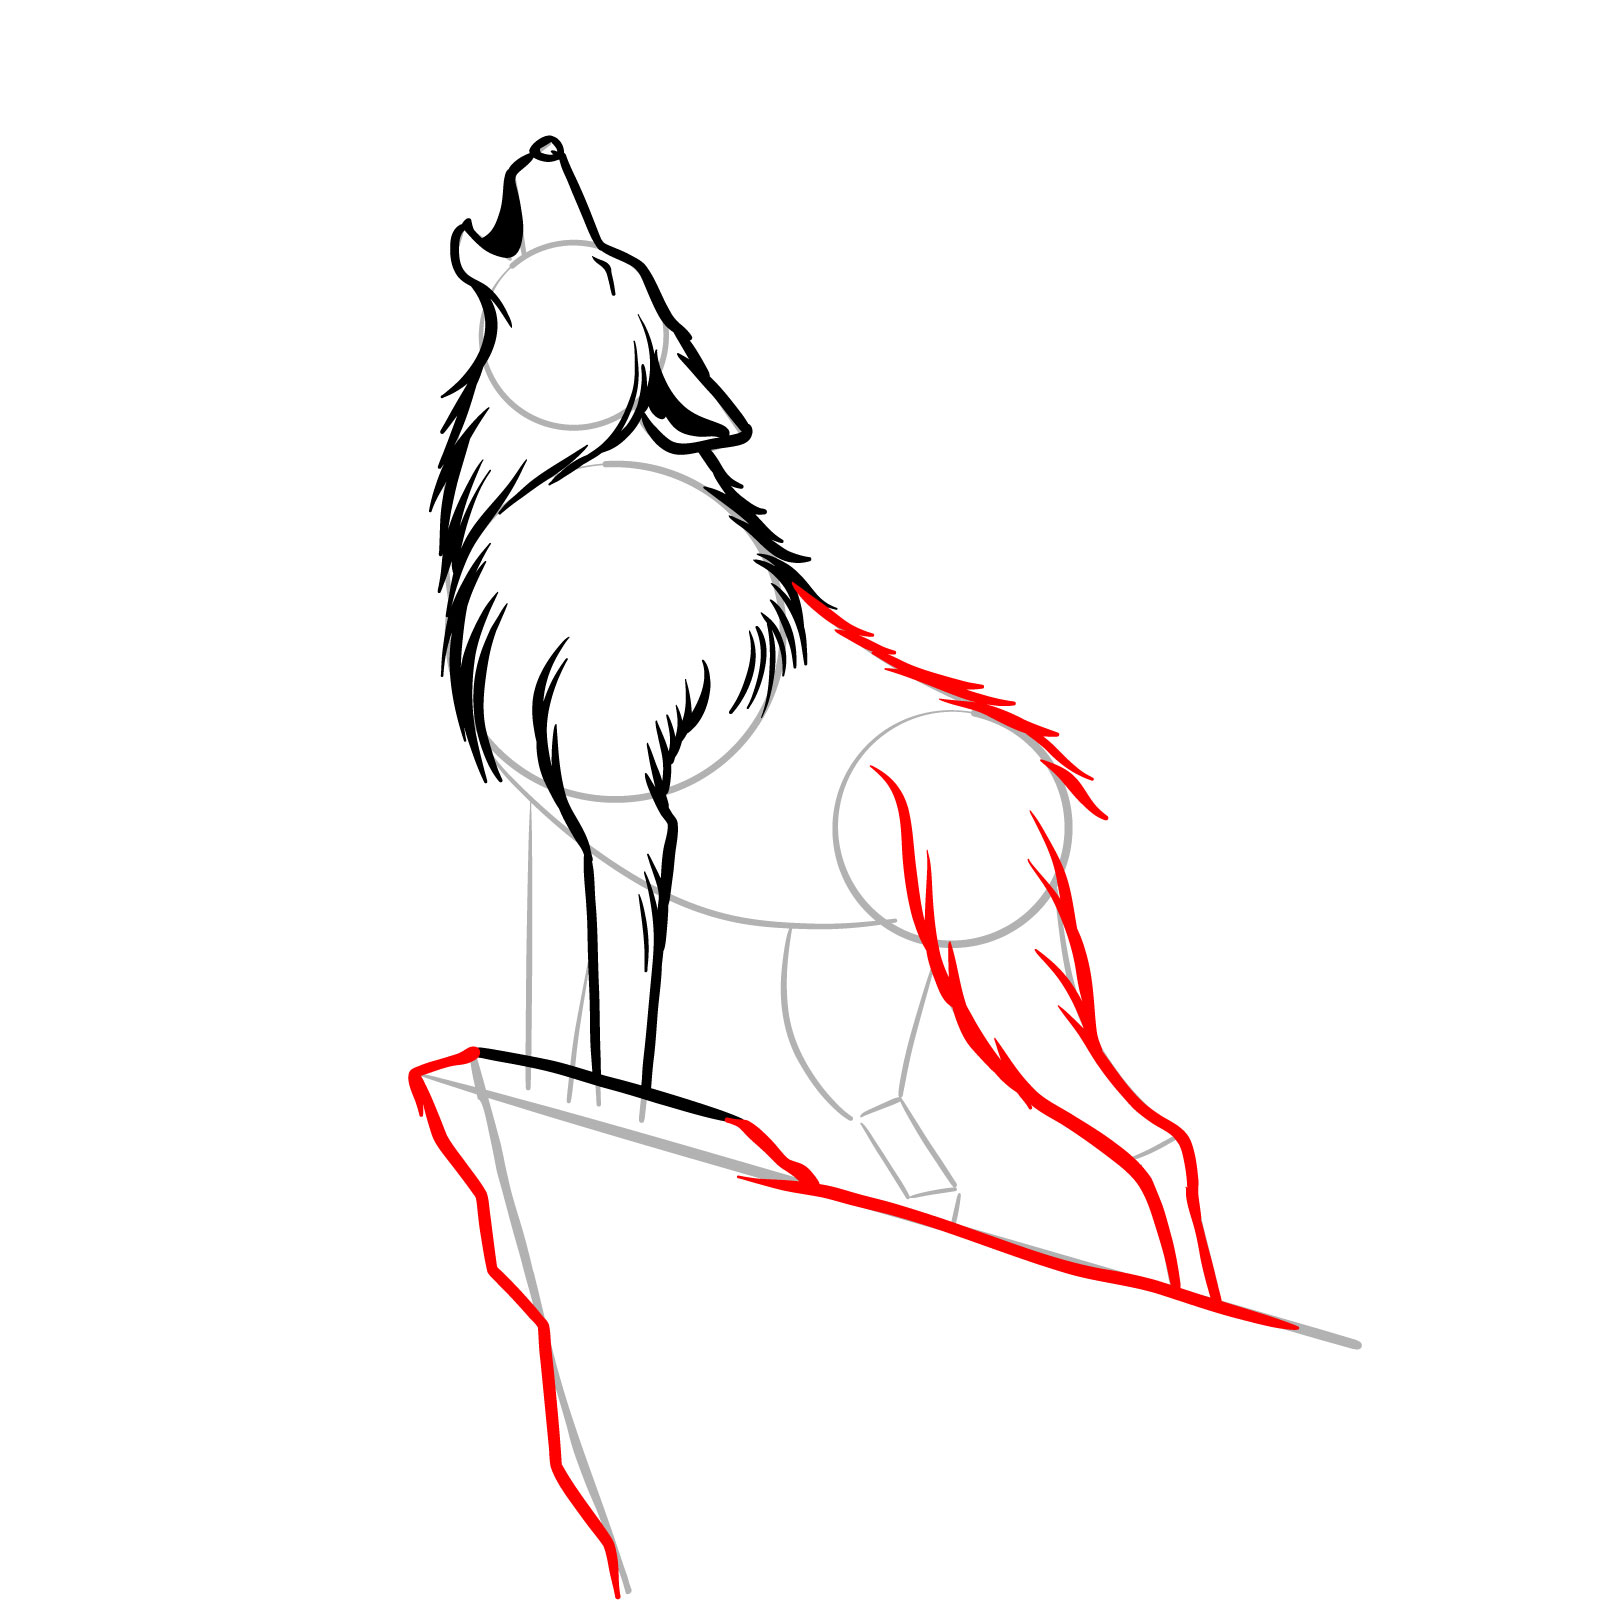
Step 07 – Draw the front leg with attention to the muscle structure and joints, and sketch the top part of the cliff. The paw hidden behind the cliff
PinCompleting the front leg and the cliff detail
Step 08 – Detail the wolf’s back and the rear leg, following the natural curve and musculature for realism. Also, shape the form of the cliff to provide a solid base for the wolf’s stance
PinDrawing the back and obscured rear leg
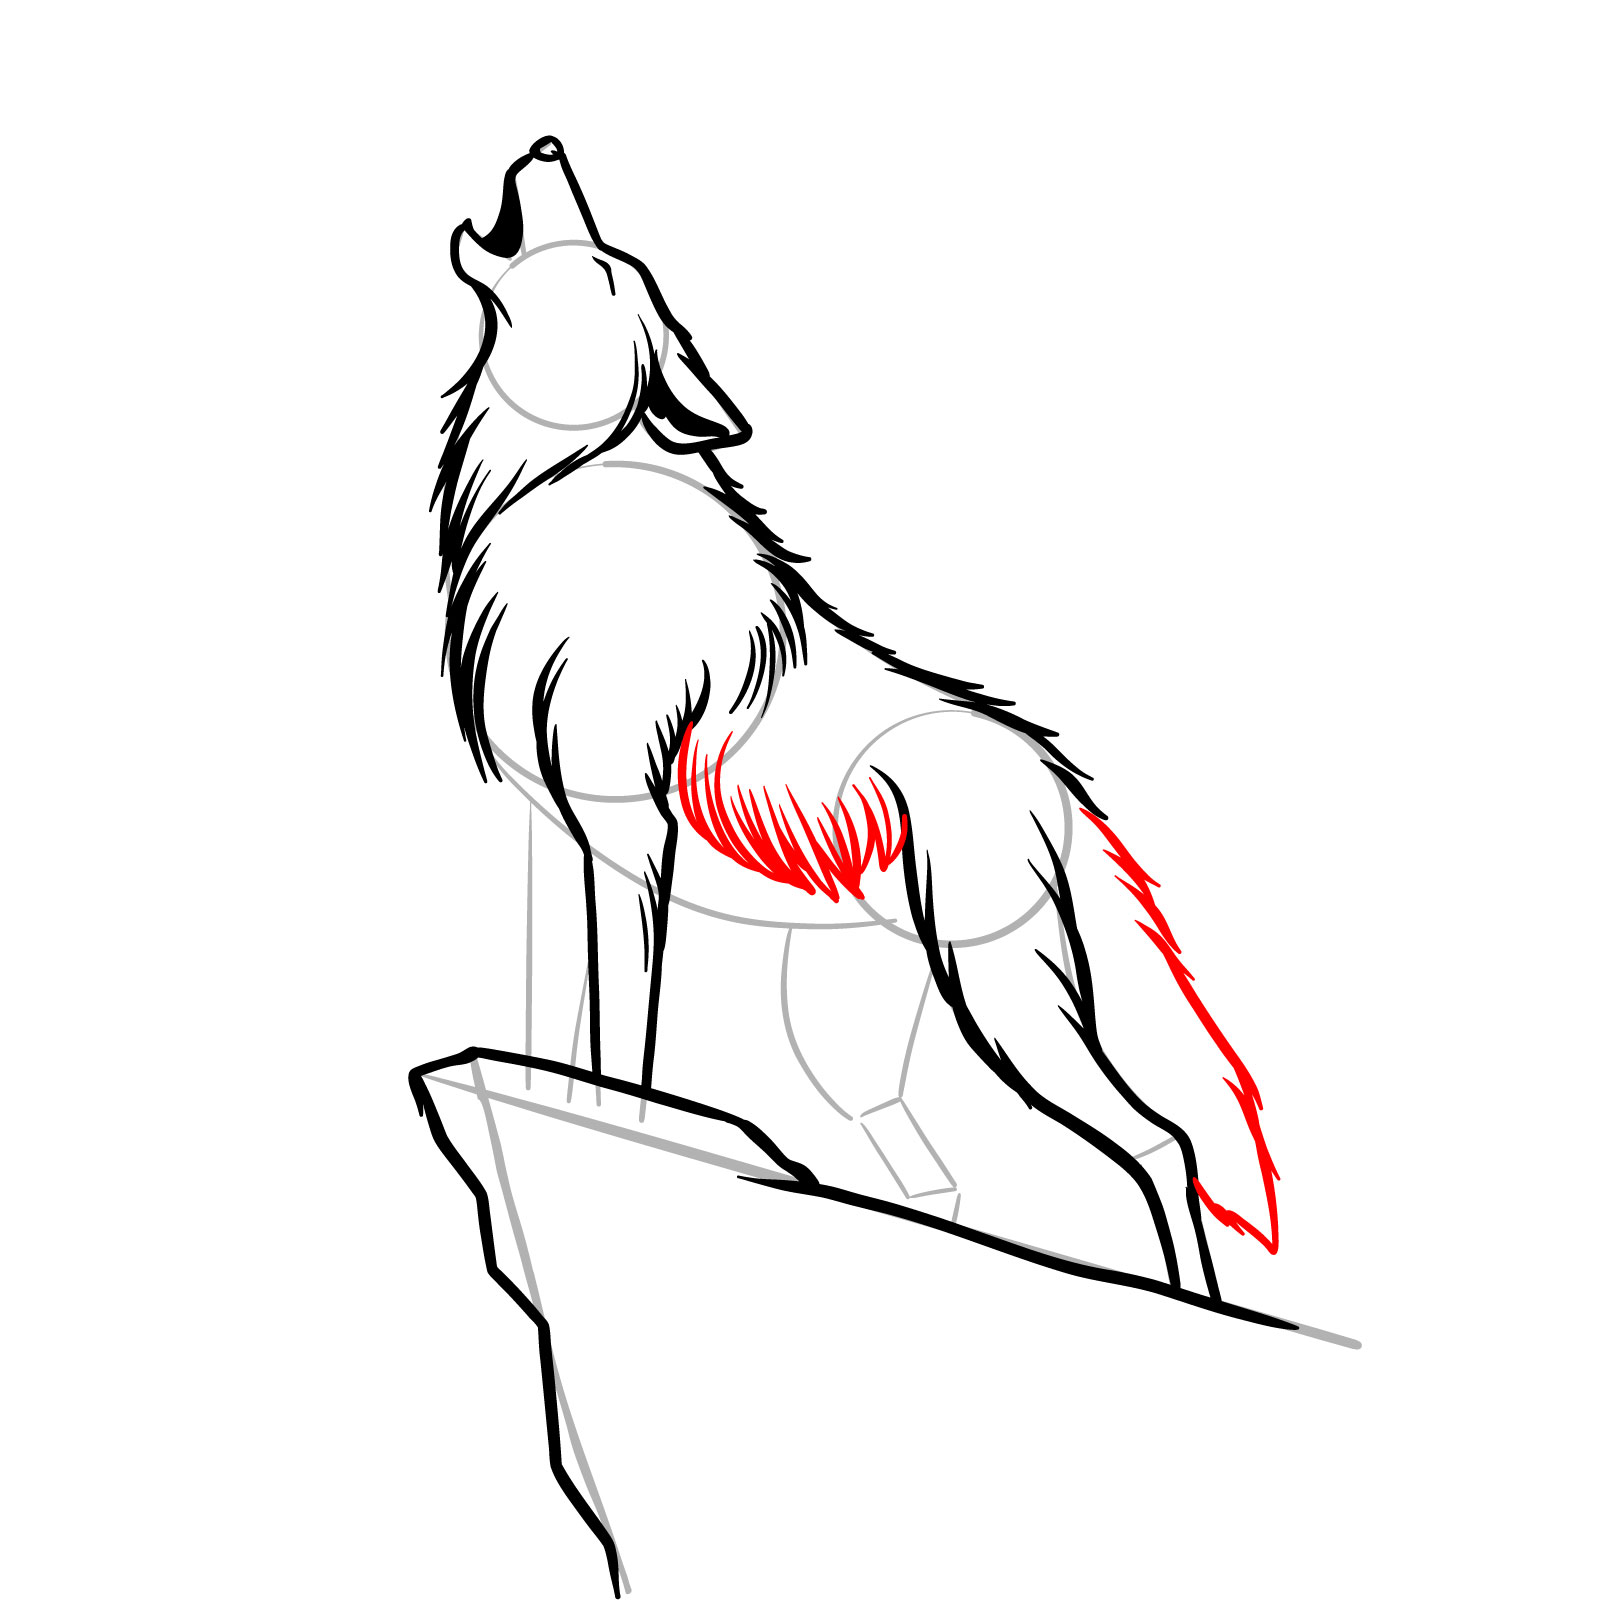
Step 09 – Sketch the belly fur with gentle strokes to give a soft texture, and draw the tail with a flow that balances the composition
PinIllustrating the belly fur and the tail of the howling wolf
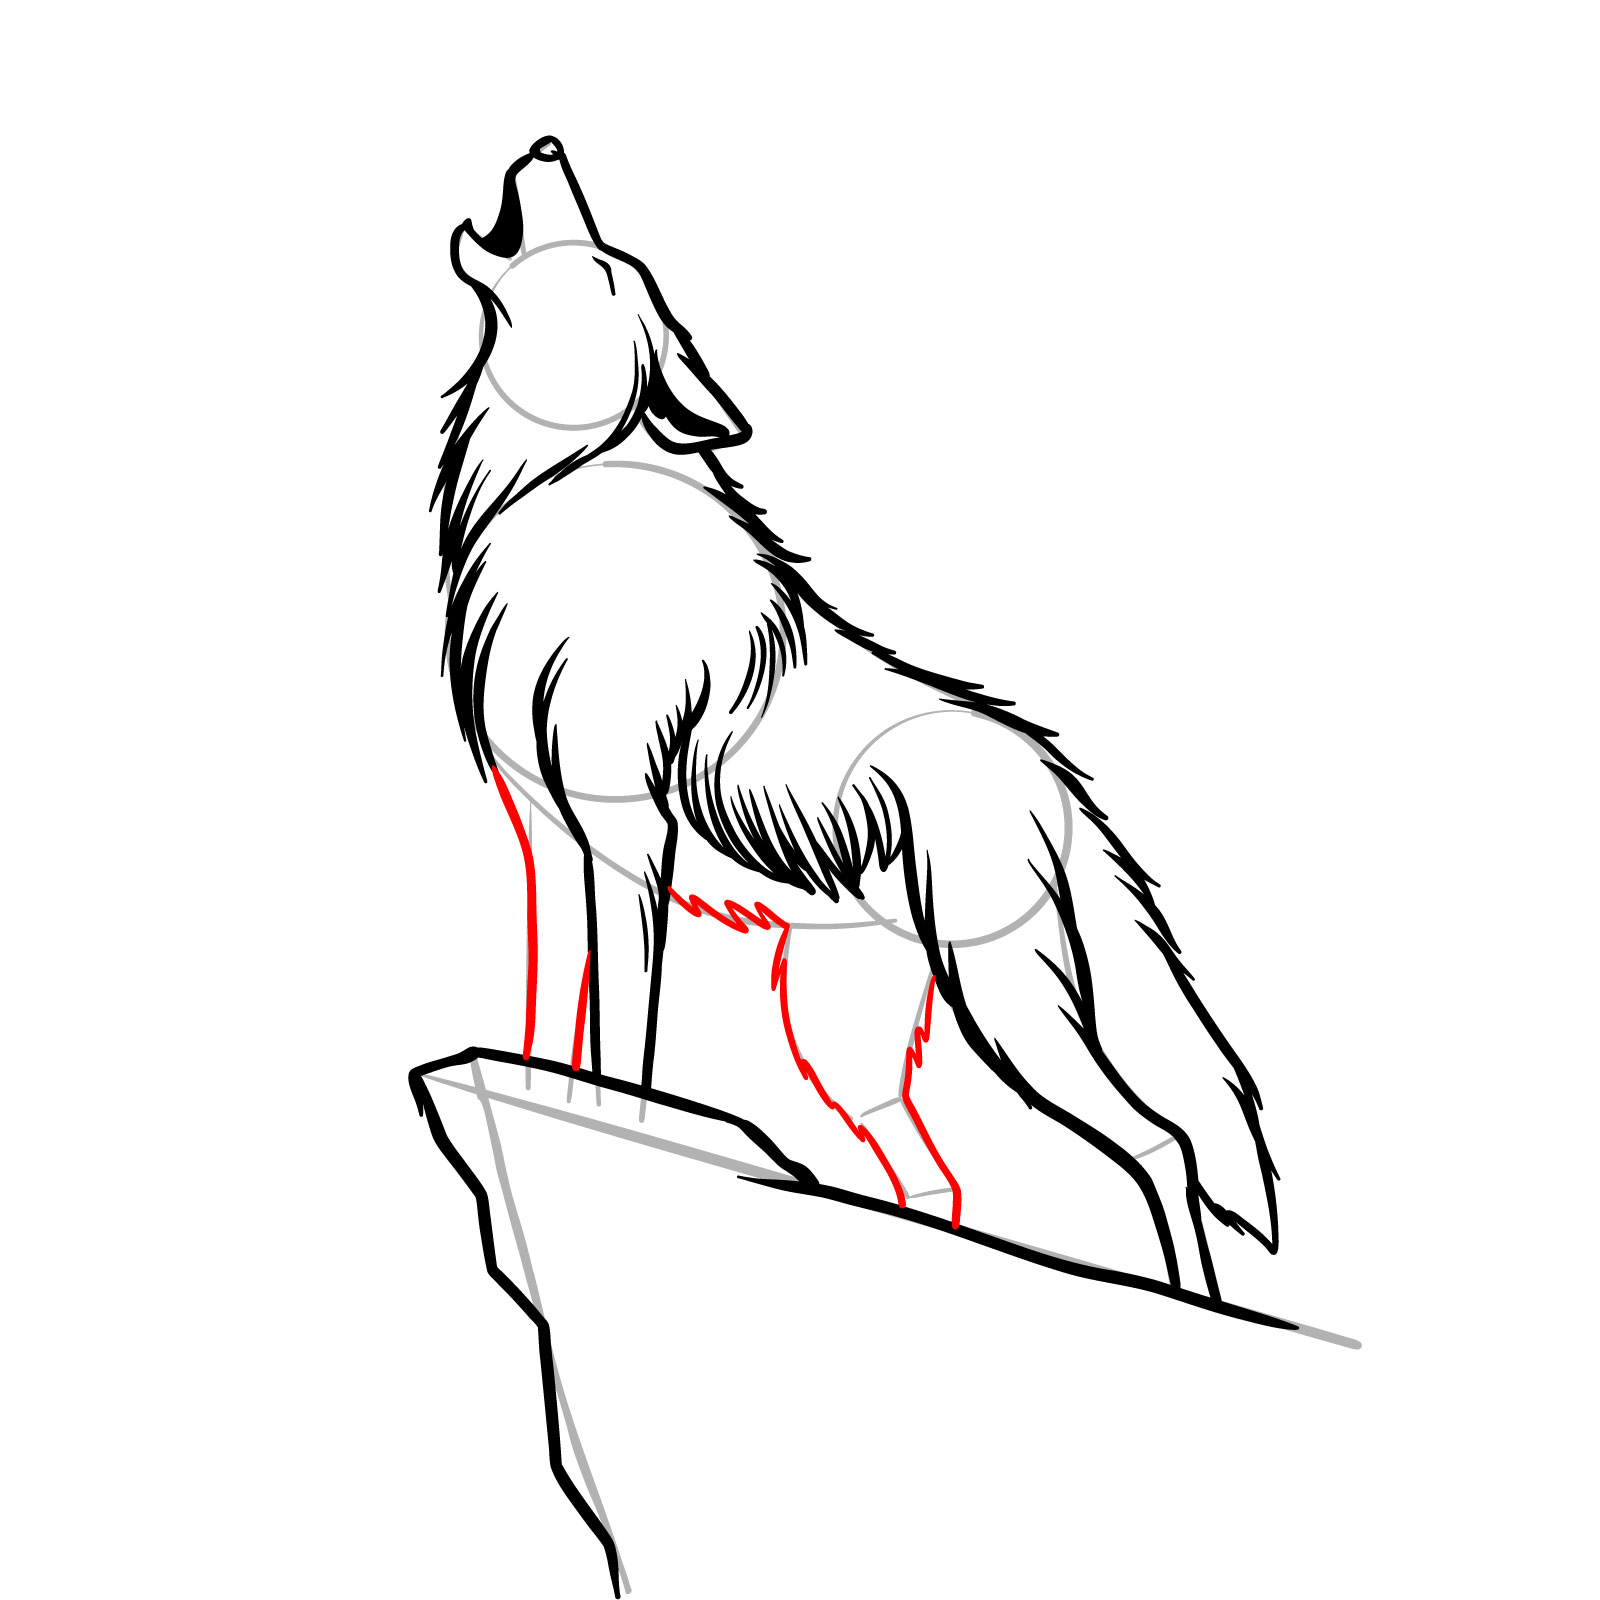
Step 10 – Form the detailed shapes of the lower body and legs, ensuring they are ready for shading. Pay attention to the muscle definition and joint positioning for a natural appearance
PinRefining the wolf’s body and leg shapes
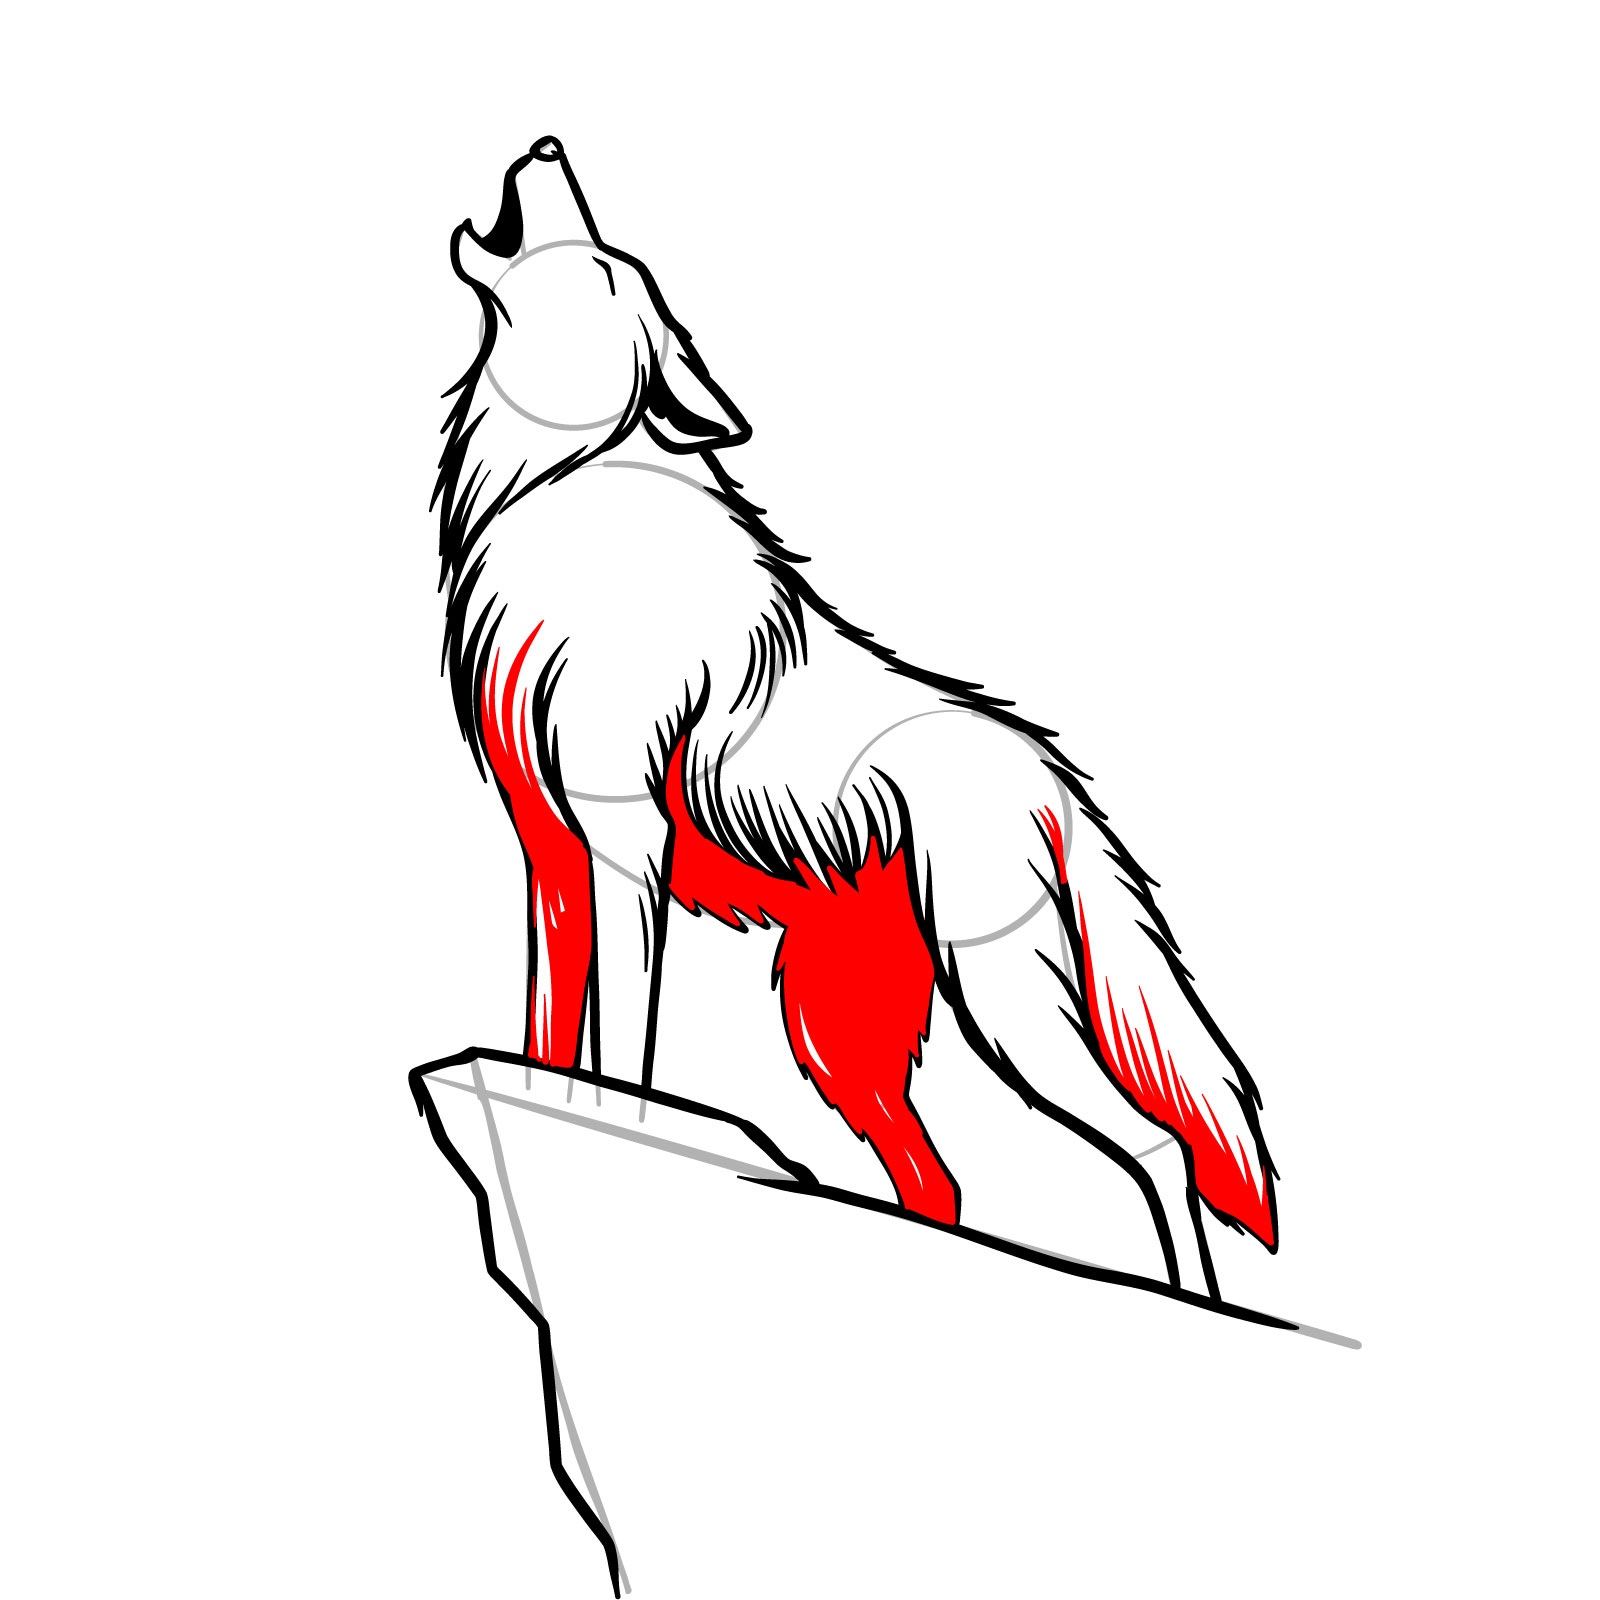
Step 11 – Fill in the shapes from the previous step with shading, leaving blank areas for highlights. Add a fur frame around the chest area to enhance the three-dimensional form of the wolf
PinShading the wolf’s body to add depth
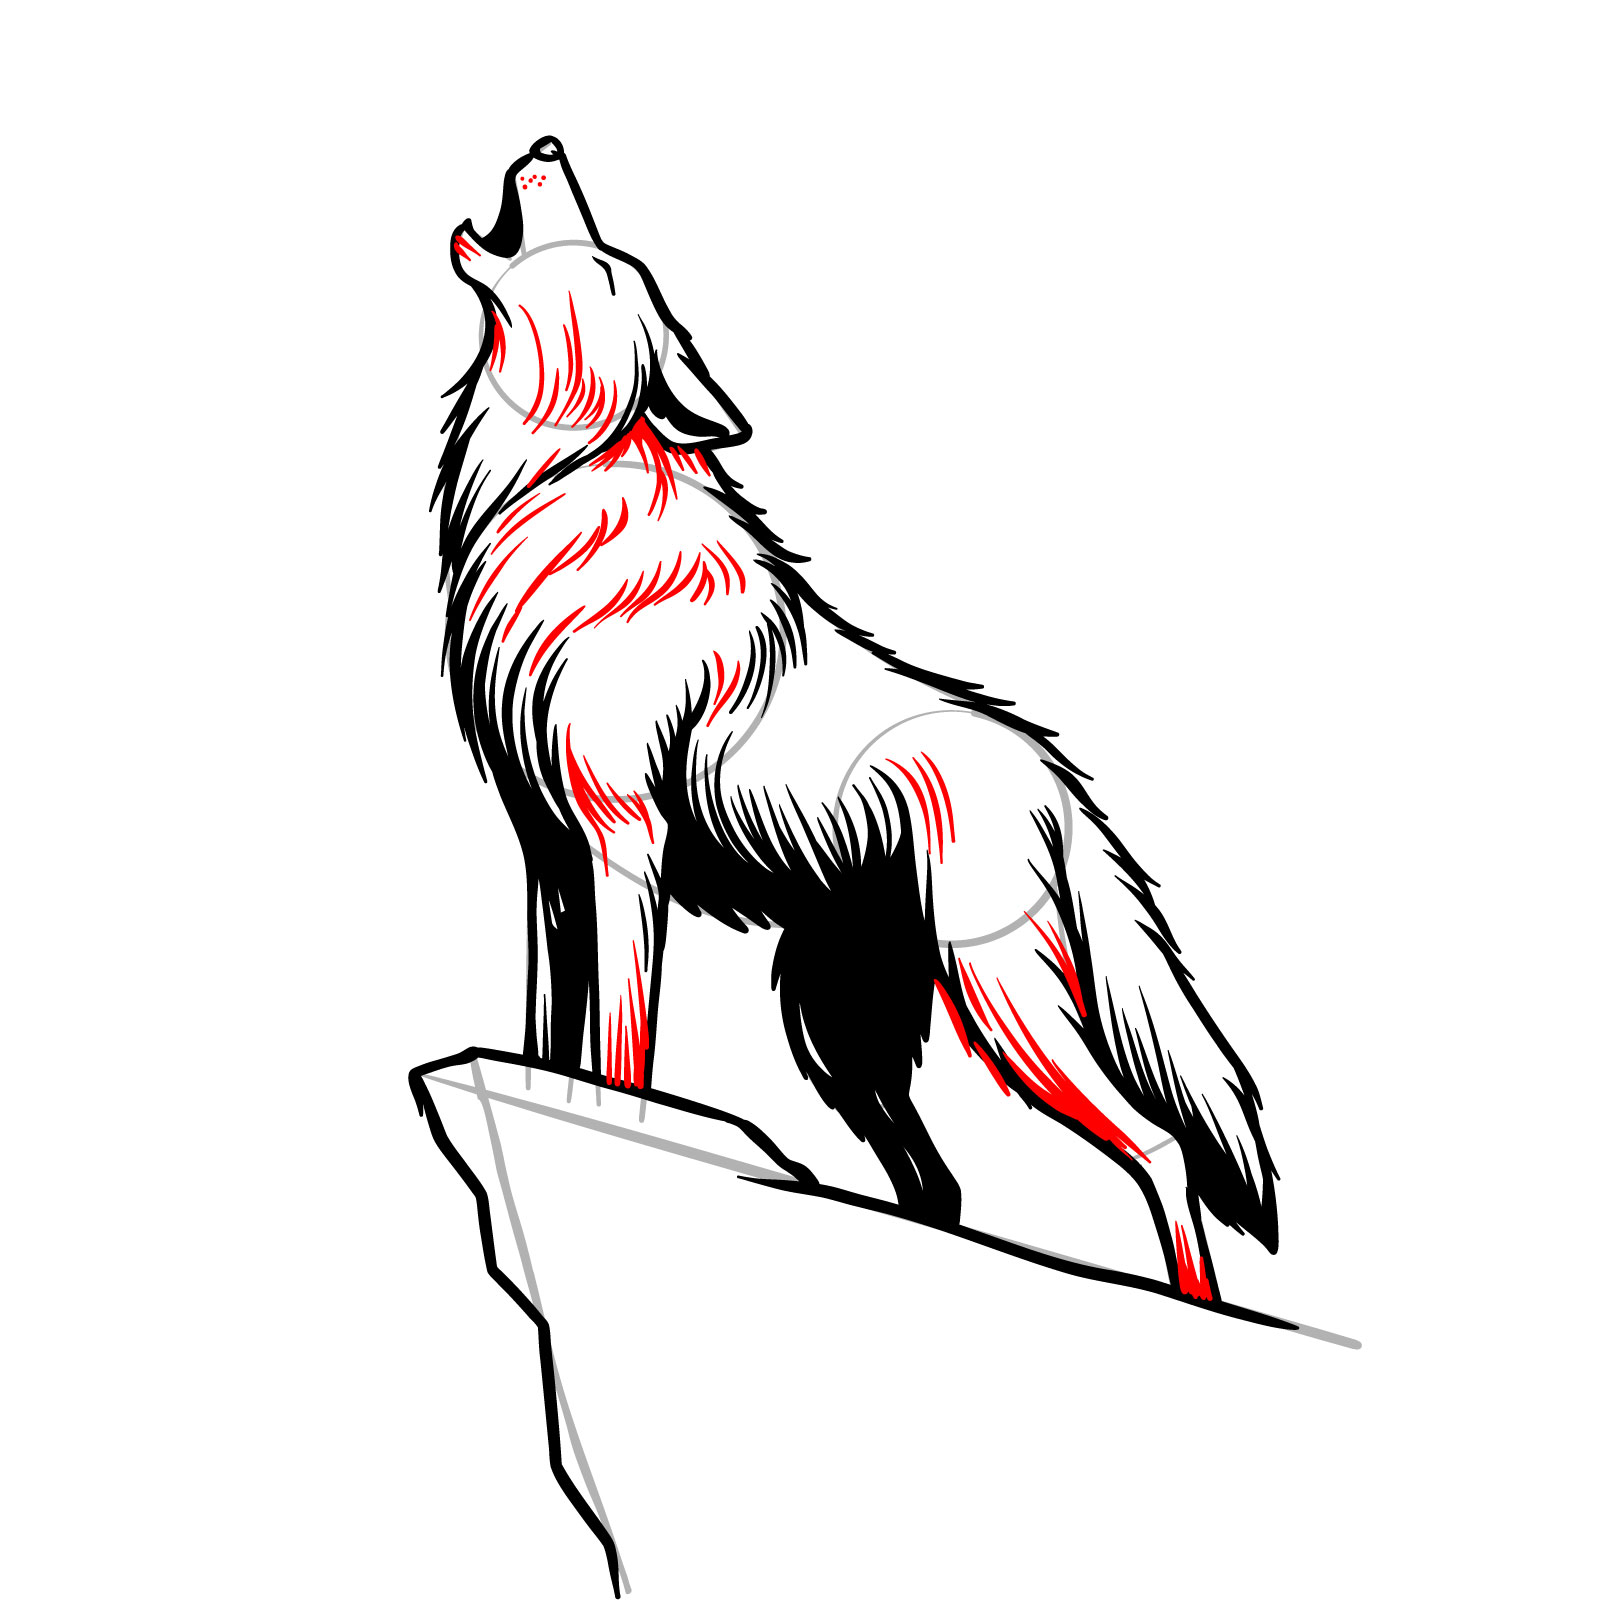
Step 12 – Apply texture to the fur on the head, neck, body, and limbs, using various stroke lengths to simulate fur’s natural appearance. Include whisker marks to add detail to the wolf’s expression
PinTexturing the fur and adding whisker marks to the howling wolf
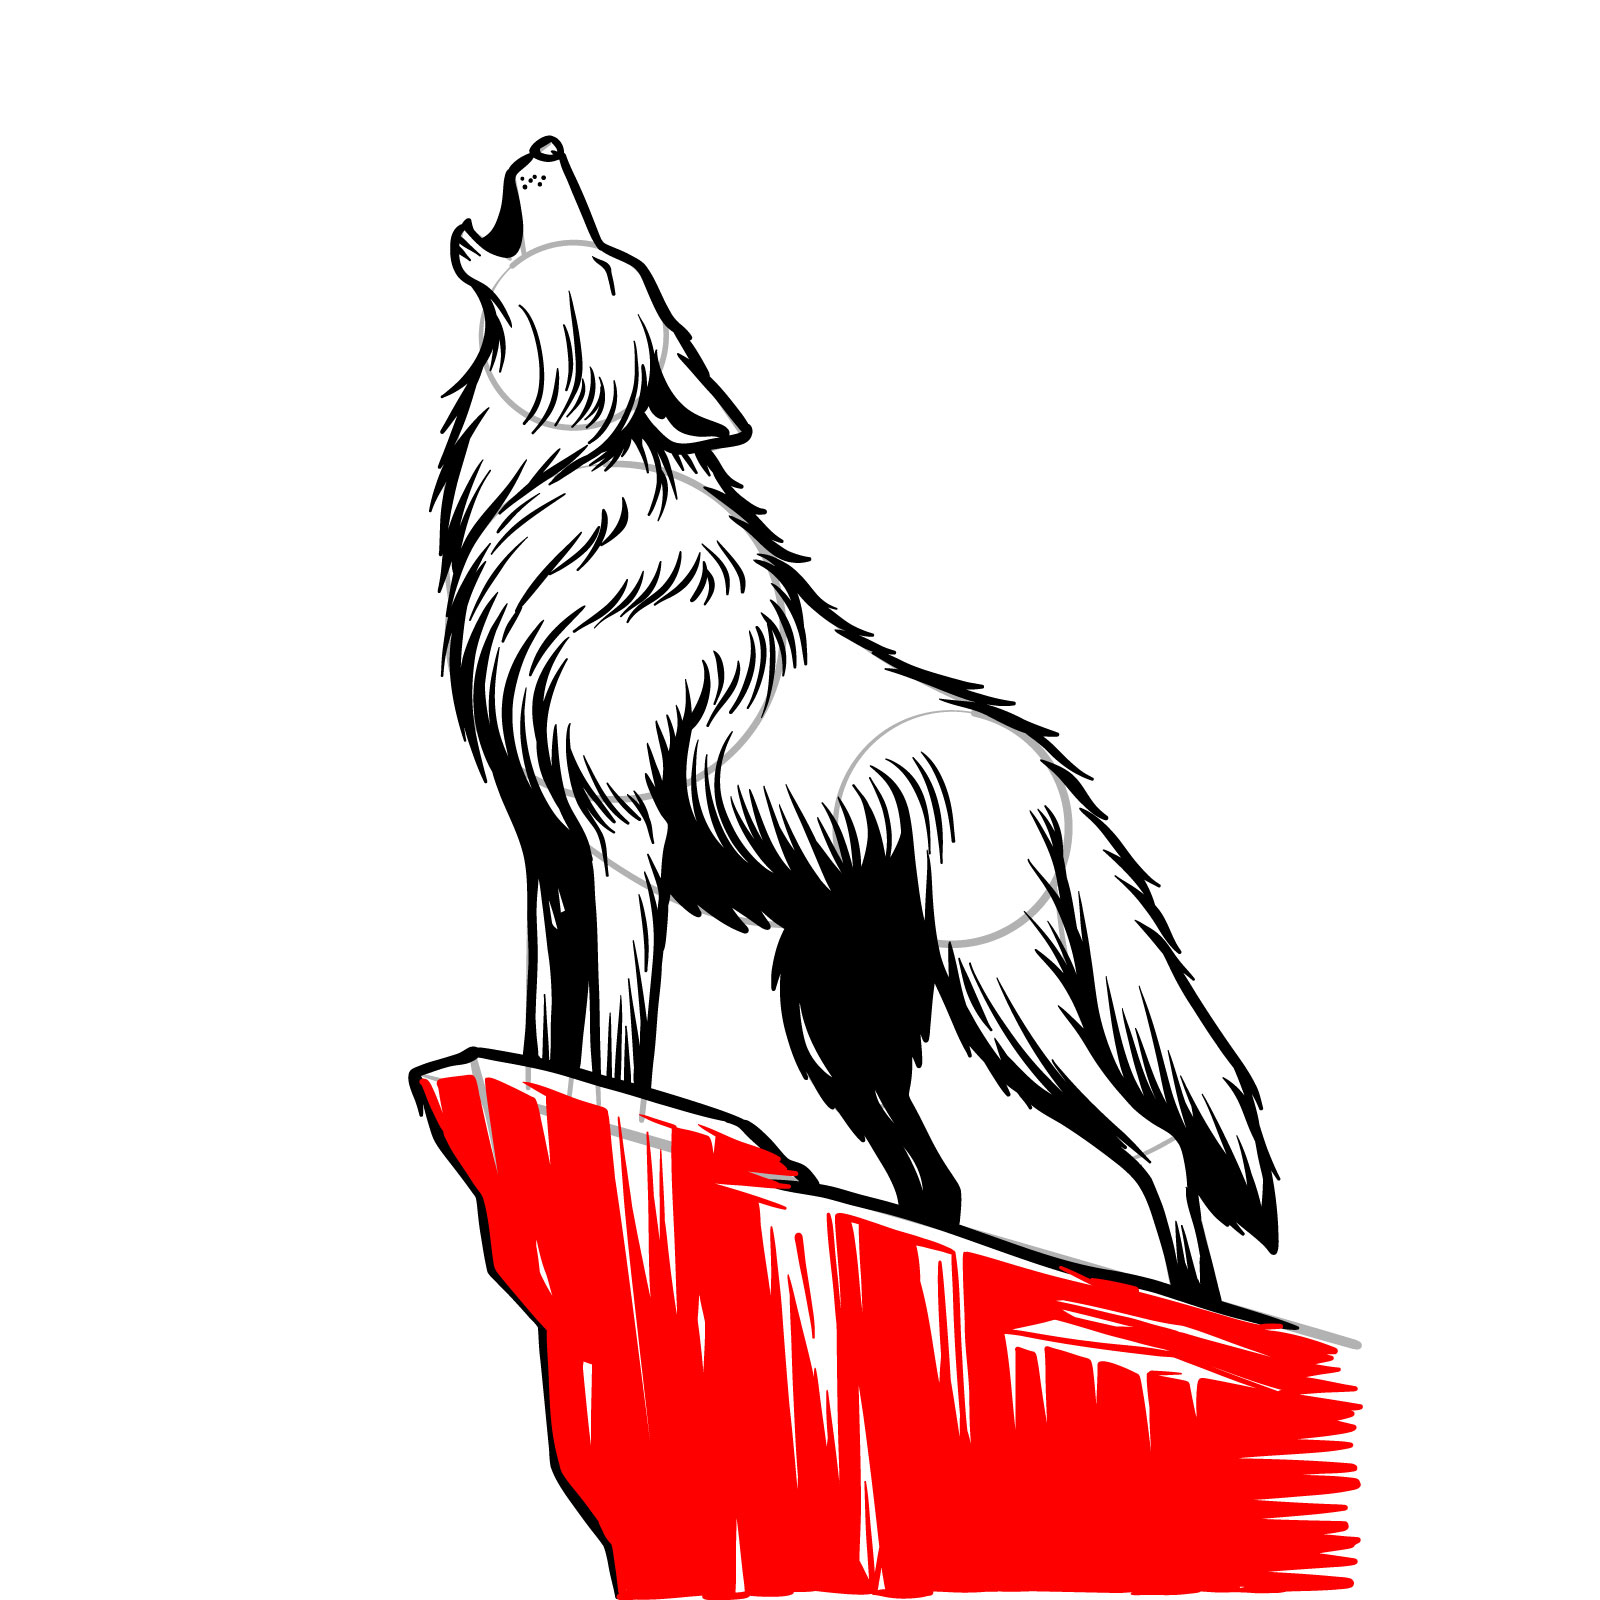
Step 13 – Optionally, add bold shading to the cliff to create contrast and focus on the wolf. This step brings shape and depth to the cliff
PinFinalizing the howling wolf’s cliff with bold shading for impact
Step 14 – Gently erase any remaining basic sketch lines, marks, and stains. Optionally, ink the drawing for a polished look. Throughout this tutorial, you’ve learned not only how to draw wolves in a natural setting but also how to capture their likeness in a multitude of different poses and styles!
PinThe completed howling wolf drawing, free of sketch lines
And there you have it! We’ve explored together how to draw wolves in various styles and poses, from the simple to the intricate. Whether you’ve followed each guide closely or taken your own creative liberties, the hope is that you’ve found joy and growth in your artistic journey.
What was your experience like using these guides? Which wolf was your favorite to draw, and which challenged you the most? Your feedback is not just welcome, it’s invaluable—so please, leave a comment with your thoughts, share your creations, and let’s continue to learn from each other.
If you want to stay updated with more drawing tutorials and tips, or just to share your progress and connect with fellow artists, make sure to follow Sketchok on our social media platforms:
Each stroke you put on paper is a step forward in your artistic journey. Keep practicing, keep challenging yourself, and most importantly, keep enjoying the process of creating. Until our next drawing adventure, keep those pencils sharp and your creativity flowing!
We use cookies on our website to give you the most relevant experience by remembering your preferences and repeat visits. By clicking “Accept”, you consent to the use of ALL the cookies.
This website uses cookies to improve your experience while you navigate through the website. Out of these, the cookies that are categorized as necessary are stored on your browser as they are essential for the working of basic functionalities of the website. We also use third-party cookies that help us analyze and understand how you use this website. These cookies will be stored in your browser only with your consent. You also have the option to opt-out of these cookies. But opting out of some of these cookies may affect your browsing experience.
Necessary cookies are absolutely essential for the website to function properly. These cookies ensure basic functionalities and security features of the website, anonymously.
Cookie
Duration
Description
cookielawinfo-checbox-analytics
11 months
This cookie is set by GDPR Cookie Consent plugin. The cookie is used to store the user consent for the cookies in the category "Analytics".
cookielawinfo-checbox-functional
11 months
The cookie is set by GDPR cookie consent to record the user consent for the cookies in the category "Functional".
cookielawinfo-checbox-others
11 months
This cookie is set by GDPR Cookie Consent plugin. The cookie is used to store the user consent for the cookies in the category "Other.
cookielawinfo-checkbox-necessary
11 months
This cookie is set by GDPR Cookie Consent plugin. The cookies is used to store the user consent for the cookies in the category "Necessary".
cookielawinfo-checkbox-performance
11 months
This cookie is set by GDPR Cookie Consent plugin. The cookie is used to store the user consent for the cookies in the category "Performance".
viewed_cookie_policy
11 months
The cookie is set by the GDPR Cookie Consent plugin and is used to store whether or not user has consented to the use of cookies. It does not store any personal data.


Hey, are requests being taken right now? I don’t wanna send in anything if the website is on hiatus.
This is amazing!
Happy to hear that!